Microsoft Office InfoPath 2003 is a form creation program allowing seamless integration of data with various databases, Web services, XML, or any other XML-enabled system.
To create the input forms, you just drag and drop controls onto the InfoPath form and specify how the controls connect to the data that is either entered in the form or referenced from external data sources. The result is a data entry form with advanced controls that conforms to Microsoft's interface standards, complete with Microsoft Office 2003 toolbars. Information entered in an InfoPath 2003 form is saved as an XML file and can be processed by a backend system.
It's Monday. After arriving at the office, you fill out last week's timesheet (Microsoft Excel), your expense report (a handwritten form), and your project status report (Microsoft Word). When you print these forms, you notice that soon you'll need a new printer cartridge, so you e-mail a purchase request to the office manager using Microsoft Outlook. You also just brought back a book you'd borrowed from the company library, so you go to the internal Wiki and record that you've returned the book.
Paper forms, Excel, Word, Outlook, and the Wiki do an adequate job of allowing users to track information, but it seems there should be an easier way to gather, store, manage, and reuse this type of data across various applications. In fact, with your current suite of applications, information must often be re-entered in multiple systems, costing both time and data integrity. Of course, you could custom write or purchase several applications to perform these tasks, but these very basic needs shouldn't be a big investment of time or money to handle. There should be a single application that allows simple data entry and easy integration of the data to other applications. Microsoft recognized this void in their Office application suite and, last autumn, InfoPath 2003 was unveiled.
Where's the Data?
InfoPath 2003 is an application that creates forms and shares data. At this point, your first questions are probably the same as ours. Where does the data get stored? What's the big deal; I can do that with Microsoft Access or Microsoft .NET.
InfoPath 2003 automatically insures that all users have the latest version of a form by providing transparent upgrades
InfoPath 2003 does not have its own database. Instead, InfoPath 2003 supports interoperability with various data sources using standard protocols such as XML (schemas or XML data files), ADO (Microsoft SQL Server, Microsoft Access, etc.), and Web services. InfoPath 2003's support for Web services allows you to create forms based on XML data that can be retrieved and submitted using Web services, creating a rich client interface for Web services' XML data. InfoPath 2003 can also save the raw XML file to a local PC if there is a need to work offline. Under the hood, InfoPath 2003 totally relies on XML technologies, using XML files (with the .XSF extension) to store all the metadata about the form, XSD (XML schemas) and scripts for data validation, and XSLT to perform a view transformation on the XML data. (Note that DTD, XDR, and XForms are not supported.) The resulting view is HTML.
InfoPath 2003 is different from tools like Access and .NET in that, technically speaking, tools like Access and .NET are used for storing and reporting structured and relational data, and InfoPath 2003 is used for semi-structured data. With InfoPath 2003, you can have tables, nested data, and text fields. InfoPath has built-in support for creating dynamic forms that can expand or shrink according to the information gathering needs of the end user. Incorporating this ability into the form does not require any special coding or customization. In fact, InfoPath 2003's power lies in its ease-of-use (it doesn't necessarily take a developer to set up and deploy a form), its rich interface, and its ability to easily create generic XML data that can be integrated into other systems. InfoPath 2003 is simply a robust interface for collecting miscellaneous pieces of data that can be used by other applications. It alone does not create full-blown applications.
Let's Take a Look
When you first build a form in InfoPath 2003, you have the choice of either starting from scratch or modifying one of the 25 included templates. These templates cover a wide range of typical tasks from purchase requests to sales reports. They provide good coverage of the range, power, and ease-of-use built into InfoPath 2003 and can be easily customized to meet your particular business' needs. All of the included templates use XML to connect to the backend data.
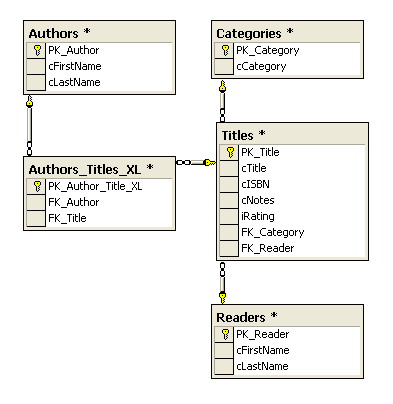
Let's create a form to add books to the company library. The problem domain is easy to understand and the structure for the data is fairly simple (Figure 1).
Design Time
Starting up InfoPath 2003 in Design mode presents two workspace areas: the form area and the task pane area. The form area is where you will spend most of your form design time and the task pane provides quick access to InfoPath 2003 features and form-specific content (Figure 2).
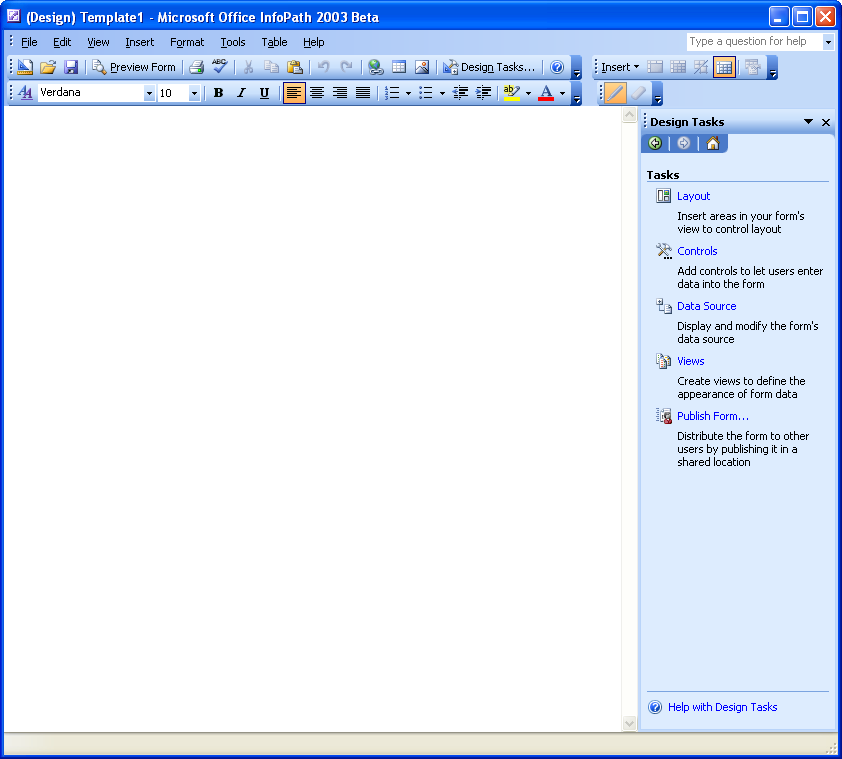
From the task pane, select New from Data Source. The Data Source Setup Wizard walks you through the steps to connect to your chosen data source. You can choose XML Schema or XML data file, database, or Web service as the data source for your form.
Data Source Selection
InfoPath 2003's Object Model documentation (included in the Developer Resource CD) lists three available DataAdapters:
- An ADOAdapter is used to connect to ADO/OLEDB-based data sources. In InfoPath 2003, these are limited to SQL Server and Access.
- A WebServiceAdapter is used to connect with XML Web services. InfoPath 2003 supports only Doc/Lit Web services.
- An XMLFileAdapter is used to connect to XML files.
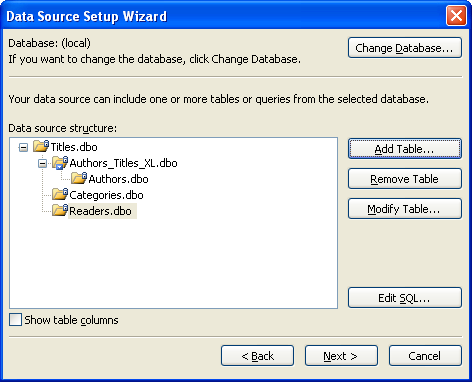
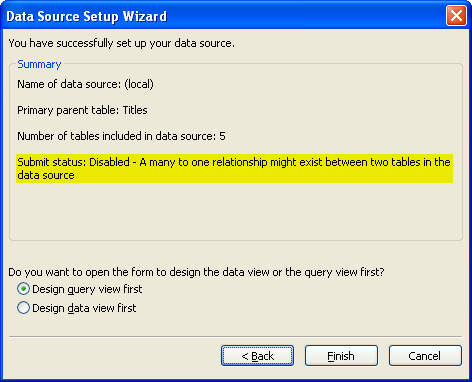
For this example, let's use SQL Server as the data source. (If you want to connect to an unsupported data source, like Microsoft Visual FoxPro or Oracle, write a Web service to retrieve and submit the data as XML for the data source, and then, in InfoPath, select the Web service option.) The wizard creates an ADO connection string as the form's primary data source. After establishing the data source, you'll add all the tables, establish relationships between each, and specify the sort order in the wizard (Figure 3). It's also possible to edit and validate the SQL query from the wizard. Clicking on the Next button brings up another dialog box (Figure 4) that says you have successfully created the data source connection but that the submit status is disabled because a many-to-one relationship exists in the data structure. You also get this warning if one of the data source columns has a long data type (text, ntext, hyperlink, or image). The disabled submit status means that a Submit button will not appear on the File menu and the end user will not be able to use that method to save the data in the form to the database. You can work around this issue by creating a custom Submit button to perform the Submit using script.
The Raw Results
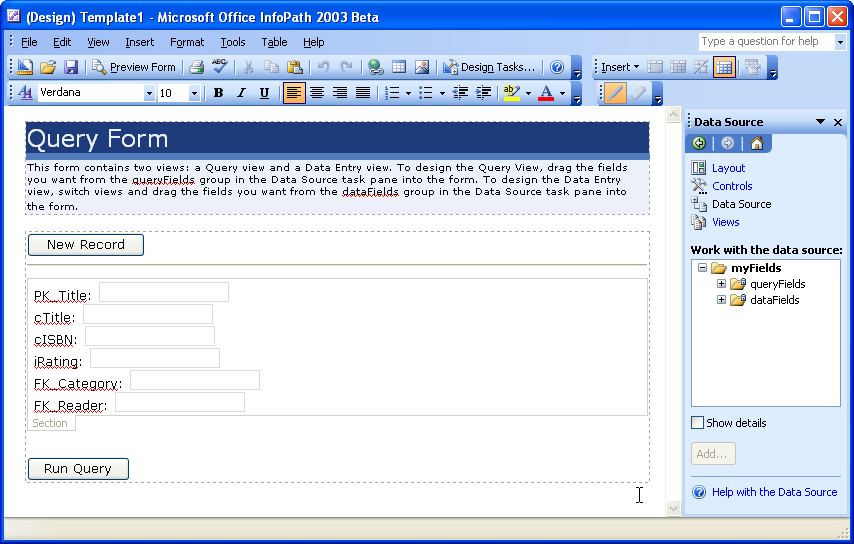
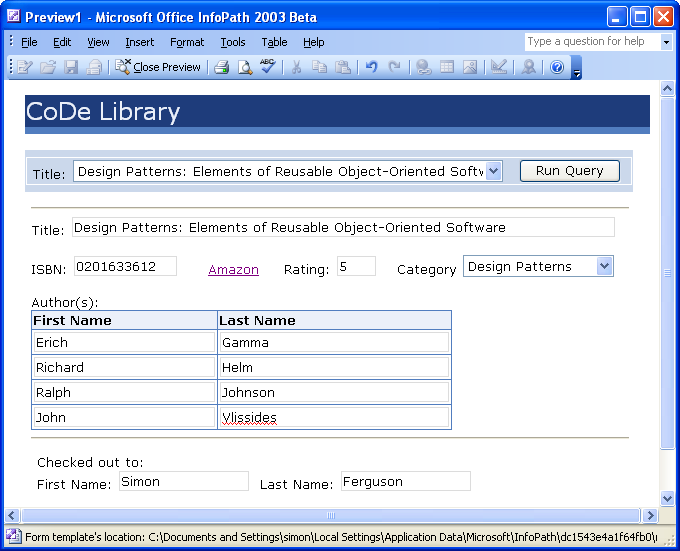
Clicking Finish brings up the resulting form template (Figure 5) in Design mode. By default, the form template has a Query and Data Entry view, although you can have multiple views in the same form. For example, in an Employee Review form, you could have a separate view for managers that would allow the manager to enter comments or review the employee's rating. For this example, let's look at the Query view. After removing some unnecessary query fields, you'll need to drag and drop the data fields you want to display below the Query section. Dropping the data fields brings up a pop-up menu with several options for configuring the section. Choosing Section with Controls creates textboxes for the parent tables and repeating sections for the child tables. To create the drop-down list boxes, use a secondary data source for the lookup. You can add as many secondary data sources as you need to populate drop-down or standard listboxes, using either XML source files, SQL Server, or Web services. You can also add a repeating table to show the Authors information and move the fields around to make the form more eye pleasing (as seen in Figure 6).
The Finished Form
Notice the Amazon hyperlink control in the form near the ISBN number. The expression for the link can be static or bound to a data source element. For the link expression, enter an XPath function to preface the ISBN field with the path to its Amazon page:
concat('<a href="http://www.amazon.com/exec/obidos/ISBN='">http://www.amazon.com/exec/obidos/ISBN='</a>, @cISBN)
Clicking on the link from the preview brings up the book's information page on Amazon. InfoPath 2003 also offers simple data validation using XPath expressions that can be easily added via the Data Validation dialog box. But the dialog box's condition builder is limited to handling comparisons of field values or constants and doesn't support expressions like validating that the ISBN field only contains numbers. For more complex validation, you can script the control's OnBeforeChange, OnValidate, or OnAfterChange event. Here's the script that uses a regular expression to verify that the ISBN is valid:
function msoxd__Titles_cISBN_attr::OnValidate(eventObj)
{
   if(eventObj.Site.nodeTypedValue != "")
   {
      var str = eventObj.Site.nodeTypedValue;
      var regex = /^\d{9,10}[\d|x]$/;
      if(!regex.test(str))
         eventObj.ReportError(eventObj.Site,
"This is not a valid ISBN number.", false);
    }
}
Other events that you can customize using script include the form's OnLoad (that occurs when the user first opens the document), the OnSwitchView (useful for validation or loading a different data snapshot when changing views), or the OnSubmitRequest (that fires when the Submit button is pressed or when a corresponding event occurs). Custom scripts are added to a file called script.js or script.vbs, depending on your preferred scripting language.
Anatomy of an InfoPath 2003 Solution
The XSN file that the InfoPath 2003 Designer creates is just a compressed CAB archive of a set of files. If you would rather work with your form template like this, when designing your form, you can use the Extract Form Files menu entry from the File menu. The files that make up an InfoPath 2003 solution are listed in Table 1.
In addition to the files listed in Table 1, xsn files can also contain binary files, such as COM components, to provide additional business logic, and HTML, gif, or other presentation files to create a custom user interface. Changing the contents of the expanded files outside of the InfoPath 2003 environment is not reflected in your solution until you “dirty” it (using Notepad) or touch the XSF file in some other fashion to update the timestamp. That way, the XML files associated with your form pick up the new changes without needing to go into the Design mode first.
Gotchas
During development of your InfoPath 2003 form, you may need to make changes to the underlying data. For example, you might need to change the length of the Title field from 50 to 70 characters to accommodate lengthy titles. When you change the structure of the table, your form no longer works because the underlying schema and the data source no longer match. InfoPath 2003 does not have a dialog box to modify the schemas, so you have to do it by hand. Extract the solution files and change the schemas to match the new data length. Then create a CAB file using MakeCab that includes all the solution files. Note that the manifest.xsf must be the first file in the solution.
If you are using a Web service as the Data Source and you get a message that “database access is denied,” your Web service is probably in a different domain (URL domain, not NT domain) from the form. To enable access, open up the Internet Options dialog box in Microsoft Internet Explorer. On the Security tab, click the Custom Level button. Find the Access data sources across domains option and change it from the defaulted Disable to Prompt. This change allows the form to access the Web service. This security setting in Internet Explorer prevents a Web page from stealing data. It's not specific to InfoPath 2003, but InfoPath 2003 honors the setting.
For tablet PC users, InfoPath 2003 does not currently have inking and recognition capabilities. The final product should have an implementation of an Ink Picture, a control that allows for signatures or note taking, etc. This control stores the strokes as base64Binary.
Does It Do Any Tricks?
InfoPath 2003 contains many features to eliminate some normally tedious and complex tasks. For example, InfoPath 2003 provides various security features that are easy to implement, including form protection and protection from unsafe operations. In order for a user to access and fill out an InfoPath 2003 form, InfoPath 2003, like other Office 2003 products, needs to be installed on each client machine, providing both form design and input capabilities. There is no way to install only one or the other. InfoPath 2003 allows you to protect the form data from modification using digital XML signatures, or to protect a form by disabling the Design mode so that an end user doesn't accidentally modify a form.
InfoPath 2003's security model is based on the same security model implemented by Internet Explorer. This model protects your computer from unsafe operations by using security zones and levels. InfoPath 2003 uses these zones to determine the level of access that an InfoPath 2003 form can have to various resources on your computer. InfoPath 2003 forms that have full access to all system resources are called “trusted” forms. Although InfoPath 2003 does not directly support authenticating against Microsoft Active Directory Services Interface (ADSI), the InfoPath programming model does support extending a solution to include this.
InfoPath 2003 automatically insures that all users have the latest version of a form by providing built-in, transparent upgrading changed forms. InfoPath 2003 form templates are seamlessly downloaded in the background to the client computer each time a user clicks on an InfoPath 2003 form or attachment, eliminating the hassle of manually providing a mechanism to update each client computer. Without any extra effort on the developer's part, InfoPath 2003 allows the user to work offline. During the time that the InfoPath 2003 form is offline, InfoPath 2003 caches the form template information in a CAB file. When filling out the forms offline, the user can choose to save the data locally in an XML file and submit the information once they are connected again.
Combining InfoPath 2003 with Windows SharePoint Services makes sharing forms easy. Windows SharePoint Services (see the related article by John Durant in this issue) is a Web-based team collaboration environment that allows anyone with permission to create and access virtual workspaces across the Web. Windows SharePoint Services also manages multiple people sharing and working on a single document. InfoPath 2003 form templates can be saved directly to a Windows SharePoint Services form library that allows team members to share the same forms by accessing a single location.
InfoPath 2003 can prevent invalid data from being stored. During design time, InfoPath 2003 includes an Xpath-aware expression builder enabling attachment of extra validation rules to various controls. InfoPath 2003 automatically checks the validity of the data as it is typed into each control, rather than waiting until an entire form is completed. Data validation includes required entries, range checking, data types, etc. Because InfoPath 2003 uses XML schemas to define valid input internally, the schema itself insures the quality of the data. A user can save forms with invalid data, but they can't be submitted to a database or Web service.
Finally, one use (albeit non-mainstream) of InfoPath 2003 is as an XSLT generator. Because XSLT is difficult to write from scratch, the InfoPath 2003 Designer can be used to generate XSLT code. Like all visual tools, it has some limitations, but these can be overcome by designing regions within the generated code for custom written extensions.
So, What's the Bad News?
As robust as InfoPath 2003 is, there are a few caveats to be aware of before jumping on the InfoPath 2003 train. For example, if you want to use InfoPath 2003, it means recreating your existing forms from scratch. Although you can copy and paste information from your existing forms into an InfoPath 2003 form, you still need to insert InfoPath 2003 controls and complete the other aspects of the form design. InfoPath 2003 does not support importing scanned versions of existing paper forms.
Also, .NET developers will be disappointed that there aren't any managed code hooks. However, because InfoPath 2003's data can be stored in XML, there are plenty of options. Keep in mind that InfoPath 2003 is not really designed to be a developer's tool, but more of an end-user tool that enables non-developers to work with XML data easily.
Finally, although live, editable views are extremely easy to create, InfoPath 2003 does not have robust reporting capabilities. Keep in mind that the design intent of the product is to collect data and store it away for other applications to use, manipulate, and display. InfoPath 2003's power is in the ease of setting up the forms and collecting solid data, not in manipulation and reporting. You can certainly use scripting and XSLT to generate reports, but the skill set required is not that of the typical end user.
Conclusion
InfoPath 2003 allows an easy and accurate way to collect, share, and use information currently being gathered from various unrelated sources. InfoPath 2003 provides a WYSIWYG interface to create robust forms that conform to Office 2003 standards. Once the information has been collected, InfoPath 2003's ability to create a customer-defined XML file format provides an almost limitless way to interact with the data. By using InfoPath 2003, companies will be able to fully integrate data that was previously diversified.
Table 1: The contents of an uncompressed InfoPath 2003 solution file (xsn)
| File Name | Description |
|---|---|
| Manifest.xsf | Template definition that lists all the files included in the solution |
| Schema(?).xsd | Schema.xsd imports the data entry fields from schema1.xsd and the query fields from schema2.xsd |
| <View>.xsl | Contains the XSL transforms for each view |
| Template.xml | Containsdefault data that displays when a new fdorm is created |
| SampleData.xml | Contains default data that displays when a new form is created |
| <various>.xsd | Additional schemas created for any secondary data source |
| Internal.js (vbs) | Script for changing views |
| Script.js (vbs) | Customized form scripts |


