


In this article, you will create a CODE Framework RESTful service and an iPhone application from scratch. For the client side, you will utilize XCode (yes, you'll need a Mac!), which uses Objective-C as the primary language. This article won't teach you the language; you need to know the basics of Objective-C. Even if you don't know anything about it but want to code right away, read the article “Building a Twitter Search Client on iOS,” by Ben Scherman, available for all CODE readers in the Xiine application for Windows, Android, and iPhone. For the database, you'll use any instance of SQL Server 2008. The service will be written in C#, using the latest version of CODE Framework, available on https://codeframework.io/Downloads, where you will find not only the download link, but also a lot of useful information.
After reading this article you will be able to:
- Develop a CODE Framework Service
- Create and use the Development Host
- Create a simple iPhone application
- Consume the service from an iOS device
- Create a Windows Service and a Setup application to install on your server
You will easily understand that the service can be consumed not only by iPhone applications, but also by many other different platforms, such as a Windows Phone or an Android phone or slate, because it uses pretty much the same protocol. In this case you'll use JSON as the main protocol to exchange information between the server and the client.
You'll take the following steps to accomplish this goal:
- Set up the database: Create the table and the fields on SQL Server 2008.
- Set up the CODE Framework: Download and install from Visual Studio 2010.
- Create the Service and the contracts to list the customers.
- Set up the development host to test the available methods.
- Set up a new iOS application to hit the methods available from the development host.
- Create a Windows Service on VS2010.
- Create a setup project to install the service on the production server.
Let's get started!
The Database
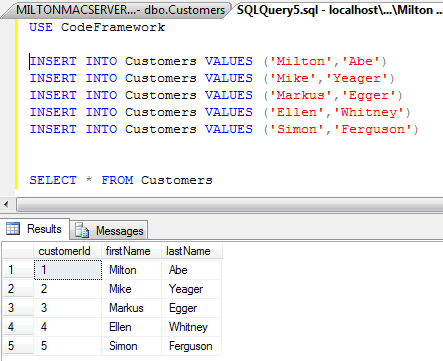
The first thing you need to do is to create the database. It's going to be very simple, with a simple table and a few fields. In this case, create a database called “CodeFramework”. Then create a table called “Customers” and three fields for this table: “customerId” as an integer and primary key with identity increment, “firstName” as nvarchar(MAX) and finally “lastName” as nvarchar(MAX). Right after creating the database, table, and fields, add some data to it manually. You can check the final results in Figure 1 and Figure 2 respectively.

Code Framework
The next step is to set up the Code Framework to run as an extension on Visual Studio 2010. Don't forget to run VS2010 in admin mode, otherwise you may have some difficulty in running the Development Host when it's time. Open the extension manager (Menu > Tools > Extension Manager), click on “Online Gallery” and type “CODE Framework,” as shown in Figure 3.

Now you're ready to get started with the service.
Let's create a new solution for this tutorial. Go to Menu > File > New > Project. Select the “Other project types,” and then “Visual Studio Solutions.” Type a name for the solution (I've chosen “CustomerServices”) and click OK.
From the solution explorer, right-click on the solution and then click on Add > New Project.
Now you're going to add a Code Framework Service Contract Project to the solution. Name it “CodeFramework.Service.Contracts” and then click OK to finish. When this extension creates this project, it automatically adds the interface ICustomerService and two other classes, GetCustomerListRequest and GetCustomerListResponse.
The ICustomerService is the place where you will expose all the public methods. You will want to have Request and a Response classes to exchange information between the client and the server. Notice that this small sample is only the service contract. The actual implementation will be hosted in a separate project.
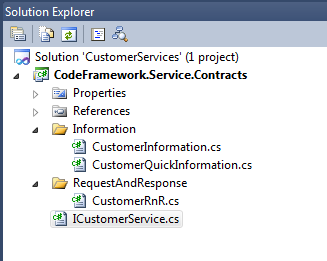
Because Code Framework delivers a small template, that doesn't mean that you should use the ICustomerService file. But if you want to take advantage of that, you'll need to organize a little bit and split this file in a few different files, as shown in Figure 4. The customer information is defined in two different classes: CustomerInformation.cs and CustomerQuickInformation.cs, which appear in Listing 1 and Listing 2 respectively.
Listing 1 - CustomerInformation.cs
using System.Runtime.Serialization;

namespace CodeFramework.Service.Contracts.Information
{
    /// <summary>Detailed information for a single customer.</summary>
    [DataContract]
    public class CustomerInformation
    {
        /// <summary>Constructor</summary>
        /// <remarks>Explicitly set default values for all
        /// properties in the constructor</remarks>
        public CustomerInformation()
        {
            CustomerId = 0;
            FirstName = string.Empty;
            LastName = string.Empty;
        }

        /// <summary>Id/Primary key that uniquely identifies the customer</summary>
        [DataMember(IsRequired = true)]
        public int CustomerId { get; set; }

        /// <summary>The customer's first name.</summary>
        [DataMember(IsRequired = true)]
        public string FirstName { get; set; }

        /// <summary>The customer's last name.</summary>
        [DataMember(IsRequired = true)]
        public string LastName { get; set; }
    }
}
Listing 2 - CustomerQuickInformation.cs
using System.Runtime.Serialization;

namespace CodeFramework.Service.Contracts.Information
{
    /// <summary>Shortened customer information suitable for use in lists</summary>
    /// <remarks>For detailed customer information, use the CustomerInformation
    /// contract. However, for large lists (with potentially large amounts of data),
    /// use this contract instead.</remarks>


    [DataContract]
    public class CustomerQuickInformation
    {
        /// <summary>Constructor</summary>
        /// <remarks>Explicitly set default values for all properties in the
        /// constructor</remarks>
        public CustomerQuickInformation()
        {
            CustomerId = 0;
            FullName = string.Empty;
        }

        /// <summary>Unique customer ID</summary>
        [DataMember(IsRequired = true)]
        public int CustomerId { get; set; }

        /// <summary>The customer's full name.</summary>
        [DataMember(IsRequired = true)]
        public string FullName { get; set; }
    }
}
Usually the requests and responses are located in the same file, because they have the same subject. It's a good practice to make sure that all requests have a response and vice-versa. The final code for the public methods, including Requests and Responses, can be viewed in Listing 3. Now the ICustomerService holds only what needs to be hosted: the operation contracts, as you can see in Listing 4.
Listing 3 - CustomerRnR.cs
using System.Collections.Generic;
using System.Runtime.Serialization;
using CodeFramework.Service.Contracts.Information;

namespace CodeFramework.Service.Contracts.RequestAndResponse
{
    /// <summary>Request contract for GetCustomerList() operation</summary>
    /// <remarks>Always create a request object, even if this object has no
    /// parameters. This allows for future changes in a structured fashion.</remarks>
    [DataContract]
    public class GetCustomerListRequest
    {
    }

    /// <summary>Response contract for GetCustomerList() operation</summary>
    [DataContract]
    public class GetCustomerListResponse
    {
        /// <summary>Constructor</summary>
        /// <remarks>Explicitly set default values for all properties in the
        /// constructor</remarks>
        public GetCustomerListResponse()
        {
            Success = false;
            FailureInformation = string.Empty;

            Customers = new List<CustomerQuickInformation>();
        }

        /// <summary>Indicates whether the call succeeded without errors or problems.</summary>
        /// <remarks>'Success' is a standard member for CODE Framework contracts.
        ///  It is not technically required but we recommend supporting it.</remarks>
        [DataMember(IsRequired = true)]
        public bool Success { get; set; }

        /// <summary>If Success is false, FailureInformation contains a brief indicator
        /// of what went wrong.</summary>
        /// <remarks>This should NOT contain an exception message for security reasons.
        /// 'FailureInformation' is a standard member for CODE Framework contracts. It
        /// is not technically required but we recommend supporting it.</remarks>
        [DataMember(IsRequired = true)]
        public string FailureInformation { get; set; }

        /// <summary>Actual list of customers returned by GetCustomerList()</summary>
        [DataMember(IsRequired = true)]
        public List<CustomerQuickInformation> Customers { get; set; }
    }

    /// <summary>Request contract for GetCustomer() operation</summary>
    [DataContract]
    public class GetCustomerRequest
    {
        /// <summary>Constructor</summary>
        /// <remarks>Explicitly set default values for all properties in the
        /// constructor</remarks>
        public GetCustomerRequest()
        {
            CustomerId = 0;
        }

        /// <summary>ID of the customer that is to be returned</summary>
        [DataMember(IsRequired = true)]
        public int CustomerId { get; set; }
    }

    /// <summary>Response contract for GetCustomer() operation</summary>
    [DataContract]
    public class GetCustomerResponse
    {
        /// <summary>Constructor</summary>
        /// <remarks>Explicitly set default values for all properties in
        /// the constructor</remarks>
        public GetCustomerResponse()
        {
            Success = false;
            FailureInformation = string.Empty;

            Customer = new CustomerInformation();
        }

        /// <summary>Indicates whether the call succeeded without errors or
        /// problems.</summary>
        /// <remarks>'Success' is a standard member for CODE Framework contracts.
        /// It is not technically required but we recommend supporting it.</remarks>
        [DataMember(IsRequired = true)]
        public bool Success { get; set; }

        /// <summary>If Success is false, FailureInformation contains a brief
        /// indicator of what went wrong.</summary>
        /// <remarks>This should NOT contain an exception message for security reasons.
        /// 'FailureInformation' is a standard member for CODE Framework contracts. It is
        /// not technically required but we recommend supporting it.</remarks>
        [DataMember(IsRequired = true)]
        public string FailureInformation { get; set; }

        /// <summary>This is the payload this sample call will return.</summary>
        [DataMember(IsRequired = true)]
        public CustomerInformation Customer { get; set; }
    }
}
Listing 4 - ICustomerService.cs
using System.ServiceModel;
using CodeFramework.Service.Contracts.RequestAndResponse;

namespace CodeFramework.Service.Contracts
{
    /// <summary>Example customer service</summary>
    /// <remarks>Contracts should always be well documented as their
    /// documentation also bubbles through for service implementations</remarks>
    [ServiceContract]
    public interface ICustomerService
    {
        /// <summary>Retrieves a list of customers</summary>
        /// <param name="request">Request</param>
        /// <returns>Response</returns>
        [OperationContract]
        GetCustomerListResponse GetCustomerList(GetCustomerListRequest request);

        /// <summary>Retrieves a specific customer</summary>
        /// <param name="request">Request</param>
        /// <returns>Response</returns>
        [OperationContract]
        GetCustomerResponse GetCustomer(GetCustomerRequest request);
    }
}
Implementing the Methods
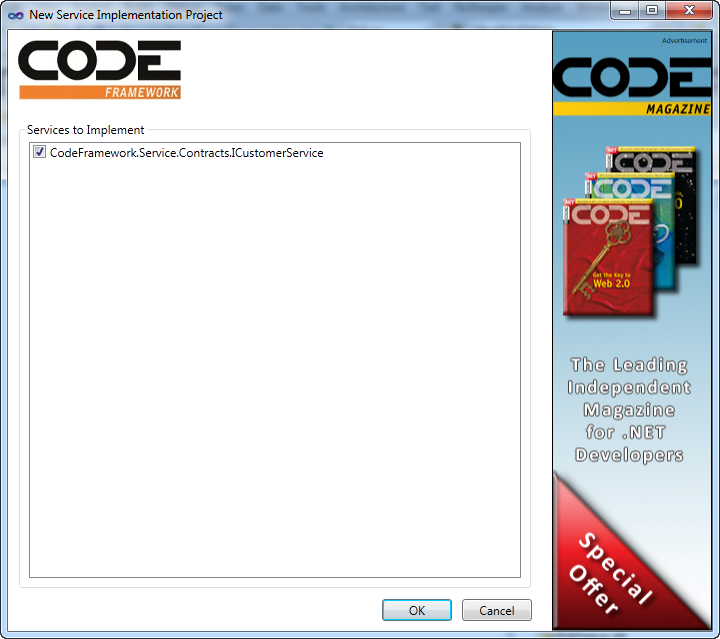
Now that you have the interface set, it's time to implement the methods defined in the ICustomerService file. On your Solution Explorer, right-click on the solution and add a new project. This time it's going to be a “Code Framework Service Implementation Project” type. Name it CodeFramework.Service.Implementation. When you click OK, the extension automatically detects the available interfaces to be implemented, as shown in Figure 5.
When you add the implementation project, the extension tries to find the CODE assemblies. If it doesn't find them, it gives you the ability to download it and reference directly. Check out Figure 6.
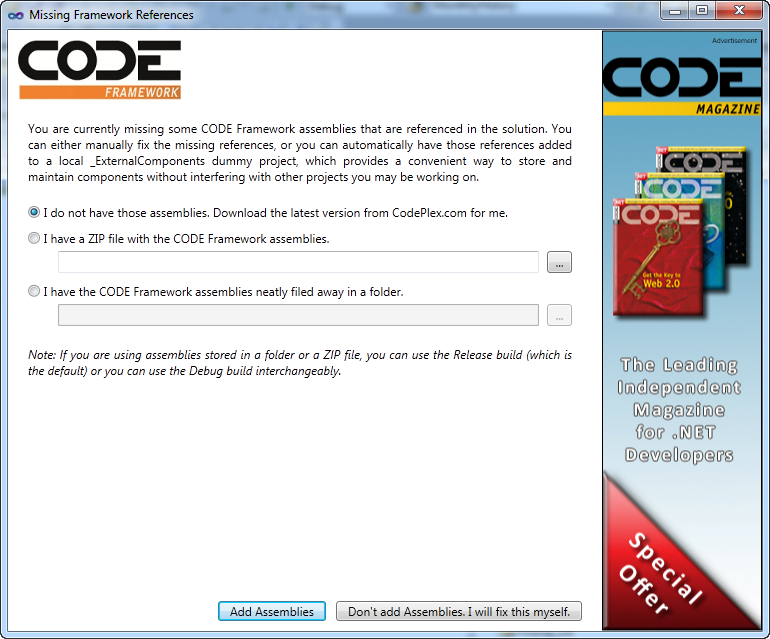
Notice that the automatic reference to the CODE assemblies was created in the _ExternalComponents class project along with a class called Class1.cs. You can get rid of Class1.cs if you want; you won't use it in this project.
The Business Objects Layer
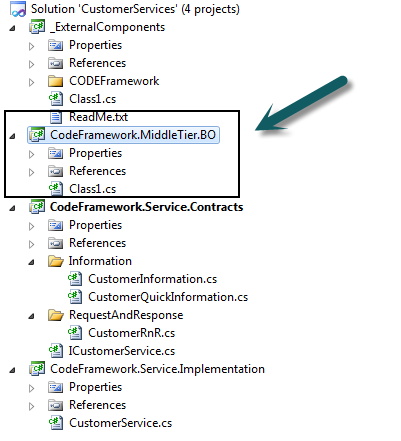
Before you start coding the implementation, you need the business object layer. Add a new class library project to the solution called CodeFramework.MiddleTier.BO, as shown in Figure 7. The easiest and fastest way to handle data is by creating a new ADO.NET Entity Data Model item. Call the data entity Customers.edmx.
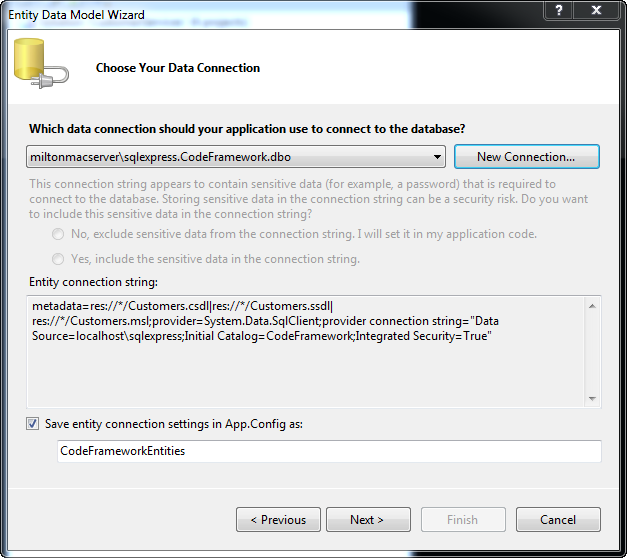
After clicking Add, Visual Studio opens the Entity Data Model Wizard. Choose Generate from Database, then your data connection, and click Next. You should see something similar to Figure 8. Select the Customers table and click Finish.
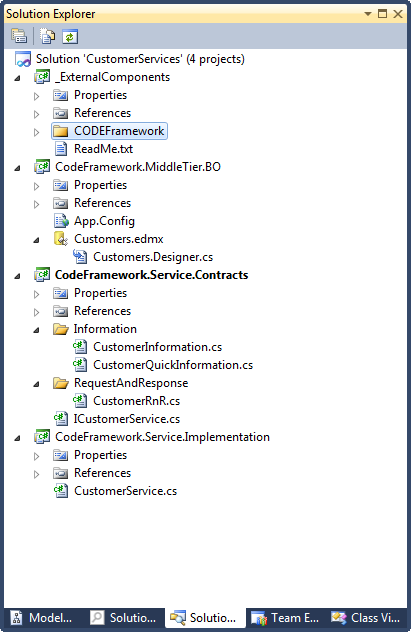
After getting rid of the Class1.cs, your solution should look like Figure 9.
The Implementation
With the business objects done, you're ready to implement the ICustomerService on the Implementation project. The first thing to do is to reference the Business Objects project on the CodeFramework.Service.Implementation and the System.Data.Entity in order to use the Data Entity features.
On the GetCustomerList method, create an instance of the CodeFrameworkEntities class. This way you're going to access the database. The response object waits for the Customers property to be filled with a list of type CustomerQuickInformation.
The code for this part can be viewed in Listing 5.
Listing 5 - CustomerService.cs
using System;
using System.Collections.Generic;
using System.Linq;
using CODE.Framework.Core.Utilities;
using CodeFramework.MiddleTier.BO;
using CodeFramework.Service.Contracts;
using CodeFramework.Service.Contracts.Information;
using CodeFramework.Service.Contracts.RequestAndResponse;

namespace CodeFramework.Service.Implementation
{
    public class CustomerService : ICustomerService
    {
        public GetCustomerListResponse GetCustomerList(GetCustomerListRequest request)
        {
            try
            {
                var response = new GetCustomerListResponse();

                var context = new CodeFrameworkEntities();

                var customers = (from customer in context.Customers select customer).ToList();

                var listOfCustomers = new List<CustomerQuickInformation>();

                customers.ForEach(customer => listOfCustomers.Add(
                    new CustomerQuickInformation{
                        CustomerId = customer.customerId, FullName = customer.firstName +
                            " " + customer.lastName}));

                response.Customers = listOfCustomers;
                response.Success = true;
                return response;
            }
            catch (Exception ex)
            {
                LoggingMediator.Log(ex);
                return new GetCustomerListResponse { Success = false,
                    FailureInformation = "Generic fault in CustomerService::GetCustomerList()" };
            }
        }

        public GetCustomerResponse GetCustomer(GetCustomerRequest request)
        {
            try
            {
                var response = new GetCustomerResponse();

                // TODO: Add service-specific code here

                response.Success = true;
                return response;
            }
            catch (Exception ex)
            {
                LoggingMediator.Log(ex);
                return new GetCustomerResponse { Success = false,
                    FailureInformation = "Generic fault in CustomerService::GetCustomer()" };
            }
        }
    }
}
The Development Host
The fastest and easiest way to test whether the implementation is working or not, is by creating a CODE Framework Development Host. Do that by right-clicking on the Solution and adding a Development Host project to it.
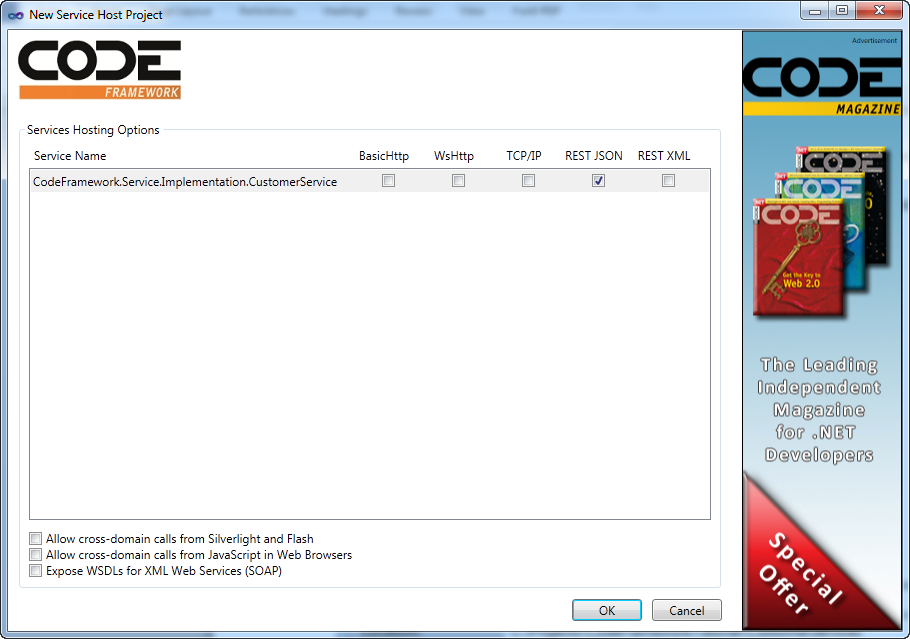
As mentioned before, you'll want get the results in JSON format, since you're going to use it in an Apple environment. Check the REST JSON option from the Services Hosting Options list on the New Service Host Project page. Since you're not going to access the service from a Silverlight application, JavaScript Web-based apps, or Flash apps, uncheck the other options, as shown in Figure 10.
The next step before trying to run the Development Host is to configure the App.config. Because you're using the Data Entity, you need to add the connection string information. Just copy and paste the information available on the Business Object App.Config file. The final App.config of the Development Host is available on Listing 6.
Listing 6 - App.config of the DevelopmentHost project
<?xml version="1.0" encoding="utf-8" ?>
<configuration>
<appSettings>
<add key="ServiceBasePath" value="dev"/>
<add key="ServiceBasePort" value="50000"/>
</appSettings>
<connectionStrings>
<add name="CodeFrameworkEntities"
connectionString="metadata=res://*/Customers.csdl|
res://*/Customers.ssdl|
res://*/Customers.msl;
provider=System.Data.SqlClient;
provider connection string="
data source=localhost\sqlexpress;
initial catalog=CodeFramework;
integrated security=True;
multipleactiveresultsets=True;
App=EntityFramework""
providerName="System.Data.EntityClient" />
</connectionStrings>
<startup>
<supportedRuntime version="v4.0" sku=".NETFramework,Version=v4.0"/>
</startup>
</configuration>
Finally, you can run the Development either by setting it as the Startup project or by right-clicking on the project and selecting Debug > Start New Instance. You should see something similar to Figure 11.
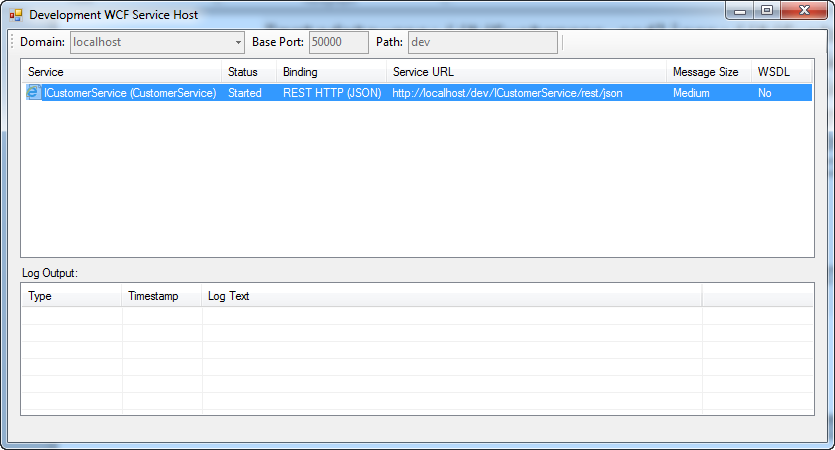
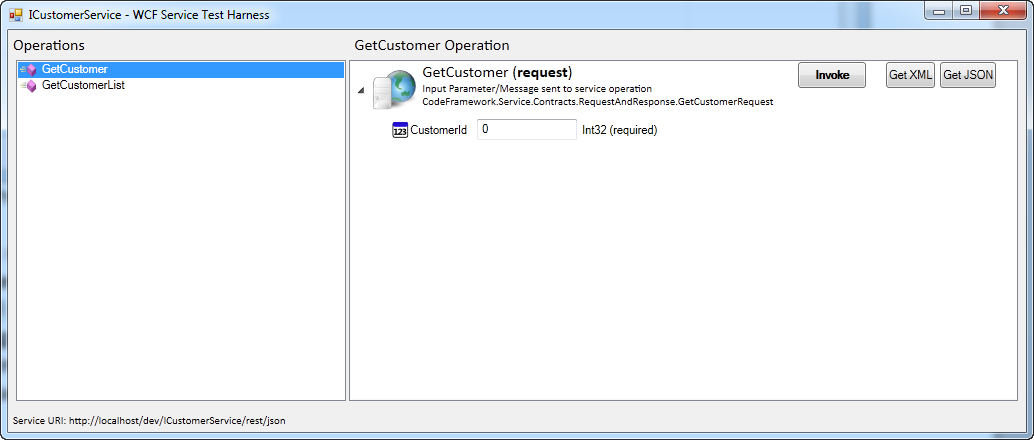
If you double click on the first row, you should be able to see the available methods. In this case, there are two: GetCustomer and GetCustomerList. You will also see three buttons: Invoke, GetXML and GetJSON, as shown in Figure 12. The Invoke button runs the method.
Now it's time to put a break point in your implementation project, in case you need to see what's going on with the code.
If you double click on the GetCustomerList, you'll see a notepad (or any similar default text application) pop up, which shows the response in JSON format, as shown in Figure 13.
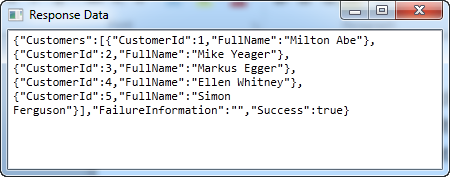
The Development Host project gives you the opportunity to test your implementation and check how the JSON was sent for each method while the Invoke button runs the actual method and returns the response, also in JSON format. This is an easy way to see what will handle the data accordingly in your client apps.
The Development Host project gives you the opportunity to test your implementation and check how the JSON was sent for each method while the Invoke button runs the actual method and returns the response, also in JSON format. This is an easy way to see what will handle the data accordingly in your client apps.
If you're seeing the response in JSON format in your default text application, it means that your implementation is working just fine! Now it's time to go to XCode and get this information from an iPhone application.
The iPhone Application
The server side is done and it's time to build the client application. In this case you're going to develop an iPhone application to consume the service that you just created. One thing that you may be thinking is: "How am I going to test the integration between the iPhone application and the service? Since they live in different worlds (one is MacOS and other is Microsoft), how we're going to do this? Well, you can use Parallels or VMWare Fusion to run Windows under MacOS. Or you can use two different computers that are in the same network. Either way works fine.
Open XCode and click on “Create a new XCode project.” Then click on Single View Application and click Next, and fill the options according to Figure 14. Only with these small steps are you able to run the application on your iPhone or the simulator. Remember that you'll only be able to run the application in your iPhone if you have an Apple developer subscription.
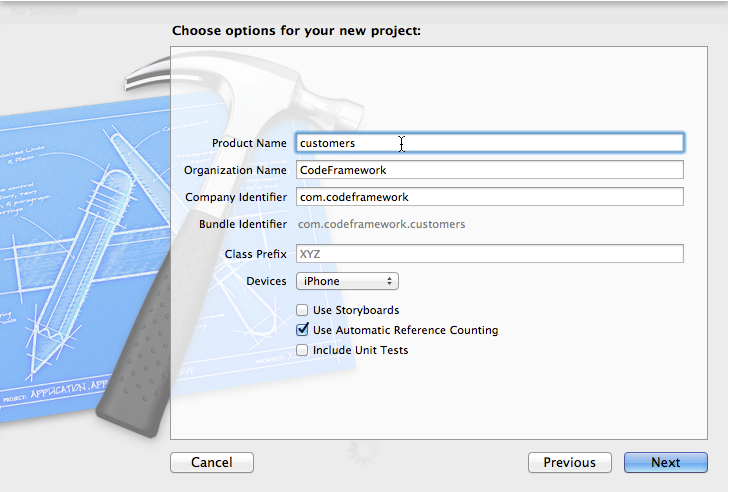
You'll only be able to run the application in your iPhone if you have an Apple developer subscription.
Adding Necessary Libraries
You're going to need a library for simplifying network programming. You'll snag ASIHTTPRequest from github at https://github.com/pokeb/asi-http-request.
Clone this project (or just download it) and drag all of the files in the Classes folder into the new project (you can safely ignore the files in subfolders). In addition, you'll need to snag Reachability.h and Reachability.m from the External folder. XCode asks you if you want to copy or reference the files. Choose Copy Files.
For more information on what an ASI HTTP Request is, check out http://allseeing-i.com/ASIHTTPRequest/.
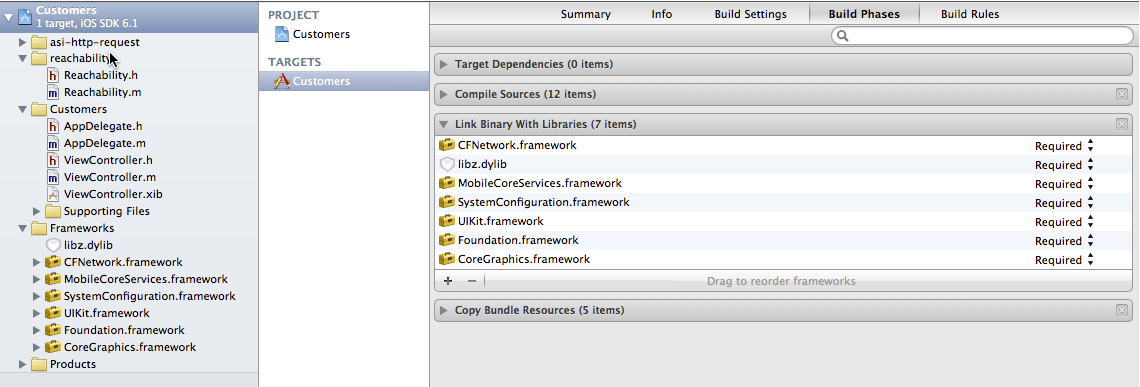
After adding the necessary libraries and the required frameworks, your project structure should look like the Figure 15.
In the iOS project, the goal is to show the customer list in a simple table view. The way you're going to write the code for it is a little bit crude but you might want to refactor and organize your classes accordingly later.
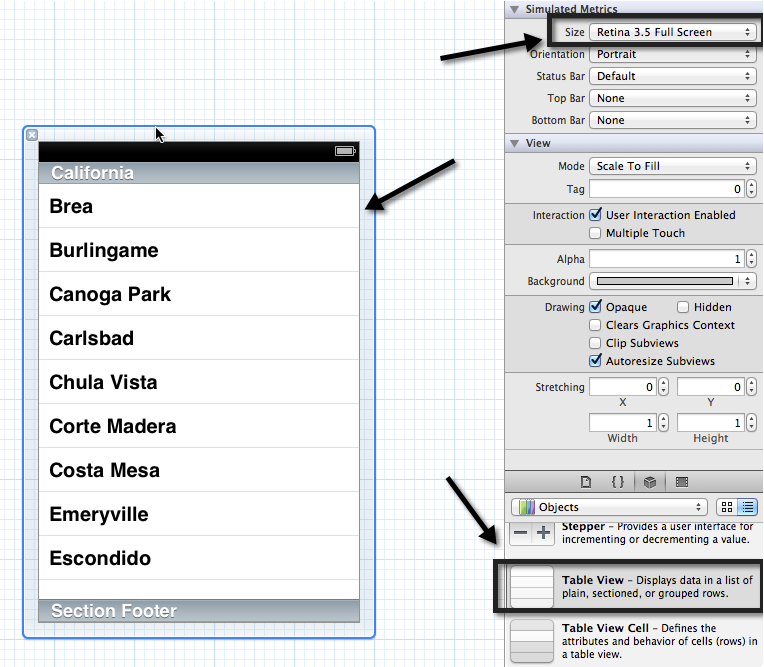
Because you're going to use a table to view the data, you need to open the ViewController.xib and make some changes first:
- Click in the view and change the
sizeproperty from Retina 4 Full Screen to Retina 3.5 Full Screen. By default, the new XCode assumes that your project will run on an iPhone 5, which has a larger screen. For now, let's develop for a standard iPhone size, so the emulator won't fill your whole monitor. - Drag and drop a Table View component onto the View.
The final result should look like Figure 16.
The next step is to open the ViewController.h and inherit the UITableViewDataSource and the UITableViewDelegate. This forces the user to implement the necessary methods to make the table work. Also create an IBOutlet property for the UITableView. It should look like this:
//  ViewController.h
//  Customers
//

#import <UIKit/UIKit.h>

@interface ViewController : UIViewController<UITableViewDataSource,
                                                UITableViewDelegate>

@property (nonatomic, strong) IBOutlet UITableView *tableView;

@end
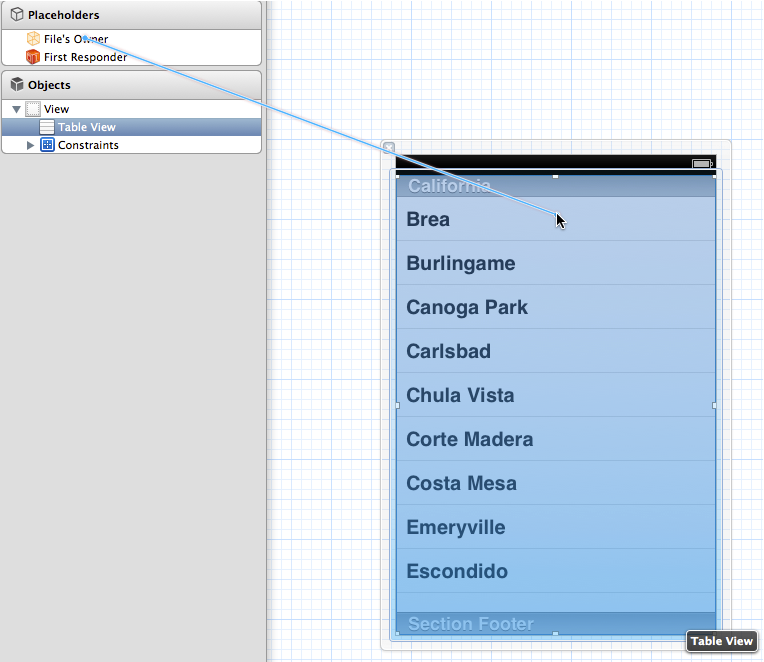
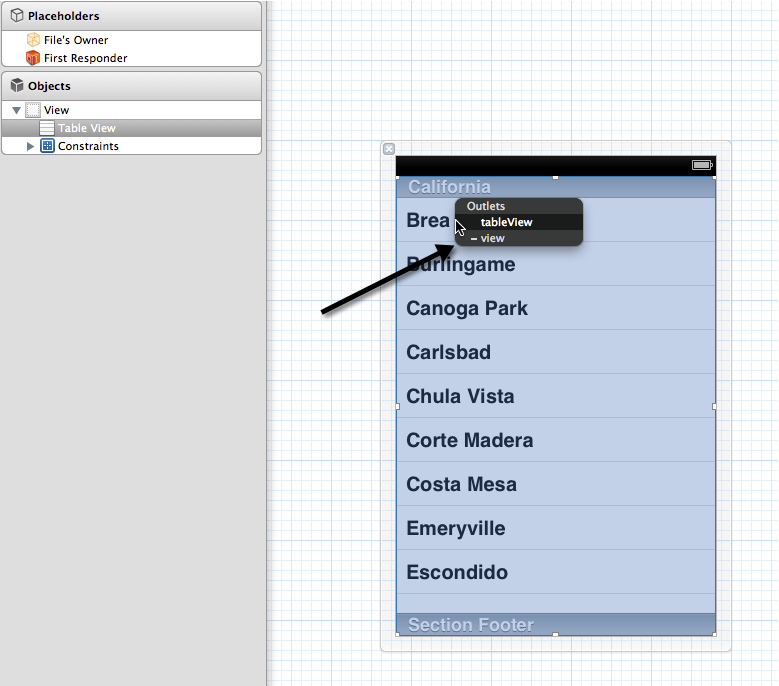
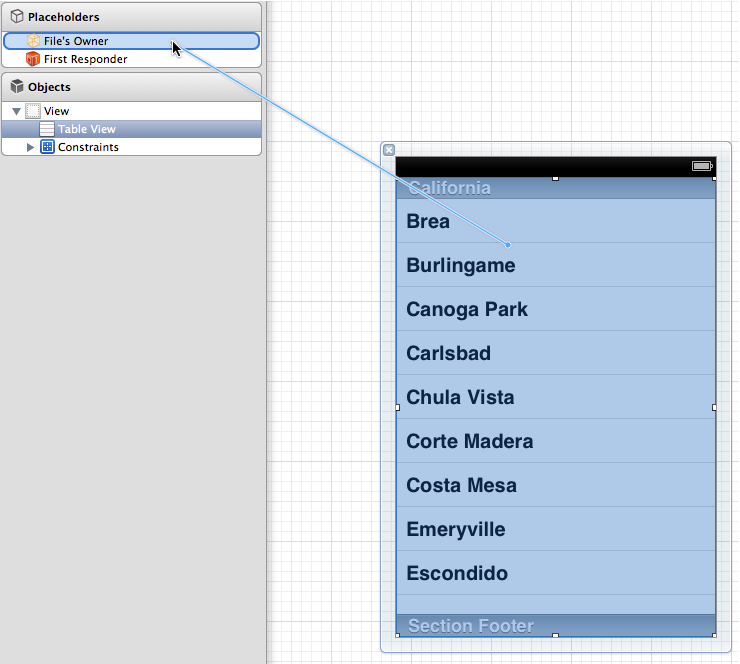
Now, link the File's owner with the UITableView component that you dropped onto the view. To do that, left-click on File's Owner and drag it to the UITableView (Figure 17). When you release the mouse button, you should see the tableView property (Figure 18), created in ViewController.h.
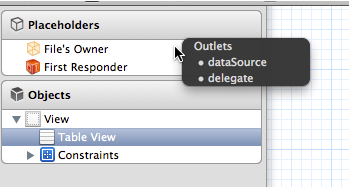
Now it's time to link the table view with the UITableDataSource and UITableDelegate. To do that, right-click on the table and drag it to the File's Owner. This will look like Figure 19 and Figure 20.
Now that you have your UITableView component in place, it's time to think about what you are going to need to access the service and show the data on this table.
Because this is a very simple application, let's say that you want to store the results from the service by calling in a simple list. In this case, you're going to create and add item by item on the list. So you'll need an NSMutableArray variable that can be declared on the ViewController.h file.
//
//  ViewController.h
//  Customers
//
//

#import <UIKit/UIKit.h>

@interface ViewController : UIViewController<UITableViewDataSource, UITableViewDelegate> {
    NSMutableArray *listOfCustomers;
}

@property (nonatomic, strong) IBOutlet UITableView *tableView;

@end
You need to implement a few methods coming from the UITableViewDataSource and UITableViewDelegate protocols:
- (NSInteger) tableView:(UITableView *)tableView numberOfRowsInSection:(NSInteger)section
- (NSString *) tableView:(UITableView *)tableView titleForHeaderInSection:(NSInteger)section
- (UITableViewCell *) tableView:(UITableView *)tableView cellForRowAtIndexPath:(NSIndexPath *)indexPath
Listing 9 shows how the code is should to be in order to run and see something on the application.
The numberOfRows comes from the numbers of items available in the Customers list. The list will be set on the viewDidLoad method. The titleForHeaderInSection is self- explanatory. In this case, you'll see “Customers” at the top of the table. Because the table has only one section, you don't need worry about the section parameter. The cellForRowAtIndexPath returns a UITableViewCell.
Whenever the UITableView is loaded or reloaded, this method is called row-by-row in order to display information based on the indexPath. The indexPath gives you two important bits of information: the current section and the current row for the current section. Because you'll be using a NSMutableArray list, the item will be easily accessed by the current indexPath.row property.
Now it's time to access the Development Host Service. To do that, create a method that populates the NSMutableArray. On the ViewController.m, implement the method loadCustomersList, just like Listing 7.
Listing 7: ViewController.m
//
//  ViewController.m
//  Customers

#import "ViewController.h"

@interface ViewController ()

@end

@implementation ViewController

- (void)viewDidLoad
{
    [super viewDidLoad];
    // Do any additional setup after loading the view, typically from a nib.
}

- (void)didReceiveMemoryWarning
{
    [super didReceiveMemoryWarning];
    // Dispose of any resources that can be recreated.
}

- (NSInteger) tableView:(UITableView *)tableView numberOfRowsInSection:(NSInteger)section
{
    return 1;
}

- (NSString *) tableView:(UITableView *)tableView titleForHeaderInSection:(NSInteger)section
{
    return @"Customers";
}

- (UITableViewCell *) tableView:(UITableView *)tableView cellForRowAtIndexPath:(NSIndexPath *)indexPath
{
    UITableViewCellStyle cellStyle = UITableViewCellStyleValue1;

    static NSString *CellIdentifier = @"Cell";
    UITableViewCell *cell = [tableView dequeueReusableCellWithIdentifier:CellIdentifier];
    if (cell == nil) {
        cell = [[UITableViewCell alloc] initWithStyle:cellStyle reuseIdentifier:CellIdentifier];
    }


    return cell;
}

@end
Now you need to implement the UITableView protocols, like Listing 8.
Listing 8 - The loadCustomersList method
- (void) loadCustomersList
{
    NSString *serviceUrl = @"http://192.168.0.69/dev";
    NSString *service = @"ICustomerService";
    NSString *method = @"GetCustomerList";
    NSString *parameters = @"";

    listOfCustomers = [[NSMutableArray alloc]init];

    NSString *url = [NSString stringWithFormat:@"%@/%@/%@/%@", serviceUrl, service, @"rest/json", method];

    NSData *body = [parameters dataUsingEncoding:NSISOLatin1StringEncoding];

    ASIFormDataRequest *request = [ASIFormDataRequest requestWithURL: [NSURL URLWithString:url]];
                                  [request addRequestHeader:@"Content-Type" value:@"application/json"];
                                  [request addRequestHeader:@"Accept" value:@"application/json"];
                                  [request appendPostData:body];
                                  [request startSynchronous];

        NSString *response = [request responseString];

        NSString *jsonString = response;

        NSData *data = [jsonString dataUsingEncoding:NSUTF8StringEncoding];
        NSError *error = nil;
        NSDictionary *json = [NSJSONSerialization JSONObjectWithData:data options:0 error:&error];

        NSArray *customers = [json objectForKey:@"Customers"];

        for (int i = 0 ; i < customers.count ; i++)
        {
            NSDictionary *customer = customers[i];
            NSString *fullName = [customer objectForKey:@"FullName"];

            [listOfCustomers addObject:fullName];
        }

            [self.tableView reloadData];
}
And finally, make the call on the viewDidLoad method, you can see here:
- (void)viewDidLoad
{
    [super viewDidLoad];
    // Do any additional setup after loading the view, typically from a nib.
    [self loadCustomersList];
}
The final code should look like Listing 9:
Listing 9 - Implementation of UITableView Protocols
- (NSInteger) tableView:(UITableView *)tableView numberOfRowsInSection:(NSInteger)section
{
    return listOfCustomers.count;
}

- (NSString *) tableView:(UITableView *)tableView titleForHeaderInSection:(NSInteger)section
{
    return @"Customers";
}

- (UITableViewCell *) tableView:(UITableView *)tableView cellForRowAtIndexPath:(NSIndexPath *)indexPath
{
    UITableViewCellStyle cellStyle = UITableViewCellStyleValue1;

    static NSString *CellIdentifier = @"Cell";
    UITableViewCell *cell = [tableView dequeueReusableCellWithIdentifier:CellIdentifier];
    if (cell == nil) {
        cell = [[UITableViewCell alloc] initWithStyle:cellStyle reuseIdentifier:CellIdentifier];
    }

    NSString *fullName = listOfCustomers[indexPath.row];

    cell.textLabel.text = fullName;

    return cell;
}
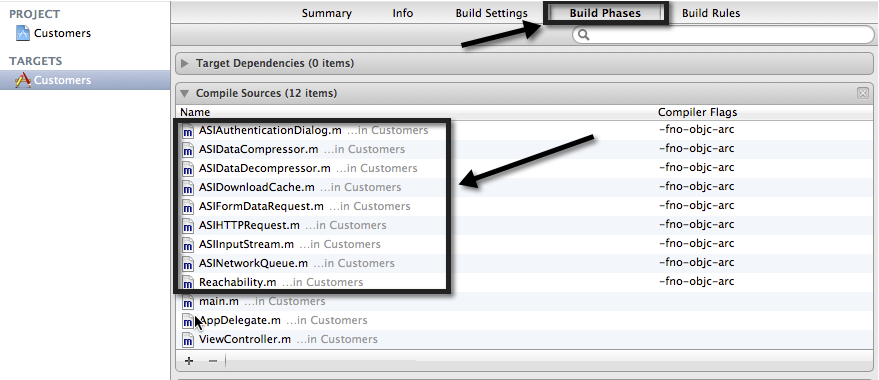
Before you try running the application, make sure that all required files are listed on the Compile Sources on the Build Phases Tab and that their Compiler Flags are set to -fno-obj-arc. Otherwise the project will not compile due to ARC issues. Neither the ASIHttpRequest library nor Reachability support ARC, which is why you need to set the compiler flags for this particular case (see Figure 21).
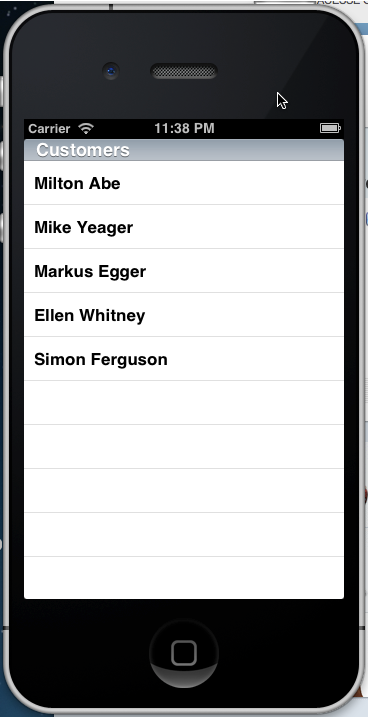
Now that you have everything in place, you can test the application by simply running it. It should look something similar to Figure 22.
Notice that in your code, you're pointing the address to the Development Host IP. In this example, the Development Host is running under the IP 192.168.0.100. You're also specifying the service that you're going to use (
ICustomerService) and the path, defined on theApp.config– in this case: dev. Finally, you set the method that you'll be using. For this example, the parameter isnull, but in case you need to pass one or more parameters, the Development Host can show you exactly the string that you should pass just by clicking on “Get JSON” button.
The ASIFormDataRequest is responsible for accessing the destination server and the NSJSONSerialization object is responsible for parsing the JSON string, coming from the same server as the original response.
Windows Service & Setup Projects
Now that you've implemented and tested the code, it's time to set up a Windows Service to be installed on the production server.
CODE Framework offers the opportunity to add the Windows Service project to the solution hassle free. All you need to do is to copy any extra configuration from the Development Host App.config file. The Windows Service is part of the Setup project. In other words, since you can't execute any Windows Service directly, the installation file is needed.
Right-click on the Solution and add a new CODE Framework Service Windows Service Host Project. Name it “CodeFrameworkCustomerService” and click OK.
You will notice that the process is similar to when you add a Development Host project. The only difference now is that you won't run anything and nothing is visual. You're only creating a Windows Service. Check only the REST JSON option for the Service Hosting Options and name the service “CODECustomersService,” as shown in Figure 23.

Right after creating the project, open the App.config and make a few changes. You can base these on Listing 10.
Listing 10 - Complete ViewController.m implementation
//
//  ViewController.m
//  Customers
//
//

#import "ViewController.h"
#import "ASIFormDataRequest.h"

@interface ViewController ()

@end

@implementation ViewController

- (void)viewDidLoad
{
    [super viewDidLoad];
    // Do any additional setup after loading the view, typically from a nib.
    [self loadCustomersList];
}

- (void)didReceiveMemoryWarning
{
    [super didReceiveMemoryWarning];
    // Dispose of any resources that can be recreated.
}

- (NSInteger) tableView:(UITableView *)tableView numberOfRowsInSection:(NSInteger)section
{
    return listOfCustomers.count;
}

- (NSString *) tableView:(UITableView *)tableView titleForHeaderInSection:(NSInteger)section
{
return @"Customers";
}

- (UITableViewCell *) tableView:(UITableView *)tableView cellForRowAtIndexPath:(NSIndexPath *)indexPath
{
    UITableViewCellStyle cellStyle = UITableViewCellStyleValue1;

    static NSString *CellIdentifier = @"Cell";
    UITableViewCell *cell = [tableView dequeueReusableCellWithIdentifier:CellIdentifier];
    if (cell == nil) {
        cell = [[UITableViewCell alloc] initWithStyle:cellStyle reuseIdentifier:CellIdentifier];
    }

    NSString *fullName = listOfCustomers[indexPath.row];

    cell.textLabel.text = fullName;

    return cell;
}

- (void) loadCustomersList
{
    NSString *serviceUrl = @"http://192.168.0.100/dev";
    NSString *service = @"ICustomerService";
    NSString *method = @"GetCustomerList";
    NSString *parameters = @"";

    listOfCustomers = [[NSMutableArray alloc]init];

    NSString *url = [NSString stringWithFormat:@"%@/%@/%@/%@", serviceUrl, service, @"rest/json", method];

    NSData *body = [parameters dataUsingEncoding:NSISOLatin1StringEncoding];

    ASIFormDataRequest *request = [ASIFormDataRequest requestWithURL: [NSURL URLWithString:url]];
                                  [request addRequestHeader:@"Content-Type" value:@"application/json"];
                                  [request addRequestHeader:@"Accept" value:@"application/json"];
                                  [request appendPostData:body];
                                  [request startSynchronous];

    NSString *response = [request responseString];

    NSString *jsonString = response;

    NSData *data = [jsonString dataUsingEncoding:NSUTF8StringEncoding];
    NSError *error = nil;
    NSDictionary *json = [NSJSONSerialization JSONObjectWithData:data options:0 error:&error];

    NSArray *customers = [json objectForKey:@"Customers"];

    for (int i = 0 ; i < customers.count ; i++)
    {
        NSDictionary *customer = customers[i];
        NSString *fullName = [customer objectForKey:@"FullName"];

        [listOfCustomers addObject:fullName];
    }

    [self.tableView reloadData];
}

@end
- The
ServiceBaseUrlis going to be the server IP or name. - The
ServiceBasePathis the actual Path of the Service. - The
ServiceBasePortcan remain unchanged. But you could pick another port if you want to.
On the connectionStrings part (Listing 11), you have to change the data source to the production server address. Remember that this will be used by the Data Entity Framework to hit the database.
Listing 11: Modifying the App.config of the Service project
<?xml version="1.0"?>
<configuration>
<appSettings>
<add key="ServiceBaseUrl" value="192.168.0.69"/>
<add key="ServiceBasePath" value="prod"/>
<add key="ServiceBasePort" value="50000"/>
</appSettings>
<connectionStrings>
<add name="CodeFrameworkEntities"
connectionString="metadata=res://*/Customers.csdl|
res://*/Customers.ssdl|
res://*/Customers.msl;
provider=System.Data.SqlClient;
provider connection string="
data source=localhost\sqlexpress;
initial catalog=CodeFramework;
integrated security=True;
multipleactiveresultsets=True;
App=EntityFramework""
providerName="System.Data.EntityClient" />
</connectionStrings>
<startup>
<supportedRuntime version="v4.0" sku=".NETFramework,Version=v4.0"/>
</startup>
</configuration>
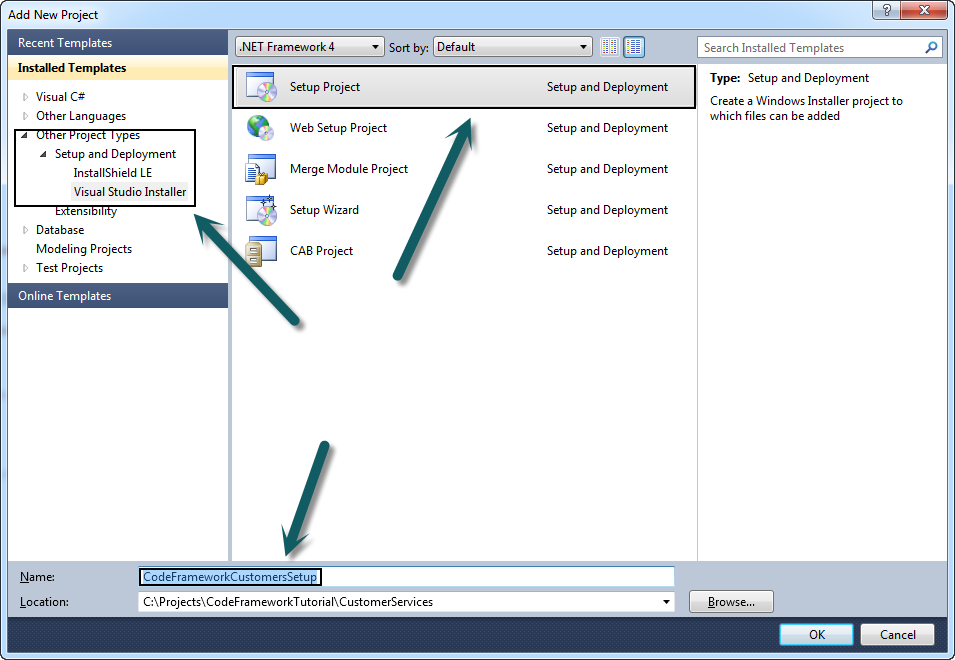
The last thing to do now is to create the Setup project. Right-click on the solution and click on Add > New Project > Other Project Types > Setup and deployment > Visual Studio Installer, and click on Setup project. Name it “CodeFrameworkCustomersSetup,” like Figure 24. Click OK to finish.
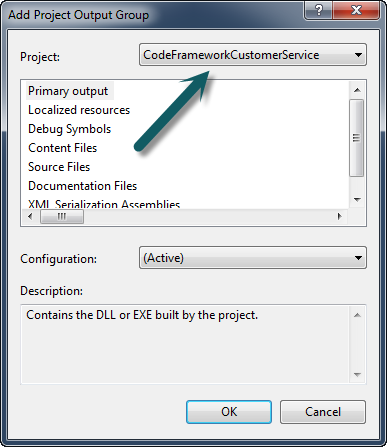
Now right-click on the CodeFrameworkCustomerSetup located on the Solution Explorer and click Add > Project Output. On the project combo, select the CodeFrameworkCustomerService and click OK (Figure 25). This is going to add all the references and dependencies to the project.
Right-click on the CodeFrameworkCustomerSetup and click Build. This creates the setup files for you. Now you're ready to install the service on the production or staging server.
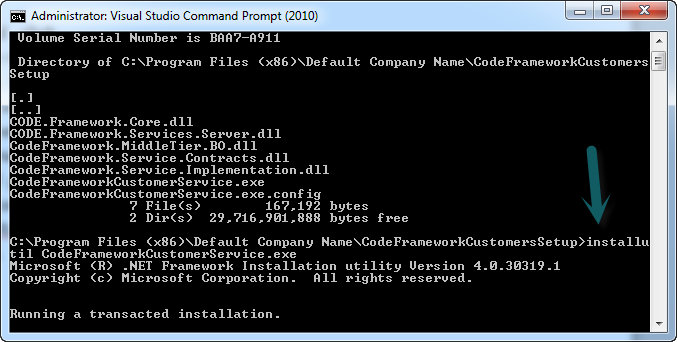
Open the DEBUG folder of the project on Windows Explorer and run the setup. After installing the service, you'll need to run the tool installutil, which is available via the Visual Studio 2010 command prompt.
If you didn't change the destination folder, you should go to the Program Files (X86)/Default Company Name folder and run the following command: installutil CodeFrameworkCustomerService.exe. Check the Figure 26.
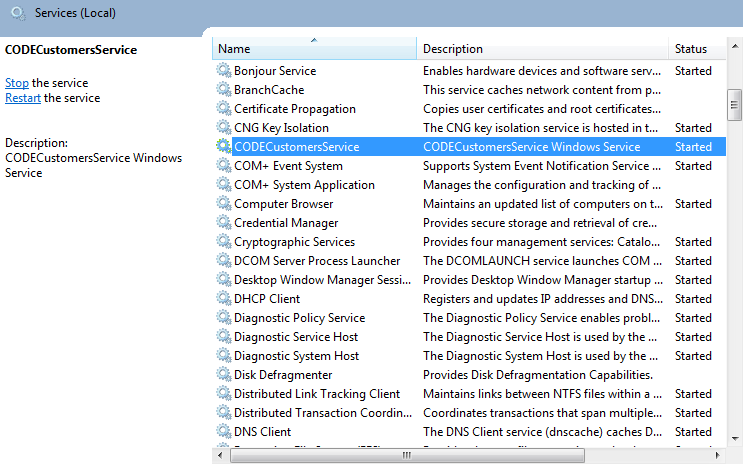
Once you do this, the service will be available on the services list, as you can see in Figure 27. Just start the service and you're good to go.
Testing the iPhone Application in Production Mode
To test your iPhone application, all you have to do now is to modify the loadCustomersList method. The serviceUrl variable should be http://192.168.0.100/prod now. After making the changes, try to run your application. If you still can see the list of customers on your screen, it means that the service has been successfully installed. It's up and running without any problem!
Conclusion
This article showed, step-by-step, how to create a Windows Service that exposes methods and returns responses in JSON format using the CODE Framework. It also showed how easy is to consume the new Windows Service from an iPhone application. But this doesn't mean that the new Windows Service will work only with that type of device. Pretty much the contrary: any software that supports JSON parsing will be able to use it. So take advantage of this great tool and build tons of awesome mobile and desktop applications! Happy coding!
