


In the July/August 2016 issue of CODE Magazine, I published an article on how to create your own scripting language and implement it in C#. I called this language CSCS: Customized Scripting in C#. But I didn't mention any practical usage of such a scripting language at the time, even though there were some unexpected applications of it, e.g., in game hacking.
Since then, Xamarin was acquired by Microsoft and at first Xamarin Studio Community Edition, and later Visual Studio 2017 Community Edition which contained Xamarin, were released for Windows and macOS. Now individual developers and even small companies can develop iOS and Android apps in C# using Xamarin for free (in addition to the Windows Phone apps that they were already able to develop in C#).
There's a choice of using either Xamarin.Forms (in case users don't require platform-specific functionality and are comfortable with using XAML) or platform-specific Xamarin.iOS and Xamarin.Android to write apps with any features that they can get as if they were using iOS Swift/Objective-C or Android Java development.
“I want to be buried with a mobile phone, just in case I'm not dead.” – Amanda Holden
The first step of shortening time-to-market if you develop cross-platform apps, is to use Xamarin. And this is where I saw the next step and an application for the CSCS scripting language: I can extend the CSCS scripting language for mobile development, so creating and placing different widgets will be just one-liners. The scripting language doesn't have to be used exclusively but can be combined with the C# code.
The most time-consuming part, at least for me, has always been the layout, which is implemented differently on iOS and Android. For Android you usually use XML, and for iOS, there's Auto Layout, a constraint-based layout system. Both systems permit having conflicts - definitions conflicting with each other - that are solved at runtime (not always obviously and depending on the screen size).
The advantages of using customized scripting in C# for mobile development are:
- The same code is used to create and place a widget on both iOS and Android. Windows Phone can be added easily as well.
- A simpler layout system works exactly the same for Android and iOS and there's no possibility of conflicts.
- You can call the native C# code from inside a CSCS script. You can avoid delays due to marshalling by pre-compilation. You'll see how to do this in this article.
- The end-result is still a native app.
- Debugging time is quicker with CSCS than with C#. When making some modifications in the script, there's no recompilation of the source code. The changes in the XML/Storyboard aren't necessary anymore for changing the layout (and it does take some time recompiling the layout changes unless you really have a “crème de la crème” development computer).
- Because of the proximity of CSCS to the C# code, you can easily modify the existing
CSCSfunctionality or add a new function. For example, it's very easy to add a new widget, and you'll see some examples in this article. - The differences from Xamarin.Forms are that you don't need to know XAML, and there fewer lines of code. You can also use platform-specific features more easily.
- People with little or no programming experience can easily create the UI using CSCS scripting.
All of the code in this article is available for free at https://github.com/vassilych/mobile. It's also associated with this article on the CODE Magazine website.
To use CSCS for mobile development, you need to download any version of Visual Studio 2017 and enable the Xamarin option there. Then you can use my sample project at https://github.com/vassilych/mobile or the CODE Magazine website, which contains the CSCS compiler in the shared C# code section, and play around with the script file script.cscs there.
A “Hello, World!” in CSCS
Let's start with our “Hello, World!” program for mobile development. Check out the CSCS script in Listing 1.
Listing 1: A “Hello, world!” program in the CSCS scripting language
function changeme_click(sender, arg) {
    SetText(sender, GetText(textChangeme));
    SetText(versionLabel, _VERSION_ + ". Size: " + DisplayWidth + "x" + DisplayHeight);
}

AddTab("Learn", "learn.png", "learn2.png");
SetBackground("ch_bg.png");

locLeft = GetLocation("ROOT", "LEFT", "ROOT", "CENTER", 20, 0);
AddButton(locLeft, "buttonChangeme", "Change me", 260, 80);
AddAction(buttonChangeme,  "changeme_click");
SetFontSize(buttonChangeme, 12);

if (_IOS_) {
    hint = "Hello, iPhone user"
} elif (_ANDROID_) {
    hint = "Hello, Android user"
} else {
    hint = "Hello, Windows user"
}

locLeftRight = GetLocation(buttonChangeme, "RIGHT", buttonChangeme, "CENTER", 40, 0);
AddTextEdit(locLeftRight, "textChangeme", hint, 260, 60);
SetFontSize(textChangeme, 12);

locAbove = GetLocation(buttonChangeme, "ALIGN_LEFT", buttonChangeme, "TOP");
AddLabel(locAbove, "versionLabel", "", 360, 60);

AddTab("Quiz", "test.png", "test2.png");
AddTab("Settings", "settings.png", "settings2.png");

SelectTab(0);
The result of executing this script is shown in Figure 1.
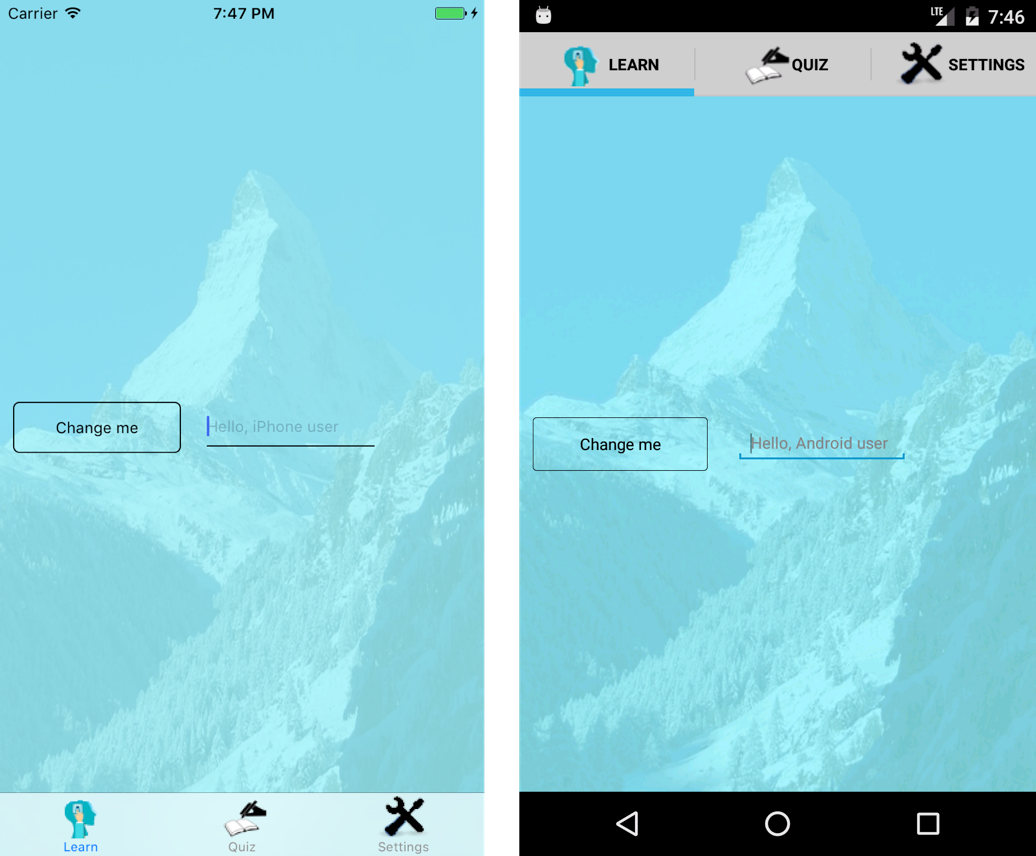
Figure 2 shows fragments of the screen on iPhone and Android after typing “Hi there” in the text field and clicking on the “Change me” button.

As you can see, I added a background and three tabs on the fly. In addition, I added the following widgets: a Label (UILabel in iOS and TextView in Android), a Button (UIButton in iOS and Button in Android), and a TextEdit (UITextField in iOS and EditText in Android).
Let's briefly examine the contents of the “Hello, World!” script in Listing 1.
The AddTab function creates a tab application on the fly and adds the first tab to the app. Its signature is the following:
AddTab(TabName, ActiveIcon, <InactiveIcon>);
The ActiveIcon is used when the tab is selected, and the InactiveIcon is used otherwise. The InactiveIcon is optional: if it's not provided, the ActiveIcon is used.
SetBackground(image) is used to set the background of the app. Note that before using this function, the image file must be first added to the Resources folder of the Xamarin.Android and Xamarin.iOS projects. See the accompanying source code download for details.
The next section explains how you add different widgets to the app.
Layout
In order to add a widget, you need to define the application layout. In this section, you're going to see how the layout is organized in CSCS. There's no familiar drag-and-drop functionality but in exchange, there's more control about where you want your widget placed.
Layout in CSCS
For the layout definition, I used a mixture of the iOS and Android approaches. From iOS and the Auto Layout, I applied a rather obvious concept: For the unique widget location, I need to define the relative widget placement horizontally and vertically, and also the widget size. That's it! I'm not sure why this can be defined multiple times, and inconsistently, in both iOS and Android, leading to conflicts; these conflicts may be resolved with unexpected results at runtime.
For the implementation, I took an approach similar to the concept of the RelativeLayout in Android, but it's not possible in CSCS to have multiple definitions for a widget (because they may contradict each other). For instance, in Android, you can apply the method ApplyRule() an unlimited number of times when placing a widget.
To create a new widget, first you need to create its location. The location has the information about the widget's horizontal and vertical placement. It won't have the widget's size: That's provided later, when you add the widget itself. The reason is that potentially the same location can be used by various widgets of differing sizes (for example, one of them can be hidden, and another can be shown, depending on some other runtime conditions).
Also, the location will have an optional parameter of the view (or layout, in the case of Android) for where to place the widget. If the location isn't provided, the widget is placed in the root view (or in the root Android layout, which happens to be a RelativeLayout).
To create a widget location, the syntax is the following:
Location = GetLocation(horizontalReference, horizontalRelation,
verticalReference, verticalRelation,
<additionalHorizontalMargin>, <additionalVerticalMargin>, <View>);
The horizontal and vertical references are either other widgets (or views) or the root window (in this case, it's denoted by the “ROOT” string). Most of the horizontal and vertical relation parameters are borrowed from the Android RelativeLayout.LayoutParams class. One of the differences is the Center parameter, which is only used for placement inside of the parent in Android, but you use it depending on the context: If the reference widget isn't the root, the new widget is centered relative to the reference widget. You'll see a few examples of placing widgets in different places on the screen and relative to each other later on.
The additional horizontal and vertical margins are, by default, zero. In case they're provided, they indicate the additional margin for moving the widget horizontally (the direction goes from left to right) and vertically (the direction goes from top to bottom). For example, a horizontal margin of -20 means moving the widget left 20 pixels; a vertical margin of 30 means moving the widget down 30 pixels. This is similar to the TranslationX and TranslationY parameters in Android.
Let's see, for example:
locLeft = GetLocation("ROOT", "LEFT", "ROOT", "CENTER", 20, 0);
The first argument, “ROOT”, refers to the reference widget, which is the main window, and the second argument specifies the horizontal placement; in other words, the widget will be placed horizontally on the left. The third and fourth argument specify the vertical placement at the vertical center of the screen. The fifth parameter, 20, indicates that the widget should be moved 20 pixels to the right.
Let's see another example:
locAbove = GetLocation(buttonChangeme, "ALIGN_LEFT", buttonChangeme, "TOP");
This horizontally aligns the left corner of buttonChangeme with the left corner of the new widget. Vertically, it places the new widget on top of the buttonChangeme.
After creating a location, you must use it to create a widget:
AddButton(locLeft, "buttonChangeme", "Change me", 260, 80);
This creates a button at the location specified before with the specific width and height in pixels. The button has the title string “Change me”.
The general syntax of a CSCS command to create a widget is the following:
AddWidget(widgetType, location, widgetName, initializationString, width, height);
There are shortcuts for some of the widget types, such as a View, a Button, a Label, etc. The whole list of the functions currently available for the mobile development is shown in Tables 1, 2, and 3. This list is constantly growing, so check the source code at GitHub for up-to-date developments.
The initialization string is context-sensitive. For a label and a button, it sets its text (or its “title” in Android terms). For the TextEdit, it sets a hint (or its “placeholder” in iOS terms). An example of this hint can be seen in Listing 1. The initialization string can also provide the image file name for the ImageView and the initialization parameters for some widgets, like Switch and Slider.
I've used pixels in this layout; in a future article, you're going to see how to use DPS (density-independent pixels). Also, even though I've given absolute sizes here, it's easy to make adjustments and have widget sizes and placement depend on the display size because you can use the DisplayWidth and DisplayHeight functions to find out the display size in pixels and use this information to create a multiplication factor for coordinates and sizes.
That's it, about the layout in CSCS. Now, using the location defined in this section, you can create widgets anywhere on the screen and position them relative to each other.
Example of the Layout in CSCS
Let's see how to implement the layout shown in Figure 3 in CSCS.
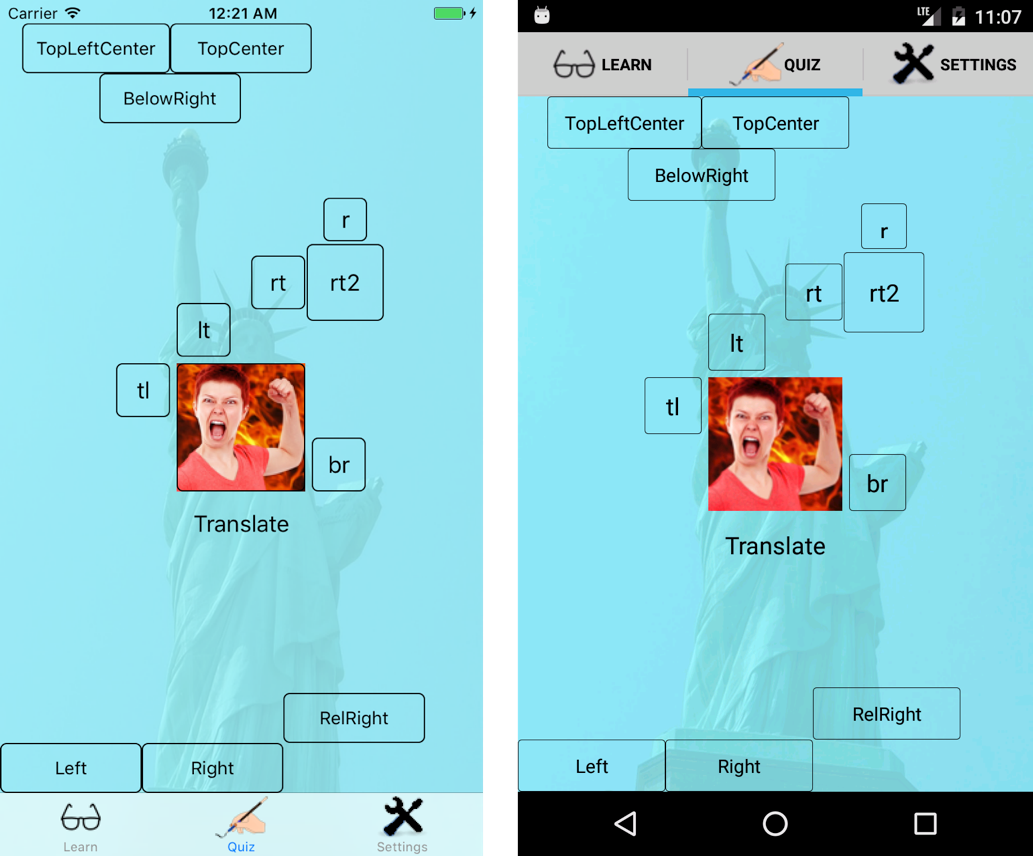
The example in Figure 3 uses many different widgets. Check its implementation in Listing 2.
Listing 2: Examples of different layouts in CSCS
w        = 220;
h        = 78;
margin   = 10;
fontSize = 14;

AddTab("Learn", "learn.png", "learn2.png");
AddTab("Quiz", "test.png", "test2.png");

locCenter = GetLocation("ROOT", "CENTER", "ROOT", "CENTER");
AddButton(locCenter, "buttonCenter", "", 200, 200);
SetImage(buttonCenter, "angry.png");

locTrans = GetLocation("ROOT", "CENTER", "buttonCenter", "BOTTOM", 0, margin);
AddButton(locTrans, "buttonTrans", "Translate", 200, 80);
AddBorder(buttonTrans, 0, 0);

AddLabel(locTrans, "labelTrans", "", 240, 80);
AlignText(labelTrans, "center");

locCenterLT = GetLocation(buttonCenter, "ALIGN_LEFT", buttonCenter, "TOP", 0, -1 * margin);
AddButton(locCenterLT, "buttonCenterLT", "lt", 85, 85);

locCenterRT = GetLocation(buttonCenter, "ALIGN_RIGHT", buttonCenterLT, "TOP", 0, margin);
AddButton(locCenterRT, "buttonCenterRT", "rt", 85, 85);

locCenterRT2 = GetLocation(buttonCenterRT, "RIGHT", buttonCenterRT, "CENTER", 2, 0);
AddButton(locCenterRT2, "buttonCenterRT2", "rt2", 120, 120);

locCenterRT3 = GetLocation(buttonCenterRT2, "CENTER", buttonCenterRT2, "TOP", 0, -5);
AddButton(locCenterRT3, "buttonCenterRT3", "r", 68, 68);

locCenterTL = GetLocation(buttonCenter, "LEFT", buttonCenter, "ALIGN_TOP", -1 * margin, 0);
AddButton(locCenterTL, "buttonCenterTL", "tl", 85, 85);

locCenterBR = GetLocation(buttonCenter, "RIGHT", buttonCenter, "ALIGN_BOTTOM", margin, 0);
AddButton(locCenterBR, "buttonCenterBR", "br", 85, 85);
loc1 = GetLocation("ROOT", "LEFT", "ROOT", "BOTTOM");
AddButton(loc1, "button1", "Left", w, h);
SetFontSize(button1, fontSize);

loc2 = GetLocation("button1", "RIGHT", "ROOT", "BOTTOM");
AddButton(loc2, "button2", "Right", w, h);
SetFontSize(button2, fontSize);

loc3 = GetLocation("button2", "RIGHT", "button2", "TOP");
AddButton(loc3, "button3", "RelRight", w, h);
SetFontSize(button3, fontSize);

loc4 = GetLocation("ROOT", "CENTER", "ROOT", "TOP");
AddButton(loc4, "button4", "TopCenter", w, h);
SetFontSize(button4, fontSize);

loc5 = GetLocation("button4", "LEFT", "ROOT", "TOP");
AddButton(loc5, "button5", "TopLeftCenter", w + 10, h);
SetFontSize(button5, fontSize);

loc6 = GetLocation("button4", "RIGHT", "button5", "BOTTOM", -1.5 * w, 0);
AddButton(loc6, "button6", "BelowRight", w, h);
SetFontSize(button6, fontSize);

AddTab("Settings", "settings.png", "settings2.png");
Implementation of the Layout in C#
Now let's see the implementation of the layout in the C# code so you can easily modify it to better fit your needs.
First, I'll do a very quick elevator pitch of how CSCS scripting language works and how you can add new functions to it. For a longer and a much more detailed explanation, take a look at the article that I published in the July-August 2016 issue of CODE Magazine (http://www.codemag.com/article/1607081).
The CSCS language is based on the Split-and-Merge algorithm, and is implemented in C#. At first, you collect a series of tokens and then merge them one by one. As soon as you encounter an expression in parentheses or a function, you apply the whole Split-and-Merge algorithm to that expression or function. At the second stage of the algorithm, merging, you only have simple expressions, like numbers or strings. And that second merging stage takes into account the priorities of the operators. The first step doesn't take priorities into account.
The CSCS is a functional language where everything turns around functions. Let's see how to add a new function to CSCS. I'll start with simple ones: the functions returning the device's width and height.
The first step is to write a new class deriving from the ParserFunction class, and to override its Evaluate() method.
Here's an example for iOS:
public class GadgetSizeFunction : ParserFunction
{
    bool m_needWidth;
    public GadgetSizeFunction(bool needWidth = true)
    {
        m_needWidth = needWidth;
    }
    protected override Variable Evaluate(ParsingScript script)
    {
        var nb = UIScreen.MainScreen.NativeBounds;
        return new Variable (m_needWidth ? nb.Width : nb.Height);
    }
}
As you can see, the function just gets the screen bounds containing both the width and the height, and returns either the width, or the height, depending on the initialization parameter.
Here is the same function implementation for Android:
public class GadgetSizeFunction : ParserFunction
{
    bool m_needWidth;
    public GadgetSizeFunction(bool needWidth=true)
    {
        m_needWidth = needWidth;
    }
    protected override Variable Evaluate(ParsingScript script)
    {
        DisplayMetrics dm = new DisplayMetrics();
        MainActivity.TheView.WindowManager.DefaultDisplay.GetMetrics(dm);
        return new Variable (m_needWidth ? dm.WidthPixels : dm.HeightPixels);
    }
}
The second step, after implementing the functions in C#, is to register them with the parser. This registration is now the same for iOS and Android, and it's the following:
ParserFunction.RegisterFunction("DisplayWidth", new GadgetSizeFunction(true));
ParserFunction.RegisterFunction("DisplayHeight", new GadgetSizeFunction(false));
This means that as soon as the parser finds the DisplayWidth token, the Evaluate() method of the GadgetSizeFunction object initialized with m_needWidth = true is called and as soon as the parser finds the DisplayHeight token, the Evaluate() method of the GadgetSizeFunction object initialized with m_needWidth = false is called.
That's it! In my previous article, there was an additional step to register any possible translations supplied in a configuration file, but I'll skip it here for brevity. This is how easy it is to add a new functionality to the CSCS scripting language: Implement an Evaluate method in a new class deriving from the ParserFunction class and then register it with the parser!
The Evaluate method returns an object of the Variable class. This is a generic object used in CSCS scripting. For mobile development, you need a more customized object.
The UIVariable class derives from the variable class and is a wrapper over all of the widgets and locations. A fragment of this class is shown in Listing 3.
Listing 3: A fragment of the UIVariable class
public class UIVariable : Variable
{
    public enum UIType  { NONE, LOCATION, VIEW, BUTTON, LABEL,
                          TEXT_FIELD, TEXT_VIEW, PICKER_VIEW,
                          IMAGE_VIEW, SWITCH, SLIDER };

    protected static int m_currentTag;

    public UIVariable(UIType type, string name = "" ,
                      UIVariable refViewX = null,
                      UIVariable refViewY = null)
    {
        WidgetType = type;
        WidgetName = name;
        RefViewX   = refViewX;
        RefViewY   = refViewY;
    }
    public UIType WidgetType     { get; set; }
    public string WidgetName     { get; set; }
    public int Width             { get; set; }
    public int Height            { get; set; }
    public int X                 { get; set; }
    public int Y                 { get; set; }
    public int TranslationX      { get; set; }
    public int TranslationY      { get; set; }

    public string RuleX          { get; set; }
    public string RuleY          { get; set; }

    public UIVariable Location   { get; set; }
    public UIVariable RefViewX   { get; set; }
    public UIVariable RefViewY   { get; set; }
    public UIVariable ParentView { get; set; }
}
The iOSVariable and DroidVariable are concrete implementations of the UIVariable for the iOS and Android correspondingly. They are shown in Listing 4 and Listing 5.
Listing 4: A fragment of the iOSVariable class
public class iOSVariable : UIVariable
{
    public iOSVariable(UIType type, string name,
        UIView viewx = null, UIView viewy = null) : base(type, name)
    {
        m_viewX = viewx;
        m_viewY = viewy;
        if (type != UIType.LOCATION && m_viewX != null) {
            m_viewX.Tag = ++m_currentTag;
        }
    }
    public CGSize GetParentSize()
    {
        if (ParentView != null) {
            return new CGSize(ParentView.Width, ParentView.Height);
        }
        return UtilsiOS.GetScreenSize();
    }
    public UIView GetParentView() {
        iOSVariable parent = ParentView as iOSVariable;
        if (parent != null) {
            return parent.ViewX;
        }
        return AppDelegate.GetCurrentView();
    }

    UIView m_viewX;
    UIView m_viewY;
    string m_originalText;
    string m_alignment;
}
Listing 5: A fragment of the DroidVariable class
public class DroidVariable : UIVariable
{
    public DroidVariable(UIType type, string name, View viewx,
        View viewy = null) : base (type, name)
    {
        m_viewX = viewx;
        m_viewY = viewy;
        if (type != UIType.LOCATION && m_viewX != null) {
            m_viewX.Tag = ++m_currentTag;
            m_viewX.Id  = m_currentTag;
        }
    }
    public void SetViewLayout(int width, int height)
    {
         DroidVariable refView = RefViewX as DroidVariable;
         m_viewLayout = MainActivity.CreateViewLayout(width, height, refView?.ViewLayout);
    }
    View         m_viewX;
    View         m_viewY;
    LayoutRules  m_layoutRuleX;
    LayoutRules  m_layoutRuleY;
    ViewGroup    m_viewLayout;  // If this is a parent itself.

    public static Size GetLocation(View view)
    {
        if (view == null) {
            return null;
        }
        int [] outArr = new int [2];
        view.GetLocationOnScreen(outArr);
        return new Size (outArr[0], outArr[1]);
    }
}
The first step in a layout operation in CSCS is to get a location for the widget. Listing 6 shows the implementation of getting a location for Android. The implementation for iOS is very similar.
Listing 6: Getting a Location for Android
public class GetLocationFunction : ParserFunction
{
    protected override Variable Evaluate(ParsingScript script)
    {
        bool isList = false;
        List<Variable> args = Utils.GetArgs(script,
             Constants.START_ARG, Constants.END_ARG, out isList);

        string nameX       = args[0].AsString();
        string ruleStrX    = args[1].AsString();
        string nameY       = args[2].AsString();
        string ruleStrY    = args[3].AsString();

        int leftMargin      = Utils.GetSafeInt(args, 4);
        int topMargin       = Utils.GetSafeInt(args, 5);
        Variable parentView = Utils.GetSafeVariable(args, 6, null);

        DroidVariable refViewX = nameX == "ROOT" ? null :
           Utils.GetVariable(nameX, script) as DroidVariable;

        DroidVariable refViewY = nameY == "ROOT" ? null :
            Utils.GetVariable(nameY, script) as DroidVariable;

        DroidVariable location = new DroidVariable (
            UIVariable.UIType.LOCATION, nameX, refViewX, refViewY);

        location.SetRules(ruleStrX, ruleStrY);
        location.ParentView = parentView as DroidVariable;
        location.TranslationX = leftMargin;
        location.TranslationY = topMargin;
        return location;
    }
}
Once you have a location, you can place the widget there. The code for Android is a bit more straightforward (because the placement is done on a RelativeLayout), so I'll show the code for placing the iOS widgets. The code here is not complete and I encourage you to check out the details in the accompanying source code.
There's one main function for adding a widget to the screen, and which is used for all types of widgets, AddWidgetFunction. There are a few exceptions to this, such as pop-up dialogs, like an Alert Dialog or a Toast, that are implemented differently. In order to use the same function for different widgets, register functions that add widgets, as follows:
ParserFunction.RegisterFunction("AddButton", new AddWidgetFunction("Button"));
ParserFunction.RegisterFunction("AddLabel", new AddWidgetFunction("Label"));
ParserFunction.RegisterFunction("AddTextEdit", new AddWidgetFunction("TextEdit"));
Continue on in that fashion. Listing 7 shows the implementation of the AddWidgetFunction class on iOS.
Listing 7: Adding a Widget. Fragments from the AddWidgetFunction class
public class AddWidgetFunction : ParserFunction
{
    public AddWidgetFunction(string widgetType = "")
    {
        m_widgetType = widgetType;
    }
    protected override Variable Evaluate(ParsingScript script)
    {
        string widgetType = m_widgetType;
        int start = string.IsNullOrEmpty(widgetType) ? 1 : 0;
        bool isList = false;
        List<Variable> args = Utils.GetArgs(script,
            Constants.START_ARG, Constants.END_ARG, out isList);

        if (start == 1) {
            widgetType = args[0].AsString();
            Utils.CheckNotEmpty(script, widgetType, m_name);
        }

        iOSVariable location = args[start] as iOSVariable;
        Utils.CheckNotNull(location, m_name);

        double screenRatio = UtilsiOS.GetScreenRatio();

        string varName = args[start + 1].AsString();
        string text = Utils.GetSafeString(args, start + 2);

        int width = (int)(Utils.GetSafeInt(args, start + 3) / screenRatio);
        int height = (int)(Utils.GetSafeInt(args, start + 4) / screenRatio);

        location.SetSize(width, height);
        CGSize parentSize = location.GetParentSize();

        location.X = UtilsiOS.String2Position(location.RuleX,
                     location.ViewX, location, parentSize, true);
        location.Y = UtilsiOS.String2Position(location.RuleY,
                     location.ViewY, location, parentSize, false);

        location.X += location.TranslationX;
        location.Y += location.TranslationY;

        CGRect rect = new CGRect(location.X, location.Y, width, height);
        iOSVariable widgetFunc = GetWidget(widgetType, varName, text, rect);
        Utils.CheckNotNull(widgetFunc, m_name);

        var currView = location.GetParentView();
        currView.Add(widgetFunc.ViewX);

        iOSApp.AddView(widgetFunc.ViewX);

        ParserFunction.AddGlobal(varName, new GetVarFunction(widgetFunc));
        return widgetFunc;
    }

    public static iOSVariable GetWidget(string widgetType,
        string widgetName, string initArg, CGRect rect)
    {
        UIVariable.UIType type = UIVariable.UIType.NONE;
        UIView widget = null;
        switch (widgetType)
        {
            case "Button":
                type = UIVariable.UIType.BUTTON;
                widget = new UIButton(rect);
                ((UIButton)widget).SetTitleColor(UIColor.Black, UIControlState.Normal);
                ((UIButton)widget).SetTitle(initArg, UIControlState.Normal);
                AddBorderFunction.AddBorder(widget);
                break;
            case "Label":
                type = UIVariable.UIType.LABEL;
                widget = new UILabel(rect);
                ((UILabel)widget).TextColor = UIColor.Black;
                ((UILabel)widget).Text = initArg;
                break;
            case "TextEdit":
                type = UIVariable.UIType.TEXT_FIELD;
                widget = new UITextField(rect);
                ((UITextField)widget).TextColor = UIColor.Black;
                ((UITextField)widget).Placeholder = initArg;
                MakeBottomBorder(widget);
                break;
            // All other widgets go here...
        }
    }
}
The function responsible for the translation of the ALIGN_LEFT, BOTTOM, CENTER, etc., parameters to the concepts that iOS and Android understand is called String2Position. This function is shown in Listing 8. Depending on the layout parameters, it returns a coordinate of the point where you place the widget.
Listing 8: Translating a Relation Parameter to a Position on iOS
public static int String2Position(string param, UIView
    referenceView, iOSVariable location, CGSize parentSize, bool isX)
{
    bool useRoot = referenceView == null;

    int refX = useRoot ? 0 :  (int)referenceView.Frame.Location.X;
    int refY = useRoot ? 0 :  (int)referenceView.Frame.Location.Y;
    int refWidth = useRoot ?  (int)parentSize.Width : (int)referenceView.Frame.Size.Width;
    int refHeight = useRoot ? (int)parentSize.Height : (int)referenceView.Frame.Size.Height;
    int parentWidth  = (int)parentSize.Width;
    int parentHeight = (int)parentSize.Height;
    int widgetWidth  = (int)location.Width;
    int widgetHeight = (int)location.Height;

    switch (param) {
        case "ALIGN_LEFT": // X
            return useRoot ? 0 : refX;
        case "LEFT": // X
            return useRoot ? 0 : refX - widgetWidth;
        case "ALIGN_RIGHT": // X
             return useRoot ? parentWidth - widgetWidth : refX + refWidth - widgetWidth;
        case "RIGHT": // X
            return useRoot ? parentWidth - widgetWidth :refX + refWidth;
        case "ALIGN_PARENT_TOP":
        case "ALIGN_TOP": // Y
            return useRoot ? ROOT_TOP_MIN : refY;
        case "TOP":
            return useRoot ? ROOT_TOP_MIN : refY - widgetHeight;
        case "ALIGN_PARENT_BOTTOM":
        case "ALIGN_BOTTOM": int offset1 = useRoot ?
                                               parentHeight - widgetHeight – ROOT_BOTTOM_MIN :
                                               refY + refHeight - widgetHeight;
            // if there is a tabbar, move the bottom part up:
            if (useRoot && !isX) {
                offset1 -= (int)(iOSApp.CurrentOffset * 0.8);
            }
            return offset1;
            case "BOTTOM": int offset2 = useRoot ?
                                                parentHeight - widgetHeight – ROOT_BOTTOM_MIN :
                                                refY + refHeight;
            // if there is a tabbar, move the bottom part up:
            if (useRoot && !isX) {
                offset2 -= (int)(iOSApp.CurrentOffset * 0.8);
            }
            return offset2;
            case "CENTER": if (useRoot) {
                return isX ? (parentWidth  - widgetWidth ) / 2 : (parentHeight - widgetHeight) / 2 ;
            } else {
                return isX ? refX + (refWidth  - widgetWidth ) / 2 : refY + (refHeight - widgetHeight) / 2;
            }
        default:return 0;
    }
}
Calling the Native C# Functions from the CSCS Code
It may be more convenient to use already-existing C# code from the CSCS code and get the results back into CSCS. Even though any feature of C# can be implemented in CSCS, this may require some time, and the C# code may be already available.
Let's see an example of how the C# code receives an argument from CSCS, gets the current time, and returns a string back to CSCS. Then this string is shown as a button title. Here's the CSCS implementation:
clicks = 0;
function click(sender, arg) {
    clicks++;
    title = CallNative("ProcessClick", "arg", clicks);
    SetText(sender, title);
}
loc1 = GetLocation("ROOT", "LEFT", "ROOT", "BOTTOM");
AddButton(loc1, "but1", "Left", 220, 80);
AddAction(but1, "click");
loc2 = GetLocation("but1", "RIGHT", "ROOT", "BOTTOM");
AddButton(loc2, "but2", "Right", 220, 80);
AddAction(but2, "click");
The result of executing this script and clicking a few times on each button is shown in Figure 4.

Let's see how it's implemented. Listing 9 contains the C# implementation of invoking a method with one string parameter that returns a string. The implementation for methods with a different number of parameters or with different types of arguments, is analogous.
Listing 9: Invoking and caching a method using Reflection in C#s
using System.Collections.Generic;
using System.Linq.Expressions;
using System.Reflection;

static Dictionary<string, Func<string, string>> m_compiledCode =
    new Dictionary<string, Func<string, string>>();

public static Variable InvokeCall(Type type, string methodName,
    string paramName, string paramValue, object master = null)
{
    string key = type + "_" + methodName + "_" + paramName;
    Func<string, string> func = null;

    // Cache compiled function:
    if (!m_compiledCode.TryGetValue(key, out func)) {
        MethodInfo methodInfo = type.GetMethod(methodName, new Type[] { typeof(string) });
        ParameterExpression param = Expression.Parameter(typeof(string), paramName);

        MethodCallExpression methodCall = master == null ?
            Expression.Call(methodInfo, param) :
            Expression.Call(Expression.Constant(master), methodInfo, param);
        Expression<Func<string, string>> lambda =
            Expression.Lambda<Func<string, string>>(methodCall,
            new ParameterExpression[] { param });
        func = lambda.Compile();
        m_compiledCode[key] = func;
    }

    string result = func(paramValue);
    return new Variable(result);
}
You can see that you cache the compiled function to be executed. The effect of caching is quite noticeable visually: The first click takes a longer time than the consequent ones, especially on Android. You can also pre-cache commonly called functions at the start-up phase.
This InvokeCall() method is called from a Parser function, which is the first point of contact in the C# code with CSCS. The iOS and Android implementation is the same and it's shown in Listing 10.
Listing 10: The implementation of InvokeNativeFunction class
public class InvokeNativeFunction : ParserFunction
{
    protected override Variable Evaluate(ParsingScript script)
    {
        string methodName = Utils.GetItem(script).AsString();
        Utils.CheckNotEmpty(script, methodName, m_name);

        string paramName = Utils.GetToken(script, Constants.NEXT_ARG_ARRAY);
        Utils.CheckNotEmpty(script, paramName, m_name);

        Variable paramValueVar = Utils.GetItem(script);
        string paramValue = paramValueVar.AsString();

        var result = Utils.InvokeCall(typeof(Statics), methodName, paramName, paramValue);
        return result;
    }
}
To glue everything together, you need to register the InvokeNativeFunction with the parser:
ParserFunction.RegisterFunction("CallNative", new InvokeNativeFunction());
What's left is the actual implementation of the method being called from the CSCS code. As you saw in Listing 10, the method is implemented in the Statics class that I added in the shared project area. In the Statics class, you can implement all of the methods called from C# and the same code is called from both iOS and Android:
public class Statics
{
    public static string ProcessClick(string arg)
    {
        var now = DateTime.Now.ToString("T");
        return "Clicks: " + arg + "\n" + now;
    }
}
Very similarly, you can also implement calling functions with a different number of arguments or with different argument types.
Where the CSCS Script Execution is Triggered in C# Code
One important question is: Where exactly in the flow do you execute the CSCS script?
For iOS, the answer is easier than for Android: In iOS, it can be done just at the end of the AppDelegate.FinishedLaunching() method.
For Android, the first attempt to run the CSCS script at the end of the MainActivity.OnCreate() method failed. The reason was that the global layout has not been completely initialized in the OnCreate() method.
The trick is to register a listener that will be triggered as soon as the global layout is initialized:
protected override void OnCreate(Bundle savedInstanceState)
{
    base.OnCreate(savedInstanceState);
    // some other stuff
    ViewTreeObserver ob = relativelayout.ViewTreeObserver;
    ob.AddOnGlobalLayoutListener(new LayoutListener());
}
In the listener code, first you unregister the listener (otherwise it will be triggered on every change to the layout) and then run the CSCS script:
public class LayoutListener : Java.Lang.Object, ViewTreeObserver.IOnGlobalLayoutListener
{
    public void OnGlobalLayout()
    {
        var ob = MainActivity.TheLayout.ViewTreeObserver;
        ob.RemoveOnGlobalLayoutListener(this);
        MainActivity .RunScript();
    }
}
In the RunScript method, you register all of the Parser functions right before the parser execution is started. Here's a fragment from the RunScript method:
public static void RunScript()
{
    ParserFunction.RegisterFunction("_IOS_" , new CheckOSFunction (CheckOSFunction.OS.IOS));
    // ... Registration of all other functions
    // with the Parser here ...

    string script = "";
    AssetManager assets = TheView.Assets;
    using (StreamReader sr = new StreamReader(assets.Open("script.cscs"))) {
        script = sr.ReadToEnd();
    }
    Interpreter.Instance.Process(script);
}
Widgets, Widgets, Widgets
Once you know how to build the layout, another important part of the CSCS scripting language is to be able to use as many widgets as possible. You can see what's currently implemented in Table 1, 2, and 3, but I'm sure that by the time you read this article, many more widgets will be implemented. Just check the accompanying source-code download at the GitHub link or go to the CODE Magazine website and download it from the article's link.
As a final example, let's see how the widgets shown in Figure 5 are implemented.
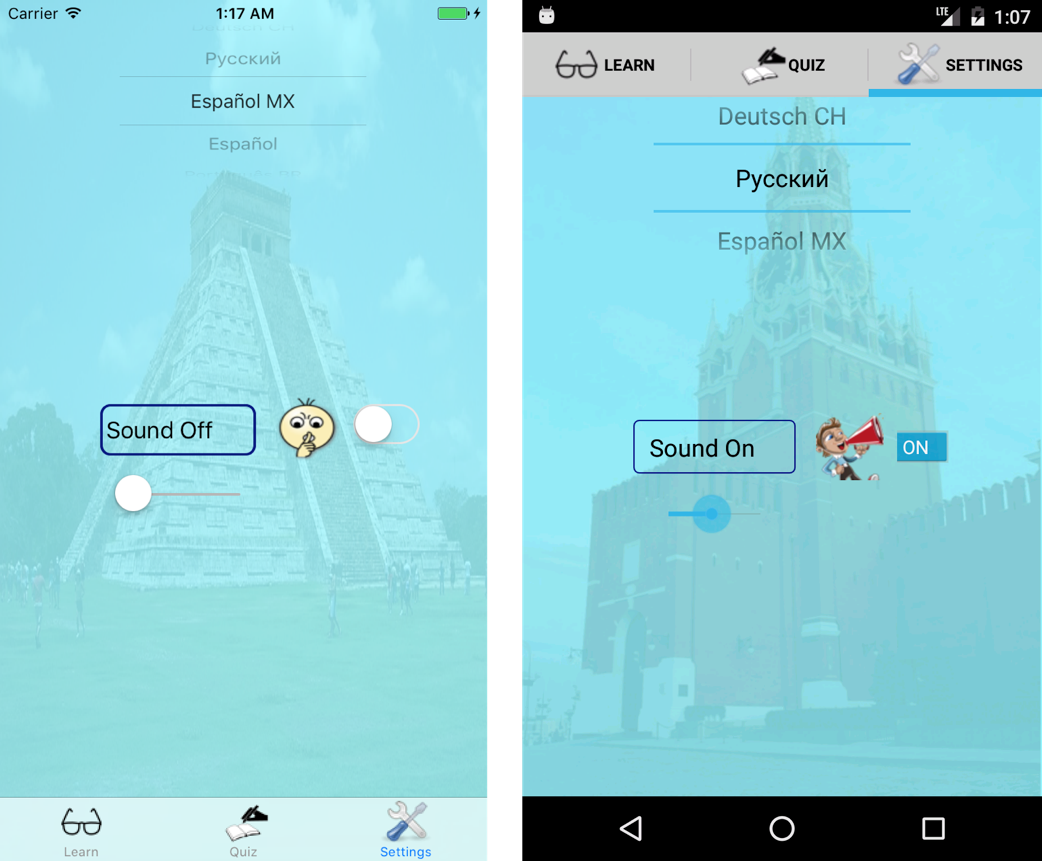
There's a TypePicker on the top: As soon as you change the value there by moving the picker's wheel, a different background image is shown.
Also, there is a Button, an ImageView, a Switcher, and a Slider. As soon as you click the Button, or the Switcher, or change the value of the Slider, the other widgets also change.
Listing 11 shows how it's implemented in CSCS.
Listing 11: Playing with Widgets: CSCS code
sound_clicks = 0;
function sound_click(sender, arg) {
    sound_clicks++;
    if (sound_clicks % 2 == 0) {
        enable_sound();
    } else {
        disable_sound();
    }
}
function enable_sound() {
    SetText(buttonCenterLeft, "Sound On");
    SetImage(imgView, "sound_on");
    SetValue(switch, 1);
}
function disable_sound() {
    SetText(buttonCenterLeft, "Sound Off");
    SetImage(imgView, "sound_off");
    SetValue(switch, 0);
}
function slider_change(sender, arg) {
    if (GetValue(slider) > 1) {
    enable_sound();
    } else {
        disable_sound();
    }
}
function pickerMove(row) {
    SetBackground(countryImages[row]);
}

countryImages = {"us_bg", "gb_bg", "de_bg", "ch_bg", "ru_bg", "mx_bg", "es_bg", "br_bg", "fr_bg", "it_bg", "cn_bg", "jp_bg", "ar_bg"};
countries = {"English US", "English", "Deutsch", "Deutsch CH", "???????", "Español MX", "Español", "Português BR", "Français", "Italiano", "??", "???", "???????"};

locPicker = GetLocation("ROOT", "CENTER", "ROOT", "TOP", 0, -20);
AddWidget("TypePicker", locPicker, "pickerColor", "Picker", 380, 280);
AddWidgetData(pickerColor, countries, "pickerMove");
pickerMove(0);

locCenterLeft = GetLocation("ROOT", "CENTER", "ROOT", "CENTER", -100, 0);
AddButton(locCenterLeft, "buttonCenterLeft", "Sound On", 240, 80);
AddBorder(buttonCenterLeft, 2, 8, "#000080");
AlignText(buttonCenterLeft, "left");
AddAction(buttonCenterLeft, "sound_click");

locCenterRight = GetLocation("ROOT", "CENTER", "ROOT", "CENTER", 100, 0);
AddImageView(locCenterRight, "imgView", "sound_on", 100, 100);

locCenter2 = GetLocation(imgView, "RIGHT", imgView, "CENTER", 20, 0);
AddSwitch(locCenter2, "switch", "1", 80, 80);
AddAction(switch, "sound_click");

locCenterDown = GetLocation(buttonCenterLeft, "CENTER", buttonCenterLeft, "BOTTOM", 0, 20);
AddSlider(locCenterDown, "slider", "0:100", 200, 80);
AddAction(slider, "slider_change");
Finally, Tables 1, 2, and 3 contain all currently available functions for mobile development in CSCS.
I'm sure by the time you read this, there'll be many more functions available: Don't forget to check out my github.com page in the links section.
Wrapping Up
Using the CSCS scripting language, you can write cross-platform applications that run natively on any device.
You can proceed as follows: Download the sample project in the accompanying source code download section and start playing with the script.cscs file there.
The features presented in this article constitute a small fraction of what you can do with CSCS. I plan to expose more advanced topics in the next articles. Some of these future topics are: advanced controls and widgets, in-app purchases, text-to-speech, voice recognition, localization, easy ways of having different layouts in different device orientations, and adding advertising content (like Google AdMob), just to name a few. Everything can be made in CSCS.
But more importantly, it's relatively straightforward to modify the existing functionality of CSCS, or to add new functions.
To add a new function to CSCS, you need to create a class deriving from the ParserFunction class and override its Evaluate method for all of the platforms where you want your script run. Then, you register the new function with the parser, as you've seen in this article.
Another advantage of CSCS is that not all of the code must be written in it, but it can be combined with other code written in C#. For example, you can use CSCS for the pure GUI development. You also saw how you can call a C# function from the CSCS code and virtually eliminate any overhead due to the marshalling by pre-compiling the Reflection functions.
I'm looking forward to getting any feedback you have for programming in CSCS for the mobile development.
Table 1: CSCS Cross-Platform Functions for Adding Widgets
| CSCS Function | Description |
| Get Location(referenceX, relationX, referenceY, relationY, marginX, marginY, parentView) | Creates a location relative to the other widget "referenceX" locations horizontally and "referenceY" vertically. Optionally, additional margins on the X and Y axes can be supplied. If the parentView is specified, the widget is constructed inside of it. |
| AddWidget(type, widgetName, location, initString, width, height) | A generic function to add a widget at a given location with the initialization string and with a given width and height. Particular specializations for different widget types follow. |
| AddView(widgetName, location, initString, width, height) | Adds a UIView on iOS and a RelativeLayout on Android to place additional widgets inside of it. |
| AddButton(widgetName, location, initString, width, height) | Adds a UIButton on iOS and a Button on Android with a given title string from the initString. The button has a border (it can be removed with `AddBorder` function below). |
| AddLabel(widgetName, location, initString, width, height) | Adds a UILabel on iOS and a TextView on Android with a given text string from the initString. |
| AddTextView(widgetName, location, initString, width, height) | Adds a UITextView on iOS and a TextEdit on Android with a given text string from the initString. |
| AddTextEdit(widgetName, location, initString, width, height) | Adds a UITextField on iOS and a TextEdit on Android with a given text hint (or a placeholder in iOS terms) from the initString. |
| AddImagetView(widgetName, location, initString, width, height) | Adds a UIImageView on iOS and an ImageView on Android with a given image filename from the initString. |
| AddSwitch(widgetName, location, initString, width, height) | Adds a UISwitch on iOS and a Switch on Android. The initString argument must be either a 0 or a 1, indicating the initial switch state. |
| AddSlider(widgetName, location, initString, width, height) | Adds a UISlider on iOS and a SeekBar on Android. The initString argument must have format "fromNumber:toNumber", e.g. "0:100". |
| AddStepper(widgetName, location, initString, width, height) | Adds a UIStepper on iOS and two Buttons on Android. The initString argument must have format "fromNumber:toNumber", e.g. "0:100". |
| AddStepper Left(widgetName, location, initString, width, height) | Adds a stepper as in AddStepper but also with the label with the stepper current value on the left of the stepper. |
| AddStepper Right(widgetName, location, initString, width, height) | Adds a stepper as in AddStepper but also with the label with the stepper current value on the right of the stepper. |
| Add Combobox(widgetName, location, initString, width, height) | Adds a UITypePicker on iOS and a Spinner on Android. It can be populated via AddWidgetData and AddWidgetImages functions. |
| Add SegmentedControl(widgetName, location, initString, width, height) | Adds a UISegmentedControl on iOS and either a Switch (for two segments) or buttons on Android. InitString specifies number of segments. |
| AddTypePicker(widgetName, location, initString, width, height) | Adds a UITypePicker on iOS and a NumberPicker on Android. The initString argument is not used. Used together with AddWidgetData. |
| Add ListView (widgetName, location, initString, width, height) | Adds a UITableView on iOS and a ListView on Android. It can be populated via AddWidgetData and `AddWidgetImages` functions. |
Table 2: CSCS Cross-Platform Functions: UI Manipulation
| CSCS Function | Description |
| Add Widget Data(widgetName, data,selectAction) | Adds a list of string data to the widget. Also registers the selectAction CSCS function to be called when an entry is selected. |
| Add WidgetImages(widgetName,images) | Adds a list of images (specified as `image` filenames) to the widget. |
| Add Action(widgetName, callback) | Adds a widget action on `clicking` event. If the widgetName is ROOT, then adds a global action, e.g., for a Tab app is OnTabSelected. |
| A utoScale(scale) | Automatically scales all the widgets according to the display resolution. The scale parameter is optional and it's 1.0 by default. The widgets can be scaled individually as well. |
| Add LongClick(widgetName, callback) | Adds a widget action on a long `clicking` event, i.e., when the user presses and holds for a few seconds. |
| Add Swipe(widgetName, callback) | Adds detection of swiping left, right, up, and down. Calls callback, passing as an argument what type of the `swipe` event happened. |
| Add DragAndDrop(widgetName, callback) | Adds drag and `drop` functionality. Moves widget till the finger is lifted. |
| Add Border(widgetName, width, corner, color) | Adds a border around a widget. If the width is 0, removes existing border. The color is optional and is black by default. |
| AddTab(tabName, activeImage, inactiveImage) | Adds a tab to the app with corresponding active and inactive images. |
| `GetSelectedTab()` | Returns index of a tab that is active in the running app. |
| SelectTab(index) | Programmatically activates a tab. |
| AlignText(widgetName, alignType) | Aligns text according to the alignType, which can be left, right, center, justified, fill or natural. |
| GetText(widgetName) | Returns widget's text. |
| SetText(widgetName, text) | Sets text to the widget. |
| GetValue(widgetName) | Returns widget value (an integer, Boolean, or a double). |
| SetValue(widgetName, value) | Sets value to the widget (an integer, Boolean, or a double). |
| SetImage(widgetName, imageFile) | Sets image on a widget. |
| SetBackground(imageFile) | Sets background image on the root view. |
| SetBackgroundColor(widgetName, color) | Sets background color on a widget. If the widget name is ROOT, sets background color on the root view. |
| SetSize(widgetName, width, height) | Sets widget's height and width. |
| SetFontSize(widgetName, fontSize) | Sets the font size of a widget. |
| ShowView(widgetName) | Shows a widget (or a view / layout). |
| HideView(widgetName) | Hides a widget (or a view / layout). |
| Move(widgetName, x, y) | Moves a widget x pixels right and y pixels down (for a negative, x moves it left and for a negative y, moves it up). |
| RemoveView(widgetName) | Removes passed view (or widget name) from the layout. |
| `RemoveAllViews()` | Removes all views from the layout. This can be used on the orientation change, when rebuilding the layout. |
Table 3: CSCS Cross-Platform not GUI Modification Related Functions
| CSCS Function | Description |
| CallNative(methodName, argName, argValue) | Calls a native C# method, having given parameters. The C# method has one string argument and returns a string. |
| GetRandom(limit,numberOfValues) | A pseudo-random number generator returning a list of generated numbers between 0 and limit (exclusive limit). |
| ShowToast(message, duration, bg_color, fg_color) | Shows a Toast on Android and a custom Toast implementation on iOS. The last two parameters are optional. |
| AlertDialog(type, title, message, button1, action1, button2, action2) | Shows an alert dialog to the user. The last three parameters are optional; the dialog is dismissed if there is no action. |
| Speak(phrase, voice, rate, pitch) | Adds Text-To-`Speech` functionality. Only phrase is a mandatory parameter. The default voice is "en-US". The speech rate and pitch are between 0 and 1. |
| VoiceRecognition(callback, voice) | Starts voice recognition and calls the `callback` function on completion, passing the recognized phrase as an argument. The default voice is "en-US". |
| ReadFile(filename) | `Reads` file form the device assets directory. Returns a list of lines of that file. |
| Schedule(timeout, callback, timerId) | Schedule execution of the `callback` function after the timeout milliseconds on the main GUI thread. The timerId is passed as an argument to the callback. |
| GetSetting(settingName, type, defaultValue) | Gets setting value from the device settings settings. Type can be "float", "int", "string" or "bool". The defaultValue is optional. |
| SetSetting(settingName, value, type) | Saves passed setting on the device so that later it can be retrieved by the `GetSetting()` function. |
| `GetDeviceLocale()` | Returns the language locale of the device. |
| Set App Locale(localeName) | Sets the locale of the app. Used closely with the `Localized()` function. The expected format of the localeName is "en-US", "es-MX", etc. |
| Localize(text, language) | Localizes passed text to the current program language (by default device language). If an optional parameter "language" is set, localizes to that language. |
| InitIAP(publicKey) | Initializes In-App Purchase (Billing) service, connecting to the Apple App Store or to the Google Play Store. |
| Restore(callback , productId1, productId2, ...) | Checks if given products have been purchased before, connecting to the Apple App Store or to the Google Play Store. |
| Purchase(callback, productId) | Purchases a product with the given product ID, connecting to the Apple App Store or to the Google Play Store. |
| InitAds(appId, interstitialId, bannerId) | Inits the Google AdMob advertisement framework with the initialization parameters, previously requested at https://www.google.com/admob |
| Add Banner(widgetName, location, bannerType) | Adds a BannerView on iOS and an AdView on Android for the Google AdMob network. The bannerType can be either SmartBanner, MediumRectangle, Banner, LargeBanner, FullBannner, or Leadeboard. |
| `ShowInterstitial()` | Shows an interstitial (full screen) advertisement from the Google AdMob network. |
| OnOrientationChange(callback) | Calls the `callback` function when there's a widget orientation change, passing as a parameter the new orientation (portrait or landscape). |
| Orientation | Current device orientation (e.g. Landscape or Portrait). |
| DisplayWidth | Returns the width of the display in pixels. |
| DisplayHeight | Returns the height of the display in pixels. |
| _ANDROID_ | Returns `true` if and only if the current code is being executed on an Android device. |
| _IOS_ | Returns `true` if and only if the current code is being executed on iOS. |
| _VERSION_ | Returns version of the smartphone operating system. |
