


Inheritance is the single most important new object-oriented feature in Visual Studio.NET.
Surprisingly, not much has been written about the subject, and most of the information available is either very basic and an “overview” at best, or just plain misleading. In this article, I give you a real-world overview of what inheritance ? especially visual inheritance ? can do for you.
Inheritance is a key concept for a language or environment to be considered truly object-oriented, rather than just object-based. In previous versions of Visual Studio (up to version 6.0), Microsoft made inheritance available in languages such as Visual C++, Visual FoxPro and Visual J++, but not in Visual Basic. This means that the majority of Microsoft's developer community is in for a major paradigm shift.
This article will help make the transition as smooth as possible for you. Unlike the `` descriptions in most .NET books and articles, inheritance is relatively simple. I recently read several articles that make statements like, “Free Threading and Inheritance are powerful features, but a lot of Visual Basic developers will shoot themselves in the foot applying these technologies incorrectly.” While I agree with this statement for the Free Threading feature, I have to disagree with the inheritance part. Visual Basic developers who are already familiar with object-based development face a steep, but fairly short learning curve. C++ and Visual FoxPro developers moving into VB.NET or C# will be able to make this move painlessly.
In this article, we will create a base data entry form class that provides some standard features. We will subclass this class to create individual data entry forms. Beyond that, we will create specialized subclasses of the subclassed data entry forms. We will create all examples in Visual Basic.NET and C#.
Inheritance is a feature provided by the Common Language Runtime (CLR) and is, therefore, not language specific. As you will see, all the concepts are available in a similar fashion in both languages, although the syntax is slightly different. All our examples will have methods that would in real life normally provide a lot of functionality (such as saving information). However, we will focus our attention on the Inheritance part of this, and will simply represent all other code with message boxes, so we can easily see what's going on in our code.
Creating a Base Data Entry Form Class
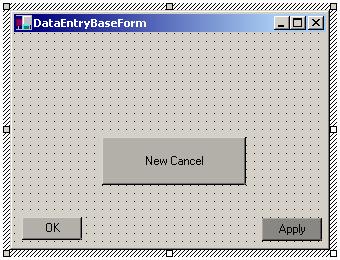
The basic scenario is simple: We want to create a base data entry form class that provides OK, Cancel and Apply buttons. Those buttons will trigger Save() and Cancel() methods. The base class itself is not designed to be used for data entry - we will use subclasses (classes based on the base class) for that. Visual Basic developers can imagine the base form like a “template on steroids.” Figure 1 shows what our base data entry form class looks like.
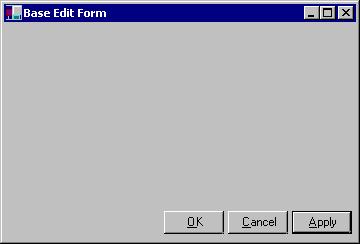
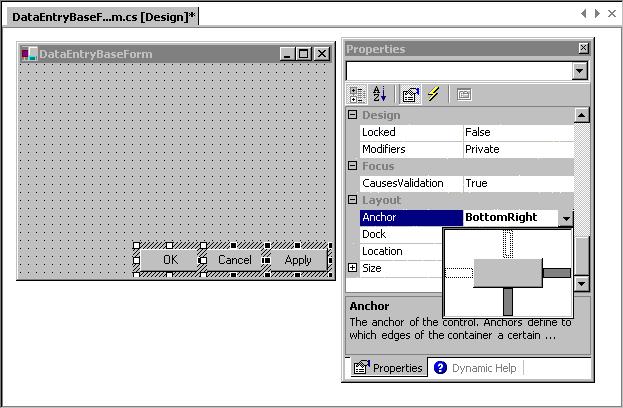
To create this class, create a new WinForms project (C# or VB.NET). This will automatically create a default form for you. You could use this form and turn it into our base form, but I used mine only as a test-bench to test our classes. To add the real class, right-click the solution in the Solution Explorer (I named my solutions CSInheritanceSample and VBInheritanceSample) and select “Add Windows Form.” As the name, use “DataEntryBaseForm”. Add three new buttons to the form (as shown in Figure 1) and set the names to cmdOK, cmdCancel and cmdApply. To make our form always look nice, we would like the buttons to maintain their position relative to the bottom-right edge of the form. In Visual Studio 6 languages (pretty much all of them), we would have needed to write manual resize code. In Visual Studio.NET, we can simply set the Anchor property to “BottomRight” (see Figure 2).
In addition, we add two methods to the form: Cancel() and Save(). The buttons on the form will call those methods. In this example, those methods don't do anything by default but show a message box. The idea is that we could later add code to these methods in the base class to automatically provide inherited save and cancel functionality in the subclasses. Or, we could override or augment the base class methods by adding code in the subclasses. But, I'm getting ahead of myself. Let's look at the base form class code first. Here is the C# version:
namespace CSInheritanceSample
{
   using System;
   using System.Drawing;
   using System.Collections;
   using System.ComponentModel;
   using System.WinForms;

   public class DataEntryBaseForm : System.WinForms.Form
   {
      private System.ComponentModel.Container components;
      private System.WinForms.Button cmdOK;
      private System.WinForms.Button cmdCancel;
      private System.WinForms.Button cmdApply;

      public DataEntryBaseForm()
      {
         InitializeComponent();
      }

      public override void Dispose()
      {
         base.Dispose();
         components.Dispose();
      }

      private void InitializeComponent()
      {
         this.components = new System.ComponentModel.Container ();
         this.cmdOK = new System.WinForms.Button ();
         this.cmdApply = new System.WinForms.Button ();
         this.cmdCancel = new System.WinForms.Button ();
         cmdOK.Location = new System.Drawing.Point (120, 185);
         cmdOK.Size = new System.Drawing.Size (60, 23);
         cmdOK.TabIndex = 2;
         cmdOK.Anchor = System.WinForms.AnchorStyles.BottomRight;
         cmdOK.Text = "&OK";
         cmdOK.Click += new
         System.EventHandler (this.cmdOK_Click);
         cmdApply.Location = new System.Drawing.Point (248, 185);
         cmdApply.Size = new System.Drawing.Size (60, 23);
         cmdApply.TabIndex = 0;
         cmdApply.Anchor = System.WinForms.AnchorStyles.BottomRight;
         cmdApply.Text = "&Apply";
         cmdApply.Click += new System.EventHandler (this.cmdApply_Click);
         cmdCancel.Location = new System.Drawing.Point (184, 185);
         cmdCancel.Size = new System.Drawing.Size (60, 23);
         cmdCancel.TabIndex = 1;
         cmdCancel.Anchor = System.WinForms.AnchorStyles.BottomRight;
         cmdCancel.Text = "&Cancel";
         cmdCancel.Click += new System.EventHandler (this.cmdCancel_Click);
         this.Text = "DataEntryBaseForm";
         this.AutoScaleBaseSize = new System.Drawing.Size (5, 13);
         this.ClientSize = new System.Drawing.Size (312, 213);
         this.Controls.Add (this.cmdOK);
         this.Controls.Add (this.cmdCancel);
         this.Controls.Add (this.cmdApply);
      }

      protected void cmdApply_Click (object sender, System.EventArgs e)
      {
         this.Save();
         cmdApply.Enabled=false;
      }

      protected void cmdCancel_Click (object sender, System.EventArgs e)
      {
         this.Cancel();
         this.Close();
      }

      protected void cmdOK_Click (object sender, System.EventArgs e)
      {
         this.Save();
         this.Close();
      }

      public void Save()
      {
         MessageBox.Show("Base Form Save");
      }

      public void Cancel()
      {
         MessageBox.Show("Base Form Cancel");
      }
   }
}
And, here is the Visual Basic.NET version:
Imports System.Drawing
Imports System.WinForms
Imports System.ComponentModel
Public Class DataEntryBaseForm
   Inherits System.WinForms.Form

   Public Sub New()
      MyBase.New
      DataEntryBaseForm = Me

      'This call is required by the
      ' Win Form Designer.
      InitializeComponent()
   End Sub

   'Form overrides dispose to clean
   ' up the component list.
   Overrides Public Sub Dispose()
      MyBase.Dispose
      components.Dispose
   End Sub

   #Region " Windows Form Designer code "
   'Required by the Windows Form Designer
   Private components As System.ComponentModel.Container
   Private WithEvents cmdApply As System.WinForms.Button
   Private WithEvents cmdCancel As System.WinForms.Button
   Private WithEvents cmdOK As System.WinForms.Button

   Dim WithEvents DataEntryBaseForm As System.WinForms.Form

   Private Sub InitializeComponent()
      Me.components = New System.ComponentModel.Container()
      Me.cmdOK = New System.WinForms.Button()
      Me.cmdApply = New System.WinForms.Button()
      Me.cmdCancel = New System.WinForms.Button()

      cmdOK.Location = New System.Drawing.Point(416, 200)
      cmdOK.Size = New System.Drawing.Size(75, 23)
      cmdOK.TabIndex = 0
      cmdOK.Text = "OK"

      cmdApply.Location = New System.Drawing.Point(248, 200)
      cmdApply.Size = New System.Drawing.Size(75, 23)
      cmdApply.TabIndex = 2
      cmdApply.Text = "Apply"

      cmdCancel.Location = New System.Drawing.Point(328, 200)
      cmdCancel.Size = New System.Drawing.Size(75, 23)
      cmdCancel.TabIndex = 1
      cmdCancel.Text = "Cancel"
      Me.Text = "DataEntryBaseForm"
      Me.AutoScaleBaseSize = New System.Drawing.Size(5, 13)
      Me.ClientSize = New System.Drawing.Size(504, 237)

      Me.Controls.Add(cmdApply)
      Me.Controls.Add(cmdCancel)
      Me.Controls.Add(cmdOK)
   End Sub

   #End Region

   Protected Sub cmdOK_Click(ByVal sender As Object, ByVal e As System.EventArgs)
      Me.Save()
      Me.Close()
   End Sub

   Protected Sub cmdCancel_Click(ByVal sender As Object, ByVal e As System.EventArgs)
      Me.Cancel()
      Me.Close()
   End Sub

   Protected Sub cmdApply_Click(ByVal sender As Object, ByVal e As System.EventArgs)
      Me.Save()
      cmdApply.Enabled = False
   End Sub

   Public Sub Save()
      MessageBox.Show("Base Form Save")
   End Sub

   Public Sub Cancel()
      MessageBox.Show("Base Form Cancel")
   End Sub
End Class
As you can see, both versions have quite a bit of code, but most of it has been created automatically. What's really important are the class definition and the methods we've added. Let's look closely at that part of the code in C#:
public class DataEntryBaseForm : System.WinForms.Form
{
   public void Save()
   {
      MessageBox.Show("Base Form Save");
   }

   public void Cancel()
   {
      MessageBox.Show("Base Form Cancel");
   }
}
The Visual Basic.NET syntax is different, but the overall concept is the same:
Public Class DataEntryBaseForm
   Inherits System.WinForms.Form

   Public Sub Save()
      MessageBox.Show("Base Form Save")
   End Sub

   Public Sub Cancel()
      MessageBox.Show("Base Form Cancel")
   End Sub
End Class
Here's what's happening: First of all, we create a new class named “DataEntryBaseForm”. This class is subclassed from System.WinForms.Form, which is the .NET standard form class. This means that our new class will have everything a standard form has, and it will behave the same way any other form behaves. Basically, we have a class that is a form ? a specialized version of a form perhaps, because we added two methods, but still a form. If Microsoft decides that forms are to behave or look differently and changes “System.WinForms.Form”, our new form will automatically behave and look the same way, because it is a form. For this reason, subclassing relationships are often called “is-a” relationships.
One of the key things here is that this was easy! We didn't really do anything special, and Visual Studio.NET took care of everything for us. And even if it didn't, it wouldn't have been hard to write the same class from scratch. Inheritance is simple!
You may now point out that there are quite a number of lines in the first listing of that code. That is true. But, as mentioned before, this is all code generated for us by Visual Studio.NET. The majority of the code deals with adding buttons, setting properties and adding event-handling code.
Talking about event handling code, I still owe you an explanation for how the Save() and Cancel() methods are called. To add event code to a button click method, we can double-click the button, and Visual Studio.NET sets up all the required bindings. The click event of the OK button is linked to the code that reacts to the event in the following fashion (as always, the C# version first):
cmdOK.Click += new System.EventHandler (this.cmdOK_Click);
And, in VB.NET:
Private WithEvents cmdOK As System.WinForms.Button
Basically, the click event points to the cmdOK_Click() method, which is a member of the current form. The system event handler is used to bind the two things together. As mentioned before, you don't really have to create this code since Visual Studio.NET does it for you, but it still doesn't hurt to know what's going on (as we will see a little further down).
Here's the C# code in the cmdOK_Click() event:
protected void cmdOK_Click (object sender, System.EventArgs e)
{
   this.Save();
   this.Close();
}
Visual Basic.NET:
Protected Sub cmdOK_Click(ByVal sender As Object, ByVal e As System.EventArgs)
   Me.Save()
   Me.Close()
End Sub
The code is really trivial. First, the save method is called, then the form is closed. (You might argue that we should check whether we saved successfully, but this isn't really relevant at the moment, as we are trying to understand the concepts of inheritance.)
Visual FoxPro people might be slightly confused at this point, since we can talk to the Save() method using the “this/Me” pointer (which, by the way, is optional in Visual Studio.NET) rather than using the equivalent to Visual FoxPro's THISFORM or THIS.Parent. The main difference here is that Visual FoxPro encapsulates the event code in the object that fires the event, while .NET points the object to a method in the actual form. Therefore, the Save() and Close() methods are actually members of the same object as the event method. This may be bad design on one hand, since object purists would point out that code that belongs to the button object should be a member of the button object. On the other hand, the event handling code defined on the form level can see protected methods of the form (see below), which promotes good design. In Visual FoxPro, methods that should be protected very often end up as public just to allow members access.
OK, at this point we are ready to test our base form class. As mentioned above, I use the default form created when I added a new project as my test bench, and I recommend you do the same. Just add a button to the form and put the following code in the click event. Again, C# first:
DataEntryBaseForm oBase = new DataEntryBaseForm();
oBase.Show();
The Visual Basic.NET version is very similar:
Dim oBase As New DataEntryBaseForm()
oBase.Show()
Note that there is a “gotcha” for Visual Basic developers here. Unlike Visual Basic 6, where all forms can just be shown (which is kind of weird, when you think about it), .NET requires the object to be created before it can be displayed.
Run your app, and click the Save button. As expected, a message box that says “Base Form Save” appears.
Creating a Customer Edit Form Class
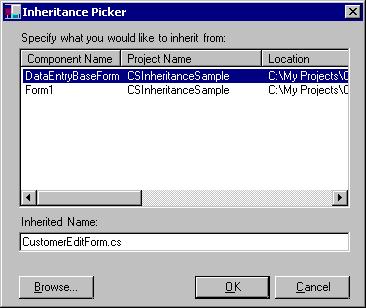
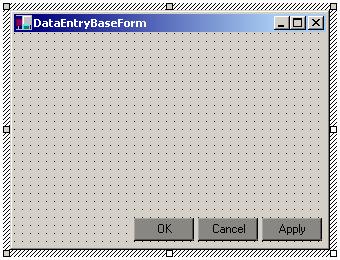
So far, so good. We are now ready to create individual subclasses. Right-click your solution in the Solution Explorer and select “Add Inherited Form”. Specify a name for the new form class (CustomerEditForm). In the dialog shown in Figure 3, pick DataEntryBaseForm. Double-click the new form in the Solution Explorer to edit it. Figure 4 shows the subclassed form in edit mode. Note that this form automatically shows three buttons, although we have not added any buttons to the form. Those three buttons have been inherited from the parent class. This is indicated by the darker background color of the inherited buttons (we will talk about this a little more further down). Here's the code (as always, first in C#) that was generated for us:
namespace CSInheritanceSample
{
   using System;
   using System.Collections;
   using System.Core;
   using System.ComponentModel;
   using System.Drawing;
   using System.WinForms;

   public class CustomerEditForm : CSInheritanceSample.DataEntryBaseForm
   {
      private System.ComponentModel.Icontainer components;

      public CustomerEditForm()
      {
         InitializeComponent();
      }

      // Form overrides dispose to clean up the component list.
      public override void Dispose()
      {
         base.Dispose();
         components.Dispose();
      }

      private void InitializeComponent()
      {
         components = new System.ComponentModel.Container();
      }
   }
}
The Visual Basic version is very similar:
Imports System.ComponentModel
Imports System.Drawing
Imports System.WinForms

Public Class CustomerEditForm
   Inherits VBInheritanceSample.DataEntryBaseForm

   Public Sub New()
      MyBase.New
      CustomerEditForm = Me

      ' This call is required by the WinForm Designer.
      InitializeComponent
   End Sub

   ' Form overrides dispose to clean up the component list.
   Overrides Public Sub Dispose()
      MyBase.Dispose
      components.Dispose
   End Sub

   #Region " Windows Form Designer code "
      'Required by the WinForm Designer
      Private components As System.ComponentModel.Container

      Dim WithEvents CustomerEditForm As VBInheritanceSample.DataEntryBaseForm

      Private Sub InitializeComponent()
         components = New System.ComponentModel.Container
      End Sub
   #End Region
End Class
None of this code really does anything for us. We could now add new code to this form, but the key is that we don't have to. Add another button to your test bench form and instantiate the new class with the following code:
CustomerEditForm oCustomer = new CustomerEditForm();
oCustomer.Show();
Visual Basic:
Dim oCustomer As New CustomerEditForm()
oCustomer.Show()
When you run the form, you will see that it behaves just like the original form, including all the message boxes.
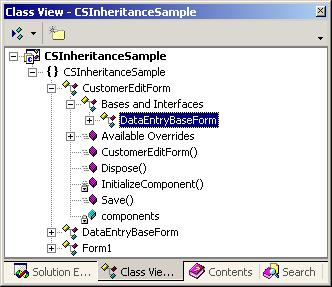
Note that you can also see the inheritance structure in the Class View Window (Figure 5). Visual Studio.NET displays parent classes as sub-items in the tree, which is somewhat against common sense, since the items we refer to as “child classes” are parent nodes in the tree. But, I guess we'll get used to it.
Adding new behavior in C#
We can now extend the form's behavior by overriding methods in the subclass. This is done slightly differently in C# than in Visual Basic.NET. We will first take a look at the C# version. Add the following code to the CustomerEditForm C# class:
public void Save()
{
   MessageBox.Show("Subclassed Save");
}
The method is almost identical to the method in the base class, with the exception of the text displayed in the message box. However, when we compile and run the form, we still see the old behavior and not the new message box. The problem is that the compiler looks at the code in the button event of the parent class and says "OK, we are calling the Save() method, so lets compile in the Save() method of the DataEntryBaseForm class…", which is correct logic, since the code that calls the method sits in the DataEntryBaseForm class. If we were to directly call the Save() method right in the code where we create the form, everything would work as expected:
CustomerEditForm oCustomer =  CustomerEditForm();
oCustomer.Show();
oCustomer.Save();
The reason this works is that the compiler sees that we want to use the Save() method of the customer form, and compiles it in as expected. What we really want, however, is a runtime decision about which code to run - not a compile-time decision. We can force the compiler to do so by using a “virtual” method, explained in detail below. For now, let's modify the method in the parent class (DataEntryBaseForm) as follows:
public virtual void Save()
{
   MessageBox.Show("Base Form Save");
}
This tells the compiler to be a bit more careful when coming up with the compiled version of this code and to delay the decision about which code to call until the code is executed. In other words, we have now designed this method to be changed in subclasses. Since we have done that, the compiler requires an explicit indication of our desire to override the Save() method in the subclass, to avoid accidental override of significant behavior:
public override void Save()
{
   MessageBox.Show("Subclassed Save");
}
Now, the compilation will work just fine, and we can execute the new form.
When you click the OK or Apply button, the new message box will be displayed. In a real-world scenario, we would add more significant code, of course. Perhaps we would call a business object to save information, or we could even do some verifications right in the Save() method.
We have just customized the original form by redefining behavior in the subclass. Of course, at this point, we've lost all behavior defined in the parent class (the terms “super class” and “parent class” can be used interchangeably and describe the class the current class inherits from). To also invoke the original behavior (known as the “default behavior”), we have to specifically invoke it. We can do so in our subclass in the following manner:
public override void Save()
{
   MessageBox.Show("Subclassed Save");
   base.Save();
}
The “base” pointer always refers to the parent class. When we run this code, both message boxes are displayed. First, the new one, and then the one from the base class. We could have changed the order by making the call to the parent class first:
public override void Save()
{
   base.Save();
   MessageBox.Show("Subclassed Save");
}
In fact, you could have made the call to the default behavior dependent on some condition:
public override void Save()
{
   MessageBox.Show("Subclassed Save");
   if (false)
   {
      base.Save();
   }
}
Obviously, “false” would be replaced by a real condition.
Calling the default behavior can be very important. It gives us the freedom to easily add behavior to the parent class. For this reason, I always call the default behavior unless I know for a fact that I want to override it. This is true even if there is no code in the default method (which would always be the case in an abstract class, but it could also be the case in any other class). After all, we might just want to add new behavior later on. If you forgot to call the default behavior, you would have to go back through all your code and add the call. This would not just be a lot of work, but it's also a major threat to overall project quality. For this reason, I would make the call to the base class a habit.
Here's an example: Let's imagine we want to add information to a log file every time information is saved (we will simulate this with… you guessed it… a message box). We can easily do this by adding the following code to the DataEntryBaseForm class:
public virtual void Save()
{
   MessageBox.Show("Logging Information...");
   MessageBox.Show("Base Form Save");
}
Now, run the customer edit form, and you will see that the OK and Apply buttons now trigger 3 message boxes, although we've didn't change anything in the subclass. That's the power of inheritance!
Adding new behavior in Visual Basic.NET
As mentioned before, the Visual Basic.NET version is a little bit different. The main difference is that in Visual Basic.NET, all methods are virtual (just like in Visual FoxPro, by the way). This has implications as described in the “Virtual Methods” sidebar. However, we still have to define a new method that specifically overrides the parent method, and we still have to define the parent method as “overridable”. Here is the method in the DataEntryBaseForm class:
Public Overridable Sub Save()
   MessageBox.Show("Base Form Save")
End Sub
And, here is the method in the subclass:
Public Overrides Sub Save()
   MessageBox.Show("Subclassed Save")
End Sub
You can compile and run this form (add a reference to the test bench form so you can launch the new form). When you click the OK button, you will see the new message box only, just like in the C# sample. To also call the method in the parent class, add the following code to the subclass:
Public Overrides Sub Save()
   MessageBox.Show("Subclassed Save")
   MyBase.Save()
End Sub
Just like in the C# sample, you could rearrange the order or make the call to the base class (in VB the reference is called MyBase) dependent on some condition.
Virtual Methods
So, what exactly was the difference between the C# and the VB.NET implementation? And what exactly are “Virtual Methods”?
To answer this question, we will have to take another look at the C# example. We created the customer form with the following code (and we could have called the Save() method right away since it is a public method):
CustomerEditForm oCustomer = new CustomerEditForm();
oCustomer.Save();
We created a reference of type CustomerEditForm and used the “new” operator to create the form. We could have also written it this way:
DataEntryBaseForm oCustomer = new CustomerEditForm();
oCustomer.Save();
In this case, the reference is of type DataEntryBaseForm. However, this reference is capable of holding a reference to the customer form, since the CustomerEditForm class is-a DataEntryBaseForm.
Now, let's think about what the compiler does in this scenario. It sees we want to create a DataEntryBaseForm type class and we also want to call the Save() method. So, the compiler says “OK, one Save() method coming right up…” and compiles in the code defined in the Save() method of the DataEntryBaseForm (since this is the type of the reference). This will result in high performance code, but will also result in the wrong behavior, as far as we are concerned. We don't want the compiler to make the decision during compilation, but we want to call the appropriate method during runtime, depending on what object we actually instantiate. That's what's called a “virtual” method. We indicate a virtual method to the compiler by adding the “virtual” keyword in C#. In Visual Basic.NET, all methods are virtual (note that this may result in slower code in case we don't want virtual methods, although it's not very likely that we would want that).
Multi-Level Subclassing
At this point, Visual Basic 6 developers might say “OK, that's nice, but I don't see the big deal here. After all, this is similar to templates, with the exception that we can also add some code.” Well, that's not quite correct, because we could now use the CustomerEditForm and subclass it to another level. This is very useful. Perhaps we have a client who likes our application, but would like the CustomerEditForm to look and/or behave differently. Rather than writing another customer edit form, we can simply subclass the CustomerEditForm and change only what the client wants. This keeps the general implementation easy to maintain, even if we have lots of specialized customer edit forms. The code for this would look just like the code we've already created. Imagine we want to create a customer edit form with an additional logo. Here's the code for that (C#):
public class CustomerEditFormWithLogo : CSInheritanceSample.CustomerEditForm
{
   // Code goes here..
}
Or, in Visual Basic.NET:
Public Class CustomerEditFormWithLogo
   Inherits VBInheritanceSample.CustomerEditForm
   ' Code goes here...
End Class
You can do this over as many levels as you want, although based on my own experience, it starts to get a bit confusing after more than 5 to 7 levels of subclassing.
Also, keep in mind that we can subclass more than just the form. Perhaps we might subclass some textbox classes to use on the form. Imagine that we want the “Apply” button to be enabled only after changes have been made in at least one of the textboxes. We could create a textbox subclass that sets the enabled state of the “Apply” button after the first modification, then base our form's textboxes on that subclass. Without that special textbox class, we would have to add that code to each textbox. What a nightmare!
In many object-oriented languages, developers hardly ever use standard classes, such as a plain textbox. All those classes are usually subclassed into a developer's (or project's) own set of classes, allowing him to change behavior and visual characteristics across the project by making the change in one place, and one place only.
We will see whether this becomes common practice in .NET, as well…
What “Scope” does to Subclassing
So far, all our example methods (Save and Cancel) were Public methods. This means that anybody can call those methods from anywhere (as long as a reference to the object is available). In Visual Basic 6, there also are “Private” methods. Those methods are visible only from within the class where they are defined (for Visual FoxPro developers, this is the same as “Hidden”). Private is available in .NET as well, but in most scenarios, “Protected” makes more sense. A protected method (or property) is protected from outside access just like a private member, but it can also be accessed in subclasses. This is usually very desirable, because it protects the class from improper use, yet does not force us to sacrifice flexibility in our subclasses.
Note: The scope could also be “Internal” or “Protected Internal”, which generally are similar to “Public” and “Protected”, with the scope limited to the current namespace. This, in essence, is the equivalent to “friendship” scenarios used in other environments. (As you can see, most object-oriented concepts are available in similar fashion on all object-oriented environments, but the vocabulary used can be quite different.)
Scope can also be applied to member objects. As we saw in Figure 4, the button objects couldn't be modified in the subclass because they were “private” objects. You can go back to the DataEntryBaseForm class and change the Modifier property of the “OK” and “Cancel” buttons to “Protected”. Now, go back to the CustomerEditForm class and edit it (note that you will have to compile the project to make the change show up in the child class ? Visual FoxPro developers, I feel your pain). You will now see the form as in Figure 6. It may be a little hard to see, but the gray shade of the “OK” and “Cancel” buttons is slightly lighter than the “Apply” button, which is still “Private”. Since we have access to “protected” members inside the subclass, we can change properties and even code attached to those objects.
Conclusion
Inheritance is a rather simple mechanism that's relatively easy to learn, although it requires a change in the developer's thought processes. To me, inheritance is one of the most important new features in .NET ? especially in Visual Basic.NET. Trust me, folks. Once you get used to inheritance, it will be hard for you to ever imagine creating a serious software project without it.
Markus Egger
