


In previous issues of Component Developer Magazine, we have introduced technologies such as Queued Components, COM+ Security, Loosely Coupled Events, SQL Server 2000 and BizTalk Server.
Each of these represents a fascinating myriad of possibilities. But, how do you put all of them together to build a real-life, highly reliable, 100% available distributed application?
In this article, I will take you through the steps of building a small application from start to finish. Since I don't want to turn this into a novel, I chose a relatively simple scenario that allows employees to order supplies from various vendors. Our little application will store all items and orders in a SQL Server database, which we will access using SQL Server 2000's XML features. A core business object will handle all communication with the database. This business object is a COM+ Component, running in a secure environment with COM+ Security. To ensure flexibility, our business object will fire loosely coupled events that could be used in the future to extend the system.
When a user attempts to place an order, COM+ Security will determine whether or not the user is allowed to place an order, and if so, will make sure the order amount is within the user's limits. If the user is allowed to place the order, we will utilize Microsoft BizTalk Server 2000 to communicate with the appropriate vendor, placing the order in a fully automated fashion.
I will illustrate several different ways of interacting (interfacing) with this system. First of all, we will provide a rich client implemented as a regular Windows form. Each user who wants to use this interface will have to run a small setup program to install the client application on his computer.
This extra step adds a very important ability: It allows us to use Queued Components to communicate with the server, even if the client application is on a notebook computer that is temporarily disconnected from the server.
While the rich client solution is great for those who use our system a lot, it is somewhat inconvenient for employees who use the system on an irregular basis. We do not want to make these people go through the setup routine. Instead, we will provide a web interface they can use by simply navigating with their web browser. Although this requires connectivity to use the system, it's a great solution for employees who don't travel and don't have the need to place orders while disconnected.
I'm sure you can envision a number of other possible interfaces for this application, such as wireless devices and a voice interface. I do not intend to provide those interfaces here, but I will design the system to be open for people who want to write those interfaces. For this reason, we could make the business object available as a Web Service. However, due to space limitations, I won't be able to cover that in this article. (If you are interested in Web Services, see Rick Strahl's article in the Issue 1 - 2001 issue.)
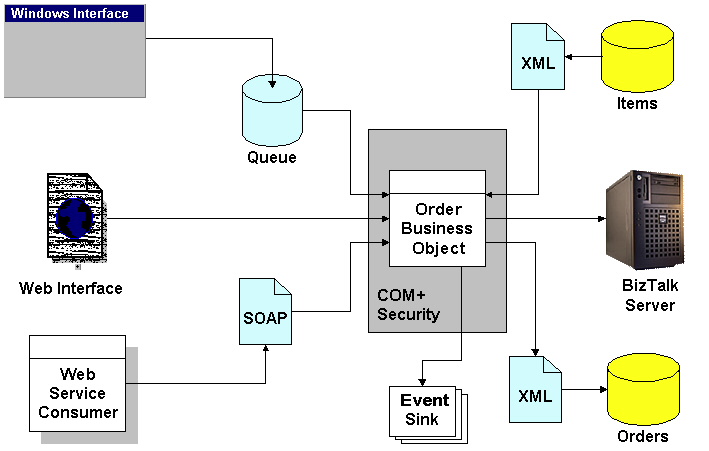
Figure 1 provides an overview of the system architecture.
Creating the Business Object
Since the heart of our application is the business object, we will start by coding this part. I will keep this simple, creating an object with two methods: one to retrieve a list of items that can be ordered, and another to place the order.
Here is the Visual Basic version of this component:
Public Function PlaceOrder(ItemID As String, _
   Quantity As Integer,_
   Total As Integer) As String

   ' We use COM+ security to see whether the
   ' current user is a manager...
   Dim oContext As ObjectContext
   Dim oSecContext As SecurityCallContext
   Set oContext = GetObjectContext()

   If Not oContext.IsSecurityEnabled() Then
      PlaceOrder = "<result type='failure'>"+ _
         "<error>Security leak!</error></result>"
      Exit Function
   End If

   Set oSecContext = GetSecurityCallContext()

   ' We check whether the order is over $5000...
   If Total > 5000 Then
      ' Managers can place orders of any size
      If Not oSecContext.IsCallerInRole("Managers") Then
         PlaceOrder = "<result type='failure'><error>"+ _
            "Total amount too large for "+ _
            "non-managers!</error></result>"
         Exit Function
      End If
   End If

   ' We finally place the order using a queued component
   Dim oPO As Object
   Set oPO = _
      GetObject("queue:PathName=EPS\PRIVATE$\Demo"+ _
      "/new:DistDemoQueue.PO")
   oPO.PlaceOrder ItemID, Quantity, _
      oSecContext.Item("AccountName")

   PlaceOrder = "<result type='Success'/>"
End Function

Public Function GetItems() As String
   ' We use the XMLDOM for connectivity
   Dim oXML As Object
   Set oXML = CreateObject("Microsoft.XMLDOM")
   oXML.Async = False

   ' We use the SQL 2000 template to
   ' retrieve the information
   oXML.Load (Http://markusnotebook/sqldemo/ _
      "template/items.xml")
   GetItems = oXML.XML
End Function
And, here we go with the Visual FoxPro implementation, using VFP7's new strong-typing syntax:
DEFINE CLASS OrderSystem AS Session OLEPublic
   FUNCTION PlaceOrder (ItemID AS String,;
      Quantity AS Integer,;
      Total as Integer) AS String

      IF PARAMETERS()<3
         RETURN [<result type="failure"><error>Parameters]+;
             [ not optional!</error></result>]
      ENDIF

      ** We use COM+ security to see whether the
      ** current user is a manager...
      LOCAL oCOMP, oContext, oSec, oSecContext
      oCOMP = CreateObject("MTXAS.AppServer.1")
      oContext = oCOMP.GetObjectContext()
      IF NOT oContext.IsSecurityEnabled()
         RETURN [<result type="failure"><error>Security ]+;
            [leak!</error></result>]
      ENDIF

      oSec = CreateObject("COMSVCSLib.GetSecCallCtx.1")
      oSecContext = oSec.GetSecurityCallContext()

      ** We check whether the order is over $5000...
      IF Total > 5000
         ** Managers can place orders of any size
         IF NOT oSecContext.IsCallerInRole("Managers")
            RETURN [<result type="failure"><error>Total]+;
               [ amount too large for non-managers!]+;
               [</error></result>]
         ENDIF
      ENDIF

      ** We finally place the order using a queued component
      LOCAL loPO
      loPO = GetObject("queue:PathName="+;
         "EPS\PRIVATE$\Demo/new:DistDemoQueue.PO")
      loPO.PlaceOrder(ItemID, Quantity,;
         oSecContext.Item("AccountName"))

      RETURN [<result type="Success"/>]
   ENDFUNC

   FUNCTION GetItems() AS String
      ** We use XMLDOM for the connectivity...
      LOCAL loXML AS Microsoft.XMLDOM
      loXML = CreateObject("Microsoft.XMLDOM")
      loXML.Async= .F.

      ** We use the SQL 2000 template to
      ** retrieve the data...
      loXML.Load("Http://markusnotebook/sqldemo/"+
         "template/items.xml")
      RETURN loXML.XML
   ENDFUNC
ENDDEFINE
Although the syntax is slightly different, both versions take the same steps. The GetItems() method retrieves information from SQL Server 2000 by using an XML Template (see below). We simply “abuse” the XMLDOM for HTTP connectivity. You may argue that there are better ways to handle the HTTP needs, and I'd have to agree with you. The DOM introduces some overhead since all the incoming information is parsed for no good reason. However, I want to keep this example simple and don't want to introduce unnecessary complexity.
The PlaceOrder() method is slightly more complex. After checking to make sure the correct number of parameters has been passed (and returning an XML-based error message in case of a problem), we get a reference to the COM+ Context for the application, and can check whether security is enabled on the component (see below and also the “COM+ Security” sidebar). If security is enabled (which is always true unless someone tried to trick us), we can retrieve the security context, which can provide detailed information about the current operation. In this example, I made up the business rule that only managers are allowed to place orders exceeding $5,000. If that amount is exceeded, we use the security context to check whether the current user is a manager. If not, we return an error message.
Placing the Order
Assuming we passed all security checks, it is now time to place the order. Typically, we would do
this right inside the business object. However, we have one requirement that makes our application a little more complex than that: We want employees using the Windows interface to be able to place orders even if they are not connected to the server. We can accomplish this with a Queued Component (see sidebar). In rich-client scenarios, we will install the Windows interface as well as the business object (the part that's listed above) on the client machine. This way, the component is always available. There will be a second part of the business object, which always resides on the server, and is responsible for storing the order and forwarding it to the vendor. Since we call that object using the COM+ Queued Components feature, it doesn't matter whether we are connected to the server or not. We can always use this component, and COM+ will make sure the call gets queued until we regain connectivity with the server.
The GetObject() line in the previous code instantiates the Queued Component. Here is the Visual Basic version:
Public Function PlaceOrder(ByVal ItemID As String, _
   ByVal Quantity As Integer, ByVal User As String)

   ' We use the XMLDOM to retrieve the item data...
   Dim oXML As Object
   Set oXML = CreateObject("Microsoft.XMLDOM")
   oXML.Async = False
   oXML.Load ("Http://markusnotebook/sqldemo/"+ _
      "template/item.xml?ItemID=" + ItemID)

   Dim oSKU As Object
   Dim oDesc As Object
   Dim loPrice As Object
   Dim oVendor As Object
   Dim cSKU As String
   Dim cDesc As String
   Dim mPrice As Currency
   Dim cVendor As String
   Dim mTotal As Currency

   Set oSKU = oXML.selectSingleNode("results/Items/@SKU")
   cSKU = oSKU.Text
   Set oDesc = _
      oXML.selectSingleNode("results/Items/@Description")
   cDesc = oDesc.Text
   Set oPrice = _
      oXML.selectSingleNode("results/Items/@Price")
   mPrice = Val(loPrice.Text)
   mTotal = lnPrice * Quantity
   Set oVendor = _
      oXML.selectSingleNode("results/Items/@Vendor")
   cVendor = oVendor.Text

   ' We store the order to SQL server...
   Dim oXML2 As Object
   Dim cURL As String
   Set oXML2 = CreateObject("Microsoft.XMLDOM")
   oXML2.Async = False
   cURL = "?ItemID=" + lcSKU + _
      "&Desc=" + lcDesc + "&Total=" + _
      CStr(lnTotal) + "&Vendor=" + _
      cVendor + "&User=" + User
   oXML2.Load ("Http://markusnotebook/sqldemo/"+ _
      template/SaveOrder.xml" + cURL)

   ' We fire a COM+ Event
   Dim oEvent As Object
   Set oEvent = CreateObject("DistDemoEvents.POEvent")
   oEvent.OrderPlaced lcSKU, lcDesc, Quantity, _
      lnPrice, lcVendor, User

   ' We send the message through BizTalk
   Dim oBTI As Object
   Dim cBTMessage As String
   cBTMessage = "<?xml version='1.0'?>"
   cBTMessage = cBTMessage + _
      "<PO Source='Home Organization' "
   cBTMessage = cBTMessage + _
      "Destination='" + lcVendor + "'>"
   cBTMessage = cBTMessage + "<Item ID='" + lcSKU + "' "
   cBTMessage = cBTMessage + "Description='" + _
      lcDesc + "' "
   cBTMessage = cBTMessage + _
      "Quantity='" + CStr(Quantity) + "'/>"
   cBTMessage = cBTMessage + "</PO>"

   Set oBTI = CreateObject("BizTalk.Interchange")
   oBTI.Submit 1, cBTMessage, "Demo PO"
End Function
Here is the Visual FoxPro equivalent:
Define CLASS PO AS Session OLEPublic
   Function PlaceOrder (ItemID AS String,;
      Quantity AS Integer,;
      User AS String) AS Void

      Local loXML, loXML2
      Local loSKU, loDesc, loPrice, loVendor
      Local lcSKU, lcDesc, lnPrice, lcVendor, lnTotal
      Local lcURL

      ** We use the XMLDOM to retrieve the item data...
      loXML = CreateObject("Microsoft.XMLDOM")
      loXML.Async = .F.

      loXML.Load("Http://markusnotebook/sqldemo/template/";
         "item.xml?ItemID="+ItemID)
      loSKU = loXML.SelectSingleNode("results/Items/@SKU")
      lcSKU = loSKU.Text
      loDesc = ;
        loXML.SelectSingleNode("results/Items/@Description")
      lcDesc = loDesc.Text
      loPrice = ;
        loXML.SelectSingleNode("results/Items/@Price")
      lnPrice = Val(loPrice.Text)
      lnTotal = lnPrice * Quantity
      loVendor = ;
        loXML.SelectSingleNode("results/Items/@Vendor")
      lcVendor = loVendor.Text

      ** We store the order to SQL server...
      loXML2 = CreateObject("Microsoft.XMLDOM")
      loXML2.Async = .F.
      lcURL = "?ItemID="+lcSKU+;
         "&Desc="+lcDesc+"&Total="+;
         Trans(lnTotal)+"&Vendor="+;
         lcVendor+"&User="+User
      loXML2.Load("Http://markusnotebook/sqldemo/";
         "template/SaveOrder.xml"+lcURL)

      ** We fire a COM+ Event
      Local loEvent
      loEvent = CreateObject("DistDemoEvents.POEvent")
      loEvent.OrderPlaced(lcSKU, lcDesc, Quantity, lnPrice,;
         lcVendor, User)

      ** We send the order through BizTalk
      Local loBTI, lcBTMessage
      lcBTMessage = [<?xml version="1.0"?>]
      lcBTMessage = lcBTMessage +;
         [<PO Source="Home Organization" ]
      lcBTMessage = lcBTMessage + ;
         [Destination="]+lcVendor+[">]
      lcBTMessage = lcBTMessage + [<Item ID="]+lcSKU+[" ]
      lcBTMessage = lcBTMessage + [Description="]+;
         lcDesc+[" ]
      lcBTMessage = lcBTMessage + ;
         [Quantity="]+TRANSFORM(Quantity)+["/>]
      lcBTMessage = lcBTMessage + [</PO>]

      loBTI = CreateObject("BizTalk.Interchange")
      loBTI.Submit(1,lcBTMessage,"Demo PO")
   Endfunc
Enddefine
The key to this component is that there is no return value or “out” parameter. This is a key requirement for Queued Components. After all, we do not know when we will actually reestablish connectivity to the component. So we would potentially have to wait days for a return value, which would defeat the purpose.
Note that it is also required to start the Queued Component at some point. We could do so manually through the COM+ Catalog or programmatically using the COM interface of the COM+ system. Alternatively, we could also use a scheduled task to launch the app. My “COM+ Queued Components” article in the Fall 2000 issue of Component Developer Magazine discusses this subject in more detail. For now, simply right-click on the COM+ Application and click “start”.
The rest of this component is straightforward. We use the XMLDOM again to interact with SQL Server, retrieving all the details about the ordered item before we actually save the order.
Note that this component also fires a COM+ Event (see below), which can optionally be used by other developers to add additional business logic each time an order is placed. Providing that feature is as simple as instantiating the “DistDemoEvents.POEvent” component and firing a method. I will describe the details a little later in this article.
The last section of the component creates a simple XML message containing all the information needed by our vendors to fulfill the order. We then create an instance of BizTalk Server's Interchange object and pass along the order in the second parameter. The third parameter holds the name of the document we are sending (in this case “Demo PO”, since we are sending a purchase order corresponding to the “Demo PO” XML Schema we will set up a little further down in this article). As you can see, invoking BizTalk is really simple. We leave it up to the BizTalk routing services to figure out where to send the order and what final delivery format to use. The BizTalk Server setup is a little trickier, as you will see below.
Compiling and Registering the Components
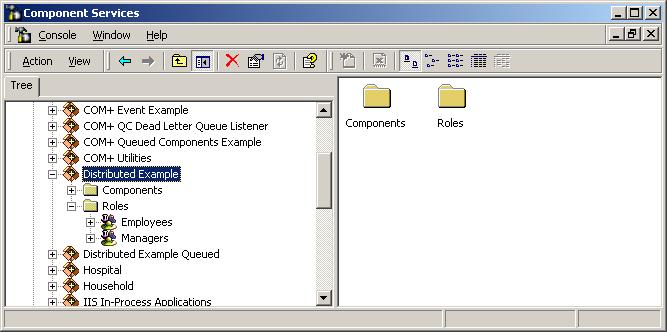
As mentioned before, the business object layer (which consists of the two classes introduced so far) is designed to run in COM+. For this reason, we have to compile our component into a multi-threaded COM DLL (I named my DLL “distdemo”) and register it with the Component Catalog (see sidebar). We also will have to create two or three different COM+ Applications. If we run our application on the server (using a Web Interface for instance), two applications are enough (one for the regular component and the other for the Queued Component). If we install the application on the client, we would need a third COM+ Application to host that component. I chose to put the Queued Component into a separate application, because I would like to run it without security. Securing Queued Components is tricky business, since security tickets may expire by the time the component is actually executed. For this reason, we will simply rely on the first business object to secure our application. Figure 2 shows the two COM+ Applications I created on my system.

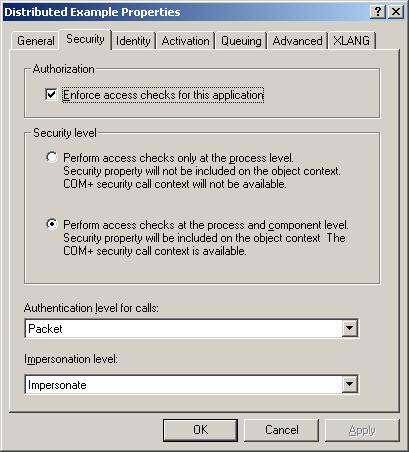
Once you've created the two applications, enable security on the first in the application properties and choose the same settings as shown in Figure 3. We also need to set up security roles for this application (see Figure 4). In this case, we will have “Employees” and “Managers”. You can simply assign Windows users or groups to roles.
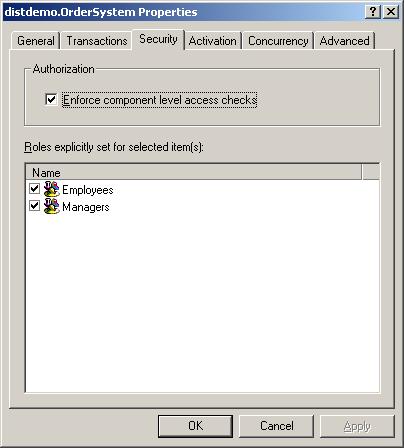
Now that the basic configuration is done for the first application, you can add the first component (“OrderSystem”) to that COM+ Application. In the component properties, configure security as shown in Figure 5, allowing both employees and managers access to the component.
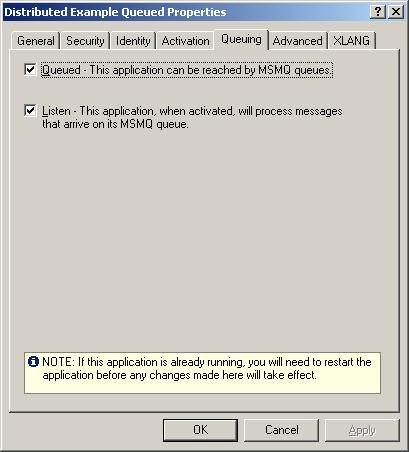
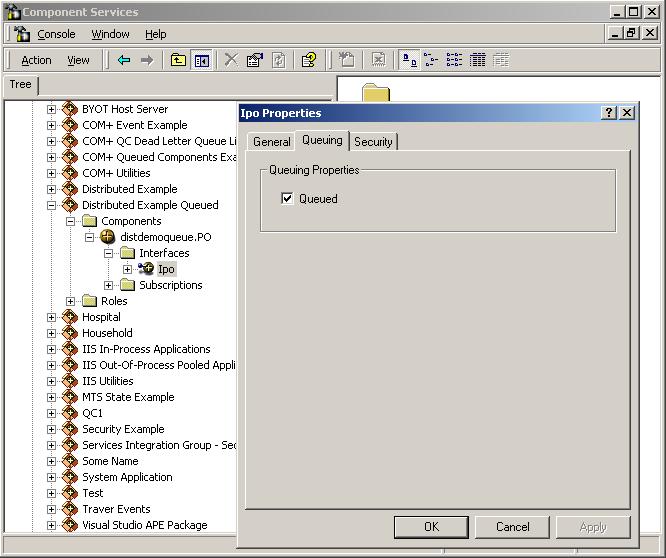
The second application (“Distributed Example Queued”) doesn't require any specific security settings. However, we need to configure it for asynchronous operation. First of all, we have to enable queuing on the entire application (see Figure 6). This doesn't mean that everything in that application is queued. It just means that the application can contain queued components. When we enable queuing for an application, COM+ automatically adds several queues to MSMQ for use by COM+. We also have to configure each individual component for queuing. To do so, first add the queued component to this application, drill down to its interface (there should be only one) and enable queuing in the properties (Figure 7).
Creating the Event Class
At this point, we are almost done with our business layer, but I still owe you an explanation regarding the events we intend to fire and to which we will react. As you can see in the last code example above, the Queued Component instantiates and calls a POEvents class. Here is the Visual Basic code for this class:
Public Sub OrderPlaced (ByVal ItemID As String, _
   ByVal Description As String, _
   ByVal Quantity As String, _
   ByVal Price As Integer, _
   ByVal Vendor As String, _
   ByVal User As String)
End Sub
Here is the Visual FoxPro version:
DEFINE CLASS POEvent AS Session OLEPublic
    FUNCTION OrderPlaced(ItemID as String,;
        Description AS String,;
        Quantity AS Integer, Price AS Integer,;
        Vendor AS String, User AS String)
    ENDFUNC
ENDDEFINE
As you can see, there is no real code in this component. We simply define a single method with a few parameters. In other words: We define an interface, but leave the implementation to whatever object wants to react to this event.
Compile this component and add it to the COM+ Catalog. You can create a new application for this component, or you can add it to the “Distributed Example” application (this component resides only on the server, so you will have to create a third application if you intend to use the fat-client approach where the “Distributed Example” application resides on the client). You can add this component to the application in a similar fashion to regular components. The main difference is that in the first step of the “New Component” wizard, you indicate that you would like to install an Event Class, rather than a plain component. This signals to COM+ that this class is to be treated in a special way, so that every time the class is called, COM+ checks for possible event subscribers and executes them, too (see below and sidebar “COM+ Events” for more information).
If someone wanted to extend our application by reacting to the event, she could simply write a class that implements the interface we defined above. Our example application does not feature any event subscribers that do anything of significance, but here is a simple example in Visual Basic that displays a message box:
Implements distdemoevents.poevent
Private Sub poevent_OrderPlaced (ByVal ItemID As String, _
   ByVal Description As String, _
   ByVal Quantity As String, _
   ByVal Price As Integer, _
   ByVal Vendor As String, _
   ByVal User As String)

   MsgBox Description

End Sub
Since Visual FoxPro doesn't allow message boxes in COM Components, we will write to a log file to prove that it worked:
Define CLASS MyEvent AS Session OLEPublic
   Implements IPOEvent IN "distdemoevents.poevent"
   Function IPOEVENT_OrderPlaced(ItemID as String,;
         Description AS String,;
         Quantity AS Integer, Price AS Integer,;
         Vendor AS String, User AS String)

      This.WriteLog(Str(Quantity)+" "+Description)

   Endfunc

   Protected Function WriteLog(Log AS String)
      Strtofile(Log,"c:\test.log",.T.)
   Endfunc
Enddefine
To make these classes react to the events, you must add them to the COM+ Catalog and define a subscription. To do so, drill down into the details of your component. Right-click on the subscriptions node to create a new subscription, and subscribe to the event class (see sidebar for more information).
The Data Store
OK, we are done with our business object, but one critical part is still missing: the database. Create a new SQL Server 2000 database with a name of your choice and add the “Orders” and “Items” tables. The exact structure is listed in Table 1 and Table 2. The “Items” table stores a list of all the items that can be ordered. Besides the actual description, each item has a price and also a vendor, from whom the item will be ordered. The second table stores the orders we place.
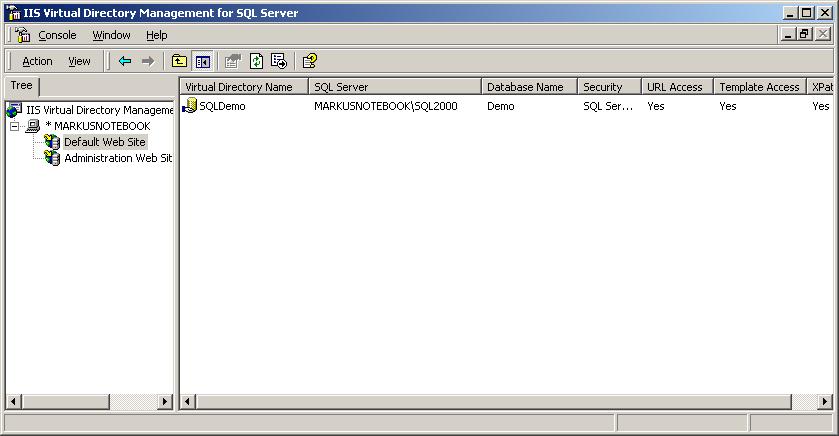
We intend to access SQL Server over HTTP and retrieve data (and send saved data) in XML. To do so, we have to configure SQL Server 2000 for HTTP access, using the “Configure SQL XML Support in IIS” tool that ships with SQL Server 2000. When accessing SQL Server through HTTP, we are required to create a virtual directory for each database. To do so, right-click the detail pane and select “New Virtual Directory”, specify a directory name of your choice (I used “SQLDemo”), pick the database we just created, and provide a user name and password. Figure 8 shows the completed Virtual Directory configuration.
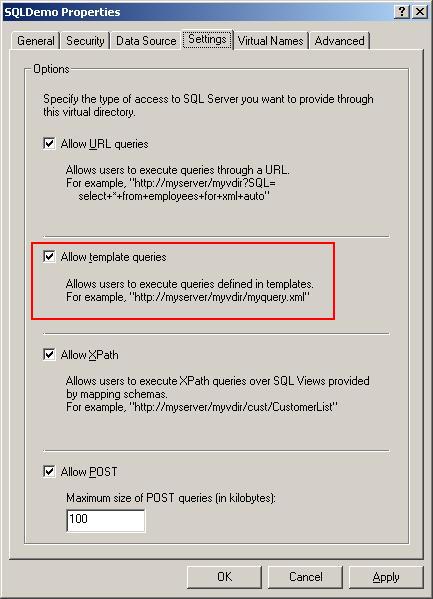
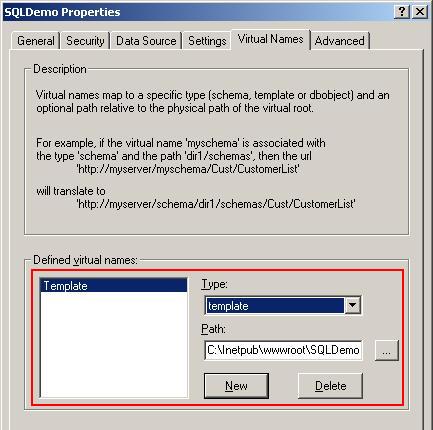
At this point, we can pass plain SQL commands to a URL and retrieve data in XML. However, this is not all that great in a production environment (someone could send a "DELETE FROM…", which wouldn't make anyone happy). Instead, we are going to use Template Queries (see sidebar) that allow us to predefine SQL commands that execute when we navigate to the template. To activate this functionality, enable template queries in the Virtual Directory properties (Figure 9) and add a template directory setting as shown in Figure 10. I named my template directory “Template”, but it could really have any name you choose. The template directory is the only one of these directories that really exists on the hard drive. Although you could just point this Virtual Directory to any existing real directory, I recommend creating a new one for this purpose only, to avoid confusion.
Note that the source code above accesses templates using the following URL: Http://markusnotebook/sqldemo/template/. You will have to adjust this code according to the location (and computer name) you specified.
Our application uses 3 template queries: one to retrieve all items, one to retrieve a specific item, and another to store orders. The first one is in a template file named “Items.xml”. Here it is:
<results xmlns:sql="urn:schemas-microsoft-com:xml-sql">
   <sql:query>SELECT * FROM Items for xml auto</sql:query>
</results>
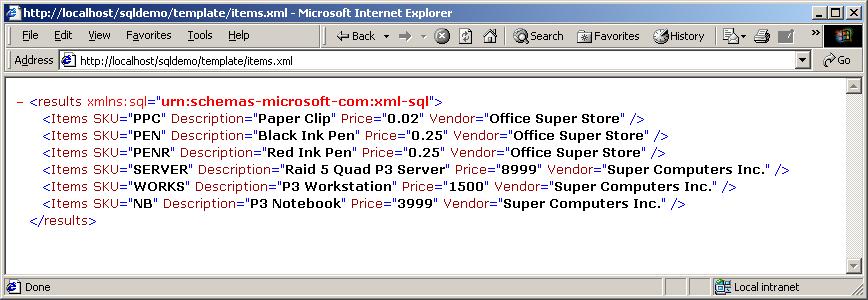
As you can see, beside the fact that the command is embedded in XML tags, the query itself is trivial, simply retrieving all items in XML format. You can use a web browser and navigate to the template to execute it. Since we configured the template directory to be a special SQL Server Virtual Directory, the return value isn't the actual template, but the result of the query executed when we hit that file. Figure 11 shows the result (which will also give you a good idea of the contents of the items table).
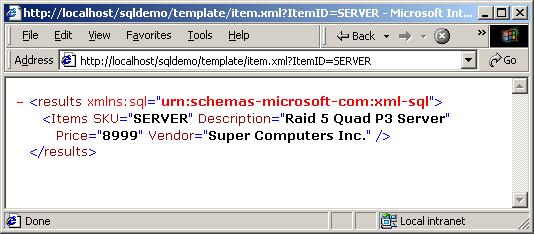
The template used to retrieve a single item (stored in Item.xml) is similar, with the exception that we allow a parameter to be passed to the template:
<results xmlns:sql="urn:schemas-microsoft-com:xml-sql">
   <sql:header>
      <sql:param name="ItemID">%</sql:param>
   </sql:header>
   <sql:query>SELECT * FROM Items WHERE SKU = @ItemID for xml auto</sql:query>
</results>
The parameter is passed as part of the URL. Figure 12 shows a possible result set returned by this template.
Finally, we have the template that is used to store orders. We take the easy way out and fire an INSERT statement straight from the template. The values inserted into the database are passed as parameters, which we can do in this case since we have only a few short values to add:
<results xmlns:sql="urn:schemas-microsoft-com:xml-sql">
   <sql:header>
      <sql:param name="ItemID"/>
      <sql:param name="Desc"/>
      <sql:param name="Total"/>
      <sql:param name="Vendor"/>
      <sql:param name="User"/>
   </sql:header>
   <sql:query>INSERT INTO Orders (SKU, Description, Total, Vendor, OrderedBy) VALUES (@ItemID, @Desc, CONVERT(money, @Total), @Vendor, @User)</sql:query>
</results>
Connecting to Vendors
At this point, we almost have a functional component. In fact, you can test some of the functionality by typing the following two lines into the Visual FoxPro Command Window:
oBiz = CreateObject("DistDemo.OrderSystem")
MessageBox( oBiz.GetItems() )
Alternatively, you can do the same in a Visual Basic program:
DIM oBiz AS Object
SET oBiz = CreateObject("DistDemo.OrderSystem")
MsgBox oBiz.GetItems()
If everything went fine, this should bring up a messagebox showing the same XML as Figure 11.
We could also place an order and it might even appear at first as if everything was functional (you could check the contents of the order table in SQL Server to see the order you placed). However, since we haven't configured BizTalk Server yet, it would fail to route the order to the vendor. That of course, would render our entire application useless, so lets go ahead and fix this problem!
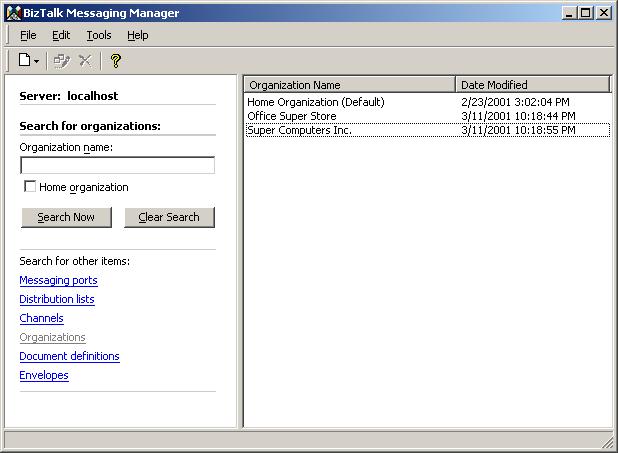
First of all, we have to tell BizTalk about the organizations we want to deal with. The data shown in Figure 11 refers to two vendors: “Office Super Store” and "Super Computers Inc.". Start the BizTalk Messaging Manager (Figure 13) and add the two new organizations, using the File/New Organization menu item. Setting up organizations is very straightforward. All you have to do is specify an organization name.
We also need to let BizTalk know what message formats we will be using. Internally, we want to use the message format created by our Queued Component. Since it is hard to see this format by reading the source code, here is an example message:
<?xml version="1.0"?>
<PO Source="Home Organization"
    Destination="Super Computers Inc.">
    <Item ID="SERVER"
       Description="Raid 5 Quad P3 Server"
       Quantity="1"/>
</PO>
As you can see, this purchase order contains information about the sender (the “Home Organization”), the receiver ("Super Computers Inc."), and the ordered item and quantity. The sender and receiver information can be used by BizTalk to automatically route the document to the appropriate destination. To do so however, we have to tell BizTalk about the document format. This is done with an XDR Schema, which we can create with the BizTalk Editor. Figure 14 shows the schema that describes the above message (for more information about BizTalk and Schemas, see sidebar “BizTalk”). What's important is that the “Source” and “Destination” attributes of our message are identified in the schema as fields containing routing information, which will be used by BizTalk Server to perform routing operations.
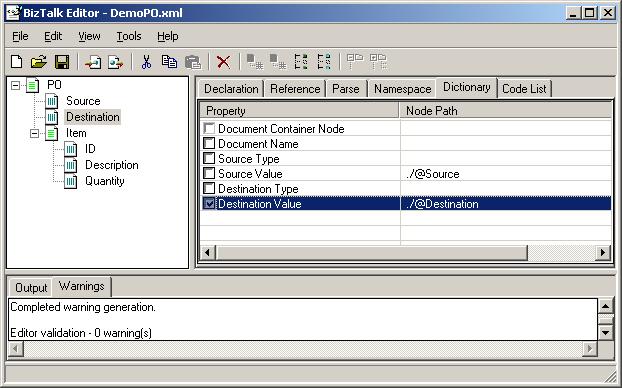
Initially, the schema exists as an external file either on the local harddrive or (preferably) in a WebDAV directory (see sidebar). BizTalk Server does not yet know about that schema, so we have to add it to BizTalk's document definitions in the BizTalk Messaging Manager. Simply select “File/New Document Definition” from the menu, define a name BizTalk will use to refer to the schema, and pick the schema from the location where you stored it. Note that the actual schema name is not significant. The name defined in BizTalk however, is crucial, since we pass the name as the third parameter in the last line of method code in the Queued Component (I'm using “Demo PO”).
Defining the Routing
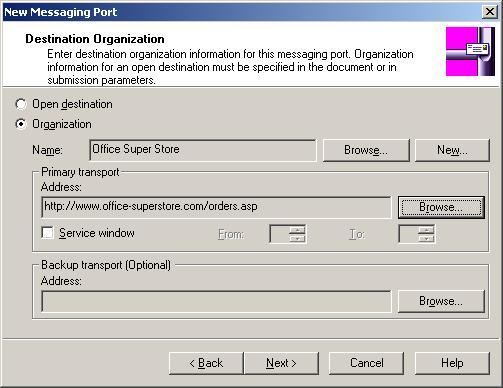
We now have organizations, as well as document definitions. What's missing is detailed routing information. In BizTalk, this is defined using Ports and Channels. A “Port” defines a routing destination. To create a port, select “File/New Message Port/To an Organization” from the menu. This brings up the Port Wizard. In step one, specify a port name of your choice. The next step is more significant (see Figure 15). First, we will select an organization using the “Browse” button, so do that and pick “Office Super Store”. (When processing our order message, BizTalk will use the name of the organization provided in the message and will pick the port based on the organization information.) The port defines the actual routing destination, and is set up as the “Primary Transport”. Usually, this will be either a URL or perhaps an email address. For testing, however, you may want to specify a file on the local hard drive. To complete the port setup, accept all the defaults through the remaining steps of the wizard.
The port gives us a way to route a message from BizTalk Server to a specified destination. All that's left now is a way to stuff messages into the BizTalk routing services. This is accomplished through Messaging Channels. When you complete the port setup, BizTalk automatically launches the Channel Wizard to create a channel linked to the port you just created.
The Channel Wizard is self-explanatory until you reach step 3, where you have to specify the inbound document format. Simply pick the “Demo PO” document definition we created before. Then, move on to step 4 and pick the same document definition as the “outbound” document (I'll explain a little more below).
You'll have to create another Port/Channel combination identical to the one I just described, with the exception that you will use the second organization in the port ("Super Computers Inc."), along with a different delivery address.
Voila! We have a fully functional system. You can go ahead and try placing an order programmatically, using our business object.
Dealing with Reality
In a perfect world, we would be ready to do business with any vendor we wanted to. In reality, things are not that easy. We will have a hard time finding vendors who are willing or able to accept our purchase order XML format. In fact, we will most likely have to comply with each vendor's XML format or even a non-XML specification.
BizTalk makes dealing with these scenarios very easy. Let's assume “Super Computers Inc.” requires us to send purchase orders in the following format:
<?xml version="1.0"?>
<PO Source="Home Organization"
   Destination="Super Computers Inc.">
   <DeliveryAddress Address1="Champion Forest Dr."
      Address2="Suite 202"
      City="Houston" ZIP="77069" State="TX"/>
   <Item ID="SERVER" Description="Raid 5 Quad P3 Server"
      Quantity="1"/>
</PO>
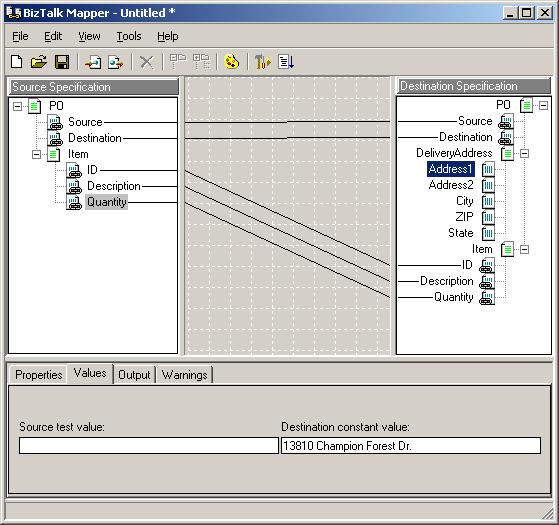
The first step is setting up a schema and document definition the same way we did with our first message format. In addition, we have to tell BizTalk how to map our document format into the new format. This can be done using the BizTalk Mapper (see Figure 16). This tool allows us to map fields from one format to the other by simple drag and drop operations. The mapper also allows the use of scripts, “functiods” and constant values, which we need in order to provide the information not contained in the original message format.
To utilize this map, we have to go back to the Channel definition. We still want to route our original message into BizTalk (in fact, we don't want our business object to know about these different formats at all), so the “inbound” document remains the same. The “outbound” document, however, has to be changed to the new document definition. Since those documents aren't identical, BizTalk asks us to provide a map for the conversion.
As you can imagine, with this type of technology, we can easily extend our system without having to change our application. If we want to add another vendor, we can simply add new records to the item database that are linked to the vendor, add the vendor to BizTalk, create a document definition and map if required, and set up a Channel/Port combination.
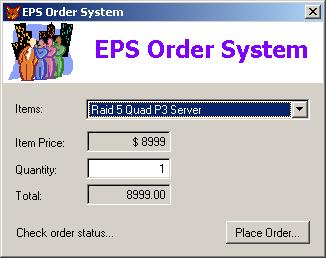
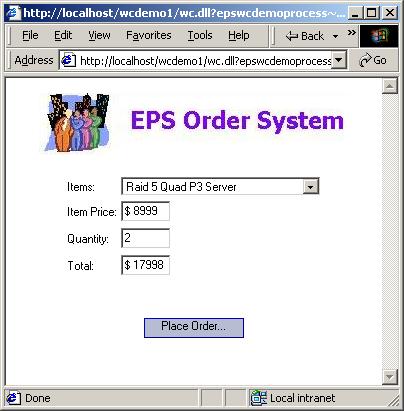
The Windows Interface
With the functionality we have created so far, creating the Windows (Figure 17) interface is almost trivial. The only major problem we face at this point is the goal of 100% availability (even if the server is down).
When the form starts up, we have to populate it with a list of available items. Here's the Visual Basic code that does so:
Public oXML As Object

Private Sub Form_Load()
   Dim oOrders As Object
   Dim cXML As String

   Set oOrders = CreateObject("DistDemo.OrderSystem")
   cXML = oOrders.GetItems()

   If cXML = "" Then
      ' We could not connect to the server, so we check
      ' whether there is a cached version...
      If Not Dir$("items.xml") = "" Then
         Open "items.xml" For Input As #1
         cXML = Input(LOF(1), #1)
         Close #1
         MsgBox "You currently do not have "+ _
            "connectivity to the server." + Chr(13) + _
            "However, you can proceed using this " + _
            "application with" + Chr(13) + _
            "the last known set of data.", , "Offline"
      Else
         MsgBox "You currently do not have "+ _
            "connectivity to the server." + Chr(13) + _
            "No data is available offline at "+ _
            "the moment. For this reason," + Chr(13) + _
            "you can not currently run this " + _
            "application.", , "Offline"
         Exit Sub
      End If
   Else
      ' We store the XML for later retrieval
      ' in disconnected mode...
      Open "items.xml" For Output As #1
      Print #1, cXML
      Close #1
   End If
   Set oXML = CreateObject("Microsoft.XMLDOM")
   oXML.async = False
   oXML.LoadXML cXML

   Dim oItems As Object
   Dim oNode As Object
   Dim iCounter As Integer

   Set oItems = oXML.selectNodes("results/Items")
   For iCounter = 0 To oItems.Length - 1
      Set oNode = _
         oItems.Item(iCounter).selectSingleNode( _
         "@Description")
      cmbItems.AddItem oNode.Text, iCounter
      If iCounter = 0 Then
         cmbItems.Text = oNode.Text
      End If
   Next
End Sub
Here is the Visual FoxPro version, which would be contained in the Init() of the VFP form:
** We use the OrderSystem business object
Local loOrders, lcXML

WAIT WINDOW "Connecting to server..." NOWAIT
loOrders = CreateObject("DistDemo.OrderSystem")
lcXML = loOrders.GetItems()
WAIT CLEAR

If Empty(lcXML)
   ** We could not connect to the server, so we check
   ** whether there is a cached version...
   If File("items.xml")
      lcXML = FileToStr("items.xml")
      Messagebox("You currently do not have connectivity "+;
         "to the server."+Chr(13)+;
         "However, you can proceed using this "+;
         "application with"+Chr(13)+;
         "the last known set of data.","Offline",64)
   Else
      Messagebox("You currently do not have connectivity "+;
         "to the server."+Chr(13)+;
         "No data is available offline at the moment. "+;
         "For this reason,"+Chr(13)+;
         "you can not currently run this "+;
         "application.","Offline",16)
      Return .F.
   Endif
Else
   ** We store the XML for later retrieval
   ** in disconnected mode...
   If File("items.xml")
      Erase items.xml
   Endif
   Strtofile(lcXML,"items.xml",.F.)
Endif

** We use XMLDOM to utilize the returned XML
This.oXML = CREATEOBJECT("Microsoft.XMLDOM")
This.oXML.async= .F.
This.oXML.loadXML(lcXML)

** We query all items...
Local loItems AS MICROSOFT.IXMLDOMNodeList
loItems = THIS.oXML.selectNodes("results/Items")

** We add all the items to the combobox
Local lnCounter, loNode, lcSource
lcSource = ""
For lnCounter = 0 TO loItems.length-1
   loNode = loItems.item(lnCounter).selectSingleNode("@Description")
   If NOT Empty(lcSource)
      lcSource = lcSource + ","
   Endif
   lcSource = lcSource + loNode.Text
   loNode = loItems.item(lnCounter).selectSingleNode("@SKU")
   lcSource = lcSource + ","+loNode.Text
Endfor
This.cmbItems.RowSource=lcSource
Both examples start out by instantiating our business object and retrieving all the items. This may or may not work, depending on whether or not we can connect to the server. If we were not able to connect, the business object will return a blank string. In that case, we may have to resort to using a version of the data that has been cached locally, so we look for a file named “items.xml”. If we find this file, we inform the user that we will operate in offline mode, and proceed. If the offline file is not available, we have no choice but abandon the operation.
If we can connect to the server, the business object returns the XML for the items. We immediately store that XML for later retrieval in offline mode. This way, the user is always able to use the application after running it at least once.
This is a great example for the power of XML, which comes mainly from its simplicity. If we used a different data source, caching the information offline would be much more difficult.
Either way, at this point we have some data in the form of an XML string. We create an instance of the XMLDOM and load the string for easier parsing. Note that this instance is not a local variable, but available throughout the life of the form, making it easy later to go back and retrieve information about individual items (we have to do this when the user selects an item in the combobox, for instance). The last part of the above code iterates over all the items in the DOM and adds them to the combobox.
When the user is ready to place an order, the following code (Visual Basic) is executed:
Private Sub cmdOrder_Click()
   ' We use the orders business object...
   Dim oOrders As Object
   Set oOrders = CreateObject("DistDemo.OrderSystem")

   ' We place the actual order
   Dim cResult As String
   Dim oSKU As Object
   Set oSKU = oXML.SelectSingleNode( _
      "results/Items[@Description='" + _
      cmbItems.Text + "']/@SKU")
   cResult = oOrders.PlaceOrder(oSKU.Text, _
      Val(txtQuantity.Text), Val(txtTotal.Text))

   ' We analyze the result
   Dim oXML2 As Object
   Dim oResType As Object
   Set oXML2 = CreateObject("Microsoft.XMLDOM")
   oXML2.Async = False
   oXML2.LoadXML cResult
   Set oResType = oXML2.SelectSingleNode("result/@type")

   ' We make sure everything went fine...
   If oResType.Text = "Success" Then
      MsgBox "Your order has been placed.", , "Order Placed"
   Else
      Dim oError As Object
      Set oError = oXML.SelectSingleNode("result/error")
      MsgBox oError.Text, , "Order Not Placed"
   End If
End Sub
Here is the Visual FoxPro version:
Local loOrders, lcResult, loXML, loResType, loError

** We use the orders business object...
loOrders = CreateObject("DistDemo.OrderSystem")

** We place the actual order
lcResult = loOrders.PlaceOrder(THISFORM.cmbItems.Value,;
   THISFORM.txtQuantity.Value,THISFORM.txtTotal.Value)

** We analyze the result
loXML = CreateObject("Microsoft.XMLDOM")
loXML.Async = .F.
loXML.LoadXML(lcResult)
loResType = loXML.SelectSingleNode("result/@type")

** We make sure everything went fine...
If loResType.Text = "Success"
   Messagebox("Your order has been placed.",;
      "Order Placed",64)
Else
   loError = loXML.SelectSingleNode("result/error")
   Messagebox(loError.Text,"Order Not Placed",16)
Endif
There is nothing really complicated in this code. We create another instance of the business object and call its PlaceOrder() method, passing along the values of the textboxes. This method returns a result in XML, which will tell us whether or not the order was placed successfully. We report the result to the user.
Note that this is always going to work, because even if the server is not available, the business object will still be operational, thanks to the queued component we are using.
The FoxPro Voodoo Web Interface
We can create the web interface several different ways. One of the simpler ones is the use of Voodoo Web Controls in a Web Connection environment. Figure 18 shows the web interface. Voodoo Web Controls allow the developer to create web pages in a fashion that's similar to creating Windows interfaces. Here's the code I used to create the web page:
Function Order
  Local loPage, loDummy, loBiz, loXML
  loPage = CreateObject("WCPAGE")

  ** We add the item list...
  loDummy = loPage.AddObject("cmbItems","MyItemList")
  loDummy.FirstTableRow = .T.
  loDummy.WriteTop([<center><img src="logo.jpg"><br><br>])

  loDummy = loPage.AddObject("txtPrice","WebTextbox")
  loDummy.AddTableRow = .T.
  loDummy.ReadOnly = .T.
  loDummy.Label = "Item Price:"
  loDummy.Width = 50

  loDummy = loPage.AddObject("txtQuantity","WebTextbox")
  loDummy.AddTableRow = .T.
  loDummy.Label = "Quantity:"
  If Empty(loDummy.Value)
     loDummy.Value = "1"
  Endif
  loDummy.Width = 50

  loDummy = loPage.AddObject("txtTotal","WebTextbox")
  loDummy.AddTableRow = .T.
  loDummy.ReadOnly = .T.
  loDummy.Label = "Total:"
  loDummy.Width = 50

  loDummy.LastTableRow = .T.

  loDummy = loPage.AddObject("cmdOrder","OrderButton")
  loDummy.WriteTop([<br><br>])
  loDummy.WriteBottom([</center>])

  loPage.DoEvents()
  Response.Write(loPage.Render())
Endfunc
The Order() function is a Web Connection process class (we could also run the same exact code in an ASP environment by instantiating a different “loPage” object, but I chose Web Connection for performance reasons). The code first creates a listbox object (and we manually add a logo above the listbox). Then, we add three textboxes with appropriate labels and put them into an HTML table for automatic alignment (AddTableRow=.T.). Finally, we add an order button and render the page.
“Hey, wait a minute!” you may say, “where is the code that places the order and populates the listbox?” The answer is simple: We encapsulate all that code in the listbox and button classes. Here is the listbox:
Define CLASS MyItemList AS WebCombobox
   Width = 200
   AddTableRow = .T.
   Label = "Items:"

   Function OnLoad()
      DoDefault()

      ** We use a business object
      loBiz = CreateObject("DistDemo.OrderSystem")
      lcXML = loBiz.GetItems()

      ** We use XMLDOM to utilize the returned XML
      loXML = CREATEOBJECT("Microsoft.XMLDOM")
      loXML.async= .F.
      loXML.loadXML(lcXML)

      ** We query all items...
      Local loItems AS MICROSOFT.IXMLDOMNodeList
      loItems = loXML.selectNodes("results/Items")

      ** We add all the items to the combobox
      Local lnCounter, loNode, lcText, lcSKU
      For lnCounter = 0 TO loItems.length-1
         loNode = ;
loItems.item(lnCounter).selectSingleNode("@Description")
         lcText = loNode.Text
         loNode = ;
loItems.item(lnCounter).selectSingleNode("@SKU")
         lcSKU = loNode.Text
         This.AddListItem(lcText,lcSKU)
      Endfor
   Endfunc

   Function OnChange()
      loBiz = CreateObject("DistDemo.OrderSystem")
      lcXML = loBiz.GetItems()

      ** We use XMLDOM to utilize the returned XML
      loXML = CREATEOBJECT("Microsoft.XMLDOM")
      loXML.async= .F.
      loXML.loadXML(lcXML)

      Local loNode, loNode2
      loNode = ;
         loXML.selectSingleNode("results/Items[@SKU='"+;
         THIS.Value+"']")
      loNode2 = loNode.selectSingleNode("@Price")

      This.Page.Members("txtPrice").Value = ;
         "$ "+loNode2.Text

      This.Page.Members("txtTotal").Value = "$ "+;
         Trans(Val(loNode2.Text) *;
         Val(THIS.Page.Members("txtQuantity").Value))
   Endfunc
Enddefine
In the OnLoad() event, we create an instance of our business object and load item information very similarly to the code in the FoxPro version of the Windows form. The main difference is that we do not look for a cached file. (Remember that this code is running on the server, so connectivity is required anyway.)
When the user selects a different item in the listbox, the OnChange() event fires. Note that due to the disconnected nature of web pages, we have to reload the XML from the business object (we could have also preserved the state, but that would have been relatively expensive bandwidth-wise). Once the XML is loaded, we select the appropriate node and update the textboxes on the form with the values retrieved from the database.
The order button is similar:
Define CLASS OrderButton AS FlatWebButton
   Caption = "Place Order..."
   Width = 100

   Function Click
      Local loOrders, lcResult, loXML, loResType, loError

      ** We use the orders business object...
      loOrders = CreateObject("DistDemo.OrderSystem")

      ** We place the actual order
      lcResult = ;
         loOrders.PlaceOrder(;
         THIS.Page.Members("cmbItems").Value,;
         Val(THIS.Page.Members("txtQuantity").Value),;
         Val(THIS.Page.Members("txtTotal").Value))

      ** We analyze the result
      loXML = CreateObject("Microsoft.XMLDOM")
      loXML.Async = .F.
      loXML.loadXML(lcResult)
      loResType = loXML.selectSingleNode("result/@type")

      ** We make sure everything went fine...
      If loResType.Text = "Success"
         This.WriteBottom([<center>]+;
            [Your order has been placed.])
      Else
         loError = loXML.selectSingleNode("result/error")
         This.WriteBottom(;
            [<center>]+loError.Text+[.])
      Endif
   Endfunc
Enddefine
The Click() event of the button is almost identical to the Click() event of the Windows button. The main difference is that the code cannot display a messagebox because it would show up on the server. The simple solution is to write the message as part of the output information.
As seasoned web developers will notice, this is not a conventional web development style. In fact, Voodoo is revolutionary, and works much like ASP.NET.
An ASP Web Interface
Creating a Visual Basic (ASP) web interface is somewhat different. We have to create several different pages that interact with each other. We have a number of options. To keep the example as short as possible, I decided to embed client-side script to perform price calculations and the like. This will limit this page to Internet Explorer, but it simplifies the implementation tremendously. Here is the ASP code:
<HTML><HEAD>
<script language="VBScript">
  Sub cmbItems_OnChange
    DIM oNode
    DIM oNode2
    SET oNode = xmlItems.SelectSingleNode("results/Items[@SKU='"+document.all("cmbItems").Value+"']")
    SET oNode2 = oNode.SelectSingleNode("@Price")
    document.all("txtPrice").Value = oNode2.Text
    document.all("txtTotal").Value = (oNode2.Text*document.all("txtQuantity").Value)
  End Sub

  Sub txtQuantity_OnChange
    document.all("txtTotal").Value = (document.all("txtPrice").Value*document.all("txtQuantity").Value)
  End Sub
</script>
</HEAD><BODY>

<%
DIM oBiz
DIM oXML
SET oBiz = Server.CreateObject("DistDemo.OrderSystem")
SET oXML = Server.CreateObject("Microsoft.XMLDOM")
oXML.LoadXML( oBiz.GetItems() )
%>

<center>
<form method="post" action="PlaceOrder.asp">
<IMG src="logo.jpg">
<TABLE>
  <TR>
    <TD>Items:</TD>
    <TD>
    <select name="cmbItems" id="cmbItems">
  <%
  DIM nCounter
  DIM oNode
  DIM oNode2
  DIM oNodes
  SET oNodes = oXML.SelectNodes("results/Items")
  FOR nCounter = 0 TO oNodes.Length - 1
     SET oNode = oNodes.item(nCounter).SelectSingleNode("@Description")
     SET oNode2 = oNodes.item(nCounter).SelectSingleNode("@SKU")
     Response.Write("<option value='"+oNode2.Text+"'>"+oNode.Text)
  NEXT
  %>
    </select>
    </TD></TR>
  <TR>
    <TD>Item Price:</TD>
    <TD><input name="txtPrice" id="txtPrice" value="0"></TD></TR>
  <TR>
    <TD>Quantity:</TD>
    <TD><input name="txtQuantity" id="txtQuantity" value="1"></TD></TR>
  <TR>
    <TD>Total:</TD>
    <TD><input name="txtTotal" id="txtTotal" value="0"></TD></TR>
</TABLE>
<br><br><input type="submit" id="submit" value="Place Order...">
</center>
</form>

<xml id="xmlItems"><%=oXML.XML%></xml>

</BODY></HTML>
The script at the top of the page is the client-side script. It will execute in the browser whenever the user selects an item. It uses an XML data island (defined at the very bottom of the page) to retrieve the data required to display price information. Note that this is a great solution for small amounts of data. However, this would be a major bandwidth problem for large item databases.
All the other scripts in this page are server-side scripts that execute when the page is generated. We again instantiate the business object and retrieve the item XML. Further down in the code, we manually generate a listbox based on the XML data. Toward the very bottom of the page, we create the XML data island.
When the user clicks the “Order” button, the browser navigates to a page named “PlaceOrder.asp”, which has the code that stores the information. Here it is:
<HTML><HEAD></HEAD><BODY>

<center>
<IMG src="logo.jpg"><br><br>

<%
DIM oBiz
DIM sSKU, nQuantity, nTotal
SET oBiz = Server.CreateObject("DistDemo.OrderSystem")

sSKU = Request.Form("cmbItems")
nQuantity = Request.Form("txtQuantity")
nTotal = Request.Form("txtTotal")
oBiz.PlaceOrder sSKU,nQuantity,1000
%>

Thank you for your order!

</center>
</BODY></HTML>
Note that I took a bit of a shortcut here. I'm not testing whether the entered values are valid, and I also don't check the return value. I did this to keep this example short, since error handling would add quite a bit of overhead and we would have to re-display the data entry fields the same way they are in the previous page. This is why technologies such as ASP.NET and Voodoo Web Controls are so exciting!
Conclusion
The application we've created in this article looks small at first sight, but is very powerful and rich in functionality. We not only provide a simple-to-use order system for our employees that directly connects them to vendors, but we've created a system that provides 100% uptime, yet is still server based. Also, our application is highly flexible and can easily be extended, modified and enhanced.
Markus Egger
Table 1: The Orders table is used to keep track of all the placed orders.
| Column Name | Data Type | Length | Allow Nulls |
|---|---|---|---|
| SKU | char | 10 | ( |
| Description | varchar | 50 | ( |
| Total | money | 8 | ( |
| Vendor | char | 30 | ( |
| OrderedBy | char | 30 | ( |
Table 2: The Items table stores all the items available for ordering.
| Column Name | Data Type | Length | Allow Nulls |
|---|---|---|---|
| SKU | Char | 10 | ( |
| Description | Varchar | 50 | ( |
| Price | Money | 8 | ( |
| Vendor | Char | 30 | ( |
