


ASP.NET is a terrific platform for Web applications.
That does not mean that tricky coding is always one or two clicks away within a dockable and resizable Visual Studio .NET dialog box. Tricky solutions require tricky coding, just the kind of features that a wizard-driven environment and a general-purpose framework can't provide. In this article, we'll tackle five ASP.NET features that require wicked and creative code.
Have you ever heard about the "real programmer?" The real programmer is someone who makes a living putting one keyword after the next, abiding by some sort of syntax and semantics. Being strongly results-oriented, the real programmer gained a reputation for hating all the bells and whistles that inevitably surround any software technology. Wizards, black box components, and data binding? No, thank you. The real programmer makes a point of writing hundreds of lines of code to get full control over each execution step.
Frankly, I've found myself in the position of the real programmer more than once, especially regarding data binding. As a real programmer, I never used old Visual Basic data-bound controls. If you ever experienced the data-bound controls of early versions of Visual Basic, you know why. But the advent of the .NET Framework changed things quite a bit. The .NET Framework comes with a powerful data binding mechanism implemented for both Windows Forms and Web Forms.
The .NET Framework comes with a powerful data binding mechanism implemented for both Windows Forms and Web Forms.
Unfortunately but reasonably, the set of ASP.NET data-bound controls just don't cover all possible scenarios; you can have automatic binding between a data source and a list of check boxes or radio buttons. But if you're looking for a data-bound bulleted or numbered list of strings, prepare to face disappointment.
I'm not sure how you feel about that, but I craved a BulletList control for a while. Then, I made the decision to build it myself. Quite surprisingly, it wasn't too difficult. It is probably a task within the reach of any programmer and not just "real programmers."
#1: Building a Bulleted List Control
The BulletList control can be built starting from the WebControl class. This class provides a default implementation for several handy UI properties, such as Font and ForeColor. By inheriting from WebControl, you don't have to worry about common UI-related properties and can focus on the more specific attributes of the control.
The BulletList control needs at least four properties, as listed in Table 1. The Items property has a double role. For one thing, it is the internal buffer in which the data-bound information is parked before it is rendered to HTML. Because the property is marked as public, you can also use it to manually add strings of text to the list. This code snippet shows how to add extra items at the bottom of the list created after the data source.
list.Items.Add("Plus this one!");
The DataSource and the DataTextField properties let you extract a particular column of data out of an ADO.NET container. The use of these properties is in no way different from analogous properties defined in other list-bound classes (e.g., CheckBoxList). The typical use you can make of them is shown in this next snippet.
// Run the query
SqlDataAdapter adapter;
string cmd = "SELECT * FROM employees";
string conn = "SERVER=...;DATABASE=...;UID=...;";
adapter = new SqlDataAdapter(cmd, conn);

// Bind the control
DataTable table = new DataTable(); adapter.Fill(table);
bList.DataSource = table;
bList.DataBind();
The control also needs to override the DataBind method inherited from the Control class. When the DataBind method is called, the control loads the bound data source into the Items string collection. During the Render method (another overridden method), the control builds the bullet list, mixing together HTML tags and text strings. In HTML, you can have two types of lists: the classic bulleted list or a numbered list. In the former case, you create it using the <ul> tag; for the latter case, use the <ol> tag. Nested within those elements, there is one <li> tag per each item to display.
The control's programming interface allows you to choose the type of bulleted list through the following enum type:
public enum BulletType
{
	UL,
	OL
}
A value of type BulletType is assigned to the BulletListType property. An enum type cannot be a collection of strings; only basic types can be used, such as int or double. By giving the entries in the enumeration the same mnemonic names of HTML tags, you can easily associate each of them with the correct string using the ToString method. Listing 1 shows how to render the BulletList control to HTML, based on the value of the BulletListType property.
The full source code of the BulletList control is shown in Listing 2. Notice the technique used to generate the HTML for the control. The Render method?the procedure that calls into the CreatePanel method shown above?gets an HTML TextWriter object from the .NET Framework and sends text to it. You can implement the Render method in such a way that the code simply outputs text to the stream; alternatively, you can use a temporary instance of a control, configure it through properties, and then render it. The gain is that you end up with code far easier to read and maintain. This technique is frequently used within ASP.NET itself.
To add IntelliSense support to the HTML view of the visual designer, you need to provide the schema of the control: an XSD file.
Regarding Listing 1, the technique based on temporary controls might seem overkill. The following code would have worked great as well. Judge for yourself.
output.WriteBeginTag("ul");
output.Write(HtmlTextWriter.TagRightChar);
foreach(string elem in Items)
{
	output.WriteBeginTag("li");
	output.Write(HtmlTextWriter.TagRightChar);
	output.Write(elem);
	output.WriteEndTag("li");
}
output.WriteEndTag("ul");
Figure 1 shows the BulletList control in action based on this next bit of code.
<%@ Register TagPrefix="expo"
Namespace="CodeMag.Controls"
Assembly="BulletList" %>

<form runat="server" ID="Form1">
  <expo:BulletList runat="server" id="bList"
   DataTextField="lastname" _
   BulletListType="ul" />
</form>
#2: Make Your Control's Schema Visible to VS .NET
So now you have a custom control and want to use it in Visual Studio .NET. It couldn't be easier, as you probably experienced already. All Web controls that inherit from WebControl provide some default design-time capabilities. As soon as you start editing the HTML source of the control, you'll notice that the Visual Studio IDE doesn't know much about the schema of your control. Let's see how to extend Visual Studio .NET so that it also provides IntelliSense support for the attributes of the control and any of its permitted child tags.

If you switch to the HTML view of a Web Forms page, IntelliSense recognizes all ASP.NET standard controls and properly provides attribute lists and auto-completion. The same doesn't happen if custom controls are involved. The problem lies in the fact that in HTML edit mode, the IntelliSense engine has no way to access the run-time code of the control or to reflect its programming interface. To add IntelliSense support to the HTML view of the visual designer, you need to provide the schema of the control: an XSD file.
The XSD file must define the markup interface of the control and specify how many attributes it supports, their name and type, child elements, events, and enumerations. You can deploy this XSD file in the root folder of the virtual application or within the Visual Studio .NET subfolder. If you opt for the second possibility, the schema is available for all applications you build with Visual Studio .NET. Listing 2 shows the XSD for the BulletList control. The XSD is composed of three blocks: Control attributes, WebControl attributes, and the attributes specific to the BulletList control. All the properties described in the schema enjoy design-time support in the HTML view of Web Forms.
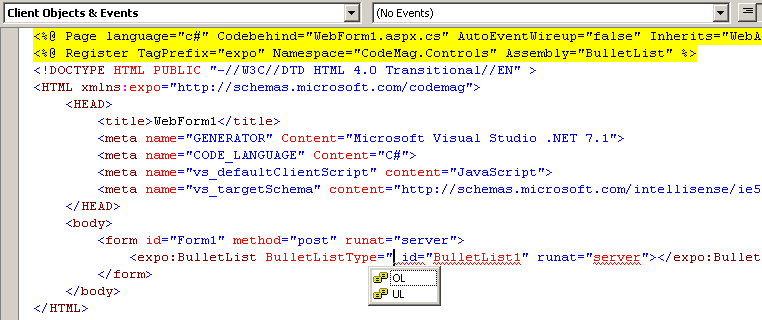
Having the XSD in the right place is not enough for Visual Studio .NET to activate code completion. You must explicitly bind the ASPX page you are writing with the target namespace of the document. This is accomplished by adding a namespace attribute to the <html> tag of the Web Forms page.
<HTML
xmlns:expo=_
   "http://schemas.microsoft.com/codemag">
The prefix used for the namespace must be used to qualify any instance of the control you use in the page. Once you do this, things go as shown in Figure 2.
#3: Truncate Text in Grid Columns
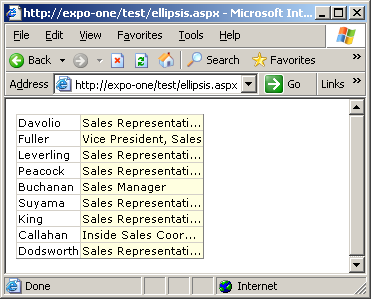
A common problem for ASP.NET developers and UI designers is that often the text you want to display in a grid exceeds the maximum width of the column. In this case, having the text wrap to the next line within the same cell is a viable option, but not necessarily an elegant option. What if you want to emulate the behavior of the Windows listviews and show an ellipsis at the end of truncated strings?
When I first approached the problem, I thought I could solve it by truncating the string to a fair number of characters. Although pretty easy to code, this technique is far from being optimal because it completely disregards the font in use. Depending on the font, and Web pages normally don't use mono-spaced fonts, the width of each character varies quite a bit, making a solution based on the number of characters displayed totally unreliable. In fact, in the space of an "M," you can sometimes fit the letter "i" four times.
When most programmers need to write reports of data, the DataGrid is the first control they look at.
A better approach is using the textOverflow CSS style for the browsers that support it: Internet Explorer 6.0 and later. This style only applies to text overflow in the horizontal direction and occurs when the text in a line overflows the available width. To force the display of ellipses, you must guarantee that the containing tag has no breaking opportunity. This means that you should wrap the content in a <NOBR> tag. The <NOBR> tag ensures that the text is not broken and wrapped in more lines. The textOverflow attribute works together with the Overflow attribute.
<SPAN
style="width:100px;overflow:hidden;text-overflow:ellipsis;">
<NOBR>text to display</NOBR>
</SPAN>
The Overflow attribute must be set to hidden if you want the exceeding text to be clipped out.
How can you apply this technique to a DataGrid column? You hook up the ItemDataBound event, retrieve the text being displayed, and then adjust it in light of the column width. This technique requires Internet Explorer 6.0 (or a browser that supports the TextOverflow CSS style) but doesn't care about the current font (see Figure 3). If you want a more compatible solution, I suggest that you resort to GDI+. You first calculate the effective width of the string given the current font. Next, if the string is too wide, you cut out the exceeding part and add an ellipsis.
#4: Two Rows for the Item
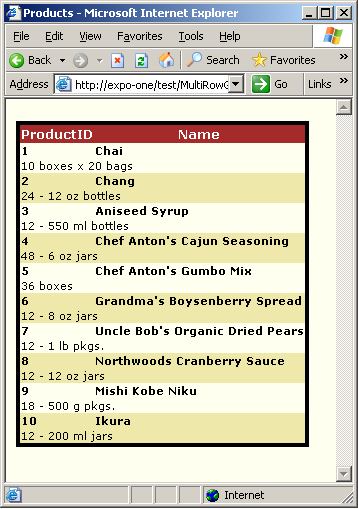
When most programmers need to write reports of data, the DataGrid is the first control they look at. The DataGrid control meets most, but not all, common user requirements in these situations. One of the (very few) things the DataGrid can't easily do is display data items on two rows. Let's consider a typical scenario: a report with product information in which each item is represented by multiple table rows. For example, the first row could contain product ID and name, and the second row contains the product description. The DataGrid is not ideal for this task because its user interface is designed to associate one data item with one row. Using the Repeater control might make the task straightforward but at the price of losing many useful (and automatic) formatting and editing capabilities of the grid. Is there a viable way in the middle?
With a Repeater, you could create multi-row reports by defining a table in the header template and then a couple of rows for each item. If you don't mind using a Repeater, this is just fine.
<headertemplate>
<table>
</headertemplate>
<itemtemplate>
<tr><td>...</td>...</tr>
<tr><td>...</td>...</tr>
</itemtemplate>
<footertemplate>
</table>
</footertemplate>
The DataList control offers the same capabilities of the Repeater plus advanced styling and formatting properties that you wouldn't readily sacrifice. Can you just use the DataList in lieu of the Repeater? As the code snippet above shows, when using the Repeater, you build the final table by combining HTML elements across templates. By design, you can't take the same liberty with a DataList. Put another way, with a DataList you can't place the opening tag of a table in the header and then close it in the footer. However, this doesn't mean that you can't have a multi-row item in a DataList.
The secret for building HTML tables using a DataList is in the ExtractTemplateRows property of the control. It gets or sets a Boolean value that instructs the DataList to extract the constituent rows from any HTML table in the templates. The idea is that you define brand new tables in each template: header, item, footer. Next, if the property is set to true, the control extracts the rows from all child tables and combines them together to create a single, all-encompassing table. ExtractTemplateRows is set to false by default.
The use of the property is subject to a few restrictions. The tables must all be defined using a well-formed <asp:table> tag. An exception is thrown if you define the table using the <table> element with or without the RUNAT attribute. The <asp:table> tag corresponds to a Table control, which is the only one to expose rows and cells programmatically. This is valuable information that allows the DataList to build a new table joining the rows defined in all constituent tables. All non-row tags are ignored. Listing 3 shows the source code of a DataList control that exploits templated rows. In Figure 4, you can see a sample page in action.
The ExtractTemplateRows property is helpful when you're going to create quite a complex structure in which tables with different templates are to be merged together. You can use the ColumnSpan and RowSpan properties of the TableCell object to control the number of columns and rows the cell spans. When the ExtractTemplateRows property is set to true, the RepeatColumns, RepeatDirection, and RepeatLayout properties are ignored and do not affect the appearance of the DataList control.
#5: Manage Global Data
In ASP and ASP.NET, the Application object represents the global state of the application. It contains data that is visible to all currently running sessions. In ASP.NET, though, the Application-intrinsic object is only one aspect of the Web application: the global state. To learn the best way to manage global data in Web applications, you should first fully understand the underpinnings of the ASP.NET runtime.
The root class of an ASP.NET application is defined in the global.asax file. Any user code there defines a new class that inherits from HttpApplication. If global.asax is not specified, the base class HttpApplication is used as the application class. ASP.NET runtime creates as many instances of the application class as is needed to process simultaneous requests. For most applications, this number falls in the 1-100 range depending on the hardware, the server workload, and the configuration. Instances of the application class are pooled and reused to serve many requests. It is important to notice that application instances are used in a thread-safe manner, one request at a time. This fact has a few important implications.
For one thing, users don't need to worry about locking to access non-static members of the application class. In addition, application code can store per-request data in non-static members of the application class. However, if you store data in members after the EndRequest event has fired, it keeps the request alive?potentially for a long time. You should just avoid that.
Just like any other class, the application class can have static members, but they are not thread safe. This means that the user code needs to provide appropriate locking around access to such members.
In light of this, there are three ways to store the global state of an ASP.NET application:
- Create a custom HttpApplication class and define custom, non-static members
- Define static members in the global.asax file
- Stick to the ASP-style Application dictionary
When you build an application using Visual Studio .NET, the project automatically creates a global.asax.cs file. It contains the application class derived from HttpApplication, typically named Global. To implement the first option, you can either change the base class to your custom class or add public non-static members to the Global class. Those members are automatically accessed in a thread-safe manner and are strong-typed data.
If you don't use Visual Studio .NET, static members are probably easier to define. A static member, in fact, can be defined directly in the global.asax file, as shown below.
<script language="C#" runat="server">
    public static int Counter = 0;
</script>
The Counter member is visible to all sessions as if it were stored in the Application object. To access the property from a page, use the following syntax.
int n = ASP.global_asax.Counter ++;
If you don't particularly like the ASP.global_asax prefix, you can name the HttpApplication class using the ClassName attribute within the @Application directive.
<%@ Application
   ClassName="Globals"
Codebehind="Global.asax.cs"
Inherits="WebApplication1.Global" %>
The preceding statement creates an alias for the ASP.global_asax class (or whatever name your global.asax class has). The alias, Globals in this sample code, can be used throughout your code wherever ASP.global_asax is accepted.
Response.Write(Globals.Counter.ToString());
Consider that concurrent access to the Counter property is not serialized and you are responsible for inserting any needed lock.
A final word needs to be stated about a couple of very special events, Application_OnStart and Application_OnEnd. From the perspective of ASP.NET, they aren't even application events but just callbacks made to the user code for classic ASP compatibility. Both events are fired only once per application lifetime, but not for every application instance. This means that changing non-static members in these methods affects only one application instance, not all instances. For this reason, the per-application-instance initialization could be done either in the constructor of the class or by overriding the Init method of the HttpApplication class.
Summary
I started this column blinking at the virtual category of real programmers. In spite of the jokes, real programmers need to be productive but technically straight-to-the-point and knowing the theory behind it all. In this article, I tried to merge a few ASP.NET issues that gave me quite a hard time. I hope that your experience is easier now. Enjoy it!
