So you finally have a product to sell, and a site to sell it on. But wait; how do you prevent unauthorized users from downloading your products?
Forms Authentication provides only part of the solution. In this article, I’ll show how to prevent specific users from accessing specific files on your site; even by browsing directly to them.
This article attacks a problem for which I have heard many solutions: How can I offer file downloads on the Internet and protect them from unauthorized downloading? There are many answers to this problem, but some are not without their own problems. In this article, I’ll review some of the techniques commonly used by software vendors, and then show you my solution for this. I should tell you that my solution is not a Miguel Castro original; it is, in fact, used by many ASP.NET sites-don’t ask me how the Java guys do it.
When you request an ASPX page, IIS takes that and passes it to the appropriate DLL for handling
Common File Protection Techniques
Many of us purchase software on the Internet all the time-a little too much, my wife tells me, but that’s another story. You’ve most likely experienced some of the common protection scenarios for file downloads. I’ll review them below.
Zip-file Password Protection
Simple in its approach, you don’t protect the file from being downloaded; instead you protect an unauthorized person from extracting the file’s contents. WinZip and many other compressors out there offer a password protection feature. However, as you can already imagine, once you give out that password to someone whom you consider authorized to access the file contents, there’s nothing stopping that person from giving that password to someone else. And you know how the Internet is; the password always gets around. The only thing you can really count on is the ethics of the person to whom you give the file and password, and hope that they don’t hand it out. You can take this kind of protection to a higher level by generating a zip on-the-fly for a specific person, and then sending them the file. You would, of course, need a file-storage solution that is inaccessible through the Web browser, since you need to have control over what files get sent to what user. This leads me to the second method of file protection.
E-mails
Many software vendors don’t post files for download on their Web sites. Instead, they send an e-mail to users who have purchased the product with the download details and sometimes even with the file itself. The e-mail can contain a link to download the file and indicate that it will only be accessible for a certain period time. Sometimes a software vendor might combine this technique with password protection. Any other protection required once the file is in the hands of the user is a topic for another article-licensing and registration. Other e-mail-based solutions also include dynamically generating file names.
Temporary File Names
To throw confusion and complication into the mix, some vendors dynamically generate a file name using a GUID or some other cryptic naming technique. They also tend to make the file available for download only for a limited time.
Reviewing the Techniques
While these techniques do work up to a point, a good programmer could crack them. But more importantly, none of these techniques offer you the ability to host a “client” area on your Web site where a user can look at their purchase history and re-download their software any time they wish. In my opinion, a site that offers this kind of features offers the best user experience and also the best manageability for you, the software provider. After the user has purchased the product, you can simply send the user an e-mail with their license key and a link to their “client” area on your site. Knowing that they can log in and download their software any time they want gives a user peace of mind, in case they ever lose their product files.
I’m going to show you how to provide just that very kind of user experience using ASP.NET Forms Authentication in conjunction with something called HTTP handlers.
HTTP Handlers
I’ve read many articles that discuss custom HTTP handlers in ASP.NET, and I’ve found many of them a bit complicated. I don’t think this topic is that difficult to comprehend.
I can offer many examples for when you could use HTTP handlers, but in this article I will concentrate on them in the context of solving the file protection problem.
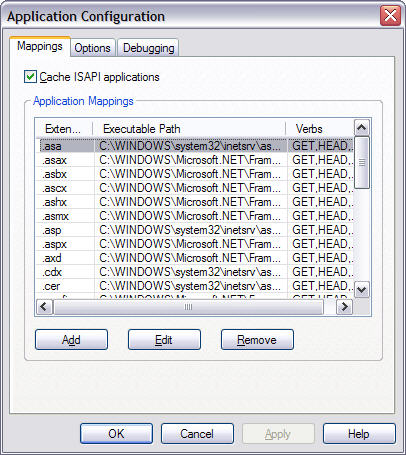
I’ll explain what a handler is and how they work, and I’ll keep the explanation as simple as possible. HTTP handlers are classes that handle requests passed to them by IIS. When you install ASP.NET on a machine, the installation process adds a bunch of entries to IIS (Figure 1). These entries include all the extensions for files that you expect ASP.NET to take care of (ASPX, ASMX, etc.). When you request an ASPX page, IIS takes that and passes it to the appropriate DLL for handling; in this case aspnet_isapi.dll, which then instantiates the appropriate HTTP handler that continues processing the request. In the case of ASPX pages, the HTTP handler that gets invoked is the Page class that resides in the System.Web.UI namespace. For a more detailed description and walkthrough of the details of what goes on behind the scenes in ASP.NET, I encourage you to read Rick Strahl’s excellent article entitled “A Low-Level Look at ASP.NET Architecture” in the Nov/Dec 2005 issue of CoDe Magazine.
In the case of an ASPX page, the Page handler builds the controls and fires the life cycle events; essentially everything that you normally take for granted when you browse to an ASPX page.
However, you can write a custom HTTP handler that intercepts any request made from the browser in an effort to adjust or customize the behavior that would normally take place. There are a couple of techniques for doing this, which I’ll teach you in this article, but first I want to talk about those IIS entries and something you may already be familiar with-Forms Authentication.
IIS and Forms Authentication
As I specified earlier, IIS sends registered extensions to the aspnet_isapi.dll. Figure 1 shows you the IIS window where the list of registered extensions is found. You can find this dialog box by clicking on “Configuration” after viewing the “Properties” of a Web site or a virtual directory. A fortunate by-product of having registered extensions handled by aspnet_isapi.dll is that any files with these extensions are subject to ASP.NET Forms Authentication. While this article is not meant to be a tutorial on Forms Authentication, I’ll demonstrate quickly how it works.
Custom HTTP handlers are classes that implement the IHttpHandler interface.
Forms Authentication allows you to secure Web pages against unauthorized access by anonymous users. The web.config file uses the following code to set up Forms Authentication:
<authentication mode="Forms">
<forms loginUrl="Login.aspx"/>
</authentication>
<authorization>
   <deny users="?"/>
</authorization>
This code prohibits users from accessing any page in a site without first going through an authentication process. If an anonymous user attempts to access a Web page, the code automatically redirects them to the Login.aspx page. It’s up to the site developer to decide which authentication technique to use in this page, but in ASP.NET 2.0 a developer can very easily accomplish this using the new security controls. (See sidebar, Wei Meng Lee’s Article on the Security Controls).
Now, I just said that this code prohibits unauthenticated users from accessing any page, but what I really should have said is that it prevents unauthenticated users from accessing any file that gets intercepted by aspnet_isapi.dll. This will all make sense in a few paragraphs.
To walk through what I want to accomplish in the rest of this article, I need to describe some specifics of my e-commerce site that I’ll be using.
My Plan for Protection
My site allows users to purchase software online. Users need to first register on my site before they can make any purchases or downloads. For the purposes of this article, I have a table for Users and a table for Products, each entity identified by a User Name and a Product ID. When a user makes a purchase, I create a record in another table that joins the user to that product using these fields. I’ll call this table UserProducts.
The goal is to store all my software product files in a folder called Files, which resides under my Web site root folder. My Products table has a field for the product file name which corresponds to one of the Zip files in my Files folder. I’ll call this field ProductFileName.
So without any protection, I can simply accept a user purchase, and then send the user a link via e-mail to the zip file where they can download it; but that isn’t secure at all, so I’ll take it step-by-step.
Securing All Zip Files
First I want to protect all zip files from unauthenticated users. I want to subject all files ending with the extension zip to ASP.NET Forms Authentication so that anonymous users cannot access them. Although this step is not crucial, it is more security on your files-which is not a bad thing.
Usually if you browse directly to a zip file on a Web site, the site prompts you to either open or save the file to your disk. I want ASP.NET to intercept a request to add files ending in a “.zip” extension, so I need to add the “.zip” extension to the list of application mappings in IIS.
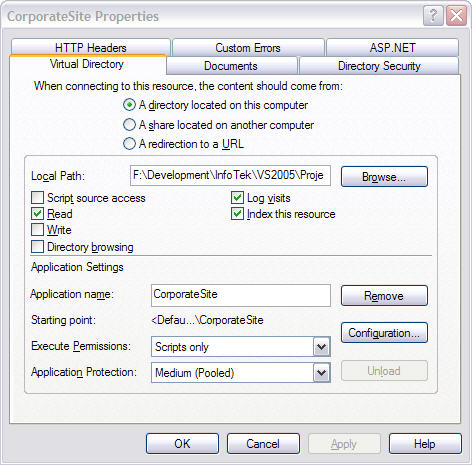
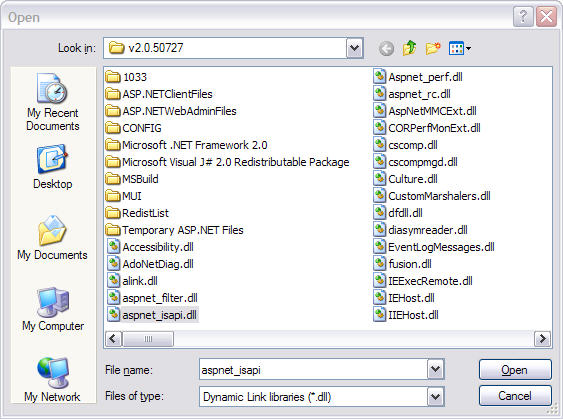
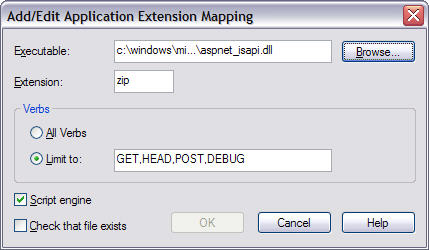
I start by opening up the IIS management console and locating the site (or virtual directory) in question. Right-clicking and selecting “Properties” displays Figure 2. If I click the “Configuration” button in the “Web Site” or “Virtual Directory” tab, I see the list of extensions and what DLL handles them (Figure 1). I need to add the “zip” extension to this list so I click the “Add” button. Enter “zip” in the extension text box and click the “Limit to verb” option button. In the Verbs text box, enter GET,HEAD,POST,DEBUG which indicates that “zip” files will be intercepted by aspnet_isapi.dll for these types of HTTP requests. In the “Executable:” text box I need to browse to the location of the aspnet_isapi.dll file (Figure 3). You’ll find this file in the “C:\WINDOWS\Microsoft.NET\Framework\” folder and under the proper framework version folder. My entry will look like Figure 4.
After I make this entry, my mappings list looks like Figure 5. Note all the other extensions in this list to which you normally would not browse: VBPROJ, CONFIG, etc. The aspnet_isapi.dll intercepts these extensions for protection purposes also. This is the reason you are redirected to a “denial” page when you attempt to browse to a web.config file.
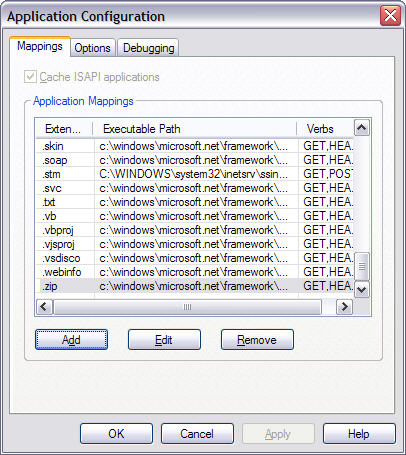
After I’ve made this entry in IIS, if I try to directly browse to a zip file on my site IIS will redirect me to the Login page if I’m not authenticated. These changes now protect my files from anonymous users; however, once you login to my site, the doors are open and I still don’t want this.
More Specific Protection
I want authenticated users to be able to browse to a page that lists their purchased software and click a link to download a specific product. Listing products for a user is a no-brainer using the table structure I defined earlier, but what about protecting the link? I’ve just protected all zip files from anonymous users, but now I want to prevent the users from browsing directly to zip files. For this I need to write a custom handler.
Custom HTTP handlers are classes that implement the IHttpHandler interface. This interface defines a method called ProcessRequest and a Boolean property called IsReusable. The property determines whether another request can reuse the same handler so I’m simply going to return a true value here. The method receives an argument of type HttpContext. This variable gives me access to the entire context of the request, including the information in the request and the method to order the request in another direction.
I’m going to create a handler called FileDenialHandler. This handler simply stops a request in its tracks and redirects the user to a page informing them that access is denied. When this handler gets hit it calls the ProcessRequest method and performs the simple redirection.
public void ProcessRequest(HttpContext context)
{
context.Response.Redirect(
   "~/Downloads/Files/AccessDenied.aspx");
}
As you can see here, my page resides in the Downloads/Files folder from my root. You can see the entire handler class in Listing 1.
Now, obviously the mere existence of this class does not do a thing-I have to wire it into the site. To do that I put it in a special section under <system.web> called <httpHandlers> in the web.config file.
The web.config file lists all special handlers in this configuration section and specifies information about them. This information includes the request verbs that instantiate this handler, the wildcard path that matches files you want this handler to handle, and the type definition for the custom handler. In this case, the addition to this configuration section looks like this:
<httpHandlers>
   <add verb="*" path="*.zip"
           type="DotNetDude.Web.UI.
            FileProtectionHandler,
            DotNetDude.HttpHandlers"/>
</httpHandlers>
The “type” argument is standard .NET type-notation with the fully qualified type and component assembly name separated by a comma. If you write your handlers in your actual Web project, you simply need to leave out the assembly name.
This entry now routes all requests for zip files into my new handler, thus immediately redirecting the requests to my “Access Denied” page. If I would have skipped the IIS entry in this example, things would still work the same because my handler is taking care of things. However, the effect I want is for anonymous users to get rerouted to my login page first before the system decides that they have accessed an illegal zip file.
If you look at the root web.config in the framework directory, you’ll notice a long list of handlers defined for many common file extensions used in ASP.NET. The handlers defined in the “<httpHandlers>” section of this file determine how IIS routes the ASPX pages, ASMX Web services, and all other files appropriately. This list of hander-definitions is also how certain file extensions are disallowed-like “*.config”. In fact, files ending with the “.config” extension are disallowed using a handler called HttpForbiddenHandler, which automatically displays a "HTTP 403 error Forbidden: Access is denied" page.
You’re probably asking why I didn’t just use this Microsoft-provided handler for the zip files? The answer: I certainly could have, but I wanted my own “access denied” page. I want to provide my own customized “denial” page that adheres to the look of my Web site. In some cases, I may even want to offer some more information to the user, or maybe even send an “unauthorized attempt” e-mail to an administrator using the code-behind class of this page.
I just blocked all zip files from being downloaded, but is this what I really want to do? Well, yes for now. I want to have absolute control over how files get downloaded from my site. I do not want to allow freeform browsing directly to zip files. Thanks to my table structure, I have a list of projects, users, and a relation list of products purchased by each user. So if I have a user name and a product ID, I can determine if this user purchased this product with a simple database query. And I want my users to click a link that initiates that query and decides whether downloading the file should be allowed. This is where it gets really cool.
Controlling the Download
I just taught you how to write a handler and install it so that it’s used for certain file requests; although my handler didn’t do much except reroute the request somewhere else. ASP.NET gives you another file extension that you can use for handlers right out of the box, without the need to install them in the web.config file-ASHX. You can create a class that ends with this extension, implement the IHttpHandler interface, and browse directly to that class, much like if it were a page. In fact it’s very similar to a page, except for the fact that you don’t get a Web Form and a Code-Behind class, so it’s a much cleaner solution.
Now, I want to create a new handler which I will call Download.ashx and have users browse to that location, specifying some information in the querystring arguments. This kind of URL is what my download links contain.
~/Downloads/Download.ashx?Product=101
This URL signifies a request to download the file associated with product 101. Now it’s up to the handler code to determine how to act.
A user or a link can access the above URL in an attempt to obtain a file. In doing so, the handlers ProcessRequest method executes, and here is where I put my checks.
I’ve authenticated my users using standard Forms Authentication, which gives me access to the User object in my site context. Remember the HTTP context is passed into the handler’s ProcessRequest method so I have access to everything I need right there. The User object allows me to obtain the name of the authenticated user using User.Identity.Name. Remember that I use this method to access the user in my Users table. Before accessing the user’s name, my code checks to see if they’ve authenticated using the User.Identity.IsAuthenticated Boolean value, and if not, it sends them to the “access denied” page. Also, I can access the product number sent into the request like this:
context.Request.QueryString["Product"]
So now I have the product number and the user name; I’m on my way. I now have the two pieces of information I need to access my UserProducts table and determine if this user purchased this product. Not only that, but remember I store the product’s file name in this table too-starting to get the picture?
OK, I have the user name and the product number, and I’ve used them both to determine if the user has purchased this product. If the answer is No, I can perform the same kind of redirection I did in the previous handler and shoot them over to an “access denied” page. For a cleaner solution, I may choose to redirect them to a page informing them that they have not purchased this product and offer them the ability to do so-gotta love Web-oriented capitalism.
If I’ve determined that the user has purchased this product, I can determine what the file is by looking at my ProductFileName field as I specified earlier. In my own design, I don’t store the entire path here, just the file name. I can obtain the file folder from a setting in my web.config, but you can do this however you want. So I now have the entire file path and name and the authority to begin a download. I’m going to do this in a method called StartDownload just for better encapsulation:
private void StartDownload(
    HttpContext context, string downloadFile)
{
      context.Response.Buffer = true;
      context.Response.Clear();
      context.Response.AddHeader(
         "content-disposition",
         "attachement; filename=" + downloadFile);

      context.Response.ContentType =
         "application/zip";

      context.Response.WriteFile(
         "~/Downloads/Files/" + downloadFile);
}
My ProcessRequest method calls the StartDownload method. You can see the entire listing for Download.ashx in Listing 2.
Let’s go over the code shown above.
My method receives the name of the file as well as the Http context. From here, all I’m doing is clearing out the response buffer, essentially eliminating anything from the request that got me here in the first place, setting up a new header, and then setting up the content type. The content type is standard “content type” notation that you see in many constructs today. Finally, I’m just spitting out the file (prefaced with the path) using the WriteFile method. The end result is the user receiving an “Open or Save As” window.
Notice that I’m using WriteFile to stream out the zip file, as opposed to redirecting the user to the zip file using Response.Redirect. If I use the latter method, the FileDenialHandler kicks in and sends the user to the “access denied” page instead.
Using this technique, clever users can browse directly to the Download.ashx file but they’re not going to get around the security checks. And if they try to browse directly to the zip file, they get redirected to the “access denied” page by the FileDenialHandler handler.
Pretty simple when you think about it.
Note the differences in the two types of handlers. One is a standard C# (or VB.NET) class that you can place in an external component. This is great if you need to write reusable handlers because you can compile them all into one DLL and share them among your sites. Of course, you need to register these in the web.config as I showed you earlier. The other type is an ASHX and you add it to your Web site just like one of its ASPX pages. In fact, you can probably accomplish something very similar to what I’m doing with Download.ashx with an ASPX page, but the ASHX handlers are a much cleaner solution and not subject to the page life cycle a standard ASPX page goes through.
Other Uses for Handlers
Custom HTTP handlers have many other uses too. In my site, I’m using a pretty slick method of syndicating contents of some of my business collections and I do that by browsing to an “rss” location. I registered the “rss” extension in IIS so it gets routed through ASP.NET. Then I created a custom handler to intercept all rss URLs and figure out what XML to stream out-hey that would make another pretty cool article. (
Another use includes intercepting all image files and embedding a watermark in them. The possibilities are endless so use your imagination.
Conclusion
Of all the approaches used to secure file downloading in ASP.NET, using HTTP handlers is the most effective and the most elegant. Using it with the combination of techniques I’ve shown you here not only ensures tight security from unauthorized users, but also grants you absolute control over how things happen when a user attempts a file download. Now, remember that once the file is in the possession of the user, there’s nothing stopping them from giving it out to someone else, so you must have some kind of licensing and registration built into your product-but that’s the topic for another article.


