


XNA Game Studio Express provides a faster and easier way to create games.
While several frameworks already exist to help facilitate creating games, XNA Game Studio Express lets you create games for Windows and for Microsoft’s Xbox 360. After a quick introduction of XNA Game Studio Express, I’ll show you how to make your own simple 2D game using XNA Game Studio Express.
If you have ever dreamed of being a game developer (honestly, who among us has not toyed with the idea at least a little?), this is your time in the sun. With the release of XNA Game Studio Express in December of 2006, Microsoft has begun a steady march on a mission to change the game development industry.
Microsoft released XNA Game Studio Express as a beta in early August 2006, followed up with a second beta a few months later in November, and then officially released version 1.0 in December of 2006 to much excitement in the game development community. The initial audience to embrace XNA Game Studio Express has been game development hobbyists and small independent game shops, but it is clear that the game development community as a whole has its eye on XNA Game Studio Express and where it is not only going but also where it is taking the game industry.
It Is Good to Be Free
One of the most attractive features of XNA Game Studio Express is its price. Everything you need to make a game with XNA Game Studio Express is free. Developers who want to use XNA Game Studio Express use C# Express, giving them the power and speed of developing with managed code in a free development environment. The only cost to game developer hopefuls is the art and sound assets, which in many cases they can find for free or create with free tools. It is pretty hard to argue with a price like that.
If you can afford the price (Did I mention it was all free?) you should make sure that your computer can actually handle developing with XNA Game Studio Express. Hardware requirements primarily consist of not having an older video card. You need a Direct3D 9.0 video card capable of at least Shader Model 1.1. You can purchase cards that meet this minimum requirement fairly inexpensively from most major computer electronic retailers. This may be a hurdle for people with older laptops, but most users won’t have trouble meeting the minimum requirements for XNA Game Studio Express.
Learn C#
Getting started with XNA Game Studio Express starts with learning C#. While you don’t need to be a C# expert to learn to use XNA Game Studio Express, you will need to have a basic understanding of the syntax and the initial concepts of object-oriented programming.
If you are pretty familiar with C# and you have some old experience with DirectX development, you may wonder where the tutorial and sample code are that show how to set up a graphic device and display that first black screen. Talking to the graphics device and getting a good blank slate is always a good first step game project and with DirectX this was quite an arduous task where you might set aside a few frustrating hours. Anyone who has developed with DirectX, both managed or unmanaged, knows that first project of figuring out how to set up resolutions, switching between full screen and windowed modes, and finally getting everything to a point that you can just have a simple black screen is an exercise in patience and a night of frustration, especially for newcomers.
Making that First Game Project
Well, to help prevent that frustration with XNA Game Studio Express, I will walk you through that initial “first game” project to get you started. I’ll use very slow and detailed steps so you won’t spend an entire evening getting this first step in game development successfully behind you.
Yes, that’s it! If you were greeted by a beautiful cornflower blue screen (it’s the new black), then congratulations! The rest of the night is now yours to spend on writing logic for a game and not on how to correctly set up communications with a graphics device.
You have just experienced a small part of the power of XNA Game Studio Express. To be fair, it is true that once you had established a communication with a graphics device with DirectX, you could have just created your own “Windows Game” template, but the point of using XNA Game Studio Express is that YOU did not have to. When you first install XNA Game Studio Express it installs the Windows Game template so that a new game developer can get up and running quickly without all the confusion.
The Game Loop
Another great example of this kind of “out of the gates” running mentality in XNA Game Studio Express is the game loop. Traditional game development has always involved a great deal of thought and philosophical debate on how to construct and use a game loop. Many people put a lot of time into this and new game developers often get lost just trying to wade through the many and differing discussions. New game developers just want to get started on their game but getting started on a game loop can cause confusion.
With XNA Game Studio Express, game loops are no longer a research topic or a stumbling block for new game developers. When you create a new XNA Game Studio Express game, the game loop is already there beneath the surface. Instead of developing the loop, game developers can immediately being putting game logic into the pre-existing Update method and display logic into the Draw method. These methods are not only automatically created when a new XNA Game Studio Express game is created, but they are automatically called by the hidden game loop and fire continuously during the life of the game. Now the developer can begin actual game development instead of trying to figure out how to correctly create an efficient game loop.
The Content Pipeline
Since XNA Game Studio Express makes creating a new game project simple and it takes care of creating an efficient game loop, what’s next on the list of XNA Game Studio Express features that continue to lower the learning curve for new game developers? That would be the content pipeline. This feature of XNA Game Studio Express aids game developers in getting content into their game. Whether that content is models, backgrounds, textures, sprite sheets, music, sound effects or even XML files, Microsoft has provided the content pipeline to make loading content a little easier and a bit more uniform.
Along with handling content loading, the content pipeline also makes it easier to distribute your games. The content pipeline that Microsoft provides converts all of your content pipeline loaded assets to “.xnb” files, which are a new file type specifically to XNA Game Studio Express called XNA binary files. These files, instead of your assets, are what will be shipped with your executable when you finally release your game. The content pipeline (and it’s outputted .xnb files) not only help keep track of your assets (since they are all part of your solution), but helps protect them a bit as well since currently there are not any tools to turn them back into their original asset type.
Now that I’ve given you an overview of how you load game content into the game you are making in XNA Game Studio Express, it might be nice to have a way of getting some user input to control that content. For that, Microsoft has given game developers the very intuitive and extremely easy to use Keyboard, Mouse, and Gamepad objects and their corresponding “state” objects to gather information about those devices.
Player Input
Suppose you want to see if the user has pressed the Escape key. You could do it like this:
if (Keyboard.GetState().IsKeyDown(Keys.Escape)
    == true)
{
    this.Exit();
}
The Keyboard object is an object that is already a part of XNA Game Studio Express and does not need to be created or initialize by the game developer. The Keyboard object just waits, ready to be used if needed. Getting information about the Mouse and Gamepad devices is just as simple through the Mouse and Gamepad objects. What that means is that gathering user input using XNA Game Studio Express is a snap.
Game Components
Game components, part of XNA Game Studio Express, are GameComponent classes that you can add to your main game class. GameComponent classes each have their own Update and Draw methods that are automatically called from the main game loop. This creates a lot of very powerful plug and play possibilities in your game design. While the XNA community has not seen a lot of game components appear yet, some early examples of calculating and displaying frames per second have appeared. As game developers get used to developing game components, adding rich game functionality to your game will be as easy as dropping in the needed GameComponent class. Hopefully game components have a great impact on game development.
Yeah, I Made That
I’ve covered some of the basic features that showcase the power of XNA Game Studio Express, but I have not yet mentioned one of the most powerful and coolest features of the framework. The feature that has generated the most buzz and has some of the highest wow factor is that you can play games you develop with XNA Game Studio Express on your Xbox 360. This feature, while cool, does come with a price. In order to play your creations on the Xbox 360, you need a membership to the Microsoft Creators Club which runs around $99 for a year membership. Try to develop for any other console at that price! No other company has given the general public this kind of officially supported access for development on a console before and this feature has great potential to start some changes in game development.
Getting Help
I wrote this article to give you an overview of XNA Game Studio Express and a brief glimpse of its power. As you begin to play with XNA Game Studio Express yourself, I am sure that you will have questions. Since I cannot possibly hope to answer all of your questions here (or even in a series of articles), I’ll point you to the Microsoft’s Creator’s Club site (http://creators.xna.com) to get your questions answered.
The Creators Club site is not only a great place to grab some Microsoft XNA Game Studio Express content such as new starter kits and samples, but it also has some of the most active support forums I have ever seen. You’ll find support from XNA community members, but even more importantly, the extremely helpful and knowledgeable XNA Game Studio Express developers at Microsoft also monitor the forums. If you post a question, you are sure to get an answer, often within hours, if not minutes, of your initial post.
The community around XNA Game Studio Express has been amazing and helpful right from the very beginning. I’d be neglectful if I do not at this point mention some of the great sites, resources, and games provided by the XNA Game Studio Express community (see sidebar, Community).
“The” Competition
With all of this power in XNA Game Studio Express and an active and growing community, how do you go about increasing the XNA Game Studio Express fever? You hold a game development competition and make the grand prize so attractive that game developers around the world from hobbyists to indies to professional houses want a shot at it. Microsoft has done that with their Dream Build Play competition (http://www.dreambuildplay.com). With a $10,000 grand prize and the potential for an Xbox LIVE Arcade publishing contract, this competition has most of the community working feverishly to get their game ideas completed and coded in time.
Now that you have learned a little about XNA Game Studio Express and the XNA Framework, let me show you how to make a game!
Drive Fast and Avoid the Oncoming Obstacles
In 1981, back when Microsoft was first getting its start, Microsoft was contacted to develop the BASIC programming language with the release of the new IBM PC computer. At that time, Bill Gates co-wrote a game to help demonstrate the abilities of the IBM PC and the new BASIC programming language. This game was DONKEY.BAS.
Today, the torch has been passed and I’ll show you how to create a clone of that simple game and its basic game play using XNA Game Studio Express. I’ll call the game “Drive Fast and Avoid the Oncoming Obstacles,” which is very similar to DONKEY.BAS and will consist of, you guessed it, a car driving fast along a road and avoiding obstacles. (That name could almost be a design document!)
I’ll start by listing some of the other design elements of the game.
- The only movement the player can make is switching lanes with their car by pressing the Spacebar key.
- Obstacles will scroll down through the screen in one of two lanes and the player must change lanes to avoid hitting the obstacles.
- The game will track how many obstacles the player has successfully passed. The more obstacles the player successfully avoids, the faster the car will go.
- Colliding with an obstacle will end the game and the player will have the choice of playing again or exiting the game.
That is some pretty simple game play, right? The XNA Game Studio Express will make this game pretty simple to put together as well, so let’s go ahead and get started!
Creating the New Game Project
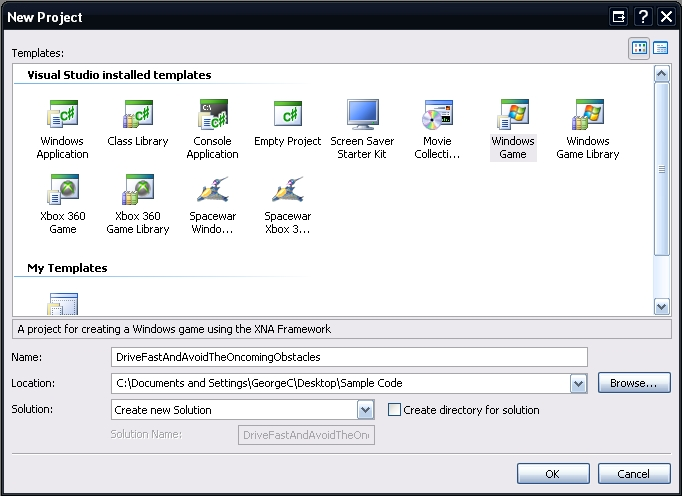
To begin you first need to create a new Windows Game Project. Launch XNA Game Studio Express and then from the File menu select New Project.
In the New Project window, select the “Windows Game” template (Figure 1) and then give the project and a save location. Call the game, “Drive Fast and Avoid the Oncoming Obstacles” so that Visual Studio names the project appropriately.
Stop here and do a quick build of the project so that you can see the power of XNA Game Studio Express and verify that you created the project correctly. This will also help you verify that your video card supports the minimum requirements for XNA Game Studio Express development.
When you run the project you should see a Cornflower blue window. If you see this wonderful new shade of blue, then you have successfully set up and created your new game project. Isn’t XNA Game Studio Express amazing?
If you have an error, then your video card most likely does not meet the minimum requirement for XNA Game Studio Express. Visit the XNA FAQ on the Microsoft site for a complete list of the minimum requirements. If you believe your video card does meet those requirements and you get an error, then I recommend you head over to the Creator’s forums and ask for some help. The forums are quite active and it is likely someone will be able to help you fairly quickly.
Adding the Road Image
Now that you have the game set up correctly, I’ll show you how to add your first image to the project. This “road” image will scroll vertically through the screen, but for now let’s just work on getting the image added to the project to display it.
To add an image to the game project, right-click on the project name and select Add > Existing Item. This will then open the Add Existing Item dialog box.
This dialog box defaults to show only “Visual C# Files,” which means you will not see any images until you change this filter. To use the Content Pipeline to manage your images, select Content Pipeline Files from the “Files of type:” combo box. Now you should be able to navigate to your image. Select the image and then click Add. With your image successfully added to your game project, I’ll now show you how to display it (Figure 2).
Drawing the Road Image
So far you’ve created the game project and added the image so now let’s finally write some code to draw that image on the screen. To start you’ll add two new objects to the main game class (Game1.cs by default). These two objects will store the image and draw the image to the screen.
private SpriteBatch mSpriteBatch;
private Texture2D mRoad;
SpriteBatch, an XNA Framework object, is used to draw the images to the screen. Texture2D, another XNA Framework object, is used to store an image. You’ll use both of these objects frequently when creating 2D games with XNA, so learning to use them and all they can do becomes very important.
With the objects declared you now need to initialize and use them. To initialize the objects you’ll add some code to the LoadGraphicsContent method. You may have noticed that there were already some additional objects added to the top of your game class and that your class is already populated with methods. These objects and methods are created automatically when you create a project using the Windows Game template. Adding code to these methods is how you begin to fill in the skeleton of the framework that will be your game.
Add the following code to the LoadGraphicsContent method within the “if” block found within that method.
if (loadAllContent)
{
    mSpriteBatch = new
        SpriteBatch(graphics.GraphicsDevice);
    mRoad = content.Load<Texture2D>("Road");
}
This code initializes the SpriteBatch object and then loads the road image from the disk and stores it in the Texture2D object. That is fairly straightforward, right?
With the objects initialized you can draw the road image to the screen by adding some code to the Draw method. That’s pretty intuitive isn’t it? The Draw method is another one of those base methods that was automatically created when you made a new Windows Game project and is where you stick your drawing logic.
Go to the Draw method and begin by making the “screen wipe” color a little better looking for the road image. To do this we will change the pre-existing line of code that clears the screen to a Cornflower blue to look like the code below.
graphics.GraphicsDevice.Clear(Color.SaddleBrown);
The Cornflower blue just doesn’t look as good with the road image as SaddleBrown does. Now that you’re clearing the screen with an eye pleasing color, let’s begin the drawing.
Add the following code to the Draw method.
mSpriteBatch.Begin();
mSpriteBatch.Draw(mRoad, new Vector2(0,0),
    Color.White);
mSpriteBatch.End();
This code tells the SpriteBatch object that you are ready to begin drawing things to the screen. Then to draw the road image to the screen you’ll pass in the screen position for the image (in this case you indicate to start drawing it in the upper left of the screen). The Color.White parameter that you pass in to the SpriteBatch’s Draw method tells the object that you do not want to apply any tint to the image.
Finally, you tell the SpriteBatch object that you’re finished drawing (mSpriteBatch.End()). Your road image is ready for its big debut.
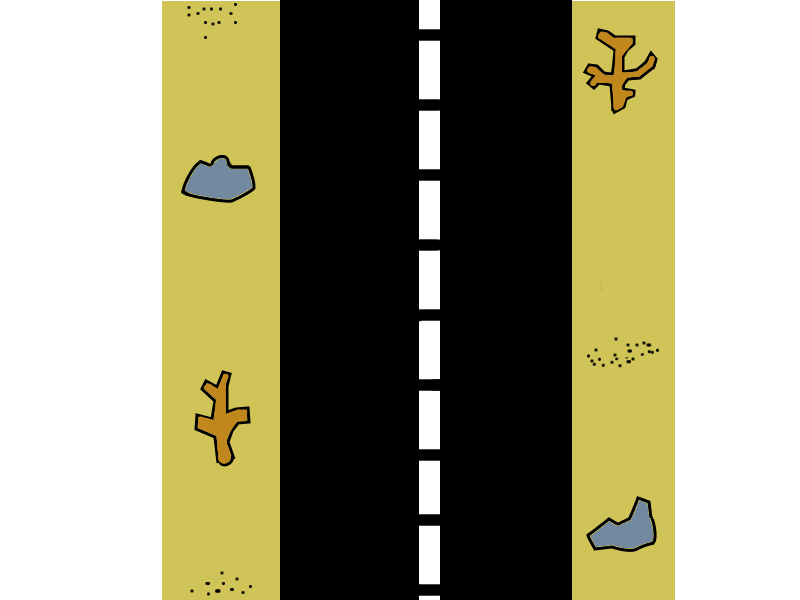
Stop and do a quick build just to make sure you have coded things correctly and that the road image displays as it should. When you do a build you should see a screen like in Figure 3. Looking good isn’t it?
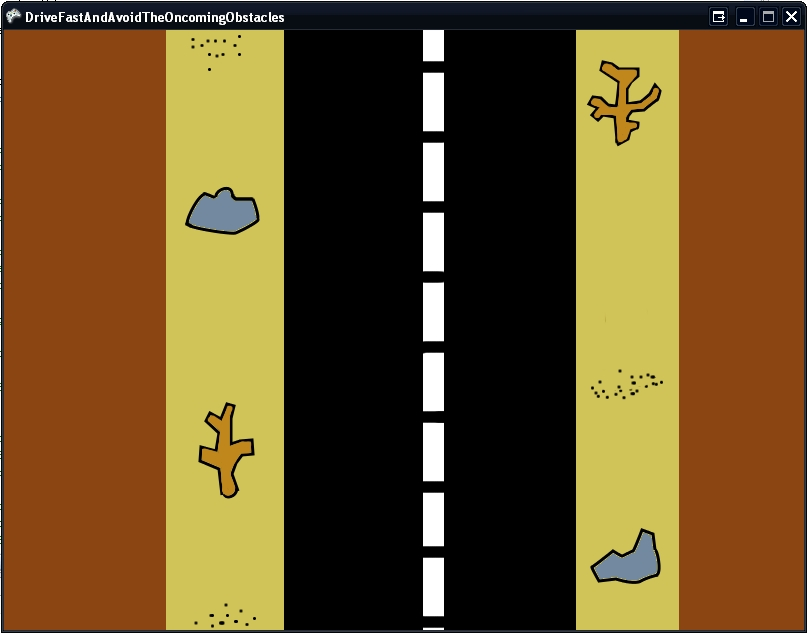
Now that the road image displays correctly, let’s go ahead and begin working on some code to start scrolling the road.
Scrolling the Road
To get the road image scrolling you’ll add some new objects to the class. Insert this code snippet towards the top where you added the SpriteBatch and Texture2D objects.
private float mVelocityY;
private int[] mRoadY = new int[3];
The array of integers will keep track of a “chain” of road images that will continually move down through the screen to simulate movement on the road. The float will keep track of the velocity of the road in the Y direction so you know how fast the road should move. This will start as a constant value but later that will change as the game progresses to increase the difficulty.
Now you’ll create a new method called StartGame to initialize the various tracking objects to their starting positions. You’ll also use StartGame to re-start the game when appropriate.
Add the following StartGame method to the Game1.cs class.
protected void StartGame()
{
    mRoadY[0] = 0;
    mRoadY[1] = mRoadY[0] + -mRoad.Height + 2;
    mRoadY[2] = mRoadY[1] + -mRoad.Height + 2;

    mVelocityY = 0.3F;
}
You’ll call the StartGame method to initialize all of the objects when the game starts. To do that you’ll add a call to the Initialize method found in the game class. It is important to call StartGame AFTER the base.Initialize() method has fired so that you know the Texture object has already been created (mRoad) since you’ll use its Height property to properly position the road images.
Add the following code to the Initialize method AFTER base.Initialize().
StartGame();
Now that you’ve initialized the tracking objects for your scrolling road, you must create a method to do the logic of actually scrolling the road.
Add the following ScrollRoad method to the Game1.cs class.
private void ScrollRoad(GameTime theTime)
{
    //Loop the road
    for (int aIndex = 0; aIndex < mRoadY.Length;
        aIndex++)
    {
        if (mRoadY[aIndex] >=
            this.Window.ClientBounds.Height)
        {
            int aLastRoadIndex = aIndex;
            for (int aCounter = 0; aCounter <
                mRoadY.Length; aCounter++)
            {
                if (mRoadY[aCounter] <
                    mRoadY[aLastRoadIndex])
                {
                    aLastRoadIndex = aCounter;
                }
            }

            mRoadY[aIndex] =
                mRoadY[aLastRoadIndex] -
                mRoad.Height + 2;
        }
    }

    //Move the road
    for (int aIndex = 0; aIndex < mRoadY.Length;
        aIndex++)
    {
        mRoadY[aIndex] += (int)(mVelocityY *
        theTime.ElapsedGameTime.TotalMilliseconds
            );
    }
}
You want to call this method every time the game updates so add the following line of code to the Update methods of the game class.
ScrollRoad(gameTime);
The only thing remaining to get this road scrolling is to loop through and draw each of the road images to the screen. You’ll use the same texture for each image but you’ll just draw it at a different Y location on the screen.
Now you’ll remove the existing lines of code you used to draw the road image to the screen and instead you’ll add the following code to the Draw method.
mSpriteBatch.Begin();

for (int aIndex = 0; aIndex < mRoadY.Length;
    aIndex++)
{
    mSpriteBatch.Draw(mRoad,
    new Vector2(0, mRoadY[aIndex]), Color.White);
}

mSpriteBatch.End();
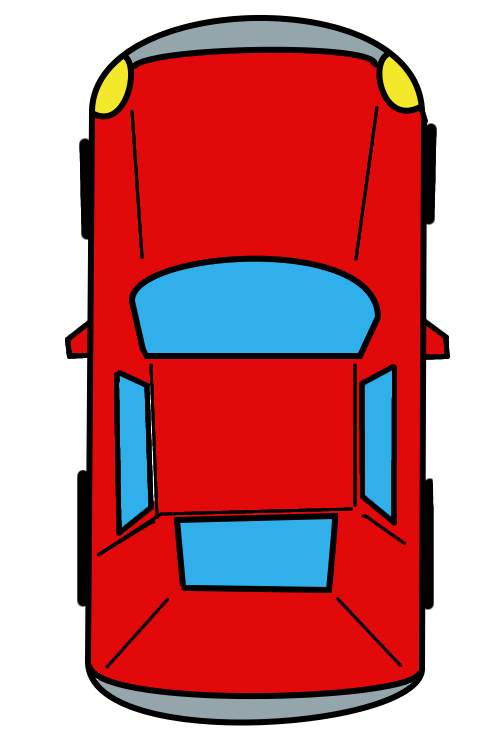
Add the Car Image
Now you’ll add the car image (Figure 4) to the project exactly how you added the road image and then add a new Texture2D object to the class to store the car image.
Add the following code to the beginning of the Game1.cs class.
private Texture2D mCar;
private Rectangle mCarPosition;
You saw the Texture2D object before when you added the road image and once again you’ll use it to store an image. The Rectangle object is an XNA Framework object used to store a rectangular shape with positioning and size information. In this game it will keep track of where the car is and how big the car should be.
Now you need to add code to initialize these new objects. Add the following line of code to the StartGame method to initialize the position object.
mCarPosition = new Rectangle(280, 440,
    (int)(mCar.Width * 0.2f), (int)(mCar.Height *
    0.2f));
Next you will need to initialize the Texture2D object by loading the car image from file and storing it in the object.
Add the following line of code to the LoadGraphicsContent method right where you previously added the code to load the road image.
mCar = content.Load<Texture2D>("Car");
With the car positioned and the image loaded, you can now draw the image to make sure you have it all set up properly. When drawing 2D images with the SpriteBatch, it is important to draw your images back to front. If you draw the car first, and then draw the road, the road image will be drawn over the top of the car image and the player will never see it.
Add the following line of code to the Draw method and make sure the road image is being drawn BEFORE the car image.
mSpriteBatch.Draw(mCar, mCarPosition,
    Color.White);
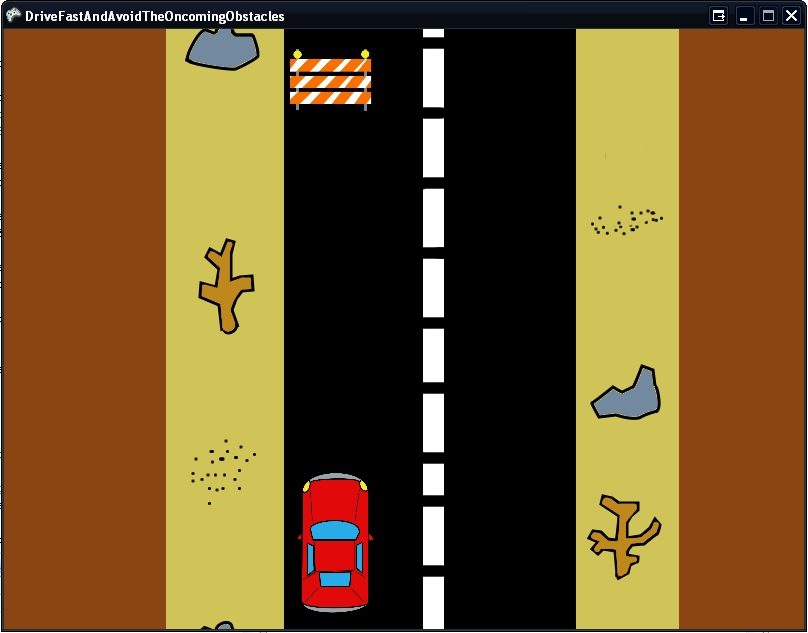
Build and then run your game project just to make sure you added the drawing code for the car correctly. You should see your little red car zooming along your road as shown in Figure 5.
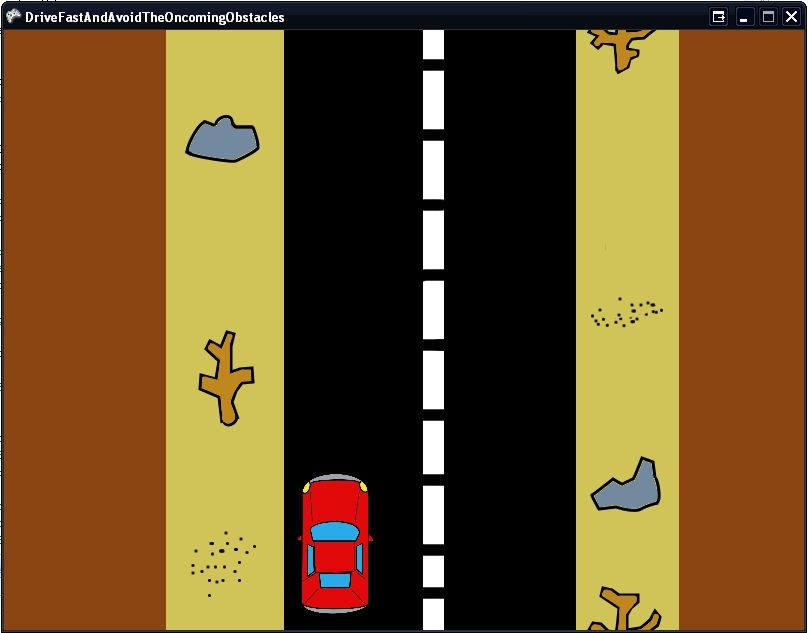
With the car successfully added, let’s start getting some user input to move the car.
Getting the User Input: Keyboard
To begin gathering user input from the keyboard correctly you will add some new class-level objects to the game. Add the following code to the beginning of the Game1.cs class.
private KeyboardState mPreviousKeyboardState;
private int mMoveCarX;
The KeyboardState object is part of the XNA Framework and you use it to store the state of the keyboard. You will query what keys are pressed and what keys are not being pressed at a given point in time. The KeyboardState object you created will store the previous state of the keyboard so you can check to see if a key that the user is currently pressing was pressed last time you checked the state. This allows you to do things like enforce that the user must release a key before an action is taken again. In this case you want to move the car between lanes every time the user presses the Spacebar, but you don’t want to continually move the car between lanes while the user holds the Spacebar down. That is where the mPreviousKeyboardSate comes into play.
The second object, the integer, stores how far you will move the car in the X direction. You’ll use this value to move the car back and forth between the lanes. Let’s start by initializing the movement integer in the StartGame method. Add the following line of code to the StartGame method.
mMoveCarX = 160;
Now you’ll add code to the Update method to check for the user input and then move the car accordingly. You want the car to switch lanes when the user presses the Spacebar and you want to make sure they have released the Spacebar before you move it again. Add the following lines of code to the Update method.
KeyboardState aCurrentKeyboardState =
    Keyboard.GetState();

if (aCurrentKeyboardState.IsKeyDown(Keys.Escape)
    == true)
{
    this.Exit();
}

if (aCurrentKeyboardState.IsKeyDown(Keys.Space) ==
    true &&
    mPreviousKeyboardState.IsKeyDown(Keys.Space)
    == false)
{
    mCarPosition.X += mMoveCarX;
    mMoveCarX *= -1;
}

mPreviousKeyboardState = aCurrentKeyboardState;
This code starts off collecting information about the current state of the keyboard. Next, it checks to see if the user has pressed the Escape key. That indicates that the user wants to exit the game.
Now using that information from the current state of the keyboard, you then check to see if the Spacebar has been pressed and that it was not pressed since the last time you checked (this prevents the user from holding it down to continually switch lanes). If the user pressed the Spacebar, then you move the car between the lanes by changing its current X position.
Finally, you store the current state of the keyboard in the mPreviousKeyboardState object for use next time through the Update method.
Go ahead and build the project again. When you press the Spacebar, the car should move between the lanes as it zooms along the scrolling road.
Getting the User Input: Xbox 360 Controller
Similar to keyboard support, you can easily add gamepad support to your game for any wired Xbox 360 (or wireless with the appropriate dongle adapter) controller. Both will plug into a USB port on your computer and the XNA Framework has built-in support for the Xbox 360 gamepad.
To begin gathering input from the gamepad correctly, you need to add some more class-level objects to the game.
Add the following code to the beginning of the Game1.cs class.
private GamePadState mPreviousGamePadState;
The GamePadState object is built into the XNA Framework and allows you to store the state of the gamepad. You’ll use this object pretty similarly to how you used the KeyboardState object. You just need a way to check to see if the user has pressed and released a button on the gamepad.
Now you need to add some code to the Update method to check to see if the user has pressed a button on the gamepad.
You’ll enhance the code that checks to see if the Escape key has been pressed to also now check to see if the Back button on the gamepad has been pressed. If so, then exit the game.
Add the following lines of code to the Update method.
KeyboardState aCurrentKeyboardState =
    Keyboard.GetState();

GamePadState aCurrentGamePadState =
    GamePad.GetState(PlayerIndex.One);

if (aCurrentKeyboardState.IsKeyDown(Keys.Escape)
    == true ||
    aCurrentGamePadState.Buttons.Back ==
    ButtonState.Pressed)
{
    this.Exit();
}

if
    ((aCurrentKeyboardState.IsKeyDown(Keys.Space)
    == true &&
    mPreviousKeyboardState.IsKeyDown(Keys.Space)
    == false) || (aCurrentGamePadState.Buttons.X
    == ButtonState.Pressed &&
    mPreviousGamePadState.Buttons.X ==
    ButtonState.Released))
{
    mCarPosition.X += mMoveCarX;
    mMoveCarX *= -1;
}

mPreviousKeyboardState = aCurrentKeyboardState;
mPreviousGamePadState = aCurrentGamePadState;
This code gets the current state of the gamepad then checks to see if the user has pressed the Back button on the controller (or the Escape key on the keyboard).
The code next checks to see if the user has pressed the “X” button on the controller and if they have, then the car will move. (Very similar to how you used the “Space” key previously).
Finally, the code stores the current state of the gamepad in the previous gamepad state object for use next time through the Update method.
Go ahead and build the project. You should be able to use your Xbox 360 controller to move the car between the lanes and exit the game.
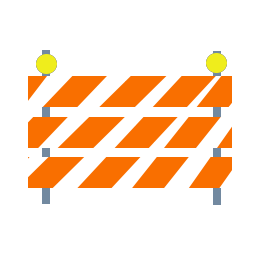
Add the Hazard Image to the Game
With the road scrolling and the car now successfully changing lanes, let’s add an obstacle for the car to avoid. You’ll start this next stage in the development of your game by adding the hazard image (Figure 6) to the project. You’ll follow the same technique as before and once you’ve added the image, you’ll once again need to add a Texture2D object to store it in.
Add the following code to the beginning of the Game1.cs class.
private Texture2D mHazard;
private Rectangle mHazardPosition;
This code uses the Texture2D object to store the car image and the Rectangle object will hold the size and current position of the hazard on the screen.
You now will need to initialize this position, so add the following code to the StartGame method to set the initialize size and starting position for the hazard.
mHazardPosition = new Rectangle(275, 0,
     (int)(mHazard.Width * 0.4f),
     (int)(mHazard.Height * 0.4f));
Now you need to load the image off the disk and into the Texture2D object.
Add the following code to the LoadGraphicsContent method.
mHazard = content.Load<Texture2D>("Hazard");
Finally, you will need to draw the hazard image to the screen so you will need to add the following code to the Draw method.
mSpriteBatch.Draw(mHazard, mHazardPosition,
    Color.White);
Place this code before the SpriteBatch.End() but after the road and car have been drawn. Remember that the order in which things are drawn is important.
Now you should build the project and verify that your code properly draws the hazard image to the screen (Figure 7).
The image will draw in the upper left lane and looks a little funny because it’s not moving with the scrolling road. Let’s address that now.
Move the Hazard
The hazards will scroll down through the screen on the road and as they exit the bottom of the screen they will reappear randomly in the right or left lane and repeat the process all over again. To introduce this randomness, you first need to add a Random object.
Add the following line of code to the top of the Game1.cs class.
private Random mRandom = new Random();
When working with Random objects in a game, it is useful to typically only make one and use it throughout the entire game. This helps ensure that your randomness is as random as it can be. Initializing multiple random objects can often lead to the same numbers being generated, especially if the random objects were created on similar ticks.
Let’s make the hazard glide into the screen a little nicer. This won’t currently happen since the hazard is positioned at the top of the screen. To fix this you’ll change the initial starting position of the hazard to be just off the screen at first so that it can then scroll down into the screen. That way it does not look like the hazards just magically pop in at the top.
Change the following line of code in the StartGame method to look like this.
mHazardPosition = new Rectangle(275,
    -mHazard.Height,
    (int)(mHazard.Width * 0.4f),
    (int)(mHazard.Height * 0.4f));
Now you’ll create a method to move the hazard down through the screen. You’ll use a similar technique to how the road scrolls.
Add the following UpdateHazard method to your Game1.cs class.
private void UpdateHazard(GameTime theTime)
{
    mHazardPosition.Y += (int)(mVelocityY *
       theTime.ElapsedGameTime.TotalMilliseconds);

    if (mHazardPosition.Y >
        this.Window.ClientBounds.Height)
    {
        mHazardPosition.X = 275;
        if (mRandom.Next(1, 3) == 2)
        {
            mHazardPosition.X = 440;
        }

        mHazardPosition.Y = -mHazard.Height;
    }
}
This code will move the hazard down the screen. It will check to make sure the hazard has not moved past the boundaries of the screen. If the hazard has moved past the boundaries of the screen, then this means the player can no longer see the hazard. When that occurs, the code uses the Random object to randomly pick a lane to make the hazard appear in and then the code will change the hazard’s position to be just off the top of the screen in that lane.
Now that you’ve changed the UpdateHazard method, you need to add a call to this method in the Update method itself.
Add the following line of code to the Update method just after the ScrollRoad method call.
UpdateHazard(gameTime);
Now build the project again to make sure you’ve done everything correctly. When you run the game, you should see the hazards scrolling down the screen one after the other and randomly appearing in the lanes.
Your car can currently drive right through the hazard, and we’ll add code to correct for that in just a bit. First we’ll add code to keep score. This game will simply keep track of the number of hazards that the car has successfully passed.
Display the Number of Hazards Passed
The XNA Framework provides a pretty nice way of getting text to display in a game. To begin the process, you need to add a new item to your project. So right-click on your project and choose Add New Item from the context menu.
In the Add New Item dialog box (Figure 8), select the Sprite Font object. Name it “myFont” and click Add.
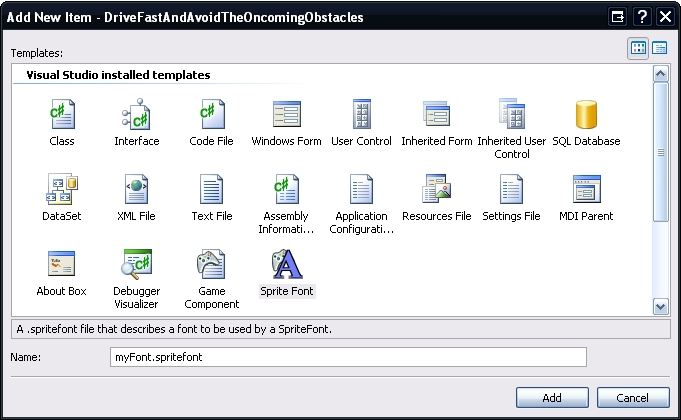
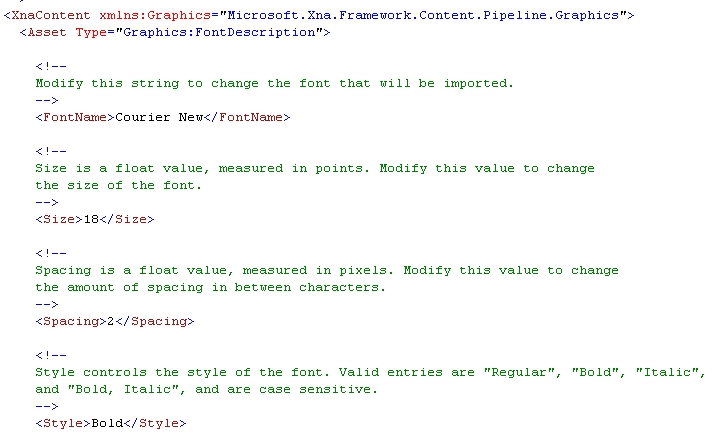
This will add a new SpriteFont object to your project, which is basically an XML file that gives some information about a system font that you want to use in your game. You’ll need to edit that information to indicate which font to use as well as the size and style of the font.
Edit the SpriteFont XML file as shown in Figure 9.
Now that you’ve created a font and defined how you want it to look, you need to add two new objects to the top of the Game1.cs class.
private int mHazardsPassed;
private SpriteFont mFont;
The integer object will keep track of how many hazards the player has successfully passed. The SpriteFont object allows you to load a font into the game, which you can use to write text to the screen.
The code snippet below will initialize the number of hazards passed in the StartGame method. That way, every time the user starts or restarts the game, the number of hazards the player has passed can reset to 0.
Add the following line of code to the StartGame method.
mHazardsPassed = 0;
Next you need to load the font into the SpriteFont object. Add the following line of code to the LoadGraphicsContent method.
mFont = content.Load<SpriteFont>("myFont");
Every time a hazard has scrolled off the screen-criteria for the player successfully passing a hazard-you need to increment the hazards passed counter. To do that you’ll enhance the UpdateHazard method. While you’re in there, you’ll also increase the velocity every time the player successfully passes a hazard just to add an extra level of complexity to the game.
Add the following code to the UpdateHazard method within the “If” block that checks to see if the hazard has exited the viewing area.
mHazardsPassed += 1;
mVelocityY += 0.1F;
Finally, you’ll use this snippet to display the number of hazards the player has passed.
Add the following code to the Draw method.
mSpriteBatch.DrawString(mFont,
    "Hazards: " + mHazardsPassed.ToString(),
    new Vector2(5, 25), Color.White, 0, new
    Vector2(0, 0),
    1.0f, SpriteEffects.None, 0);
Build the game and check your handiwork. As the hazards scroll off the screen, you should see the number in the upper left of the window display the number of hazards (and increase) as shown in Figure 10.

You’re almost ready to start making it a little harder to run right over the hazards, but first there’s one more concept to add to the game. When working on a game, you reach a point where you realize that depending on what’s going on, you need to display certain things at certain times, but not at others. This brings me to the topic of game state.
Game State
Game state, in its simplest form, is just a way of keeping track of what state your game is in. For this game, there are only two states: Running and Crash, and you’ll create an enum to hold the various states of the game.
For more complicated games, the game state system becomes a bit more robust, but it’s important to understand game state and how you might use it before you get to that point.
So once again you need to add some new objects to your game class. You want an enum to define the various states the game can be in and an object to indicate which state the game currently is in.
Add the following code to the top of the Game1.cs class.
private enum State
{
    Running,
    Crash
}

private State mCurrentState;
Next you need to make sure that when the game starts you initialize the current state to running. Here you’ll modify the StartGame method.
mCurrentState = State.Running;
Next you’ll enhance the Update method to respond to the various states. Using the states information, you’ll update certain things when the game is running.
Add the following code to the Update method.
KeyboardState aCurrentKeyboardState =
    Keyboard.GetState();

GamePadState aCurrentGamePadState =
    GamePad.GetState(PlayerIndex.One);

if (aCurrentKeyboardState.IsKeyDown(Keys.Escape)
    == true ||
    aCurrentGamePadState.Buttons.Back ==
    ButtonState.Pressed)
{
    this.Exit();
}

switch (mCurrentState)
{
   case State.Running:
   {
    if
    ((aCurrentKeyboardState.IsKeyDown(Keys.Space)
    == true &&
    mPreviousKeyboardState.IsKeyDown(Keys.Space)
    == false) || (aCurrentGamePadState.Buttons.X
    == ButtonState.Pressed &&
    mPreviousGamePadState.Buttons.X ==
    ButtonState.Released))
    {
         mCarPosition.X += mMoveCarX;
         mMoveCarX *= -1;
     }

     ScrollRoad(gameTime);
     UpdateHazard(gameTime);

     break;
   }
   case State.Crash:
   {
     break;
   }
}

mPreviousKeyboardState = aCurrentKeyboardState;
mPreviousGamePadState = aCurrentGamePadState;
Basically you are taking the existing code in the Update method and putting it within a Switch block for the case when the current state is running. The Keyboard state still remains outside of the block, but has been shown for context.
Currently, the game doesn’t do anything when a crash occurs and there is not even a way to detect a crash. You’ll change that in the next section, but first, quickly build the game just to make sure everything still runs as it should with the newly added game state code.
Collision Detection-Game Over Man
Without collision detection, the game is pretty easy to play. Luckily, adding simple collision detection into the game is fairly easy as well.
The XNA Framework has functionality built into the Rectangle objects that allow you to check if another Rectangle object is intersecting them. You’ll use this functionality and add it to the Update method to check if a hazard has collided with the car. When a collision does occur, then you need to switch the current game state to Crash.
Once a crash has occurred, the game will be over but you need a way to allow the user to play the game again or exit and you should probably tell them how to do that.
Go ahead and add the following code to the Update method. This code replaces the existing UpdateHazard call.
if (mHazardPosition.Intersects(mCarPosition) ==
    false)
{
    UpdateHazard(gameTime);
}
else
{
  mCurrentState = State.Crash;
}
This code checks for a collision by using the Intersects method of the Rectangle object. When a collision is detected, the current state of the game changes to Crash to reflect this.
You also want to add the following lines of code within the Crash case of the Switch block within the Update method.
if (aCurrentKeyboardState.IsKeyDown(Keys.Enter) ==
    true || aCurrentGamePadState.Buttons.Start
    == ButtonState.Pressed)
{
    StartGame();
}
This code checks to see if the user has pressed the “Enter” key or the “Start” button. If either of them has been pressed then it calls the StartGame method, which will restart the game for the player.
Now that the code responds to the various states of the game in the Update method, you need to do the same within the Draw method.
Add the following code just after the line of code that draws the current number of hazards that the car has passed.
if (mCurrentState == State.Crash)
{
    mSpriteBatch.DrawString(mFont, "Crash!",
        new Vector2(5, 200), Color.White, 0,
        new Vector2(0, 0), 1.0f,
        SpriteEffects.None, 0);
    mSpriteBatch.DrawString(mFont,
        "'Enter' to play again.",
        new Vector2(5, 230),
        Color.White, 0, new Vector2(0, 0), 1.0f,
        SpriteEffects.None, 0);
    mSpriteBatch.DrawString(mFont,
        "'Escape' to exit.",
        new Vector2(5, 260),
        Color.White, 0, new Vector2(0, 0), 1.0f,
        SpriteEffects.None, 0);
}
This code displays some informational text to the player, but only if the current state of the game is Crash. The user then knows how they can exit the game or replay.
We Are DONE!
Now you can build the project for the last time and play the game (Figure 11).
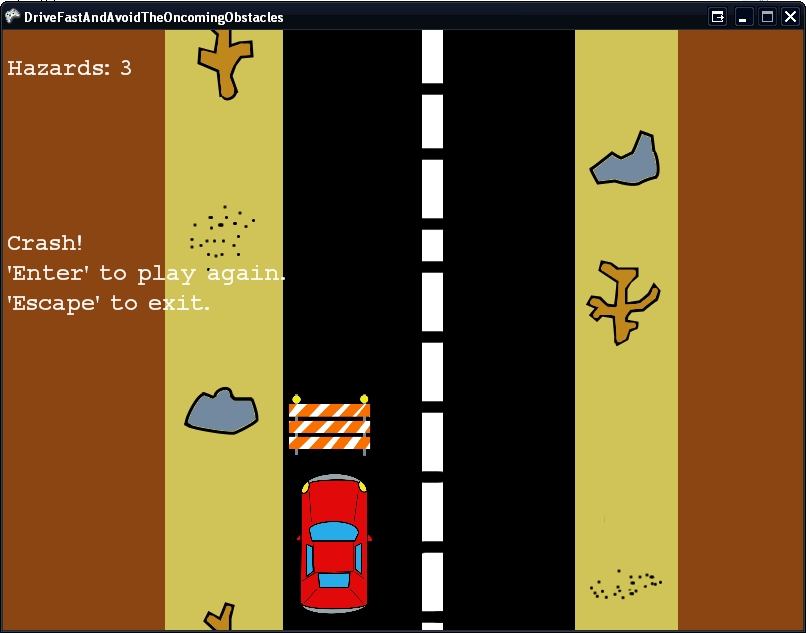
That’s right! You now have a functional game. Sure you can make some enhancements to make it a little prettier, a bit more challenging and more interesting, but I’ll leave that to your very capable minds.
In Conclusion
XNA Game Studio Express is a perfect fit for a game developer. With a small learning curve, low (or no) cost, a thriving community and excellent support from Microsoft, if you are interested in giving game development a shot, this is your time. By making it intuitive and easier to get a game started and developers developing quicker, Microsoft is opening the floodgates for creativity and risk taking in game development. I’m excited to see what the community does with this and just where XNA game development might take the future of gaming.
In April 2006 Microsoft refreshed XNA Game Studio Express and included even more features. Microsoft built font support into XNA Game Studio Express and you can more easily share game projects without packaging up the source code. I expect that Microsoft will continue to add features and enhancements to XNA Game Studio Express, and I expect the XNA team will continue to solicit feedback in the forums for problems and ask for enhancements requests and priorities.
Now go create and most of all have some fun.
