


All applications are dependent on data in some form and most developers find themselves writing reams of data access code.
Microsoft has been building databinding frameworks for years. Each one promises to solve our databinding woes forever. We’re still waiting for the perfect one. In the Nov/Dec 2008 issue of CoDe Magazine you were exposed to programmatically controlling data binding mechanisms of WPF. Along with a programmatic interface, WPF also provides a declarative databining interface. This second article will introduce you to using the declarative data binding mechanisms contained in WPF.
XAML Binding
It’s possible to set up a binding in XAML only. The XAML parser understands how to parse and instantiate many of the WPF framework classes. It doesn’t know how to work with non-WPF classes unless they are registered with the parser. Therefore, the first step in using a custom data source is to associate an XML namespace with a CLR namespace. The following XAML snippet shows how to set up an xmlns “sys” namespace for the System namespace in mscorlib and a “local” namespace for a custom assembly:
<Page
xmlns:sys      ='clr-namespace:System;assembly=mscorlib'
xmlns:local='clr-namespace:MyLib' />
Next you need to create an instance of the type and store it in a discoverable location. In C#/Visual Basic you would create a variable and instantiate the type. In XAML you have to put the instance in a resources section. The XAML parser instantiates your type and adds the instance to the resource dictionary. You provide a key for the resource so that you can retrieve the instance later:
<Page.Resources>
  <!-- Instantiate a string
         and load into resource dictionary -->
  <sys:String x:Key='sample'>ABC 123 DEF 456
  </sys:String>

  <!-- Instantiate a employee
         and load into resource dictionary -->
  <local:Employee x:Key='emp'
                  FirstName='Jimmy'
                  LastName='Crickett'
                  Salary='2500'
                    />
</Page.Resources>
Now it is time to set up the binding in the main part of the page and employ the Source property for the configuration. Set the Source property to refer to an instance of an object, in this case the sample string declared in the Page.Resources section shown previously. Bind the first TextBlock directly to the string and use a Path for the second TextBlock to show the second Char in the String.Chars array:
<TextBlock
  Text="{Binding Source=
     {StaticResource sample}}" />
<TextBlock Text="{Binding
  Source={StaticResource sample},Path=[2]}" />
The next example shows comparable XAML for binding to the Employee object:
<TextBlock
     Text="{Binding Source=
        {StaticResource emp},Path=LastName}" />
Relative Source Binding
It’s not necessary or desirable to name every element in a WPF logical tree. This poses a problem when binding to other elements. Use the ElementName property to specify a named element as the source. There are times when you won’t know the element name but you’ll want to bind to it anyway.
Sometimes you just want to say; “Bind to my parent StackPanel” or “Bind to the previous item in this list”. You may not know the names of these elements, but you want the data anyway. Another example is when you want to bind to a property on the same element. Could there be a way to configure this same element binding without requiring an element name?
Use the RelativeSource property when you need an element binding, but you can’t use the ElementName property. There are four modes available for RelativeSource bindings. I’ll explain two of the modes below (the other two aren’t relevant to this article):
Self: Reference any property on the current object. The next example shows some XAML that binds the TextBox Background property to the Text property on the same TextBox. Note the nesting of one markup extension within another in this example. Run the application and try typing “Red” or #FF336688 in the text box to see the background color change:
<TextBox  Text='#FF55FFCC'
  Background='{Binding Text,
  RelativeSource={RelativeSource Self }}'/>
FindAncestor: Walk the tree of parent elements looking for a specific type of element. You must specify the AncestorType, a DockPanel in this example, for a successful binding. Use the AncestorLevel to skip over parent levels. For example setting AncestorLevel=2 will skip one generation. In the following example the TextBox Background will bind to the grandparent DockPanel and will be blue:
<DockPanel Background='Blue'>
  <DockPanel Background='Green'>
    <TextBox Margin='20'
         DockPanel.Dock="Top"
         Background='{Binding Background ,
    RelativeSource={RelativeSource FindAncestor,
         AncestorType=DockPanel ,
         AncestorLevel=2}}' />
    </DockPanel>
</DockPanel>
The other two RelativeSource modes are TemplatedParent and PreviousData, which are not relevant to this article.
Binding Direction
When you configure a binding you can influence the direction that the data flows. A common binding direction is from the source to the target. This is implemented with the BindingMode.OneWay enumeration setting. In a OneWay binding, the target property is updated when the binding source changes. Remember that change notification only happens if the data source object notifies WPF about the changes. See the Change Notification section earlier in this article for details.
OneWay direction is common if the target is a non-editable element like a TextBlock or Label. Since the user cannot change the value, it’s not necessary for the data to flow back to the source:
<TextBlock Margin='20'
           Background='LightGray'
           Text="{Binding Source=
             {StaticResource emp},
              Path=FirstName,
              Mode=OneWay}" />
In a BindingMode.TwoWay binding, the target property is updated when the source property changes and vice versa. TwoWay is common when the target is an edit control like Slider or TextBox.
What if you don’t specify a value for the Mode property? What type of binding direction will you get? The answer is that it depends on the type author preferences. Each dependency property has a FrameworkPropertyMetadataOptions enumeration flag set. If you’ve set the BindsTwoWayByDefault value then the default is TwoWay, otherwise it will be OneWay. The TextBox default Mode is TwoWay. Most other controls are OneWay by default.
In a BindingMode.OneTime binding, the target property is updated once, when the system establishes the binding. The WPF dependency property system disconnects the binding after it sets the initial value and the system does not forward further changes. Usually you’ll use this mode to reduce overhead if you know the value won’t change in the source property.
In a BindingMode.OneWayToSource binding the data flows from the target property to the source property. It is still a single direction binding. In other words, no data flows back to the target. OneWayToSource exists to solve one particular problem in the WPF binding world. Data target properties are always dependency properties. There are no exceptions to this rule.
Occasionally you’ll run across an element that has a property that you want to use as a target, but you discover that it wasn’t implemented as a dependency property. The Run element is a classic example of this problem. A Run is a subsection of a FlowDocument. Run elements allow you to break a big document into manageable sections and apply formatting or modify the Run text from your code:
<StackPanel>
  <FlowDocumentPageViewer Height='300'>
    <FlowDocument>
      <Paragraph>
        <Run>Intro Text</Run>
        <Run x:Name='changeMeRun'>
           Lorem Ipsum</Run>
      </Paragraph>
    </FlowDocument>
  </FlowDocumentPageViewer>
  <Button x:Name='ChangeTextButton'
          Click='ChangeTextButton_Click'
          Content='ChangeText' />
</StackPanel>
In the code behind, change the Run as shown here.
In C#:
changeMeRun.Text =
DateTime.Now.ToLongTimeString();
In Visual Basic:
changeMeRun.Text = DateTime.Now.ToLongTimeString()
Now imagine that you want to bind a TextBox to the Run element. Sorry, you can’t do that with a OneWay or TwoWay binding. Since Run.Text is not a dependency property, you’ll have to use a OneWayToSource binding instead. Here’s some XAML that demonstrates this binding:
<TextBox
  Text='{Binding
  ElementName=changeMeRun,
  Mode=OneWayToSource,
  Path=Text}' />
Binding Updates
TwoWay bindings exist for a good reason-to push modified data back to the data source. In certain application scenarios it is not wise to update the data immediately. Perhaps you have a slow connection back to the data server and your design documents state that the changes should be batched. WPF provides the UpdateSourceTrigger enumeration to control the immediacy of the update, granting you better control over the trigger condition. Setting the UpdateSourceTrigger property to PropertyChanged provides immediate gratification and causes the framework to update the data source whenever the user changes the target property:
<TextBox
 Text="{Binding Source ={StaticResource emp},
 Path=FirstName,
 Mode=TwoWay,
 UpdateSourceTrigger=PropertyChanged}"
 />
Setting the UpdateSourceTrigger property to LostFocus delays the update until the focus leaves the bound control, and setting the UpdateSourceTrigger to Explicit forces you to write some code to update the source. Examine the following code for an example of how to update an Explicit binding.
In C#:
private void UpdateButton_Click(object sender,
System.Windows.RoutedEventArgs e)
{
  // get the elements binding expression
  BindingExpression be =
           TextBox3.GetBindingExpression(TextBox.
           TextProperty);

  // update the bound source
  be.UpdateSource();
 }
In Visual Basic:
Private Sub UpdateButton_Click( _
ByVal sender As Object, _
ByVal e As RoutedEventArgs)
  ' get the elements binding expression
  Dim be As BindingExpression =
  TextBox3.GetBindingExpression( _
  TextBox.TextProperty)

  ' update the bound source
  be.UpdateSource()
End Sub
For most elements the default UpdateSourceTrigger behavior is to update the data source when the target control data is changed. The TextBox control is one of the few elements that updates its source data on the LostFocus event.
Binding Errors
Setting up a binding requires getting the settings and properties correct in your XAML. One simple typo could turn your intended binding into an unfathomable mess for the binding class.
What happens if you have an invalid binding configuration? Instead of throwing an exception and bringing your application to a screeching halt, WPF ignores the error, displays the rest of your UI correctly, and quietly dumps the error information to the trace listener.
At first glance this seems an unreasonable choice by Microsoft, but further examination shows that it’s not so impractical after all. Often a designer sets the binding in XAML using Expression Blend long before there is a valid data context in place for the binding. Working in an environment that is throwing exceptions while you are configuring the XAML would be a joyless experience.
The following XAML is invalid because I’ve misspelled the FirstName property:
<TextBlock
    Text="{Binding Source
         {StaticResource emp},  Path=FirstNam}" />
My typo causes a binding error which produces the following information in the Visual Studio output window:
System.Windows.Data Error: 35:
BindingExpression path error: 'FirstNam' property
not found on 'object' ''Employee'
(HashCode=18307385)'.
BindingExpression:Path=FirstNam;
DataItem='Employee' (HashCode=18307385); target
element is 'TextBlock' (Name=''); target property
 is 'Text' (type 'String')
If you want more control over the trace process, you can set up a custom TraceOutput, which permits dumping trace output to external files, filtering of WPF namespaces for reporting, and controlling message verbosity flags.
Even if you configure your binding correctly you can still end up with problems. You could have a valid binding, but the data shown in the data target is incorrect. WPF provides the PresentationTraceSources.TraceLevel attached property (introduced in .NET 3.5) to help in this situation. Enabling the TraceLevel switch causes WPF to dump detailed debugging information to the trace window. The first step to use this property is to add the correct xmlns attribute to your XAML:
<Page
 xmlns:diag='clr-namespace:System.Diagnostics;
 assembly=WindowsBase'
Next, use the attached property as shown below:
<TextBlock
 Text="{Binding Source={StaticResource emp},
 Path=FirstNam,
 diag:PresentationTraceSources.TraceLevel=High}"
/>
Check out Listing 1 for an example of the debug trace that is sent to the Output window.
Validation
The potential for getting corrupt input data is high when implementing a TwoWay binding. Good UI design attempts to lessen input errors by narrowing input choices and guiding the user through a well-defined set of controls. The accumulation of experience in UI design has shown that limiting the user to a small set of items in a ListBox is a better option than allowing the user to input ad hoc text. The WPF binding engine implements a validation system that simplifies the validation process.
A reasonable separation of concerns for validation looks like this. The business class provides the validation rules and enforces them. The UI provides feedback to the user supplying visual cues indicating which controls are invalid. If the business class offers explanatory information regarding the error, the UI should also show these details to the end user. For a thorough discussion of Object binding in Windows Forms, see Deborah Kurata’s article (CoDe Magazine, Mar/Apr 2006).
Business Class Validation
Deciding when you should validate an object is a subject open to frequent debate. Experts all agree that a business object must validate any inbound data and notify the client code when the data is unacceptable. Where they disagree is in how and when to do this. There is one school that states: “Always throw an exception when incoming data is invalid”. While this rule is simple to understand it doesn’t always fit well in data-binding or multi-tier application scenarios. There are lots of alternate architecture choices, but for this article I’ll only look at the “Throw Exception” implementation and the IDataErrorInfo implementation.
The Throw Exception model is so simple it doesn’t require much explanation. If the incoming property value is invalid, throw an exception. That’s really all there is to this model.
The IDataErrorInfo model is only slightly more work. The IDataErrorInfo interface has been part of .NET for years. Originally you used it to return a list of errors to a Windows Forms UI. WPF 3.5 added support for this interface so you can use it to report error details to your WPF UI too. The IDataErrorInfo interface is simple to implement. Create a read only Error property that returns an error string and an Indexer that returns a specific error by name.
In C#:
string IDataErrorInfo.Error
{
  get
  {
    return _errorString;
  }
}
 string IDataErrorInfo.this[string propertyName]
{
  get
  {
    return (string)_errorDetails[propertyName];
  }
}
In Visual Basic:
Public ReadOnly Property [Error]() As String _
Implements IDataErrorInfo.Error
  Get
    Return _errorString
  End Get
End Property

Default Public ReadOnly Property Item _
(ByVal propertyName As String) As String _
Implements IDataErrorInfo.Item
  Get
    Return _errorDetails(propertyName)
  End Get
End Property
See the full implementation of the IDataErrorInfo interface in Listing 2.
Validation Feedback in the UI
It’s not enough for the business class to reject the data. You have to inform your users of the problem and show the errors in the user interface too. Once again Microsoft provides the answer with two properties on the Binding class: ValidatesOnExceptions and ValidatesOnDataErrors.
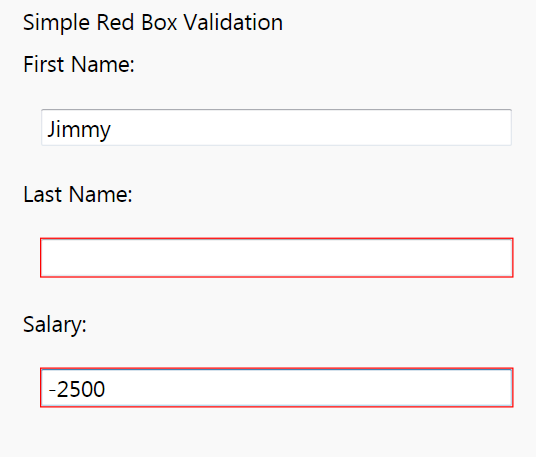
When you set ValidatesOnExceptions to true, WPF monitors any attempt to update the source property. If an exception is thrown, WPF draws a red border over the outline of the offending bound element. WPF draws the error border in a special area, called the Adorner layer, which is the last layer drawn (highest Z-Order) by the WPF renderer. Therefore the red border, or your custom error template if you have one, is always superimposed on the normal UI:
<TextBox Margin='20'
         Text="{Binding Source=
         {StaticResource emp},
          Path=FirstName,
          Mode=TwoWay,
          ValidatesOnExceptions =true}" />
In Figure 1 you can see what the Red Exception Border looks like in the UI.
The Red Border is simple but very plain. Admit it. You were thinking that the Red Border was lame. You’ve seen the ASP.NET or Windows Forms error providers and you know that there are better looking error icons available. Even though WPF only provides this simple error template, you’re not stuck with it. WPF UI is based on a templating model and you can transform any UI control instantly to a radical new appearance with a template. That’s the solution to the red border crisis; you can create a replacement UI with an error template.
Error Template
You typically define control templates as part of a style. In the Error Templates case the template is part of the Validation.ErrorTemplate setter. The following XAML shows the first few lines of the style. The style applies only to text boxes and within the Validation.ErrorTemplate setter there is a ControlTemplate section:
<Style TargetType="{x:Type TextBox}">
  <Setter Property='Margin'
          Value='0,0,40,0' />
  <Setter Property="Validation.ErrorTemplate">
    <Setter.Value>
      <ControlTemplate>
        <DockPanel LastChildFill="True">
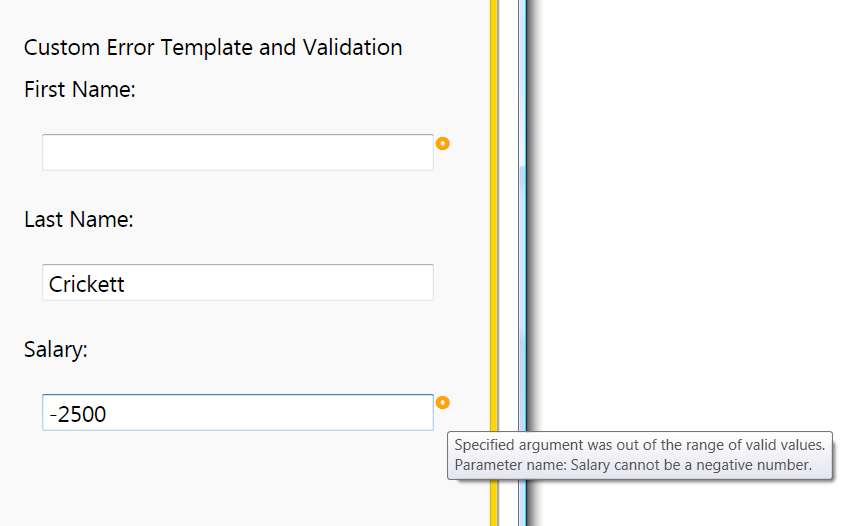
Control templates can contain any valid WPF elements, so have fun creating the control template. In this example I’ve added a DockPanel and a TextBlock. The TextBlock is using a WingDing that looks like a small circular ring. Don’t forget to tell the WPF where to place the Error Template in the Adorner layer by adding the <AdornedElementPlaceholder> element. The placeholder represents the real UI control that has the binding exception. The original control will still be visible and WPF will draw the replacement error template in the same location as the original control:
<DockPanel LastChildFill="True">
  <TextBlock DockPanel.Dock="Right"
     Foreground="Orange"
     FontFamily='WingDings'
     FontSize="14"
     FontWeight="Bold"
     ToolTip='{Binding ElementName=customAdorner,
                       Path=AdornedElement.
(Validation.Errors)[0].ErrorContent}'>£
</TextBlock>

<AdornedElementPlaceholder Name="customAdorner" />

</DockPanel>
Retrieve the original exception information and use the following XAML in your template:
Path=AdornedElement.
(Validation.Errors)[0].ErrorContent}'
Examine Figure 2 to see what the custom error template looks like in the UI.
ValidatesOnDataErrors
The ErrorProvider component in Windows Forms relies on an eventing model to receive error notifications from the business class. WPF supports the same model, you just have to implement the IDataErrorInfo interface in the business class and use the ValidatesOnDataErrors property in your XAML binding:
<TextBox
         Text="{Binding Source=
         {StaticResource emp},
          Path=FirstName,
          Mode=TwoWay,
          ValidatesOnDataErrors=True}" />
ValidatesOnDataError enables the built-in validation rule that checks for errors raised by the IDataErrorInfo data source. If an error is raised, the binding engine creates a ValidationError object and adds it to the Validation.Errors collection of the bound element. The resultant UI looks the same as the previous exception based example, but WPF sends the error information by an event instead of by an exception.
Data Formatting
Your raw data would likely benefit from some dressing up before showing it to your users. They probably think that 12.5% looks better than 0.0125.
Consider the following Sale business class which represents a sale and its details.
In C#:
class Sale
{
  // simplifed sale class
  // for demo purposes
  public Double CommisionRate { get; set; }
  public DateTime SaleDate { get; set; }

  // allowed values
  // R = retail, W = wholesale
  // G = goverment, I = internal
  public Char SaleType { get; set; }
  public Decimal Amount { get; set; }
}
…

// initializing the Sale class
// and setting data context.
Sale sale = new Sale();
sale.Amount = 1200;
sale.CommisionRate = .0125;
sale.SaleDate = DateTime.Now;
sale.SaleType = 'W'; // wholesale

this.DataContext = sale;
In Visual Basic:
Class Sale
   ' simplifed sale class
   ' for demo purposes
   Private privateCommissionRate As Double
   Public Property CommissionRate() As Double
      Get
         Return privateCommissionRate
      End Get
      Set(ByVal value As Double)
         privateCommissionRate = value
      End Set
   End Property
'...
 ' the rest of the properties omitted for brevity
End Class
…

  ' initializing the Sale class
  ' and setting data context.
  Dim sale As New Sale()
  sale.Amount = 1200
  sale.CommissionRate =.0125
  sale.SaleDate = DateTime.Now
  sale.SaleType = "W"c ' wholesale
  Me.DataContext = sale
Figure 3 shows the raw data in the UI before applying any formats.

I’d wager that string formatting is the most common conversion operation that’s applied to data before showing it in the UI. Look at our Sale class. Every property except the SaleType property would look better with some formatting. To help with this common scenario, Microsoft added string formatting to WPF data binding in .NET 3.5 SP1. Now it’s a snap to apply a string format with the standard formatter characters like C for currency, P for percentage, and D for long date. Just use the StringFormat or ContentStringFormat attributes as shown in the following sample:
<!      -- applies the currency format--      >
Text="{Binding Path=Amount,StringFormat=C}"

<!      -- use curly braces for more complex
string formatting--      >

Text="{Binding Path=CommissionRate,
StringFormat=2008 Rates :: {0:P}}"

<!      -- some controls have direct support
for formatting--      >
<Button ContentStringFormat="{}{0:P}">

      <sys:Double>3.14</sys:Double>

    </Button>
Figure 4 shows the results of applying these formats.

Data Metamorphosis
String formatting is useful but sometimes you want a bigger hammer to knock your data into shape. For that, WPF has binding converters. Once again WPF demonstrates its foresight when you examine how binding converters work.
Binding converters, implemented via the IValueConverter interface, grant you full control over your data representation as it moves through the binding pipeline. The converter sits between the data source and data target and offers you the opportunity to transform the data as it flows through the converter. Data moving from source to target goes through the IValueConverter.Convert method. Data moving in the reverse direction goes through the IValueConverter.ConvertBack method before arriving back at the data source.
The possibilities are tantalizing if you think about what you can do with the conversion infrastructure. Not only can you change from one data type to another but you can run code to examine the data and alter it based on various conditions. Do you want to convert a series of numbers (1, 2, 3, 4) to an ordinal representation (1st, 2nd, 3rd, 4th)? Use an Integer to String converter. How about changing the foreground color of a text box based on the sales amount? No problem, create a Decimal to SolidColorBrush converter.
The key to the conversion process are the Convert and ConvertBack methods. Both methods have the following parameters:
-
value: The original value from the data source. -
targetType: The target property data type. In the following example the target type would be the Brush type for the first binding and the String type for the second binding:
Background='{Binding Path=Amount,
      Converter={StaticResource bonusConverter}}
Text= '{Binding Path=SaleDate,
      Converter={StaticResource saleConverter}}
-
parameter: an optional parameter specified in the binding. -
culture: The current CultureInfo as determined by the .NET Framework. Useful for culturally aware formatting.
Look at Listing 3 to see how I’ve implemented the AmountToBonusBrushConverter, and then examine Listing 4 to see how to configure the AmountToBonusBrushConverter binding in your XAML. I’d like to direct your attention to the three properties (BonusBrush, BonusGoal, DefaultBrush) in the converter class which permit customization of the converter in the page XAML.
Figure 5 shows the results in the UI. As you can see in the screenshot, the first and third TextBlocks are painted the default color (set as Yellow in the following XAML block). The second TextBlock is painted green because the underlying value is greater than the BonusGoal amount of 4000:

<local:AmountToBonusBrushConverter
       x:Key="bonusConverter"
       BonusBrush='LightGreen'
       BonusGoal='4000'
       DefaultBrush='Yellow' />
As a final example here is a short snippet that shows how to convert the SaleType char value to a more readable string.
In C#:
public object Convert(object value,
  Type targetType, object parameter,
  CultureInfo culture){
      char candidate = (char)value;
      switch (candidate){
        case 'R':
          return "Retail";
          break;
        case 'W':
          return "Wholesale";
          break;
      }
      return "Unknown sale type";
    }
In Visual Basic:
Public Function Convert(ByVal value As Object, _
  ByVal targetType As Type, _
  ByVal parameter As Object, _
  ByVal culture As  CultureInfo) As Object _ Implements IValueConverter.Convert
     Dim candidate As Char = CChar(value)
     Select Case candidate
      Case "R"c
        Return "Retail"
      Case "W"c
        Return "Wholesale"
     End Select
     Return "Unknown sale type"
   End Function
What’s Left?
This article is a good starting point on your journey to data binding mastery. I’ve spent a few pages covering the wonders of the WPF binding world but I’m not finished. There is still a mountain of binding topics left to cover. Data templates, data selectors, data triggers, data providers, MultiBinding Converters, and managing hierarchical data are some of the essential topics you should explore. I haven’t covered the sorting, filtering, grouping, and navigation abilities of the CollectionView or looked at list binding or any of the ItemsControls elements. I hope that you see the power and potential of WPF binding by now and are ready to learn more.
Listing 1: Output Window for PresentationTraceSources.TraceLevel
-- output has been cleaned and reformtted
-- for this Code Magazine article
47:Created BindingExpression (hash=12102828) for Binding
   (hash=53540541)
49:  Path: 'FirstNam'
51: Default mode resolved to OneWay
52: Default update trigger resolved to PropertyChanged
53:Attach to System.Windows.Controls.TextBlock.Text (hash=41816592)
58:Resolving source
61:Found data context element: <null> (OK)
69:Activate with root item Employee
98:At level 0 - for Employee.FirstNam found accessor <null>
35:path error: 'FirstNam' property not found on 'object'
   'Employee'.
71:TransferValue - got raw value {DependencyProperty.UnsetValue}
77:TransferValue - using fallback/default value '
78:TransferValue - using final value ''
Listing 2: Implementing the IDataErrorInfo (C#)
class EmployeeWithValidation2 : IDataErrorInfo
  {
    var _errorDetails = new Dictionary<string, string>();
    private string _errorString = string.Empty;
    private string _firstName;
    public string FirstName
    {
      get
      {
        return _firstName;
      }
      set
      {
        if (String.IsNullOrEmpty(value))
        {
          _errorDetails["FirstName"] = "You must provide a
                          FirstName for the Employee.";
          _errorString = "Errors in Employee class.";
        }
        else
        {
          _firstName = value;
          _errorDetails["FirstName"] = "";
          _errorString = "";
        }
      }
    }
    private string _lastName;
    public string LastName
    {
      get
      {
        return _lastName;
      }
      set
      {
        if (String.IsNullOrEmpty(value))
        {
          _errorDetails["LastName"] = "You must provide a
                         LastName for the Employee.";
          _errorString = "Errors in Employee class.";

        }
        else
        {
          _lastName = value;
          _errorDetails["LastName"] = "";
          _errorString = "";
        }
      }
    }
    private decimal _salary;
    public decimal Salary
    {
      get
      {
        return _salary;

      }
      set
      {
        if (value < 0)
        {

          _errorDetails["Salary"] = "Salary cannot be less
                                     than zero.";
          _errorString = "Errors in Employee class.";

        }
        else
        {
          _salary = value;
          _errorDetails["Salary"] = "";
          _errorString = "";
        }
      }
    }

    string IDataErrorInfo.Error
    {
      get
      {
        return _errorString;
      }
    }
    string IDataErrorInfo.this[string propertyName]
    {
      get
      {
        return (string)_errorDetails[propertyName];
      }
    }
  }
Listing 3: The AmountToBonusBrushConverter class (Visual Basic)
Imports Microsoft.VisualBasic
Imports System
Imports System.Windows.Data
Imports System.Windows.Media

Namespace DataBindingMainApp.DataConversion
  Friend Class AmountToBonusBrushConverter
     Implements IValueConverter
   Private privateBonusGoal As Decimal
   Public Property BonusGoal() As Decimal
      Get
         Return privateBonusGoal
      End Get
      Set(ByVal value As Decimal)
         privateBonusGoal = value
      End Set
   End Property
   Private privateBonusBrush As Brush
   Public Property BonusBrush() As Brush
      Get
         Return privateBonusBrush
      End Get
      Set(ByVal value As Brush)
         privateBonusBrush = value
      End Set
   End Property
   Private privateDefaultBrush As Brush
   Public Property DefaultBrush() As Brush
      Get
         Return privateDefaultBrush
      End Get
      Set(ByVal value As Brush)
         privateDefaultBrush = value
      End Set
   End Property

Public Function Convert(ByVal value As Object, _
  ByVal targetType As Type, _
  ByVal parameter As Object, _
  ByVal culture As System.Globalization.CultureInfo) As Object _
  Implements IValueConverter.Convert
     ' the value param contains the original value
     ' targetType specifies the type
     ' data target binding that the current

     Dim saleAmount As Decimal = CType(value, Decimal)
     If saleAmount > BonusGoal Then
      Return BonusBrush
     End If

     Return DefaultBrush
End Function

Public Function ConvertBack(ByVal value As Object, _
  ByVal targetType As Type, _
  ByVal parameter As Object, _
  ByVal culture As System.Globalization.CultureInfo) As Object _
  Implements IValueConverter.ConvertBack
     ' not implemented
     Throw New NotImplementedException("not implemented")
   End Function
  End Class
End Namespace
Listing 4: Using the AmountToBonusBrushConverter converter
<Page.Resources>
    <local:AmountToBonusBrushConverter x:Key="bonusConverter"
                                       BonusBrush='LightGreen'
                                       BonusGoal='4000'
                                       DefaultBrush='Yellow' />
  </Page.Resources>
  <StackPanel>
    <Label>Amount A:</Label>
    <TextBlock
                Background='{Binding Path=Amount,
                Converter={StaticResource bonusConverter}}'
               Text="{Binding Path=Amount}" />
    <Label>Amount B:</Label>
    <TextBlock
               Background='{Binding Path=Amount,
                Converter={StaticResource bonusConverter}}'
               Text="{Binding Path=Amount}" />
    <Label>Amount C:</Label>

  </StackPanel>
</Page>
