


**In this chapter from ** ** Software Testing with Visual Studio 2010 ** , Jeff Levinson covers how to create a Test Plan with Microsoft Test Manager (MTM) and the various options that the Test Plan provides to you. More important, this chapter covers what to test and how to get involved as a tester early in the development process.
To begin, you need a plan. The plan does not need to be 500 pages of documentation or a massive Gantt chart. This chapter covers how to create a Test Plan with Microsoft Test Manager (MTM) and the various options that the Test Plan provides to you. More important, this chapter covers what to test and how to get involved as a tester early in the development process. In addition, Microsoft provides a little-used Test Plan Word template that can help answer some questions about the testing process up front.
Another key item covered here is how to plan and test for multiple iterations. Can you reuse your Test Cases, and does it make sense to do that? Many items come into play when planning the testing for an entire release versus a single iteration. By the end of this chapter, you will know how to use the Plan tab of MTM, create new plans, and create a framework for testers to work in for a given period of time.
As mentioned in Chapter 1, “State of Testing,” testers should be involved, ideally, during the requirements gathering process. In a waterfall cycle this is during the Analysis phase. In an agile cycle this is during the period of time in which the business analyst or product owner fills in the details for items on the Product Backlog but before introducing the item into an Iteration Backlog. This chapter covers what the testers’ responsibilities should be and what they can do to help reduce the potential for bugs to be introduced into the software.
TEST APPROACH
When starting any testing endeavor, you need an approach to the process. Consider what is acceptable, what are the criteria for release, how you can perform each type of test, and other information that forms the framework of the approach. If you use the MSF for Agile v5.0 process template, there is a Test Approach Word template located in the sample documents on the SharePoint site. (The path to the document is Documents/Samples and Templates/Test/Document Template - Test Approach.dotx.) You can also find a sample document showing how the Test Approach looks when filled out.
Microsoft Test Manager
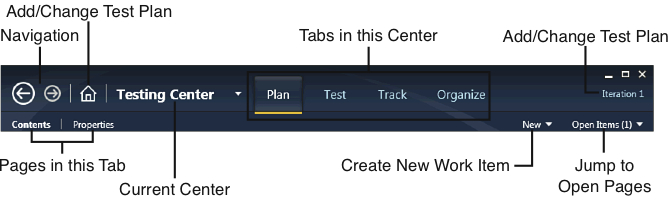
Microsoft provides a separate tool for testers: Microsoft Test Manager (MTM) where you can create Test Plans and add and update Test Cases and where manual and automated tests are executed from. Before getting into the details of creating Test Plans, you need to understand how to navigate within MTM. Figure 3-1 shows the navigation controls.
MTM is organized into Centers, Tabs, and Pages, as shown in Figure 3-2.
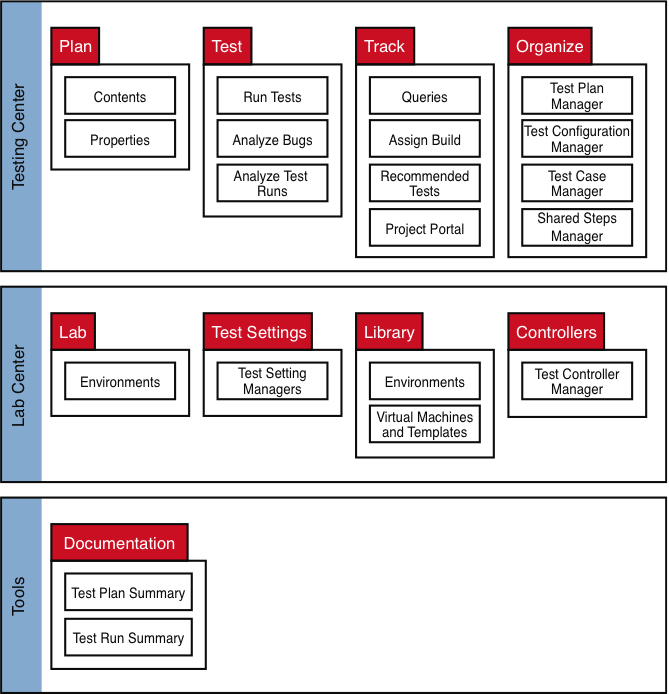
Table 3-1 briefly describes each section. These pages and the options they enable are described throughout the book.
TEST SCRIBE AND THE TOOLS CENTER
The Tools Center does not exist when you first install MTM. After the release of Visual Studio 2010, Microsoft released a Test Scribe tool (available at http://visualstudiogallery.msdn.microsoft.com/en-us/e79e4a0f-f670-47c2-9b8a-3b6f664bf4ae.) (Or you can Bing “Test Scribe Visual Studio Gallery,” and this link will be the first one.)
This addition is critically important to most organizations and should be in-stalled immediately after installing MTM. The documentation it generates can be provided to users or external testers and serves as an excellent, detailed document showing the tests and test runs.
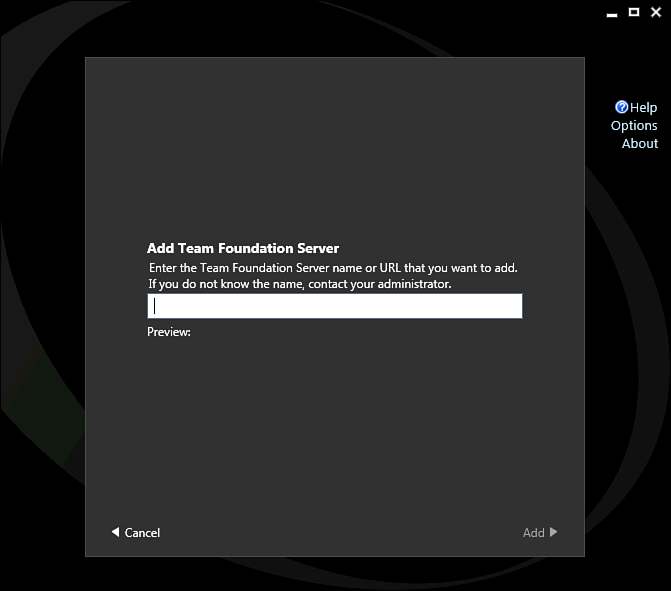
When you first start MTM, you will be asked to connect to a server (Figure 3-3), select a Team Project (Figure 3-4), and then select a Test Plan (Figure 3-5).
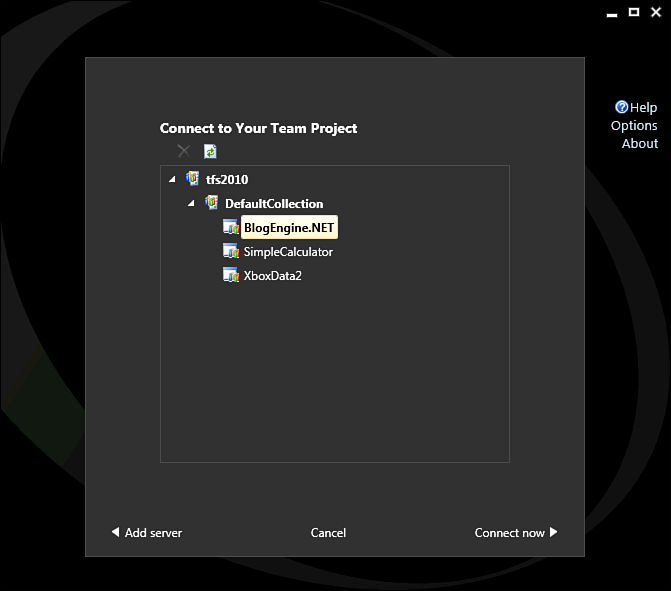
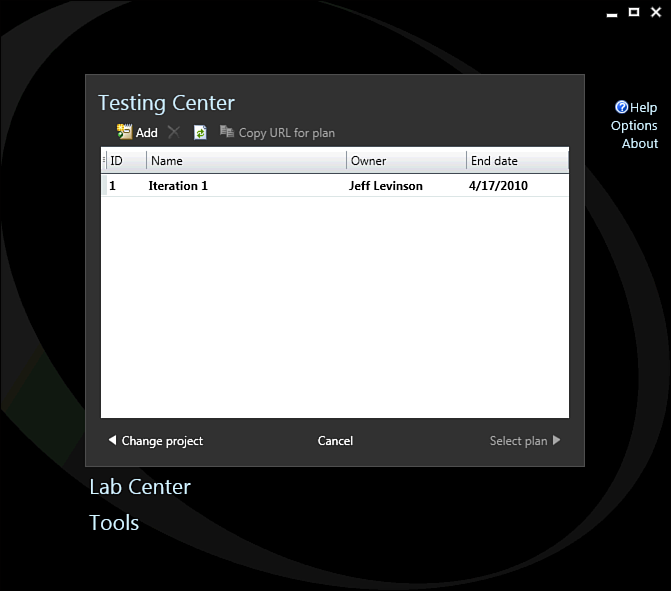
Note the Copy URL for the plan option in Figure 3-5. MTM enables you to provide URLs to specific plans, so you can send the URL to someone who can then click it and have MTM open to the right plan. Only Active plans show up in this dialog. You can view all plans (Active and Closed) from the Testing Center, Organize Tab, Test Plan Manager page.
MTM enables you to work in one Team Project and only one Plan in that Team Project at a time, although you can change plans and projects as needed. After doing this the first time, MTM remembers your last selection, so MTM can open to the last selected Plan.
Before starting the exercises, see the section “About the Application Used in This Book” in the front matter. These exercises assume that you have fol-lowed the steps in that section.
Test Plans
Before using the testing tools, you need to understand where all the various artifacts fit together because it matters when you start to manage an actual project**. Figure 3-6** shows a container view of the artifacts.
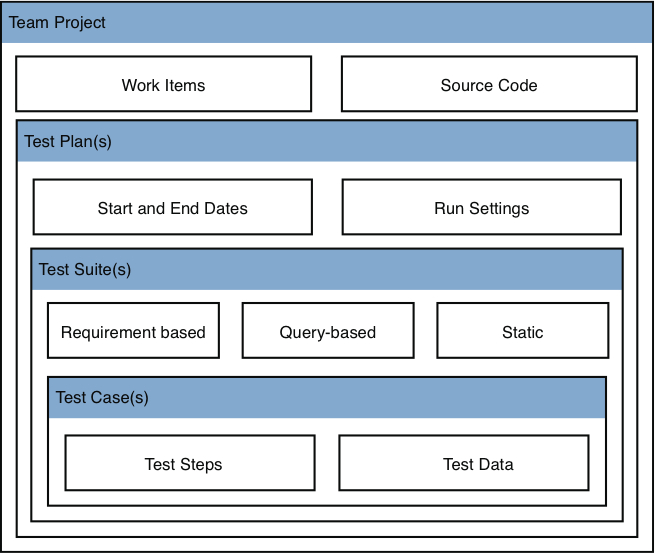
Figure 3-6 shows that a Test Plan in MTM is associated with a specific Team Project. A Test Plan is composed of one or more Test Suites, and each Test Suite is composed of one or more Test Cases. This is a straightforward structure that enables flexible reporting and easy management of the Test Plans.
Exercise 3-1 Create a New Test Plan
This step assumes that you have not used MTM before. If you have, but you want to work through this exercise, you need to select the Home button in the upper-left corner of the screen and select Change Project:
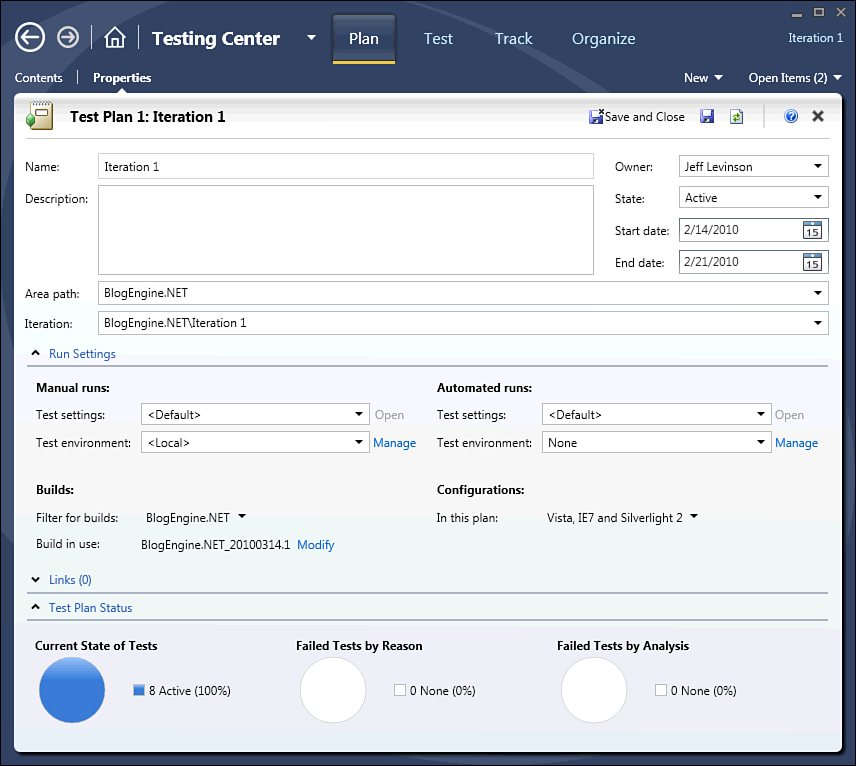
Figure 3-7 shows the Iteration 1 Test Plan.
Properties
Test Plans have a name and a description, and if you use multiple Test Plans concurrently, you need to give them a descriptive name and also a more detailed description. The owner is usually the test manager but can also be a test lead if a lead is responsible for the testing that occurs within a plan. The state can either be Active or Inactive depending on whether it is currently used, and this is not customizable. Inactive Test Plans can either be previously completed Test Plans or Test Plans that have yet to be started and are still being created. The default state for new Test Plans is Active, but you might want to set the plan to Inactive if it is still being designed.
The area and iteration are the standard work item classification scheme. In general Test Plans should be related to iterations in some way (or whatever scheme the development team uses to produce software) because the testing follows the requirements or the coding, which are distinct phases in any methodology whether they are called out.
Test Plans are not work items such as a requirement, user story, or task. They are independent of the work item system. This is both a benefit and a disadvantage. The benefits are in the flexibility: the Test Plan contains more information and is more dynamic than a work item. On the other hand, items such as the Start and End date cannot be reported through a simple mechanism. You need to use the data warehouse (refer to Chapter 9, “Reporting and Metrics”) to report on Test Plans.
Run Settings
Run settings define where tests execute and what diagnostic data adapters are implemented. Figure 3-7 shows the two categories of Run settings: Manual and Automated. Manual Run settings relate to any tests executed with the Test Runner (refer to Chapter 4, “Executing Manual Tests”). Automated Run settings relate to the execution of any automated tests (refer to Chapter 6, “Automating Test Cases”) through MTM.
CHANGE THE TEST SETTINGS IMMEDIATELY
When the test settings are set to <Default> you have no control over them. You cannot set any diagnostic data adapters to run specifically or any other options associated with manual or automated runs. For the manual settings, simply select the drop-down list, and pick Local Test Run, or create a new test setting and change the properties as needed.
To create a new Run setting, go to the Lab Center, Test Settings tab, Test Settings Manager page, and copy an existing setting or add a new setting. These can then be assigned in the Test Plan Properties page. Figure 3-8 shows the Test Settings creation screen.

Depending on whether you create an automated or manual setting, the options will be slightly different**. Figure 3-8** shows a manual test setting on the Data and Diagnostics tab that contains the diagnostic data adapters. Table 3-2 lists the default diagnostic data adapters you can choose.
Diagnostic data adapters enable the test infrastructure to gather data-any particular piece of data you want. They are fully extensible and easy to create and modify (literally 20 lines of code plus whatever code is needed to collect data).
Builds
If you aren’t using automated builds right now, you should be. Automated builds are one of the most effective ways to reduce the amount of time it takes to find and fix bugs. These automated builds can be Continuous Integration builds (the process of running a build immediately upon check-in to determine if the check-in broke anything) or nightly builds, and they can discover build breaks faster and with fewer lines of code to review to find the problem. They are also critical to manual testing; although not required for automated testing, they will certainly make things easier.
Builds enable you to specify which build you can execute the tests against. After you select a build to execute the Test Cases against, MTM provides you with information related to the build. Automated builds help light up the Test Impact Analysis results and provide the testing team with a list of all changes made to the code since the build they were previously using.
The build filter enables you to filter by build definition and build quality. Chapter 5, “Resolving Bugs,” discusses build quality.
Configurations
On one hand configurations play an important part in test execution, and on the other hand they provide only metadata. Configurations enable you to specify various pieces of information about the tests you execute in the Test Plan. They also have a material effect on the number of tests that you need to execute and how you plan your Test Suites. For example, the default setting in MTM is Windows 7 and IE 8. If you have a Test Suite with 20 Test Cases, you need to execute 20 Test Cases. For every configuration that you add to a suite, all the tests need to be executed against the additional configurations as well. (By default, but you can change this.) So, if you have three configurations that you need to test against, you need to run 60 tests. The effect of configuration on testing and reporting are discussed in the “Assigning Test Configurations” section later in this chapter.
Obviously, you do not have to execute any Test Cases you don’t want to, and in many cases you can't execute every Test Case because of the time available to you.
The “Test Configurations” section covers Test Configuration details.
Test Plan Status
This section provides status on the current Test Plan. The first pie chart lists the total number of tests broken down by successful tests, failed tests, and tests that have not yet been executed. The Failures by Type pie chart breaks down the categories of each failure. Table 3-3 shows the available categories.
You can also provide a category for a failure type before or after it has been fixed, but leave this empty until the defect has been fixed. Table 3-4 lists the analysis categories.
FAILURE AND RESOLUTION EXTENSIBILITY
You can customize the Resolution type through the process template or the object model; however, you cannot customize the Failure type. (It looks like you can do it by editing the process template, but it does not actually work because of technical reasons.)
These graphs are updated as changes are made to the Test Plan and as test runs are completed and analyzed. (For performance reasons you might need to click the Refresh button to see the latest data.) This is a great view that quickly enables a testing team to see the progress of its testing within a given plan (as shown at the bottom of Figure 3-7).
Contents
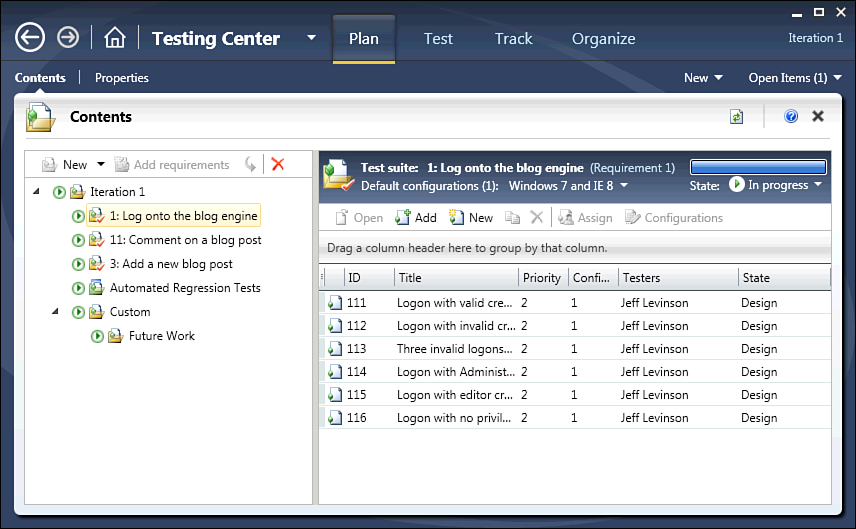
The Contents portion of a Test Plan contains information on what will be tested; that is, it contains a list of all the Test Cases broken down into Test Suites. Figure 3-9 shows the Contents page of the Plan tab.
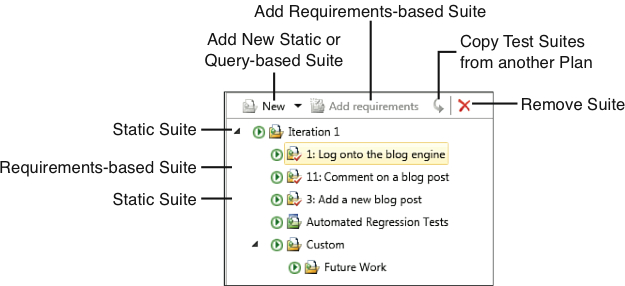
Refer to Figure 3-3 for the relationships between items. Test Suites can be composed in three ways: requirement-based, query-based, or customized with a static suite, and there are good uses for each of the three. The type of Test Suite is differentiated by icons next to the suite name (see Figure 3-10).
Requirements-Based Suites
For most teams developing line-of-business applications, the entire application is based around completing requirements; therefore, it makes sense that testers should test in relationship to the requirements that the developers finish. In other words, testers can rarely perform testing on partially completed requirements. They also can’t perform testing on random pieces of the application because, in general, functional and integration testing relies on complete features. Even performing boundary tests must be done in the context of a requirement.
And, for the most part, customers want to know the status of their requirements. Are they close to completion? Did they pass their tests? How many bugs does a given requirement have? This is true regardless of what type of methodology you use. Grouping suites by requirement makes it extremely easy to report this information back to the customer.
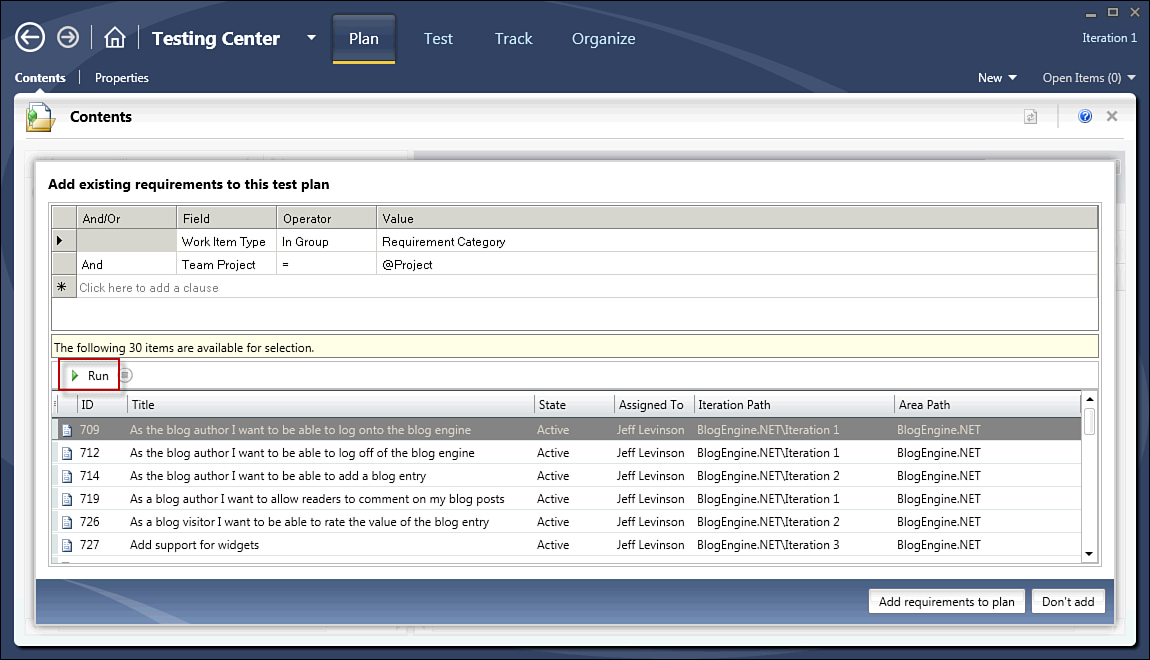
To create requirements-based suites, simply select a static suite (the root node or another static suite) and click Add Requirements; then choose one or more requirements. Each requirement becomes its own suite. Any Test Cases already associated with the requirement are automatically added to the suite.
Requirements and Work Item Types
Whether you use the MSF for Agile or CMMI templates, you have a require-ment work item type. For the CMMI template, it is a Requirement, and for the Agile template it is a User Story. What determines a requirement from the perspective of a requirements-based suite is the category that the requirement is in. Categories are new to TFS 2010 and are a classification scheme for work item types. MTM operates on the requirement, Test Case, and bug cate-gories. The reason it operates on categories is so that you can create a custom work item type, for example, called a Use Case that also appears in MTM if it is in the requirement category. In addition, you can create a Defect work item type that generates when you file a bug.
Query-Based Suites
These are suites created based on the results of a work item query. An example of why you might want to create a suite of this type is the need to test a specific area of your application that might be involved in different functionality. Using the requirement-based suite, you could not do this. Another reason for this type of suite can be the need to test all the bug fixes regardless of what requirement they are related to. The query-based suite simply provides you with more flexibility in selecting what you test and also enables you to run Test Cases from multiple Team Projects or requirements at the same time.
When creating this type of suite, you are limited to the results of the query, and the query specifies that you can query only work items in the Test Case category. So a query-based suite is specific to Test Cases. Because this type of suite is based on the results of a query, if the results of that query change, so will your Test Suite. Use this suite for short-term suites or suites where you don’t mind them changing. An example of where this is effective is automated regression testing. You can create a query where Automation Status = Yes; when you execute the suite, all the automated tests execute.
Static Suites
A static suite is a fully custom suite; you provide the title of the suite and then add Test Cases as needed. One benefit of a static suite is that you can nest suites. This is not possible with the other two suite types. The reasons to use this type of suite can vary; however, an example of this might include final application testing where you might have time to only test requirements from various areas and iterations, and you want to break those up into subsuites so that you can roll the results up. In MTM when you select the New drop-down to add a new suite, the only two options you see are Suite and Query-Based Suite. The Suite option is the static suite.
Adding Suites and Test Cases to Your Plan
The mechanics of using the Contents window are fairly straightforward but offer a lot of options to help you control what happens when testers begin testing. The list of Test Suites is on the left side. Figure 3-6 shows a series of Test Suites starting with the Root Test Suite that is always the name of the Test Plan (Iteration 1 here). The Root Test Suite is a static suite, so you can add Test Cases directly to the root. Icons that have a red check on them are requirements-based suites. Another way to know this is to look above the list of Test Cases in the right pane; you can click the Requirement 1 link to open the requirement that these Test Cases relate to.
The Automated Regression Tests Suite in Figure 3-6 is a query-based suite, which you can tell by looking at the icon. The last suite listed, Custom, is a static suite with a Future Work subsuite that enables you to easily compose and manage your Test Suites.
You can change the default configuration for all the Test Cases here, or you can change the configuration for only individual tests. (This is not recommended because it can be difficult to keep track of which test is supposed to be run on which configuration.) You can change who the Test Cases are assigned to-either individually by selecting a Test Case and clicking the Assign button or by right-clicking the Test Suite on the left and selecting Assign Testers for All Tests (or any combination of testers to Test Cases).
In addition notice where it says State: In Progress in the upper-right corner. You can set the state to be one of three states: In Planning, In Progress, or Completed. In Progress is the default, and tests in a Test Suite that is In Progress may be executed. A Test Suite that is In Planning will not show up on the Test tab, so those tests cannot be executed. The same is also true for Completed suites.
You can also change the columns displayed for the Test Cases by right-clicking the column headers. You can filter certain columns (any column with a discrete list) to limit what displays. (For example, you can filter the Priority column in the default list of columns.)
Finally, you have the option to open a Test Case that has been added to a suite, add Test Cases that already exist in the suite, or create new Test Cases from within MTM. Any Test Cases you create or add are automatically linked with the requirement (or user story) if the suite is a requirements-based suite with a Tested By link type. The opposite is also true; if you remove a Test Case from a requirements-based suite, the Test Case is no longer in a relationship with the requirement. (The Tests/Tested By link is deleted, but the Test Case is not deleted.)
Exercise 3-2
Create a Test Suite
This exercise assumes that you have completed Exercise 3-1.
Testing Configurations
Testing configurations are configurable and can have an impact on the number of tests that need to be executed (mentioned previously). Test configurations specify any particular piece of information needed to ensure that your software is tested against all possible configuration options users could have on their machine.
As of this release, test configurations are strictly metadata. That is, they do not have any impact on the test runs and cannot be used to specify the hard-ware or software a particular test is actually executed against.
The most typical example is using different browsers to ensure the rendering works correctly. Added to that may be the operating system those browsers run on. The two default configuration options are Operating System and Browser; to this you can add other things such as a Silverlight version or a particular piece of hardware, such as a webcam.
The biggest benefit to using test configurations is reporting results. All your test results can be broken down into configurations. In addition you have to write the Test Cases only one time, but this presents other issues, such as that the actions you take on one configuration may not be valid on another configuration. In some cases the differences may be so great it doesn’t make sense to use the same Test Case. Consider these items when deciding on how to use test configurations.
Managing Test Configurations
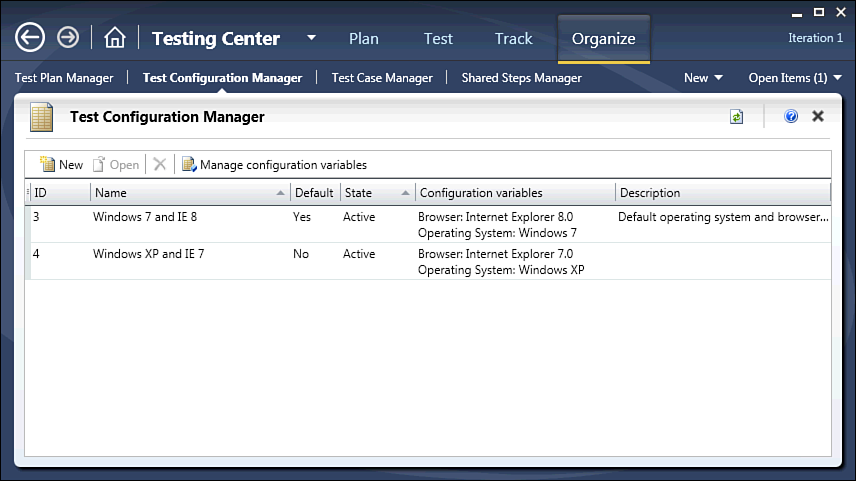
You can access the Test Configuration Manager in two ways. The first is to go to Testing Center, Plan, Properties and select the drop-down arrow next to the configuration; then click Manage. The easier way is to go to Testing Center, Organize, Test Configuration Manager. This brings up the screen shown in Figure 3-12.
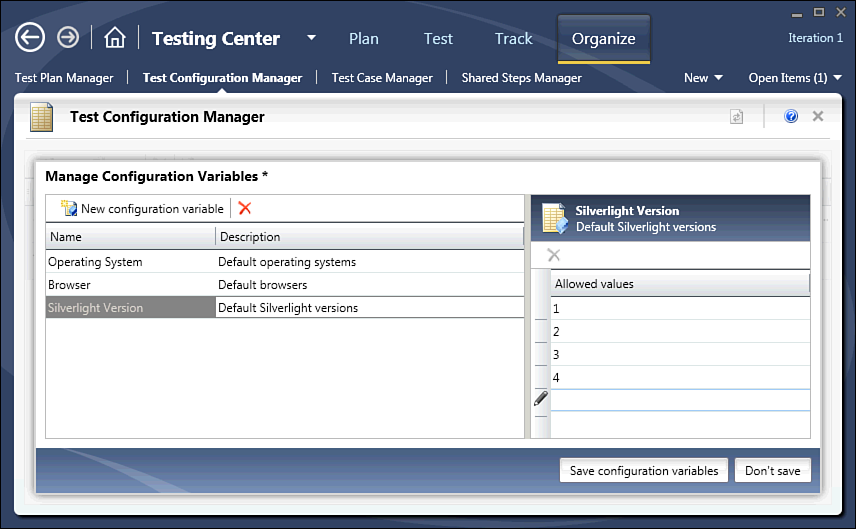
The Manage Configuration Variables option enables to you create new configuration categories. You can also add new values to an existing configuration variable.
Exercise 3-3
Adding a New Configuration Variable
To add a new configuration variable, follow these steps:
The variables themselves cannot be used directly. You need to create an actual configuration composed of one or more configuration variables.
Exercise 3-4
Create a New Test Configuration
To create a new test configuration, follow these steps:
You now have a new test configuration that can be assigned to plans. You can also delete test configurations if they are not being used or have not been used by previous Test Plans. If you try to delete a test configuration that is in use, you are prompted to set it to Inactive instead.
Assigning Test Configurations
To assign configurations to Test Cases, you have a few options. The first is to go to the Properties page of the plan and change the configuration. This can instantly apply the changes to all Test Cases contained within the plan and any Test Cases you add to the plan at a later date. The next option is to change the Default configurations from the Plan Contents tab (see Figure 3-9 just below the Test Suite name in the Test Suite Details pane). To make a change here, uncheck the Use Configurations from Parent Test Suite option, and check any additional test configurations you want to include. Changes you make here apply to the individual suite and any suites contained in the currently selected suite. For example, looking at Figure 3-9, if you select the Iteration 1 node and change the default configurations, the new set of configurations apply to all Test Suites in Iteration 1. If, however, you change the default configurations at Test Suite 1 (log onto the blog engine) the change applies only to this suite. Changing the configuration here is not automatically reflected on the Test tab. To illustrate this, after making one of the previous changes, select the Test tab; notice the same number of tests to be run as there are Test Cases. You see how to change this in a minute.
Another option is to assign test configurations at the suite level for existing Test Cases. To do this, right-click the suite in the left pane of the Contents tab, and choose Select Test Configurations for all Tests. This shows the screen in Figure 3-14.
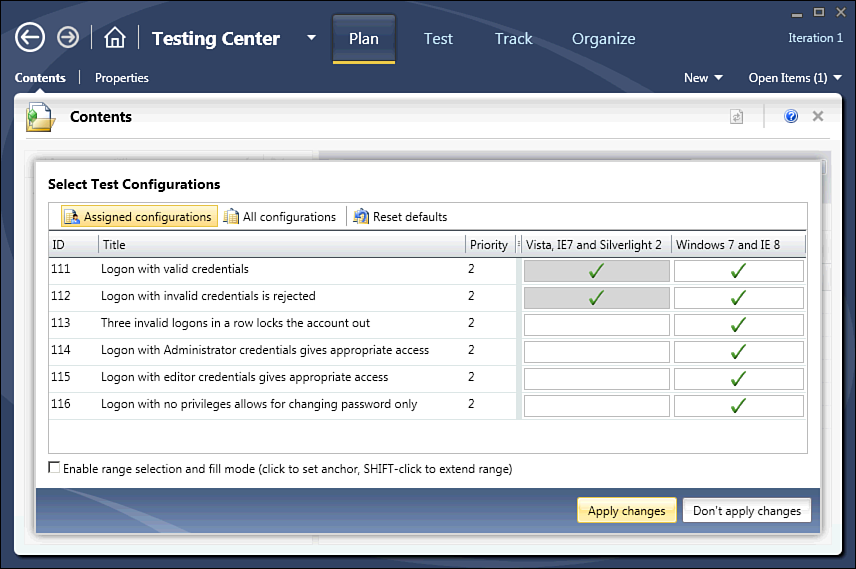
One option available to you is the Reset Defaults option. If you have previously changed the default configuration at the Suite level and want to apply it to all existing Test Cases, selecting the Reset Defaults button will do this for you. (As shown in Figure 3-14, pressing this button automatically selects both configurations for all tests listed.)
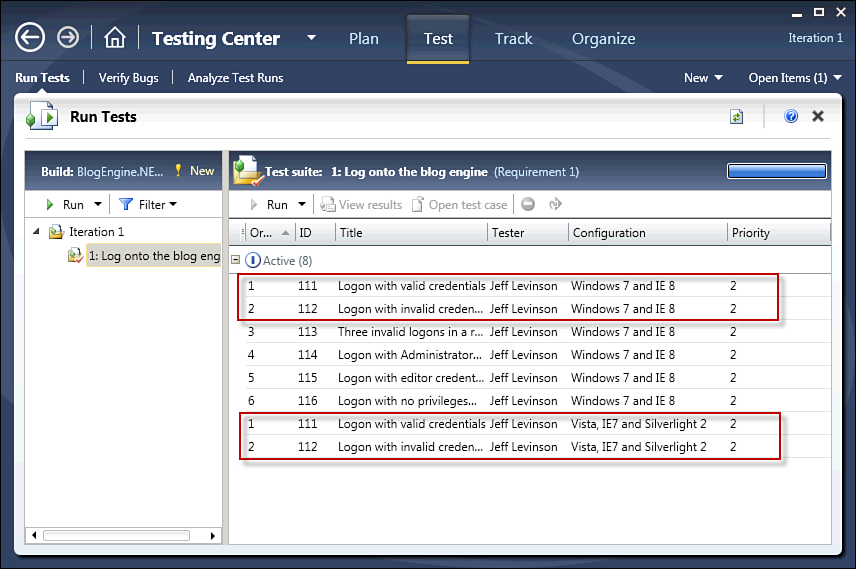
After assigning one or more Test Cases to different configurations and applying the changes, you return to the Plan Contents page. The one apparent difference is the configurations column now has a value greater than 1. This column notes how many configurations are assigned to a given Test Case; you might see the Tester for a Test Case listed as Multiple. (You revisit this when assigning testers to Test Cases is discussed.) You see the changes when you select the Test tab. You can execute two more tests than there are Test Cases; these additional tests have different configurations, as shown in Figure 3-15.
An additional option for setting test configurations is to select one or more tests and click the Configurations button. This enables you to set configurations just for the specific tests selected.
So far you have seen how to set test configurations for a plan. Options can be set at the Plan, Suite, and Test Case level, and generally they cascade down. The next step is to assign and manage testers in the context of the plan.
Assigning Testers
As with the test configurations, you can assign testers in a number of ways. The first and most obvious way (and certainly the easiest to report on) is to simply assign the Test Case work item to a tester. That person is then the “tester” of record. There are numerous scenarios in which the person who writes the Test Case does not also execute it. There are also scenarios in which the Test Case, as previously mentioned, is executed on different configurations, and different testers work those different configurations.
To assign a tester to a Test Case, you work at the suite or Test Case level. The screen for both is the same; the only difference is which testers show up. Right-click the Test Suite or the Test Case, and click Assign Testers for Selected Tests or Assign Testers for All Tests, or click the Assign button in the Suite Details pane. This brings you to the page shown in Figure 3-16.
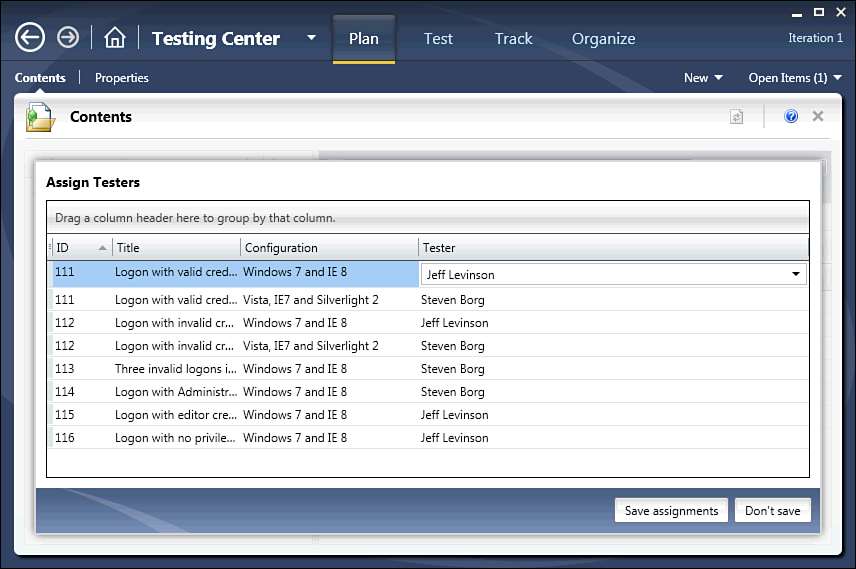
You can select individual testers for each Test Case and configuration either one at a time or in bulk. To assign testers in bulk, select the Test Cases you want to assign (using the Control or Shift keys) and change the assignment for any Test Case. This change will be duplicated to all selected Test Cases. At this point some Test Cases on the Planning tab show Multiple in the Testers column. Remember that the Plan tab has a distinct list of Test Cases, but because different testers are assigned for different configurations, MTM aggregates all the testers assigned to a Test Case as Multiple. You can see the individual testers on the Test tab.
Test Case Planning Workflow
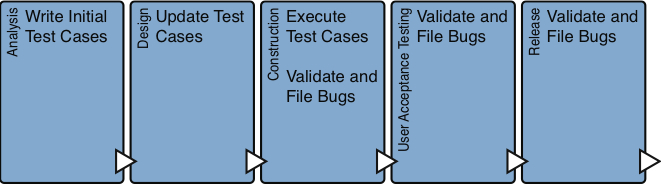
Now that you have seen the Plan tab in MTM, it’s time to talk about usability. How do you use it to manage the testing workflow? What are the consequences of managing it in any particular way? How does the usage of it translate into reporting? Before jumping into the planning, take a look at a rough overall software development process. This process, shown in Figure 3-17, is not specific to any methodology.
What Is Presented Versus What You Should Do
It is logically impossible to present scenarios that cover every situation. Because of that much of what is presented is generalized, but some strong opinions are presented about what should be done regardless of the methodology used. Please be skeptical! What is presented here may not apply to your particular situation. There are many situations in which conventional wisdom must be discarded. In addition, theory and reality don’t go together particularly well-which is why theory is discussed but is always balanced with practicality-such as with some of the advice you are about to get on creating Test Plans.
What should be obvious is that the basic steps you need to take are the same-regardless of whether you work in an agile or waterfall methodology. Someone needs to gather requirements; someone needs to write Test Cases; and someone needs to execute Test Cases. For example, using Test Driven Development is not enough to ensure the application meets the needs of the user, so even in TDD functional testing needs to be performed. However, the way in which it is performed and the emphasis placed on functional testing can vary widely. So pick and choose those practices that make sense for your organization.
Figure 3-17 presents a basic development process in which the testers come into play-and roughly when they come into play in an ideal model. The three phases of the development lifecycle where testers work are initial design and construction, testing, and maintenance.
PHASES IN AGILE
In an agile methodology, the analysis, design, construction, and testing can be tightly compressed and not visible as distinct phases. This is an important consideration to determine what works best for you. In Figure 3-17 testing is not presented as a distinct phase because it should be occurring hand-in-hand with development.
Analysis and Initial Design
During the initial design (for those plans created that deal with the analysis and design phase) the Test Plans look radically different than after the testing team can actually perform tests. Tests in these phases are created to validate the analysis and design of the application. Tests turn a subjective requirement into an objective understanding of what the customer wants.
This is a common practice. Formal specification languages-one of the best known is “Z”-enable you to precisely state requirements. (You can find more information on Z at http://formalmethods.wikia.com/wiki/Z.)
Specifications written in a formal modeling language follow strict mathematical theory that does not, in general, enable ambiguity. However, reading Z or other formal languages can be difficult. A well-constructed Test Case may not meet the rigor of a formal modeling language but can provide roughly the same benefits in an easy-to-read form in much less time. A good Test Case is one with little or (ideally) no ambiguity and provides the same result for every run.
GOOD TEST CASES
One definition for a good Test Case is that it is likely to find bugs.
Goal
The goal of Test Cases in the initial design phase is simple: Objectify and thereby validate the requirements. The following is a relatively simple, often-used example. Take a requirement that states the following: Visitors should comment on a blog post. This is a straightforward requirement-or is it? Remember that you are now looking at this requirement from the perspective of testability. You don’t necessarily need to come up with all possible tests (virtually impossible in any small system and absolutely impossible in any large system) but you need to make sure that the requirement is testable. For a requirement to be testable, it cannot be ambiguous because if it is ambiguous, it is not repeatable. Before examining the details, look at Table 3-5, which is a use case that documents this requirement in more detail.
Requirement Statements Versus Requirement Details
It is acceptable to get a requirements statement like the one just given. These are supposed to be high-level statements that provide a container for users to narrow down their requirements. The details need to be unambiguous.
This use case raises a number of questions. First, what is the order of precedence when pulling cookie information or profile information? In other words, what if a user has logged onto the system before and made a comment (and thereby had the cookie set) and another user who has never made a comment before is using the system? Does the system clear the information? Does it use the cookie information? What about when a user logs onto the blog engine (from the same machine) after a nonlogged-on user has made a comment? Which information do you use? “Can a blog poster comment on his own post?” That’s another good question that isn’t answered by the use case.
These questions seem minor, and this is a small example, but these can lead to questions that, unanswered, can cause bugs. It also makes it difficult for developers to say they got it right. Testers have to ask these questions to create good Test Cases. Other ambiguous items show up here as well-what information is needed to create a comment? Do I just need the comment, or do I need to provide an e-mail address? What information is actually in the user profile, and just because it is there, do I use it to fill in whatever fields are available? These questions are more important because there is a data model issue here. These fields must be saved someplace, so you must know something about them; otherwise, you may end up having to rewrite the data access code to pull data from a different place.
Having seen this use case, you can roughly infer that there are three “sub” requirements:
- A visitor can add a comment to a blog post.
- Logged-on users can add a comment to a blog post, and their information should be prefilled from their profile.
- If users previously made a comment, their information should be prefilled from the cookie.
Now look at a simple Test Case to validate the requirement (see Table 3-6).
This simple Test Case follows the normal path. It also identifies a few details you didn’t have before; the user can supply the name, e-mail address, website, and nationality. Now, it doesn’t specifically say the fields are required, but it enables users to understand that this is what the developer is coding to, and if they want additional fields, they can ask for them. This Test Case does enable room for ambiguity-what blog engine website? Which post should they click? What information displays in addition to the comment? However, during the analysis phase you may not have anything concrete to latch onto or need that level of information.
The important piece here is that the user now knows exactly what to expect. This is good enough for the analysis phase. The user can say, “If this Test Case passes, the system does what I want it to do.” So, at the end of the analysis and design phases, you may have a series of Test Cases marked as either In Design (the initial state of a Test Case work item type) that played a part in validating the requirements, or you may choose to change the state to Ready to indicate it is done and the users have validated the Test Case(s) against the requirement. Mostly, this will be a choice of how you want to report on these during the analysis and design phase. However, you should probably opt to leave the Test Cases in the In Design state so that you will almost always have to do minor updates after the functionality is built and ready for testing. This may include adding or removing steps and putting in concrete controls (such as Select Your Nationality From the Drop Down List as opposed to the preceding scenario in which the Test Case specified that places were merely provided for you to enter your nationality; now the control type is known). In general, a Test Case that is Ready is in a final form that can be executed.
Customizing Work Items
Because of how flexible the work item system is, it is easy to add additional states, which is another option available to you. In general, adding additional states will not break the reports, but the reports need to be updated to see the new states.
However, this does bring up another point: Test Cases and iterations. Use the following: Iteration 1 is the analysis iteration and as such no testing will be done on this iteration, but Test Cases will be written. It is perfectly acceptable to mark Test Cases in Iteration 1 as Ready when they are completed by the standards of Iteration 1.
Then, when you begin Iteration 2, which is the start of the construction iterations, you may want to duplicate the Test Cases and reclassify them into Iteration 2. This also enables for granular tracking of Test Cases and enables you to say that a Test Case was ready in one iteration but not ready in another. Again, how you do this is up to you and how you want to report on it. The “Scenarios” section provides more detail.
Construction
The goal of Test Cases in construction is straightforward; they should be repeatable to find bugs before the user does and test the functionality of the application. The first and last items are open for discussion. Exploratory testing is not necessarily repeatable, unless you record it. Fortunately, you can record with MTM, so this isn’t too much of a problem. The test may not be repeatable because of back-end data or processes, but at least a tester or developer can duplicate the steps taken to find a bug if one is found. The last item can be a bit of a problem.
In a perfect world you can achieve 100% code coverage through functional testing. Anyone who has ever done testing can tell you that this is not possible unless this is your quality bar that usually occurs only in life safety applications. So assume that this isn’t going to be possible. What do you test? It goes back to the second point; you should run those tests first that are likely to be used by the user (and therefore the place to find bugs). To make it a bit clearer, in most applications, 20% of the code is used 80% of the time, and the other 80% of the code is used to handle alternative or exception paths. It’s amazing how much code applications need to handle these outlying conditions. So a good rule of thumb is that the 20% of the code (100% of the normal path requirements) is tested 100%. All the other code is tested if time is available.
Will there be exceptions to this? Sure. There always are. Using this guideline can help catch the majority of the bugs before the users catch them. Testing the other 80% of the code should be done if time permits or if bugs are found that relate to the outlying conditions. That isn’t to say that no testing in these areas should be done, but in general keep it to spot testing or let Unit Testing cover those conditions.
User Acceptance Testing
As an industry, there tends to be a lack of agreements (Service Level Agreements [SLAs] or other agreements) relating to the acceptance of software by the customer. This makes things difficult for the development team. Imagine completing the software for the customer, and after the “final presentation,” the customer says, “Nope, this isn’t what I wanted,” and them asking you to redo parts of it. Who pays the cost for it? Who messed up? Does it matter? Yes. Even if the development team doesn’t see it, someone has to pay for the rework, and someone cares about who made the mistake. And that’s the thing: It usually isn’t a mistake; it’s because of changing requirements or misinterpretation. That’s why it’s puzzling to see this lack of an acceptance agreement.
Ideally, the conditions under which the customers will accept or reject the software are documented in a contract. The best basis for this is that an agreed upon set of Test Cases execute correctly. If this were the case, the customers would be saying that these Test Cases adequately demonstrate the features of the system that you are supposed to deliver. If these Test Cases pass, the system does what they asked you to do, and they can validate that you have delivered that functionality to them.
Now this does a couple of things: The customers have to sign off on the Test Cases. Changes to the requirements cause changes to the Test Cases that require customer signoff. Changes that go outside the scope of the agreed upon Test Cases are easily discoverable because the Test Cases are objective rather than subjective, which allows for ambiguity and therefore changes that aren’t discoverable. The last benefit is that user acceptance testing is well defined. Sure, the users can do exploratory testing (that is, playing with the system to see if it works). But the real meat is the execution of the Test Cases, and this makes acceptance easy. The reason is that the Test Cases should have all been executed, at a minimum, twice: once by the developers and once by the testers. The users should almost never find problems with UAT Test Cases. So these Test Cases you create now are of benefit when delivering the software as well.
A Good UAT Option
One potential benefit of MTM being separate from Visual Studio is that for users performing UAT, this can be installed, and the users can run their ex-ploratory testing through the Test Runner. In this way, if the user does find a bug, the development team has a complete record of the steps the user took to arrive at the bug. (This does require the end user to have a license for the software.)
Are SLAs going to be used? After all this, it is sad to say that the answer is probably no, because there will almost always be some last-minute items the customers want that can cause problems somewhere. Keep a process but be aware of the customer needs. Finding a way to fit both the process and the customer needs together can give you the power to use what has been discussed here. Even if you can’t get there right now, start thinking about it now so that when the opportunity comes you can take advantage of it.
Common Scenarios
This section covers some common scenarios and how you can handle them from a planning and tracking perspective.
Scheduling and Tracking Test Case Creation and Execution
Before everyone on the team rushes to write features and write Test Cases, you need a plan for how to manage and track this work. Out-of-the-box, you can notice that the Test Case work item type (regardless of whether you use the MSF for Agile or MSF for CMMI template) lacks the Remaining Work and Completed Work fields. There is a reason for this. What would that time track? Is it tracking the creation of the Test Case or the execution of the Test Case? Or both? It would be hard to say.
Another item to consider is projects in which the project manager uses Microsoft Project to track work. It uses a Work Breakdown Structure (WBS) that uses parent/child relationships between work items to create that WBS. The Test Case work item is related to the requirements with a Tests/Tested By relationship, so Test Cases will not show up in the WBS, and the project manager cannot schedule them the way they would schedule a task.
The best way to handle this is with the structure shown in Figure 3-18.
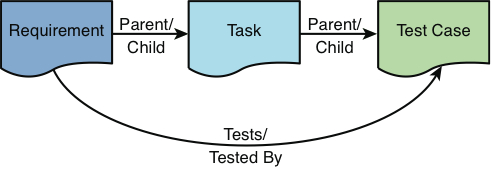
This structure solves a number of problems. First, a project manager can assign the task of creating a Test Case to the test team, which means that the activity can be captured in a Microsoft Project WBS. Second, the project manager has the option to schedule the Test Case for creation and for execution separately. When doing it this way, the Assigned To field would be the person creating it in the first case and executing it in the second case. You do not need to use the Assign To Tester functionality unless testing on multiple configurations. This enables the project manager to track the time discretely for each activity; however, you may not want to assign a task to execute a Test Case. This is quite difficult for a tester to realistically keep track of. The task would be associated with the Test Case and not the test run, which makes reporting even more difficult.
The Parent/Child relationship between the Task and Test Case is not necessary. It provides some additional structure and enables the Test Cases to show up in a tree query (as opposed to a directed links query) but does not feed any reports.
Feature Driven Development
In FDD, software development is done on multiple branches. That is, you may have a branching structure like the one shown in Figure 3-19.
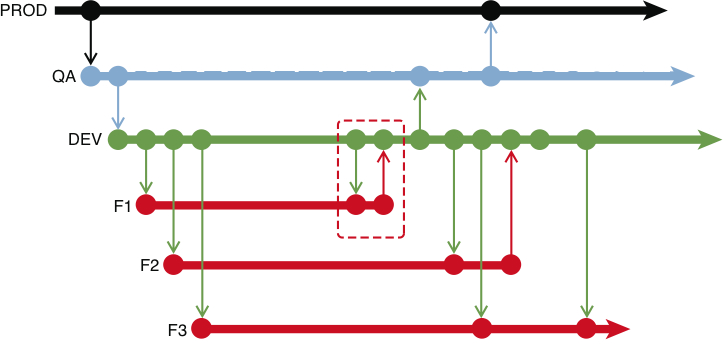
In this type of branching structure, it is generally considered a best practice to perform comprehensive testing on all code in each feature branch before merging it to the main development environment. As part of this process, Test Cases need to be “migrated.” For example, if you create a series of Test Cases (Test A, Test B, Test C) for code on feature branch F1 and that code is merged to Dev and then back down to feature branch F2, those Test Cases may need to be executed against the code in branch F2. How do you keep track of it?
The recommended solution is to create one Test Plan per feature branch. Because you can copy suites between Test Plans, this becomes relatively simple. Figure 3-20 shows the Copy Suites screen.
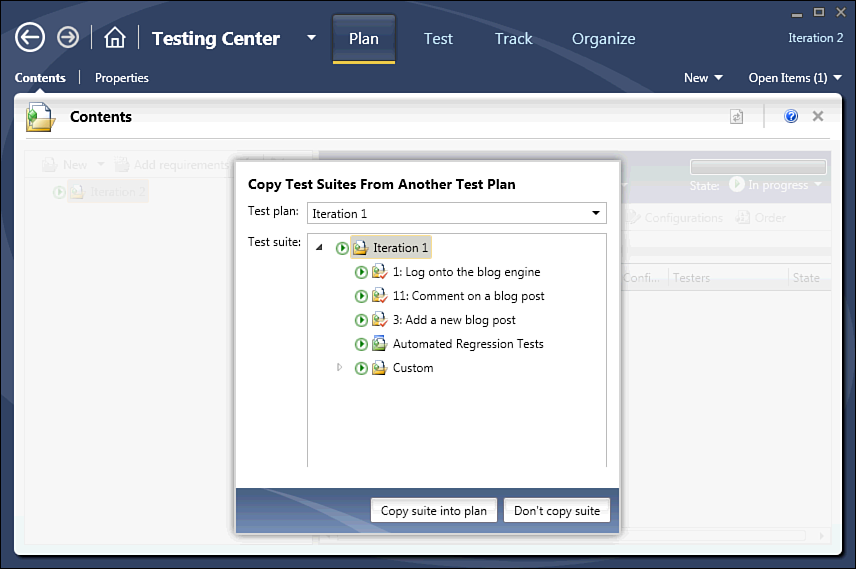
To get to this dialog, right-click Test Suite in the Plan, Contents page, and select Copy Suite from another Test Plan. You can either copy the entire suite (which includes the root node) or you can copy individual suites. It is critical to note that this does not create a copy of the Test Case. It simply references the existing Test Cases, which in this situation is exactly what you want-change the Test Case in one place and it changes it in all places. In this way multiple Test Plans can be associated with different code from different branches (because each Test Plan can be associated with its own build) but the results can all be reported on together.
Moving from One Iteration to Another
When you move from iteration to iteration, you need to deal with a number of issues. Some of these include uncompleted Test Cases, and in others the Test Cases were completed but never executed. Do you simply “copy” them from one suite to another, which creates a reference, or do you duplicate the Test Cases? This depends on how you want to report on them.
If you have a Test Case with the area set as Iteration 1 but then you copy the suite that it is part of to another Test Plan, which is testing Iteration 2, you have a problem. Because a suite copy is actually a “reference,” the Test Case continues to show up in Iteration 1-not Iteration 2. This can significantly skew your reporting depending on how you report on it. On the other hand, creating actual copies of the Test Cases adds to the “number” of Test Cases, even though this number doesn’t change.
What are your options? In the first case, the suite copy is an expedient way to handle the problem. But the recommendation for this is to go one step farther. After you perform a suite copy, update all the Test Cases that were copied to be the same iteration that the new plan is in. To make this clearer, consider the following: You have a plan (Analysis) that is set for Iteration 1. All Test Cases in the plan are also set for Iteration 1. The analysis phase is complete, and you move to the next phase in which these Test Cases will be updated. If you plan to do work on these Test Cases, use the suite copy to add them to a new Test Plan called Construction. After they are copied over, update all the Test Cases so that the iteration is set to Iteration 2 (to match the iteration in which they will be worked on). Then continue to work on them as you normally would.
The second option in many ways is more appealing. Creating copies of the Test Cases allows you to preserve the Test Case as it was executed against the code in a given iteration. An example is that Iteration 3 ended in a release to the customer. The team begins work on Iteration 4, which will modify some of the features in Iteration 3. (This is an every-day occurrence in agile development but less so in waterfall.) However, between the current release and the next release, those Test Cases may need to be re-executed against production code. If you are actively changing those Test Cases, you need to go back into the Test Case work item type history to get back to the Test Case executed against the current release. In this way it acts almost as a branching mechanism for your Test Cases and enables you to preserve the Test Cases executed against a release. This may be handy for auditing purposes.
The advice for this issue is “It depends on what you’re trying to do.” There are no “best practices” because everything is dependent on your situation. Just be aware of what can happen in the various scenarios, and think it through before developing your plan.
Handling Different Test Configurations
As previously mentioned you can use configurations as metadata for reporting purposes and to cut down on the number of Test Cases that you need to maintain. But does it always make sense to do this? The answer is no. No tools can easily solve this problem, so it takes some planning. First, you need to determine if the different configurations require different tests. If they do, your answer is simple: Do not use the MTM test configurations to differentiate configurations. In this scenario, it requires you to create separate Test Cases and differentiate by Area. In addition, you would be better off creating separate Test Plans. Why? As noted earlier, Test Plans have one manual test setting and one automated test setting. It can be assumed that for different configurations you may be testing on different systems or with different settings, so it is easier to manage with separate Test Plans. If you do this, you do not need to use Areas to break up your configurations; MTM can work for you.
This is one item that should absolutely not be overlooked. The test settings can be cumbersome to manage if you have to change them on a per-run basis. It is easy enough to group Test Plans in different areas and then arrange the Test Cases under them. If you have to group Test Cases together that require different test settings, you are adding more work for the testers, so plan this before you get to the point where it is a problem.
Summary
In this chapter, you learned about Test Plan components and how to create them. You learned the relationships between all the different test containers and about the goals of different stages of testing: analysis, construction, and user acceptance testing. This chapter also showed you how to create different testing configurations and their effects on Test Cases. You learned how to start managing a Test Plan by assigning testing configurations and testers to different Test Cases and configuration combinations. Most important, you explored a number of different scenarios that require you to think about the structure of your testing environment and common problems to these scenarios. In the next chapter, you learn how to execute tests using Microsoft Test Manager.
Table 3-1. MTM Pages Described
| Center | Tab | Page | Description | |||
|---|---|---|---|---|---|---|
| Testing | Plan | Contents | Contains the settings for the given Test Plan including manual and automated test settings, test configurations, and the build in use | |||
| Properties | Contains the suites and Test Cases that need testing for the selected plan | |||||
| Test | Run Tests | Main page for executing test runs | ||||
| Verify Bugs | Contains bugs that have been resolved that the tester can quickly get to and verify | |||||
| Analyze Test Runs | Shows all test runs (manual and automated) but used mainly to view an automated test run and take appropriate actions based on the outcome of the test runs | |||||
| Track | Queries | Same as in Team Explorer; it enables you to execute stored work item queries or create new queries | ||||
| Assign Build | Enables a tester to assign an automated build to the Test Plan | |||||
| Recommended Tests | Shows the list of all tests that have been impacted by a code change | |||||
| Project Portal | Provides a quick link to the project portal (opens a web browser) | |||||
| Organize | Test Plan Manager | Lists all the Test Plans in the current Team Project | ||||
| Test Configuration Manager | Lists all test configurations | |||||
| Test Case Manager | Lists all Test Cases in the current Team Project | |||||
| Shared Steps Manager | Lists all the shared steps (reusable test steps) in the current Team Project | |||||
| Lab | Lab | Contains all the physical and virtual environments ready for testing purposes | Contains all the physical and virtual environments ready for testing purposes | |||
| Test Settings | Test Settings Manager | Contains all manual and automated test settings | ||||
| Library | Environments | Lists all the environments prepped for use in testing, including environments that have been deployed | ||||
| Virtual Machines and Templates | Contains all the virtual machines available to be composed into a test environment | |||||
| Controllers | Test Controller Managers | Contains a list of all test controllers and all agents associated with those controllers | ||||
| Tools | Documentation | Test Plan Summary | Generates a document with the selected Test Plans, associated Test Suites, Test Cases, Test Steps and related work items | |||
| Test Run Summary | Generates a document with the results of the selected test runs |
Table 3-2. Default Diagnostic Data Adapters
| Collector | Description | |
|---|---|---|
| Action Recording and Action Log | Records each step that the tester takes in the application during a manual test run. | |
| ASP.NET Client Proxy for IntelliTrace and Test Impact | Enables you to capture IntelliTrace and Test Impact information during a test execution of an ASP.NET application. Note: This setting does not actually perform the capture; you must check the IntelliTrace and/or Test Impact collectors in addition to this collector. | |
| Event Log | Captures selected events written to the Event Log during a test run. | |
| IntelliTrace | .Enables capturing of the debug log | |
| Network Emulation | Throttles the network performance based on the specified settings. | |
| System Information | Captures system configuration information for the system on which the test is performed. | |
| Test Impact | Records Test Impact information for calculating Test Cases affectede by modified code. | |
| Video Recorder | Records a video of all actions taken on the screen during a test run |
Table 3-3. Failure Categories
| Category | Description | |
|---|---|---|
| None | Use if the test faulure is a nonissue. | |
| Regression | Where the previous test results indicate a pass. | |
| New issue | Has not been seen before. | |
| Known issue | Possibly because a previous run found this bug or the development team has notified the testing team that the build is ready to test, but it knows about this particular failure. | |
| Unknown | An error occurred, but the tester is not sure what the classification of the issue is. A test lead or manager should look further at Unknown issues. |
Table 3-4. Analysis Categories (Also Called Resolution Type)
| Category | Description | |
|---|---|---|
| None | No resolution at this time. | |
| Needs investigation | The test team has decided to do a further investigation because it isn't sure of the cause. | |
| Test issue | Usually set if the Test Case were at fault or the setup for the test were incorrect. This might be cause for concern because if a Test Case is wrong, the requirement it is based on might also have potential inaccuracies that need to be investigated. | |
| Product issue | A valid failure occurred in the code. | |
| Configuration issue | Usually a failure in the configuration files or on the machine on which the test was deployed. |
Table 3-5. "As a Visitor" Requirement Use Case
| ID | BE-1-1 |
|---|---|
| Title | Visitors should comment on a blog post. |
| Description | Visitors should comment on blog posts. The visitors do not need to be registered to comment on posts but can comment only on blog posts that permit comments. |
| Actors | User (not logged on), Logged on User, System. |
| Preconditions | A blog post must have been published. |
| Post-Conditions | A blog post has a comment attached to it and displayed when the blog post is viewed. |
| Normal Path | 1. User navigates to the blog site. |
| 2. User selects a blog post. | |
| 3. System displays the blog post and all associated comments. | |
| 4. User elects to add a comment. | |
| 5. System provides a comment entry display. | |
| 6. User adds and saves the comment. | |
| 7. System displays the comment at the end of the list of existing comments. | |
| Alternative Path | [ID BE-1-1a: User is logged on] |
| [Branch after step 1] | |
| 1a. User logs onto the site. (User becomes a Logged on User.) | |
| [Resume at step 2.] | |
| 5a. System prefills fields with the Logged on User's profile information. | |
| [Resume at step 6.] | |
| [ID BE-1-1b: User has visited the site before.] | |
| [Branch after step 5.] | |
| 5a. System prefills all information from previously set cookie (as long as the cookie has not expired). | |
| [Resume at step 6.] |
Table 3-6. Simple Test Case
| Action | Expected Result |
| Navigate to the blog engine website. | BlogEngine.NET welcome page displays, and you are not logged in. |
| Click a blog post. | The post detail page displays with the post and all comments listed below it. |
| Click the Comment link. | The page displays places to enter your name, e-mail address, website, and nationality. |
| Enter the name Joe. | |
| Enter the e-mail address as joe@nowhere.com. | |
| Enter the comment as Test Comment and click Save Comment. | The comment displays above all the existing comments and below the blog post. |
