


Since the beginning of .NET, developers have been able to take advantage of multithreading when developing applications. In fact we've been given more than one programming model to accommodate just about any requirement that might come across. There's the Thread class, the Thread Pool, the Async Pattern, and the Background Worker. Well, as if that isn't enough, we now have a couple of more patterns that bring with them another genre - parallel programming.
I'll start by explaining exactly what is meant by parallel programming because it's actually not a synonym for multithreaded programming. Parallel programming covers a wider spectrum and refers to the ability to have multiple tasks going on concurrently. Concurrent does not necessarily mean multithreaded. It can mean grid computing on many machines. In fact, even the term multithreaded is often misunderstood. Threads on a CPU are a bit different than threads managed by the CLR using the thread pool. In that case, threads are more than likely not even truly simultaneous but more akin to time slicing, since more than likely the number of active threads will exceed the number of cores on the machine. Even in today's day and age, a CPU (or core) is capable of doing only one thing at any one time. As .NET developers we are provided the luxury of a rich toolset that lets our applications give their users the perception that many things are occurring at the same time. This appearance is more important than the deception it implies. An application's ability to demonstrate to the user that many things are happening at the same time is often more important than its true measure of speed. In fact, with multithreading often is the case where the overhead of thread management actually affects the performance of the code execution in a negative way.
“An application's ability to demonstrate to the user that many things are happening at the same time is often more important than its
truemeasure of speed.”
The responsiveness of the environment around an application is often neglected by developers. With the rise of mobile development, developers can no longer ignore this. Think of the ability to navigate back from a choice that causes a long process to execute on your mobile phone, or even to cancel the app altogether. Smartphone users have come to accept this as normal behavior in every mobile app we use, but the truth is that it should be normal behavior in every app we develop; mobile or not.
The problem was that though the programming models to write multithreaded code were not that difficult to learn, they were cumbersome to write and developers often sacrificed the benefits they offered in the interest of just getting the app done. The Task Parallel Library can remedy this with a few new models that are not only easy to use, but also bring the code constructs involved to the modern age in technique and pattern.
.NET Parallelism
Most of the parallel extensions in the .NET Framework were released with .NET 4, though I still find them drastically underused. The Visual Studio Async CTP (SP1 Refresh) later introduced the async and await keywords, and of course these made it into .NET Framework 4.5. I'm going to give you my own coverage of this feature, but it would be useless without leaving you comfortable with the concept of tasks. So the parts of the framework that I will cover in this article include:
- The Task Parallel Library
- The async and await keywords
Like the older programming models, you should use the new ones with care. Multithreaded programming still seems to be one of those things where once a programmer learns how it's done, they get carried away rather quickly.
In mobile programming, you should keep parallelism in the forefront of your thoughts. Why? Because mobile platforms allow immediate access to one application at a time so you should avoid monopolization of the device.
The Task Parallel Library
Perhaps the largest addition to the world of parallel programming in .NET is the Task Parallel Library. This library includes the contents of the namespace, System.Threading.Tasks. The two primary classes here are the Task class and the Parallel class. These two classes make up the core of the API you should use going forward to perform multithreaded programming, going forward referred to as parallel programming. I'll start by focusing on the Task class.
Task
The Task class is the centerpiece of the Task Parallel Library. A task represents an operation that is running or going to run. Using the Task class, you benefit from a state-of-the-art fluent API that is easy to use and offers extreme flexibility. Another benefit of the Task Parallel Library is that when it incorporates multithreading, it uses the thread pool. The thread pool manages thread usage for maximum throughput and scalability. Tasks don't necessarily have to execute on a separate thread, but usage of the Task class as I will explain it in this article will be in a multithreaded capacity. You can set tasks to execute on the current (or a specific) thread.
Simple Task Execution
In its simplest form, a task defined by the Task class contains a snippet of code that defines the operation that will execute.
Task task = new Task(() =>
{
    Console.WriteLine("Task on thread {0} started.",
    Thread.CurrentThread.ManagedThreadId);
    Thread.Sleep(3000);
    Console.WriteLine("Task on thread {0} finished.",
    Thread.CurrentThread.ManagedThreadId);
});
This code snippet defines a piece of code that when started, will execute on another thread. To run the operation defined by the task, I simply need to execute the task's Start method. This method of starting kicks off the task on a separate thread.
task.Start();
Console.WriteLine("This is the main thread.");
Since the code defined in the task executes on another thread, any code that follows the execution of the task's Start method will continue to execute immediately. In this particular example, since the asynchronous code is simply going to sleep its thread for 3 seconds, the text “This is the main thread” will display before the text, "Task on thread ‘x' finished."
Returning a Value
There are many times when you need an asynchronous process to return a value when it is finished. The Task class makes this very easy as well.
Task<int> task = new Task<int>(() =>
{
    Thread.Sleep(3000);
    return 2 + 3;
});
As this snippet illustrates, the task performs a simple mathematical operation and returns its result. The result type is defined in the generic argument. I can use a couple of techniques to examine those results. The easiest one is to use the Result property of the Task class.
task.Start();
Console.WriteLine("This is the main thread.");
int sum = task.Result;
Console.WriteLine("The result from the task is {0}.", sum);
The Result property carries the return value as returned by the code defined in the task. The type of the Result variable is the type defined by the generic argument used when declaring the Task instance. What's important to note here is that reference to the Result property will block the calling thread until the task completes. So in this case, the task starts the 3-second sleep cycle. On the main thread you would immediately see the message that follows the Start method, but the result message will not show until the task is complete. This means that you can execute whatever code you want between the time you start the task and the time you reference the Result property, but when you get to the latter you'll be waiting for completion of the task and the thread will be blocked while you wait. This is important to remember when you're calling thread happens to be the UI thread.
Another way of examining return values from a task illustrates the Task class's fluent interface. The ContinueWith method lets me define a callback code construct that will get automatically executed when my task completes.
task.ContinueWith(taskInfo =>
{
    Console.WriteLine("The result from the task is {0}.", taskInfo.Result);
});
The argument for this method is an Action type with its generic argument being of the type of the task. So in this case, the signature of the ContinueWith method is Action<Task<int>>. If you're well versed with lambda expressions (sorry, no time for that kind of tutorial), you'll know this means that the lambda variable is of type Task<int> and that its value will represent my running task. Because of this, I can access the Result variable from within the code snippet. This callback code is also called the “task continuation code.”
In the ContinueWith method up front you can define both the Task class and its code c as well as the callback code. Afterwards, use the Start method to execute. In this case, anything after the Start call will continue to execute. Whenever the task completes on the background thread, the callback code will get executed. It's important to note that the callback code executes on yet another background thread so all UI marshaling rules apply. I will explain the reason for this below.
Fluent API
I said the ContinueWith demonstrated the Task class's fluent API so the first thing is what exactly is a fluent API? Put simply, and defined by Martin Fowler, it's an object-oriented API with emphasis on readability. What makes a fluent API visually unique is its use of method chaining.
Before I demonstrate this, let me first explain that the ContinueWith method actually returns a Task object itself. In fact, if you add a generic argument to the ContinueWith<T>, it will return a Task<T> instance. This task can then also call upon its own ContinueWith method, and so on, and so on. This is the reason that the code defined within a ContinueWith method executes on another background thread; it is in itself another task. Firing off the Start method on the initial task will start the process going. The first task will execute on a background thread and when it is complete, its callback as defined in its ContinueWith method will then execute in another background thread and when it completes, yet another thread will execute any code that may be defined in another ContinueWith method. Listing 1 shows the code I just described.
Listing 1: Multiple tasks with ContinueWith
Task<int> task = new Task<int>(() =>
{
    Console.WriteLine("Task on thread {0} started.", Thread.CurrentThread.ManagedThreadId);
    Thread.Sleep(3000);
    Console.WriteLine("Task on thread {0} finished.", Thread.CurrentThread.ManagedThreadId);

    return 2 + 3;
});

Task<string> task2 = task.ContinueWith<string>(taskInfo =>
{
    Console.WriteLine("The result from the task is {0}.", taskInfo.Result);
    Console.WriteLine("Task2 on thread {0} started.", Thread.CurrentThread.ManagedThreadId);
    Thread.Sleep(3000);
    Console.WriteLine("Task2 on thread {0} finished.", Thread.CurrentThread.ManagedThreadId);

    return "Miguel";
});

task2.ContinueWith(taskInfo =>
{
    Console.WriteLine("The result from the second task is {0}.", taskInfo.Result);
});

task.Start();
Console.WriteLine("This is the main thread.");
Rather than declaring all of this in separate lines of code using different task variables, I can use the fluent API to do it in a more elegant fashion. You can chain the ContinueWith methods one after the other, each returning its own instance of a Task or Task<T> class. But because the last one is the task whose type must be the initial task type defined at the beginning (and it may not be), the following syntax would not work:
// Does not work
Task<int> task = new Task<int>(() =>
{
    Thread.Sleep(3000);
    return 2 + 3;
}).ContinueWith<string>(taskInfo =>
{
    Thread.Sleep(3000);
    return "Miguel";
}).ContinueWith(taskInfo =>
{
    Console.WriteLine("The result from the second task is {0}.", taskInfo.Result);
});
As you can see, the last ContinueWith method would return an instance of Task, and the initial variable defined is of type Task<int>. If you try to simply change the initial declaring type from Task<int> to Task, when you call the Start method, you'll get an error saying that you cannot execute Start on a ContinueWith statement. What I need is the ability to declare and fire off in one step, or one statement. That's where the task factory comes in.
Task Factory
I can easily modify my code to use the task factory. I start by creating an instance of the TaskFactory<T> class, where the generic is the type I need to return. This is similar to creating a Task<T> instance. Using the factory instance, I can define a new task and have it executed by calling upon the StartNew method. The StartNew method's argument is the same Action type as the constructor of the Task class and through its lambda expression, can then be used to contain the code construct that will get executed asynchronously. You can do callback chaining using ContinueWith exactly the same way as shown above.
To save even more code, the Task<T> class contains a static property called Factory that returns an instance of TaskFactory<T>.
Task<int>.Factory.StartNew(() =>
{
    Thread.Sleep(3000);
    return 2 + 3;
}).ContinueWith<string>(taskInfo =>
{
    Thread.Sleep(3000);
    return "Miguel";
}).ContinueWith(taskInfo =>
{
    Console.WriteLine("The result from the second task is {0}.", taskInfo.Result);
});
The code above declares and fires off the task chain. Which code technique you chose is up to you. The task factory is nice to have if you want to take advantage of the fluent API, but many times I prefer to declare my tasks separately from firing them off so I use the Task<T> conventionally with a ContinueWith statement.
When defining a task, you may need to use variables that are defined outside of the task. This requires conventional locking techniques in the case that those same variables are modified in parallel while the task is running. Another choice is to send state into the task. This provides better encapsulation and code elegance. You define the state variable in the lambda expression that defines the code construct to be asynchronously executed. You get one state variable so multiple values need to be wrapped in a single class or an array.
Task<int> task = new Task<int>((value) =>
{
    int num = (int)value;
    Thread.Sleep(3000);
    return 2 + num;
}, 4);
As you can see, the value for the state variable is offered as the second argument of the Task class's constructor.
You can use a callback to access a state variable using the AsyncState variable of the Task instance used in its lambda expression.
task.ContinueWith(taskInfo =>
{
    Console.WriteLine("The state passed to the task is {0}.", taskInfo.AsyncState);
    Console.WriteLine("The result from the task is {0}.", taskInfo.Result);
});
Passing Methods
When defining tasks, you don't need to inline the code to be asynchronously executed. In fact, in this case code is code, and that code can simply be methods to which you will defer the actual processing.
For example, I may have two methods setup, one for performing the math formula and the other for displaying results.
static int PerformMath(int amt1, int amt2)
{
    return amt1 + amt2;
}

static void ShowResults(int result)
{
    Console.WriteLine("Final result is {0} and the thread is {1}.", result, Thread.CurrentThread.ManagedThreadId);
}
Now I can set up a task with a callback to call upon these two methods. In this example, I'll use the task factory.
Task<int>.Factory.StartNew(() => PerformMath(5, 7)).ContinueWith(taskInfo => ShowResults(taskInfo.Result));
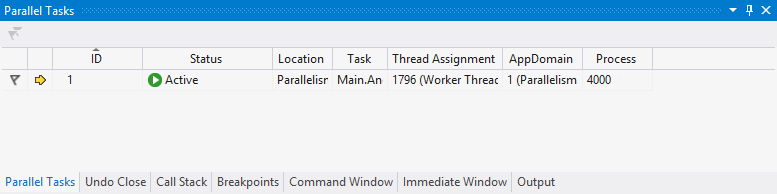
Debugging Running Tasks
Every Task instance contains a property called ID which developers can use for logging purposes (or any other) or to examine the active tasks using the Parallel Tasks tool window (Figure 1). You can access this window from the Debug menu in Visual Studio 2012. This is similar to the Threads tool window and in fact can be used in conjunction with it, but remember there are times where a task may not be running on a separate thread but still needs to be tracked during debugging.
Waiting
After firing of an asynchronous task, the main thread can continue to work on something else. However, the point may come when the main thread has finished doing all the processing it can do in parallel and what comes next should only execute if the task is complete. I can ensure this with the Wait method.
Task task = new Task(() =>
{
    Thread.Sleep(3000);
});

task.Start();
task.Wait();
Console.WriteLine("This is the main thread.");
In the code above, the output to the console will not occur until the task is complete. If I omit the Wait call, the output to the console would happen immediately after firing off the task.
The Task class also has a WaitAll static method that accepts an array of tasks. This would let me halt the current thread until a set of tasks have completed.
Later I will show you a much more efficient wait pattern when I go over the async and await keywords.
Task Cancelation
At some point you may decide that you need to cancel a long running task from the calling thread. When you think about it, it's actually quite dangerous to simply kill a running process without some sort of proper housekeeping. We've been taught to properly shut-down our PCs rather than simply pulling the plug and killing tasks is pretty similar. For this reason, the Task Parallel Library enables you to “request a cancelation,” making it up to the task's implementation code to check for this.
I must take one step in this process before I can even define the task. I first need to define an instance of the CancelationTokenSource class. With this object I can later request a cancelation of the task. The task gets the message because I'm going to give it the cancelation token provided by the Token property of the CancelationTokenSource object. I do this through the second constructor argument of the Task class when I define the task.
Let me show you an example of what I mean:
CancellationTokenSource tokenSource = new CancellationTokenSource();
CancellationToken token = tokenSource.Token;

Task task = new Task(() =>
{
    Console.WriteLine("Task on thread {0} started.", Thread.CurrentThread.ManagedThreadId);
    Thread.Sleep(5000);
    if (!token.IsCancellationRequested)
        Console.WriteLine("Task on thread {0} finished.", Thread.CurrentThread.ManagedThreadId);
    else
        Console.WriteLine("Cancelation requested.");
}, token);

task.Start();
Thread.Sleep(1000);
Console.WriteLine("This is the main thread.");
tokenSource.Cancel();
As you can see, when the task is declared, the first constructor argument is, of course, the code construct, while the second is the cancelation token. Afterwards, when I start the task I output to the console, and then request a cancelation. Because my task sleeps for 5 seconds and the cancellation request happens shortly after starting it, when the task code checks the token's IsCancellationRequested it finds that it is true and chooses not to continue processing.
It's important to understand that the task must decide what to do, or rather what not to do, if it encounters a cancellation request.
Also note the one second sleep immediately after I start the task. I put this here for a very interesting reason - one I discovered by accident, for there is no documentation out there for it (at least none that I found). If I start the task and immediately issue a cancellation request, I run into the possibility that the task never got a chance to start its processing. The process of spinning up the thread is heavy enough that the task delays milliseconds behind the cancellation request but just enough. The result is that if the task is about to start its processing and has already been requested for cancellation, it simply cancels itself. This is good behavior because remember that the reason we have cancellation “requests” to begin with is for code processing safety, but if that code has not even begun to execute then it's perfectly safe for it to simply not run. I put the delay in there for the purposes of this demonstration only. I would leave it out in a real application.
The Task class has other features and capabilities but I've given you the most important here, and the ones that set the foundation for the rest of the article content. The Task class makes it easier for developers to kick off asynchronous processes in their applications and design applications that are capable of parallel processing without the burden of previous tricky programming models that would sometimes hinder productivity.
When the time comes for us to design applications that require some kind of parallel processing, we can use the Task class. But the Task class is not the only piece of the Task Parallel Library that eases the pain of multithreading. The Parallel class further wraps the Task class and gives developers even more help in specific usage scenarios for parallel processing.
Parallel
Developers use the Parallel class for a scenario referred to as data parallelism. This is a scenario where the same operation is performed in parallel on different items. The most common example of this is items in a collection or an array which need to be acted upon. Using the Parallel class, you can perform an operation on members of a collection or any kind of iteration, in parallel.
While I can certainly code this manually using the Task class inside a for or for-each loop, I can code it easier and faster with the Parallel class. This class has two methods that will allow me to work with loops: For and ForEach. As C# developers you should be able to ascertain what they're each for by their names, but I'll show you how to use them anyway.
For
The For method will perform the same kind of iteration you would normally make using a for loop but each iteration would be executed in a new task. This may or may not mean a different thread. What determines this is the implementation of the iteration code. The Parallel class continues to monitor the code running in the threads it uses. If it's long processing, then that increases the chance that more threads will be started to assist with the iterations that are left. But remember that as each iteration completes, its thread is returned to the thread pool and can be reused. This means that if an iteration of the loop is pretty much instant, it may reuse a thread from a previous iteration. In fact, even the main thread that started the iteration will participate in the iterations.
I'll start with an example of a sequential loop:
for (int i = 0; i < 10; i++)
{
    Console.WriteLine("Sequential iteration on index {0} running on thread {1}.", i, Thread.CurrentThread.ManagedThreadId);
    Thread.Sleep(200);
}
Now I'll perform the same loop using parallel processing:
Parallel.For(0, 10, i =>
{
    Console.WriteLine("Sequential iteration on index {0} running on thread {1}.", i, Thread.CurrentThread.ManagedThreadId);
    Thread.Sleep(200);
});
The syntax is quite simple. The first two arguments are the “from” and “to” values and the variable in the lambda expression is the counter.
There's a specific reason I'm sleeping for 200 milliseconds on each iteration in both examples. When executed, the sequential example will output 10 iterations to the console with a 200 millisecond delay after each output. It will also execute each iteration on the same thread.
The parallel example will not visually demonstrate any delay before you see an output to the console. This is because each iteration will be done on a different thread. The threads might be reused since the delay is only 200 milliseconds so it's possible you'll see 3 or 4 threads reused throughout the iterations. In fact, I tested the same example with no delay at all and it's so fast that every iteration happens on the same thread. This means that each iteration processed so fast, it returned its thread to the thread pool just in time for the next iteration to pick it up.
orEach
The ForEach method is to a for each loop what the For method is to a for loop. It lets you perform a collection or array iteration in parallel.
Here's an example of a conventional, sequential collection iteration:
foreach (string item in bands)
{
    Console.WriteLine("Sequential iteration on item '{0}' running on thread {1}.", item, Thread.CurrentThread.ManagedThreadId);
    Thread.Sleep(200);
}
And this is the same loop using Parallel.ForEach:
Parallel.ForEach(bands, item =>
{
    Console.WriteLine("Sequential iteration on item '{0}' running on thread {1}.", item,
    Thread.CurrentThread.ManagedThreadId);
    Thread.Sleep(200);
});
Similar to the For method, the first argument is the collection through which I want to iterate and the variable in the lambda expression is the iteration value. Incidentally, my full code example had a collection of some of my favorite rock bands, hence the collection variable name.
Invoke
The Parallel class has one additional method (Invoke) that you can use to fire off an asynchronous task quickly with no frills. No frills also means you don't get callback ability or cancelation or any of the advanced features you would get when using the Task class.
To use the Invoke method, I simply pass it an empty lambda expression with the code that I want to execute asynchronously:
Parallel.Invoke(() =>
{
    Console.WriteLine("This code is running on thread {0}.", Thread.CurrentThread.ManagedThreadId);
});
It's important to note that while the Parallel class manages the possible spawning of multiple threads to handle its iterations in the most efficient manner, it itself is synchronous. This means that though the code in each iteration is designed to run asynchronous, it is not until all iterations are completed that the statement after the Parallel class usage executes. Think of it as one big synchronous process that while it is running, is firing off several asynchronous ones.
All of these features will make it much easier and elegant to write parallel-oriented code. (Wow, did I just coin a new phrase?) With the storm of mobile development needs impacting our industry, knowing how to properly write this kind of code is more important than ever. On a mobile device, it is crucial that an application not lock up the device at any point in time. With this requirement, we need even a little more help in ensuring that we write non-blocking code and that we do it easy enough to be able to do it often enough. So we turn to the async and await keywords.
Going “Async”
The .NET Framework contains many things that we refer to as syntactic sugar. This term means that to accomplish something with the .NET Framework's base class library, which requires a specific pattern, usually a complex one, we as developers are given the luxury of a simple code syntax. The compiler team at Microsoft didn't have to add new features and keywords to the IL compiler. They simply modified the language compilers to turn simple syntax into the complex one when it generates the IL during compilation.
Iterators are a perfect example of this. Rather than having to learn and repeat the IEnumerable/IEnumerator pattern that lets you write custom iterators, you can simply use the yield statement and the language compiler will figure out what the code should actually look like and turn it into that. Another example is the lock statement. IL doesn't recognize the lock statement any more than it recognizes the yield statement. Instead, the language compiler turns the lock statement into a usage of the Monitor class. If you haven't seen this class in use, the Monitor class represents another way to handle synchronization and provides more functionality than the lock statement. The lock statement is a simple code-shortcut to achieving one of the more commonly used patterns available through the Monitor class.
The async and await keywords are, IMHO, the ultimate representation of syntactic sugar because the syntax they allow developers to use is drastically simpler than the code that is actually needed at the IL level to perform the same functionality.
Microsoft introduced async and await with the Async CTP for .NET 4 and they are now fully qualified members of .NET 4.5.
Microsoft created these keywords to prevent blocking of the current thread and in many cases allow for parallel execution of code. There are variations on how this can be coded as well as variations on what the behavior of each case is, but the more useful one incorporates true multithreading and guarantees no UI blocking during a call. I'll demonstrate this usage of async and await to you. It's the one that's been embraced by the framework with the addition of many new methods scattered in various subsystems.
You may recall that the .NET Framework is filled with methods whose parent class also contains corresponding “Begin” and “End” prefaced versions. This is the classic asynchronous delegate pattern at work and it has served well for a very long time. In fact, my very first article for CODE Magazine was called “Async-Up Your Objects” and it showed how to incorporate this pattern in your own classes. Though it worked well and was a powerful pattern, the asynchronous delegate pattern was tedious to write sometimes and required a bit of code, especially if you needed callbacks. Well, everything progresses with new versions of the framework and this is no exception. You might have run into methods whose names end with the word Async. These methods represent the new way of doing asynchronous calls and demonstrate a much cleaner coding pattern, thanks to the async and await keywords.
Let me begin with a brief description of how these two keywords work. The primary keyword here is await, and it can be placed in front of anything that returns a Task or Task<T> instance. You can only use the await keyword inside a method that has the async keyword in front of it. The await keyword simply ensures that the current code will not continue until the value being “awaited” is fully available. It offers concurrency by wrapping anything that follows it in a task continuation. This is where the compiler's syntactic sugar magic comes in. Take the following code sample:
async void button2_Click(object sender, EventArgs e)
{
    Trace.WriteLine(string.Format("Button pressed on thread {0}", Thread.CurrentThread.ManagedThreadId));

    Task<int> getLengthTask = GetStringLengthAsync("Miguel A. Castro");

    Thread.Sleep(1000);

    Trace.WriteLine(string.Format("Continuing to run within button event on thread {0}.", Thread.CurrentThread.ManagedThreadId));

    int length = await getLengthTask;

    Trace.WriteLine(string.Format("The length of the string is {0}.", length));

    Thread.CurrentThread.ManagedThreadId));
}
Here, I'm making a call to a method called GetStringLengthAsync which very simply gets the length of a string (yes, I know you can do this with string.Length - humor me here). Now here's where it can get a little confusing and even misleading. When and where (what thread) the actual code in the GetStringLengthAsync executes is up to how that method is written. Take a look at this first version:
async Task<int> GetStringLengthAsync(string text)
{
    Trace.WriteLine(string.Format("Task on thread {0} started.", Thread.CurrentThread.ManagedThreadId));

    // something long running here
    Trace.WriteLine(string.Format("Task on thread {0} finished.", Thread.CurrentThread.ManagedThreadId));

    return text.Length;
}
Here, you see that the method returns a task but doesn't actually start one within; or even set one up. That's because I declared this method with the async keyword. The compiler turns it into an actual task. What's misleading is the misconception that this will execute on another thread, which it will not. In this example, the GetStringLengthAsync method will execute its code when it is called and in the same thread as the caller. The await on the getLengthTask variable in the caller tells the compiler to wrap anything that follows it in a task continuation. The pattern, though set up correctly, does not give you any apparent benefit because as I said, how you write the “awaited” code is what determines true concurrency. So you can say async/await enables concurrency potential but not necessarily multithreading.
The new methods you'll see scattered throughout the framework that end in the word Async are written to be potentially long running tasks so they incorporate multithreading. So now I'll rewrite mine similarly.
Task<int> GetStringLengthAsync(string text)
{
    Task<int> task = Task.Run<int>(() =>
    {
        Trace.WriteLine(string.Format("StringLength task on thread {0} started.", Thread.CurrentThread.ManagedThreadId));
        Thread.Sleep(5000);
        Trace.WriteLine(string.Format("StringLength task on thread {0} finished.", Thread.CurrentThread.ManagedThreadId));

        return text.Length;
    });

    return task;
}
Notice this version returns a task as well which, according to my earlier stated rule, can be “awaited.” Simply calling upon this method (the calling code doesn't change) will kick off this task because the method is explicitly creating and executing the task. Task.Run is simply a shortcut for Task.Factory.StartNew with some default settings. Notice that this method is not marked with the async keyword because I'm not letting the compiler wrap the code in a task, as I have explicitly done this myself. Explicitly using a task also allows this code to compile using .NET 4 without the Async CTP. Task.Run will fire off its code using a thread from the thread pool so the calling code will continue to run. In this case, because my method is sleeping for five seconds, the Output Window will display the text “Continuing to run within button event…” just after the text “StringLength task started…” (thanks to the one second delay in the caller), but before the “StringLength task finished…” text. Also, the thread IDs on the called method will be different than in the caller method. Now, I said that the calling method will continue to execute code even after it made the call to the GetStringLengthAsync method and it will, right up to the point when it reaches the await on the variable returned by the call. My five second delay has ensured that by the time I get to this line, the called method is still working but the caller will simply wait until it has the results of the task and then continue on to return the length of the string. That is because, as established in my description of the pattern earlier, the code following the await is wrapped into a task continuation so it is essentially a callback. In the meantime, control will return to the caller of the button Click event (the UI) and you will get no UI-thread blockage. Now, although the compiler is wrapping the code following the await keyword in a task continuation, that code will execute on the synchronization context under which the calling method runs. I specify this because earlier when I briefed you on the Task class's ContinueWith method, I said that the code runs on yet another background thread, but by incorporating additional features of Task, a specific Synchronization Context can be specified, and that's what the compiler does. Running on the UI's context means that it's perfectly safe to update the UI. I would expect this behavior if I'm going to write code like the calling method example above (the button Click event), where there is really no indication that “tasking” is taking place.
The confusion you'll receive (as I have, believe me) when you read about these features all over the web, is that simply incorporating the async/await keywords in a method will make that method asynchronous, and that is simply not true. Remember that only a Task or a Task<T> can be “awaited” (actually a void can as well), and how the method that will define this task is written is what will make this process truly parallel.
An example of a place where this pattern is used in the framework is in the async methods provided by the HttpClient class. These are used to make REST calls and return a string of data. Depending on what's going on behind the actual service calls and where the service is, obtaining the returned string data on a REST call can take a few seconds, so you don't want to block the calling thread during this process. Calling the GetStringAsync method on the HttpClient class lets you make the REST call on another thread while you can continue to work on the main thread. Now, since I've opened up this can of worms, let me continue to use this as an example on how to properly make a call like this.
You have two ways to call a method designed to run asynchronously:
string getResponse = await client.GetStringAsync("http://localhost:1665/api/zipcode/07035");
And:
Task<string> getResponseTask = client.GetStringAsync("http://localhost:1665/api/zipcode/07035");
// continue processing on the main thread
string getResponse2 = await getResponseTask;
The difference here is that the first one is a straight forward call that will initiate the task and wait for its completion all in one shot. The second example starts the task and allows you to continue executing code. When I get to the point where I cannot continue without the result of the call, I use the await statement to obtain it. Neither scenario will block the calling thread because remember that anything following the await statement is rewritten by the compiler to run as a task continuation and control returns to whatever method called the async-marked method to begin with. This is during the awaited call because when the code following begins to run, it gets marshaled up to the calling thread. It is details like this that are often missed and the reason patterns are misunderstood and therefore misused.
If I put some long running code, or even a sleep statement, immediately after the await that gets my return value, I would block the calling thread. For this reason you need to be mindful of how you write async-enabled code. Keep processing in the methods that will call upon async method short because those methods are running on the calling thread and that might just be your UI thread.
Both of the examples above will require the methods in which these calls reside to have the async keyword in their declaration. Because the Task class is available in .NET 4, whereas the async and await keywords were only present if the Async CTP was installed, Async methods can be called in a conventional fashion and the resulting value obtained through the Result property.
string getResponse = client.GetStringAsync("http://localhost:1665/api/zipcode/07035").Result;
Remember that when accessing the Result property, the current thread will block, unlike when using the await keyword where the thread will wait for the completion of the task but not block any UI.
Conclusion
I could have gone on for a long time on this topic. The Task class alone is filled with overloads to discuss, but I wanted to concentrate on the patterns at play in modern parallel programming. Many developers discuss this topic and each seems to express things a bit differently. Having multiple points of view on a potentially confusing yet important feature can help you grok it; and grok it you must as parallelism moves to the forefront of programming models.
