


When considering mobile development, you have a variety of techniques to choose from. In many cases, reactive rendering (using CSS media queries) provides a good solution. Additional mobile customization can be achieved by using ASP.NET MVC4 device detection/customization to provide adaptive rendering. Both of these techniques follow the traditional Web development pattern where each page is focused on a specific task. In an application managing a list, there is a page devoted to the list of items, a second page to view details, and perhaps a third to edit a specific item.
Single Page Application (SPA) approaches development differently. As its name implies, a SPA consists of a single view page. A SPA page contains all of the presentation markup required by the application. In the list management application mentioned above, a SPA has a single page containing markup to display the list and markup to display or edit an item. Manipulation of the Document Object Model (DOM) determines the view visible by the user.
Single Page Application (SPA) approaches development differently. As its name implies, a SPA consists of a single view page. A SPA page contains all of the presentation markup required by the application.
SPA benefits are twofold: less network bandwidth and faster navigation. The first is accomplished because, although the initial page download is larger (you are essentially getting multiple pages of markup in one file), you only have to transmit supporting navigation and JavaScript libraries once. Additionally, on-page navigation may need little or no request between the client and the server. Faster navigation is the second benefit. Because the application already has the markup necessary to display all forms, no request to the server to generate and retrieve display markup is necessary. Any required data (typically JSON-formatted) may be retrieved asynchronously using JavaScript.
When architecting a SPA, there are several ways to go. You can craft your own, in which case, you are responsible for showing or hiding the different forms based on a navigation request. You are also responsible for all CSS styling to drive the appearance of your markup. Finally, you are also responsible for all data display and binding.
Fortunately, there are several mobile development frameworks that can assist or completely relieve you of these duties. Frameworks like Sencha Touch, jQuery Mobile, and KendoUI Mobile will provide the CSS styling. Other frameworks like Knockout, Ember, and KendoUI provide assistance in displaying and binding your data. A common thread with these frameworks is JavaScript.
This brings us to an important point about SPA development. In contrast to server-side development, SPA development is primarily done on the client side, which means JavaScript. If you are not familiar with JavaScript, SPA development may be challenging. There is still server-side development in the SPA world, but it is primarily limited to a service type of role, commonly, to provide data functionality.
SPA development is primarily done on the client side, which means JavaScript. If you are not familiar with JavaScript, SPA development may be challenging.
Now that you understand what SPA is about, let's get started building one. For this exercise, I have chosen to use KenodoUI Mobile for my client-side JavaScript framework. However, this same technique could be used with jQuery Mobile/Knockout or Sencha Touch/Ember or any other combination of your choice.
KendoUI is a relatively new JavaScript framework created by Telerik. KendoUI is designed for HTML5 applications and is intended to provide a complete framework to build applications that look and feed native. This “one-stop shopping” approach provides an interesting alternative to having to ensure the compatibility of various frameworks from different vendors or open source repositories. In fact, to achieve all the features shown in this article, you have to use at least two different frameworks, one for model binding and one for styling. More complex applications may require additional frameworks for various controls. KendoUI not only provides the model binding and styling framework, but also includes a number of “widgets” to aid in development.
KendoUI can be found at https://www.telerik.com/kendo-ui. Although KendoUI is not free, your organization might feel more comfortable using a framework that has a support organization backing it.
Setting up the Project
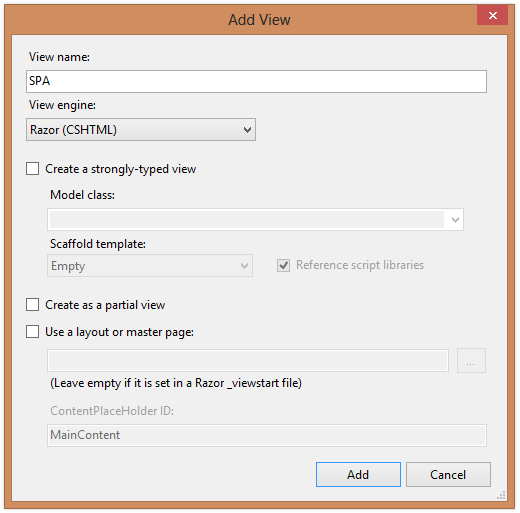
Let's start by creating a new MVC4 project using the Web API template. Eventually, you will use Web API to interact with data. (Web API interaction will be covered in an article in the next issue.) Once your project has been created, open up the HomeController and add a new ActionResult (I called mine SPA) to serve your single page. Once you have added your ActionResult, expand the \Views\Home folder and right-click to add a new view. Make sure the View Name matches your ActionResult. Uncheck the “Use a layout or master page” option (Figure 1) to generate a simple HTML page to start our SPA from.
Referencing the framework libraries is the next step. If you haven't already downloaded them, go to https://www.telerik.com/kendo-ui and click on the “Download” menu item. They have a free trial version available. After downloading, extract the JavaScript libraries add them to your project.
These two files provide the styling support that allows Kendo UI to work its magic.
Because Kendo UI is dependent on jQuery, add a reference to jQuery first. Use the “jquery.min.js” that is included with the Kendo UI download or use your own jQuery download. Follow the script library references with two style sheets, one to the “kendo.mobile.all.min.css” style sheet and another to the “main.css”. These two files provide the styling support that allows Kendo UI to work its magic. In all, you need to make the four references for scripts and style sheets.
<!DOCTYPE html>
<html>
  <head>
     <meta name="viewport"
           content="width=device-width" />
     <script
          src="~/Content/kendo/js/
              <a href="http://jquery.min.js">jquery.min.js</a>">
     </script>
     <script
          src="~/Content/kendo/js/
              <a href="http://kendo.mobile.min.js">kendo.mobile.min.js</a>">
     </script>

     <link href="~/Content/kendo/styles/
        kendo.mobile.all.min.css" rel="stylesheet" />
     <link href="~/Content/kendo/styles/main.css"
           rel="stylesheet" />
     <title>SPA</title>
</head>
Beginning the Page Layout
Now that the framework is available, you need to start laying out the page. Departure from traditional HTML development begins at this point because SPA structure is based on one or more views. Each view is responsible for displaying a specific feature, such as showing a list of information or a form to edit data. Start by defining the view that is responsible for displaying the list of customers. This view consists of several DIV tags and one unordered list and is located inside the body tag of the page.
<body>
  <div data-role="view" id="homeView"
       data-url="/">
      <div data-role="header">
          <div data-role="navbar">
              <span>Customers</span>
          </div>
      </div>
      <ul data-role="listview" data-style="inset">
          <li>Microsoft</li>
          <li>Apple</li>
          <li>EPS Software</li>
      </ul>
  </div>
</body>
You will notice several “data-” attributes that are specific to the framework. Frameworks commonly use the data- attribute to control how the markup is rendered. See the sidebar HTML5 Embedding Custom Data for more information on data- attributes. In the case of Kendo UI, the data-role=“view” tells KendoUI to generate this DIV tag as a view. You can see other data- attributes, such as Header, Navbar, and ListView, used in the basic view definition. Each of these attributes has a specific meaning to KendoUI and tells it exactly how to display a given DIV tag.
You can see other data- attributes, such as Header, Navbar, and ListView, used in the basic view definition.
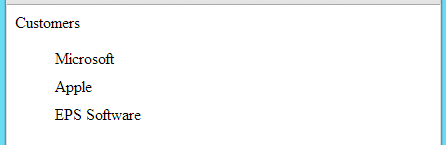
If you run the application now, you will see the rather unimpressive display shown in Figure 2. At this point, you have only performed two of the three necessary steps to fully activate a framework. You have made the framework available by referencing scripts and style sheets in the Head tag and you have defined a view with framework-specific data attributes. But you have not yet initialized the framework.
At this point, initializing is a simple matter of adding one line in a script tag. The full text, shown in Listing 1, shows the new Script tag added at the bottom of the page.
Listing 1: Initializing the KendoUI Framework
<!DOCTYPE html>
<html>
  <head>
      <meta name="viewport" content="width=device-width" />
      <script src="~/Content/kendo/js/
           <a href="http://jquery.min.js">jquery.min.js</a>"></script>
      <script src="~/Content/kendo/js/
           <a href="http://kendo.mobile.min.js">kendo.mobile.min.js</a>">
      </script>
      <link href="~/Content/kendo/styles/kendo.mobile.all.min.css"
            rel="stylesheet" />
      <link href="~/Content/kendo/styles/main.css"
            rel="stylesheet" />
      <title>SPA</title>
  </head>
  <body>
      <!-- View for Customer list -->
      <div data-role="view" id="homeView"
           data-url="/">
          <div data-role="header">
              <div data-role="navbar">
                  <span>Customers</span>
                  <a data-role="button"
                     data-icon="add"
                     data-align="right"
                     data-bind="click: newCustomer"
                     href="#editView">New</a>
              </div>
          </div>
          <ul data-role="listview" data-style="inset">
              <li>Microsoft</li>
              <li>Apple</li>
              <li>EPS Software</li>
          </ul>
      </div>

      <script>
          //KendoUI initialization
          var app = new kendo.mobile.Application(document.body,
              {
                  transition: "slide",
                  layout: "homeView"
              });
      </script>
  </body>
</html>
Running the application now yields the more impressive result shown in Figure 3.
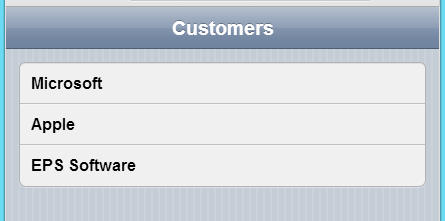
KendoUI identifies all of the data- attributes and applies the appropriate style to accomplish this change. Chrome was used for the screen shots, so they appear similar to an iPhone (both use the WebKit engine for rendering). However KendoUI does something that is relatively unique; it adjusts the display to emulate the native look and feel of the OS on the requesting device. Figure 4 shows how the same screen looks when displayed by an Android device (shown here by overriding the Chrome user-agent string).
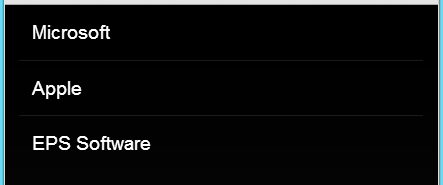
KendoUI does something that is relatively unique; it adjusts the display to emulate the native look and feel of the OS on the requesting device.
Binding to Data
So far, I have focused on the styling provided by frameworks, but the page is displaying a hard-coded list. Because the list of Customers will grow, you want to bind this list to data to allow for updating. To accomplish this, use some client-side binding, as provided by the framework.
To display data, you need a data source. For the purpose of this article, I will use a JSON formatted list of Customers assigned to a local variable. To define the customer data add the code shown in Listing 2 in the script tag. In a real application, this JSON list would be retrieved using an AJAX call to the data service.
Listing 2: JSON Data
//JSON data, this could come from a Service/Web API call
    var customerJSON = [
                {
                    "Id": 1,
                    "Company": "Microsoft",
                    "FirstName": "Bill",
                    "LastName": "Gates",
                    "StartDate": "1976-11-26"
                },
                {
                    "Id": 2,
                    "Company": "Apple",
                    "FirstName": "Steve",
                    "LastName": "Jobs",
                    "StartDate": "1971-01-29"
                },
                {
                    "Id": 3,
                    "Company":
                        "EPS Software",
                    "FirstName": "Jeff",
                    "LastName": "Etter",
                    "StartDate": "2012-02-23"
                }
            ]
To hook up the data to the View, start by removing the list items that are hard coded and add data-source="customerJSON" to the UL tag. Running it now results in a list of three items, all showing Object.Object - not exactly what you are looking for, but understandable since the JSON is a complex object and you haven't told the list what part of the object to display. Control of the display is accomplished by using a simple template.
Listing 3 shows the simple layout of the template. The template creates an HTML anchor tag, with the data-role attribute of listview-link, displays the Company property, and allows for navigation to the not yet created editView. Now add a data-template attribute on the UL tag that is bound to the data, making sure that the template name matches the actual template ID.
Listing 3: Customer List using a Template
<!-- View for Customer list -->
<div data-role="view" id="homeView"
     data-model="customerViewModel"
     data-url="/">
    <div data-role="header">
        <div data-role="navbar">
            <span>Customers</span>
            <a data-role="button" data-icon="add"
               data-align="right" data-bind="click: newCustomer"
               href="#editView">New</a>
        </div>
    </div>
    <ul data-role="listview" data-style="inset"
        data-source="customerJSON"
        data-template="customerTemplate">
    </ul>
</div>

<!-- Template for Customer list -->
<script id="customerTemplate" type="text/x-kendo-template" >
    <a  data-role="listview-link"
        href="\#editView">
        #: Company #
    </a>
</script>
If you run the application now, it looks the same as when the list was hard coded, but you now see that it displays the JSON data and shows a hyperlink (indicated by the > on the right of the screen), as shown in Figure 5.
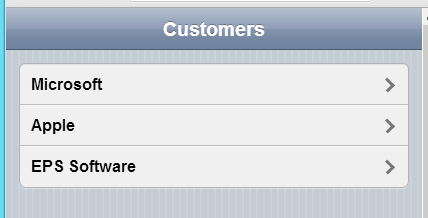
Applying the Framework
Viewing a list of customers is a great start, but you also want to edit the list. To implement editing, things get a little more complicated. You need to provide a view to edit a record, and the application will also need a mechanism to support modifications and additions to the list. You could manually code this assignment, but you want to take advantage of the client-side MVVM framework. KendoUI uses observable collections to implement MVVM functionality. With this in mind, you can begin defining the view model.
//viewModel
var customerViewModel = kendo.observable({
    customers: customerJSON,
});
Here, you can see the KendoUI view model in its simplest form. The JSON data is exposed via a single property called Customers. Ultimately, you will need a lot more functionality from the view model, but this is the minimum amount that you need to display the data.
KendoUI performs binding of view models by using the
data-modelattribute.
With the view model now exposing data, you need to update the view to reference it instead of the raw JSON data. To accomplish this, use a new data attribute: the data-model. KendoUI performs binding of view models by using the data-model attribute. You need to update the "homeView" DIV tag to include the data-model="customerViewModel" attribute. The home view is now aware of the customer view model, but you also need to point the list to the Customers property that is exposed on the view model. If you look at the UL tag, you can see a data-source="customerJSON" attribute;you need to replace this with data-bind="source: customers". Rather than just referencing a static list, you are now binding the list to data.
<!-- View for Customer list -->
<div data-role="view" id="homeView"
         data-model="customerViewModel"
         data-url="/">
    <div data-role="header">
        <div data-role="navbar">
            <span>Customers</span>
        </div>
    </div>
    <ul data-role="listview" data-style="inset"
        data-bind="source: customers"
        data-template="customerTemplate">
    </ul>
</div>
Building the View Model
Running the application now shows the same result shown in Figure 5. The difference now is that the list is bound to the view model, instead of a static list. Of course, you need to do a lot more than just expose a list, so let's tackle some of the more advanced features. Listing 4 shows the entire view model with all the functionality you will need, but it does merit some discussion.
Listing 4: The ViewModel
var customerViewModel = kendo.observable({
    customers: customerJSON,
    selectedItem: null,
    addMode: true,
    editMode: true,
    editCustomer: function (e) {
        this.set("addMode", false);
        this.set("editMode", true);
        var customerList = this.get("customers");
        var index = customerList.indexOf(e.dataItem);
        this.set("selectedItem", this.customers[index]);
        console.log(index);
    },
    newCustomer: function () {
        this.set("addMode", true);
        this.set("editMode", false);
        this.set("selectedItem",
        {
            "Id": 0,
            "Company": "",
            "FirstName": "",
            "LastName": "",
            "StartDate": "1/1/2013"
        }
    );
    },
    addCustomer: function () {
        var customer = this.get("selectedItem");
        this.customers.push(customer);
    },
    removeCustomer: function (e) {
        var customer = this.get("selectedItem");
        var customerList = this.get("customers");
        var index = customerList.indexOf(customer);
        this.customers.splice(index, 1);
    }
});
Several fields now exist on the customerViewModel, such as selectedItem, addMode, editCustomer, etc. Each of these properties provides specific functionality to the view and are of various “types”. The selectedItem is a complex type of a Customer, the addMode is a Boolean, and the editCustomer is a function.
You can define a property of virtually any type because JavaScript is a dynamically typed language. Dynamic typing allows a variable to take on the type of the value assigned to it. MVVM framework leverages this aspect of JavaScript and allows you to define various properties as required by the application. Let's look a little closer at the editCustomer function.
The editCustomer function accepts a single argument (e) that represents the list item to which the hyperlink was bound. You will hook up this function later when you update the view. Assignment of fields is accomplished by the function this.set("addMode", true);. All access to view model properties is accomplished by the “set” and “get” methods.
The syntax is fairly intuitive; you simply supply the string value that represents the property name, followed by the value to set it to. The addMode property is set to true using this syntax. The editMode property is set using the same syntax, but it is initialized to false. Retrieving a reference to the customer field is accomplished by calling this.get("customers"). The this.set and this.get are how you retrieve field values. Once you have a reference to the customer list, you find the current item in the list and set it to the selectedItem property. Once you are familiar with this concept, the rest of the view model becomes clear.
Creating the Edit View
Now that the view model is finished, you need to enhance the view to take advantages of its new features. In the customerTemplate, you provided a hyperlink to an editView that you now need to define. Like the list view, it starts with a new DIV tag, with the data-role defined as a view. You also need to give it a unique ID; in this case you want to match the editView used in the list item template. Additionally, you need to bind the view to the View Model, and to let the user know something is happening, you can give it a nice slide transition.
Next, you want to define the header section for this view. In this case, the header contains the buttons to call the adding and deleting of customers. In Listing 5, you can see a total of four buttons defined, each having their visibility bound to the current “mode” of the view model. As you may recall, the view model exposes two Boolean properties: editMode and addMode. When in the editMode, the Done and Delete buttons are visible. When in the addMode, the Save and Cancel buttons are shown. Looking closely at the Done button, you can see no function associated with it. Because the collection is observable, any change made on the selectedItem is propagated to the main collection, and you don't need to explicitly save any changes. In a real world scenario, where you want to persist the data, you need to provide a Save function on the view model to post the changes back to the server. The other button available in the editMode is the Delete button. Add a click binding to the removeCustomer function on the view model to perform the detail action. The other two buttons follow the same pattern.
Listing 5: Edit View Header
<header data-role="header">
    <div data-role="navbar">
        <a data-role="backbutton" data-icon="reply"
           data-align="left"
           data-bind="visible: editMode">Done</a>
        <a data-role="button" data-icon="add" data-align="left"
           data-bind="click: addCustomer, visible: addMode"
           href="/">Save</a>

        <span data-role="view-title">Edit</span>

        <a data-role="button" data-icon="trash" data-align="right"
           data-bind="click: removeCustomer, visible: editMode"
           href="#homeView">Delete</a>
        <a data-role="button" data-icon="trash" data-align="right"
           data-bind="visible: addMode" href="/">Cancel</a>
    </div>
</header>
After the header section of the editView, you need to add the content markup. Both editing and adding records is handled by this code. In Listing 6 you can see the enclosing DIV tag has the KendoUI role of content and contains an unordered list, with list items displaying the label and input box for each property exposed on the SelectedItem of the view model. Of special note is the data-binding of each input to the value of the property. Additionally, you set the class of the input to the KendoUI style of k-textbox, which changes the input appearance based on the requesting OS.
Listing 6: Edit View Content
<div data-role="content">
    <ul>
        <li>
            <input type="hidden"
                   data-bind="value: selectedItem.Id" />
            <label>Company</label>
        </li>
        <li>
            <input type="text"  class="k-textbox"
                   data-bind="value: selectedItem.Company" />
        </li>
        <li>
            <label>First Name</label>
        </li>
        <li>
            <input type="text" class="k-textbox"
                   data-bind="value: selectedItem.FirstName" />
        </li>
        <li>
            <label>Last Name</label>
        </li>
        <li>
            <input type="text" class="k-textbox"
                   data-bind="value: selectedItem.LastName" />
        </li>
        <li>
            <label>Start Date</label>
        </li>
        <li>
            <input type="date" class="k-textbox"
                   data-bind="value: selectedItem.StartDate" />
        </li>
    </ul>
</div>
Running the application now and clicking on a record triggers two things: the editCustomer method defined on the view model, and navigation to the editView defined by the hyperlink on the list item. The result is shown in Figure 6. Navigation does not cause a post back because it is contained solely within the current page. In a live application, the editCustomer method defined in the view model would have made an AJAX call to retrieve the full details of the record you are editing.

Navigation does not cause a post back because it is contained solely within the current page.
Because the SelectedItem is a direct reference to an item in the Customers list, any changes made here are automatically reflected in the list. So when you change the Company text and click the Done button, you navigate back to the Customer list and see that the changes are there. Clicking on the Delete button triggers the removeCustomer method of the view model, which removes the selectedItem from the Customers list.
Defining the Add Functionality
With the editing and deleting done, you have one more action to wire up. You need a way to trigger the addCustomer method. To accomplish this, add an anchor tag to the header of the Customer list view, as highlighted in Listing 7.
Listing 7: New record button
<div data-role="view" id="homeView"
     data-model="customerViewModel"
     data-url="/">
    <div data-role="header">
        <div data-role="navbar">
            <span>Customers</span>
            <a data-role="button" data-icon="add"
               data-align="right" data-bind="click: newCustomer"
               href="#editView">New</a>
        </div>
    </div>
    <ul data-role="listview" data-style="inset"
        data-bind="source: customers, click: editCustomer"
        data-template="customerTemplate">
    </ul>
</div>
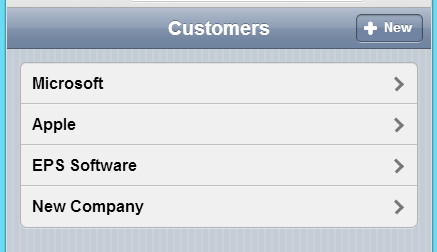
Running the application now shows the New button at the top of the screen (or if you are using an Android device, it appears at the bottom of the screen). Clicking on it triggers navigation to the editView and newCustomer method, which simply creates a new Customer object and assigns it to the selectedItem property. You will also notice that the top buttons change from Done and Delete to Save and Cancel, which are the appropriate actions when adding a new record.
At this point, you have a fully functional Single Page Application, which allows you to add and edit records to a static JSON array. Two-way binding is applied to the edit form, and the list is bound to an observable collection. Additionally, since you use the KendoUI framework, the application appearance takes on the native look of the OS requesting the page. The impressive part is that it is all done client-side using JavaScript.
At this point, you have a fully functional Single Page Application, which allows you to add and edit records to a static JSON array.
The next step is to persist your data back to some sort of data store. There are multitudes of ways to accomplish this. Several points were identified where you might want to make an AJAX call to retrieve or commit data. Any service that is able to produce and consume the JSON format can perform these functions. Look for my article in the next issue, on using ASP.NET Web API to persist data.
You can see that the traditional MVVM pattern applied to desktop development has truly made its way into the Web world. This article is a starting point; much more than this can be accomplished. In fact, you may forget that you are developing for a client side Web application. And that leads to another topic altogether: the Hybrid application.
With hybrid applications it is common to take an application that was developed in HTML5/JavaScript (as this one is) and use a framework to package the application and publish it as an installable application. This means that you could use this same code as the basis for an installable iOS and Android application. This technique gives the author of an SPA a wide range of possibilities. So the question is: Where do you want to take your app today?
