


Unless you have been hiding in a cave for the past few months, you have heard of a company called Xamarin. In 2013, Xamarin announced Xamarin Studio, a tool that allows developers to build mobile applications using the C# language. In addition, Xamarin announced its integration with Microsoft's Visual Studio, allowing developers to continue using their favorite development environment to build mobile apps.
In this article, I provide an introduction to Xamarin and its appeal to developers who are building cross-platform mobile apps.
The Platform War Goes On
Since Apple announced the iPhone in 2007, Apple and Google (its proxies really: Samsung, HTC, Motorola, etc.) have been embroiled in endless legal battles over the ownership of the various patents. Along the way, Microsoft also joined in the foray, alleging that Android infringed upon some of its patents. While the battles have been fought for the past couple of years, there has been no clear indication of who has ultimately won the platform wars. Two platforms stand shoulder to shoulder: Apple's iOS and Google's Android.
Why Xamarin?
To understand how Xamarin fits into the developer's roadmap, you have to understand how mobile apps are written. There are three types of mobile apps that developers can write: native, Web apps, and a combination.
Native apps run directly on the mobile device. They make use of the hardware features available on the device, such as a camera and sensors such as an accelerometer, a compass, etc. Native apps are feature-rich and interactive, with full access to the hardware. This approach, although good, requires developers to learn a specific language for each platform: Objective-C for iOS and Java for Android. For companies that require apps to run on multiple platforms, it's expensive to maintain different code bases for multiple platforms, which are usually not easily ported to the other platforms.
The second type of apps, Web-apps, are applications that run off the Web browser. To use them, users have to launch the Web browser on the device and navigate to the correct URL. Web apps run within the confines of the Web browser, which restricts them from accessing most parts of the hardware. Web apps tend to be less interactive and are limited in scope and functionalities. Web apps, due to their ubiquitous access, has the greatest benefits-the ability to “write once and run everywhere,” to borrow the slogan from Sun Microsystems. However, “write once, run everywhere” also means that the app will look the same everywhere. This limited the usability of the apps, as their UI must be written to the lowest-common-denominator. But the upside of using this approach is that Web apps are relatively easy (and less expensive) to build-developers simply need to know HTML, JavaScript, and CSS.
A third approach to building apps is to take the best of both approaches and combine them: Use native code for portions of the code that need to access specific hardware features of the device and use Web languages (HTML, JavaScript, and CSS) for the rest. Although this approach sounds enticing, hybrid apps suffer from performance issues, and are not easily scalable as the user base increases.
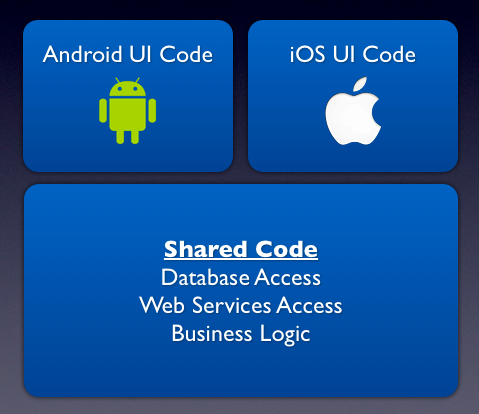
Xamarin's approach is to let developers create UIs that are unique to each platform, and then create components that can be reused easily on another platform, using the C# programming language.
Xamarin takes the middle path; it respects the uniqueness of each platform and does not force developers to create apps that look the same on all platforms. On the contrary, it encourages developers to take advantage of the features that each platform offers.
Xamarin also recognizes that beyond the surface (user interface), apps have a lot of highly reusable components that can be shared across platforms. For example, your code for accessing Web services can be reused easily on the iOS and Android platforms.
Also, database code is also highly portable. Xamarin's approach is to let developers create UI that are unique to each platform, and then create components that can be reused easily on another platform.
What about the language? Instead of using different languages for different platforms, a unifying language is needed: C# was chosen because it's easy to learn, and it's the language of choice for many .NET developers. Using C# allows Xamarin to reach out to millions of potential developers.
Integrated Development Environment (IDE): Xamarin Studio
The IDE plays a very important role. A good IDE enables acceleration of any development effort. Xamarin offers the Xamarin Studio (in addition to Visual Studio support), which is a world-class IDE that makes developing, debugging, testing, and packaging applications (and more) a walk in the park.
Platforms Supported by Xamarin
To write iOS apps, you need a Mac or a reasonable facsimile. Xamarin offers three broad choices:
- Use Visual Studio on Windows. Using Visual Studio, you can develop iOS and Android apps natively on your Windows computer. However, the caveat here is that in order to test iOS applications, you need to have access to a networked Mac, which will provide the build and deployment services.
- Use Xamarin Studio on Windows. Instead of Visual Studio, Xamarin provides its own IDE: Xamarin Studio. Like Visual Studio, Xamarin Studio provides a world-class development environment to accelerate your development effort. Like option 1, testing iOS applications requires access to a networked Mac.
- Use Xamarin Studio on a Mac. This is the best option if you are developing applications for both iOS and Android. Xamarin Studio's tight integration with Xcode makes designing and testing iOS applications easy.
For this article, I will be using Xamarin Studio on the Mac. To get started, you can use the free Starter edition, which you can download from http://xamarin.com/download.
How Xamarin Works
In a nutshell, Figure 1 shows how Xamarin works. You write your UI code for each specific platform-one for Android and one for an iOS device. Then write business logic that can be reused on both platforms.
Xamarin exposes all the APIs available in iOS and Android to your application as regular C# class libraries. In addition, your apps have access to a fully functional implementation of the .NET runtime, which is bundled with your app so that your code executes with all the power of C# and .NET, such as memory management, etc. When you are ready to compile the application for each platform, Xamarin produces an ARM binary for iOS and takes advantage of just-in-time compilation for Android. As Xamarin apps are compiled to native binary, they are able to perform without any performance degradation that you might expect from cross-compiled apps.
Getting Started with Xamarin.iOS
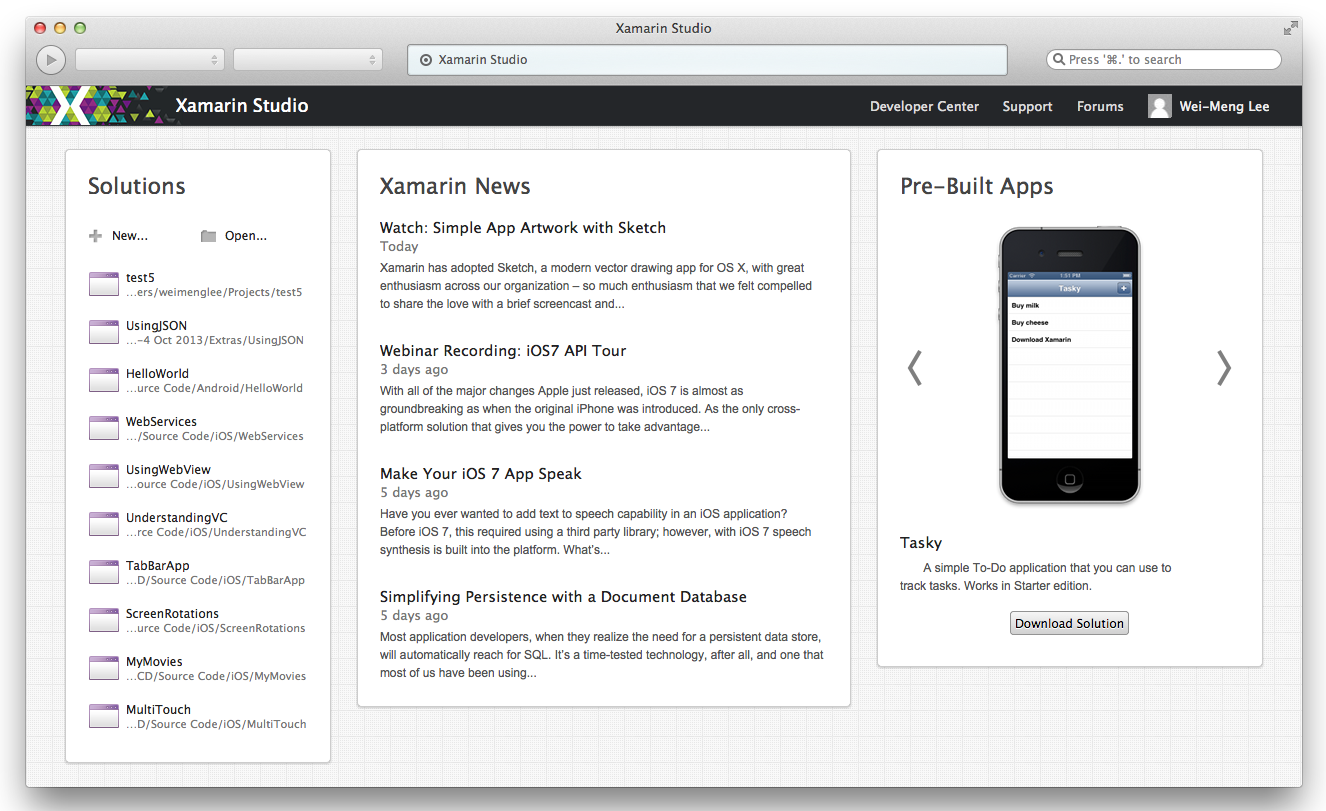
The part of Xamarin that allows you to develop iOS apps is called Xamarin.iOS. Let's use it to develop an iOS app. First, launch Xamarin Studio and you'll see the opening screen, as shown in Figure 2.
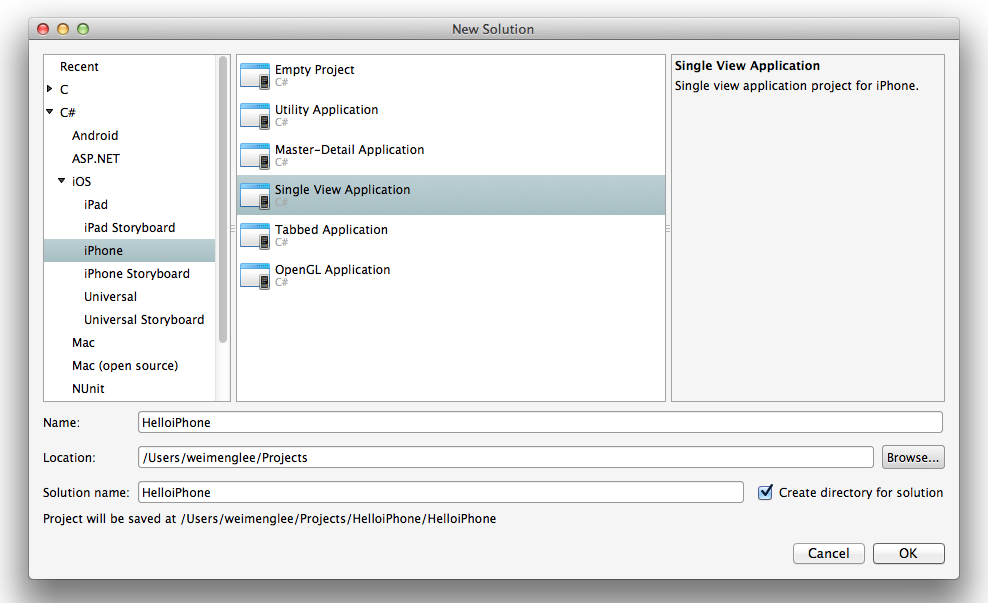
Click on the New button to create a new project. For now, expand the iOS section (see Figure 3) and select iPhone. On the right-side of the dialog box, select Single View Application. Name the project HelloiPhone and click OK.
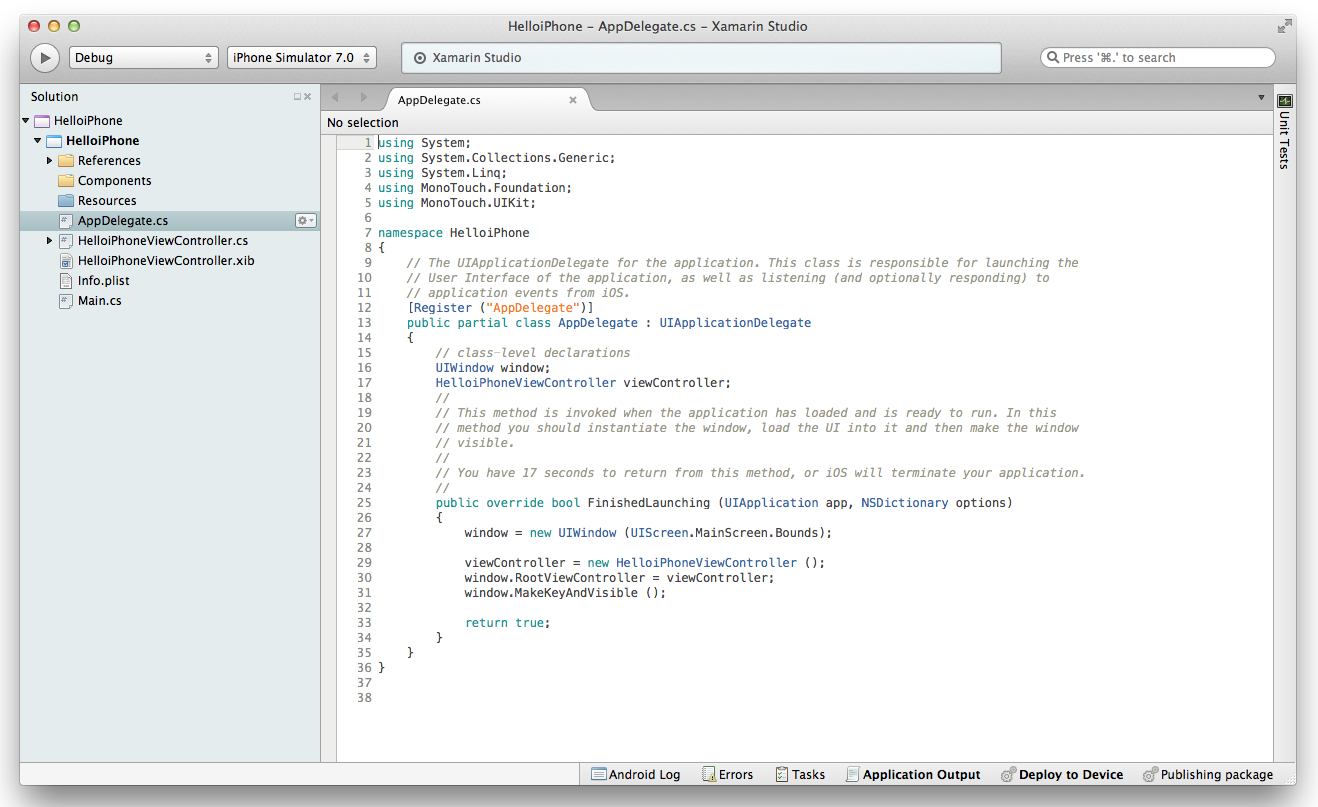
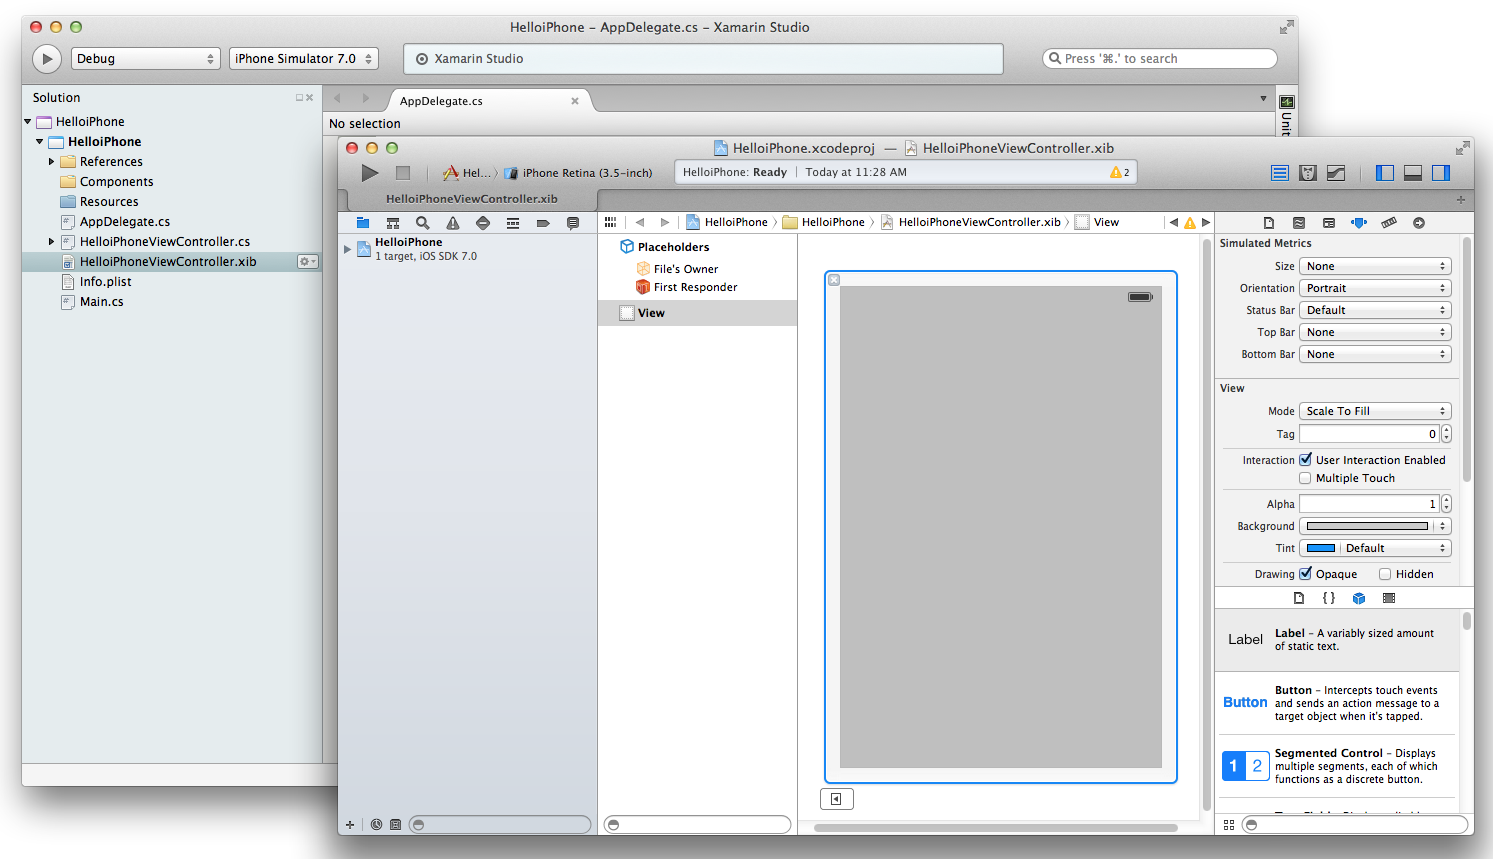
The project has been created (as shown in Figure 4). You can see that the application delegate (AppDelegate.cs) is selected. In addition to this app delegate, most notable is the HelloiPhoneViewController.xib file (which represents the UI for your View window), as well as its code behind, HelloiPhoneViewController.cs.
At the time of writing, editing.xib files require the use of Xcode; Xamarin has plans to build their own editor for iOS UIs. You need to double-click on the HelloiPhoneViewController.xib file to edit it in Xcode, which then displays the HelloiPhoneViewController.xib file, as shown in Figure 5.
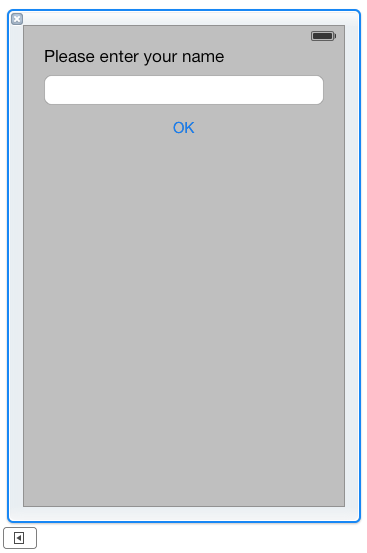
Drag and drop the following views onto the View window:
- Label
- Text Field
- Button
The View window should now look like Figure 6.
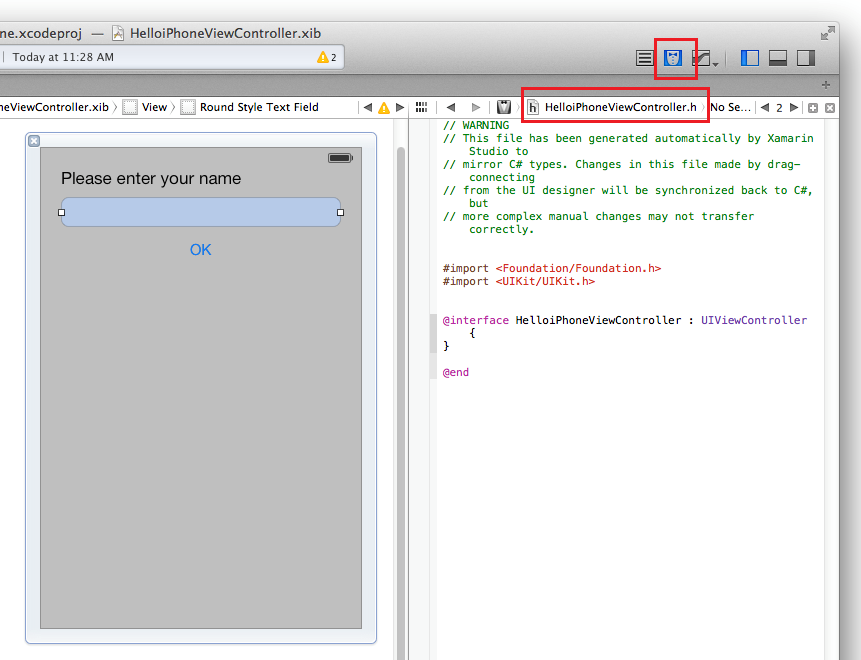
To ensure that your code can interact with the views that you have just added to the View window, click on the Show Assistant Editor button located on the top of Xcode to reveal the code editor. Also, ensure that the HelloiPhoneViewController.h file is selected (see Figure 7).
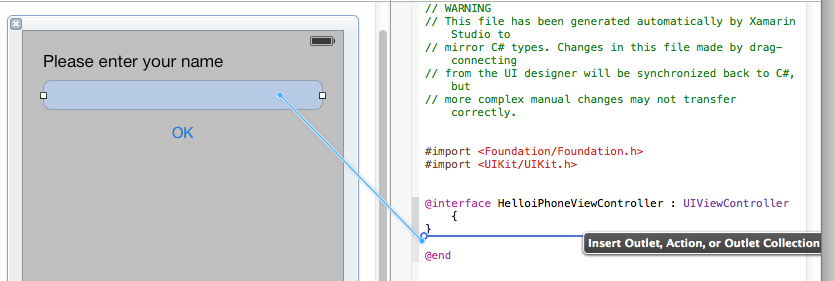
Control-click the Text Field view and drop it over the code editor, as shown in Figure 8.
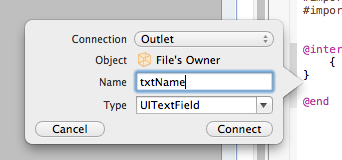
A pop-up appears. Name it txtName and click the Connect button (see Figure 9). This creates an IBOutlet for the Text Field. An IBOutlet is a programmatic reference to the views on the View window.
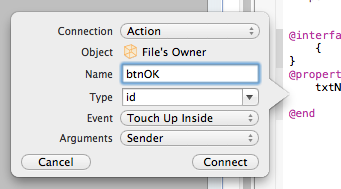
Control-click the button and drag it over the code editor. This time, change the Connection to Action and name it btnOK (see Figure 10). Click the Connect button to create an IBAction for the button. An IBAction is an event handler for the button. In this example, the event is Touch Up Inside.
Once the IBOutlet and IBAction are created, you can see that some statements are added to the HelloiPhoneViewController.h file in Xcode:
#import <Foundation/Foundation.h>
#import <UIKit/UIKit.h>

@interface HelloiPhoneViewController : UIViewController {
    UITextField *_txtName;
}

@property (nonatomic, retain) IBOutlet UITextField  *txtName;

- (IBAction)btnOK:(id)sender;

@end
Two of the new statements added automatically in Objective-C, which you will not use directly in Xamarin. Instead, whatever statements added here are reflected in Xamarin Studio automatically. Be sure to save the .xib file in Xcode and then exit Xcode.
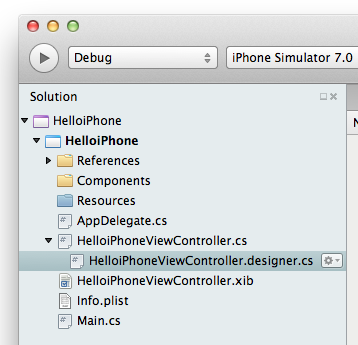
Back in Xamarin Studio, expand the HelloiPhoneViewController.cs item by clicking on the arrow icon displayed next to it. This reveals the item named HelloiPhoneViewController.designer.cs (see Figure 11).
The HelloiPhoneViewController.designer.cs contains code that is pertinent to the View window of the View Controller. Double-click on it and you can see that the some statements (Listing 1) are added in automatically for you.
Listing 1: The IBOutlet and IBAction added to the HelloiPhoneViewController.designer.cs file
using MonoTouch.Foundation;
using System.CodeDom.Compiler;

namespace HelloiPhone
{
    [Register ("HelloiPhoneViewController")]
    partial class HelloiPhoneViewController
    {
        [Outlet]
        MonoTouch.UIKit.UITextField txtName { get; set; }

        [Action ("btnOK:")]
        partial void btnOK (MonoTouch.Foundation.NSObject sender);

        void ReleaseDesignerOutlets()
        {
            if (txtName != null)
            {
                txtName.Dispose();
                txtName = null;
            }
        }
    }
}
The IBOutlet is now represented in Xamarin as a UITextField object (with the MonoTouch.UIKit namespace). It has the Outlet attribute to indicate that this is an IBOutlet:
[Outlet]
MonoTouch.UIKit.UITextField txtName { get; set; }
The IBAction is now represented as a partial method (only a declaration with no implementation) with an input parameter of type NSObject (with the MonoTouch.Foundation namespace). It has the Action attribute to indicate that this is an IBAction:
[Action ("btnOK:")]partial void btnOK (MonoTouch.Foundation.NSObject sender);
To implement the partial method, define the partial method in the HelloiPhoneViewController.cs file, as shown in Listing 2.
Listing 2: Implementing the partial method
using System;
using System.Drawing;
using MonoTouch.Foundation;
using MonoTouch.UIKit;

namespace HelloiPhone
{
    public partial class HelloiPhoneViewController : UIViewController
    {
        public HelloiPhoneViewController() : base ("HelloiPhoneViewController", null)
        {
        }

        public override void DidReceiveMemoryWarning()
        {
            // Releases the view if it doesn't have a superview.
            base.DidReceiveMemoryWarning();

            // Release any cached data, images, etc that aren't in use.
        }

        public override void ViewDidLoad()
        {
            base.ViewDidLoad();

            // Perform any additional setup after loading the view,
            // typically from a nib.
            alertDelegate = new MyAlertDelegate();
        }

        public class MyAlertDelegate : UIAlertViewDelegate
        {
            public override void Clicked (UIAlertView alertview, int buttonIndex)
            {
                Console.WriteLine(buttonIndex.ToString() + " clicked.");
            }
        }

        MyAlertDelegate alertDelegate;

        partial void btnOK (MonoTouch.Foundation.NSObject sender)
        {
            UIAlertView alert = new UIAlertView("Hello, World!",
                "Welcome to Xamarin, " + this.txtName.Text, alertDelegate,
                "OK", "Cancel");
            alert.Show();
        }

        public override bool ShouldAutorotateToInterfaceOrientation(
            UIInterfaceOrientation toInterfaceOrientation)
        {
            // Return true for supported orientations
            return (toInterfaceOrientation !=
                       UIInterfaceOrientation.PortraitUpsideDown);
        }
    }
}
Let's examine the code in more detail. First, you use the UIAlertView class to create a pop-up (think of it as the equivalent of the venerable MessageBox in the Windows world):
UIAlertView alert = new UIAlertView("Hello, World!", "Welcome to Xamarin, "
    + this.txtName.Text, alertDelegate, "OK", "Cancel");
alert.Show();
The first argument to the UIAlertView's constructor is the title of the pop-up. The second argument specifies the message you want to display, and the third takes in an object of type MyAlertDelegate that you have defined in the code. The use of this object is to handle the Clicked event that is fired when the pop-up is dismissed, letting you know which button was clicked. The last argument is of params type, meaning you can pass in a variable number of arguments. Here, you specify the caption of the buttons that are to be displayed in the pop-up.
Next, you create a class called MyAlertDelegate that extends the UIAlertViewDelegate base class:
public class MyAlertDelegate : UIAlertViewDelegate
{
    public override void Clicked (UIAlertView alertview, int buttonIndex)
    {
        Console.WriteLine(buttonIndex.ToString() + " clicked.");
    }
}
Within the MyAlertDelegate class, override the Clicked method. Here, you simply want to print a statement indicating which button was clicked.
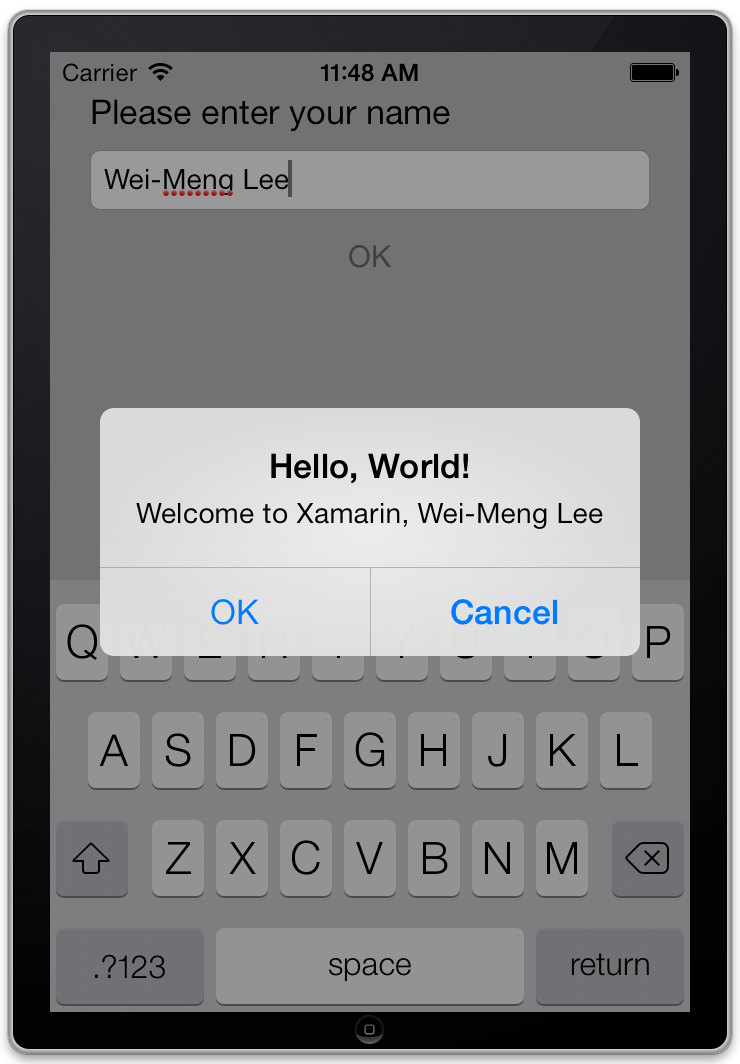
That's it! Click on the Run button in Xamarin Studio to deploy the application onto the iPhone Simulator. When the application is loaded, enter your name and click the OK button (see Figure 12).
When you click on either the OK or Cancel button, the pop-up is dismissed. You can view the output that is printed by your application by selecting View | Pads | Application Output in Xamarin Studio. Figure 13 shows the output.

Getting Started with Xamarin.Android
Now that you have seen how things work in Xamarin.iOS, it's time to move to the other world and explore Xamarin.Android, that allows you to develop Android apps.
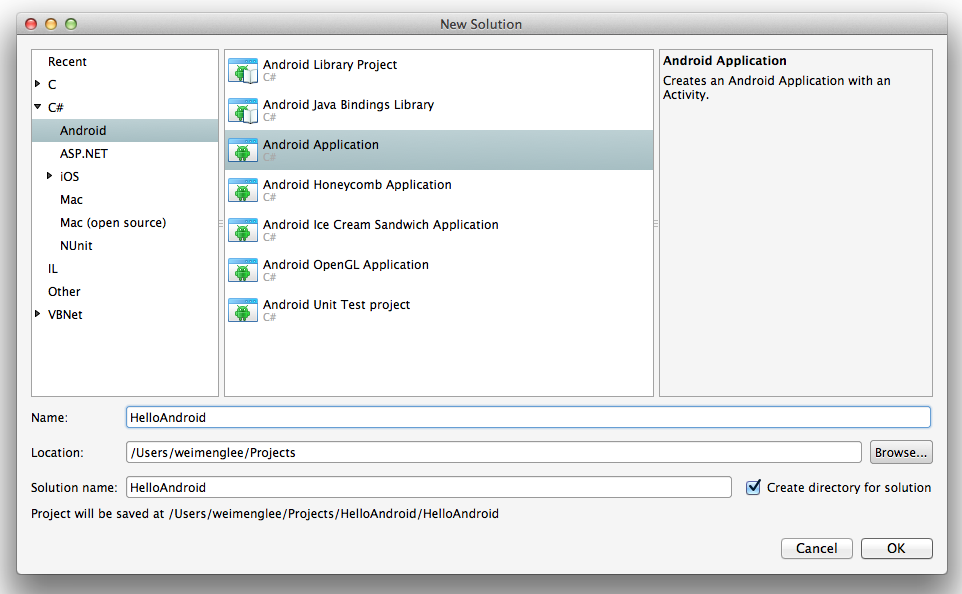
Create a new Solution in Xamarin Studio and select Android | Android Application (see Figure 14). Name the project HelloAndroid and click OK.
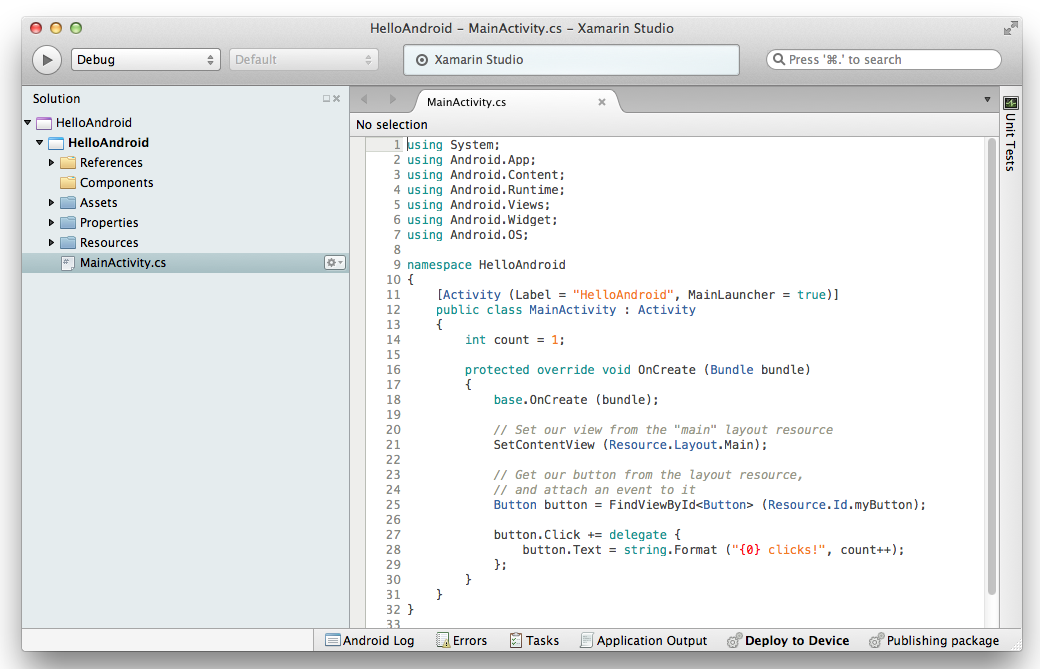
The project loads, as shown in Figure 15. The MainActivity.cs file is the code-behind for the default activity in this project.
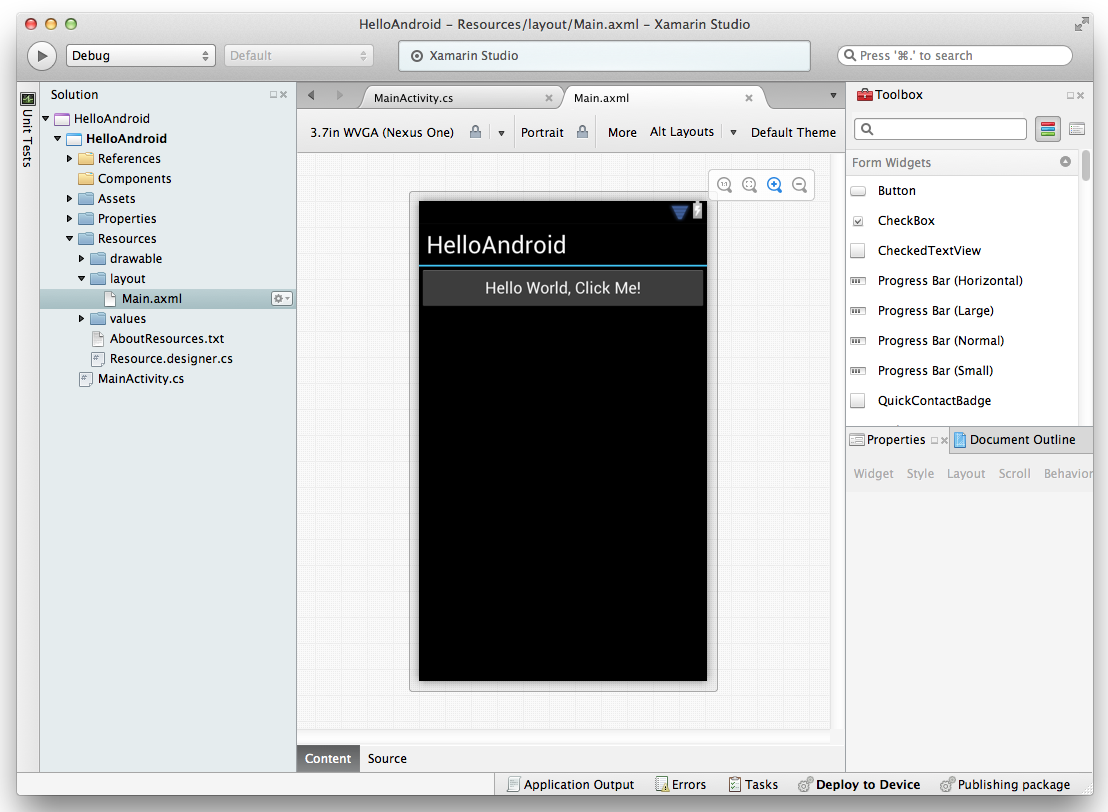
Expand the Resources item and then choose Layout and you can see the Main.axml file listed (see Figure 16). The Main.axml file contains the layout for your activity. Double-clicking it launches the visual editor. In the editor, you can drag-and-drop widgets from the Toolbox onto the design surface. You can also click on the Source tab located at the bottom of the designer to switch to the editor that allows you to directly modify the UI of the activity using XML.
For this example, switch to the Source editor and enter the XML directly, as shown in Listing 3.
Listing 3: Creating the UI for the activity
<?xml version="1.0" encoding="utf-8"?>
<RelativeLayout xmlns:p1="http://schemas.android.com/apk/res/android"
    p1:minWidth="25px"
    p1:minHeight="25px"
    p1:layout_width="fill_parent"
    p1:layout_height="fill_parent"
    p1:id="@+id/relativeLayout1">
    <TextView
        p1:text="Please enter your name"
        p1:layout_width="match_parent"
        p1:layout_height="wrap_content"
        p1:id="@+id/textView1" />
    <EditText
        p1:inputType="textPersonName"
        p1:layout_width="fill_parent"
        p1:layout_height="wrap_content"
        p1:layout_below="@id/textView1"
        p1:id="@+id/editText1" />
    <Button
        p1:text="OK"
        p1:layout_width="match_parent"
        p1:layout_height="wrap_content"
        p1:layout_below="@id/editText1"
        p1:id="@+id/button1"
        p1:layout_marginLeft="0.0dp" />
</RelativeLayout>
This produces the UI, as shown in Figure 17.

Back in the MainActivity.cs, add in the statements that I've added, as shown in Listing 4.
Listing 4: Implementing the event handler for the Button view
using System;
using Android.App;
using Android.Content;
using Android.Runtime;
using Android.Views;
using Android.Widget;
using Android.OS;

namespace HelloAndroid
{
    [Activity (Label = "HelloAndroid", MainLauncher = true)]
    public class MainActivity : Activity
    {
        int count = 1;
        protected override void OnCreate (Bundle bundle)
        {
            base.OnCreate (bundle);
            // Set our view from the "main" layout resource
            SetContentView (Resource.Layout.Main);

            // Get our button from the layout resource, and attach an event to it

            //---comment out---
            /*
            Button button = FindViewById<Button>(Resource.Id.myButton);
            button.Click += delegate {
                button.Text = string.Format ("{0} clicks!", count++);
            };
            */

            EditText txtName = FindViewById<EditText>(Resource.Id.editText1);
            Button btn = FindViewById<Button>(Resource.Id.button1);
            btn.Click += delegate {
                Toast.MakeText (this, "Welcome to Xamarin, " + txtName.Text,
                    ToastLength.Long).Show();
            };
        }
    }
}
To get a reference to the EditText view, use the FindViewById() method and specify the ID of the view like this:
EditText txtName = FindViewById<EditText>(Resource.Id.editText1);
Likewise, obtain a reference to the Button view. In addition, implement the Click event of the button so that when the button is clicked, you can do something useful. In this case, you'll display a pop-up using the Toast class:
Button btn = FindViewById<Button>(Resource.Id.button1);
btn.Click += delegate
{
    Toast.MakeText (this, "Welcome to Xamarin, " +
        txtName.Text, ToastLength.Long).Show();
};
In Xamarin Studio, double-click on the project name and under the Build section, select General and change the Target framework to Android 4.2 (Jelly Bean) (see Figure 18).

Creating an Android Virtual Device (AVD)
Before you can test the application on the Android Emulator (known as an Android Virtual Device), you need to create one.
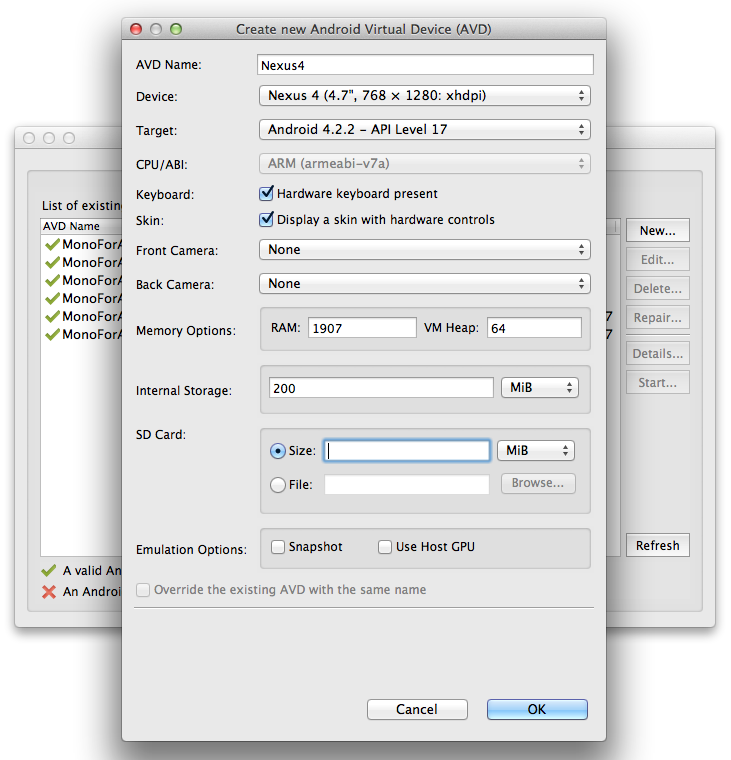
Select Tools | Open AVD Manager and create an AVD with the details shown in Figure 19.
Back in the Android Virtual Device Manager dialog box, select the AVD that you have just created and click Start… Click Launch to launch the AVD (see Figure 20).

The AVD launches and is ready a few minutes later (see Figure 21).
Testing the Android Application
Back in Xamarin Studio, click the Run button to test the application on the AVD that you have just created. You should see a dialog box to select a device for testing. Select the AVD that you have just launched and click OK.
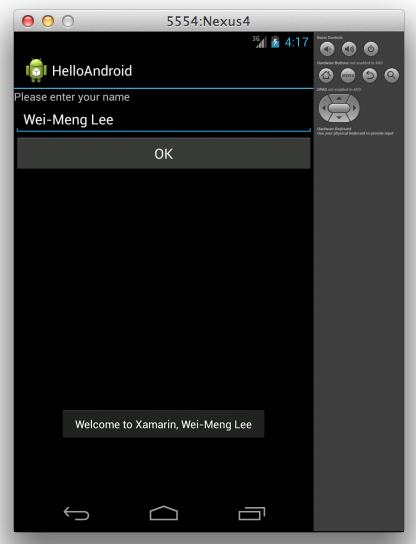
Figure 22 shows the application running on the AVD.
Sharing Code across Platforms
By this point, you should have a good feel for developing iOS and Android apps using Xamarin. As you can see, the coding that you have done is all for the UI. So far, there is really no benefit to using Xamarin apart from using the C# language instead of using Objective-C for iOS and Java for Android. Well, the following example is going to show you the true benefits of using Xamarin.
Let's assume that your app requires access to a Web service. For the demonstration, I am going to consume an ASP.NET Web service that returns the exchange rate between two currencies. This Web service is located at: http://www.webservicex.net/currencyconvertor.asmx. Editor's note: The page this URL points to no longer works.
Instead of adding the code for accessing the Web service to each project, I am going to create a new Class Library project. This class library will serve as the shared library to be used by both the iPhone and Android projects.
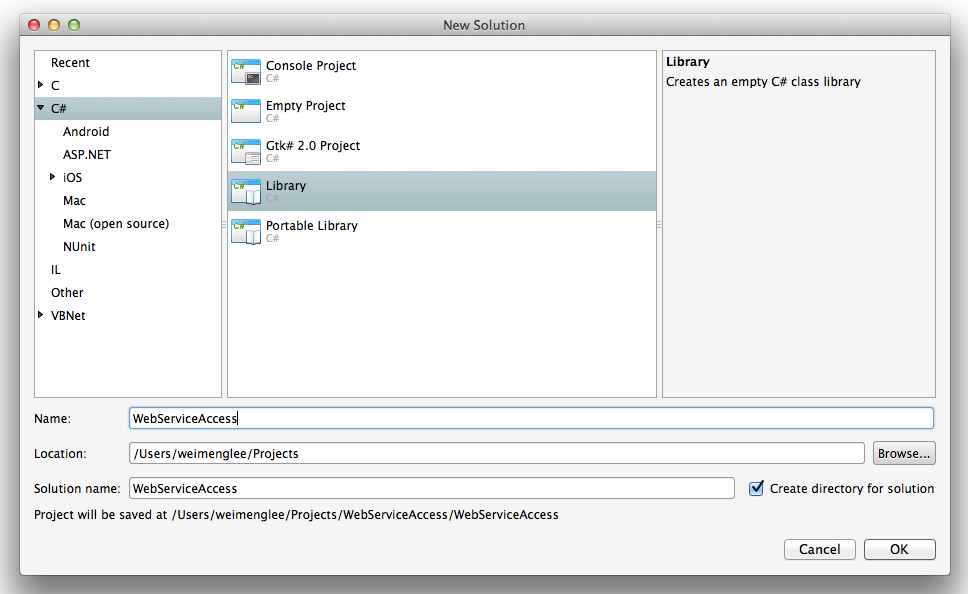
Using Xamarin, create a new C# Library project (see Figure 23). Name the project WebServiceAccess and click OK.
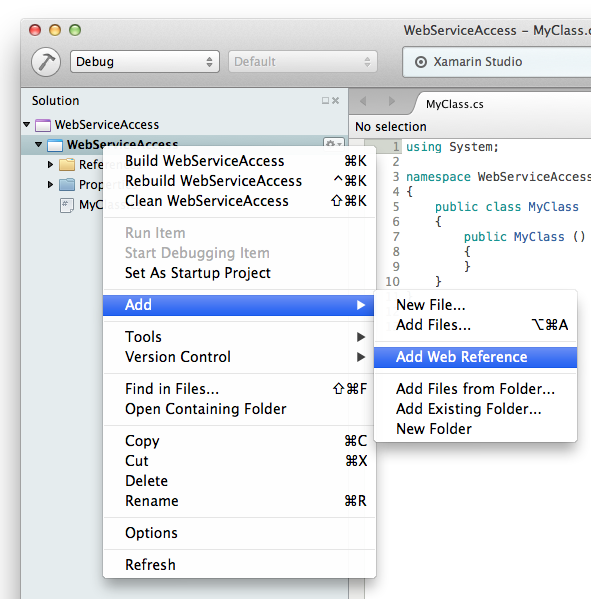
Right-click on the project name and select Add | Add Web Reference (see Figure 24).
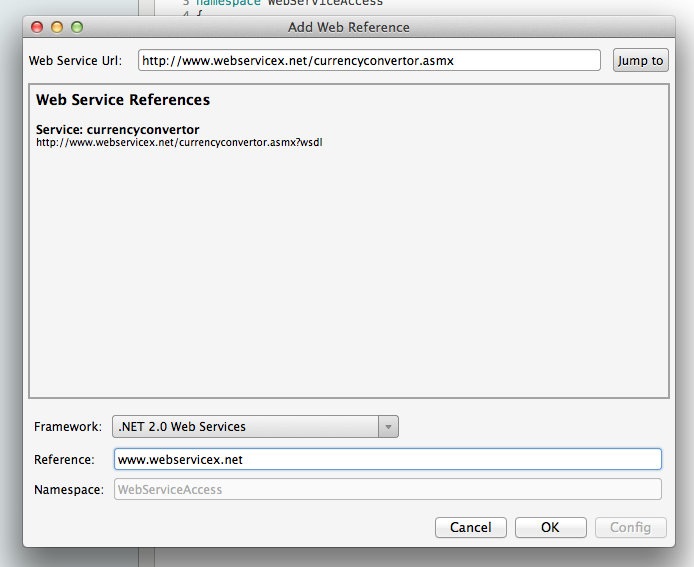
Enter the URL for the Web service and click the Jump to button (see Figure 25). For the Framework, select ".NET 2.0 Web Services" and click OK.
This creates a proxy class for the Web service so that you can access the Web service just as you would a normal class.
In the MyClass.cs file, add the statements that are new, as shown in Listing 5.
Listing 5: Implementing the class for Web service access
using System;
using WebServiceAccess.www.webservicex.net;

namespace WebServiceAccess
{
    public class MyClass
    {
        public double Rate {get; set;}
        public event RateChangedEventHandler RateChanged;
        public delegate void RateChangedEventHandler(MyClass sender, EventArgs e);
        CurrencyConvertor ws;

        public MyClass ()
        {
            ws = new CurrencyConvertor();
        }

        public void USDtoEURRate()
        {
            ws.BeginConversionRate(Currency.USD, Currency.EUR, (ar) => {
                this.Rate = (double) ws.EndConversionRate(ar);
                RateChanged(this, new EventArgs());
            }, null);
        }
    }
}
Let's dissect the code to see what you are doing here.
First, a new property was created named Rate. This property is used to store the exchange rate between two currencies after the value has been retrieved from the Web service:
public double Rate {get; set;}
Next, you created an event named RateChanged that the code fires when the value has been returned by the Web service:
public event RateChangedEventHandler RateChanged;
public delegate void RateChangedEventHandler(MyClass sender, EventArgs e);
You also created an object of type CurrencyConvertor (the Web service proxy class) and instantiated it in the constructor of the class:
CurrencyConvertor ws;
public MyClass ()
{
    ws = new CurrencyConvertor();}
}
You also created a method named USDtoEURRate() that accesses the Web services asynchronously:
public void USDtoEURRate()
{
    ws.BeginConversionRate(Currency.USD, Currency.EUR, (ar) => {
        this.Rate = (double) ws.EndConversionRate(ar);
    RateChanged(this, new EventArgs());
    }, null);
}
    {
        this.Rate = (double) ws.EndConversionRate(ar);
        RateChanged(this, new EventArgs());
    }, null);
    , null);
}
For simplicity, you are finding the exchange rate between the US Dollars and the Euro. When the result is returned from the Web service, the value is saved in the Rate property and the RateChanged event is fired so that the application can act on the values returned.
That's it! You can compile the Class Library project into a DLL by selecting Build | Build WebServiceAccess.
Using the Library in the iPhone and Android Projects
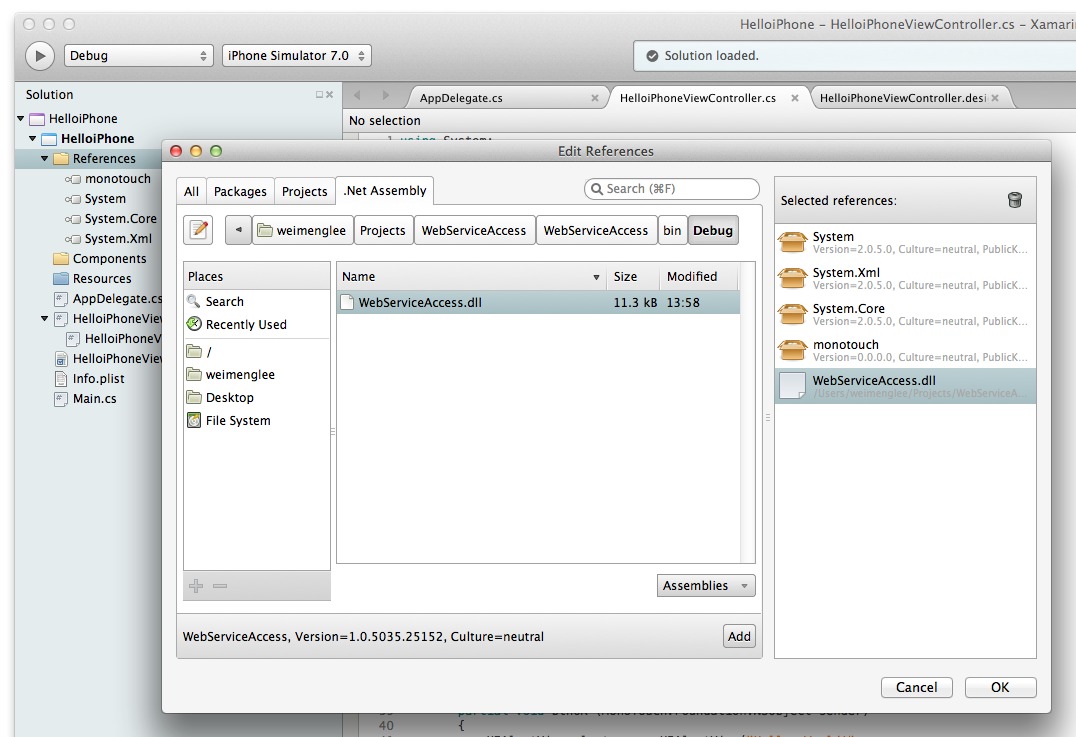
Now that the class library is built, it is time to test it on both the iPhone and Android projects to see if Xamarin really lives up to its promises. Open up the HelloiPhone project that you have created earlier and double-click on the References item in the solution (see Figure 26). Under the .Net Assembly tab, navigate to the ~/Projects/WebServiceAccess/WebServiceAccess/bin/Debug/ folder and double-click on the WebServiceAccess.dll and then click OK. This adds the class library to the project so that you can use it for accessing the currency convertor Web service.
In the HelloiPhoneViewController.cs file, add the new statements, as shown in Listing 6.
Listing 6: Add the statements to access the Web service through the shared library in the iPhone project
using System;
using System.Drawing;
using MonoTouch.Foundation;
using MonoTouch.UIKit;
using WebServiceAccess;

namespace HelloiPhone
{
    public partial class HelloiPhoneViewController : UIViewController
    {
        public HelloiPhoneViewController() : base ("HelloiPhoneViewController", null)
        {
        }

        public override void ViewDidLoad()
        {
            base.ViewDidLoad();

            alertDelegate = new MyAlertDelegate();
            MyClass ws = new MyClass();
            ws.USDtoEURRate();
            ws.RateChanged += (MyClass sender, EventArgs e) => {
                using(var pool = new NSAutoreleasePool()) {
                    pool.BeginInvokeOnMainThread(() => {
                        UIAlertView alert = new UIAlertView("USD to Eur",
                            "Exchange Rate is " + ws.Rate, alertDelegate, "OK");
                        alert.Show();
                    });
                }
            };
        }
    }
}
Here, you create an instance of the MyClass class. Then you call the USDtoEURRate() method so that you can obtain the exchange rate between the two currencies. As the USDtoEURRate() method is asynchronous, you handle the RateChanged event so that you can be notified when the exchange rate is returned from the Web service. When the rate is obtained, create an NSAutoreleasePool object so that you can call its pool.BeginInvokeOnMainThread() method to display the alert view on the main thread:
using(var pool = new NSAutoreleasePool())
{
    pool.BeginInvokeOnMainThread(()=>
    {
        UIAlertView alert = new UIAlertView("USD to Eur", "Exchange Rate is "
            + ws.Rate, alertDelegate, "OK");
        alert.Show();
    });
}
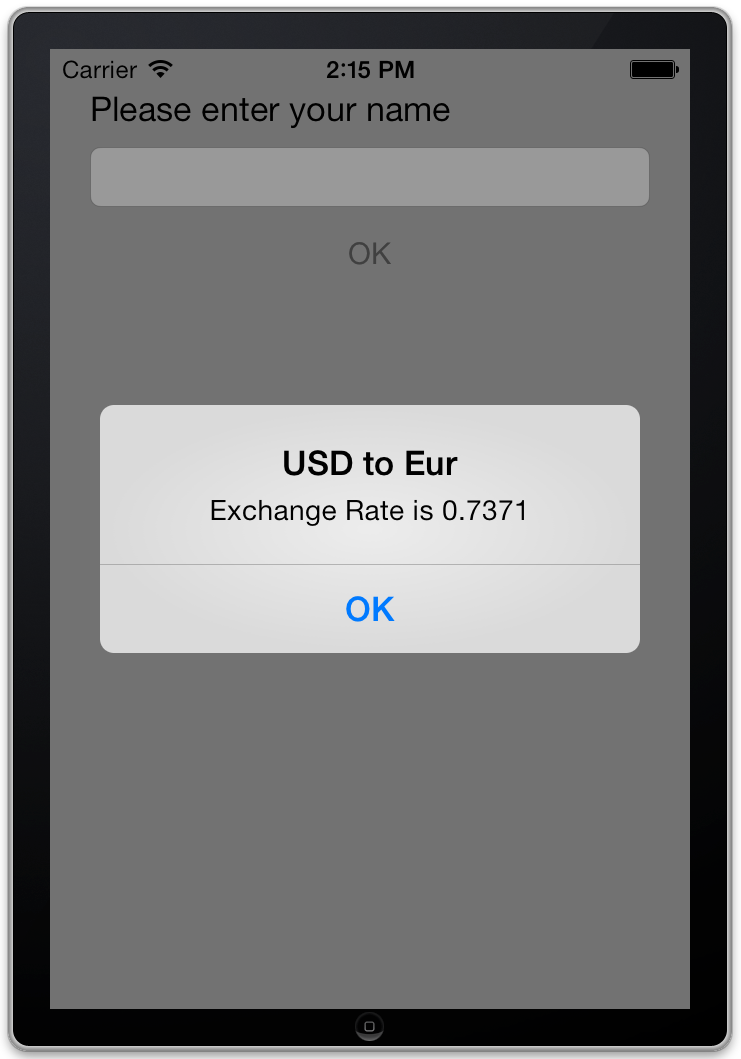
That's it! Run the project on the iPhone Simulator. The View window loads, and after a while, the alert view displays the exchange rate, as shown in Figure 27.
With the iPhone version tested working correctly, let's now open up the HelloAndroid project that you created earlier. Like in the iPhone project, add a reference to the WebServiceAccess.dll library in the project.
In the MainActivity.cs file, add the statements that are new, as shown in Listing 7.
Listing 7: Add the statements to access the Web service through the shared library in the Android project
using System;
using Android.App;
using Android.Content;
using Android.Runtime;
using Android.Views;
using Android.Widget;
using Android.OS;
using WebServiceAccess;

namespace HelloAndroid
{
    [Activity (Label = "HelloAndroid", MainLauncher = true)]
    public class MainActivity : Activity
    {
        int count = 1;

        protected override void OnCreate (Bundle bundle)
        {
            base.OnCreate (bundle);
            // Set our view from the "main" layout resource
            SetContentView (Resource.Layout.Main);
            // Get our button from the layout resource,
            // and attach an event to it
            MyClass ws = new MyClass();
            ws.USDtoEURRate();
            ws.RateChanged += (MyClass sender, EventArgs e) => {
                RunOnUiThread (() => {
                    Toast.MakeText(this, "Exchange Rate is "
                        + ws.Rate, ToastLength.Long).Show();
                });
            };

            //---comment out---
            /* ... */

            EditText txtName = FindViewById<EditText>(Resource.Id.editText1);
            Button btn = FindViewById<Button>(Resource.Id.button1);
            btn.Click += delegate {
                Toast.MakeText (this, "Welcome to Xamarin, " + txtName.Text,
                    ToastLength.Long).Show();
            };
        }
    }
}
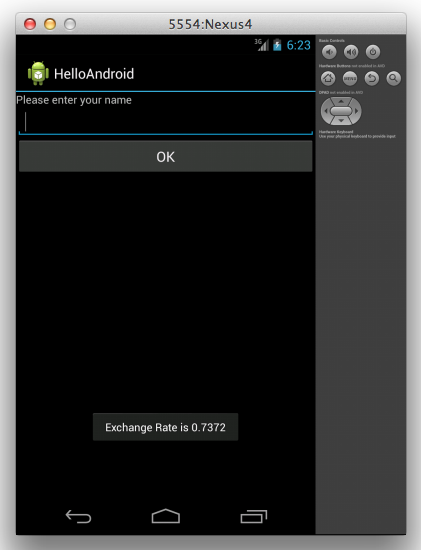
Just like in the iPhone project, you create an instance of the MyClass class and then proceed to call its USDtoEURRate() method. The only difference is that in Android, you use the RunOnUiThread() method to display the Toast window in the main UI thread. Run the application on the AVD and you can see the exchange rate after a while (see Figure 28).
Summary
In this article, you have seen what it is like to develop iOS and Android apps using Xamarin. It is important to realize what Xamarin is not; it is not a “write once and run everywhere” tool for your mobile development. Instead, Xamarin respects that each platform has its own unique features, and that apps on each platform behave differently. However, business logics are highly reusable and this is where Xamarin shines.
