


Although the name implies otherwise, Windows Azure Active Directory (WAAD) is not the same thing as Active Directory in the cloud. Although WAAD has the same purpose and provides the same type of functionality, it works quite differently, especially for developers.
So if WAAD is not exactly the same as AD, what exactly is it? First, WAAD is a Software-as-a-Service (SaaS) service that enables (single) sign-on for other SaaS services. WAAD is used in this capacity for all Microsoft online services, such as Office 365 and Dynamics CRM Online. In fact, it was used only for this purpose for quite some time. These days, you can also hook your own applications into this infrastructure to provide single sign-on, and there are already over 500 third-party services available that allow single sign-on through WAAD (see http://bit.ly/waadapps).
Secondly, WAAD provides directory services to store information about users. This information is partly passed on to applications using WAAD for (single) sign-on. You can query the remainder using the new Graph API.
Both functionalities are, in essence, what AD also offers. But where AD uses an NTLM or Kerberos for sign-on, WAAD supports WS-Federation and OAuth. And where AD is actually an LDAP store that you can query using the LDAP protocol (probably using the corresponding .NET libraries), you query WAAD using a REST-based API. To see how it all works, I'll walk you through setting up and using WAAD.
Creating a Directory
Creating a new directory is a simple process. When you've logged in with the Windows Azure Management Portal at http://manage.windowsazure.com, you navigate to the Active Directory section on the left-hand side. You then click Add in the bottom bar. Then you'll see the dialog box shown in Figure 1.
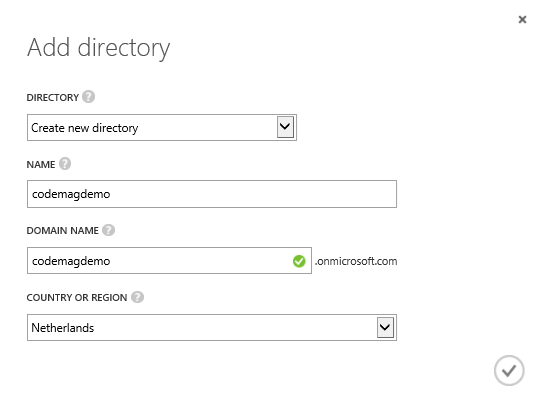
In the dialog box in Figure 1, you first need to select whether you want to create a new directory (the default) or use an existing directory. The second option allows you to add an existing WAAD directory from another Windows Azure subscription. This is an interesting option, because it enables you to tie multiple subscriptions together with the same WAAD directory.
In the dialog box shown in Figure 1, you also need to specify a name, which is mainly for display purposes, and a domain name. The latter is the primary domain name associated with the directory. It's a domain name that ends with onmicrosoft.com, so you may want to add another domain name later.
Finally, you also need to select the country for your region. In my case, this is The Netherlands. It's important to select the right country, because that determines the location of the data centers where the directory is hosted. I selected The Netherlands, so the selected data center region is Europe and the United States. Because the directory is hosted in two regions, it's hard to imagine the directory not being available.
Managing Your Directory
Managing your directory is, in many respects, just like managing any other directory. You can add users, create groups and add members, and add more information about users. The main difference is the simplicity of the management interface. Through the management portal, you can only perform basic operations. For more elaborate operations, you need to use the API from code or PowerShell. To manage a particular directory, first click Active Directory in the left menu bar (you may have to scroll). That shows you a list of directories you have. When you click on one you see the Start screen, from where you can start working with the directory.
Domains and Directory Integration
When your directory has been provisioned, it uses a default domain with the top-level domain onmicrosoft.com. In the case of my demo, the full domain name is codemagdemo.onmicrosoft.com. You can add your own custom domain(s) so that users can use their own domain account names instead of the Microsoft default. To do this, you need to be the owner of the domain and be able to set a DNS record.
Adding a domain is beyond the scope of the article, but you can find a walkthrough at http://bit.ly/waadcustomdomain. If you want to use directory synchronization with your local AD, adding a custom domain is just the first step. You can learn more and how to do this at http://bit.ly/waaddirintegration.
Adding Users
You can add a user by clicking “Add a user” in the start screen of your directory. Alternatively, you can go to the Users tab and click the corresponding button at the bottom of the page. When you add a new user, you have three options. You can create an entirely new account, you can add a user with an existing Microsoft account, or you can add a user with an existing WAAD account in another directory. The former enables you to easily add individual users, such as freelancers and temps, to the directory using their Microsoft accounts. The latter enables you to add users from another WAAD directory that you manage. For instance, if you manage both the production and test directory of your organization, you can add users from the production environment to have access to the test directory and associated resources. Because you have to be an administrator of both directories, this is not (yet) useful for collaboration scenarios with other organizations, although the ground-work has been laid. I won't cover using multiple directories any further, but you can find more information at http://bit.ly/waadmultidir. Editor's note: the specified URL no longer works.
Regardless of which way you add a user, you have to provide some basic profile information, as shown in Figure 2.
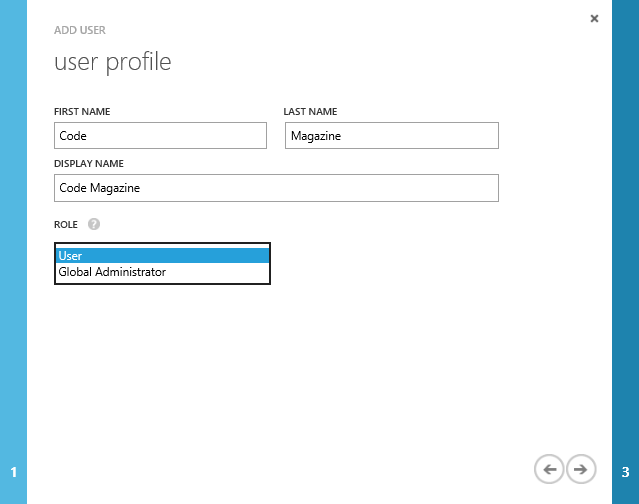
In the dialog box in Figure 2, notice the drop-down list for choosing the role of the user. It defaults to User, which designates a regular user. The other option is Global Administrator, which means that the user has full rights to modify the directory. As yet, there is no middle ground enabling scenarios for which only partial rights need to be granted, such as working with partner organizations, as mentioned earlier.
Adding Profile Information
You can see all the users in your directory under the Users tab of the directory. When you click on a user's name, you can edit the profile information, which is divided into two sections: Profile and Work Info. In the former, you edit the identity information that you entered in the dialog box in Figure 2, and you can block the user so he/she can't sign into services accessed through the directory. Under Work Info, you can add job and contact information, as shown in Figure 3.
You can block a user so he can't sign into services through the directory.

There are more default attributes in the directory than those editable through the page shown in Figure 3. Some of these attributes only make sense if you're syncing your local AD with WAAD, but you could manipulate them with the Graph API discussed later in this article. The management portal also doesn't allow you to add custom attributes and set these for users. The Graph API facilitates that as well, although that is beyond the scope of this article. Lastly, in the management portal, you can create groups and add users to those. At the time of this writing, this is still preview functionality, so its features may change going forward. Again, the Graph API provides you with the means to query groups and its members.
Adding Single Sign-on To Your Application
With your directory set up, you can add applications to use its single sign-on capabilities. For this to work, your application doesn't have to be a cloud application. It can be hosted in your local data center just the same, as long as your application uses Windows Identity Foundation (see “Getting to Know the Identity of .NET 4.5” at http://www.codemag.com/Article/1309101). This also means that you can temporarily host your application on a localhost address on your development environment.
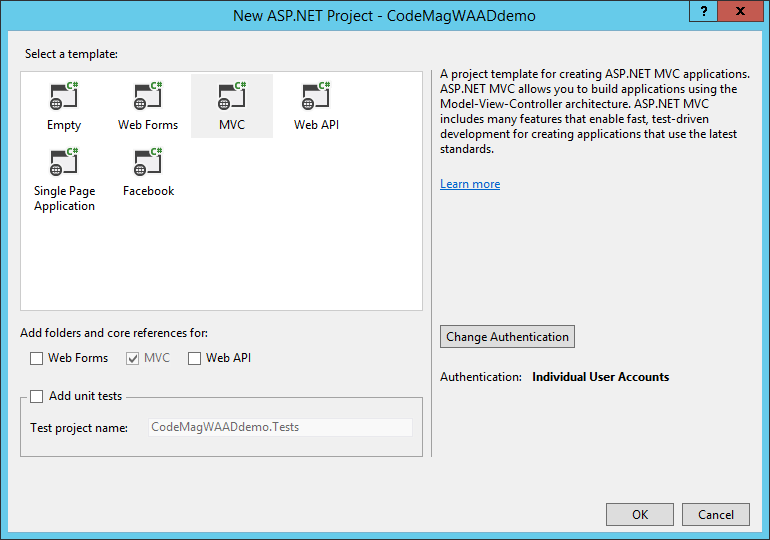
How you add single sign-on to a Web application depends on whether you use Visual Studio 2012 or Visual Studio 2013. Visual Studio 2013 provides you with dialog boxes when you create an application that take care of configuring your application correctly and register it with WAAD. You don't have to go into the Windows Azure Management Portal at any point in the process.
By contrast, Visual Studio 2012 isn't WAAD-aware, so you have to register the application manually and use the Identity and Access Tools for Visual Studio to configure your application as I explained in the article mentioned earlier. You can find a complete walkthrough for Visual Studio 2012 at http://bit.ly/waadssovs2012.
How you add single sign-on to a Web application depends on whether you use Visual Studio 2012 or 2013.
When you create a Web application in Visual Studio 2013, you can change the way authentication works in the application by clicking the Change Authentication button, as shown in the dialog box in Figure 4.
When you click the Change Authentication button in Figure 4, you see the dialog box shown in Figure 5. After selecting the Organizational Accounts option, you have several options to enable authentication based on WS-Federation. In Figure 5, Cloud-Single Organization is set, which is also the default.
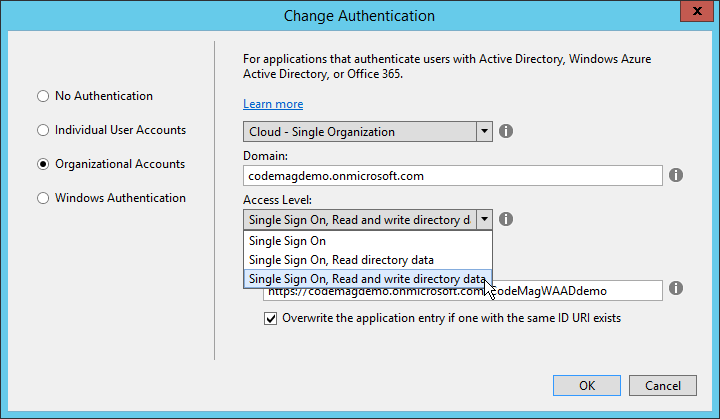
In the dialog box shown in Figure 5, you need to set the WAAD domain. As you can see, this is the full domain name. If you've added additional domains, you can also use one of those. The domain and the name of the application are combined to create the unique App ID by which the application is identified by WAAD. In Figure 5, I've made the App ID visible so I could edit it. I've also selected to not just enable single sign-on, but also grant access to read and write in the WAAD directory. When you click OK, Visual Studio configures both the application and WAAD. For the latter, you need to provide a username and password of an account in the directory that has Global Administrator rights. This must be an organizational account in the directory, not a Microsoft account. For this reason, it's a good idea to create an organizational account specifically for administration purposes as soon as you've provisioned a WAAD directory. This account should have Global Administration rights.
Once Visual Studio is done, you can check the configuration in the Azure management portal. Figure 6 shows the configuration of the application that I added from the dialog in Figure 5.
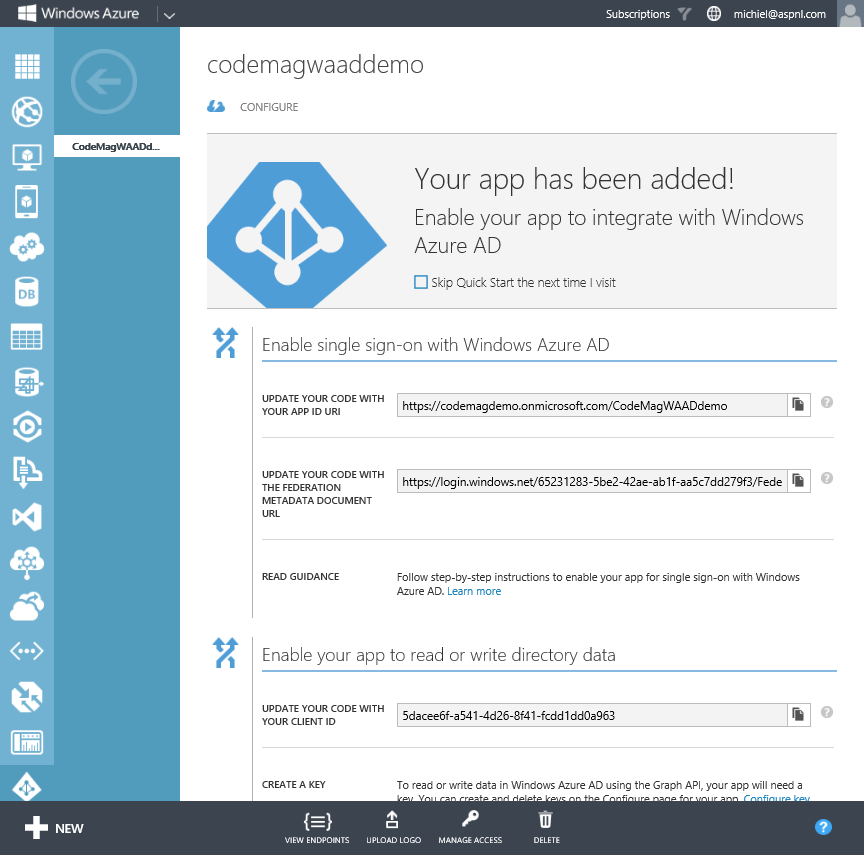
The page in Figure 6 shows several important things. First, it shows the App ID with which the application identifies itself to WAAD. Second, it shows the Federation Metadata URL. If it weren't for the wizard in Visual Studio 2013, you'd need the Federation Metadata to configure your application, as is the case in Visual Studio 2012. Third, the page displays the client ID you need to access the Graph API.
Visual Studio added a few things to web.config. It added several values to the appSettings section, two sections with configuration related to the .NET Identity Model, and two modules taking care of the authentication logic. My article “Getting to Know the Identity of .NET 4.5,” explains what the additional settings mean.
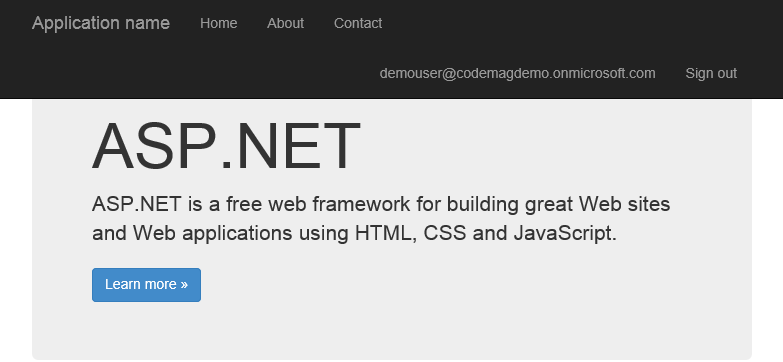
At this point, single sign-on works. You can fire up the application from Visual Studio and log in using a directory account. Providing that you used the Internet template to create the application, you see the login name at the top of the screen, as shown in Figure 7.
Modifying the Single Sign-On Configuration
Having an application in your development environment connected to WAAD is a step in the right direction, but in the end, you want to have the application running in production.
That means that you need to modify the configuration in WAAD. Basically, this comes down to modifying the endpoint at which the application is running. The application configuration in WAAD contains this endpoint as App URL and as Reply To URL, the URL to which WAAD redirects when the user is authenticated. This URL is configured in WAAD, so the sign-in functionality can't be hijacked by another application, which could then spoof the real application.
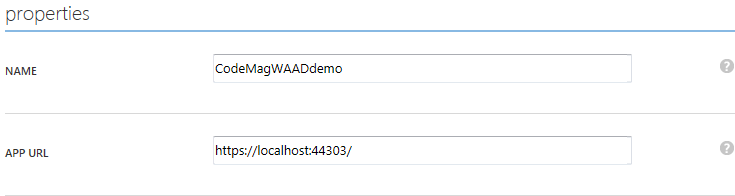
You modify the configuration in the Azure management portal from the page shown in Figure 6. When you click Configure at the top of the page, you see more settings and have the ability to edit them. In the properties section shown in Figure 8, you change the APP URL to the new URL that the application will be running under.
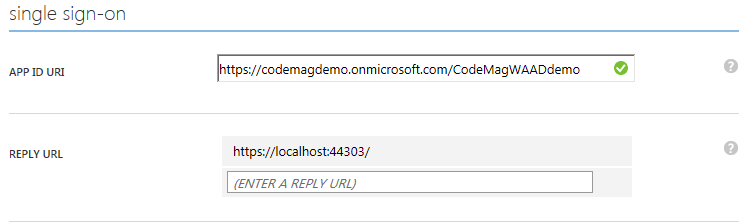
In the single sign-on section shown in Figure 9, you enter the new location in REPLY URL. Hover over the existing URL to turn the text into a textbox that you can edit. After saving the settings, you can run the application from the new location.
Reading the Directory with the Graph API
To access the Graph API from your application, you need a Client ID and a password. If you used Visual Studio 2013 to configure WAAD and indicated that you want to read and write the directory, both values are already in web.config in the appSettings section. Otherwise, you need to get these values from the Azure management portal. You can find the Client ID in the properties section. Generate a new password in the keys section. An important thing to note is that you can only get a key (password) when you create it. The next time you open the configuration page, you will see an entry for a key, but you can't see what the key is, as shown in Figure 10.

To use the Graph API, you need WCF Data Services version 5.3 or later. Visual Studio 2013 comes with version 5.6, but Visual Studio 2012 comes with version 5.2 by default. You can get the 5.6 version through NuGet or as an installer from http://bit.ly/wcfdatasvc56. Editor's note: this download is no longer available from Microsoft.
The second thing you should get is the Graph API Helper Library from the Windows Azure samples, because it takes care of much of the heavy lifting to talk to the REST API. You can download the C# project from http://bit.ly/waadgraphapihelper. Include the project in the solution and reference it from your Web application. In the application, you also need to reference the assemblies Microsoft.Data.Edm, Microsoft.Data.OData, and Microsoft.Data.Services.Client, also referenced in the Graph API Helper. Note that the helper uses WCF Data Services 5.3, so you may want to update those to the latest version as well.
Querying the Graph API is a three-step process: acquire a token, reference the service, and execute the query. To acquire a token using the Graph API Helper, you need three things: the client ID, the password, and the ID of the tenant (directory) in WAAD. As mentioned earlier, the first two are stored in web.config. You could do the same with the tenant ID, but you can also get this at runtime from the claims of the user token, as is the case in Listing 1. After you've acquired the token, you get a reference to the Graph API with the tenant ID and the token.
Listing 1: Methods to get a token and user from the directory
public DirectoryDataService GetService()
{
    // Get Graph API credentials from web.config
    var clientId = ConfigurationManager.AppSettings["ida:ClientID"];
    var password = ConfigurationManager.AppSettings["ida:Password"];

    // Get tenant from the current user.
    var tenant = ClaimsPrincipal.Current.FindFirst(
     "http://schemas.microsoft.com/identity/claims/tenantid").Value;

    // Get a token to access the API.
    var token = DirectoryDataServiceAuthorizationHelper.GetAuthorizationToken(
        tenant, clientId, password);

    // Return a reference to the Graph API for the tenant.
    return new DirectoryDataService(tenant, token);
}

public User GetUser(DirectoryDataService graph, string username)
{
    // Get a reference to the Graph API for the tenant.
    var graph = GetService();

    // Create and execute query
    var users = (DataServiceQuery<User>)graph.users.Where(
     u => u.userPrincipalName == username);
    var response = users.Execute() as QueryOperationResponse<User>;
    return response.FirstOrDefault();
}

public ActionResult User()
{
   var graph = GetService();
   var user = GetUser(graph, ClaimsPrincipal.Current.Identity.Name);
   return View(user);
}
Again, the heavy lifting is performed by the Graph API Helper. When you query the API, you need to ensure that you don't get too much data. You could easily list all the users, but with a large number of accounts, that would incur a lot of data traffic. You could set up a query using LINQ and then execute it. In Listing 1, I only get users with the same principal name as the current user, which is effectively one user. The User object contains all the attributes you can set in the Azure management portal, and quite a few more that are mainly there for synchronization with an on-premises Active Directory.
Updating Information
Once you have an object from the directory, you can update the object very easily. Just set properties on the object, indicate to the data services that the object was updated within, and then save changes, as shown in Listing 2.
Listing 2: Modify a user in the directory
public void ChangePhoneNumber(string phoneNumber)
{
   var graph = GetService();
   var user = GetUser(graph, ClaimsPrincipal.Current.Identity.Name);
   user.telephoneNumber = "1-555-555-5555";
   graph.UpdateObject(user);
   graph.SaveChanges(SaveChangesOptions.PatchOnUpdate);
}
Adding new users and other objects is equally simple, because most attributes are just text. There are some exceptions however, as you can see in Listing 3. Listing 3 creates a new user by setting required attributes. Adding a password, which is also required, must be done using a PasswordProfile. This object includes the password and indicates whether or not the user must set a new password when logging in for the first time.
Listing 3: Add a user to the directory
public void AddUser()
{
    var graph = GetService();
    var passwordProfile = new PasswordProfile
{
    forceChangePasswordNextLogin = true,
    password = "P@$$w0rd"
};
graph.AddTousers(new User
{
    accountEnabled = true,
    displayName = "Test User",
    givenName = "Test",
    surname = "User",
    mailNickname = "testuser",
    userPrincipalName = "testuser@codemagdemo.onmicrosoft.com",
    passwordProfile = passwordProfile
});
graph.SaveChanges();
}
Now that you've seen the basics, you can have a look at programming against the Graph API yourself. A good starting point is a sample ASP.NET MVC application that demonstrates editing users and group membership. You can find the sample at http://bit.ly/waadmvcsampleapp.
Good, But Not Yet Easy
WAAD is already a great service for building new cloud services that require single sign-on from an organizational account. As a directory, it still falls a little short, because most actions require PowerShell or programmatic changes (and sometimes both). On top of that, the REST API takes some wading through the responses to find what you need, because documentation is still scarce. The Graph API Helper is a step in the right direction, but I wouldn't quantify this as an easy-to-use API yet. That said, all the ingredients are there to use the directory, which is a good option if you don't have an on-premises directory to begin with.
