


If you want an app to leverage services such as Facebook, Twitter, Flickr, and so on, users need to authorize the app to use these services. For instance, if you want an app to post a tweet or read from the user's Facebook friend list, the user must tell the service it's okay. OAuth is an authorization protocol developed to enable this. In this article, I'll show you how to connect to Facebook using OAuth 2.0, and to Twitter using OAuth 1.0. I'll also show you how you can use the API of these services to perform some actions. Armed with this knowledge, you can do more elaborate things with these services or connect to other services using the same methods.
Setting Up for Facebook
Because the OAuth 2.0 protocol is much easier to implement for a Windows 8 Store app, I'll start there. To authorize your app with Facebook, you first need to register it. To do this, you need a Facebook account, which I assume you already have.
You can register your app at https://developers.facebook.com/apps. Here, you get an overview of all the apps you registered. When you click the Create New App button, you see the dialog box in Figure 1.
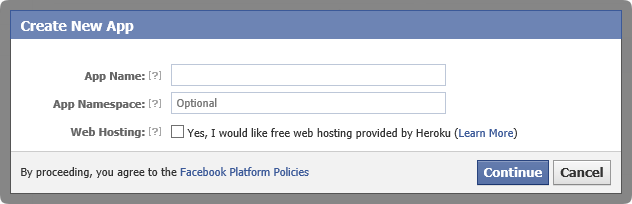
In the dialog in Figure 1, you need to enter an App Name. This is a unique name that the user sees when authorizing your app. As you can see, the App Namespace is optional and for the purpose of authorizing a Windows 8 Store app, not really relevant. After filling out the dialog box, Facebook creates the app and shows you an overview of the application settings.
You still have to tell Facebook how your app integrates with it. There are quite a few options, which basically boil down to a Web page that integrates with Facebook in various ways or a native Android or iOS app. At some point in the future, Windows (Phone) 8 might also be listed. Because Windows Store apps are neither Android nor iOS apps, and can definitely not be found in their respective app Stores, you need to take another route with Windows Store apps.
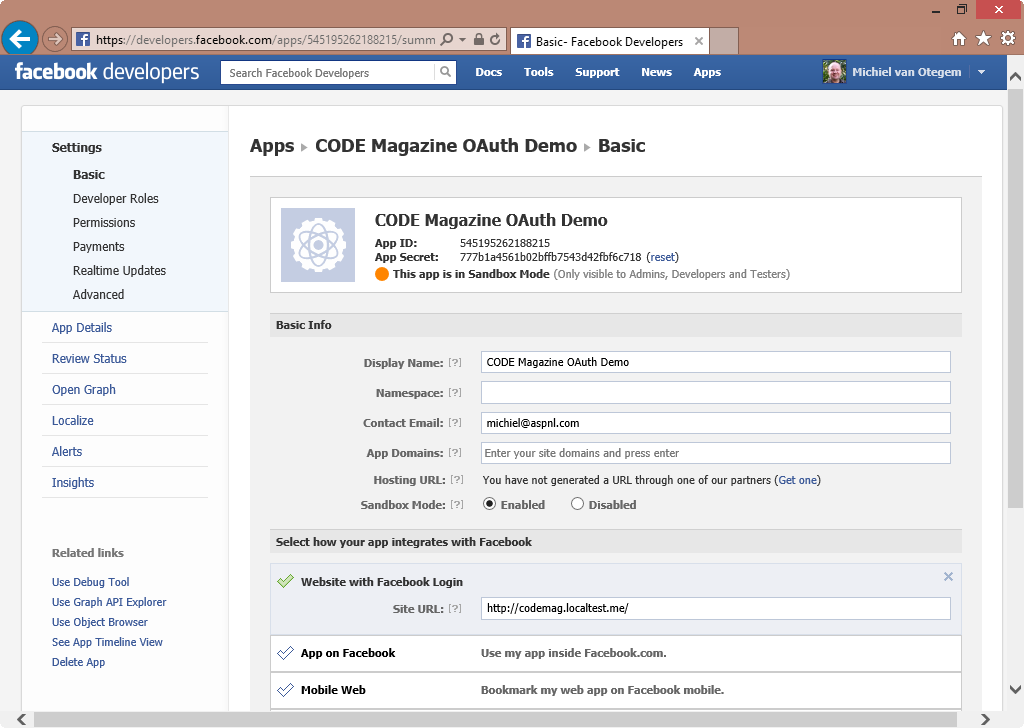
For the purpose of what you are trying to accomplish, Website with Facebook Login is the best choice because it requires the least amount of configuration. All you need to provide is a site URL, which can be practically any valid URL. It should also be a valid endpoint, so you should have a page running at that URL. This page will never be visible in your app, so you can pick any page that works for you. In Figure 2, you can see that I've used http://codemag.localtest.me/. The top-level domain, localtest.me, is a handy option when you need a public URL to point to your localhost. Any localtest.me subdomain points to 127.0.0.1. Figure 2 also shows all the other settings, including the app ID, which you'll need later.
Creating a Facebook-Connected App
In a Facebook-connected app, you use Facebook services on behalf of the user. The app needs an Access Token to do this, and to get it, the user must authenticate with Facebook and authorize your app. This means that the user does not provide your app with his/her username and password for Facebook. Instead, the app gets a token and this token identifies the user and the app. This process is depicted in Figure 3.
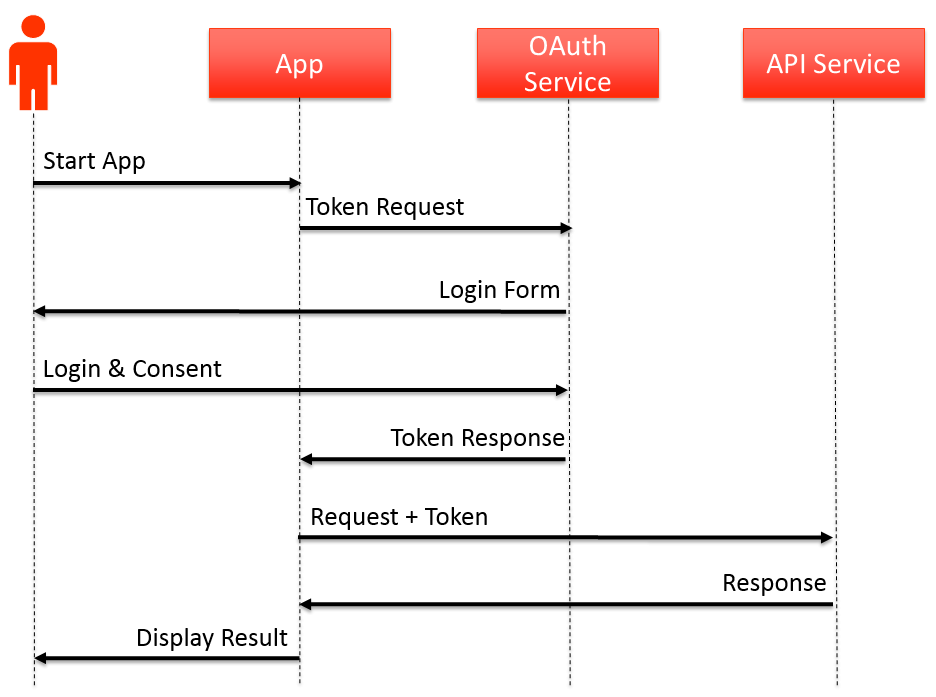
The great thing about the process in Figure 3 is that users never have to give their username and password to anyone but Facebook, and users can revoke apps from using Facebook services by invalidating the token. The downside is that you somehow need to get the access token in your app, preferably without the user having to do anything but log into Facebook.
The problem is that acquiring the access token is a browser-based process, so the user can verify that he/she is actually providing credentials to Facebook, and not some malicious third party. Now, you could ask the user to login to Facebook, get an access token and then have the user copy it from the browser and paste it into the app, but that isn't very user friendly.
A better way is to bridge the gap between the app and the browser, by hosting a WebView control inside the app and show it when the user needs to log in. The WebView control is basically a browser, so the user can log in there and you can hide the WebView control once the user has logged in. The WebView control has a LoadCompleted event that you can use to intercept the response.
The response you need to intercept is the response that contains the access token. This is the site URL that you entered into Facebook when you registered your app (in my case https://codemag.localtest.me, as shown in Figure 2). Facebook adds parameters to this URL with the access token and information about when it expires. You can get to these parameters in the LoadCompleted method.
Acquiring an access token is a browser-based process.
Although using the WebView control definitely works (I've done it), there's a better way. You can use the WebAuthenticationBroker class to achieve the same thing with less code. Also, because all apps are likely to use this method, it will be(come) recognizable to the user. The WebAuthenticationBroker contains a method called AuthenticateAsync, which takes care of grabbing the response at the right time. To do this, provide it with the base URL to which Facebook sends the response with the access token. Because this is a generic class that works with any authentication mechanism following the same pattern, you also have to specify the URL of the log in page.
Creating an OAuth 2.0 Helper
Before you start creating a UI, you should start with some plumbing you don't want in the code behind the app pages. In your Windows Store app, add a class called TokenInfo class, as shown in Listing 1. This class contains the access token and expiration information.
Listing 1: TokenInfo class to hold information about the OAuth token
using System;

namespace OAuth20Client
{
    class TokenInfo
    {
        public string AccessToken { get; set; }
        public DateTime Expires { get; set; }
    }
}
Next, add a class called OAuth20Helper. This helper class takes care of all the OAuth log in details. To operate the helper, you need three things: the URL template to do an OAuth token request, the base return URL, and the client ID identifying the app.
Listing 2 shows the foundation of the helper class taking care of the three needed values. Notice that it also exposes a TokenInfo property to get the token after the log in was successful. Listing 2 already contains the namespaces needed for the remainder of the code you'll put in there. The two important ones are System.Threading.Tasks so that you can do the asynchronous calls preferred in Windows Store apps when you do something that may take a while, and Windows.Security.Authentication.Web, which is where the WebAuthenticationBroker class lives.
Listing 2: Foundation of the OAuth20Helper class
using System;
using System.Linq;
using System.Threading.Tasks;
using Windows.Security.Authentication.Web;

namespace OAuth20Client
{
    public class OAuth20Helper
    {
        private string _oauthLoginUrlTemplate { get; private set; }
        private string _oauthReturnUrl { get; private set; }
        private string _oauthClientId { get; private set; }

        public TokenInfo TokenInfo { get; private set; }

        public OAuth20Helper (string loginUrlTemplate,
                             string returnUrl, string clientId)
        {
            _oauthLoginUrlTemplate = loginUrlTemplate;
            _oauthReturnUrl = returnUrl;
            _oauthClientId = clientId;
        }
    }
}
The response from Facebook is part of a URL and contains key-value pairs. The information needs to be parsed out to be useful. Listing 3 shows the GetTokenFromResponse method that takes care of this. It returns a TokenInfo object with the Access Token and a DateTime corresponding to when the token expires. Unless you extend the token lifetime, an access token expires after roughly an hour. Note that there is currently no error handling. However, a response that doesn't contain an access token is useless, so you should check for this in production code.
Listing 3: GetTokenFromResponse method of the OAuth20Helper class
private TokenInfo GetTokenFromResponse(string data)
{
    // OAuth parameters start after the # character.
    var paramString = data.Substring(responseData.IndexOf('#') + 1);

    // Parameters are divided by the & character.
    var parameters = paramString.Split("&".ToCharArray());

    // Create token and fill from key-value pairs.
    var tInfo = new TokenInfo();
    for (int i = 0; i < parameters.Count(); i++)
    {
        var param = parameters[i].Split("=".ToCharArray());
        switch (param[0])
        {
            case "access_token":
                 tInfo.AccessToken = param[1];
                 break;
            case "expires_in":
                var seconds = Convert.ToDouble(param[1]);
                tInfo.Expires = DateTime.Now.AddSeconds(seconds);
                break;
            // Skip this value if its key is unknown.
         }
    }
    // TODO: Check if the token is valid.
    return tokenInfo;
}
Unless you extend the token lifetime, an access token expires after roughly an hour.
The GetTokenFromResponse method is called from the main method in the Helper class: the Login method shown in Listing 4. This method first constructs the login URL to which the WebAuthenticationBroker sends the user. The template used for this requires two parameters: the client ID and the return URL, both of which are supplied to the constructor along with the template. You'll learn shortly what the template looks like exactly.
Listing 4: Login method of the OAuth20Helper class
public async Task<bool> Login()
{
    // Construct login URL.
    var loginUrl = string.Format(_oauthLoginUrlTemplate,
                        Uri.EscapeDataString(_oauthClientId),
                        Uri.EscapeDataString(_oauthReturnUrl));

    // Let the user login.
    var result = await WebAuthenticationBroker.AuthenticateAsync(
                           WebAuthenticationOptions.None,
                           new Uri(loginUrl),
                           new Uri(_oauthReturnUrl));

    // Process the response.
    if (result.ResponseStatus == WebAuthenticationStatus.Success)
    {
        var response = result.ResponseData.ToString();
        TokenInfo = GetTokenFromResponse(response);
        return true;
    }
    else
    {
        return false;
    }
}
Next, the AuthenticateAsync method is called with the constructed log in URL and the return URL. You can also set options, but that's not necessary, hence the use of WebAuthenticationOptions.None. Notice that the call to AuthenticateAsync uses the await statement to make the call asynchronously. The Login method needs to be marked with the async keyword to be able to do this.
Calling the Log in Method to Get a Token
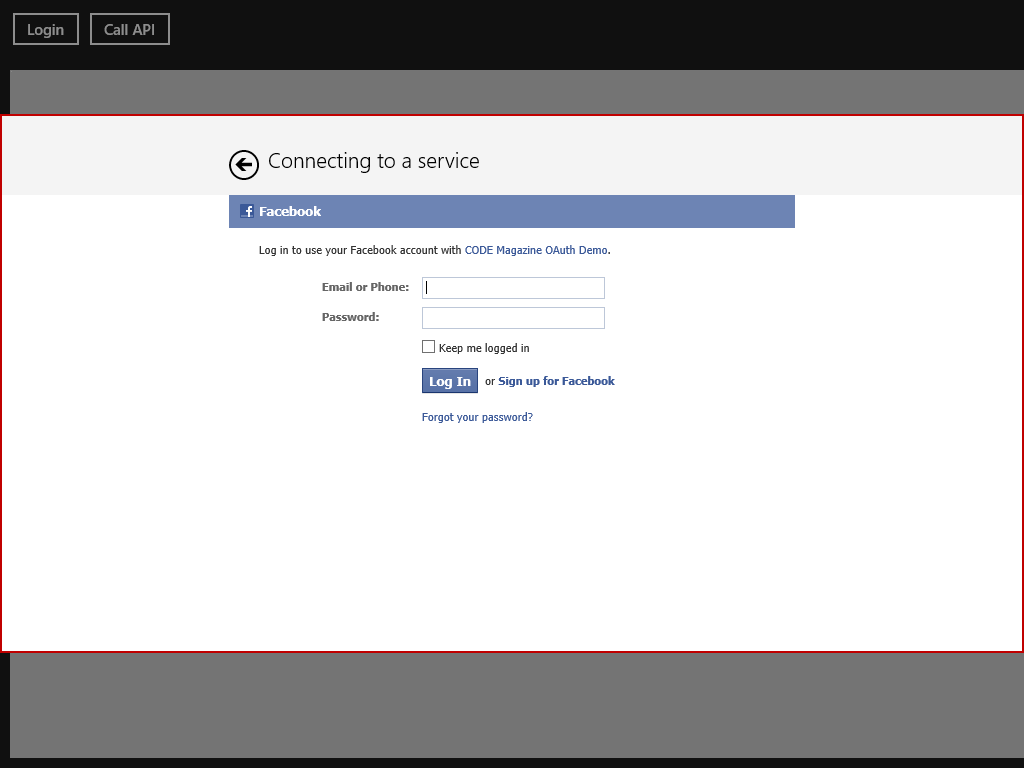
In the MainPage, create a log in button. When the user clicks this button, you call the Login method of the OAuth20Helper class. Because a UI should not block when calling the Login method, it is good practice to call it asynchronously. In Listing 5, you can see that the LoginButton_Click event handler is marked with async to make it possible to call the log in method using the await statement. When the Login method calls AuthenticateAsync, the Windows Store app reaches out to the specified log in URL, and shows it to the user in an overlay over the app, as shown in Figure 4. The portion inside the red rectangle is shown by the WebAuthenticationBroker, and the remainder of the screen is the app.
Listing 5: Core of the MainPage code behind
// OAuth configuration values. TODO: Move to config file.
const string facebookUrlTemplate =
    "https://www.facebook.com/dialog/oauth?client_id=</a>{0}" +
    "&redirect_uri={1}&response_type=token";
const string facebookSiteUrl = "http://codemag.localtest.me/";
const string facebookClientId = "123456789012345";

private OAuth20Helper _oauthHelper;

public MainPage()
{
    this.InitializeComponent();

    // Initialize the OAuth20Helper
    _oauthHelper = new OAuth20Helper (facebookUrlTemplate,
                           facebookSiteUrl, facebookClientId);
}

private async void LoginButton_Click(object sender,
                                     RoutedEventArgs e)
{
    var result = await _oauthHelper.Login();
    LoginButton.IsEnabled = !result;
}
The facebookUrlTemplate constant in Listing 5 shows the template of the URL shown by the WebAuthenticationBroker. It contains three parameters: the client ID, the return URL, and the response type. The latter defaults to token, because you want a token response.
Calling the Facebook API
The token you receive as a result of running the WebAuthenticationBroker is simply a long string of characters. When the app makes a call to the Facebook API, it must supply this token. Facebook retains a link between the token and the user account until the token expires. You can find information about extending the token lifetime at https://bit.ly/fbtokes.
With the token in hand, you can call the Facebook API. This is actually a misnomer, because there is no single API, there are several, the most common one being the Facebook Graph API. You call this API using a URL that consists of four parts: the API URL (https://graph.facebook.com/), a path indicating the information you are interested in (for instance me/friends for the friend list), parameters indicating filters and other options (if applicable), and the access token. There are some cases where the access token is not required, but that only goes for public API calls that don't require an active user. The result of the API call is a JSON string which you can parse to do whatever your app needs to do.
Listing 6 displays the result of the API call in a text field in the UI. As you can see, this is no more than a simple request over HTTP using classes you've probably used often.
Listing 6: Code to call the Facebook API
const string fbApiUrlTemplate =
    "https://graph.facebook.com/{0}?access_token={1}";

private async void CallApiButton_Click(object sender,
                                       RoutedEventArgs e)
{
    // Display result from
    // https://graph.facebook.com/me/friends?access_token=1234etc
    ResultTextBox.Text = await AccessFacebookApi("me/friends",
                             _oauthHelper.TokenInfo.AccessToken);
}

private async Task<string> AccessFacebookApi(string api,
                                             string accessToken)
{
    // Make request to the Facebook API
    var apiUrl = string.Format(fbApiUrlTemplate, api, accessToken);
    var request = HttpWebRequest.Create(apiUrl);
    var response = await request.GetResponseAsync();

    // Get the response as a string
    using (var stream = response.GetResponseStream())
    {
        byte[] buffer = new byte[response.ContentLength];
        await stream.ReadAsync(buffer, 0,
                           Convert.ToInt32(response.ContentLength));
        return Encoding.UTF8.GetString(buffer, 0, buffer.Length);
    }
}
Listing 7 shows a sample response from Facebook. Notice that if the response yields more than a certain number of items, the response contains a paging URL at the bottom, which includes the access token. You can use that URL directly to retrieve more items.
Listing 7: Sample result from Facebook
{"data":[
  {"name":"John Doe","id":"123456789"},
  {"name":"Jane Doe","id":"123456780"}],
TRUNCATED FOR BREVITY
"paging":{"next":"https:\/\/graph.facebook.com\/100002289948685\/friends?
access_token=CAAHv2invmrcBAIBSpQ9dJNBdhDcPEbTAIv0sg3r1EddjpIp133IF8HzCZB4wX
EmPsKqRFZBUuPzwV4t4X8ZBigSJrVS8OP2fAjrPHgvtFHSetWtWniPfVVMwTSkZAU2axiYK3Krk
GecGkKFZClShNyZBwsm3e81KQZD&limit=5000&offset=5000&__after_id=100006039072451"}}
Creating a Twitter-Connected App
An app that connects to Twitter uses OAuth 1.x, instead of OAuth 2.0, so it's similar to connecting to Facebook, right? Unfortunately, wrong. OAuth 1.x and OAuth 2.0 are significantly different. The basic concept is the same, but OAuth 1.x places a much greater emphasis on ensuring that no one can hijack the interaction using a service. OAuth 2.0 largely relies on SSL for this, whereas OAuth 1.x is pretty secure over HTTP as well.
OAuth 1.x and OAuth 2.0 are significantly different.
OAuth 1.x Key Concepts
Like OAuth 2.0, to access a service with OAuth 1.x, you need an access token. The way you get an access token is more elaborate than OAuth 2.0, however, as you can see in Figure 5.
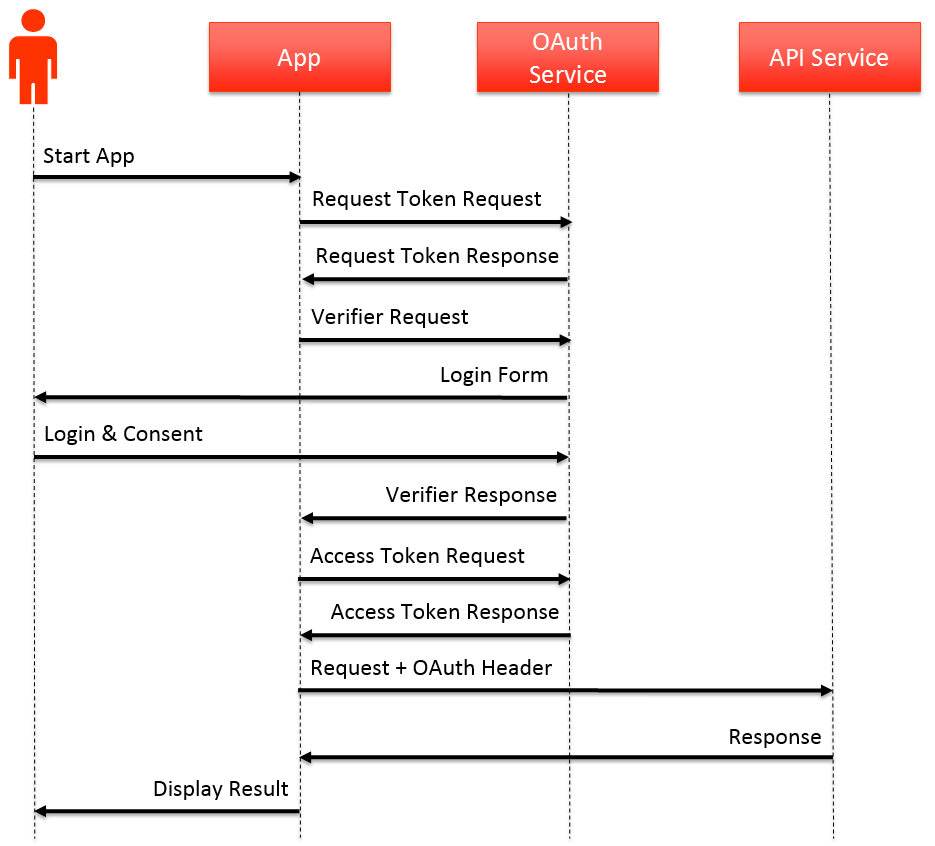
First, you need to get a request token. You send the request token and the consumer key (the Client ID in OAuth 2.0 lingo) when you send the user to the Login page. The request token ensures that even if your consumer key is stolen, another app can't impersonate your app, because the fake app can't get a request token. To get a request token, you need a consumer secret to sign the request message that retrieves the token. You send this message to a REST-based OAuth service.
When the user has logged in, the result received by the WebAuthenticationBroker contains a Verifier. Armed with the Verifier and the request token, you can make another call to a REST-based service to get an access token.
In and of themselves, these additional steps aren't very hard. What makes this complicated is the fact that OAuth 1.x services require a signed message. This goes for the services used in the log in process, but also when doing API calls. This makes OAuth 1.x a pain to implement compared to OAuth 2.0, but it is more secure, as explained in the sidebar OAuth 1.x vs OAuth 2.0.
OAuth 1.x services require a signed message.
Registering Your App with Twitter
As for Facebook, you first need to register your application with Twitter. To do so, log into https://dev.twitter.com/apps with your Twitter account and click the Create new application button. This shows the dialog box in Figure 6.
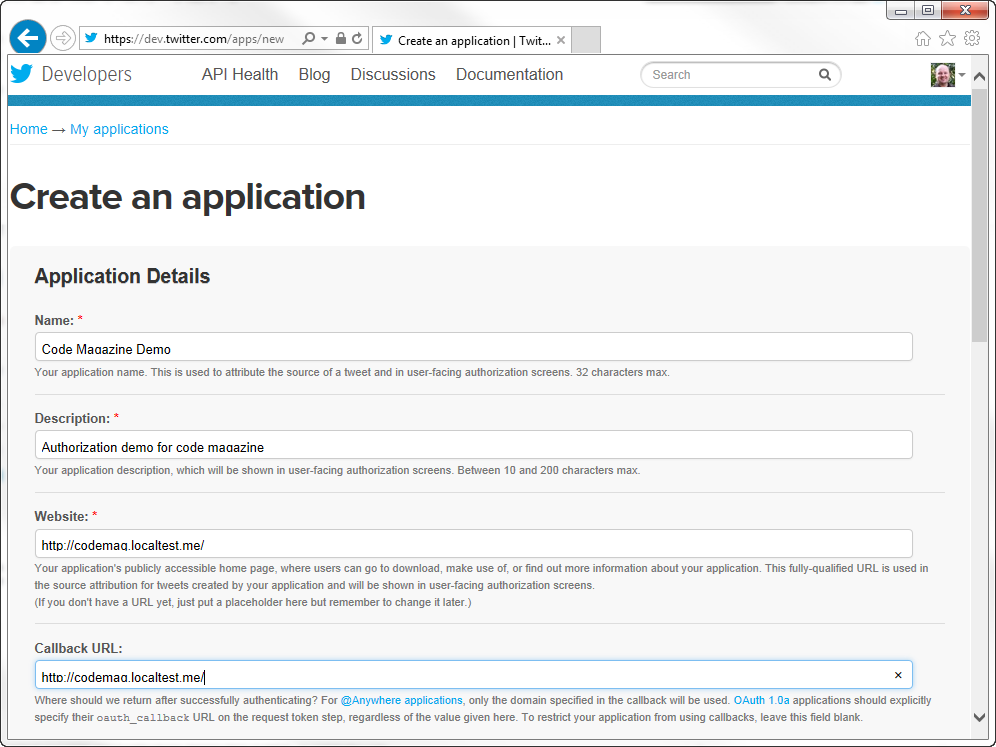
Enter the name and description, and set the Website and Callback URL. For the latter, I used http://codemag.localtest.me/ again. Once you've registered your app, you're sent to the details page. There you can see the consumer key and the consumer secret you have to use, as well as the URL part of the login process. Before you can use these, you need to enable signing in with Twitter, which you have to do on the Settings tab. There, you have to scroll down to the Application Type heading, as shown in Figure 7.
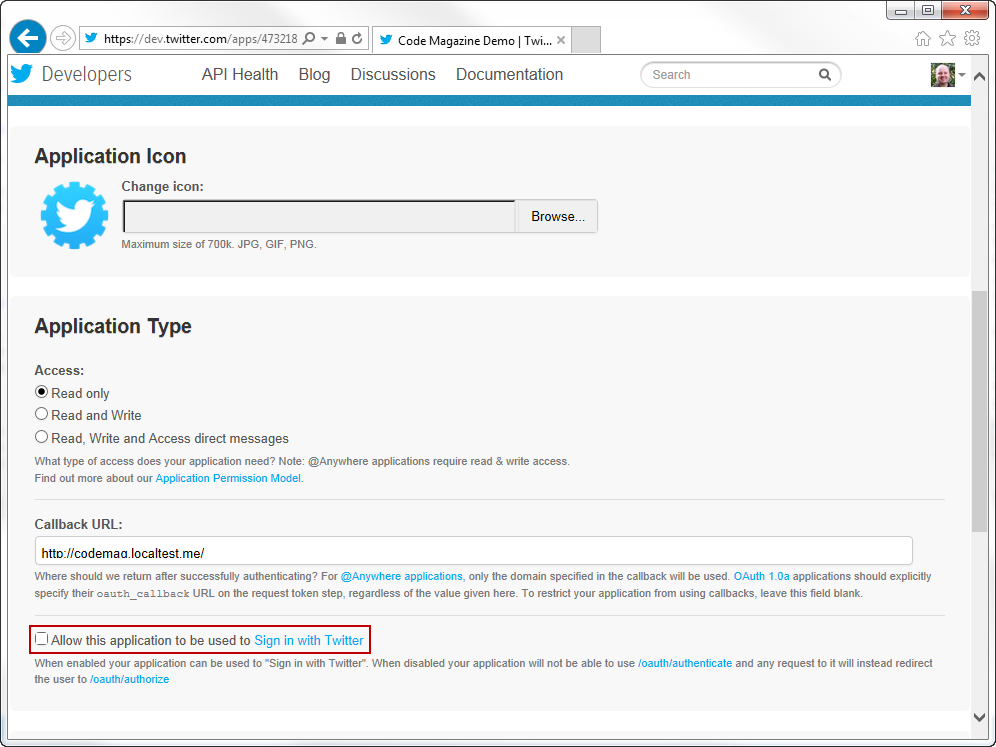
To enable users to log in to your app with Twitter, check the checkbox highlighted in Figure 7. Notice that you can also change what the app is authorized for. If you want to create an app that can post a tweet, you need to change the access level to Read and Write.
Creating an OAuth 1.x Helper
Because the OAuth 1.x process is much more complicated, you need a Helper class that's much more complicated than in the OAuth 2.0 case. I'm not going to discuss the Helper class in detail, but will discuss what the helper does at key points in the process. You can download the sample with the helper from my blog at https://bit.ly/OAuthWin8Demo. Editor's note: This resource is no longer available at the indicated URL.
The Helper contains two main methods: Login, which handles the log in process, and GetOAuthMessage to construct messages with all the OAuth data needed to authorize a request to the service API.
From the outside, the behavior of the Login method is exactly the same as with the OAuth20Helper. It shows the user the log in screen and takes care of getting the token. The difference is that the Login method code achieving this also takes care of getting the request token, getting the Verifier when the user has logged in, and getting the access token. Because there are more tokens involved, the TokenInfo class in Listing 1 has been replaced by the OAuth10TokenInfo class shown in Listing 8.
Listing 8: Class to hold token information for OAuth 1.x
namespace OAuth10Lib
{
    class OAuth10TokenInfo
    {
        public string AccessToken { get; set; }
        public string AccessTokenSecret { get; set; }
        public string RequestToken { get; set; }
        public string RequestTokenSecret { get; set; }
        public string Verifier { get; set; }

        public string RequestAuthUrl { get; set; }
    }
}
Apart from the tokens (plus associated secrets) and Verifier, the OAuthTokenInfo class contains the URL at which the user must log in. Some OAuth services supply this URL with the request token, but some supply a static URL, which is what Twitter does. Besides this URL you also need the URL to get the request token, the URL to get the access token, and the return URL that the WebAuthenticationBroker needs to identify the token response. You pass these URLs in as parameters of the OAuth10Helper constructor, along with the consumer key and consumer secret and the signature algorithm (for most services, HMAC-SHA1).
Creating the App
Because the OAuth10Helper class is very similar to the OAuth20Helper discussed earlier, the code of the client app can be identical to the Facebook-connected app when it comes to logging in. The difference lies with calling the API, because you need to supply the Authorization header with a signed OAuth credential based on the access token and the Verifier. The AccessTwitterApi method in Listing 9 uses the OAuth10Helper to achieve this. For brevity this method does not contain any exception handling, and it also lacks capabilities to add parameters in case of a POST request.
Listing 9: Class to hold token information for OAuth 1.x
private async Task<string> AccessTwitterApi(string url,
    string querystring, HttpMethod httpMethod)
{
    // Initialize HttpClient
    HttpClient httpClient = new HttpClient
    {
        MaxResponseContentBufferSize = int.MaxValue
    };
    httpClient.DefaultRequestHeaders.ExpectContinue = false;

    // Initialize HttpRequestMessage
    string fullUrl = string.Format("{0}?{1}", url, querystring);
    HttpRequestMessage request = new HttpRequestMessage
    {
        Method = HttpMethod.Get,
        RequestUri = new Uri(fullUrl)
    };

    // Set the OAuth message to transmit to Twitter
    string oauthMessage = _oauthHelper.GetOAuthMessage(url,
                                          querystring, httpMethod);
    request.Headers.Authorization = new
                  AuthenticationHeaderValue("OAuth", oauthMessage);

    // Get the response
    var response = await httpClient.SendAsync(request);
    return await response.Content.ReadAsStringAsync();
}
For read-only access to Twitter, you only need GET. For instance, to get the user's timeline, you make a call to the following URL: https://api.twitter.com/1.1/statuses/user_timeline.json. I won't go through the result, because it's quite a large structure. However, the sample from my blog shows the result in a text field, so you can analyze it. You can experiment with other calls from the API listed at https://dev.twitter.com/docs/api/1.1. Editor's note: This resource is no longer available at the indicated URL.
Wrapping Up
OAuth provides a powerful yet fairly simple way to authorize apps to certain functionality. It is easier to implement than a lot of security mechanisms available in SOAP Web services, but it does take some getting used to the REST paradigm if you're new to it. With the Helper classes, you can easily leverage functionality from services such as Facebook, LinkedIn, Twitter, and much more. Enjoy!
