


Traditionally, the development lifecycle for a mobile application involves the process of architecting a backend solution to receive and serve data to and from mobile clients. At a high level, that process most often includes creating a database and then coding various API endpoints to act as a bridge between that data and the client application. In reality, the process involves so much more.
Developers must answer a series of difficult questions throughout this process. Where do you host the files and the data? How does the solution scale? Do you need an SSL Certificate? What about load-balancing?
The list goes on and on. Each project demands its own answers and the process usually accounts for a large portion of the project's overall budget.
What if, as a developer, you could focus all of your efforts on building a robust front-end experience and not have to worry about constructing a complex backend infrastructure? What if, as a company, you could offer your clients a more cost-effective data storage solution? What if, as a project manager, you could allocate fewer resources on a per project basis?
With Parse, you can achieve all of these, and a whole lot more.
What is Parse, Exactly?
Parse is a secure and scalable cloud data storage platform comprised of three distinct services: Parse Core, Parse Push, and Parse Analytics. Combined, these services allow you to focus on creating memorable and lasting user experiences without the hassle of complicated infrastructure.
Parse Core
Parse Core is the lifeblood of the Parse system built atop MongoDB; Parse Core gives you the ability to store and retrieve data, run server-side cloud logic, and schedule background jobs. With plug-in SDKs for virtually every major platform, Parse Core allows you to seamlessly share data among your Web, desktop, and mobile applications.
Think of Parse Core for your traditional database and the available SDKs as replacing your need to write API endpoints to connect your app with that data. Using the SDKs, you can create, update, save, and delete data directly from the client without routing through a traditional server-side middleman. Don't want to handle data processing from the device? No problem, write cloud code functions using JavaScript and call those functions directly from the client, triggering a server-side execution.
With plug-in SDKs for virtually every major platform, Parse Core allows you to seamlessly share data among your Web, desktop, and mobile applications.
Parse Core also comes equipped with the Parse Dashboard, a point-and-click interface that makes managing your data a breeze. Figure 1 shows a sample dashboard for an application called CODEChat, a small chat application that you will work through later in this article.
The dashboard is your one-stop shop for configuring the various classes and relationships needed to manage your application's data. In Parse, you store data in classes. Create your own custom class or take advantage of one of the several default classes. The most widely used of the default classes, the User class, simplifies user account management by automatically enforcing unique usernames, hashing passwords, verifying email format, and handling both Facebook and Twitter logins.
As you can see in Figure 1, the messages class is shown containing five rows of data. Columns serve as the building blocks of these rows, each assigned their own data type. Parse has many custom data types that make developers' lives easier, including a type specifically for saving files (images, video, audio, etc.) and another for storing a GeoPoint (latitude and longitude). Parse also includes all of the traditional data types as well.
Parse Push
Parse Push simplifies one of the most fundamental aspects of mobile development: push notifications. Push notifications give your app a necessary voice, helping you retain a user's attention by engaging them in real-time. Without them, your application will likely be forgotten or overlooked.
In iOS, configuring your application to send and receive push notifications is no small feat. Traditionally, you need to prompt the user for permissions to send push notifications, grab their device token, configure a server with an SSL Certificate and a Private Key, code an API endpoint to receive the device token and store it, and finally code API endpoints to comprise the push notifications and forward them to Apple's APNS servers so they can be sent to the target device. This workflow contains various components creating more work and more possible points for failure.
With Parse Push, that same process requires only that you open up the Parse Dashboard, go to the settings section for push notifications, and drop in your push notification's provisioning profile. Once that's done, you use the client-side Parse SDK to send notifications from one device directly to the other or use cloud code to write a routine that distributes to multiple devices at the same time.
The Parse Dashboard puts even more power in your hands, allowing you to send notifications to your users directly from the dashboard. You can target a specific subset of users or push to the entire user base. Want that notification to be sent at a specific time? With Parse's advanced scheduling service, you can schedule the notifications ahead of time so nothing gets forgotten.
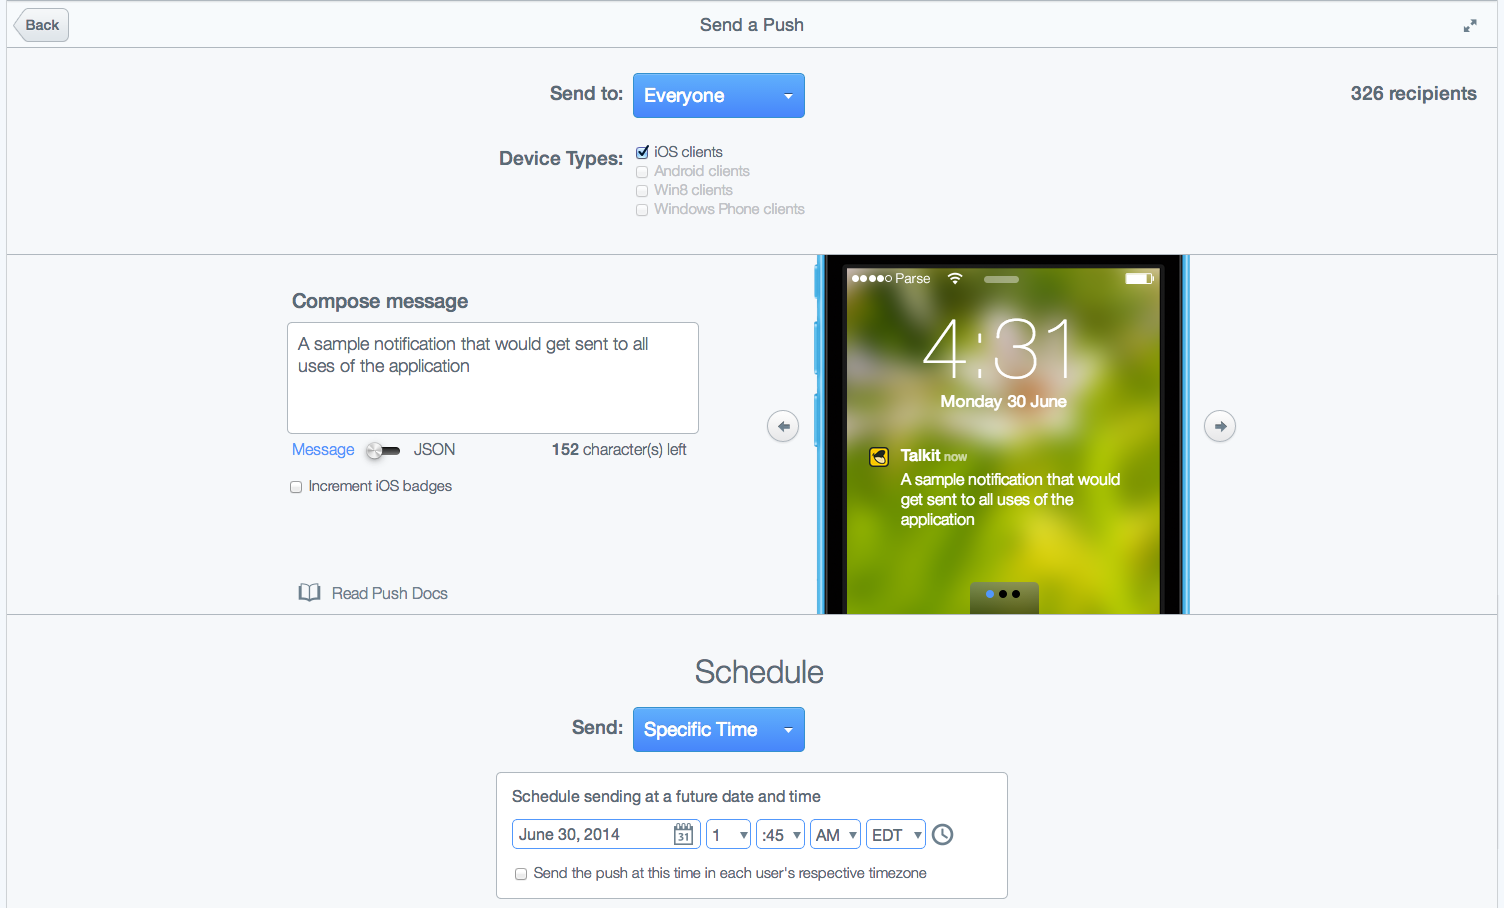
Parse comes with a default Installation class that helps you better target specific destinations for your notifications. The Installation class has a channels column, which holds an array of channel names. Subscribe your users to various channels and then target those channels directly. For instance, each user may have their own channel and several of those users could also belong to the CODE Magazine Fans channel. Let's say that you're running a special promotion for fans of CODE Magazine. You could open the Parse Dashboard, compose the notification, preview exactly how it will look on various devices, single out that specific group of users, and schedule the notification to coincide with the release of the promotion. Figure 2 shows an example of the interface used do this.
You could open the Parse Dashboard, compose the notification, preview exactly how it will look on various devices, single out that specific group of users, and schedule the notification to coincide with the release of the promotion.
Parse Analytics
In order to measure and understand the success or failure of any application, you need to be able to analyze the usage patterns of your users. Parse Analytics is packed into the Parse SDK and it tracks a handful of useful metrics automatically by default. Not only does it track popular metrics like the number of installs and opens, but it also tracks metrics you don't usually think about, like total requests, consecutive request volume, dropped requests, user retention rate, and many others.
Additionally Parse Analytics piggy backs off of Parse Push to give you analytics around the number of devices that receive and engage the push notifications sent out, allowing you to judge the effectiveness of your campaigns. You can track any additional data points that Parse doesn't track automatically using a single line of code.
How Expensive is Parse to Use?
Parse is broken up into several different tiers. Each tier carries its own cost with the base tier being absolutely free. The free tier is so robust that smaller apps likely won't ever have to pay for the service. The free tier includes:
- 20 GB file storage
- 20 GB database storage
- 2 TB data transfer
- 30 requests/sec
- 1 concurrent background job
- 1 million unique Push recipients
- Parse Analytics platform
Parse has no hard limits; exceeding any of the listed limits won't result in your application failing to work. Rather, you'll be notified that the limit is surpassed and charged small fees ($0.03/GB extra file storage for example) for the overage content until you decide to bump up to the next tier.
The free tier is so robust that smaller apps likely won't ever have to pay for the service.
Bumping up to 40 requests/sec and two concurrent background jobs will run you $100 a month and the tiers continue to scale, as needed, in $100 increments.
Coding with Parse is as Simple as…
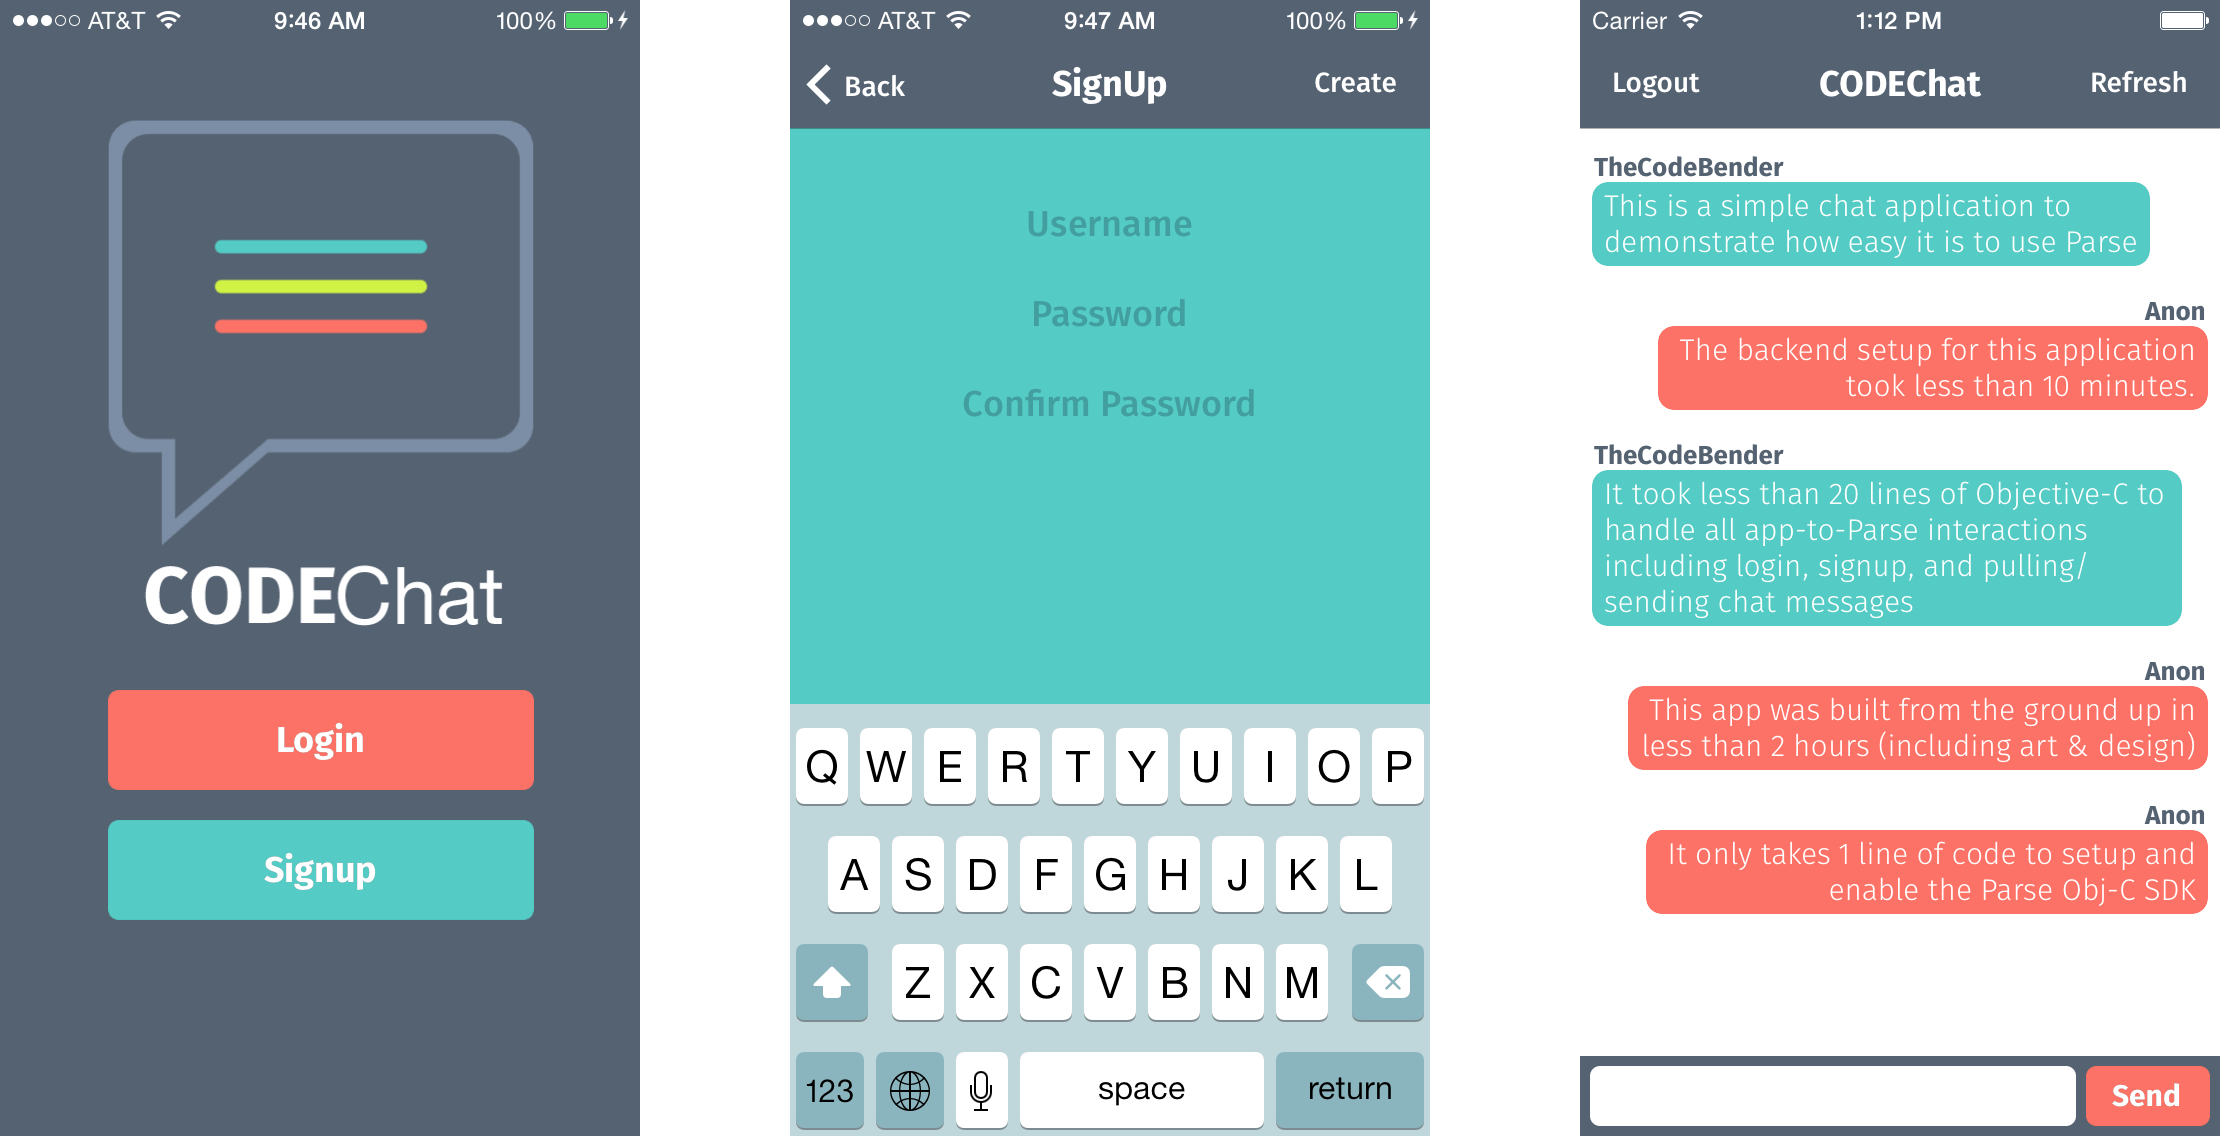
To get a better understanding of the simplicity of working with Parse, let's take a look at a real world application and the Parse code that powers it. CODEChat is a small iOS application, seen in Figure 3, which allows users to create an account, login, and then chat in real-time with other users.
Project Setup
When working with Parse, you first need to configure your project on . Configuring your project involves creating a free account, naming your project, and setting up some classes for data you want to store. In this case, I've created a project called CODEChat and initialized it with two classes: User and messages. The User class will hold the user objects created by signing up and will be responsible for user verification when the users try to log in. Messages will hold the chat messages that the users send back and forth. The Messages class will also have a pointer back to the User class, tying each message to a particular author.
Now that you have the classes configured, you need to set up a project using the Parse SDK. Parse has a robust and incredibly user-friendly set of documentation on their website, including interactive QuickStart guides for each SDK. To integrate Parse with iOS, just download Parse's blank XCode project that comes pre-equipped with the SDK and add a single initializing statement:
[Parse setApplicationId:@"YOUR APPLICATION ID"
clientKey:@"YOUR CLIENT ID"];
The initialization statement should be added to application:didFinishLaunchingWithOptions in the main app delegate and you'll need to add your app's specific application and client identifiers, as found on the dashboard's settings page. Once that line is added, your project is ready to use Parse. Import Parse into any file you wish and you can instantly take advantage of all of its features.
#import <Parse/Parse.h>
Working with PFObject and PFUser
PFObject is the key to storing and manipulating data with Parse. Think of each PFObject as a dictionary of key-value pairs comprised of JSON-compatible data. For example, a PFObject containing a message in the CODEChat app might look like this:
message: "Parse is epic", visible: true, views: 4
Each PFObject has an associated class name that makes it easy to distinguish the types of data it contains and it also denotes where to save that data. In the last snippet, the sample PFObject was of class type messages. If you were going to create that same PFObject in Objective-C and save it to Parse, it might look like this:
PFObject *message = [PFObject objectWithClassName:@"messages"];
message[@"message"] = @"Parse is epic";
message[@"visible"] = @YES
message[@"views"] = @4;
[message saveInBackground];
You might notice that in this example, the message has no related author. Without storing who the author is, you wouldn't know who sent each message. To avoid the redundancy of storing author information in each message object, you can create a pointer to the author's User object. This way, any changes to the parent User object automatically propagate down to all the child messages.
Because the User class is a special default class, it also comes with a default object with special capabilities called PFUser. For example, when a user logs in, the currentUser property of PFUser is automatically set and can be accessed anywhere in the application. Let's take a look at the previous example, but this time, you will also store a pointer to the message's author.
PFObject *message = [PFObject objectWithClassName:@"messages"];
//store the author of the message
message[@"author"] = [PFUser currentUser];
message[@"message"] = @"Parse is epic";
message[@"visible"] = @YES
message[@"views"] = @4;
[message saveInBackground];
By simply assigning the author property to the PFUser object, a pointer to that object is created and stored. Now whenever you query Parse to get recent messages, you can ask that the data from the User object tied to each message be returned as well (I will touch more on this later).
User Account Management
Account management is something that almost every application deals with. Parse understands this and tries to simplify the process for you as much as possible. As mentioned earlier, user management is handled with the PFUser object and comes pre-packed with functionality that you would otherwise have to code from scratch.
In the CODEChat app, you want users to be able to register an account and login. Creating an account involves nothing more than creating a PFUser object and calling the default PFUser sign up method. Take a look at that process:
//initialize a new PFUser object
PFUser* newUser = [[PFUser alloc] init];
newUser.username = @"Anon";
newUser.password = @"superSecure";

//now that you have the user object, sign them up
[newUser signUpInBackgroundWithBlock: ^(BOOL succeeded, NSError *error){
    if (!error){
        //account created
    }else{
        //something went wrong
        //most likely username already taken
    }
}];
Once the account creation completes, you can go ahead and log the user into the application using the default login method provided by the PFUser object. That method looks like this:
[PFUser logInWithUsernameInBackground:@"Anon"
        password:@"superSecure"
            block:^(PFUser *user, NSError *error){
    if (user){
        //logged in successfully
    } else{
        //login failed
        //probably wrong username/password
    }
}];
After confirming the login, you direct users to the main chat screen so they can begin chatting with other users. To provide the best possible user experience, the next time the user opens the app, you want to remember them and not prompt them to login again until they manually logout. The currentUser property of PFUser that I mentioned earlier will indicate if there is an active user session.
if ([PFUser currentUser]){
    //user is currently logged in
}
Lastly, you want to give the user the ability to logout of the application whenever they so choose. As you might expect, PFUser has a default method for ending the currentUser session.
[PFUser logout];
Account management with Parse isn't limited to signing up or logging in with just a username and password. Parse provides default methods for logging in with Facebook and Twitter as well. Even if you don't want to support the Twitter login but want to give users the ability to share via Twitter at a later point in time, for example, Parse has default methods for linking an existing user account with a Twitter account. The same goes for Facebook.
Sending and Receiving Messages
Now that the user is logged in, you want him to have the ability to read recent messages that have been posted and to respond to those messages in real-time. To get recent messages to display, you can use a PFQuery to grab the desired data from the Parse cloud. Simply construct the query, apply all your needed parameters, and then fetch the corresponding data. To get the last 25 messages sent through the application, construct a query like this:
PFQuery *query = [PFQuery queryWithClassName:@"messages"];
//set the limit of messages you want to get
query.limit = 25;
//order by newest to oldest
//createdA = default field for each Parse class
[query orderByDescending:@"createdAt"];
[query includeKey:@"author"];

//get the results
[query findObjectsInBackgroundWithBlock: ^(NSArray *messages, NSError *error){
    if(!error){
        //messages array holds PFObjects
    }else{}
}];
In the above snippet, notice the call to includeKey. This tells the query to also get all the corresponding data that the Author pointer points to and return that instead of returning the pointer. How is this useful? Well when you go to display the messages and also want to display the username of the message's author, you don't have to go back and do an additional query to find that information. You can simply derive the author's PFUser object from the message's PFObject like so:
//message from the array returned by the PFQuery
PFObject* aMessage = [messages objectAtIndex:0];

//the author object from the message's data
PFUser* author = aMessage[@"author"];

//now you can access the author's username
NSLog(@"%@", author.username);
If you tried the previous snippet of code without calling includeKey during the query, you would hit a runtime error when trying to print author.username. If you didn't call includeKey and wanted to avoid the runtime error, you would need to fetch the author's data at the time of accessing it, like this:
//the author object from the message's data
PFUser* author = aMessage[@"author"];
[author fetchInBackgroundWithBlock: ^(PFObject *authorObj, NSError *error){
    //now you can access the author's username
    NSLog(@"%@", author.username);
}];
As far as sending messages is concerned, you simply create a PFObject for the message and then save it as was demonstrated in the previous section dealing with PFObjects.
Simple is an Understatement
Using Parse, you were able to build a small chat application from the ground up with less than 10 minutes of backend configuration, one line of app-side configuration code, less than 20 lines of Objective-C to manage all app-to-Parse interactions, and less than two hours spent overall, including the time to create all of the view components. Additionally, all of this can be done with little to no backend experience or know-how.
Parse is opening up a world of possibilities by streamlining the development lifecycle, putting the focus on creating meaningful user experiences, and giving you the power to do more with fewer resources.
Parse is opening up a world of possibilities by streamlining the development lifecycle, putting the focus on creating meaningful user experiences, and giving you the power to do more with fewer resources.
The source code for CODEChat has been included on the CODE download page, and includes more in-depth comments and explanation of how to effectively use Parse in your own applications. Register for a free Parse account, drop in your client and application IDs, and build the project within Xcode.
