Windows Azure network services provide the foundation for building hybrid cloud solutions for your business. Windows Azure Virtual Network lets you securely connect your cloud infrastructure to your on-premises datacenter. Windows Azure Traffic Manager allows you to control how user traffic is distributed to cloud services. Windows Azure also includes a name resolution service you can use for internal hostname resolution within a cloud service. This chapter provides an overview of the different network services in Windows Azure and includes insights from product team experts concerning how these services relate to one another, what you can do with them, and how you can use them.
Virtual Network
In the past when you needed to add more servers to your datacenter to handle increasing demand, you had to obtain the necessary hardware and deploy operating systems and applications on your new systems. Such tasks were generally time consuming to perform-hardware procurement can particularly be a bottleneck because of your organization’s budgeting process as well as vendor delivery timing.
With the Windows Azure platform, however, you can now easily extend your on-premises datacenter into the cloud, and Windows Azure Virtual Network is key to making this possible. For example, you can use Virtual Network to create and manage a virtual network that uses a private IPv4 address space in Windows Azure. You can also use Virtual Network to create a secure link between your on-premises IT infrastructure and your virtual network in Windows Azure. By creating a hybrid IT infrastructure that combines your on-premises network and your virtual networks in Windows Azure, you can securely connect your cloud-based applications to your on-premises information systems.
Virtual Network can be used with other Windows Azure services such as Virtual Machines. For example, you can use Virtual Network to provide connectivity between virtual machines provisioned using Windows Azure Virtual Machines. This approach is ideal-for example, if you want to run a Microsoft SharePoint farm in Windows Azure. Virtual Network can also be used with Cloud Services. By default, all virtual machines running in the same cloud service can already communicate with each other without the need for you to create a virtual network for this purpose. By creating additional virtual networks, however, you can also enable virtual machines running in different cloud services to talk to each other.
Creating virtual networks
The best way to become familiar with Virtual Network is to start creating virtual networks. Begin by opening the Windows Azure Management Portal, select the Virtual Network tab on the left and then click the New button in the command bar at the bottom. The command bar expands, as shown in Figure 3-1, and displays the different options available for creating and configuring virtual networks.
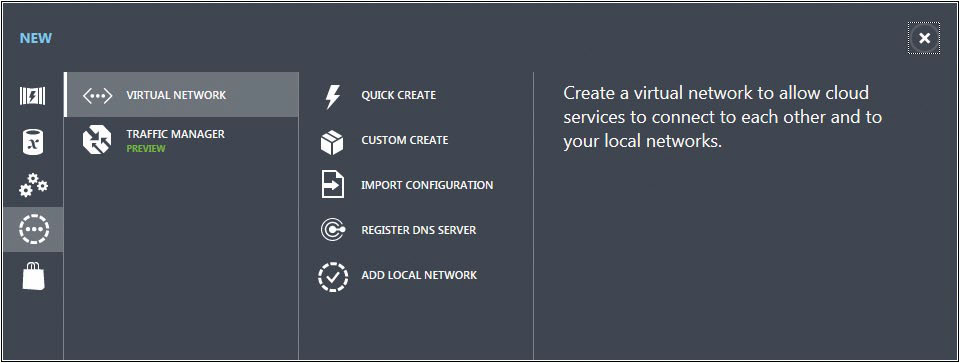
The Quick Create option lets you create a basic virtual network which you can then further configure later on. Custom Create lets you configure your virtual network as you create it, while Import Configuration lets you configure a virtual network by importing an XML configuration file. The remaining options allow you to register DNS servers for your virtual network and add your local network for cross-premises connectivity.
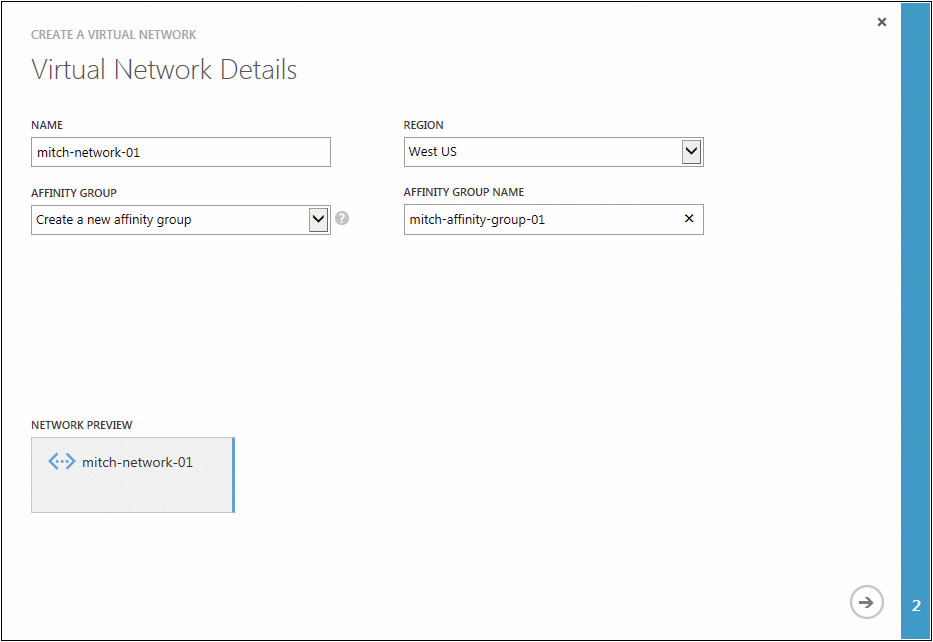
Selecting the Custom Create option launches the Create A Virtual Network wizard. Figure 3-2 shows what the first page of this wizard looks like if this is the first virtual network you are creating. Because virtual networks must be associated with an affinity group, you must create a new affinity group if you haven’t done so previously. An affinity group is a logical grouping of Azure services that tells Windows Azure where to locate the services in order to optimize the performance of cloud applications. When you create a new affinity group you must specify the geographical region where your affinity group will reside. For example, Figure 3-2 shows an affinity group being created in the “West US” region. Then if we later create a storage service in the same affinity group, Windows Azure will know that it should locate the storage in the “West US” location in order to optimize performance with other cloud services in the same affinity group.
The next wizard page. shown in Figure 3-3, allows you to add DNS servers to your virtual network for name resolution. See the sidebar titled “Windows Azure and DNS name resolution” later in this section for more information on the different ways you can configure DNS name resolution for Windows Azure.
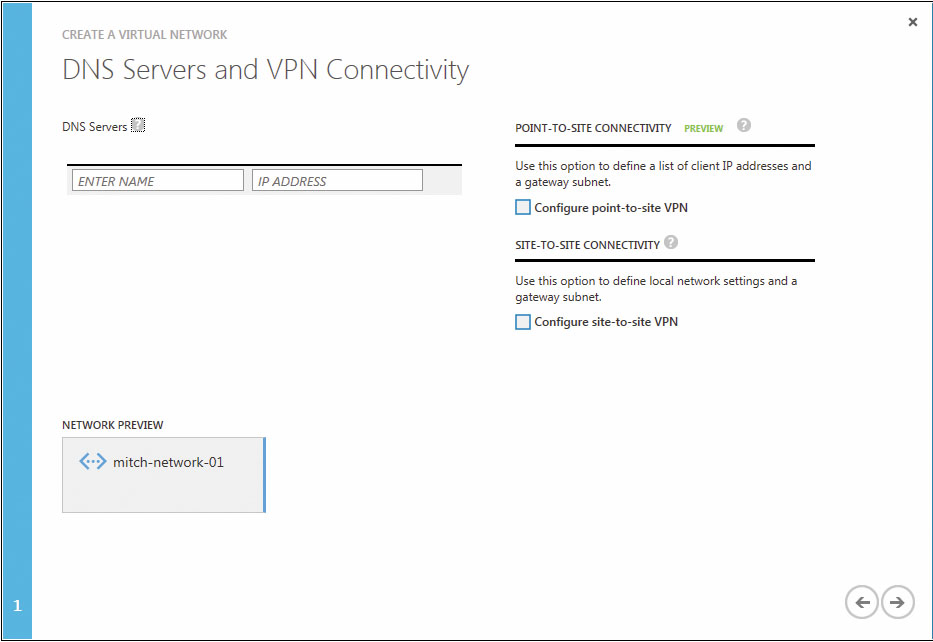
You can also use the wizard page shown in Figure 3-3 for configuring two kinds of VPN connectivity:
- Point-To-Site Connectivity Selecting this option displays an additional wizard page where you can define the address space for VPN clients that will connect to your virtual network from outside your virtual network space. This feature is currently in preview at the time of writing.
- Site-To-Site Connectivity Selecting this option displays an additional wizard page where you can define the VPN device IP address and address space used by clients connecting your virtual network from a remote site. You might use this option, for example, to establish a secure site-to-site VPN connection between your on-premises corporate network and your virtual network in the cloud. For more information on this feature and how to configure it, see the expert sidebar titled “The secure door to hybrid IT-Windows Azure site-to-site VPN” from a Microsoft insider later in this section.
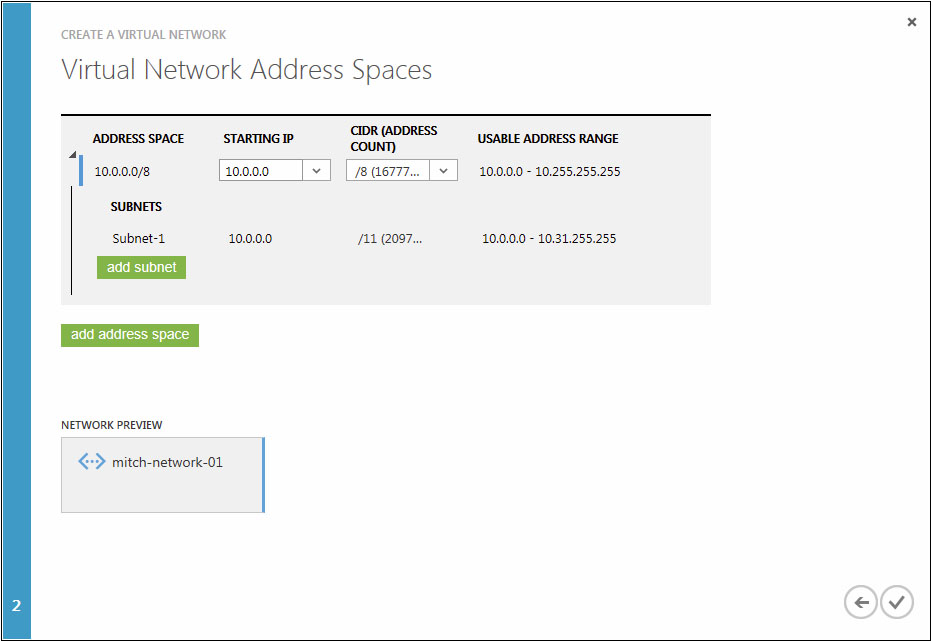
If you haven’t selected either of the two options above, the next and final wizard page shown in Figure 3-4 is where you can add address spaces and subnets to your virtual network. By default, the address space 10.0.0.0/8 is automatically added and the subnet 10.0.0.0/11 created, but you can edit both of these to change your virtual network addressing if desired, for example by changing the address space to 172.16.0.0/12 or 192.168.0.0/16 or something different. Only private IP address ranges can be specified as address spaces however.
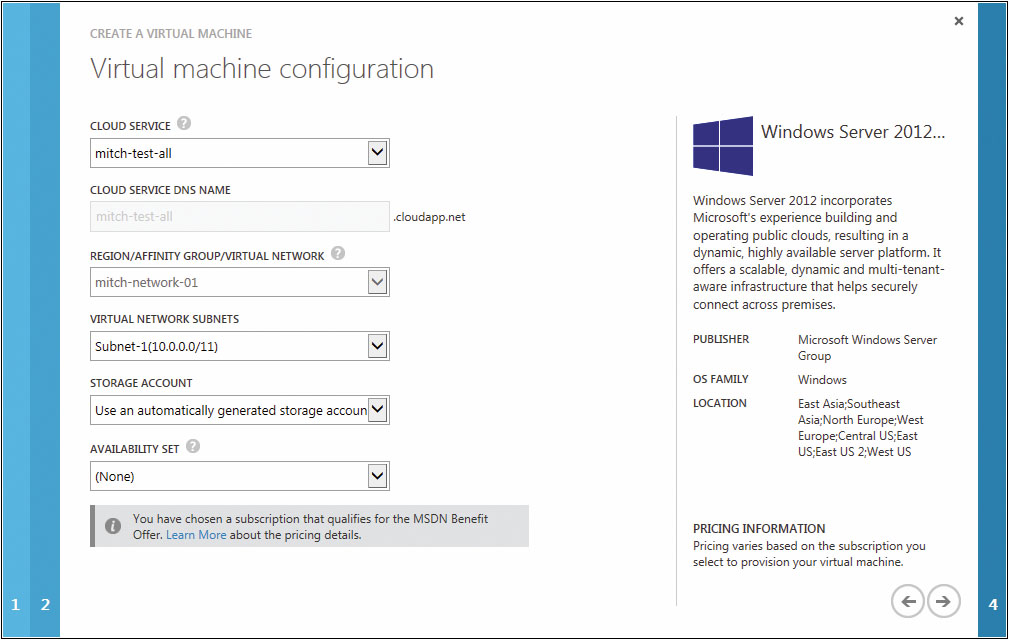
Once you’ve created one or more virtual networks in Windows Azure, you can associate a virtual network subnet with a virtual machine when you create the virtual machine using the procedure shown previously in Chapter 2, “Windows Azure compute services.” For example, Figure 3-5 shows a new virtual machine being created and associated with a previously created cloud service named mitch-test-all and with the Subnet-1 (10.0.0.0/11) virtual network subnet.