


In the previous articles in this series on building a WPF business application (see Related Articles below), you created a new WPF business application using a pre-existing architecture. You added code to display a message while loading resources in the background. You also learned how to load and close user controls on a main window. You built a login screen, a user feedback screen, and a user maintenance screen to display a list of users, and the detail for a single user. In this article, you're going to finish this user maintenance screen by learning to manage button state, and to add, edit, and delete users.
This article is the fourth, and final, in a multi-part series on how to create a WPF business application. Instead of starting completely from scratch, I've created a starting architecture that you can learn about by reading the blog post entitled “An Architecture for WPF Applications” located at https://pdsa.com/blog. Download the samples that go along with the blog post to follow along step-by-step with this article. This series of articles is also a Pluralsight.com course that you can view at https://bit.ly/2SjwTeb. You can also read the previous articles in the May/June, July/August, and September/October issues of CODE Magazine.
Related Articles
- A Design Pattern for Building WPF Business Applications: Part 1
- A Design Pattern for Building WPF Business Applications: Part 2
- A Design Pattern for Building WPF Business Applications: Part 3
A Design Pattern for Master/Detail Screens in WPF
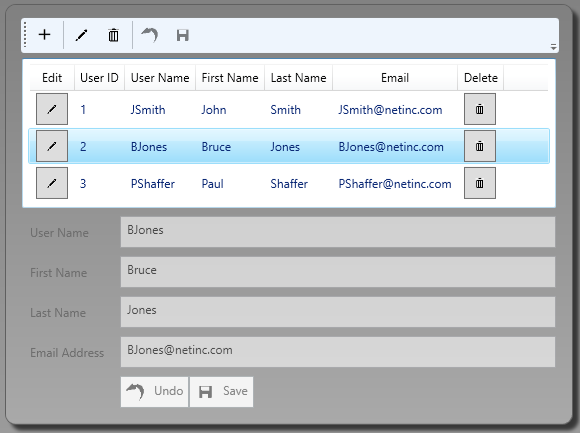
In the last article, you built the UI for a user maintenance screen (Figure 1). In this article, you're going to add the code necessary to manage state so that different controls on the screen can be enabled or disabled depending on what the user is doing. You also create code to add, edit, and delete users.
Overview of Managing State
When building a maintenance screen that will list, add, edit, and delete any records in a database, you need to keep track of what state the user is currently in. There are three different states that you need to keep track of:
- Displaying the list of users
- Editing user information
- Adding a new user
When you are in each of these states, you need to change various controls on the maintenance screen to be enabled or disabled. The following sections describe the state that each of the controls should be in, depending on what the user is currently doing on that screen. The reason to enable or disable controls is to keep the user focused on what they are currently doing with the data on the screen. For example, the user may be browsing the list of users or maybe trying to modify a single user.
The List State
When you first enter the user maintenance screen, the list of all users is displayed. When you are in this List state, the following controls on the screen should be set to the following states.
- The List View is enabled.
- The Detail User control is disabled.
- The Add button is enabled.
- The Edit button is enabled.
- The Delete button is enabled.
- The Undo button is disabled.
- The Save button is disabled.
The Edit State
When the user clicks on the button to add or edit a user, you want them to focus only on the detail area until they're finished modifying that user. When in this Edit state, the only way to finish is to click the Undo or the Save buttons. Modify the controls on the screen to the following states.
- The List View is disabled.
- The Detail User control is enabled.
- The Add button is disabled.
- The Edit button is disabled.
- The Delete button is disabled.
- The Undo button is enabled.
- The Save button is enabled.
The reason to disable the List view when editing is to force the user to focus on just editing a user. If you didn't disable the List view, they might accidently click on the list and move to a new user before they've had a chance to save their changes. Yes, you could add an IsDirty property on the view model, but this requires a lot more code than simply disabling the list view.
The Add State
Adding a user is almost the same state as when editing a user. When you are ready to save the data, you need a flag, so you know to add a new record using the Entity Framework versus merely updating the record. You're going to use an IsAddMode property to keep track of this state.
A View Model Base Class for Add, Edit, Delete
For any maintenance screen like the one shown in Figure 1, you're going to need to keep track of the different states outlined in the previous section. Create a class named ViewModelAddEditDeleteBase in the ViewModelLayer project, have it inherit from the ViewModelBase class, and add three new properties; IsListEnabled, IsDetailEnabled and IsAddMode, as shown in Listing 1.
Listing 1: Create a view model to handle standard add, edit and delete screens
using Common.Library;

namespace WPF.Sample.ViewModelLayer
{
    public class ViewModelAddEditDeleteBase : ViewModelBase
    {
        private bool _IsListEnabled = true;
        private bool _IsDetailEnabled = false;
        private bool _IsAddMode = false;

        public bool IsListEnabled
        {
            get { return _IsListEnabled; }
            set
            {
                _IsListEnabled = value;
                RaisePropertyChanged("IsListEnabled");
            }
        }

        public bool IsDetailEnabled
        {
            get { return _IsDetailEnabled; }
            set
            {
                _IsDetailEnabled = value;
                RaisePropertyChanged("IsDetailEnabled");
            }
        }

        public bool IsAddMode
        {
            get { return _IsAddMode; }
            set
            {
                _IsAddMode = value;
                RaisePropertyChanged("IsAddMode");
            }
        }
    }
}
Add a BeginEdit() method in this class to set these properties to the valid state for adding or editing a record.
public virtual void BeginEdit(bool isAddMode = false)
{
    IsListEnabled = false;
    IsDetailEnabled = true;
    IsAddMode = isAddMode;
}
Add a CancelEdit() method to reset these properties back to the normal mode of displaying a list of users only.
public virtual void CancelEdit()
{
    base.Clear();

    IsListEnabled = true;
    IsDetailEnabled = false;
    IsAddMode = false;
}
Add two additional methods to this class, Save() and Delete(). The Save() method is a virtual method with no functionality in this class; it provides a design pattern for you to use in your view models.
public virtual bool Save()
{
    return true;
}
The Delete() method is also virtual and provides no functionality in this class; it also serves as a design pattern for your own view models. The signature for this method is as follows.
public virtual bool Delete()
{
    return true;
}
Modify User Maintenance List View Model
Originally, you had the UserMaintenanceListViewModel class inherit from the ViewModelBase class. Change that class to inherit from the ViewModelAddEditDeleteBase class by opening the UserMaintenanceListViewModel.cs file in the WPF.Sample.ViewModelLayer project and modify the inheritance, as shown in the code snippet below.
public class UserMaintenanceListViewModel : ViewModelAddEditDeleteBase
Modify User Maintenance Detail View Model
Open the UserMaintenanceDetailViewModel.cs file in the WPF.Sample.ViewModelLayer project and override the Save() and Delete() methods. In the Save() method, call the CancelEdit() method to put the state back to List mode, as shown in the following code. You are going to fill in the code to save and delete records later in this article.
public override bool Save()
{
    // TODO: Save User
    CancelEdit();
    return true;
}

public override bool Delete()
{
    // TODO: Delete User
    return true;
}
Bind Controls to State Properties
Now that you've changed the inheritance on your view model that's bound to your WPF screen, you can bind up each of the three new properties to the appropriate controls. These properties enable and disable controls, depending on the state the form is in.
Save and Undo Buttons
Open the UserMaintenanceDetailControl.xaml file and locate the Undo and the Save buttons. Bind the IsDetailEnabled property to the IsEnabled property of each of these buttons.
<Button IsCancel="True" IsEnabled="{Binding Path=IsDetailEnabled}" Style="{StaticResource toolbarButton}">
    <StackPanel Orientation="Horizontal">...</StackPanel>
</Button>
<Button IsDefault="True" IsEnabled="{Binding Path=IsDetailEnabled}" Style="{StaticResource toolbarButton}">
    <StackPanel Orientation="Horizontal">...</StackPanel>
</Button>
List Control
Open the UserMaintenanceListControl.xaml file, locate the ListView control and bind the IsListEnabled property to the IsEnabled property of this control.
<ListView ItemsSource="{Binding Path=Users}"
          IsEnabled="{Binding Path=IsListEnabled}"
          SelectedItem="{Binding Path=Entity}">...</ListView>
Toolbar Buttons
Open the UserMaintenanceControl.xaml file and locate the buttons within the toolbar control. Bind each button's IsEnabled property to the appropriate property in the ViewModelAddEditDeleteBase class, as shown in Listing 2.
Listing 2: Bind all the toolbar buttons to the appropriate properties
<ToolBar Grid.Row="0">
  <Button Style="{StaticResource toolbarButton}" IsEnabled="{Binding Path=IsListEnabled}" ToolTip="Add New User">
    <Image Source="pack://application:,,,/WPF.Common;component/Images/Plus_Black.png" Style="{StaticResource toolbarImage}" />
  </Button>
  <Separator />
  <Button Style="{StaticResource toolbarButton}" IsEnabled="{Binding Path=IsListEnabled}" ToolTip="Edit Current User">
    <Image Source="pack://application:,,,/WPF.Common;component/Images/Edit_Black.png" Style="{StaticResource toolbarImage}" />
  </Button>
  <Button Style="{StaticResource toolbarButton}" IsEnabled="{Binding Path=IsListEnabled}" ToolTip="Delete Current User">
    <Image Source="pack://application:,,,/WPF.Common;component/Images/Trash_Black.png" Style="{StaticResource toolbarImage}" />
  </Button>
  <Separator />
  <Button Style="{StaticResource toolbarButton}" IsEnabled="{Binding Path=IsDetailEnabled}" ToolTip="Undo Changes">
    <Image Source="pack://application:,,,/WPF.Common;component/Images/Undo_Black.png" Style="{StaticResource toolbarImage}" />
  </Button>
  <Button Style="{StaticResource toolbarButton}" IsEnabled="{Binding Path=IsDetailEnabled}" ToolTip="Save Changes">
    <Image Source="pack://application:,,,/WPF.Common;component/Images/Save_Black.png" Style="{StaticResource toolbarImage}" />
  </Button>
</ToolBar>
Detail User Control
The final binding is on the UserMaintenanceDetailControl user control. Bind the IsEnabled property of this user control to the IsDetailEnabled property. Binding this property on the user control is much less code than setting each input control's IsEnabled property individually.
<UserControls:UserMaintenanceDetailControl Grid.Row="2"
                                           x:Name="detailControl"
                                           IsEnabled="{Binding Path=IsDetailEnabled}"
                                           DataContext="{StaticResource viewModel}" />
Try it Out
Run the application and click on the Users menu item. You should see that the various buttons are all enabled or disabled because they have been bound to the Boolean properties in your view model.
Changing State
When you want to go into Add or Edit mode, call the BeginEdit() method in the view model. You do this by adding click events on each button in the toolbar and the buttons on the detail screen. You can use WPF commanding if you want to, but I prefer click events because I can follow the logic of the screen easier.
Add Events to Detail Screen
Open the UserMaintenanceDetailControl.xaml file and add a Loaded event to the <UserControl> element.
<UserControl x:Class="WPF.Sample.UserControls.UserMaintenanceDetailControl" ...
             mc:Ignorable="d" d:DesignHeight="450" d:DesignWidth="800"
             Loaded="UserControl_Loaded" >
Open the UserMaintenanceDetailControl.xaml.cs file and add a using statement at the top of this file so you can reference the view model class from the code behind.
using WPF.Sample.ViewModelLayer;
Create a private field in the screen to reference the UserMaintenanceViewModel object. In the UserControl_Loaded() event, grab the instance of the UserMaintenanceViewModel object from the DataContext and assign that value to the field _viewModel, as shown in the code below.
private UserMaintenanceViewModel _viewModel;
private void UserControl_Loaded(object sender, System.Windows.RoutedEventArgs e)
{
    _viewModel =  (UserMaintenanceViewModel)this.DataContext;
}
Open the UserMaintenanceDetailControl.xaml file and modify the Undo and Save buttons to fire a click event.
<Button IsCancel="True" ... Click="UndoButton_Click" Style="{StaticResource toolbarButton}">
    <StackPanel Orientation="Horizontal">...</StackPanel>
</Button>
<Button IsDefault="True" ... Click="SaveButton_Click" Style="{StaticResource toolbarButton}">
    <StackPanel Orientation="Horizontal">...</StackPanel>
</Button>
In the UndoButton_Click event, call the CancelEdit() method on the view model to reset the state back to List mode. In the SaveButton_Click() event call the Save() method on the view model. The Save() method right now just calls the CancelEdit() method to reset the state back to the List mode. Later in this article, you'll write code to save the user information.
private void UndoButton_Click(object sender, System.Windows.RoutedEventArgs e)
{
    _viewModel.CancelEdit();
}

private void SaveButton_Click(object sender, System.Windows.RoutedEventArgs e)
{
    _viewModel.Save();
}
Add Click Events to List Screen
Open the UserMaintenanceListControl.xaml file and at the top of this user control, add a Loaded event procedure to the <UserControl> element.
<UserControl x:Class="WPF.Sample.UserControls.UserMaintenanceListControl"
             mc:Ignorable="d" d:DesignHeight="450" d:DesignWidth="800"
             Loaded="UserControl_Loaded" >
Open the UserMaintenanceListControl.xaml.cs file and add two using statements so you can access classes in the data layer and the view model layer projects.
using WPF.Sample.DataLayer;
using WPF.Sample.ViewModelLayer;
Create a private field in the screen to reference the UserMaintenanceViewModel object. In the UserControl_Loaded() event, grab the instance of the UserMaintenanceViewModel object from the DataContext and assign it to the field _viewModel.
private UserMaintenanceViewModel _viewModel;
private void UserControl_Loaded(object sender, RoutedEventArgs e)
{
    _viewModel = (UserMaintenanceViewModel)this.DataContext;
}
Write the code for the EditButton_Click event to set the Entity property in the view model to the value you retrieve from the button's Tag property. Once this property has been set, call the BeginEdit() method. The reason you need to set the Entity property is in case the ListView is currently displaying the first user, but the user clicks on the third user. You need the Entity property to be set to the third user instead of the one that has focus.
private void EditButton_Click(object sender, RoutedEventArgs e)
{
    // Set selected item
    _viewModel.Entity = (User)((Button)sender).Tag;

    // Go into Edit mode
    _viewModel.BeginEdit(false);
}
Write a DeleteUser() method to be called from the DeleteButton_Click event procedure you created earlier. This method asks the user if they wish to delete the current user. If they answer Yes, call the Delete() method on the view model to delete the user from the database.
public void DeleteUser()
{
    // Ask if the user wants to delete this user
    if (MessageBox.Show("Delete User " + _viewModel.Entity.LastName + ", " + _viewModel.Entity.FirstName + "?",  "Delete?", MessageBoxButton.YesNo) == MessageBoxResult.Yes)
    {
    _viewModel.Delete();
    }
}
Write the DeleteButton_Click event to set the Entity property on the view model from the button's Tag property. Just like you did for the Edit button, ensure that the Entity property is set to the one the user clicked on, and not the one currently selected in the DataGrid. Once the Entity property has been set, call the DeleteUser() method.
private void DeleteButton_Click(object sender, RoutedEventArgs e)
{
    // Set selected item
    _viewModel.Entity = (User)((Button)sender).Tag;

    // Delete user
    DeleteUser();
}
Add Click Events to Toolbar
Open the UserMaintenanceControl.xaml file and add Click event procedures to each Toolbar button. The complete code for the Toolbar is shown in Listing 3. After you create each of these Click events, add the appropriate calls to the methods in the view model class, as shown in Listing 4.
Listing 3: Add Click events to each of the Toolbar items
<ToolBar Grid.Row="0">
  <Button Style="{StaticResource toolbarButton}" Click="AddButton_Click" IsEnabled="{Binding Path=IsListEnabled}" ToolTip="Add New User">
    <Image Source="pack://application:,,,/WPF.Common;component/Images/Plus_Black.png" Style="{StaticResource toolbarImage}" />
  </Button>
  <Separator />
  <Button Style="{StaticResource toolbarButton}" Click="EditButton_Click" IsEnabled="{Binding Path=IsListEnabled}" ToolTip="Edit Current User">
    <Image Source="pack://application:,,,/WPF.Common;component/Images/Edit_Black.png" Style="{StaticResource toolbarImage}" />
  </Button>
  <Button Style="{StaticResource toolbarButton}" Click="DeleteButton_Click" IsEnabled="{Binding Path=IsListEnabled}" ToolTip="Delete Current User">
    <Image Source="pack://application:,,,/WPF.Common;component/Images/Trash_Black.png" Style="{StaticResource toolbarImage}" />
  </Button>
  <Separator />
  <Button Style="{StaticResource toolbarButton}" Click="UndoButton_Click" IsEnabled="{Binding Path=IsDetailEnabled}" ToolTip="Undo Changes">
    <Image Source="pack://application:,,,/WPF.Common;component/Images/Undo_Black.png" Style="{StaticResource toolbarImage}" />
  </Button>
  <Button Style="{StaticResource toolbarButton}" Click="SaveButton_Click" IsEnabled="{Binding Path=IsDetailEnabled}" ToolTip="Save Changes">
    <Image Source="pack://application:,,,/WPF.Common;component/Images/Save_Black.png" Style="{StaticResource toolbarImage}" />
  </Button>
</ToolBar>
Listing 4: Call methods in the view model from each Toolbar's Click event
private void AddButton_Click(object sender, RoutedEventArgs e)
{
    _viewModel.BeginEdit(true);
}

private void EditButton_Click(object sender, RoutedEventArgs e)
{
    _viewModel.BeginEdit(false);
}

private void DeleteButton_Click(object sender, RoutedEventArgs e)
{
    listControl.DeleteUser();
}

private void UndoButton_Click(object sender, RoutedEventArgs e)
{
    _viewModel.CancelEdit();
}

private void SaveButton_Click(object sender, RoutedEventArgs e)
{
    _viewModel.Save();
}
Notice that the DeleteButton_Click event procedure calls the public DeleteUser() method on the UserMaintenaceListControl class. This is done because the DeleteUser() method must display a message box, and UI code doesn't belong in a view model class.
Try it Out
Run the application and click on the Users screen and then try pressing the different buttons to watch the screen move in and out of the different states.
Begin and Cancel Edits
When a user starts making changes to the user data in the text boxes, those changes are updated into the bound properties in your view model. If the user wishes to cancel the edit mode, you must have some way of putting back the original data. One way to do this is to add another field to your view model to hold the original entity data. Open the UserMaintenanceDetailViewModel.cs file and add the following variable.
private User _OriginalEntity = new User();
You are going to set each property on this User object with the values from the currently selected user.
Override BeginEdit Method
In the UserMaintenanceDetailViewModel class, override the BeginEdit() method from the ViewModelAddEditDeleteBase class. Copy all of the properties in the Entity object and place them into the corresponding properties of the _OriginalEntity field. The CommonBase class has a Clone() method that performs this copying for you.
public override void BeginEdit(bool isAddMode = false)
{
    // Create a copy in case user wants undo their changes
    base.Clone<User>(Entity, _OriginalEntity);

    if (isAddMode)
    {
        Entity = new User();
    }

    base.BeginEdit(isAddMode);
}
You can't just assign _OriginalEntity property equal to the Entity property, as that creates a reference between the two objects. When you have a reference between two objects, the changes you make to one are changed in the other too. The Clone() method uses reflection to perform a GET on each property in the Entity object, then calls the set on the corresponding property in the _OriginalEntity object. This accomplishes two goals: it makes a copy of the data, and it fires each property's RaisePropertyChanged event. This is important when the user cancels the edit because you want the old values to propagate to the screen, and this is done by firing the RaisePropertyChanged event.
After cloning the user, check whether the user is adding a new user, and if so, create a new user and put it into the Entity property. The Entity property is bound to the product detail user control, so creating a new instance of the User class, all fields are displayed as blanks. Finally, call the BeginEdit() method to change the state of the UI.
Override CancelEdit Method
Override the CancelEdit() method so if the user clicks the Undo button, the Entity property is set back to what it was prior to beginning the add or edit process. You once again call the Clone() method to put all the values from the _OriginalEntity object into the Entity object.
public override void CancelEdit()
{
    base.CancelEdit();

    // Clone Original to Entity object so each RaisePropertyChanged event fires
    base.Clone<User>(_OriginalEntity, Entity);
}
Add/Update a User
It's now time to write code to add or update a user in the user table using the Entity Framework. To start, add some using statements to the top of the UserMaintenanceDetailViewModel.cs file.
using System;
using System.Collections.ObjectModel;
using System.Data.Entity;
using System.Data.Entity.Validation;
using System.Linq;
using Common.Library;
Modify the Save Method
Modify the Save() method you created earlier with the appropriate code to add or update a record in the User table. The complete Save() method is shown in Listing 5.
Listing 5: Use the Entity Framework to add or update a user in the user table
public override bool Save()
{
    bool ret = false;
    SampleDbContext db = null;

    try
    {
        db = new SampleDbContext();

        if (IsAddMode)
        {
            // Generate a random password
            Entity.Password = StringHelper.CreateRandomString(16);

            // Add new user to EF Users collection
            db.Users.Add(Entity);
        }
        else
        {
            db.Entry(Entity).State = EntityState.Modified;
        }

        db.SaveChanges();

        ret = true;

        // Set Original Entity equal to changed entity
        _OriginalEntity = Entity;

        // If new entity, add to view model Users collection
        if (IsAddMode)
        {
            Users.Add(Entity);

            // TODO: Send user name and password to user
        }

        // Set mode back to normal display
        CancelEdit();
    }
    catch (DbEntityValidationException ex)
    {
        ValidationMessages = new ObservableCollection<ValidationMessage>(db.CreateValidationMessages(ex));
        IsValidationVisible = true;
    }
    catch (Exception ex)
    {
        PublishException(ex);
    }

    return ret;
}
The Save() method creates a new instance of the SampleDbContext class. This class inherits from the Entity Framework's DbContext class. If the user is adding a new user, a random password is generated for the new user. Optionally, you could add a PasswordBox control that only shows up on the screen when you're in add mode. This allows the person entering a new user to add a password. The new user object in the Entity property is added to the Users collection in the EF object. If the user is in Edit mode, the state of the existing entity is changed to Modified.
The SaveChanges() method is called to have EF submit the changes to the User table in SQL Server. If this call is successful, the return value is set to true and the Entity property is set to the _OriginalEntity field. If adding a new record, the new user object is added to the Users collection property in the view model. The ListView control is notified so that it can redisplay the new collection. Finally, the CancelEdit() method is called to reset the state of the form back to List mode.
Try it Out
Run the application, add a new user, then save the new user. Also, try starting the add process, but then click the Undo button to ensure that the new user is aborted and is placed back to the original user. Try editing a user and, while editing. try clicking the Undo button to ensure that the changes you made to the existing user are reverted to the original values.
Validation Messages
Add a list box to display validation messages that may arise from the user entering incorrect information. Open the UserMaintenanceDetailViewModel.xaml file and, just before the final </Grid> element, add the following XAML.
<!-- Validation Message Area -->
<ListBox Grid.Row="5" Grid.ColumnSpan="2"
         Style="{StaticResource validationArea}"
         Visibility="{Binding IsValidationVisible, Converter={StaticResource visibilityConverter}}"
         ItemsSource="{Binding ValidationMessages}"
         DisplayMemberPath="Message" />
If you look at the User class, you can see that it's decorated with Data Annotations. The validation system works the same as that described for the login screen shown in the second part of this article series (CODE Magazine, July/August 2019).
Delete a User
The last bit of functionality to add to your user maintenance screen is to delete a user. Modify the Delete() method that you created earlier in the UserMaintenanceDetailViewModel class and fill in the appropriate code to delete a record from the User table, as shown in Listing 6.
Listing 6: Delete a user using the Entity Framework
public override bool Delete()
{
    bool ret = false;
    int index;
    SampleDbContext db;
    User entity;

    try
    {
        db = new SampleDbContext();

        // Find entity in EF Users collection
        entity = db.Users.Find(Entity.UserId);

        if (entity != null)
        {
            // Find index where this entity is located
            index = db.Users.ToList().IndexOf(entity);

            // Remove entity from EF collection
            db.Users.Remove(entity);

            // Save changes to database
            db.SaveChanges();

            ret = true;

            // Remove from view model collection
            Users.Remove(Entity);

            // Calculate the selected entity after deleting
            if (Users.Count > 0)
            {
                index++;
                if (index > Users.Count)
                {
                    index = Users.Count - 1;
                }

                Entity = Users[index];
            }
            else
            {
                Entity = null;
            }
        }
    }
    catch (Exception ex)
    {
        PublishException(ex);
    }

    return ret;
}
Although there may seem to be a lot of code in Listing 6 for a simple delete operation, it's necessary. If you delete a record from the User table, you also need to delete the entity object from the Users collection property in the view model class. This leaves the Entity property pointing to an invalid user and thus the ListView object isn't highlighting a user. The screen is now in an invalid state as there's nothing selected in the list view, and nothing being displayed in the detail area of the screen.
To avoid this invalid state, locate the user to delete in the EF Users collection. Retrieve the index of where this user is in the EF Users collection. Save this index in the variable index. Remove the user from the EF collection and call SaveChanges() on the DbContext object.
Remove the user from the Users collection property of the view model class. Find a valid user in the Users collection to set the Entity property to, so the ListView control can display a valid user. If there are no users left, set the Entity property to a null value.
Try it Out
Run the application and try deleting a user. Ensure that a valid user is selected after the delete has been run.
Summary
In this article, you learned to move from one state to another on the user maintenance screen. With just a few properties and a few lines of code, you can keep the user focused on what they're doing, and they always know what state they're in just by looking at the buttons. You also added code to add, edit, and delete users in the User table. Having a good set of base classes helps you follow a design pattern for standard add, edit, and delete screens. Use reflection to copy properties from a current user into another User object. This allows you to put values back if the user cancels the editing process.
