


Did you know that Amazon is a member of the .NET Foundation? And that Amazon Web Services (AWS) supports a variety of .NET platforms such as hosting for ASP.NET Core apps? There are also .NET SDKs to connect to AWS services from your .NET apps, PowerShell modules and extensions for Visual Studio, VSTS, VS Code, and JetBrains Rider to connect to and interact with many of AWS's services. I didn't know any of this and when it was being relayed to me for the first time, I was surprised and a little embarrassed. Not embarrassed that I wasn't expert in any of this but just that I hadn't thought to look at any of this until now.
So where to begin? Well, there are also a host of database engines in AWS and, given my long relationship with Entity Framework and EF Core, that seemed like a good first stop for me. What I'll do in this article is take an existing small ASP.NET Core API that uses EF Core, use EF Core migrations to create a database on AWS, interact with the database, and explore secrets management for the database credentials both locally and for a deployed app.
RDS is the acronym for Amazon's Relational Database Service. Amazon RDS is a database service that provides access to several relational databases on AWS: SQL Server, Oracle, MariaDB, MySQL, and PostgreSQL. It also has a database called Amazon Aurora, which is Amazon's cloud-native, distributed relational database that's MySQL and PostgreSQL compatible. And Aurora is fast; according to Amazon (aws.amazon.com/rds/aurora): five times faster than accessing MySQL directly through RDS and three times faster than PostgreSQL. With the exception of Aurora and Aurora Serverless (aws.amazon.com/rds/aurora/serverless/), the RDS databases are also available via AWS's free tier, which makes them great targets for exploring AWS databases with existing EF Core database providers.
An important concept about RDS databases is that you start by creating a database instance that's like a server. When creating an instance, you configure it for the type of database you want (e.g., SQL Server or MySQL) along with other attributes that affect performance, scaling, and cost. Then you can create databases inside of an instance. More on this later.
I'll take an existing small ASP.NET Web API and retarget it to SQL Server Express on RDS to see what the experience is like. If you want to follow along, you can download the starting example from github.com/julielerman/codemagawsrds or on the CODE Magazine page associated with this article.
Setting Up an Account with AWS Free Tier
You'll need an AWS account in order to do any of this work. And if you don't have an account, it's easy to create one using the Free Tier (aws.amazon.com/free) which gives access to a variety of services that are always free, others that are free for some amount of use (e.g., number of GBs or hours), others that are free for 12 months, as well as access to free trials for some additional services. The RDS services are in the 12 months bucket, giving you up to 750 hours a month, 20 GB of storage and 20 GB of backup—certainly enough to start exploring.
Go to aws.amazon.com/free to create the account. It does require a credit card. You'll initially create what is called a “root account.” That's like a master account and once that exists, you can create Identity and Access Management (IAM) users in the root account. AWS strongly recommends, as a best practice, that you only use IAM users to build apps and services, not the root account. When you create an IAM user, you can associate two access types: programmatic and management console access. You don't need to create the IAM account in advance as the AWS Toolkit for Visual Studio (which I'll walk you through below) will give you some helpful guidance for creating IAM user credentials and even importing them into the toolkit. But you do need to have the root account before you start. Here's a link to additional information about identities in your AWS account: https://docs.aws.amazon.com/IAM/latest/UserGuide/id.html.
Setting Up the AWS Toolkit with Your Credentials
The AWS Toolkit for Visual Studio can be installed from the Visual Studio extensions. There's also an AWS Toolkit for Visual Studio Code (https://aws.amazon.com/blogs/developer/announcing-aws-toolkit-for-visual-studio-code/), which is focused on creating serverless functions and applications.
When you first use the Toolkit's Explorer, a Getting Started page prompts you connect the toolkit to your IAM account or create an IAM account. Once you've associated an IAM account, the explorer lets you see everything tied not just to that particular IAM account but filtered by regions. I'd done my first RDS experimentation online, creating a SQL Server and a PostgreSQL database, then interacting with them through Azure Data Studio. This was one of those silly exciting moments in the life of a developer when I first got everything connected. Satisfied that I'd worked this out correctly, I moved on to Visual Studio and the AWS Toolkit. I'll walk you through the AWS Toolkit path for creating the IAM account and your first database instance, and then you'll let EF Core create a database using migrations.
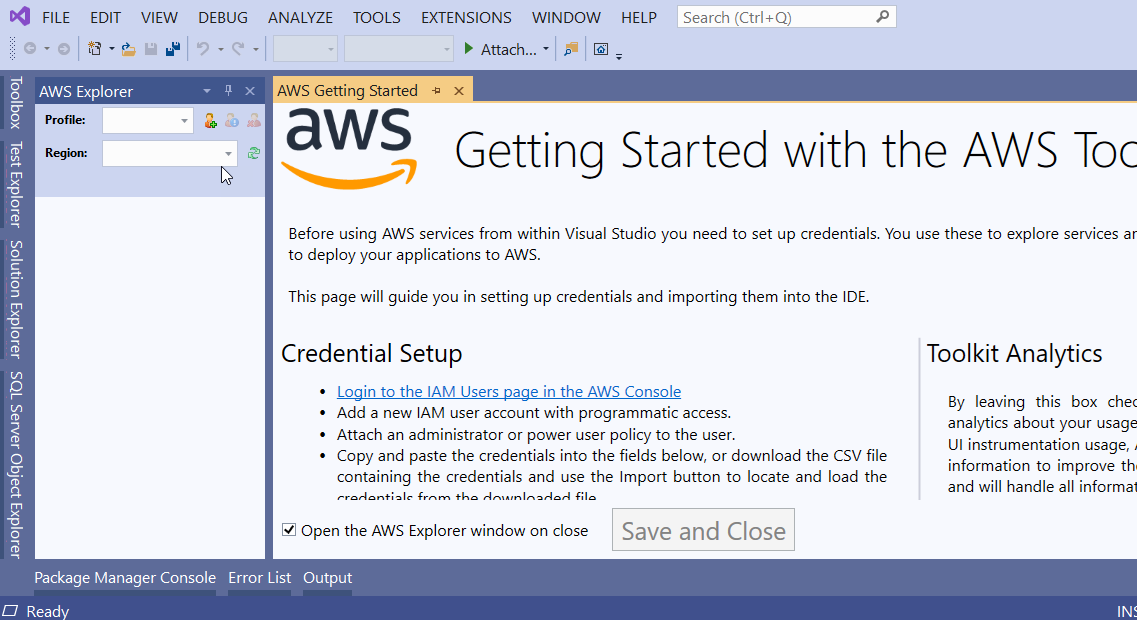
The Toolkit's Getting Started page (Figure 1) provides a link to the AWS Console and also lists a small set of steps to perform so that you can avoid getting caught up in credential management. Following these steps, I began by signing into the AWS Console with my root account and then added a new IAM user named JulieCodeMag, checking the Programmatic access type as instructed by the Getting Started page. The next step is to either add the user to an existing permissions group or directly to one of the AWS policies. Again, as per the instructions, from the possible power user policies, I chose AdministratorAccess, which is okay for my purposes, not production. After this, I just left the last few options at their default and let AWS create the user. Finally, I clicked the Download .csv button, saved the file and then imported the CSV file into the toolkit using an option on the Getting Started page. Note that the CSV file doesn't populate one of the fields—Account Number—and that's okay. Next, I renamed the profile from default to JulieCodeMag and saved the credentials.
As a result, the AWS Explorer was then populated with nodes for all of the services that the toolkit provides access to. And because the JulieCodeMag user has broad access, I was able to see services tied to any of my IAM accounts created in the specific region. I'd created my test database instances in the US East (Ohio) region so if the explorer is filtered on that region, I'll see those instances. If I changed the explorer region, I wouldn't see those database instances.
Creating an RDS Instance Through the Toolkit
You will need a database instance (remember, this is like a running server) before EF Core can create databases in that instance. And you can create new instances through the toolkit, so let's do that.
Right-click on the Instances node under Amazon RDS, then choose Launch Instance. That means to launch (create) a new instance. You'll then see a list of the possible engines for which you can create an instance including various SKUs of Microsoft SQL Server and all of the other RDS options. I'll choose SQL Server Express. For those of you who're used to using EF Core's Windows default, SQL Server LocalDB, for development, LocalDB is a slice of Express (https://docs.microsoft.com/en-us/sql/database-engine/configure-windows/sql-server-express-localdb?view=sql-server-ver15). But it's not a separate option from Express. Once you've selected the engine, you'll be prompted to configure the instance to specify the database version, memory (“DB Instance class”) for which I chose the smallest: micro and storage. You'll also be prompted to set up a user name and password. The highest version available as I'm writing this is SQL Server 2017.
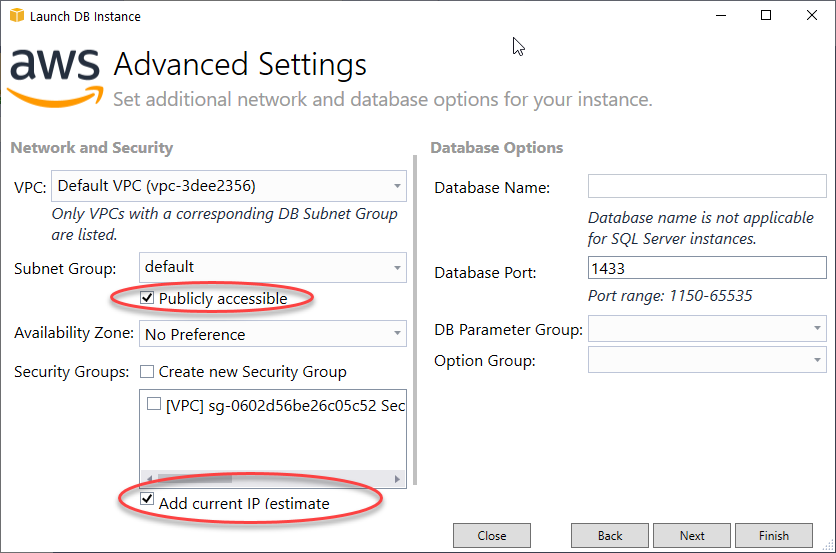
The next page of the configuration, Network and Security, has a critical setting that you need to enable, which is to make the database publicly available (see Figure 2) for the sake of this exploration. Do keep in mind that it's not a best practice for production. Although the Toolkit will be able to see the instance, you won't be able to connect to it from your code or from any tools like Server Explorer in Visual Studio, SSMS, Azure Data Studio, etc. By default, the databases are locked down and only accessible from within the VPC that RDS creates to host the instance. Therefore it's also necessary to allow a specific IP address (or range) to access RDS so that other Visual Studio tools, such as the SQL Server Object Browser, are able to connect. To do that, be sure to check the “Add current IP” option also shown in Figure 2.
There's one more page with configuration for backups and maintenance. By default, RDS backs up the instance immediately after creation and then performs backups daily. For this exploration, I recommend changing that setting to “No Automated Backups,” which makes the instance available more quickly. The rest of the defaults are okay for our purposes. The grid for DB Instances shows the status of each instance (see Figure 3) so you can see when the new instance (in my case “codemagmicro”) is available. I did experiment with creating various types of database instances from the Toolkit. As I expected, both PostgreSQL and MySQL instances took less time than SQL Server although the difference wasn't significant.

Once the instance is available, I can use EF Core migrations against my little sample application to create a database in the instance. You can download the sample or create a new ASP.NET Core API. As I'm using VS, I'm doing that through the create project workflow, not the CLI. I left defaults as they are: e.g., no authentication and configured for HTTPS. Given that this is using Amazon's cloud, the model goes back to Amazon's roots with authors and books. And keeping it simple, one author can write multiple books but there are no co-authors, therefore it's a strict one-to-many relationship.
public class Author
{
  public Author()
  {
    Books = new List<Book>();
  }

  public int AuthorId { get; set; }
  public string Name { get; set; }
  public List<Book> Books { get; set; }
}

public class Book
{
  public int BookId { get; set; }
  public int AuthorId { get; set; }
  public string Title { get; set; }
}
Starting with ASP.NET Core 3.0, EF Core is no longer included in the default dependencies, so you'll have to add Microsoft.EntityFrameworkCore.SqlServer to the project via NuGet. Additionally, because you'll be using migrations, add the Microsoft.EntityFrameworkCore.Tools package, which gives you the PowerShell version of the migration commands and the design time logic.
With EF Core included, I then added a simple DbContext class called BookContext. Note the constructor that's needed for ASP.NET Core to use Dependency Injection (DI).
public class BookContext:DbContext
{
  public BookContext (DbContextOptions<BookContext> options) : base(options) {  }

  public DbSet<Author> Authors {get; set; }
  public DbSet<Book> Books { get; set; }
}
Now it's time to wire up the API with the database instance and specify a database to work with. I'll name mine BooksDatabase because I'm a very creative human. More importantly, I'll need the server name.
The URI is formed as (with no line breaks): [instancename].[AWS Server Name].[region].rds.amazonaws.com.
The DB Instances view gives you two ways to access the server URI. One is by right-clicking the instance and choosing properties; then, in the properties window, you can see and copy the Endpoint value. The other is by right-clicking the instance and choosing Copy Address to Clipboard.
In order to avoid accidentally posting my database credentials to GitHub, I'll use ASP.NET Core's Secret Manager (https://docs.microsoft.com/en-us/aspnet/core/security/app-secrets) to protect these credentials during development. If you haven't used that before, right-click on the project in Solution Explorer and choose Manage User Secrets. This opens up a hidden secrets.json file where you can specify key pairs for your secrets.
{
  "DbPassword": "mysecretpassword",
  "DbUser": "theusername"
}
Then, in appsettings.json, I created the connection string without the user or password attributes. I've masked the server name with asterisks.
"ConnectionStrings": {
  "BooksDb" :
    "Server=codemagmicro.***.us-east-2.rds.amazonaws.com,1433;Database=BookDatabase"
},
Finally, in the startup file where I configure the services to use DI to spin up the BookContext, I build up the connection string from the configuration info found in appsettings.json and the user and password from the secrets, and then pass the resulting connection string to the SQL Server provider's options. All of this is achieved with the following code that gets added to the ConfigureServices method in Startup.cs:
var builder = new SqlConnectionStringBuilder (Configuration.GetConnectionString("BooksDb"));
builder.UserID = Configuration["DbUser"];
builder.Password = Configuration["DbPassword"];
Services.AddDbContext<BookContext>(options => options.UseSqlServer(builder.ConnectionString));
If you prefer to debug against a local database, you can use a SQL Server LocalDb connection in appsettings.Development.json (which doesn't require a password). But that would mean putting the full AWS connection string into your secrets file and your code won't need to build the string as it's currently doing. To keep this demo simple, I'll run everything against the cloud database.
Creating the Database with EF Core Migrations
Now everything is in place to create and execute migrations. I'll start by creating a migration file named Initial with the EF Core command, add-migration initial, in the Package Manager Console (PMC) window. Once the migration file is created, I'll call update-database in the PMC to migrate (in this case, create) the BooksDatabase database in the codemagmicro instance.
If you have all of the pieces in place—the website instance is publicly available (again for this exploration, not production), your IP address is allowed to connect, your IAM account has the correct permissions, and the database connection string (along with its secret user and password) are tied to the BooksContext through the ASP.NET Core DI services—EF Core should be able to create the BooksDatabase database in the codemagmicro instance on AWS. If there's something missing, the command will fail and I've found that it provides pretty useful information in its error messages.
Connecting to the Database
Because this is a SQL Server database, you have a variety of options for connecting: SQL Server Management Studio, Azure Data Studio, and other third-party tools. The toolkit makes it easy to connect right through the data tools in Visual Studio. First, you'll add the instance to Server Explorer and from there to the SQL Server Object Browser.
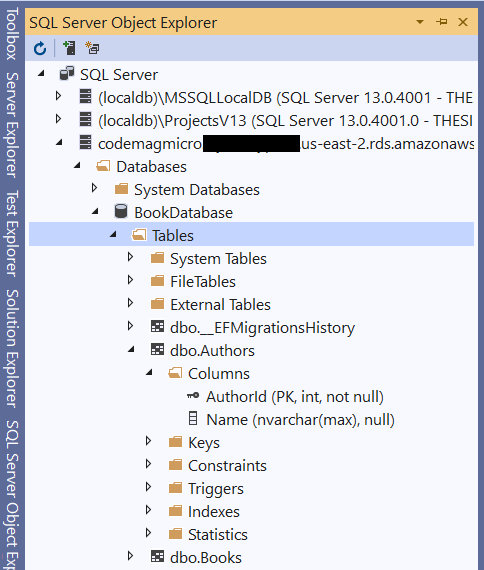
Here's how. In the AWS Explorer, right-click the RDS instance and select the Add to Server Explorer option. This launches a Connection Properties window with the server name and SQL Server Authentication user name already populated. Just fill in the password and connect. The server should now be listed under Data Connections in the Server Explorer. You can see your database in there, but I much prefer using SQL Server Object Explorer in Visual Studio. Just right-click on the server in Server Explorer and choose Browse in SQL Server Object Explorer, and the instance will be added to the Object Explorer for you where you can see the database that migrations just created (see Figure 4).
Although this is enough for me to be satisfied that everything is working properly, it wouldn't feel right not to finish up creating and testing out the API. To do so, I'll need a controller that interacts with my model.
The quickest path is using the Add Controller wizard (right-click on the Controllers folder to get to it) to create a new controller—API Controller with actions, using Entity Framework—for the Author class. Now you can run the API to start interacting with it.
With the new API running locally, I used the wonderful Rest Client extension for Visual Studio Code (https://marketplace.visualstudio.com/items?itemName=humao.rest-client) to easily send a request to the API. I ran a POST request to the URI to add an author using the new controller. This is just a simpler alternative to other great apps like Postman or Fiddler for sending requests. Use whatever you prefer. Here's the rest call that I executed:
POST https://localhost:5001/api/authors
 HTTP/1.1
content-type: application/json
{
    "name": "Julie"
}
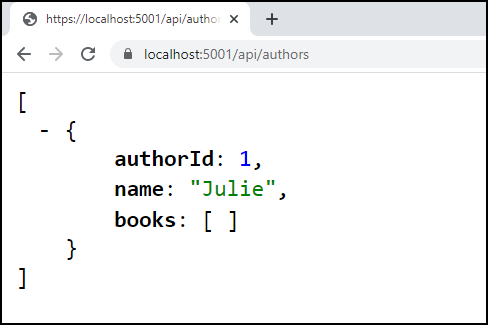
Once that data was in the database, I browsed to the controller's default (localhost:5001/api/authors), which requests the GET method of the controller and can see that the API is truly connecting to the AWS database and returning the single author in that table, as you can see in Figure 5.
Getting the Secrets on AWS for the Deployed App
So far, the database connection credentials are stored on my computer using ASP.NET Core Secret Manager. When I deploy the API to the AWS Cloud, it'll need access to those secrets. AWS provides a few ways to store secrets and make them available to other AWS services. Because I'm relying on ASP.NET Core's ability to read parameters, I'll use the AWS Systems Manager Parameter Store to tuck away my user and password values.
There are a few steps involved.
- Create the secrets in the Parameter Store console online.
- Add some NuGet packages to the solution.
- Add some configuration code into the program file of the API.
The Parameter Store console is an option in the AWS Systems Manager service under the Application Management section.
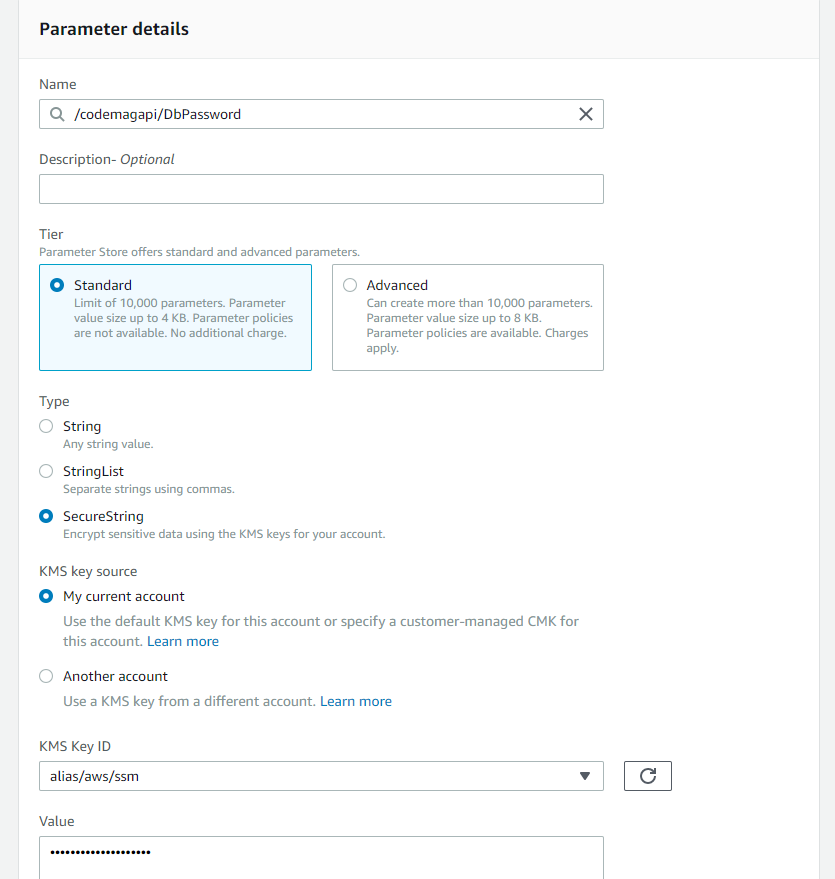
In there, you'll find a bright orange “Create parameter” button and in the details page for the new parameter, you'll need to enter four pieces of information, as shown in Figure 6:
- Parameter name: a combination of some name you'll use, specific to the app and the name of the parameter. Remember, my first secret is called DbPassword, so I'll use /codemagapi/DbPassword as the name.
- Type: an important step that I missed the first time around, be sure to set the type to SecureString. That encrypts the value for you.
- KMS Key Source: choose My current account. Leave the associated KMS Key ID at its default (alias/aws/ssm).
- Value: the password value
That's enough to finish up with the Create parameter button below.
Follow the same steps to create the DbUser.
Next, you'll update the application to read the secrets from AWS instead of ASP.NET Core. Once I know that's working, I'll show you how to make the app read from the local secrets during development and from AWS at runtime.
Begin by adding the Amazon.Extensions.Configuration.SystemsManager NuGet package to your project. This was originally created by community member Ken Hundley and adopted by the AWS team, who are now the maintainers.
Next, you'll add a new section into the appsettings.development.json file, which you can access by expanding the appsetting.json node in Solution Explorer. This section allows any AWS extension to use the permissions assigned to one of the AWS Toolkit profiles you created. I've only created one, JulieCodeMag and it's using the us-east-2 region. Therefore, I've configured the section as follows:
"AWS": {
    "Region": "us-east-2",
    "Profile": "JulieCodeMag"
}
Finally, you'll tell the application (in program.cs) to load the AWS parameters into the ASP.NET Core's configurations. The new code, the italicized ConfigureAppConfiguration method in this code snippet, goes in the CreateHostBuilder method in program.cs.
public static IHostBuilder CreateHostBuilder(string[] args) =>
    Host.CreateDefaultBuilder(args).ConfigureAppConfiguration((context, builder) =>
    {
        builder.AddSystemsManager("/codemagapi");
    }).ConfigureWebHostDefaults(webBuilder =>
    {
        webBuilder.UseStartup<Startup>();
    });
By default, ASP.NET Core reads configurations from a number of sources, such as the appsettings files, your system environment variables, the ASP.NET Core secrets, and more. There's a precedence that if a setting, such as my DbPassword, is found in multiple configuration sources, the last one read is the one that's used. Because the AWS configuration is added in after the others, its DbPassword overrides the DbPassword read from the ASP.NET Core secrets file. Because of the AWS setting in the appsettings.development.json file, the extension uses the permissions from the Toolkit's JulieCodeMag profile to read the AWS Parameters online. That's only needed during development. When you deploy your application to AWS, you'll need to be sure that the VPC instance to which the app gets deployed has the needed permissions to read the parameters. I won't be covering app deployment in this article, as I'm focused on the RDS usage with EF Core.
To really validate that the parameters are being read from AWS, not the secrets file, you can edit either DbPassword or DbUser in your ASP.NET Core secrets, which would cause the app to fail when trying to connect to the database if they're the ones being used.
Running the app with these modifications gives me the same results as earlier when I browsed to the locally hosted API. The data that's in the RDS database is output exactly as it was in Figure 5.
Now that you have confidence that this is working, you may want to go back to reading from the local secrets while developing and the AWS parameters in production. To do that, you can force the app to only load the AWS configurations when the application environment is production, not development.
I've updated ConfigureAppConfiguration method to conditionally load the AWS configurations:
.ConfigureAppConfiguration((context, builder) =>
{
    if (context.HostingEnvironment.IsProduction())
    {
        builder.AddSystemsManager("/codemagapi");
    }
})
Even though I'm not walking you through the final bit of deploying the API, I did publish the API to AWS Elastic Beanstalk in order to see for myself that everything was working as expected. See the deployment article noted in the sidebar to learn more about deploying apps to AWS from the toolkit.
Final Thoughts
I love the fact that these modern times enable developers to use the tool and platforms they choose and that companies like Microsoft and Amazon don't force us to be siloed into a single organization. Amazon's investment in the .NET Foundation and support for .NET developers is broad-minded. That's important to me as a consultant and coach because I never know what stack my next client will be on. Being able to take all of my skills and investment in .NET development and the related IDEs and use them on AWS is valuable. And for me, apparently with some blinders on for a while, it's a revelation. Thanks to the free tier, I also have the ability to explore how I can do that. I look forward to broadening my horizons further on AWS.
