


In this article, I'm going to talk about developing WPF (Windows Presentation Foundation) GUI using a scripting language. Why would we use a scripting language for making a graphical interface? There are several benefits:
- The GUI functionality could be changed at runtime, without recompiling the binary.
- The GUI can have a different customization for the same binary.
- Programming can be done much quicker: C# implementation that may require many lines of code, can be embedded in just one or two scripting language statements.
As a scripting language, I'm going to use CSCS (Customized Scripting in C#). This is an easy and a lightweight open-source language that has been described in previous CODE Magazine articles: https://www.codemag.com/article/1607081 introduced it, https://www.codemag.com/article/1711081 showed how you can use it on top of Xamarin to create cross-platform native mobile apps, and https://www.codemag.com/article/1903081 showed how you can use it for Unity programming. CSCS resembles JavaScript with a few differences, e.g., the variable and function names are case-insensitive.
A picture is worth a thousand words. An interface is worth a thousand pictures.
–Ben Shneiderman
You're going to see how to integrate scripting into a WPF App and use it for different tasks:
- Creating new GUI widgets
- Moving/showing/hiding existing widgets
- Dynamically modifying GUI
- Providing some non/GUI functionality, e.g., working with SQL Server
- Creating new windows from XAML files on the fly
- Automatic binding of the Windows and Widget events
Using a scripting approach significantly decreases development time. What could've taken many lines of code in C#, takes just one command in CSCS, or even nothing at all. For example, there's no need to bind a widget or a window event to the event handler. This binding is created by the CSCS Framework behind the scenes. The developer just needs to fill out the corresponding function, which will have an empty body by default. You'll see some examples of that later on.
Also, it takes much less code to access the SQL Server, to get data from it, and to update existing SQL tables using CSCS than C#. The CSCS Framework is open source and you're free to use and modify it as you wish. The framework GitHub link is provided in the side bar.
You can add some missing events or widgets there in the same way it's done with other widgets. Similarly, you can add other databases, like Oracle, or add any missing database functionality. Let's start with setting up a sample project.
Setting Up Scripting in a WPF Project
Note that I used Visual Studio 2019 Express Edition for all of the examples in this article.
To set up CSCS scripting in a WPF project, first open a new WPF project from Visual Studio [by selecting File > New Project. . > WPF App (.NET Framework)]. After that, you can add a CSCS framework manually to the project. The CSCS framework is open source and can be downloaded from https://github.com/vassilych/cscs.
Alternatively, you can download an existing WPF sample project from https://github.com/vassilych/cscs_wpf with everything already set up, and start playing with it by changing the GUI, some parameters, etc. It also has a few sample scripts.
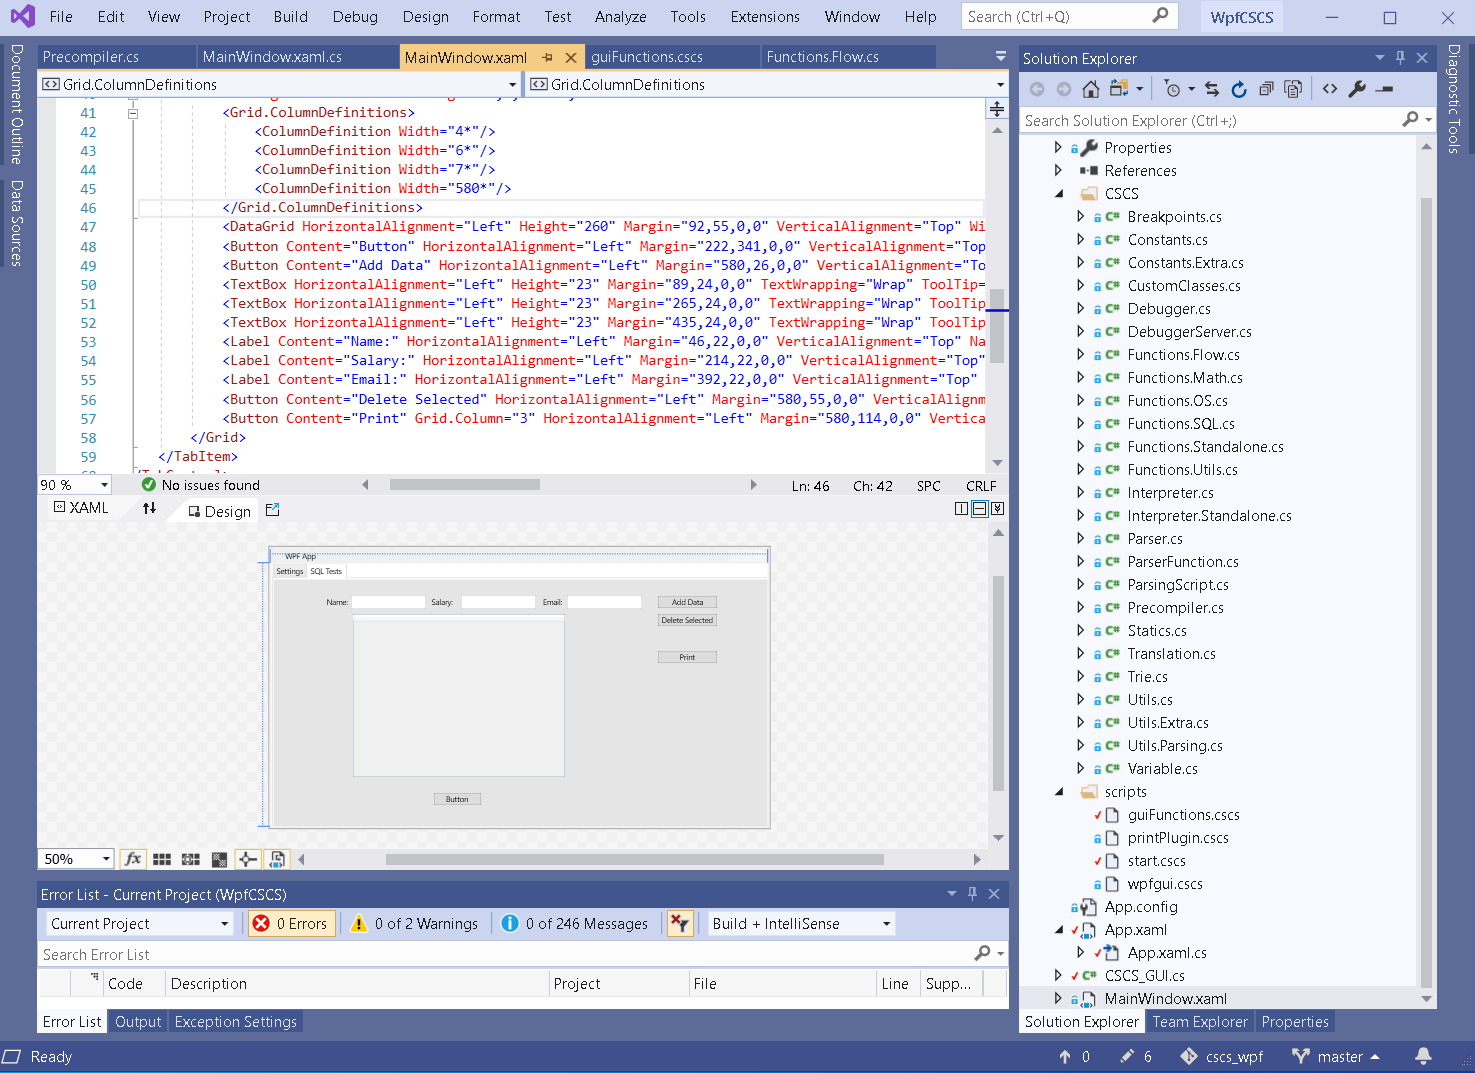
After that, your Visual Studio main view will look similar to the one shown in Figure 1.
How Scripting is Triggered in a WPF Project
The code that initializes the CSCS scripting engine and starts it up is in the MainWindow.xaml.cs file, in the MainView_Loaded() method. As its name suggests, this method is triggered after the main view is loaded; then you can do some GUI adjustments, subscribe to the GUI events, etc. Here is this method:
void MainView_Loaded(object sender, RoutedEventArgs e)
{

    CSCS_SQL.Init();
    CSCS_GUI.MainWindow = this;
    var res = this.Resources;
    var cscsScript = (string)res["CSCS"];
    Console.WriteLine("Running CSCS script: " + cscsScript);
    CSCS_GUI.RunScript(cscsScript);
}
The name of the CSCS scripting file to run is taken from the resources. Specifically, it's defined in the MainWindow.xaml file. Here's an example of how it can be defined:
<Window.Resources>
  <sys:String x:Key="CSCS">../../scripts/start.cscs</sys:String>
</Window.Resources>
CSCS scripts are first-class citizens of the WPF projects and are included in the scripts folder on the top level (see the right side of Figure 1 for details).
The contents of the start.cscs script is rather straightforward; it just says what script to run:
StartDebugger();
include("wpfgui.cscs");
The StartDebugger() statement is optional. It starts the scripting debugger so that you can connect and debug scripting from Visual Studio Code. A previous CODE Magazine article explains its usage: https://www.codemag.com/Article/1809051. Basically, you need to download a Visual Studio Code CSCS Debugger and REPL extension from the marketplace.
The real action happens in the wpfgui.cscs file. This way, you can change what file to include in the start.cscs file if you work with different projects.
General Structure of a WPF Project with Scripting
The general structure of a WPF project with scripting is similar to a plain vanilla WPF project with this exception: You create the GUI in mainView.xml as usual, but you don't create any event handling. All this will be handled by the CSCS GUI module. This GUI module is part of the CSCS project and it's called CSCS_GUI.cs
The GUI widgets can also be created purely in CSCS and you'll see an example of this later on.
It's a good idea to take a look at the CSCS_GUI.cs file at the GitHub location mentioned on the sidebar. You will see how the C# widget events are hooked to the CSCS methods.
It works as follows: First you define a widget in MainWindow.xml. The relevant parameter is DataContext in the widget definition. For instance, if a new button is defined as following:
<Button Content="Open File"
        HorizontalAlignment="Left"
        Width="75"
        Name="button1"
        DataContext="myButton"/>
Then a few event handlers in CSCS are created automatically by the CSCS GUI module. Some of these event handlers are the following:
myButton@click: This function will be triggered when the user clicks on the button.myButton@preclick: This function will be triggered when the user presses the mouse on the button.myButton@postclick: This function will be triggered when the user releases the mouse on the button.myButton@mouseHover: This function will be triggered when the user's mouse is over the button.
The Event Handlers will be created automatically, e.g., if you define myButton widget, myButton@Click will be triggered as soon as the user clicks on myButton.
For a text field, there are different event handlers. For instance, if you have this definition of a text field:
<TextBox HorizontalAlignment="Left"
         Width="75"
         Name="textfield1"
         DataContext="myTextField"/>
Some of the event handlers created by the CSCS GUI module are going to be:
myTextField@textChange: This function will be triggered when the user types anything in the text field.myTextField@keyDown: This function will be triggered when the user presses any key.myTextField@keyUp: This function will be triggered when the user releases any key.
For a combo-box (a drop-down widget), a typical automatically created event handler is:
myCombobox@selectionChanged: This function will be triggered when the user selects an entry.
Even though the event handlers will be created by the CSCS framework, the function bodies, by default, will be empty. In the next section, you're going to see how these event-handling functions can be filled with some useful stuff in CSCS code.
Hello World in WPF with Scripting
Let's take a look at a relatively simple GUI example. Let's create a GUI in Visual Studio by dragging and dropping different widgets, as shown in Figure 2.
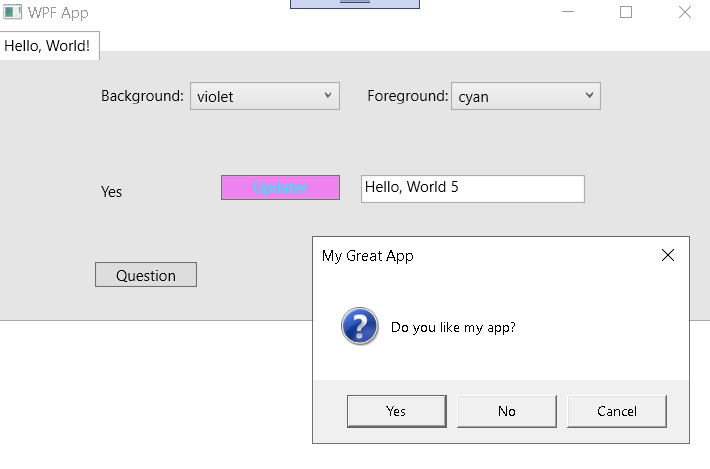
What you're going to do in CSCS is to add some life to the GUI created in Figure 2. First, initialize the global data and populate both combo boxes with data as follows:
comboItems = {"white", "green", "red", "yellow", "black", "pink", "violet", "brown", "blue", "cyan"};
AddWidgetData(comboBGColors, comboItems);
AddWidgetData(comboFGColors, comboItems);
count = 0;
Next, add the event handlers:
function comboBGColors@SelectionChanged(sender, arg) {
    SetBackgroundColor("buttonUpdater", arg);
}
function comboFGColors@SelectionChanged>(sender, arg) {
    SetForeGroundColor"buttonUpdater", arg);
}
function buttonUpdater@Clicked>(sender, load) {
    SetText("textArea", "Hello, world " + (++count));
}
function buttonQuestion@Clicked(sender, load) {
    result = MessageBox("Do you like my app?", "My Great App", "YesNoCancel", "question");
    SetText("labelAnswer", result);
}
The first two functions are triggered when the combo-box values change. They update the colors of a button. The third function updates the value of a textbox with a global variable counter, being incremented on each click. The fourth function shows a modal message box and waits until the user clicks on one of its buttons. The very moment of this message box shown to the user is shown in Figure 2. The name of the button that user clicked on is shown in the labelAnswer widget.
Note that you only need to implement the event handlers; binding them with the actual events will be taken care by the CSCS Framework.
CSCS is case-insensitive. Therefore, the method signature buttonUpdater@Clicked is the same as Buttonupdater@clicked.
That's it; as you can see, there would be much more coding if the same functionality were implemented directly in C#. The whole source code for this example can be consulted on the GitHub (see the links in the sidebar).
Using SQL Server in Scripting
In this section, you're going to see how to use SQL Server together with WPF and scripting. You don't need any extra include statements in the scripting. Do make sure that the System.Data.dll is included in the project references (it's already included in the sample project).
Table 1 contains available SQL functions with corresponding examples. You'll also see more examples below.
Let's see an example of using the SQL functions described above. For the example, create the following table in your SQL database:
CREATE TABLE [dbo].[Users](
    [Id] [int] IDENTITY(1,1) NOT NULL,
    [Name] [varchar](255) NULL,
    [Salary] [real] NULL,
    [Email] [varchar](255) NULL,
    [Created] [datetime] NOT NULL,
    PRIMARY KEY CLUSTERED ([Id] ASC)
    WITH (PAD_INDEX = OFF) ON [PRIMARY]) ON [PRIMARY]
GO
ALTER TABLE [dbo].[Users] ADD DEFAULT (getdate()) FOR [Created]
Using the SQL statement above, you're making sure that the Id filed is autogenerated by incrementing the previous Id and the Created filed is autogenerated from the current date.
Then create GUI in Visual Studio, as shown in Figure 3. The data table in the middle is a DataGrid. The XAML file that contains this example is available in the sample WPF project on GitHub.
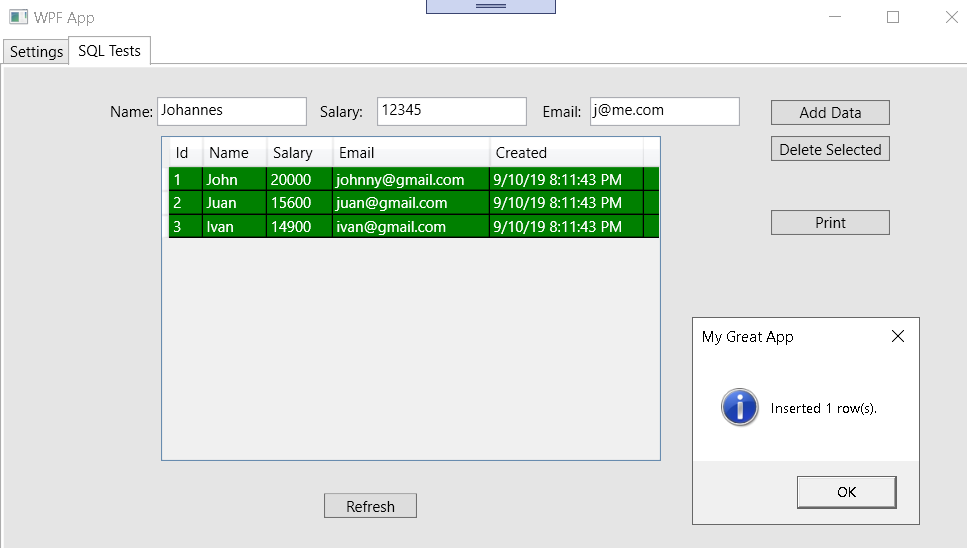
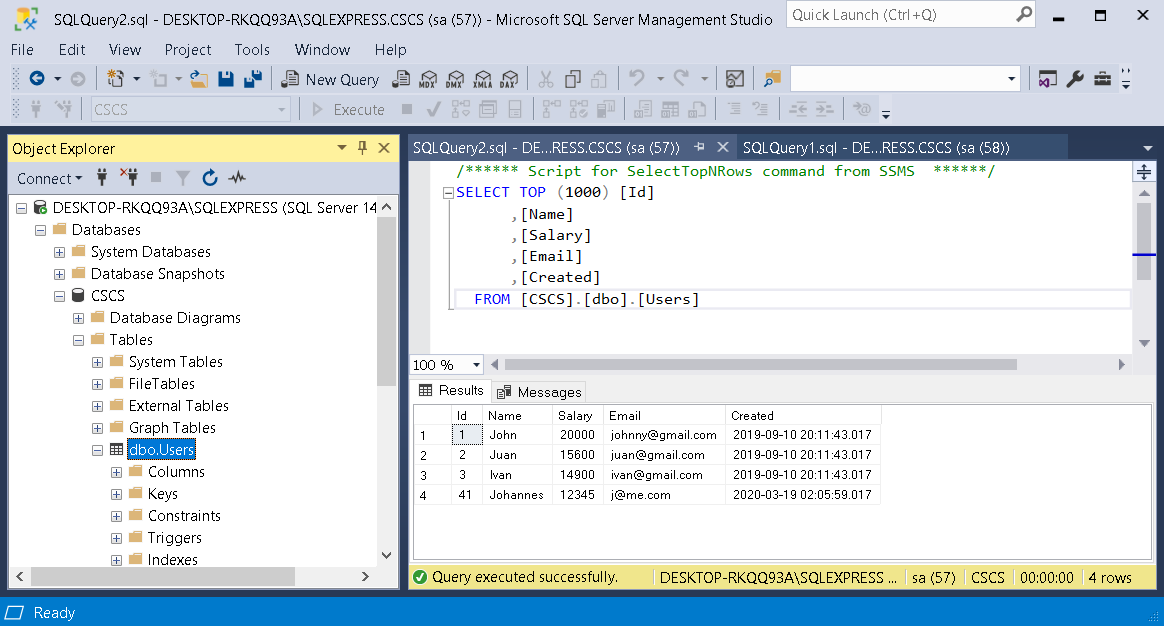
Figure 3 shows the moment after the user clicked on the “Add Data” button to add a new entry but before the data grid has been auto-populated. After adding an entry from the GUI, the SQL table Users will look like Figure 4.
Now let's see how this is implemented in CSCS. Let's start with the implementation of the function when the user clicks on the Refresh button, which fills out the table in the GUI in Figure 3:
function buttonRefresh@Clicked(sender, load) {
    BindSQL("myGrid", "Users");
    query = "SELECT TOP 15 * FROM Users where id <= 100";
    print(SQLQuery(query));
}
As you can see, it's pretty short. But actually it's even shorter than it looks; to fill out the table, you need just one statement: BindSQL(“myGrid”, “Users”). It will populate the DataGrid with the contents of the Users table, setting the header row with the column names from the SQL Server database defined earlier with the SQLConnectionString() CSCS function.
The other two statements are there just for the illustrative proposes – they show what happens if you want to run a SQL Server select query. The result of that query is printed in the Output Window in Visual Studio. This result is a list consisting of the following entries:
{
    {Id, Name, Salary, Email, Created},
    {1, John, 20000, johnny@gmail.com, 9/10/19 8:11:43 PM},
    {2, Juan, 15600, juan@gmail.com, 9/10/19 8:11:43 PM},
    {3, Ivan, 14900, ivan@gmail.com, 9/10/19 8:11:43 PM},
    {41, Johannes, 12345, j@me.com, 3/19/20 2:05:59 AM}
}
The first list entry is the header (column names in the corresponding database table) and the rest are the table values (corresponding to the actual values, as shown in Figure 4).
When the user clicks on the Add Data button, the following CSCS function is triggered:
function buttonAddData@Clicked(sender, load) {
    data = {
        GetText("textName").Trim(),
        GetText("textSalary").Trim(),
        GetText("textEmail").Trim()
    };

    if (data[0] == "" || data[1] == "" || data[2] == "") {
        MessageBox("Please fill out all fields", title, "OK", "warning");
        return;
    }

    try {
        result = SQLInsert("Users", "Name,Salary,Email", data);
        MessageBox("Inserted " + result + " rows(s).", title, "OK", "info");
        buttonRefresh@Clicked(sender, "");
    }
    catch (exc) {
        MessageBox(exc, title, "Cancel", "error");
    }
}
This function explains why Figure 4 has the message box saying that a new entry was inserted even though the DataGrid in the GUI hasn't been updated; this is because the buttonRefresh@Clicked() method is called after that. If you want to change this functionality and update the DataGrid first, simply put the buttonRefresh@Clicked() method before triggering the MessageBox.
Note that the data array containing the rows to be inserted, has only Name, Salary, and Email columns, even though the Users table has two more columns (see Figure 4). This is because of the way the table was created: the first column, ID, will be auto-incremented with each insert, and the last column, Created, will automatically contain the current timestamp.
Finally, here is the implementation of the CSCS function triggered when the user clicks on the Delete Data button:
function buttonDeleteData@Clicked(sender, load)
{
    selected = GetSelected("myGrid");
    if (selected.Size == 0) {
        MessageBox("Nothing has been selected.", title, "OK", "warning");
        return;
    }
    deleted = 0;
    for (row : selected) {
        deleted += SQLNonQuery("Delete from Users where id=" + row);
    }
    MessageBox("Deleted " + deleted + " row(s).", title, "OK", "info");
    buttonRefresh@Clicked(sender, "");
}
The GetSelected(widget) is a CSCS function that returns a list of all rows being selected. In this example, you iterate over all selected DataGrid rows and run a Delete statement for each of them.
If there are many rows selected, it would make sense to run the Delete statement just once for all of them. In this case, you can slightly modify the code above in the Delete statement by including all the selected rows and then concatenating them with an “or”.
Implementation of SQL Functions in C#
Let's see how the SQL functions shown in the previous section are implemented in C#. The shortest one is a SQL non-Query function:
class SQLNonQueryFunction : ParserFunction
{
    protected override Variable Evaluate(ParsingScript script)
    {
        var args = script.GetFunctionArgs();
        var query = Utils.GetSafeString(args, 0);
        using (SqlConnection con = new SqlConnection(CSCS_SQL.ConnectionString))
        using (SqlCommand cmd = new SqlCommand(query, con))
        {
            con.Open();
            cmd.ExecuteNonQuery();
        }
        return new Variable(true);
    }
}
To bind it with the Parser, register this function in the initialization phase, as follows:
ParserFunction.RegisterFunction("SQLNonQuery", new SQLNonQueryFunction());
That's it. As soon as the parser encounters the “SQLNonQuery” token, it triggers the execution of the Evaluate() method on the SQLNonQueryFunction shown above. The script.GetFunctionArgs() method extracts all of the parameters passed to the CSCS “SQLNonQuery” method.
The implementations of other functions, like SQLQuery(), SQLInsert, etc., are similar. I encourage you to consult the source code and take a look at other implementations as well.
Creating, Showing, Hiding, and Moving Widgets with Scripting
Using the CSCS Scripting language, it's easy to implement most of the GUI related functions. Here's an example of showing and hiding a widget when the user clicks on a button:
function myButton@Clicked(sender, load) {
    if (showCounter % 2 == 1) {
        ShowWidget("gridTable");
    } else {
        HideWidget("gridTable");
    }
    showCounter++;
};
Similarly, here is a function to add a new button:
function addButtons@Clicked(sender, load) {
    name = "newButton" + newWidgets;
    text = "New Button" + (newWidgets++);
    AddWidget(name, "button", text, x, y, width, height);
    x += 100;
}
The C# implementation of all of these GUI functions is similar. Here is an implementation of a function to show or to hide a widget:
class ShowHideWidgetFunction : ParserFunction
{
    bool m_showWidget;

    public ShowHideWidgetFunction(bool showWidget)
    {
        m_showWidget = showWidget;
    }

    protected override Variable Evaluate(ParsingScript script)
    {
        var args = script.GetFunctionArgs();
        var name = Utils.GetSafeString(args, 0);
        Control widget = CSCS_GUI.GetWidget(name);
        widget.Visibility = m_showWidget ? Visibility.Visible : Visibility.Hidden;
        return new Variable(true);
    }
}
To register the implementation above with the parser, the following statements must be executed at the start-up time:
ParserFunction.RegisterFunction("ShowWidget", new ShowHideWidgetFunction(true));
ParserFunction.RegisterFunction("HideWidget", new ShowHideWidgetFunction(false));
The implementation of other GUI functionality, like removing or moving widgets, is very similar and can be found by consulting the source code.
To have any C# functionality available in CSCS, first create a class deriving from the ParserFunction class and override its Evaluate() method. Then register the new class with the parser.
Creating New Windows Dynamically from XAML Files
Another useful feature of using a scripting language for GUI development, is the possibility to create new GUI windows at runtime with just a few scripting commands.
For example, you can add any new window to an existing application, if you have this window sourced as a standard WPF XAML file. This XAML file can be created using Visual Studio or any text editor. Note that the XAML file doesn't have to be compiled into the executing program but can be added dynamically on the fly.
Here is an example of such a XAML file containing a window definition:
<Window xmlns:local="clr-namespace:WpfCSCS" Title="Window1" Height="350" Width="500">
    <Grid Margin="0,0,230.6,172">
        <Button Content="Button1"
                HorizontalAlignment="Left"
                VerticalAlignment="Top"
                Margin="48,68,0,0"
                Width="75"
                DataContext="Window1Button"/>
        <Label Content="Window1"
               HorizontalAlignment="Left"
               VerticalAlignment="Top"
               Margin="48,10,0,0"
               Height="44"
               Width="76"/>
    </Grid>
</Window>
This window can be added either as a modal window (i.e., having a parent window) or a stand-alone window. To add this window as a modal window, execute this CSCS statement:
win = ModalWindow(pathToWindowXAMLFile);
Optionally, you can provide a parameter indicating the window's parent (by default, it's the main window). To create a stand-alone window from a XAML file execute this CSCS statement:
win = CreateWindow(pathToWindowXAMLFile);
Both of these functions, ModalWindow() and CreateWindow(), will compile the XAML file on the fly and show user the corresponding Window GUI.
Once a new window is created, there are a few event handlers bounded to the Window creation and destruction events. These event handlers will be created automatically for each new window created from a XAML file.
For each new window dynamically created from a XAML file, the window event handlers will be created automatically.
For instance, if you want to have some code executed when the user closes a window, implement a function called WindowName_OnClosing() (by default it has an empty body). Here is an example of such function implementation:
function Window1_OnClosing(sender, load)
{
  result = MessageBox("Do you want to close this window?", title, "YesNo", "info");
  return result != "Yes";
}
If this function returns true, the window closing will be canceled.
Similarly, the following functions can be implemented in CSCS:
WindowName_SourceInitialized(corresponds to the window SourceInitialized event)WindowName_Activated(corresponds to the window Activated event)WindowName_Loaded(corresponds to the window Loaded event)WindowName_ContentRendered(corresponds to the window ContentRendered event)WindowName_Closing(corresponds to the window Closing event)WindowName_Deactivated(corresponds to the window Deactivated event)WindowName_Closed(corresponds to the window Closed event)
A good explanation and overview of the Windows lifetime events mentioned above can be consulted here: https://docs.microsoft.com/en-us/dotnet/framework/wpf/app-development/wpf-windows-overview#window-lifetime-events.
Wrapping Up
You need just two steps to have any C# functionality available in CSCS. First, implement a class deriving from the ParserFunction class and override its Evaluate() method. Second, register the new class with the parser using the ParserFunction.RegisterFunction() method.
In this article, you saw how to use a scripting language to change a WPF GUI at runtime and also how to add muscle to the XAML file created with Microsoft Visual Studio.
Basically, CSCS is a functional language; with just a few CSCS statements, you can achieve something that would have taken you tens or even hundreds of lines of the C# code.
The code shown in this article is an invitation to explore. After reading it, I hope you can extend the GUI functions shown in this article and create the new ones. If it's not available yet in the sample project, you can implement any GUI-related functionality in CSCS similar to what I did in this article.
I'm looking forward to your feedback: Tell me what you create with CSCS and WPF, or what other features in CSCS you would like to see.
Table 1: CSCS Cross-Platform Functions for Mobile Development
| CSCS Function | Description |
| SQLConnectionString(connString) | Initializes database and sets it to be used with consequent DB statements. The connString is in a standard SQL initialization form. Example: SQLConnectionString("Server=myPC\\SQLEXPRESS;Database=CSCS;User Id=sa;Password=sqlpassword;"); |
| SQLTableColumns(tableName) | Returns a list of all column names of a given table. Example: cols = SQLTableColumns("Users"); |
| SQLQuery(query) | Performs a select statement and returns an array with the results. Example: results = SQLQuery("SELECT TOP 5 * FROM Users where id <= 100"); |
| SQLNonQuery(sqlStatement) | Performs a non-query statement, like insert, delete, etc., and returns the number of records affected. Example: SQLNonQuery("Delete from Users where id=10"); |
| SQLInsert(tableName, colNames, data) | Inserts data from the data CSCS array into the table. Example: data = {"John", 5000, "john@me.com"}; result = SQLInsert("Users", "Name,Salary,Email", data); |
| BindSQL(widgetName, tableName) | Binds WPF widget to a given SQL table. After this statement, the widget is going to have the data from the passed table. Example: BindSQL("myGrid", "Users"); // myGrid is a WPF DataGrid |
