


Go (aka Golang) is one of the fastest growing programming languages. It's an open-source language released by Google in 2009 and created by Ken Thompson (designer and creator of UNIX and C), Rob Pike (co-creator of UTF 8 and UNIX format), and Robert Griesemer. It's a multi-purpose programming language specifically designed to build scalable and faster applications. Although Go has been around for quite a while now, it didn't manage to get wide adoption by developers until more recently due to the proliferation of cloud computing and microservices. Today, Go has been widely used by major companies such as Google, Dropbox, Uber, and Dailymotion.
In this article, I'll walk you through the language and dive into some areas where Go shines. By the end of this article, you should have a pretty solid feel of Go and be on your way to writing some cool Go packages.
Getting Started with Go
Installing Go on your computer is straight-forward - go to https://golang.org/dl/ and download the installer for the OS you are using (see Figure 1).

You can use your favorite code editor to write Go code. I use Visual Studio Code.
Hello World!
In the spirit of adhering to tradition, let's create a text file named helloworld.go and populate it with the following statements:
package main

import "fmt"

func main() {
    fmt.Println("Hello, world!")
}
The first line indicates the name of this package, which is main. Packages are used in Go to organize and reuse code. Within this main package, you have the main() function, which is the function to call when you start your program. Note that you also import another package called fmt, which is a package that implements formatted I/O. This package contains functions (e.g., Println) that allow you to print output to the console, similar to C's printf() and scanf() functions.
The
fmtpackage contains functions similar to C'sprintf()andscanf()functions.
To run the helloworld.go, you can first build the program using the go tool with the build command:
$ go build helloworld.go
A binary will then be created. You can now run the binary and see the output:
$ ./helloworld
Hello, world!
Alternatively, you can also build and run the program using the run command:
$ go run helloworld.go
Hello, world!
You can also use the built-in println() and print() function for printing purposes.
Variables
There are a couple of ways to declare variables in Go. To declare a variable explicitly, you use the var keyword:
var num1 = 5              // type inferred
var num2 int = 6          // explicitly typed
var rates float32 = 4.5   // declare as float32 and initialize
var raining bool = false  // declare as bool and initialize
Notice that you can either explicitly specify the type of variable, or let the compiler infer it for you. When you are declaring a variable and initializing it, you should use type inference. Otherwise, you need to specify the type explicitly:
var str string // declare as string
Variables declared without initialization are zero-valued. For example, str above would have an initial value of "" and an integer variable has a value of 0.
There's a shortcut for declaring and initializing variables without needing to use the var keyword. This is done using the := operator, like the following:
num3 := 7 // declare and init
num4 := num3
You can also declare multiple variables and assign them in a single statement, like this:
var num5, num6 int = 8, 9 // multiple declares and assignment
Here's another example where you can declare and initialize multiple variables:
var (
    age = 25
    name = "Samuel"
)
String Interpolation
One of the common things you do in programming is printing out the values of variables in a string. Consider the following declarations:
var num1 = 5
var rates float32 = 4.5
Suppose you want to print out the values of these two variables in a string. To do that, you need to convert the two numeric variables using the strconv package:
import ("fmt" "strconv")
...
    fmt.Println("num1 is " + strconv.Itoa(num1) + " and rates is " + strconv.FormatFloat(float64(rates),'f',2,32))
    // output is: num1 is 5 and rates is 4.50
The strconv package contains a number of functions for converting numeric/Boolean values to strings, such as:
s := strconv.FormatBool(true)
s := strconv.FormatFloat(3.1415, 'E', -1, 64)
s := strconv.FormatInt(-42, 16)
s := strconv.FormatUint(42, 16)
There are also functions to convert strings to numeric, such as:
b, err := strconv.ParseBool("true")
f, err := strconv.ParseFloat("3.1415", 64)
i, err := strconv.ParseInt("-42", 10, 64)
u, err := strconv.ParseUint("42", 10, 64)
An easy way to combine string and numeric values is to use the Sprintf() function with the various format specifiers, like the following:
str := fmt.Sprintf("num1 is %d and rates is %.2f", num1, rates)
fmt.Println(str)
Data Structures
Go supports a number of data structures:
- Arrays
- Slices
- Maps
- Struct
The following sections discuss each of these in more detail.
Arrays
In Go, an array has fixed size. That is, once an array is declared, its size cannot be changed. The following shows some examples of declaring arrays of specific sizes:
var nums [5] int     // int array of 5 items
fmt.Println(nums)    // [0 0 0 0 0]
var names [3] string // string array of 3 items
fmt.Println(names)   // [  ]
var ended [3] bool   // bool array of 3 items
fmt.Println(ended)   // [false false false]
Array elements are zero-based, and you can access them individually and also assign values to them:
names[0] = "iOS"
names[1] = "Android"
names[2] = "Symbian"
fmt.Println(names)   // [iOS Android Symbian]
Slices
As mentioned, arrays in Go are fixed in size. A Slice in Go is a light-weight data structure that's more flexible than arrays. Think of slices as a view into an array.
A slice in Go doesn't store any data; it just describes a section of an underlying array.
Let's see how slices are created:
x := make([] int, 5)  // creates a slice of 5 elements, capacity = 5
fmt.Println(x)        // [0 0 0 0 0]
The make() function allocates and initializes an array of the specified type. In the above code snippet, x is a slice of five elements. You can also create a slice of two elements, but with a maximum capacity of three:
x = make([] int, 2, 3)  // creates a slice of 2 elements, capacity = 3
fmt.Println(x)          // [0 0]
In the above example, x now has two elements, but it can contain a maximum of three items. An easier way to write a slice is this:
odds := [] int {1,3,5}fmt.Println(odds) // [1 3 5]
In fact, if you recall, earlier you declared an array using this:
var nums [5] int // nums is an array
If you remove the 5, nums is now a slice and not an array:
var nums [] int // nums is now a slice
Understanding the Behavior of Slices
Consider the following code snippet:
original := []int{1,2,3,4}
other := original
In the above code snippet, original is a slice of capacity four. After you assigned original to other, other is now a reference to original (see the top of Figure 2).
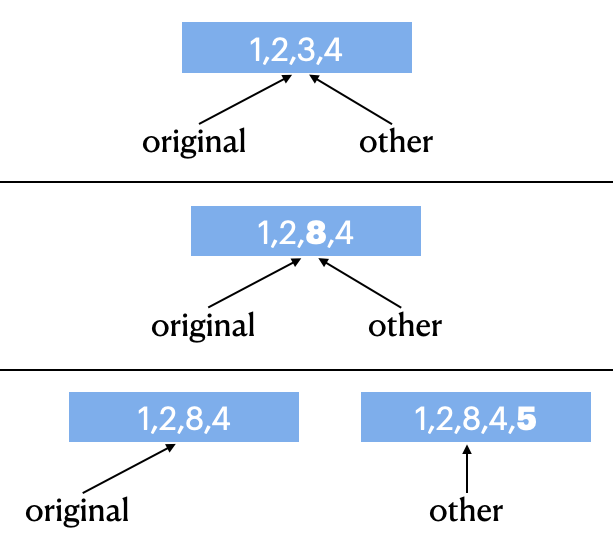
Now, when you make changes to the third element in other like this:
other[2] = 8
Both slices now print the same values (see also the middle of Figure 2):
fmt.Println(original)       // [1 2 8 4]
fmt.Println(other)          // [1 2 8 4]
If you append an item to original and then assign it to other:
other = append(original, 5)
Then other now points to a new slice (as it has exceeded its capacity of four), as shown in the bottom of Figure 2. So when you now make changes to other, original won't be affected:
other[2] = 9
fmt.Println(other)          // [1 2 9 4 5]
fmt.Println(original)       // [1 2 8 4]
Consider another example, where you now have a slice of two elements but with a capacity of four:
x := make([] int, 2, 4)
fmt.Println(x)              // [0 0]
Let's now assign x to y (see the top of Figure 3):
y := x
fmt.Println(x)              // [0 0]
fmt.Println(y)              // [0 0]
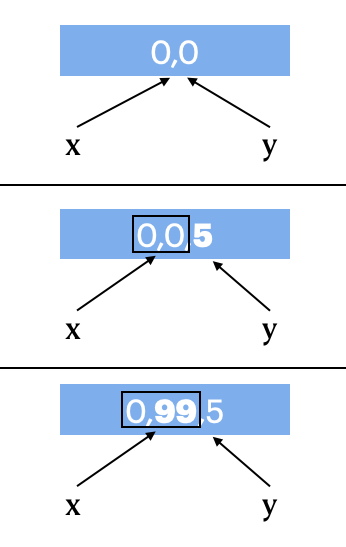
If you now append an item to x and then assign it back to y:
y = append(x,5)
fmt.Println(x)           // [0 0]
fmt.Println(y)           // [0 0 5]
Then x still points to the original two numbers and y now points to the same numbers, plus the additional one appended to x (see the middle of Figure 3). This is because y (as well as x) has the capacity of four and has room for up to four items.
When you now modify the second item in y, both x and y are affected (see the bottom of Figure 3):
y[1] = 99
fmt.Println(x)           // [0 99]
fmt.Println(y)           // [0 99 5]
Slicing on Slices/Arrays
You can perform slicing (extracting a range of values) on arrays and slices. Consider the following array:
var c[3] string
c[0] = "iOS"
c[1] = "Android"
c[2] = "Windows"
To extract the first two items, you can use the following slicing:
b := c[0:2]
fmt.Println(b)      // [iOS Android]
The result of the slicing (b) is a slice. You can print the capacity of b using the cap() function:
fmt.Println(cap(b)) // 3
Observe that the capacity of b assumes the capacity of the underlying array - c. You can change the capacity of the slice b, by specifying the capacity as the third argument in the slicing:
b = c[0:2:2]
fmt.Println(b)      // [iOS Android]
fmt.Println(cap(b)) // 2
Maps
Besides array, another essential data structure is a dictionary. In Go, this is known as a map, which implements a hash table. The following statement declares a map type called heights:
var heights map[string] int
The following statement initializes the map using the make() function:
heights = make(map [string] int)
The following statement declares and initializes an empty map:
weights := map[string] float32 {}
You can also declare and initialize the map variable with some values:
weights := map[string] float32 {
    "Peter": 45.9,
    "Joan": 56.8,
}
The following statement adds a new key/value pair to the heights map:
heights["Peter"] = 178
To delete the key/value pair, use the delete() function:
delete(heights, "Peter")
To check whether a key exists in the map, use the following code snippet:
if value, ok := heights["Peter"]; ok {
    fmt.Println(value)
} else {
    fmt.Println("Key does not exists")
}
If the key exists, the ok variable will be set to true; otherwise, it will be set to false. You can also iterate through a map using the for loop together with the range keyword:
// iterating over a map
for k, v := range heights {
    fmt.Println(k,v)
}
Structs
Go doesn't have classes, but it supports structs. The following shows the Point struct containing two members:
type Point struct {
    X float64
    Y float64
}
You can also define methods on structs. A method is a function with a special receiver argument. To add a method to a struct, define a function with the struct passed in as an argument defined before the function name, like this:
func (p Point) Length() float64 {
    return math.Sqrt(math.Pow(p.X,2.0) + math.Pow(p.Y,2.0))
}
The following statement creates an instance of the Point struct:
ptA := Point{5,6}
If you want to create a reference to another struct, use the & character:
ptB := &ptA // assigning a reference
Here, ptB is a reference to ptA. To prove this, modify the value of X through ptB and then print out the values of ptA and ptB:
ptB.X = 55
fmt.Println(ptA)       // {55 6}
fmt.Println(ptB)       // &{55 6}
You can call the Length() method of the Point struct like this:
fmt.Println(ptA.Length()) // 7.810...
Here is another example of creating a new instance of the Point struct:
pt1 := Point{X:2,Y:3}
pt2 := pt1             // making a copy
Now pt2 is a copy of pt1. As usual, the following statements prove this:
pt2.X = 22
fmt.Println(pt1)       // {2 3}
fmt.Println(pt2)       // {22 3}
Decision-Making and Looping Constructs
Go's decision-making statements are very similar to other languages. It supports the standard if-else statement and switch statement, but surprisingly, no ternary statement. For looping, there's only one looping construct: the for loop.
The following sections will discuss these in more detail.
If-else
Decision making in Go is very similar to other languages:
if true {
    fmt.Println(true)
} else {
    fmt.Println(false)
}
Interestingly, there's no ternary operator in Go. However, the if statement allows you to have two expressions in it: one assignment and one condition. Consider the following:
limit := 10
if sum := addNums(5,6); sum <= limit {
    fmt.Println(sum)
} else {
    fmt.Println(limit)
}
// prints out 10
In the above, the if statement first evaluates the addNums() function and assigns the result to sum. It then evaluates the condition to check if sum is less than or equal to limit.
Switch Statements
If you need to evaluate multiple conditions, use the switch statement:
grade := "B"
switch grade {
case "A":
    fallthrough
case "B":
    fallthrough
case "C":
    fallthrough
case "D":
    fmt.Println("Passed")
case "F":
    fmt.Println("Failed")
default:
    fmt.Println("Undefined")
}
// Passed
There's no need to specify the break statement in a switch statement in Go. Once a condition is matched and its associated block evaluated, it breaks automatically from the switch statement. If you want to have the default behavior in C, use the fallthrough keyword.
Looping
Similar to most languages, Go has the for looping construct:
for i:=0; i<5; i++ {
    fmt.Println(i)
}
You can use the for loop to run an infinite loop, like this:
for {}
There is no while loop in Go, because you can improvise it using the for loop:
counter := 0
for counter <5 {
    fmt.Println(counter)
    counter++
}
You can use the continue statement to force the for loop to continue with the next iteration of the loop, skipping all the code thereafter:
// prints 0 to 9 except 5
for i:=0; i<10; i++ {
    if i==5 {
        continue
    }
    fmt.Println(i)
}
The break statement, on the other hand, exits a for loop prematurely:
// prints 0 to 4
for i:=0; i<10; i++ {
    if i==5 {
        break
    }
    fmt.Println(i)
}
Ranging
To iterate over an array or slice, you use the range keyword. When used with the for loop construct the range keyword returns an index and item of each element in the array/slice. Here's an example:
primes := [] int {2, 3, 5, 7, 11, 13}
for i, v := range primes {
    fmt.Println(i, v)
}
The above code snippet prints out the following:
0 2
1 3
2 5
3 7
4 11
5 13
You can also iterate through a string using the range keyword and the for loop:
s:= "Hello, world!"
for _, c := range s {
    fmt.Printf("%c\n", c)
}
When you iterate through a string, it returns the ASCII code for each character in the string. To print it out as a character, you need to use the Printf() function with the %c format specifier.
Functions
In Go, you define a function using the func keyword:
func doSomething() {
    fmt.Println("Hello")
}

func main() {
    // calling a function
    doSomething()
}
If the function returns a value, you specify the return value type at the end of the function name:
// returns int result
func addNum(num1 int, num2 int) int {
    return num1 + num2
}
Multiple Return Values
Functions can also return multiple values, very much like tuples in some languages (like Python):
func countOddEven(s string) (int,int) {
    odds, evens := 0, 0
    for _, c := range s {
        if int(c) % 2 == 0 {
            evens++
        } else {
            odds++
        }
    }
    return odds,evens
}

odds, evens := countOddEven("123456789")
The above countOddEven() function can also be rewritten using named return types:
func countOddEven(s string) (odds,evens int) {
    ...
    return
}
Go doesn't support optional parameters.
Variadic Functions
Go supports variadic functions, which are functions with a variable number of arguments:
func addNums(nums ... int) int {
    total := 0
    for _, n := range nums {
        total += n
    }
    return total
}
To call the addNums() function, you can now pass in any number of arguments:
sums := addNums(1,2,3)
fmt.Println(sums) // 6

sums = addNums(1,2,3,4,5,6)
fmt.Println(sums) // 21
Anonymous Functions
An anonymous function is a function without a name. Consider the following statement:
var i func() int
Here, i is declared to be a function that returns int value. You can now provide an implementation for i:
i = func() int {
    return 5
}
To invoke the anonymous function, you call i the way you call a normal function, like this:
fmt.Println(i()) // 5
Closures
Anonymous functions are very useful when implementing closures. A closure is a function that references variables from outside its body. Closures allow you to pass in functions as arguments into functions. To understand closure, it's useful to see a concrete example.
Closures allow you to pass in functions as arguments into functions.
Most programming languages that support closures (AKA lambda functions) come with the predefined filter(), map(), and reduce() functions. However, Go doesn't come with these predefined functions. So let's now implement the filter() function in Go using closures. Consider the following filter() function:
func filter(arr [] int, cond func(int) bool) [] int {
    result := [] int{}
    for _,v := range arr {
        if cond(v) {
            result = append(result, v)
        }
    }
    return result
}
It takes in two arguments: an int array and an anonymous function (cond), which itself takes in an int value and returns a bool result. Within this filter() function, you iterate through each of the items in the arr array, and call the cond anonymous function. If the cond anonymous function evaluates to true, the item in the array is appended to the result array.
Now if you have an array and want to extract all even numbers from the array, you can call the filter() function and write your own filtering logic using the anonymous function:
a := [] int {1,2,3,4,5}
fmt.Println(filter(a, func(val int) bool {
    return val%2==0
}))
To extract those numbers that are multiple of threes, you can simply modify the expression inside the anonymous function:
a := [] int {1,2,3,4,5}
fmt.Println(filter(a, func(val int) bool {
    return val%3==0
}))
Goroutines
Most developers are familiar with threading. Threading allows you to implement concurrent operations: multiple functions all running at the same time. In Go, a goroutine is a light-weight thread managed by the Go runtime. To run a function as a goroutine, simply call it using the go keyword.
In Go, a goroutine is a light-weight thread managed by the Go runtime.
Consider the following example:
package main
import ("fmt" "time")

func say(s string, times int) {
    for i := 0; i < times; i++ {
        time.Sleep(100 * time.Millisecond)
        fmt.Println(i, s)
    }
}

func main() {
    go say("Hello", 3)
    go say("World", 2)

    // prevent main() from exiting
    fmt.Scanln()
}
In the above code snippet, you have a function called say(). It takes in a string and a number. The number indicates how many times the given string is to be printed on the console. There's a delay of 100ms between each printing. In the main() function, you call the say() function twice, each one with the go keyword:
go say("Hello", 3)
go say("World", 2)
The first statement calls the say() function as a goroutine. Essentially, it means “go and run the say() function independently and immediately return control back to the calling statement.” The second statement does the same. Now you have two separate instances of the say() function running concurrently. The result may appear like this (you may get a different result):
0 World
0 Hello
1 World
1 Hello
2 Hello
Each time you run this, you might get a slightly different sequence of the words printed. This is because the Go runtime manages how this functions runs, and you have no control over which is printed first. Observe that the main() function has the following statement:
fmt.Scanln()
Without this statement, you'd most likely be unable to see any outputs. This is because each time a goroutine is called, the control is immediately returned back to the calling statement. Without the Scanln() function to wait for user input, the program automatically terminates after the second goroutine is called. Once the program is terminated, all goroutines are also terminated and no output will ever be printed.
Channels
Goroutines are executed independently of one another. But they can communicate with one another through pipes known as channels. In Go, channels are the pipes that connect concurrent goroutines. You can send values into channels from one goroutine and receive those values in another goroutine. To understand the usefulness of channels, consider the following example. Suppose you have a function named sum() that sums up an array of integer values:
func sum(s []int, c chan int) {
    sum := 0
    for _, v := range s {
        sum += v
    }
    c <- sum
}
In Go, channels are the pipes that connect concurrent goroutines.
Notice that the function has a second parameter:
func sum(s []int, c chan int) {
The chan keyword represents a channel, and in this example, it's a channel of type int. When the numbers in the array have been summed up, the sum is written to the channel via this syntax:
c <- sum
To use the sum() function, let's now generate 10 random numbers and assign it to an array, s:
rand.Seed(time.Now().UnixNano())
s := []int {}
for i := 0; i < 10; i++ {
    s = append(s, rand.Intn(100))
}
Let's also create a channel to store int values:
c := make(chan int)
Although we only have 10 items in the array, imagine if you have 1 million items. It will take some time to sum up all the numbers in the array. For this example, you'll split this array into five parts, take each part and pass it to the sum() function together with the channel c, and call it a goroutine:
parts := 5
partSize := 2
i := 0for i<parts {
    go sum(s[i*partSize:(i+1)*partSize], c)
    i += 1
}
Essentially, you're breaking up the array into five parts and trying to sum each part concurrently. As each goroutine finishes the summing process, it writes the partial sum to the channel, as shown in Figure 4.
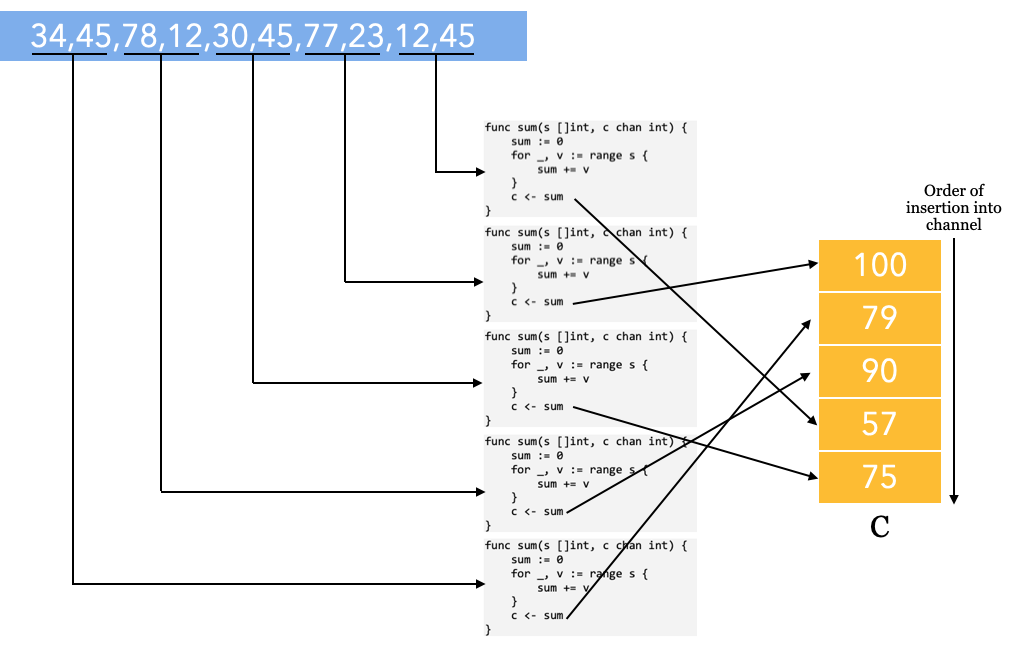
Channels behave like queues: All items are retrieved in the same order that they were written (First-In-First-Out).
Because you know that you have five separate goroutines (and therefore five values to be written to the channel), you can write a loop and try to extract the five values in the channel:
i = 0

total := 0for i<parts {
    partialSum := <-c

    // read from channel
    fmt.Println("Partial Sum: ", partialSum)
    total += partialSum
    i += 1
}

fmt.Println("Total: " , total)
Each value in the channel represents the partial sum of the values in each array. It's important to know that when you send a value into a channel, the goroutine is blocked until the value is received by another function/goroutine. Likewise, when you're reading a value from a channel, your code is blocked until the data is read from the channel. In the event that the goroutines are taking a long time to sum up, the above code snippet will block until all the partial sums are retrieved. Listing 1 shows a complete program where you can simulate the sum() function summing up 1000 numbers.
Listing 1. Demonstration of the use of channels
package main
import ("fmt" "math/rand" "time")

func sum(s []int, c chan int) {
    sum := 0
    for _, v := range s {
        sum += v
        time.Sleep(time.Duration(rand.Intn(100)) * time.Millisecond)
    }
    c <- sum
}

func main() {
    rand.Seed(time.Now().UnixNano())
    s := []int {}
    for i := 0; i < 1000; i++ {
        s = append(s, rand.Intn(100))
    }
    fmt.Println(s)

    c := make(chan int)
    parts := 5
    partSize := 200
    i := 0
    for i<parts {
        go sum(s[i*partSize:(i+1)*partSize], c)
        i += 1
    }

    i = 0
    total := 0
    for i<parts {
        partialSum := <-c
        fmt.Println("Partial Sum: ", partialSum)
        total += partialSum
        i += 1
    }

    fmt.Println("Total: " , total)
}
Go Packages and Modules
Go uses the concept of packages to better organize code for reusability and readability. So far, you've seen how to use some of the built-in packages like fmt, strconv, math, and time in your Go application. In this section, you‘ll dive into the topic of packages and modules in more detail. You will also learn how to create your own packages and make them available to fellow developers for use.
Go Packages
So far, you've seen that your Go applications always have this first statement:
package main
Go organizes code into units called packages. A package is made up of a collection of files. The main package is a special package that contains the main() function, and this makes the main package an executable program. The main() function serves as the entry point to your application. All files in a package must be in the same directory and all package names must be in all lowercase.
Let's take a look at one example. Suppose you have a directory named my_app and in it is a file named helloworld.go:
$HOME
  |__my_app
    |__helloworld.go
The content of the helloworld.go file looks like this:
package main
import ( "fmt" "math" )
type Point struct { X float64 Y float64 }

func (p Point) Length() float64 {
    return math.Sqrt(math.Pow(p.X,2.0) + math.Pow(p.Y,2.0))
}

func main() {
    pt1 := Point{X:2,Y:3}
    fmt.Println(pt1)
}
Observe that the package is named main and so it has the main() function. You can extract the definition of the Point struct as well as its method Length() to another file, say, point.go, and put it in the same directory as helloworld.go:
$HOME
  |__my_app
    |__helloworld.go
    |__point.go
The content of point.go looks like this:
package main
import ("math")
type Point struct { X float64 Y float64 }
func (p Point) Length() float64 {
    return math.Sqrt(math.Pow(p.X,2.0) + math.Pow(p.Y,2.0))
}
It's important to make sure that the first line uses the same main package name. With the Point struct and the Length() method removed, helloworld.go now looks like this:
package main
import ("fmt")
func main() {
    pt1 := Point{X:2,Y:3}
    fmt.Println(pt1)
}
Because these two files – helloworld.go and point.go – all reside in the same directory and they have the same package name (main), they are deemed to be of the same package. To run the above application, type the following commands in Terminal:
$ cd ~/my_app
$ go run *.go
{2 3}
For this to work, you need to ensure that:
- Both files are in the same directory
- Both packages have the same package name (
main) - One of the files has a
main()function
Using Third-Party Packages
Unlike languages likes Python or JavaScript where you can download third-party packages from central repositories like PyPI or NPM, Go doesn't have a centralized official package registry. Instead, you simply fetch third-party packages through a hostname and path. For example, there's a Go package located at https://github.com/hackebrot/turtle that allows you to obtain emojis based on names. To install that package, you simply use the go get command followed by the URL of the package (without the https://), like this:
$ go get github.com/hackebrot/turtle
Once you do that, the github.com/hackebrot/turtle package is installed in the ~/go/src folder of your local computer:
$HOME
|__go
|__src
|  |__github.com
|    |__hackebrot
|    |  |__turtle
|    |    |__ ...
|    |    |__ ...
To use the package, you simply import it into your package, like this:
package main
import ("fmt" "github.com/hackebrot/turtle")
func main() {
    emoji, ok := turtle.Emojis["smiley"] //??
    if !ok {
        fmt.Println("No emoji found.")
    } else {
        fmt.Println(emoji.Char)
    }
}
Creating Go Modules
So far, the package you created in the previous section can be run directly as an executable program. However, a package is more useful if it contains functions that can be imported by other programs, just like the way you import the fmt package that contains functions for printing output to and getting inputs from the console window. In this section, you'll learn how to convert a package into a module so that it can be imported into another Go application.
A module is a collection of related
Gopackages that are versioned together as a single unit.
To learn how to create a module, let's create the following directories:
$HOME
  |__stringmod
    |__strings
    |__quotes
The above creates a module named stringmod, with a sub-directory named strings. The idea is to group related functionalities into directories so as to logically group them together. This strings folder should contain functions related to strings. In this example, stringmod is a module and strings and quotes are packages.
Now, add a file named strings.go to the strings directory and a file named quotes.go to the quotes directory:
$HOME
  |__stringmod
    |__strings
      |__strings.go
    |__quotes
      |__quotes.go
Populate the strings.go file with the following:
package strings

func internalFunction() {
    // In Go, a name is exported if it begins with a capital letter
}

// Must begin with a capital letter in order to be exported
func CountOddEven(s string) (odds,evens int) {
    odds, evens = 0, 0
    for _, c := range s {
        if int(c) % 2 == 0 {
            evens++
        } else {
            odds++
        }
    }

    return
}
Unlike languages like C# and Java, Go has a much simpler approach to access modifiers. Instead of specifying whether a member is private, public, or protected, Go simply uses the function name to determine if a function is exported (visible outside the package) or unexported (restricted to use within the same package). A function name that starts with a capital letter is exported (i.e., can be accessed outside the package) and the rest can only be accessed internally within the package.
In Go, a function name that starts with a capital letter can be accessed outside the package and the rest can only be accessed within the package.
Populate the quotes.go file with the following:
package quotes
import ("github.com/hackebrot/turtle")

func GetEmoji(name string) string {
    emoji, ok := turtle.Emojis[name]
    if !ok {
        return ""
    }

    return emoji.Char
}
Observe that the quotes package has a dependency on an external package: github.com/hackebrot/turtle.
In Terminal, type the following commands:
$ cd ~/stringmod
$ go mod init github.com/weimenglee/stringmod
go: creating new go.mod: module github.com/weimenglee/stringmod
The go mod init command creates a go.mod file in the stringmod directory:
$HOME
  |__stringmod
    |__go.mod
    |__strings
      |__strings.go
    |__quotes
      |__quotes.go
The content of go.mod is:
module github.com/weimenglee/stringmod
The role of the go.mod file is to define the module's path, so that it can be imported and used by other packages. Next, type the following command in Terminal to build the module:
$ go build
go: finding github.com/hackebrot/turtle v0.1.0
go: downloading github.com/hackebrot/turtle v0.1.0
During the build process, the package (github.com/hackebrot/turtle) required by the quotes package is downloaded and installed on your local computer in this path: ~/go/pkg/mod/ directory.
$HOME
  |__go
    |__pkg
      |__mod
        |__github.com
          |__hackebrot
            |__turtle
              |__ ...
              |__ ...
The go.mod file now becomes:
module github.com/weimenglee/stringmod

require github.com/hackebrot/turtle v0.1.0
It lists all the packages required by the packages inside the module. There's one additional file created: go.sum. This file contains the expected cryptographic checksums of the content of specific module versions. It looks like this:
github.com/hackebrot/turtle v0.1.0 h1:cmS72nZuooIARtgix6IRPvmw8r4u8olEZW02Q3DB8YQ=
github.com/hackebrot/turtle v0.1.0/go.mod h1:vDjX4rgnTSlvROhwGbE2GiB43F/l/8V5TXoRJL2cYTs=
Using the Module
With the module created, let's try to import it into another package and use it. Add a new file named main.go in the stringmod folder:
$HOME
  |__stringmod
    |__strings
      |__strings.go
    |__quotes
      |__quotes.go
    |__main.go
Populate the main.go file as follows:
package main
import ("fmt" "github.com/weimenglee/stringmod/strings" "github.com/weimenglee/stringmod/quotes")
func main() {
    o, e := strings.CountOddEven("12345")
    fmt.Println(o,e) // 3 2
    fmt.Println(quotes.GetEmoji("turtle"))
}
Notice that you're importing the two packages inside the stringmod modules using the github.com/weimenglee/stringmod import path:
"github.com/weimenglee/stringmod/strings"
"github.com/weimenglee/stringmod/quotes"
Also observe that the packages are referred to using their last name in the package path github.com/weimenglee/stringmod/strings and github.com/weimenglee/stringmod/quotes. If you don't want to use the last name in the package path, you can also provide aliases for the packages during import:
package main
import ("fmt" str "github.com/weimenglee/stringmod/strings" qt "github.com/weimenglee/stringmod/quotes")
func main() {
    o, e := str.CountOddEven("12345")
    fmt.Println(o,e) // 3 2
    fmt.Println(qt.GetEmoji("turtle"))
}
Finally, to run the program type the following command in Terminal:
$ cd ~/stringmod
$ go run main.go
3 2
??
Publishing the Module
So far, your module has been created and tested correctly to run locally on your computer. To share it with the world, you simply need to publish it to an online repository, like GitHub. To demonstrate that, I've published the module to GitHub, accessible through the following link: https://github.com/weimenglee/stringmod.
To install this module on your computer, use the following command:
$ cd ~
$ go get github.com/weimenglee/stringmod
The package is downloaded in the ~/go/src/ and ~/go/bin/ folders:
$HOME
|__go
|__src
|  |__github.com
|    |__hackebrot
|    |  |__turtle
|    |    |__ ...
|    |    |__ ...
|    |__weimenglee
|       |__stringmod
|         |__ ...
|         |__ ...
|__bin
  |__stringmod
To use the module in your own package, you can import it to your application just like you did in the previous section:
package main
import ("fmt" "github.com/weimenglee/stringmod/quotes")
func main() {
    fmt.Println(quotes.GetEmoji("turtle"))
}
Go Workspace Directory
In the previous section, you saw that Go uses a number of directories to store your modules and packages. These directories in your ~/go directory are:
- Src: contains the source code of packages that you have installed in your computer
- Bin: contains the binary executables of Go applications that have the
mainpackage (and therefore contains themain()function). - Pkg: contains the non-executable packages. These packages are typically imported by other applications.
Summary
By now, you should have a pretty good feel for the Go language. Syntax wise, it's close to C and should be very easy for developers to pick up. Goroutines is one big feature of the language, which should make it a breeze to create multi-threaded server-side apps. Hopefully, this article makes your learning journey much easier and fun!
