


If you work in the Microsoft ecosystem, it's hard to ignore something as big as Microsoft Graph. Imagine that you're new to the Microsoft ecosystem and your boss just attended a Microsoft conference, and everyone's talking about Microsoft Graph, as they often are. Your boss feels that your product must integrate with Microsoft Graph because apparently, it'll help people and organizations get more done. That can't be a bad thing, right? It's your job now, as a developer/architect, to figure out this amazing technology called Microsoft Graph. This is where you start hitting the search engines trying to educate yourself.
I tried to find a definition for Microsoft Graph. Wikipedia (https://en.wikipedia.org/wiki/Microsoft_Graph) likes to define it like this: “Microsoft Graph is a Microsoft developer platform that connects multiple services and devices.”
I guess that's nice. It's a developer platform, I'm a developer, I'm on some kind of platform, like maybe Java or C#. I'm not 100% sure yet what this means, but I'm intrigued. I narrow my search to Microsoft docs.
I found the following definition in Microsoft's official docs (https://docs.microsoft.com/en-us/graph/overview):
"Microsoft Graph is the gateway to data and intelligence in Microsoft 365. It provides a unified programmability model that you can use to access the tremendous amount of data in Microsoft 365, Windows 10, and Enterprise Mobility + Security. Use the wealth of data inMicrosoft Graphto build apps for organizations and consumers that interact with millions of users."
Wow, so this is a developer platform, and a gateway to data and intelligence. As a developer, the line about the unified programmability model makes some sense. But I'm not sure if I want to interact with millions of users. I think I'll need to read up on what this Microsoft 365 thing is that they're talking about. I've heard of Office 365. Did they rename it? More search bingeing is in order.
I land on this definition of Microsoft 365: “A productivity cloud that delivers innovative and intelligent experiences, rich organizational insights, and a trusted platform to help people and organizations get more done.”
Well, I'm glad it's a trusted platform to help people and organizations get more done. I certainly wouldn't want an untrusted platform that would help people and organizations get less done.
Gosh! We seem to have a department of confusing documentation at work here. Just tell me already what Graph is and how I integrate with it. I figure that you're just as frustrated, so I wrote this article. If you've never heard of Microsoft Graph, and your boss has the sudden urge to use it, what does it mean to you, the developer?
What is Microsoft Graph?
Before I go much further, I have no doubt that no matter what words I pick to describe Microsoft Graph, someone is going to poke holes into my wordsmithing capabilities. That's okay, this is how I understand Graph. But wait a second! Before I explain what Microsoft Graph is, you need to know what Azure AD and the Microsoft identity platform are. Let's take a short detour into Azure Active Directory and the Microsoft identity platform first.
Azure Active Directory (Azure AD) is a cloud-based identity and access management service. The Microsoft identity platform is an ecosystem that's a superset of Azure AD. When you log into Office 365, you're logging into Azure AD. When you log into Microsoft Teams, you're logging into Azure AD. Given how flexible and extensible Azure AD is, there are many variants of the user experience that the end user may see. Some may be on iOS. Some are in the browser. Some are federated to ADFS (Active Directory Federation Services). Some use SAML, some use OpenID Connect. Modern authentication, which is another ill-defined umbrella term, is quite flexible. Azure AD is Microsoft's flavor of modern authentication and so much more.
Now back to Microsoft Graph. Microsoft Graph is a bunch of programmable features that are protected by the Microsoft identity platform and are accessible from any platform. And when I say a bunch of programmable features, it's mainly three: APIs, connectors, and Data Connect.
APIs
APIs are simple REST APIs available at https://graph.microsoft.com. To be fair, there are a LOT of APIs here. A lot of stuff in the Microsoft cloud is available through various endpoints under this URL. You can really go to town with what you can do with these APIs. For example, you can access your mail. You can access your colleague's mail protected by permissions, of course. You can access calendars. You can invite users. You can… I really should stop. You can do a lot and I really mean a lot. Here's the currently released functionality https://docs.microsoft.com/en-us/graph/api/overview?view=graph-rest-1.0 and here's the functionality currently in beta https://docs.microsoft.com/en-us/graph/api/overview?view=graph-rest-beta. Take a moment to glance through the possibilities. You can really program the heck out of the Microsoft ecosystem with MS Graph.
You can really program the heck out of the Microsoft ecosystem with MS Graph.
These APIs are all protected by the Microsoft identity platform. Let me really simplify this for you: If you've ever called an OpenID Connect-protected API, calling a Microsoft Graph API is exactly the same. In fact, with the SDKs that Microsoft provides, it's even easier. And by SDKs, I mean not just the SDKs that allow you to authenticate to any Azure AD-protected endpoint, such as MSAL, but there are also MS Graph SDKs that really eliminate the friction for you.
As a developer, here's what you need to know. MS Graph has a bunch of REST APIs that you can call from any platform, and Microsoft SDKs make it very easy to use the APIs.
Connectors
Microsoft Graph connectors are how your non-Microsoft systems provide data to the Microsoft cloud. There are a lot of connectors available for Microsoft Graph, as can be seen here https://docs.microsoft.com/en-us/microsoftsearch/connectors-gallery. These connectors make it possible for all those data sources to input data into the Microsoft cloud, and make it available for services such as Microsoft Search. As an example, there's a connector available for MSSQL. This means that Microsoft search can now make MSSQL searchable. How neat is that?
Data Connect
These APIs and connectors are great. But as an organization invested in the Microsoft ecosystem, your lifeline - your data - is sitting in the cloud. You can call a bunch of APIs, but sometimes you need lots of data to do further insightful work. Maybe you're trying to write an AI model that analyzes your user's emails, for instance.
You can imagine that calling API after API under the users' delegated permission can get cumbersome very quickly. In fact, it's not going to scale at all. It's precisely to get around this problem that Microsoft Graph Data Connect exists. It allows you to work with the data in popular Azure datastores, such as Azure Data Lake or Azure Blob storage. You can then analyze that data using Azure Data Lake analytics or Azure SQL database, and really your imagination is the limit at that point.
I used a particular phrase here: "users' delegated permission." This simply means that you're trying to call the API on the user's behalf. I'll talk more about this shortly. For now, just imagine that if I want to read your email, I must do it on your behalf. That's exactly what the users' delegated permission allows me to do. It allows me to perform an action, such as reading your email, on your behalf. And yes, there's a permission model built around this, which requires something called “consent” from the user. Afterall, if I'm reading your email, you must consent to it, right? Or an administrator can consent on your behalf. But I'm getting ahead of myself here. I'll explain consent shortly.
My point is that in the back of your mind, you might be thinking that for bulk data processing, there must be some kind of controls built inside of Microsoft Graph Data Connect. After all, you don't want anybody reading just anybody's email; you want some controls on this ecosystem. Random access would entirely defeat the purpose of consent. You'll be glad to know that Microsoft Graph Data Connect has a lot of controls built in so an administrator can set up various rules, and exceptions that define exactly what data is exposed when using Microsoft Graph Data Connect.
Application Permissions vs. Delegated Permissions
A very large and key part of Microsoft Graph are the APIs that it exposes. These APIs are protected by the Microsoft identity platform. To understand how you call these APIs, you must have a basic understanding of how APIs work in the Microsoft identity platform.
These APIs are accessible using standard OpenID Connect mechanisms. This means that in order to access this API, you have to pass in an access token. The access token is a string you pass into the Authorization header in your HTTP request to the API. It typically has a whole bunch of information, such as the validity, who it was issued to, a signature, and much more.
A key but optional part of that access token is the user's identity. Pay special attention to this: The user's identity is optional.
Why would the user's identity in an access token be optional?
Think about the various kinds of APIs that Microsoft Graph can expose. I'll give you two examples: I want to read all users' emails versus I want to read the logged-in users' emails.
Reading all users' emails is something that a background process, such as a daemon or a CRON job, would do. Here, the user's identity isn't important, but the application's identity is important. However, if I say that I wish to read the logged-in users' emails, I must know who the logged in users are.
In this example, when I wish to call an API from an application without a signed in user present, such as background services or daemons, I'd use an application permission.
In contrast, when I wish to call an API from an application where the signed-in user is present, I'd use a delegated permission. Microsoft Graph leverages another capability of the Microsoft identity platform called “administrator consent.” Put simply, certain delegated permissions are low risk and can therefore be consented by non-administrator users. Certain permissions are higher risk and they require administrator consent. All application permissions require admin consent, but some delegated permissions don't require admin consent.
There's another feature of the Microsoft identity platform called consent policies. Consent policies allow you to control this behavior for your organization to a large extent.
Effective Permissions
Before I move off the topic of permissions, there's one more important thing for you to know, and that's the concept of effective permissions. As the name suggests, effective permissions are the permissions that your app has when it makes a request to an API. But there's a key difference in how effective permissions work in delegated permissions and application permissions.
For delegated permissions, the effective permissions of your app are the least privileged intersection of the delegated permissions that the app has been granted by consent and of the privileges of the currently signed in user. In other words, your app when using delegated permissions will never have more privileges than the signed in user.
Application permissions, on the other hand, are simply the permissions that have been consented to for the application.
How Do You Call Microsoft Graph?
I think you already know the answer to this. You call a REST API. If only things were this simple! Because the APIs are authenticated, you first need to get an access token. As you can imagine, the access token has permissions to do something versus not being allowed to do something else. Also, the access token may or may not have user identity. Then there is the whole idea of throttling, and Graph SDKs, that I won't get into in this article.
There are a few distinct patterns emerging here. I think I'll need an access token. To get an access token, I'll also need to somehow specify what permissions the access token will have. These are specified in an app registration, which is a concept unique to the Microsoft identity platform, although other OpenID Connect platforms have similar equivalent concepts as well.
This means that there are three distinct steps:
- Set up an app registration.
- Set up permissions.
- Get an access token.
With the access token, I can call Microsoft Graph.
Set Up an App Registration
To call Microsoft Graph, or, for that matter, any API, your application must be granted permissions to call that certain API. In other words, Azure Active Directory needs to know about your application. This process of informing Azure Active Directory everything about your application that Azure Active Directory needs to care about so it can provide authentication services to it is called app registration.
As you can imagine, an app registration contains a lot more information than just permissions. For example, in an application that users are signing into, you need to know a reply URL. This reply URL is the whitelisted URL to which Azure Active Directory will send the tokens. Perhaps your application logic depends on certain claims. Your app registration contains information about the claims your app expects.
For my purposes here, let's go ahead and set up an Azure Active Directory app registration. Because I intend to target both delegated permissions, which run on the user's behalf, and applications permissions, which run on the application's behalf, I'll configure the app registration accordingly. In other words, the app registration must allow for an application to sign in and for a user to sign in.
It's possible to set up an application registration through the Azure portal, Azure CLI, or through PowerShell. For the purposes of this article, I'll stick with the portal.
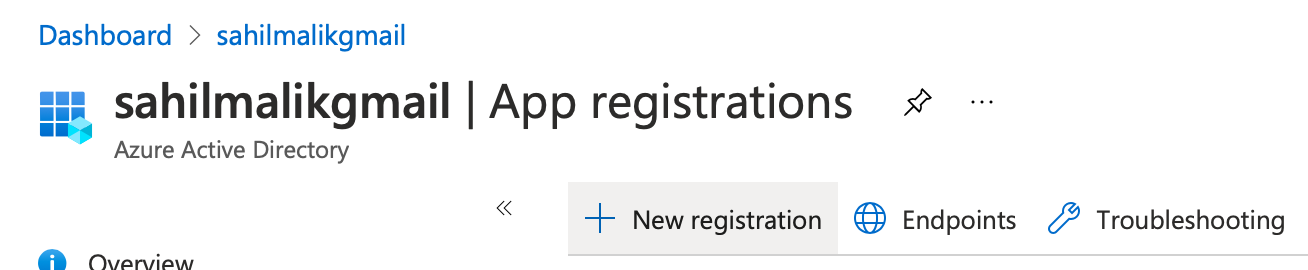
To register an application, go ahead and visit portal.azure.com, and navigate to the Azure Active Directory link on the left-hand side. On this page, under the Manage section, look for App registrations and click New registration, as shown in Figure 1.
Clicking that button shows you a form where Azure Active Directory asks you for the basic information it needs to create this app registration. Specifically, you'll be asked for three bits of information.
First, you'll be asked for the name of this application. This is a name that should make sense to the administrators and the users. For example, this could be “fancy email application”. Go ahead and provide the name “MSGraphClient”.
Second, it asks you what kind of accounts can sign into this application. There are four choices here.
- A single tenant application allows an account from the current Azure Active Directory to sign in. This is the simplest choice, and this is what I will pick in this scenario. I'll briefly describe what the other choices do as well.
- The second choice is to make the application multi-tenant. This means that users from other Azure active directories can also sign into my application. Of course, this is controlled by consent.
- The third choice is that you can allow either multitenant users, or Microsoft accounts to use your application. It's worth noting that there may be significant API differences when you're signing in using a Microsoft account versus an Azure Active Directory account. For example, not every feature is exposed to personal Microsoft accounts.
- Finally, you can choose to target your application to only personal Microsoft accounts.
The third question that Azure Active Directory asks you during an app registration is an optional question. It asks you for one or more redirect URLs. This is a whitelisted list of URLs to which Azure Active Directory can send the tokens. Note that these tokens wield a lot of power and responsibility. An access token is like cash: If you find it lying on the ground and you pick it up, it's yours. Therefore, Azure Active Directory must be very careful where to send these access tokens. Depending upon the specific OpenID Connect grant you use, this may be sent either as the result of a post request or posted by Azure Active Directory to a whitelisted URL. Therefore, Active Directory must ask you for redirect URLs so it knows which URLs are safe. Additionally, it ties down what you can specify in that redirect URL, such as that it must be HTTPS and it can't use wildcards. I'll configure this later, so just leave this blank for now and click the register button.
I just mentioned that an access token is like cash. It belongs to whoever discovers it. There is, however, another standard called proof of possession, that proves that the requestor who requested the access token is the one sending the access token. This effectively makes the access tokens a little more secure because it gives the called API confidence that this access token wasn't stolen. Further discussion about this is out of scope for this article.
Once the app is registered, you're shown a bunch of information. A key information here is a GUID called the Client ID, sometimes also referred to as the Application ID. Note that this is different from the Object ID. Note down the Tenant ID and Client ID shown on this screen. The Tenant ID is a GUID that represents your Azure Active Directory and is shared by all app registrations registered in your Azure Active Directory.
Set Up Permissions
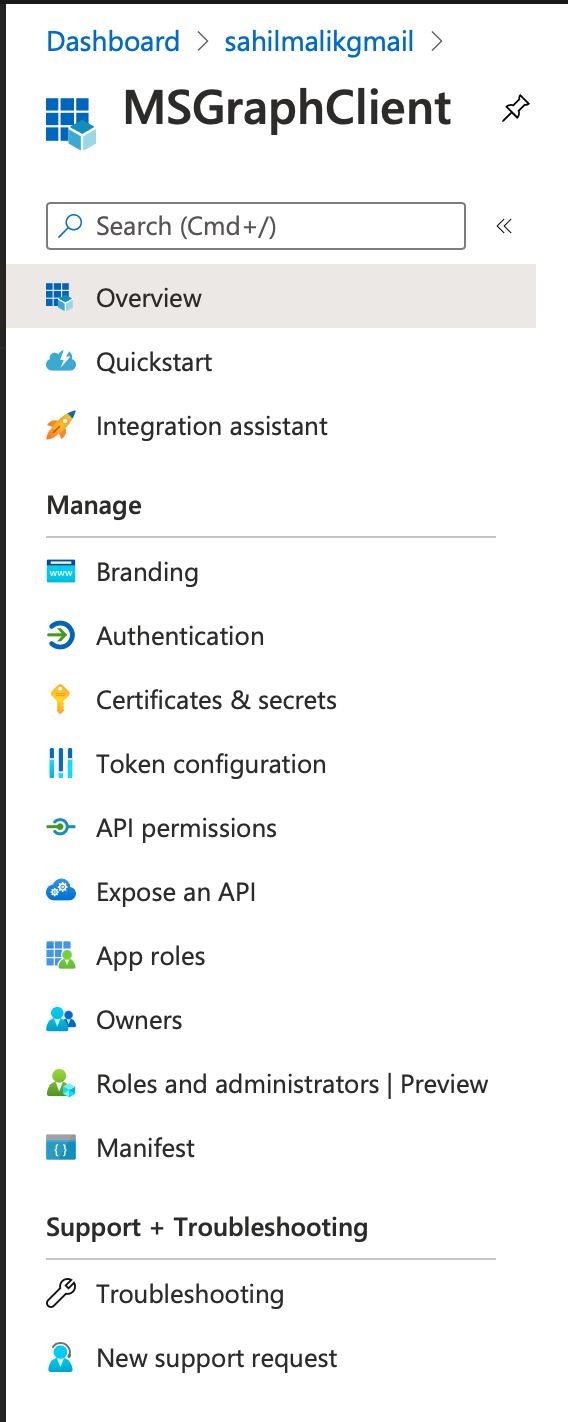
With my app registration in place, let's add some permissions to it. Specifically, I wish to inform Azure Active Directory that my app or the user using my app has the ability to call certain APIs. To do so, visit the Azure portal again, and under Azure Active Directory, look for App registrations and locate your MSGraphClient app again. Go ahead and click on it. You'll note that there's a menu on the left-hand side, as shown in Figure 2.
Here, click on API permissions. You'll notice, as shown in Figure 3, that there's already a permission called User.Read added for your app. This allows the app to read the absolute basic profile of the user. To be precise, you don't need this permission in an app registration. You could go ahead and remove it, and the app registration is still valid. However, this permission lets you read the absolute basic profile information of the user that signs in. It's innocuous, so leave it alone.

There are several other interesting things going on in Figure 3. For example, notice that permissions are grouped under Microsoft Graph. Microsoft Graph is just one of the APIs, incidentally, authored by Microsoft, that's available for you to use. There are several other APIs available for you as well. In fact, you can author your own APIs, and then allow your own applications to be able to call those APIs. This is out of scope for this article.
Also notice that under the type column, it's clearly specified which permissions are application permissions and which are delegated permissions. In this case, the out-of-the-box permission of User.Read is a delegated permission. Can you guess why that's a delegated permission? Well, you're reading the profile of the logged-in user. This requires you to have the user's identity. Therefore, it's a delegated permission. Additionally, there's a simple description for the permission, and there's another interesting column called admin consent required. Now this is interesting because not all permissions are equal. Some of them are a little more sensitive than others. For permissions that are deemed slightly more sensitive in nature, the logged-in user consenting must be an administrator. And finally, there's the status column. The status column displays consent grants. That's best explained with an example, when you add a new permission.
At the top of Figure 3, you should see an Add a permission button. Go ahead and click on it. This should open a pane on the right-hand side and Microsoft Graph should appear prominently on the top. Additionally, there are a number of other APIs that Microsoft exposes that should also be visible in that same pane. If you've authored custom APIs, there should be a tab called My APIs available over there as well. For now, go ahead and click on Microsoft Graph, and you should be prompted to pick between delegated permissions and application permissions. For the purposes of this article, I'll work with both Delegated and Application permissions. This is a great way to see both in action. You already have a delegated permission called User.Read added, so you need to add an additional application permission. How about a permission that lets me read all users' profiles? Go ahead and click on application permissions tab, and under the user category, look for a permission called User.Read.All. Select it and click on the Add Permissions button. Your app registration's permissions should now look like Figure 4.

Notice anything strange in Figure 4? Under the status column, there's a “not granted for” status written for the newly added permission. When you clicked on the add permissions button, you didn't actually add the permission. You merely requested for the permission to be added. In order to actually add the permission and make it usable, you need to grant consent. There are two ways to grant consent. One way is to click on the grant admin consent button at the top of Figure 4. This is necessary for application permissions because application permissions, when called from a headless process, don't have the ability to show an interactive user interface in order to grant consent. The other option is that the user during the log-in process can grant consent. For the purposes of this article, while you are in the Azure portal, go ahead and click on the grant admin consent button that you see on top of Figure 4. Verify that the consent is granted. This can be seen in Figure 5.

At this point, the application has the necessary permissions. But before I go much further, I think it's worth mentioning another animal called the Azure AD Graph. The permission you added, for instance User.Read, is shorthand for https://graph.microsoft.com/User.Read. Although that reads like a URL, it's merely a unique string that allows you to identify a permission. It's mere co-incidence, and perhaps some planning on Microsoft's part, that Microsoft Graph is also exposed at https://graph.microsoft.com. There exists another User.Read in the Microsoft ecosystem, and that's https://graph.windows.net/user.read. Pay close attention: One ends in .com and the other ends in .net. Again, these are just unique strings. Graph.windows.net represents AAD Graph, which is on its way to deprecation. You shouldn't use it. Unfortunately, you'll find a lot of parallel permissions between Microsoft Graph and AAD graph, and that could get confusing. But as AAD graph is on its way to deprecation, pay close attention and make sure that you're using Microsoft Graph and not AAD graph.
With that out of the way, it is time to call Microsoft Graph.
Get an Access Token
To call Microsoft Graph, or for that matter any OpenID Connect-protected API, you're going to need an access token. The access token is put in the authorization header in the following format:
Bearer <access token>
The obvious question is: How do you get an access token that will work with Azure Active Directory? The access token is intended for Microsoft Graph, but it's issued to the application, or the application and user pair. The process of requesting the access token between these two is different. OpenID Connect has various flows that allow you to request access tokens. Some of them work with application identities, and some of them work with application and user identity. Describing each flow is out of scope for this article, but I assure you that it's a very interesting topic and I hope to cover it in a future article.
For the purposes of this article, I'll show you a simple trick to get an access token. I'll show this in two parts. First, I'll call the API under application permissions and therefore request an access token on behalf of the application. Second, I'll call the delegated permission and request an access token on behalf of the user.
Call the Application Permission API
To call an API using an access token with application permission, you'll need to first ask Azure Active Directory for such a token. One way to get this token is using a standard OpenID Connect grant, called the client credential grant. Client credential grant is a simple POST request to the Azure Active Directory token endpoint with the following information:
- Who are you?
- What do you need this token for?
- Prove your identity with a credential.
In this scenario, the question of who you are is answered by the identity of the application. In your app registration, you'll see something called the application ID. Sometimes we also refer to this as client ID. Go ahead and copy this information from your app registration.
In this scenario, the question of what you need this token for is answered with Microsoft Graph. In the case of Azure Active Directory, there's a special scope called .default. That's what you need to use with client credential flow. So the scope you're requesting an access token for is https://graph.microsoft.com/.default. Specifying this scope causes Azure Active Directory to return an access token that's valid for all previously consented permissions.
Finally, you can prove your identity by either providing a secret or using a certificate. Although the secret is a simpler choice, a certificate is a safer choice. This is because when you use a secret, you're required to send the secret over the wire. When you use a certificate, you send a string that merely proves your possession of the accurate certificate. It's worth mentioning that Azure Active Directory, when using client credential flow, won't validate expired certificates, or certificates from a certificate authority, or certificate revocation lists. The certificate is merely a credential. To provide a secret, go to your app registration area, and under Certificates and Secrets, go ahead and add a secret. This secret is shown to you only once and you should treat it like a password. In fact, production applications prefer to use managed identity. Where you can't use managed identity, put this secret in a key vault and use managed identity to read from the key vault.
Now that you have a client ID, a scope, and a secret, you can make a simple POST request to get an access token using application permissions, as shown in Listing 1.
Listing 1: Requesting an access token
curl --location --request POST
  'https://login.microsoftonline.com/<tenantid>/oauth2/v2.0/token' \
--header 'Content-Type: application/x-www-form-urlencoded' \
--data-urlencode 'client_id=<guid>' \
--data-urlencode 'scope=https://graph.microsoft.com/.default' \
--data-urlencode 'client_secret=secret' \
--data-urlencode 'grant_type=client_credentials'
Sending the request shown in Listing 1 should return you a JSON object, one of the nodes of which is the access token. Copy and paste that access token, which you'll use to call the API. You can see how to call the API in Listing 2.
Listing 2: Call the API
curl --location --request GET 'https://graph.microsoft.com/v1.0/users' \
--header 'Content-Type: application/json' \
--header 'Authorization: Bearer '
You can verify that this call returns the users in your organization.
Call the Delegated Permission API
To call Microsoft Graph, or, for that matter, any API under the delegated permission, you first need to obtain an access token that uses delegated permissions. Again, there are many ways to do so, but I'll use something called the auth code flow using PKCE. I'll leave the description of all these deep identity related topics or a future article. For now, just follow along.
At a high level, this flow requires you to request a code. Using that code, you can request an access token. There's some protection involved using something called the code challenge, so Azure AD has some confidence that the party requesting the access token is the party that originally requested the code.
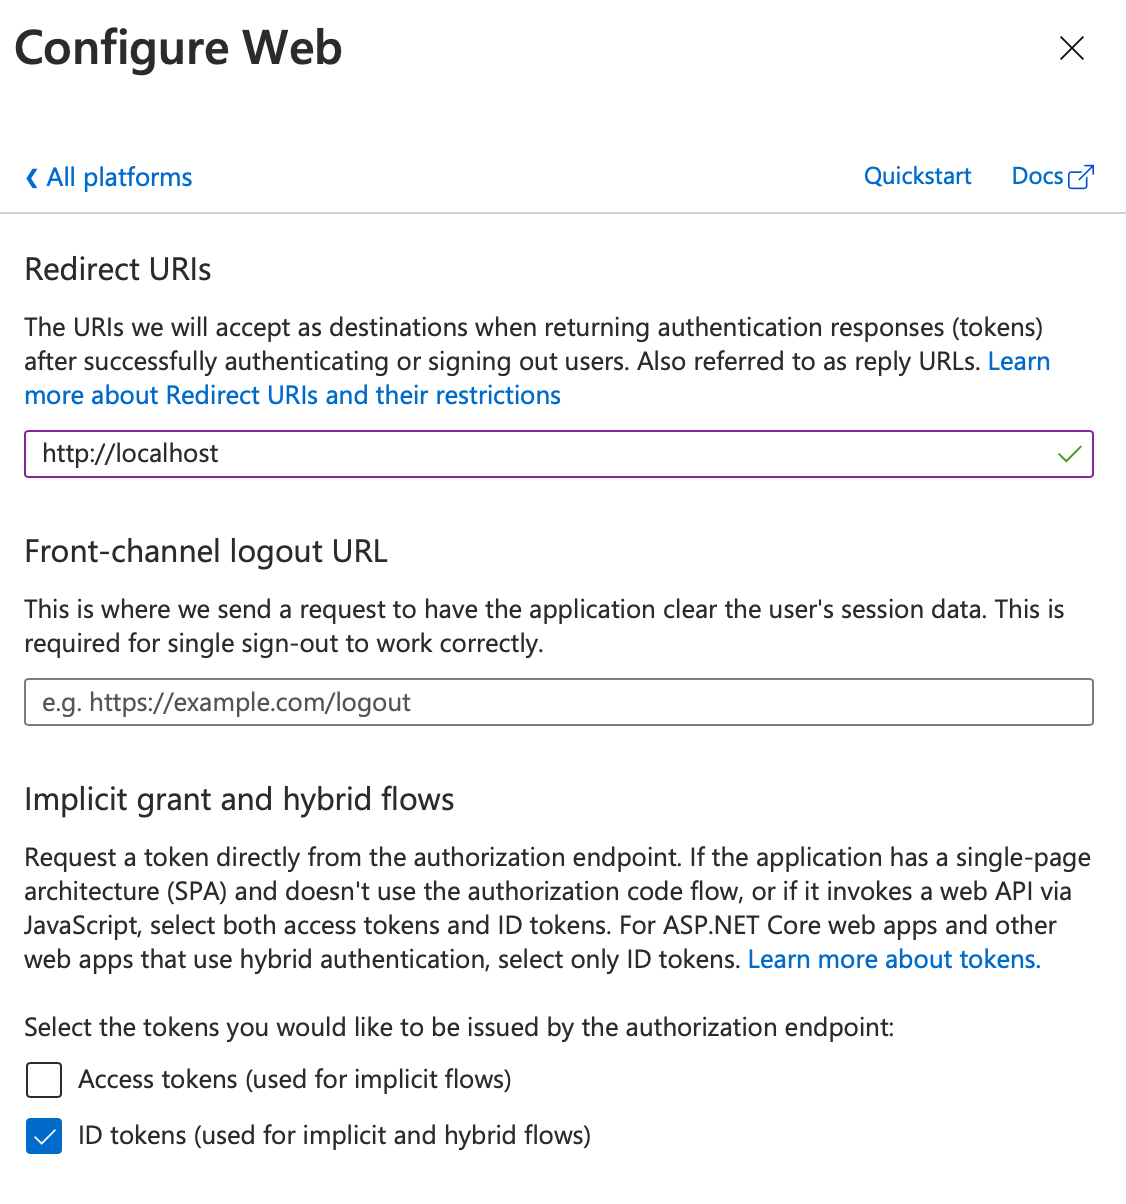
First let's request the code. Because there's a user involved here, you'll have to perform this operation in a browser. This allows the user to sign in, and therefore the token will be issued on behalf of the user. This token will be sent back to a whitelisted URL, so in your app registration, under authentication, choose to add a Web application with http://localhost as a reply URL for a Web application. Also choose to enable ID tokens for hybrid flows. This can be seen in Figure 6.
Now you need to create a URL for the user to sign in. The URL can be seen in Listing 3. There's a lot going on in Listing 3 and frankly, in most cases, SDKs such as MSAL will abstract it for you. Wherever you have an SDK such as MSAL available, you should use it. But because I'm doing this by hand here, I need to craft up a URL.
Listing 3: The login URL
https://login.microsoftonline.com/<tenantid>/oauth2/v2.0/authorize?
    client_id=<guid>&
    response_type=code%20id_token&
    redirect_uri=http://localhost&
    response_mode=fragment&
    scope=openid&
    state=1245&
    nonce=abcde&
    code_challenge=n4bQgYhMfWWaL-qgxVrQFaO_TxsrC4Is0V1sFbDwCgg&
    code_challenge_method=S256
In Listing 3, you may see a lot of things that may be unfamiliar. I'll leave all those details for a future article where I get to talk about authentication in depth. For now, replace the strings in various place holders, such as the GUID for the Client ID and the Tenant ID, and then open a browser window in private mode and visit the URL from Listing 3. That URL should ask you to log in. After you provide your credentials, you're shown an ugly window, like Figure 7.
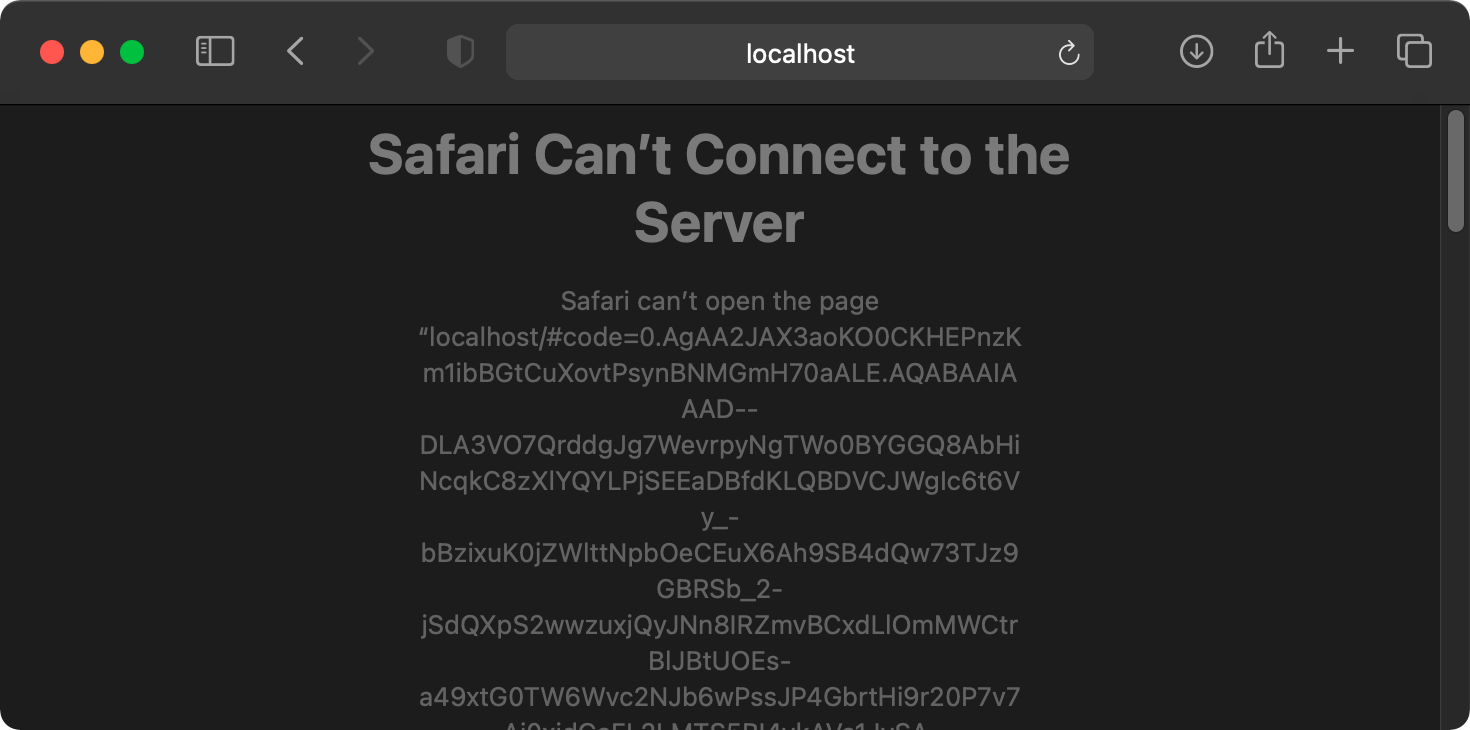
It may look like a request failed from Figure 7, but the reality is that the request worked. In a real-world application, you'd have something listening on localhost, or whatever redirect URL you specified in your Web application authentication settings. Because I don't have anything listening there, I'll have to perform this step manually. Copy and paste the entire URL from your browser window that should look like Figure 7. That entire URL should have a bunch of query parameters, and the one you're interested in is code. Copy and paste its value. Another interesting parameter here is the id_token, which proves the user's identity. If you're interested, go ahead, and visit https://jwt.ms to decode that token. You should see some interesting claims, including the user's identity.
Next, you'll redeem this code for an access token. The request for an access token can be seen in Listing 4.
Listing 4: Requesting an access token
curl --location --request POST
  'https://login.microsoftonline.com/<tenantid>/oauth2/v2.0/token' \
--header 'Content-Type: application/x-www-form-urlencoded' \
--data-urlencode 'redirect_uri=http://localhost' \
--data-urlencode 'client_id=<guid>' \
--data-urlencode 'grant_type=authorization_code' \
--data-urlencode 'code=<code>' \
--data-urlencode 'code_verifier=thisisasecret' \
--data-urlencode 'scope=https://graph.microsoft.com/.default' \
--data-urlencode 'client_secret=<secret>'
Sending this request should send you back, among other things, an access token. This is a short-lived token that you can now use to make requests to Microsoft Graph. Feel free to decode this token at jwt.ms and verify that it contains the user's identity.
To call MS Graph now under delegated permission, use the code shown in Listing 5.
Listing 5: Call the API
curl --location --request GET
  'https://graph.microsoft.com/v1.0/me\
--header 'Content-Type: application/json' \
--header 'Authorization: Bearer '
Verify that the request shown in Listing 5 shows the current user's data. There's a very subtle difference between Listing 2 and Listing 5. The only difference is the URL you are calling. Now let's try and be a little naughty. The access token that I have can call the granted delegated permissions. Let's try to use this access token to call the API from Listing 2.
You should see an error, as shown in Figure 8.
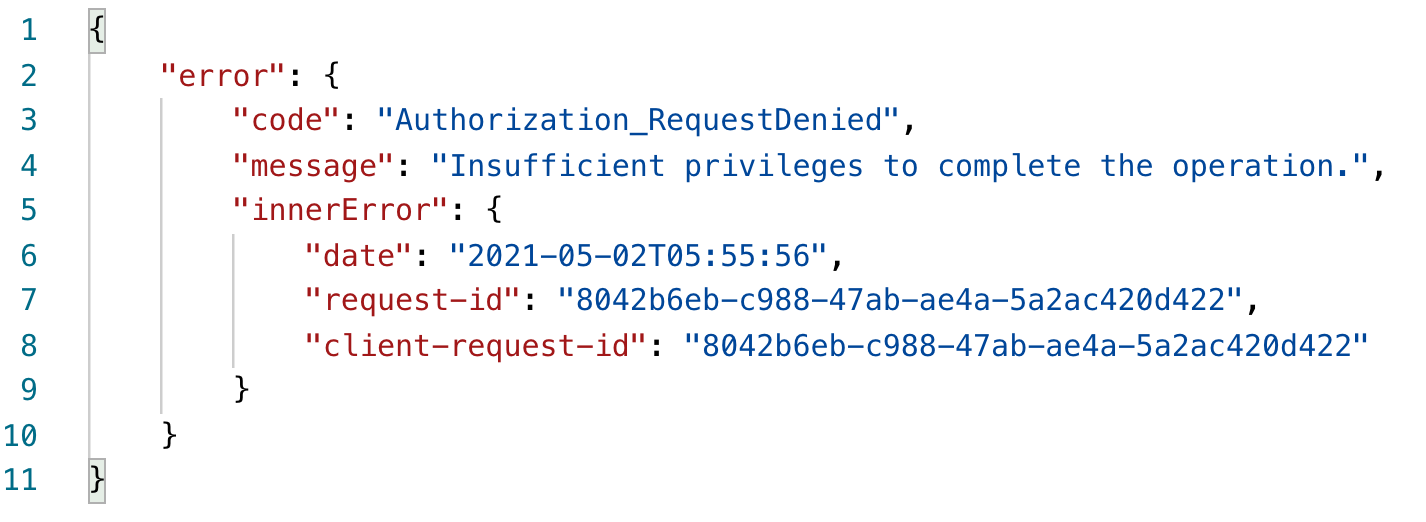
This makes sense, because the logged-in user doesn't have the ability to read all users' profiles, because you didn't give such a permission consent. If you're curious, there is a delegated permission concern that does allow you to do this. And that's User.Read.All under delegated permissions.
Similarly, you can try the reverse - try calling the me endpoint from Listing 5 with the access token you obtained for application permissions. Because there's no me, no logged in user, the request won't work.
Summary
The word “graph” is annoyingly overused in the Microsoft ecosystem and, perhaps the entire tech industry. Graph fatigue aside, let me assure you that Microsoft Graph is a very key part of the Microsoft ecosystem. It will serve you well, so get familiar with it.
Of course, there's a lot more I can say about Microsoft Graph. There are some interesting APIs. There's the whole DevOps aspect. And then there are various tips and tricks you can use – they help you discover new APIs, the right permissions, and just make you more productive in general.
And then there's the authentication bit that you should know about.
More on such topics in future articles. Happy coding.
