


The Microsoft .NET Framework comes in two flavors: conventional .NET Framework, which versions out at 4.8, and .NET Core Framework, which is currently at version 5. Neither framework has classes that provide solutions for all possible tasks. When either framework requires additional classes, a developer creates a class project, writes code, and references the class project in one or more other projects. It isn't necessary to write all these classes yourself; Microsoft provides classes in packages delivered through NuGet.
NuGet host packages are compressed files (with an extension of .nupkg) that are dependent on the publisher target of one or more .NET Frameworks. They include dependencies which, if missing, are installed along with the package.
For example, let's say that a developer intends to interact with a SQL Server database using Entity Framework. The package requires other packages, dependencies. When installing this package or other packages with known dependencies, NuGet installs these packages.
Although there are several methods for interacting with packages from installation to uninstalling from the command line or inside of Visual Studio, this article focuses on using NuGet inside of Visual Studio 2019, which provides tools natively for working with NuGet packages.
In order to access NuGet functionality, you can choose accessing the NuGet Package Manager from Visual Studio's project menu, right-clicking on the top branch of a solution in Solution Explorer, right-clicking on a project node in Solution Explorer, or using the NuGet Package Manager Console. For those new to Visual Studio and working with NuGet packages, start with the NuGet Package Manager, as there are details not available from the NuGet Package Manager Console.
Developers can not only consume packages but also create their own packages published locally. Local packages can be on a developer computer for single use or on a shared location for a team of developers to consume.
In this article, you'll learn how to write code to publish to a local source, which entails testing code intended for publishing as a NuGet package and publishing a package.
Requirements
In order to follow along, you'll need the following items:
- Microsoft Visual Studio 2019 or higher, community edition or higher
- .NET Core
- An individual or organization NuGet account using a Microsoft account
Setting Up NuGet
For publishing a local package, you'll need NuGet CLI (Command Line Interface). Make sure to add the executable to the Windows path, as outlined in the instructions.
Install the NuGet.Commandline interface from a PowerShell window.
Set Up the Local Feed Folder
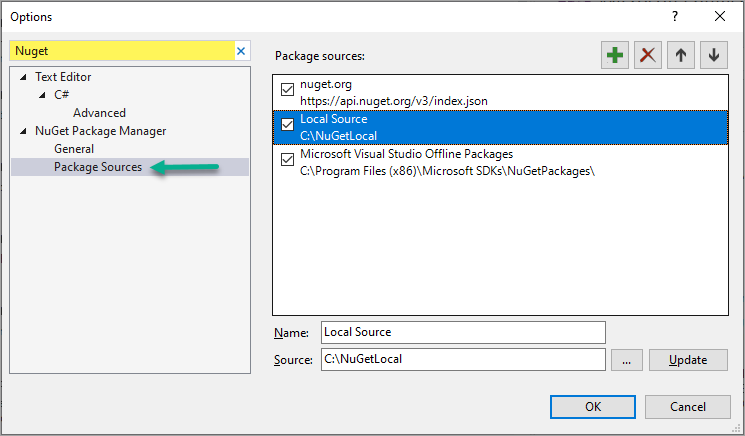
A local feed is a physical folder that a developer creates under Visual Studio options, NuGet Package Manager, Package Sources add the folder to the list of package sources. When limited to a single developer, consider a path like C:\NuGetLocal. For a team, the folder needs a location where all team members have proper permissions and access to the folder. NuGet supports feeds using a local server and remote private feeds, which is another option for teams. See Microsoft documentation for various options for remote private feeds.
Set Up Visual Studio for Local Feed
From Visual Studio's menu, select Tools > Options, and then enter NuGet in the search input. Select the suitable Package Sources, as shown in Figure 1, followed by clicking the green plus button to add your path from set up local feed folder. Provide a name, and then click the OK button.
What to Publish Locally
Candidates for local packages range from proprietary code to an organization, to code that includes licensed third-party packages, to class projects that enforce internal code standards.
Unit Test
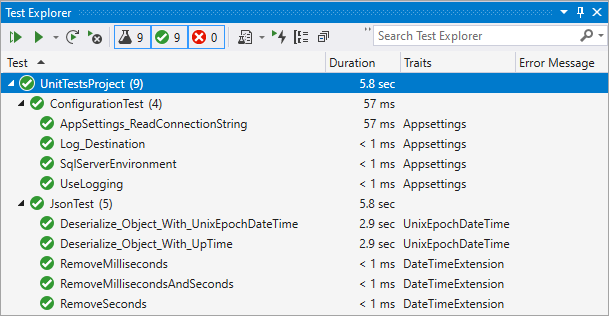
Before publishing a package, create a unit test project with sufficient test to verify code functions properly. The accompanying Visual Studio solution provides examples for unit testing, as shown in Figure 2.
Documentation
I recommend including a readme.md file and a document file that describes the library, classes, and methods included as well as known issues.
There are many packages hosted on NuGet that have no documentation, which means that the consumer must have an understanding of the library. It doesn't matter if the package is local or public; consider documenting code for future users.
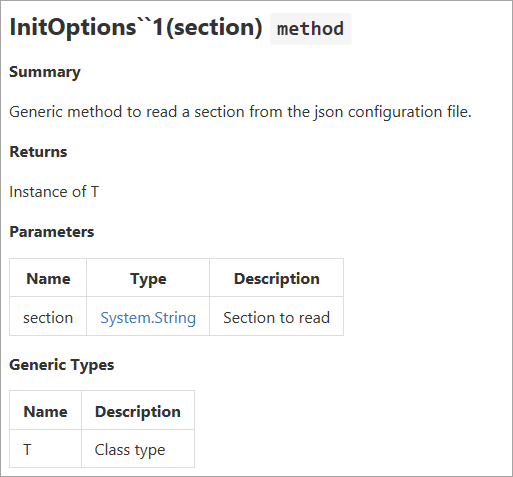
The level of detail in documentation is dependent on the audience. For example, documentation might be for a team of developers that provides just enough information, as shown in Figure 3. For public consumption, more details are needed, along with code samples.
Preparing for Publishing
From project properties for the intended project, select the Package tab.
- Check Generate NuGet package on build.
- Populate Package ID with a unique identifier. If the identifier is already in use, you'll see an error
- Provide a license.
- It's highly recommended that you include an icon file to distinguish your package from other packages.
- When appropriate, include the address for the source repository under the Repository URL.
For a complete list for setting properties, see the main readme file included with source code.
Packages can have a text file displayed once an installation has completed. To include a text file, add readme.txt to the root of the project. To select properties for the readme.txt, set Copy to Output Direction to Copy if newer. Add content for a consumer to read.
Publishing to a Local Feed
There are two ways to publish a package to a local feed. The first is to construct a command composed of a call to a NuGet executable with parameters that may be executed from a command or PowerShell window. This can end up as a tedious process.
The second method uses a utility written in C#, as shown in Figure 4.
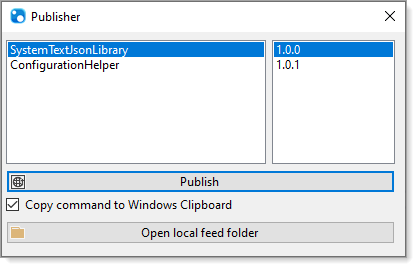
Benefits for option two, utility-based publishing, include:
- Providing a visual of all packages in the current Visual Studio solution
- Publishing a package by selecting a package and version
- Configuring through code and/or a JSON setting file
To remove a package from a local feed, use the Delete command, as described in the documentation under Secondary commands.
The publishing utility doesn't provide a remove package option. Instead, it's easier to open to the local feed folder by clicking the Open local feed folder button, as shown in Figure 4, and perform a Delete action from Windows Explorer. You can add more options to this utility, but that's beyond the scope of this article.
The local feed folder and path to the NuGet path are stored in a simple configuration file, which needs to be set up for your computer prior to running the utility.
{
  "NuGetExecutable": "C:\NuGetStuff\\nuget.exe",
  "PackageLocation": "C:\NuGetLocal"
}
In the configuration above, the first line points to where NuGet has been installed and the second line points to the local feed folder, the same folder as is set up in Visual Studio > Options > NuGet options.
Sample Code
The sample code (downloadable from the online version of this article) provides two class projects that are ready to publish to a local feed, plus a test project to test consuming these two projects. The unit test projects provide validation code that will tell you if the two test projects work correctly.
Steps to working with the sample code:
- Create a folder on your C drive for publishing local packages.
- Edit
appsettings.jsonin the Publisher project. Set thePackageLocationproperty to the local feed folder created above, followed by setting theNuGetExecutableproperty to the NuGet.exe location even if it's in the PATH for the current computer. - Build the solution.
- Open Test Explorer and run all tests.
- Run Publisher and select a project and version, as shown in Figure 4, followed by clicking the Publish button.
- Once published, a dialog appears indicating that the operation has completed.
- Click the Open local feed folder button, which opens Windows Explorer to visually validate that the code has run successfully.
Resources
Additional resources for working with NuGet packages can be located with the included source code in the online version of the magazine.
Summary
NuGet provides more offering the consumption of other developer's packages. If you follow information provided in this article, you can host local packages.
