


In this article, I'm continuing my series on how to enhance the user experience (UX) of your MVC applications, and how to make them faster. In the first article, entitled (“Enhance Your MVC Applications Using JavaScript and jQuery: Part 1”), you learned about starting the MVC application, which was coded using all server-side C#. You then added JavaScript and jQuery to avoid post-backs and to enhance the UX in various ways. If you haven't already read that article, I highly recommend that you read it to learn about the application you're enhancing in this series of articles. The previous article contains installation instructions for the MVC application and how to set up the database.
You're going to continue to add additional client-side code to the MVC application to further enhance the UX as you work your way through this article. You'll learn to expand search areas after the user performs a search, hide certain HTML elements when printing a Web page, and create custom jQuery validation rules to enforce business rules on the client-side. Download the sample that accompanies this article and install it, to follow along step-by-step with this article.
The Problem: Duplicate Form Submission Code
In the previous article, you wrote code to respond to the form being submitted and to display a “please wait” message while waiting for the page to return. The problem is that this code is duplicated on the product, customer maintenance, promotional code, and vehicle type pages. If you look at these pages, you'll find the same three lines of code within the $(document).ready() function.
$("form").submit(function () {
    mainController.pleaseWait(this);
});
The Solution: Move Code to Main Controller
You should move these three lines of code to the mainController closure in the site.js file. Open the wwwroot\js\site.js file and add a new method to the mainController closure named formSubmit().
function formSubmit () {
    $("form").submit(function () {
        pleaseWait(this);
    });
}
Make this method public by adding it to the return object of the closure.
return {
    "pleaseWait": pleaseWait,
    "disableAllClicks": disableAllClicks,
    "setSearchValues": setSearchValues,
    "isSearchFilledIn": isSearchFilledIn,
    "setSearchArea": setSearchArea,
    "formSubmit" : formSubmit
}
Open the Views\CheckOut\Index.cshtml file and modify the code at the bottom to look like the following code snippet.
$(document).ready(function () {
    // Setup the form submit
    mainController.formSubmit();
});
Open the Views\CustomerMaint\CustomerMaintIndex.cshtml file and modify the code at the bottom to look like the following code snippet.
$(document).ready(function () {
    // Setup the form submit
    mainController.formSubmit();
});
Open the Views\Product\ProductIndex.cshtml file and modify the code at the bottom to look like the following code snippet.
$(document).ready(function () {
    // Setup the form submit
    mainController.formSubmit();
});
Open the Views\PromoCode\PromoCodeIndex.cshtml file and modify the code at the bottom to look like the following code snippet.
$(document).ready(function () {
    // Setup the form submit
    mainController.formSubmit();
});
Open the Views\VehicleType\VehicleTypeIndex.cshtml file and modify the code at the bottom to look like the following code snippet.
$(document).ready(function () {
    // Setup the form submit
    mainController.formSubmit();
});
Try It Out
Run the sample MVC application and click on the Admin > Products menu to display the product page. Expand the “Search for Products” area and fill in the word “Auto” in the “Product Name (or Partial)” field. Click the Search button and you should see still the “please wait” message appear. Try out some of the other pages you just changed to ensure that they still display the “please wait” message as well.
The Problem: After Searching, the Search Area Closes
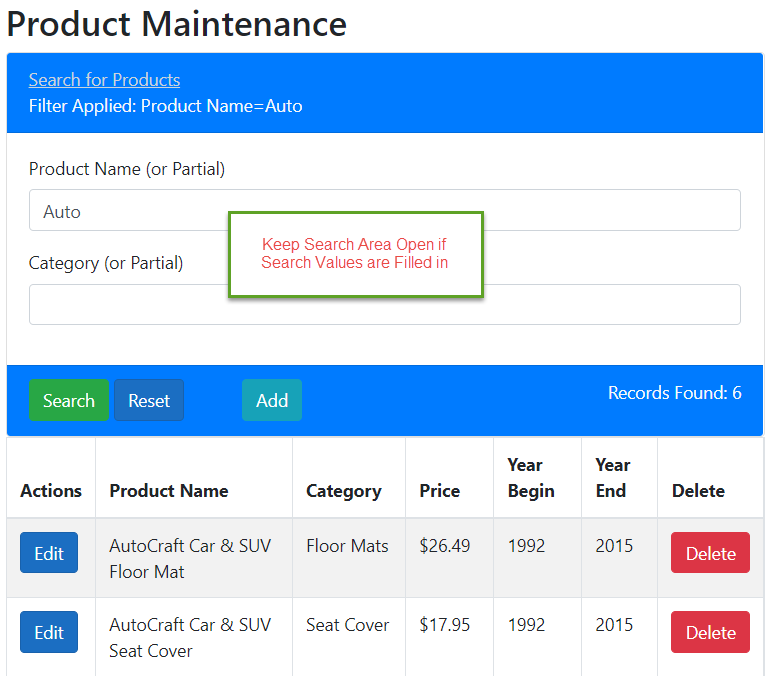
When you ran the MVC application and clicked on the Admin > Products menu to display the product page (Figure 1), did you notice that when the page returned, the search area was closed? You can see the Filter Applied telling the user what the current filter is, but a better UX is to have the search area automatically open if there are values present in any of the search fields. You could accomplish this functionality with server-side C# code, but a better technique is to add a few lines of JavaScript code.
The Solution: Look for Values in Search Fields
There are many pages that have a search area: the product, customer maintenance, promotional code, and vehicle type pages to be exact. Each page's search area has the same ID attribute to identify the <div> element that contains the unique search fields for each page. You need to write code to determine if any search values have been filled in, and whether to expand the card body or not. Part of this code can be made into a set of generic methods and placed into the mainController closure located in the site.js file. Open the wwwroot\js\site.js file and add a new private variable into the mainController, as shown in the following code snippet.
// ************************************
// Private Variables
// ************************************
let searchValues = null;
Add three new methods to this closure, as shown in the code snippet below. The first method setSearchValues(), is called by each page after gathering the unique search field values for that page. If any value is filled into the searchValues variable, then isSearchFilledIn() returns a true, otherwise it returns a false value. The setSearchArea() method calls the Bootstrap collapse() method on the <div> tag with the ID attribute set to “searchBody”. The value “show” or “hide” is passed to the collapse() method depending on the return value from the isSearchFilledIn() method.
function   setSearchValues ( value ) {
    searchValues = value;
}
function   isSearchFilledIn() {
    return searchValues;
}
function setSearchArea() {
    $("#searchBody").collapse(isSearchFilledIn() ? "show" : "hide");
}
Add each of these three methods to the return object to make them public from the mainController, as shown in the following code snippet.
return {
    "pleaseWait": pleaseWait,
    "disableAllClicks": disableAllClicks,
    "setSearchValues": setSearchValues,
    "isSearchFilledIn": isSearchFilledIn,
    "setSearchArea": setSearchArea
}
Let's now use these new methods and learn how to set the values from the search area on the Product maintenance page. Open the Views\Product\ProductIndex.cshtml file and add a closure named pageController immediately after the use strict; statement, as shown in Listing 1. You only need to write a single method named setSearchValues() in this controller. This method's purpose is to gather any unique search field values on this page and pass them into the mainController using its setSearchValues() method. The return object on the pageController, exposes this setSearchValues() method, as well as mapping two others to call the methods in the mainController directly.
Listing 1: Add a pageController closure to help gather search values and pass them into the mainController
let pageController = (function () {
    function setSearchValues() {
        let searchValues =
            $("#SearchEntity_ProductName").val() +
            $("#SearchEntity_Category").val();

        mainController.setSearchValues(searchValues);
    }

    // Expose public functions from closure
    return {
        "setSearchValues": setSearchValues,
        "setSearchArea": mainController.setSearchArea,
        "isSearchFilledIn": mainController.isSearchFilledIn
    }
})();
Now that you have the pageController written, add two lines of code in the $(document).ready() to call the setSearchValues() method, then the setSearchArea() method on the pageController closure.
$(document).ready(function () {
    // Setup the form submit
    mainController.formSubmit();

    // Collapse search area or not?
    pageController.setSearchValues();
    pageController.setSearchArea();
});
Try It Out
Click on the Admin > Products menu to display the product page. Expand the “Search for Products” area and fill in the word “Auto” in the “Product Name (or Partial)” field. Click the Search button and now, after the search results are displayed, the “Search for Products” area should be opened so you can see the value you placed in there.
Add Search Functionality to Other Maintenance Pages
Let's now add this same functionality to the other maintenance pages that need it. Open the Views\CustomerMaint\CustomerMaintIndex.cshtml file and add a pageController closure within the <script> tag, as shown in the code below. Notice that the only thing different from the pageController closure you added to the Product Maintenance page is the code within the setSearchValues() method.
let pageController = (function () {
    function setSearchValues() {
        mainController.setSearchValues($("#SearchEntity_LastName").val());
    }
    // Expose public functions from closure
    return {
        "setSearchValues": setSearchValues,
        "setSearchArea": mainController.setSearchArea,
        "isSearchFilledIn": mainController.isSearchFilledIn
        }
})();
Add two lines of code in the $(document).ready() to call the setSearchValues() method, then the setSearchArea() method on the pageController closure.
$(document).ready(function () {
    // Setup the form submit
    mainController.formSubmit();

    // Collapse search area or not?
    pageController.setSearchValues();
    pageController.setSearchArea();
});
Open the Views\PromoCode\PromoCodeIndex.cshtml file and add a pageController closure within the <script> tag, as shown in the code below. Notice that the only thing different from the pageController closure you added to the Customer Maintenance page is the code within the setSearchValues() method.
let pageController = (function () {
    function setSearchValues() {
        mainController.setSearchValues($("#SearchEntity_Code").val());
    }
    // Expose public functions from closure
    return {
        "setSearchValues": setSearchValues,
        "setSearchArea": mainController.setSearchArea,
        "isSearchFilledIn": mainController.isSearchFilledIn
    }
})();
Add two lines of code in the $(document).ready() to call the setSearchValues() method, then the setSearchArea() method on the pageController closure.
$(document).ready(function () {
    // Setup the form submit
    mainController.formSubmit();

    // Collapse search area or not?
    pageController.setSearchValues();
    pageController.setSearchArea();
});
Open the Views\VehicleType\VehicleTypeIndex.cshtml file and add a pageController closure within the <script> tag, as shown in Listing 2. Notice that the only thing different from the pageController closure you added to the Promotional Code Maintenance page is the code within the setSearchValues() method.
Listing 2: The setSearchValues() method can be simple, or a little more complicated, depending on the number and type of search fields you use
let pageController = (function () {
    function setSearchValues() {
        let searchValues =
            $("#SearchEntity_Make").val() +
            $("#SearchEntity_Model").val();

        let year = $("#SearchEntity_Year").val();

        // Year may contain <-- Select a Year -->
        // ignore that entry
        if (year && !year.startsWith("<--")) {
            searchValues += year;
        }

        mainController.setSearchValues(searchValues);
    }

    // Expose public functions from closure
    return {
        "setSearchValues": setSearchValues,
        "setSearchArea": mainController.setSearchArea,
        "isSearchFilledIn": mainController.isSearchFilledIn
    }
})();
This setSearchValues() method is a little different from the previous ones because there's a drop-down list of years. In this method, you concatenate the two drop-down values together, but you should get the value of the selected year independently. The reason is if you haven't filled in any years yet, then a null is returned. You don't want to try to concatenate a null to string as this can have unpredictable results. In addition, if the year drop-down has been loaded with years, the first element is always "<-- Select a Year -->" and you need to ignore that element. The If statement checks to ensure that the years drop-down has a value and that it doesn't start with "<--". If it doesn't, the value is added to the searchValues variable, which is then passed to the setSearchValues() method in the mainController.
Add two lines of code in the $(document).ready() to call the setSearchValues() method, then the setSearchArea() method on the pageController closure.
$(document).ready(function () {
    // Setup the form submit
    mainController.formSubmit();

    // Collapse search area or not?
    pageController.setSearchValues();
    pageController.setSearchArea();
});
Try It Out
Run the application and try out each search area to make sure it's only open when a search value is filled in.
The Problem: Search Area on Shopping Cart Closes After Searching
If you remember from the previous article, you added code to the shopping cart page, so the two search areas are mutually exclusive on being open. If you run a search from either of the two search areas, notice that when the search returns, that search box remains open. As you haven't written any JavaScript code to control this, you can only assume (and rightly so) that this functionality is being controlled on the server.
The code for this functionality is contained on the Views\Shopping\Index.cshtml page, the ShoppingController, and the ShoppingViewModel classes. Two separate properties are needed to set the “collapse” class to one or the other of the two different search area elements. Although this isn't necessarily a bad thing, it does make the HTML markup a little more convoluted and a front-end UI developer might have trouble understanding what's going on. So, let's change this code to run from the client-side instead of from the server-side.
The Solution: Remove the Server-Side Code
Open the ShoppingViewModel class located in the PaulsAutoParts.ViewModelLayer project and remove the two properties that controls each of the search areas' collapsibility.
public string SearchYearMakeModelCollapse { get; set; }
public string SearchNameCategoryCollapse { get; set; }
Next, remove all references to these properties from the ShoppingController class. Open the Controllers\Shopping\ShoppingController.cs file and locate where these two variables are set in the Index(), SetYearMakeModel(), and SearchNameCategory() methods and delete those lines of code.
Finally, open the Views\Shopping\Index.cshtml file and locate the <div> element where the SearchYearMakeModelCollapse property is used to set the class attribute.
<div id="yearMakeModel" class="@Model.SearchYearMakeModelCollapse">
Change the class attribute to collapse.
<div id="yearMakeModel" class="collapse">
Locate the <div> element where the SearchNameCategoryCollapse property is used to set the class attribute.
<div id="nameCategory" class="@Model.SearchNameCategoryCollapse">
Change the class attribute to collapse.
<div id="nameCategory" class="collapse">
Add a closure at the end of the file immediately after the use strict statement, as shown in Listing 3.
Listing 3: Add a closure to control which search area is open on the shopping cart page
let pageController = (function () {
    // ************************************
    // Private Variables
    // ************************************
    let searchYearMakeModel = null;
    let searchNameCategory = null;

    // ************************************
    // Private Functions
    // ************************************
    function setSearchArea() {
        // Make collapsible regions mutually exclusive
        $("#yearMakeModel").on("show.bs.collapse", function () {
            $("#nameCategory").collapse("hide");
        });
        $("#nameCategory").on("show.bs.collapse", function () {
            $("#yearMakeModel").collapse("hide");
        });

        setYearMakeModel();

        setProductNameCategory();
    }

    function setYearMakeModel() {
    }

    function setProductNameCategory() {
    }

    // ************************************
    // Public Functions
    // ************************************
    return {
        "setSearchArea": setSearchArea
    }
})();
The code used to make the two search areas on the page mutually exclusive has now been written in the setSearchArea() method. Modify the $(document).ready() function to delete the code now in the setSearchArea() method, and replace it with the call to the pageController.setSearchArea() method as shown below.
$(document).ready(function () {
    // Determine if search area
    // should be collapsed or not
    pageController.setSearchArea();
});
Now go back to the pageController closure and fill in the code for the setYearMakeModel() to see if anything is filled into the Make or Model drop-downs.
function setYearMakeModel() {
    let value = "hide";
    // Have Make or Model been loaded?
    let searchValues =
        $("#SearchEntity_Make option").length +
        $("#SearchEntity_Model option").length;
    // Make and Model have been loaded
    // Thus, a year has been selected
    if (searchValues > 0) {
        value = "show";
    }
    $("#yearMakeModel").collapse(value);
}
In this method, add up the value of the lengths of the make and model drop-down lists. If this value is greater than zero, you know the Year drop-down has been loaded. If the Year drop-down has been changed to anything other than the first item in the list, the other two lists have been loaded. Remember that these are dependent lists, so once a valid year has been selected, the make and models have been loaded, and you need to display this search area. Add a new method named setProductNameCategory(), as shown in Listing 4, to see if anything is filled into the “Product Name / Category” search area.
Listing 4: Check whether a product name and/or category has been filled in on the shopping page
function setProductNameCategory () {
    let value = "hide";

    // Check for a value in product name
    if ($("#SearchEntity_ProductName").val()) {
        value = "show";
    }
    else {
        // Has category drop-down been loaded?
        if ($("#SearchEntity_Category option").length > 0) {
            // Has a valid category been selected?
            if ($("#SearchEntity_Category").prop("selectedIndex") > 0) {
                value = "show";
            }
        }
    }

    $("#nameCategory").collapse(value);
}
In the setProductNameCategory() method, check to see if the Product Name search input value has been filled in and if so, set the value variable to show so that the collapsible area is displayed. If not, check to see if the Category drop-down has been loaded with data, and if so, check whether the current category selected is greater than the first element and set the value variable to show.
Try It Out
Run the application and fill in different search criteria in the two different search areas and make sure the appropriate search box stays open after searching.
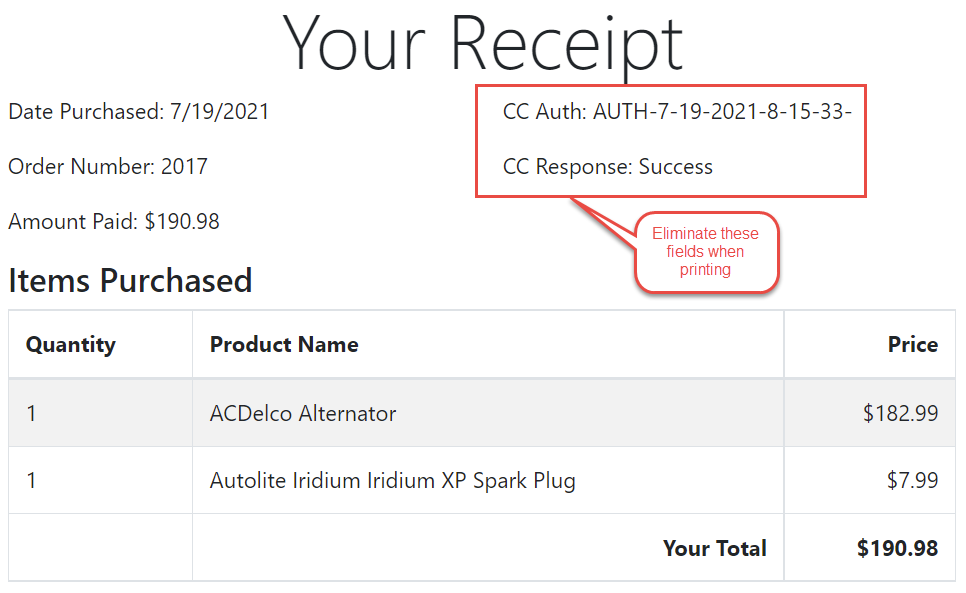
The Problem: Print a Receipt but Hide Certain Elements
Run the sample MVC application, click on the Shop menu, and search for some products. Add one or two products to the cart. Click on the n Items in Cart menu and click on the Check Out button. Click on the Submit Payment button and you should be taken to the Your Receipt page, as shown in Figure 2. The user can just use the browser's print menu to print out the current page, but you might wish to hide some of the HTML elements so they aren't printed. In addition, I recommend that you add a “Print Receipt” button to make it easier for the user to perform the printing. When this button is clicked, call the window.print() function. You can use a Bootstrap CSS style, d-print-none to eliminate any element you want when entering the print mode for this page.
The Solution: Use Bootstrap Class to Hide Elements While Printing
Open the Views\CheckOut\Receipt.cshtml file and add the d-print-none class on the <div> element that displays the CCAuth field.
<div class="col d-print-none">
    <p>CC Auth: @Model.PaymentInformation.CCAuth</p>
</div>
Also add the d-print-none class on the following <div> element that displays the Response field.
<div class="col d-print-none">
    <p>CC Response: @Model.PaymentInformation.Response</p>
</div>
Add a new <button> element at the bottom of the page so the user doesn't need to use the browser's print feature, which can be in different places on different browsers. In the onclick event of this button, call the window.print() function to bring up the browsers' print dialog.
<div class="row">
    <div class="col text-center">
        <button type="button"
                onclick="window.print();"
                class="d-print-none">
        Print Receipt
        </button>
    </div>
</div>
Try It Out
Run the application and add some items to the shopping cart. Then go through the payment and click on the Print Receipt button. Notice that all the HTML elements that have been marked with d-print-none don't show up in the print preview window.
The Problem: Avoid Post-Backs Just to Validate User Input
When you create your entity classes to match the tables in your database, most code generators (such as the Entity Framework generator) can only infer so much from the meta-data in the database. They can usually detect the data type, primary key, the maximum length of a string, whether the field is required or not, and a few other items. This meta-data is added as data annotation attributes to each property in the generated class. However, you probably know a little bit more about each column and can add more information such as a minimum length, a range of valid data, and whether a field holds an email address, phone number, or a credit card number.
The Solution: Add Data Annotations to Entity Classes
Go through each of the properties on each entity class used for data input and add or modify the appropriate data annotations. The data annotations on input properties are turned into unobtrusive jQuery validation on the client-side. This jQuery validation enforces business rules on the client-side and thus avoids a lot of post-backs just to perform business rule checking. Let's modify and also add some additional data annotations to some of the entity classes in the MVC application.
Open the TableEntities\Customer.cs file in the PaulsAutoParts.EntityLayer project. Modify the FirstName property's [StringLength] attribute to set the MinimumLength to 2.
[Display(Name = "First Name")]
[Required(ErrorMessage = "First Name must be filled in.")]
[StringLength(50, MinimumLength = 2,
    ErrorMessage = "First Name must be
    between {2} and {1} characters long.")]

public string FirstName { get; set; }
Modify the LastName property's [StringLength] attribute to set the MinimumLength to 2.
[Display(Name = "Last Name")]
[Required(ErrorMessage = "Last Name must be filled in.")]
[StringLength(75, MinimumLength = 2,
    ErrorMessage = "Last Name must be
    between {2} and {1} characters long.")]

public string LastName { get; set; }
Modify the Email property's [StringLength] attribute to set the MinimumLength to 3. Add the [EmailAddress] data annotation to the Email property.
[Display(Name = "Email Address")]
[Required(ErrorMessage = "Email Address must be filled in.")]
[StringLength(255, MinimumLength = 3,
    ErrorMessage = "Email Address must be
    between {2} and {1} characters long.")]
[EmailAddress]

public string EmailAddress { get; set; }
Modify the Phone property's [StringLength] attribute to set the MinimumLength to 3. Add the [Phone] data annotation to the Phone property.
[Phone]
public string Phone { get; set; }
Open the TableEntities\Product.cs file and modify the ProductName property's [StringLength] attribute to set the MinimumLength to 3.
[Display(Name = "Product Name")]
[Required(ErrorMessage = "Product Name must be filled in.")]
[StringLength(50, MinimumLength = 3,
    ErrorMessage = "Product Name must be
    between {2} and {1} characters long.")]

public string ProductName { get; set; }
Modify the Category property's [StringLength] attribute to set the MinimumLength to 3.
[Display(Name = "Category")]
[Required(ErrorMessage = "Category must be filled in.")]
[StringLength(20, MinimumLength = 3,
    ErrorMessage = "Category must be
    between {2} and {1} characters long.")]

public string Category { get; set; }
Add the [Range] data annotation to the Price property to set the minimum, maximum, and error message. Adding the Range attribute tells jQuery validation to enforce the data entry by the user to be between the minimum and maximum ranges set in this attribute.
[Display(Name = "Price")]
[DataType(DataType.Currency)]
[Column(TypeName = "decimal(18,2)")]
[Range(0.01, 99999, ErrorMessage = "{0} Must Be Between {1} and {2}")]

public decimal Price { get; set; }
Open the ShoppingEntities\CreditCard.cs file and add the [CreditCard] data annotation to the CardNumber property.
[Required]
[StringLength(25)]
[Display(Name = "Credit Card Number")]
[CreditCard]

public string CardNumber { get; set; }
Modify the [StringLength] data annotation to the SecurityCode property to set the MinimumLength to 3 and set the appropriate error message.
[Required]
[StringLength(4, MinimumLength = 3,
    ErrorMessage = "{0} must be between
    {2} and {1} characters long.")]
[Display(Name = "Code on Back")]

public string SecurityCode { get; set; }
Add the [Range] data annotation to the ExpMonth property to set the minimum, maximum, and errormessage attributes.
[Display(Name = "Expiration Month")]
[Range(1, 12, ErrorMessage = "{0} Must be Between 1 and 12")]
public int ExpMonth { get; set; }
Open the ShoppingEntities\ShoppingCartItem.cs file and add the [Range]`` data annotation to the Quantityproperty to set the range between1and99999and theerror message` to display if the quantity is outside of this range.
[Display(Name = "Quantity")]
[Range(1, 999999, ErrorMessage = "{0} must be between {1} and {2}")]
public int Quantity { get; set; }
If you are using the [Phone] and/or [CreditCard] attributes you need to include the additional-methods.min.js file. Open the Views\Shared\_ValidationScriptsPartials.cshtml file in the PaulsAutoParts project. Add the following line at the end of this file.
<script src="~/lib/jquery-validation/dist/additional-methods.min.js">
</script>
Try It Out
Run the application and click on Admin > Products menu. Click the Add button, then click the Save button and you should see the “Please Wait While Loading” message appear. But the form is invalid and you can just barely see the messages because the page has been grayed out. This is the problem you now need to solve in the next section of this article.
The Problem: “Please Wait” Message Displays Even If Input Isn't Valid
As you just saw, if you attempt to post-back the form but the data is invalid, the “please wait” message is still being displayed. To solve this problem, you need to check to see if the form is valid before displaying this message.
The Solution: Check If Form Is Valid Using jQuery
Because you centralized the form submission code into the site.js file, this fix is very easy to employ. Open the wwwroot\js\site.js file and locate the formSubmit() method and add an if() statement to check whether the form is valid. If it is, then display the “please wait” message; otherwise, don't do anything. Modify the formSubmit() method to look like the following code snippet.
function formSubmit() {
    $("form").submit(function () {
        if ($("form").valid()) {
            pleaseWait(this);
        }
    });
}
Try It Out
Run the application and click on Admin > Products menu. Click the Add button and immediately click the Save button. If you've done everything correctly, you should just see the error messages on the page and no “please wait” message is displayed. Go through some of the other pages, such as the customer maintenance and promotional code pages, and ensure they work as well.
The Problem: Don't Allow Numbers in Input Fields
Sometimes data annotations can't cover every type of business rule you wish to enforce. This is where the jQuery Validation library comes in handy. You can add custom rules using jQuery to handle situations where you don't want to have to post-back just to enforce basic rules, such as making sure that there are no numbers in a text string, that a certain date is greater than some other date, etc. Let's look at how to add jQuery Validation to ensure that no numbers are contained in the first name or last name of a customer.
The Solution: Add jQuery Validation Method
Open the Views\CustomerMaint\CustomerMaintIndex.cshtml file and add a new method in the pageController closure called addValidationRules(), as shown in Listing 5.
Listing 5: Build custom jQuery validation rules using addMethod() and validate() methods
function addValidationRules() {
    $.validator.addMethod("nonumbers", function (value, element) {
        // this.optional(element): returns true
        // if element is blank and NOT required
        return this.optional(element) || /^([^0-9]*)$/.test(value);
    });

    $("form").validate({
        // The properties in the rules and messages
        // objects are based on the name= attribute
        // in the HTML, not the id attribute
        rules: {
            "SelectedEntity.FirstName": {
                nonumbers: true
            },
            "SelectedEntity.LastName": {
                nonumbers: true
            }
        },
        messages: {
            "SelectedEntity.FirstName": {
                nonumbers: "First Name may not have any numbers in it"
            },
            "SelectedEntity.LastName": {
                nonumbers: "Last Name may not have any numbers in it"
            }
        }
    });
}
In the addValidationRules() method, call the $.validator.addMethod() on the jQuery validator object and pass in two parameters. The first parameter is a name, nonumbers, that uniquely identifies this custom rule. The second parameter is the function to run when enforcing the rule on the specific field(s) on the page. Make the validation rule name as descriptive as possible so you can tell what it does at a glance. This rule name is also referenced in the rules and messages objects in the jQuery validate() method.
The nonumbers function receives two parameters, the value typed in by the user, and the element object that caused this function to run. Pass the element to the optional() method, which checks to see if the HTML element is missing the required attribute and if the value is blank. If both these conditions are true, this function returns true immediately and the second part of the or condition isn't checked. If the value is filled in, a regular expression is used to determine whether any numeric values are contained in the value typed in by the user. If so, a false value is returned, and the error message specified in the messages object is returned.
In the $("form").validate() method, create an object that has two properties; rules and messages. The rules property is itself another object with property names that match up to HTML input elements with the name attribute set to the property name. Within each of these properties is another object with a series of properties to specify which rules to check. For example, you may have required:true as one of property/value pairs under the "SelectedEntity.FirstName" property. This tells jQuery that the HTML element with the name attribute set to "SelectedEntity.FirstName" is a required field. In the code shown in Listing 5, you have the property/value pair nonumbers:true, which tells jQuery to invoke the function you wrote previously and pass in the value from the HTML element. Once the user tabs off the First Name field, the function executes and if it returns a true, the value input by the user is valid. If the function returns a false, the input value is invalid, and the message connected to the nonumbers property under the messages object is displayed. Make the addValidationRules() method public by adding it to the return object of the closure as shown in the code snippet below.
return {
    "setSearchValues": setSearchValues,
    "setSearchArea": mainController.setSearchArea,
    "isSearchFilledIn": mainController.isSearchFilledIn,
    "addValidationRules": addValidationRules
}
Call the addValidationRules() method from within the $(document).ready() function at the bottom of the page.
$(document).ready(function () {
    // Add jQuery validation rules
    pageController.addValidationRules();

    // Setup the form submit
    mainController.formSubmit();

    // Collapse search area or not?
    pageController.setSearchValues();
    pageController.setSearchArea();
});
If the value input is invalid, jQuery displays the error message immediately after the HTML element by inserting a <label> element with the class attribute set to the error. Open the wwwroot\css\site.css and add a new CSS rule with the class name error so the error message displays as red on white text.
.error {
    color: red;
}
Try It Out
Run the application and select the Admin > Customers/Orders menu. Click the Add button and add a number to either the first name or last name fields and tab off the field. You should see the appropriate error message appear immediately after the field.
The Problem: Only Allow Years Less Than the Current Year Plus Two
When adding a new vehicle, the user is required to add a year, make, and model. When adding a year, they shouldn't be able to enter a year that's greater than one year from now. For instance, if this is the year 2021, they shouldn't be able to enter a year greater than 2022. There isn't a data annotation attribute for this (although you could create one). This task is easy to accomplish using the jQuery Validation library.
The Solution: Add jQuery Validation Rule
Open the Views\VehicleType\VehicleTypeIndex.cshtml file and add a new method named addValidationRules() to the pageController closure, as shown in Listing 6.
Listing 6: Remember that the rules are tied to the name, and not the ID, attribute
function addValidationRules() {
    $.validator.addMethod("yearplusone",
    function (value, element) {
        // this.optional(element): returns true
        // if element is blank and NOT required
        return this.optional(element) || value < (new Date().getFullYear() + 2);
    });

    $("form").validate({
        // The properties in the rules and messages
        // objects are based on the name= attribute
        // in the HTML, not the id attribute
        rules: {
            "SelectedEntity.Year": {
                yearplusone: true
            }
        },
        messages: {
            "SelectedEntity.Year": {
                yearplusone: "Year Must Be Less Than " +
                    (new Date().getFullYear() + 2)
            }
        }
    });
}
Just as in the previous addValidationRules() method, you start by calling the jQuery addMethod() on the validator object. The name of this validation rule is yearplusone. In the function for this rule, check to ensure that the value the user typed in is less than current year plus two. In the messages object, create the error message with the actual year that they must be less than. Doing this lets the user know exactly the values they should be entering for this field. Make the addValidationRules() method public by adding it to the return object on the pageController closure, as shown in the following code snippet.
return {
    "setSearchValues": setSearchValues,
    "setSearchArea": mainController.setSearchArea,
    "isSearchFilledIn": mainController.isSearchFilledIn,
    "addValidationRules": addValidationRules
}
Call the addValidationRules() method from within the $(document).ready() function at the bottom of the page.
$(document).ready(function () {
    // Add jQuery validation rules
    pageController.addValidationRules();

    // Setup the form submit
    mainController.formSubmit();

    // Collapse search area or not?
    pageController.setSearchValues();
    pageController.setSearchArea();
});
Try It Out
Run the application, select the Admin > Vehicle Types menu, and click on the Add button. Set the Year field to the current year plus two and tab off the field. You should see the appropriate error message appear just after the input field.
The Problem: Validating Two Dependent Fields
Another custom rule you might need is to take the values from two different input fields and checking them to one another or combine them together to check against some other criteria. As an example, in the credit card entry screen, the user needs to select a month and year their credit card expires. These two fields are separate, but you need to compare the month and the year against the current month and year to make sure what they selected are greater than those.
The Solution: Add jQuery Validation Rules
Open the Views\CheckOut\Index.cshtml file and add a pageController closure immediately after the 'use strict' statement as shown in the code below.
let pageController = (function () {
    function isMonthYearValid(month, year) {
}

    function addValidationRules() {
}
    // Expose public functions from closure
    return {
        "addValidationRules": addValidationRules
    }
})();
Modify the isMonthYearValid() method in the pageController closure, as shown in the code below.
function isMonthYearValid(month, year) {
    let ret = true;
    let currentMonth = new Date().getMonth() + 1;

    // Only check month, if the current year has been selected
    if (year == new Date().getFullYear()) {
        ret = month >= currentMonth;
    }
    return ret;
}
The isMonthYearValid() method accepts the month and the year from the respective drop-downs on the page. Only if the year passed in is the same as the current year will the month be checked. Otherwise, you assume the year is greater than the current year. When the Year drop-down is loaded, only the current year and greater years are added to the drop-down, thus you don't need to check for a year less than the current year. Modify the addValidationRules() method and add two addMethod() calls to define the custom methods for checking the month and the year, as shown in Listing 7.
Listing 7: If you have multiple dependent fields, you need to call addMethod() for each one
function addValidationRules() {
    $.validator.addMethod("checkexpmonth",
        function (value, element) {
            let ret = isMonthYearValid(parseInt(value),
            $("#CustomerCreditCard_ExpYear").val());

            return ret;
        });

        $.validator.addMethod("checkexpyear",
        function (value, element) {
            let ret = isMonthYearValid(
                $("#CustomerCreditCard_ExpMonth").val(), parseInt(value));

        return ret;
        });
}
The first validation rule created is named checkexpmonth and its function passes the value parameter (which is the month), and the year value from the drop-down to the isMonthYearValid() method. The return value from this function is returned from this validation function.
The second validation rule created is named checkexpyear and its function receives the value parameter, which is the year selected by the user from the Year drop-down. The month value is retrieved using jQuery and both these values are passed to the isMonthYearValid() method. The return value from this function is returned from this validation function.
Just below the two addMethod() calls, but still within the addValidationRules() method, add the code shown in Listing 8 to set up the jQuery Form validation.
Listing 8: The Depends function is useful when two or more fields depend on one another
$("form").validate({
    rules: {
        "CustomerCreditCard.ExpMonth": {
            required: true, checkexpmonth: {
                depends: function (element) {
                    // After checking the month, always check the year too
                    return $("form").validate().element(
                                                "#CustomerCreditCard_ExpYear");
                }
            }
        },
        "CustomerCreditCard.ExpYear": {
            required: true,
            checkexpyear: true
        }
    },
    messages: {
        "CustomerCreditCard.ExpMonth": {
            checkexpmonth: "Expiration Month/Year Must Be Greater
                Than or Equal to The Current Month/Year"
        },
        "CustomerCreditCard.ExpYear": {
            checkexpyear: "Expiration Month/Year Must Be Greater
                Than or Equal to The Current Month/Year"
        }
    },
    errorPlacement: function (error, element) {
        if (element.attr("name") == "CustomerCreditCard.ExpMonth" ||
            element.attr("name") == "CustomerCreditCard.ExpYear")
            error.insertAfter("#CustomerCreditCard_ExpMonth");
        else
            error.insertAfter(element);
    }
});
Depends Function
To get the Month and Year drop-downs to validate together, you need to add a depends property within the checkexpmonth property. The depends property is a function call that accepts the current element. You're not doing anything with the element argument, instead, you simply make a call to the specific element that's the Year drop-down. This means that both the month and the year rules are called, and both must return true for the validation to pass.
ErrorPlacement Property
Besides the rules and messages properties, there's one additional property created in the jQuery validate() object called errorPlacement. The errorPlacement property is a function that's passed the error message to display and the element that caused the error. The default error placement is after the current element being validated. However, in this code I'm checking to see if the name attribute on the element passed into this function is either the Month or Year drop-downs. If it is, the error message for either of these is only going to be displayed after the Month drop-down. Because these two elements are validated together, the error message should be placed consistently after just one of them.
Add the <partial> element shown below to the </script> element at the end of the page to ensure that the jQuery validation script files are included on this page.
<partial name="_ValidationScriptsPartial" />
NOTE: If the validation checking doesn't work, ensure that you have the <partial> element after all your </script> tags. Add the code to call the addValidationRules() method inside the $(document).ready() function.
$(document).ready(function () {
    // Add jQuery validation rules
    pageController.addValidationRules();

    // Setup the form submit
    mainController.formSubmit();
});
Try It Out
Run the application and click on the Shop menu. Add an item to the shopping cart and go to the checkout screen. Set the month to a value less than the current month and set the year to this year. You should see an error message appear once you tab off the drop-down.
Summary
In this article, you added additional jQuery to your pages to enhance the user experience and avoid post-backs. It's a good idea to centralize code that's used on multiple pages into a JavaScript file that's included on all pages and keep code that's only for that specific page within a closure on that page. It's also a good practice to reuse the same variable names, such as pageController, for each closure on your pages. Take advantage of jQuery validation to create client-side business rules, but you should still write the appropriate code on the server-side to also check those same rules. In the next article, you're going to learn to use Ajax to populate drop-downs, add and delete items from the shopping cart, use jQuery auto-complete, and calculate totals on the shopping cart page.
