


Today's enterprises need reliable, scalable, and high-performant distributed messaging systems for data exchange in real-time. There are quite a few messaging systems out there, and Apache Kafka is one of them. It's an open source and versatile stream-processing software that's a high-throughput, low-latency messaging system for distributed applications, and it's written in Java and Scala.
This article provides a deep dive on how to work with Apache Kafka in ASP.NET 6 Core.
If you're to work with the code examples discussed in this article, you should have the following installed in your system:
- Visual Studio 2022
- .NET 6.0
- ASP.NET 6.0 Runtime
- Apache Kafka
- Java Runtime Environment (JRE)
- 7-zip
You can download and install 7-zip from here: https://www.7-zip.org/download.html.
You can download JRE from here: https://www.java.com/en/download/.
If you don't already have Visual Studio 2022 installed in your computer, you can download it from here: https://visualstudio.microsoft.com/downloads/.
You can download Apache Kafka from here: https://kafka.apache.org/downloads.
Introduction to Apache Kafka
Streaming data refers to data constantly produced by hundreds of data sources, which often transmits the data records concurrently. A streaming platform must manage this continual influx of data while still processing it sequentially and progressively.
Take advantage of Apache Kafka for high performance, scalable, and reliable messaging in real-time.
Kafka is a publish/subscribe messaging platform with built-in support for replication, partitioning, fault tolerance, and better throughput. It's an excellent choice for applications that need large scale data processing. Kafka is mainly used to build real-time streaming data pipelines. Kafka incorporates fault-tolerant storage and stream processing capabilities to allow for the storage and analysis of historical and real-time data.
Here's the list of Apache Kafka features:
- It can publish and subscribe streams of data.
- It's capable of handling a vast number of read/write operations per second.
- It can persist data for a particular period.
- It has the ability to grow elastically with zero downtime.
- It offers support for replication, partitioning, and fault-tolerance.
Why Should You Use Apache Kafka?
Scalability. Apache Kafka is highly scalable. It supports high-performance sequential writes and separates topics into partitions to facilitate highly scalable reads and writes. This helps Kafka to enable multiple producers and consumers to read and write at the same time. Additionally, because Kafka is distributed, you can scale up by adding new nodes to the cluster.
High throughput. Throughput is a measure of the number of messages that arrive at a given point in time. Apache Kafka is capable of handling massive volumes of incoming messages at a high velocity per second (around 10K messages per second or a maximum request size of one million bytes per request, whichever comes first).
High performance. Apache Kafka can deliver messages at high speed and high volumes. It provides high throughput with low latency and high availability.
Highly reliable. Kafka is a fault-tolerant messaging system and is adept at recovering from failures quickly. Kafka can replicate data and handle many subscribers. In Apache Kafka, the messages are durable even after they have been consumed. This enables the Kafka Producer and Kafka Consumer to be available at different times and increases resilience and fault tolerance. Kafka can load balance consumers in the event of a failure. It is more reliable than other messaging services such as RabbitMQ, AMQP, JMS, etc.
Low latency. Latency refers to the amount of time required to process each message. Apache Kafka can provide high throughput with low latency and high availability.
Durability. Kafka messages are highly durable because Kafka stores the messages on the disk, as opposed to in memory.
Kafka vs. Traditional Messaging Systems
Kafka differs from traditional messaging queues in several ways. Kafka retains a message after it has been consumed. Quite the opposite, competitor RabbitMQ deletes messages immediately after they've been consumed.
RabbitMQ pushes messages to consumers and Kafka fetches messages using pulling.
Kafka can be scaled horizontally and traditional messaging queues can scale vertically.
Typical Use Cases
Here are some use cases for Kafka:
- Messaging: Kafka acts as a message broker. A message broker enables applications, services, and systems to communicate with one another and exchange information. It can decouple processing from data producers and store, validate, organize, route, and deliver messages to appropriate destinations.
- Application activity tracking: Kafka was originally developed to address application activity tracking. You can leverage Kafka to publish all events (user login, user registration, time spent by a logged in user, etc.) that occur in your application to a dedicated Kafka topic. Then you can have consumers subscribe to the topics and process the data for monitoring, analysis, etc.
- Log aggregation: You can publish logs to Kafka topics and then aggregate and process them when needed. Kafka can collect logs from various services and make them available to the consumers in a standard format (JSON).
- Real-time data processing: Today's applications need data to be processed as soon as it's available. IoT applications also need real-time data processing.
- Operational metrics: Kafka can aggregate the statistical data collected from several distributed applications and then produce centralized feeds of operational data.
Components of the Apache Kafka Architecture
The Apache Kafka architecture is comprised of the following components:
- Kafka Topic: A Kafka topic defines a channel for the transmission of data. When the producers publish messages to the topics, the consumers read messages from them. A unique name identifies a topic pertaining to a Kafka cluster. There's absolutely no limit to the number of topics you can create in a cluster.
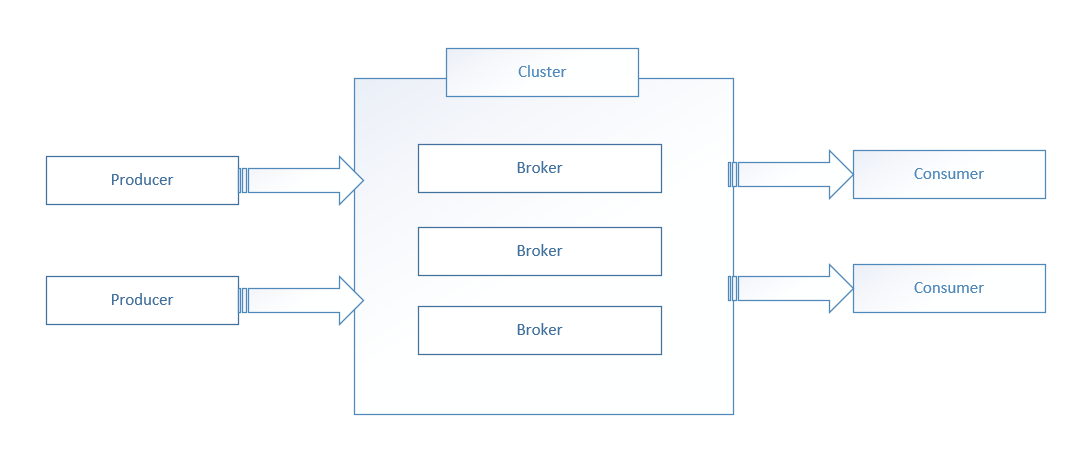
- Kafka Cluster: A Kafka cluster comprises one or more servers or Kafka brokers. For high availability, a Kafka cluster typically contains many brokers, each of them having its own partition. Because they're stateless, ZooKeeper (see later in this list) is used to manage the cluster state.
- Kafka Producer: A Kafka producer serves as a data source for one or more Kafka topics and is responsible for writing, optimizing, and publishing messages to those topics. A Kafka producer can connect to a Kafka cluster through Zookeeper. Alternatively, it can connect to a Kafka broker directly.
- Kafka Consumer: A Kafka consumer consumes data through reading messages on the topics they've subscribed to. Incidentally, each Kafka consumer belongs to a particular consumer group. A Kafka consumer group comprises related consumers who share a common task. Kafka sends messages to the consumers within the group from different partitions of a topic.
- Kafka ZooKeeper: A Kafka Zookeeper manages and coordinates the Kafka brokers in a cluster. It also notifies producers and consumers in a Kafka cluster of the existence of new brokers or the failure of brokers.
- Kafka Broker: A Kafka broker acts as a middleman between producers and consumers, hosting topics and partitions and enabling sending and receiving messages between them. The brokers in a typical production Kafka cluster can handle many reads/writes per second. Producers and consumers don't communicate directly. Instead, they communicate using these brokers. Thus, if one of the producers or consumers goes down, the communications pipeline continues to function as usual.
Figure 1 illustrates a high-level Kafka architecture. A Kafka cluster comprises one or more Kafka brokers. Although the Producers push messages into the Kafka topics in a Kafka broker, the Consumers pulls those messages off a Kafka topic.
When Not to Use Kafka
Despite being the most popular messaging platform and having several advantages, you should not use Kafka in any of the following use cases:
- Kafka's not a good choice if you need your messages processed in a particular order. To process messages in a specific order; you should have one consumer and one partition. Instead, in Kafka, you have multiple consumers and partitions and so it isn't an ideal choice in this use case.
- Kafka isn't a good choice if you only need to process a few messages per day (maybe up to several thousand). Instead, you can take advantage of traditional messaging queues like RabbitMQ.
- Kafka is an overkill for ETL jobs when real-time processing is required because it isn't easy to perform data transformations dynamically.
- Kafka is also not a good choice when you need a simple task queue. Instead, it would be best if you leveraged RabbitMQ here.
Kafka isn't a replacement for a database, and it should never be used for long-term storage. Because Kafka stores redundant copies of data, it might be a costly affair as well. When you need data to be persisted in a database for querying, insertion, and retrieval, you should use a relational database like Oracle, SQL Server, or a non-relational database like MongoDB.
Setting Up Apache Kafka
First off, download the Apache Kafka setup file from the location mentioned earlier. Now switch to the Downloads folder in your computer and install the downloaded files one by one. Kafka is available as a zip file, so you must extract the archive to the folder of your choice. Assuming you've already downloaded and installed 7-zip and Java in your computer, you can proceed with setting up and running Apache Kafka.
Now follow the steps outlined below:
- Switch to the Kafka config directory in your computer. It is
D:\kafka\configon my computer. - Open the file
server.properties. - Find and replace the line
log.dirs=/tmp/kafka-logswithlog.dirs=D:/kafka/kafka-logs, as shown in Figure 2.
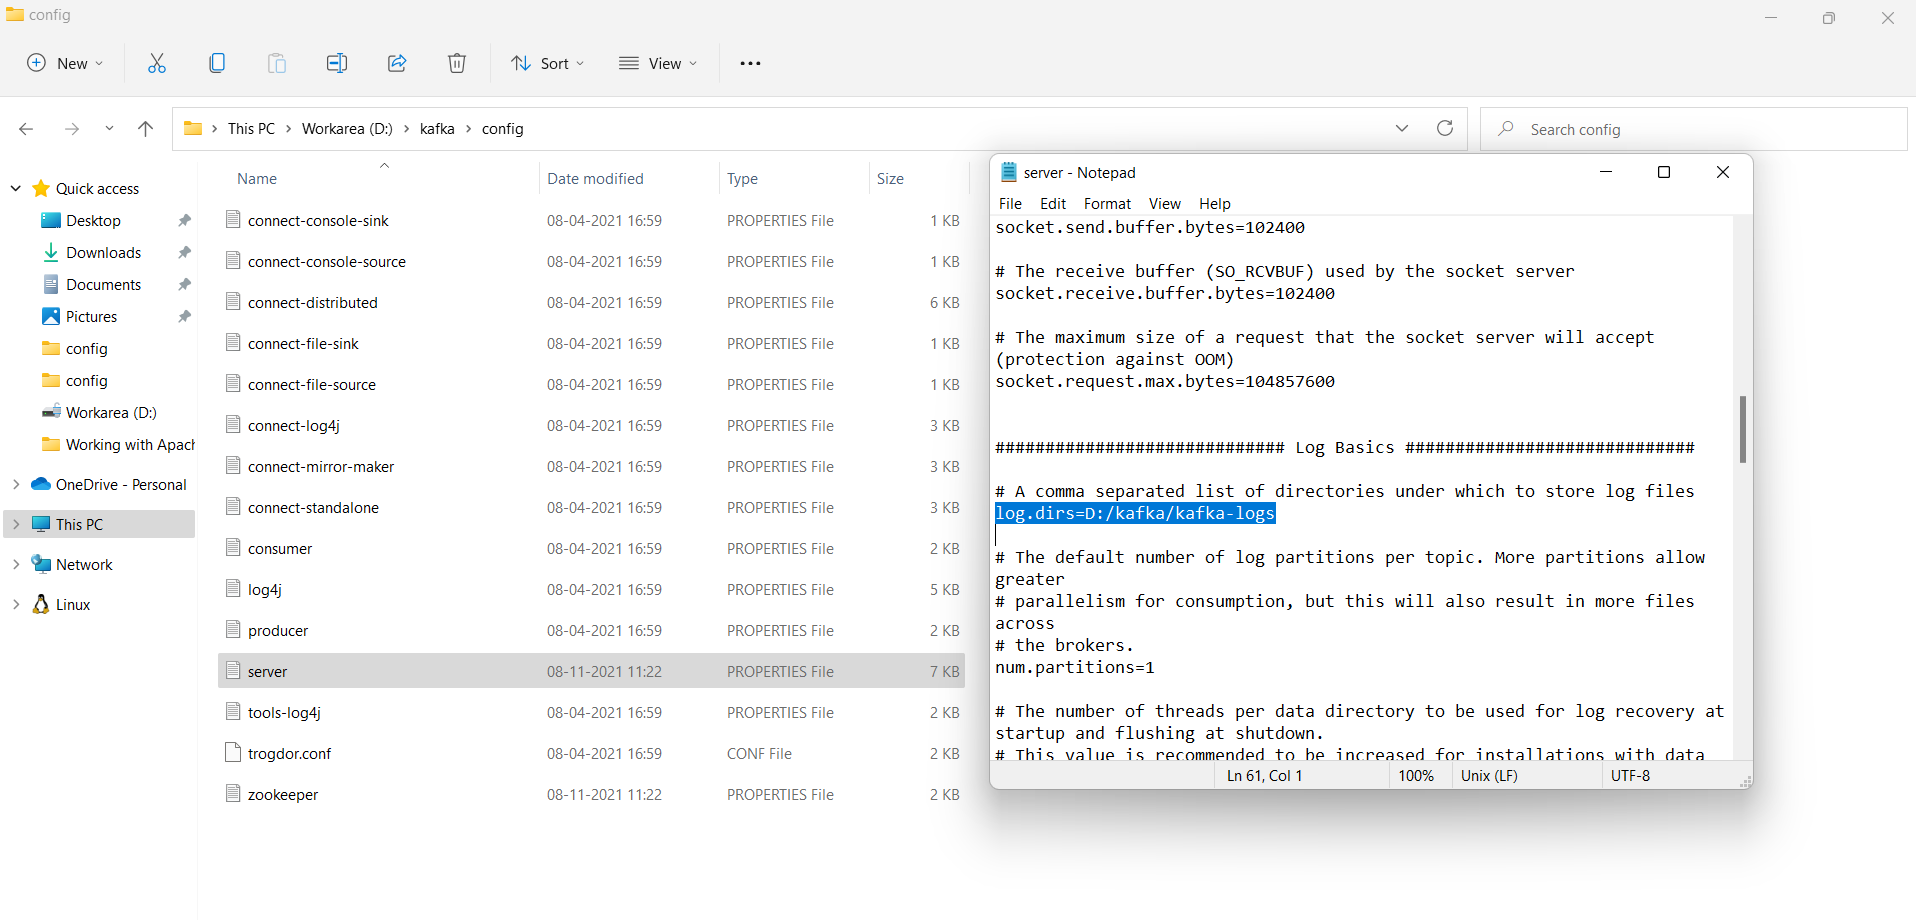
- Save and close the
server.propertiesfile. - Now open the file
zookeeper.properties. - Find and replace the line
dataDir=/tmp/zookeeperwithdataDir=D:/kafka/zookeeper-data, as shown in Figure 3.
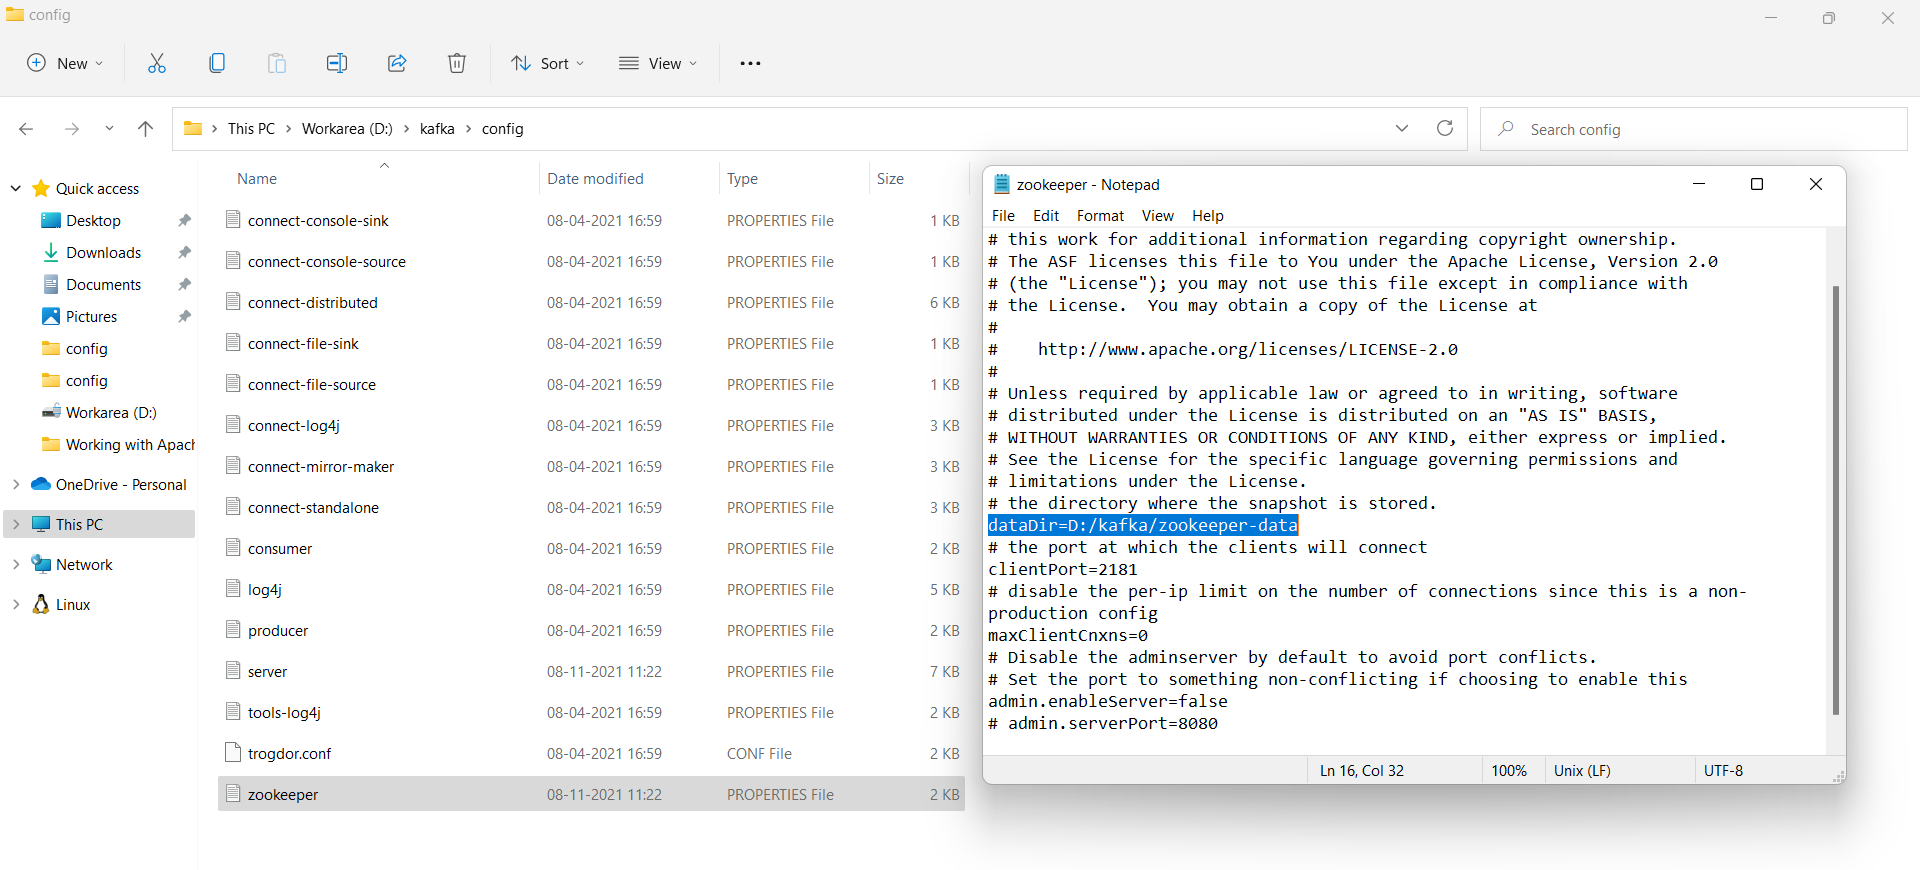
- Save and close the file.
By default, Kafka runs on the default port 9092 in your computer and connects to ZooKeeper at the default port 2181.
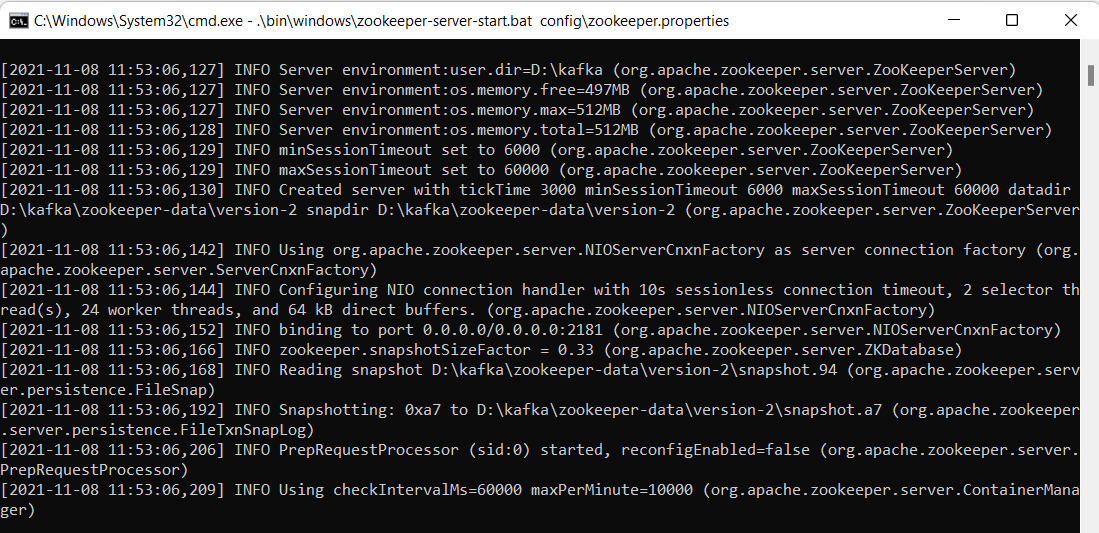
Switch to your Kafka installation directory and start Zookeeper using the following command:
.\bin\windows\zookeeper-server-start.bat
    config\zookeeper.properties
Figure 4 is how it looks when Zookeeper is up and running in your system:
Launch another command window and write the following command in there to start Kafka:
.\bin\windows\kafka-server-start.bat
config\server.properties
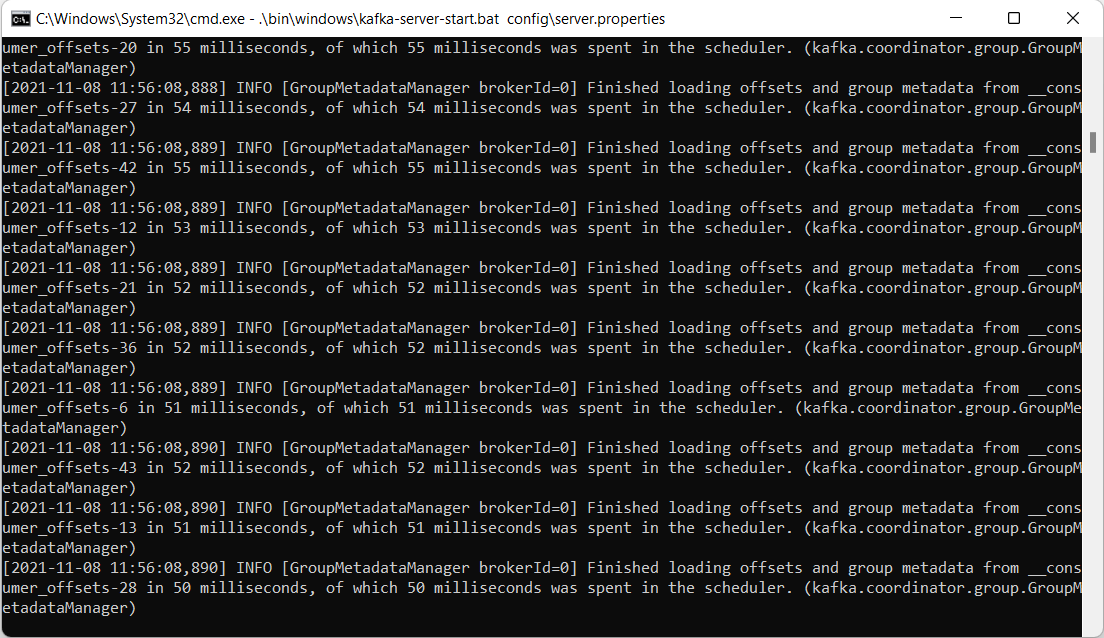
When Kafka is up and running in your system, it looks like Figure 5.
Create Topic(s)
Now that Zookeeper and Kafka are both up and running, you should create one or more topics. To do this, follow the steps outlined below:
- Launch a new command prompt window.
- Type the following command in there and press enter:
kafka-topics.bat --create --zookeeper
    localhost:2181 --replication-factor 1
    --partitions 1 --topic test
- You can list all topics in a cluster using the following command:
.\bin\windows\kafka-topics.bat --list
    --zookeeper localhost:2181
Working with Apache Kafka in ASP.NET Core 6
In this section, you'll implement a simple Order Processing application. You'll build two applications: the producer application and the consumer application. Both of these applications will be created using ASP.NET 6 in Visual Studio 2022 IDE.
Create a New ASP.NET 6 Project in Visual Studio 2022
Let's start building the producer application first. You can create a project in Visual Studio 2022 in several ways. When you launch Visual Studio 2022, you'll see the Start window. You can choose “Continue without code” to launch the main screen of the Visual Studio 2022 IDE.
To create a new ASP.NET 6 Project in Visual Studio 2022:
- Start the Visual Studio 2022 Preview IDE.
- In the “Create a new project” window, select “ASP.NET Core Web API” and click Next to move on.
- Specify the project name as
ApacheKafkaProducerDemoand the path where it should be created in the “Configure your new project” window. - If you want the solution file and project to be created in the same directory, you can optionally check the “Place solution and project in the same directory” checkbox. Click Next to move on.
- In the next screen, specify the target framework and authentication type as well. Ensure that the “Configure for HTTPS,” “Enable Docker Support,” and the “Enable OpenAPI support” checkboxes are unchecked because you won't use any of these in this example.
- Click Create to complete the process.
Follow the same steps outlined above to create another ASP.NET Core 6 Web API project. Name this project ApacheKafkaConsumerDemo. Note that you can also choose any meaningful name for both these projects.
You now have two ASP.NET Core 6 Web API projects: ApacheKafkaProducerDemo and the ApacheKafkaConsumerDemo.
Install NuGet Package(s)
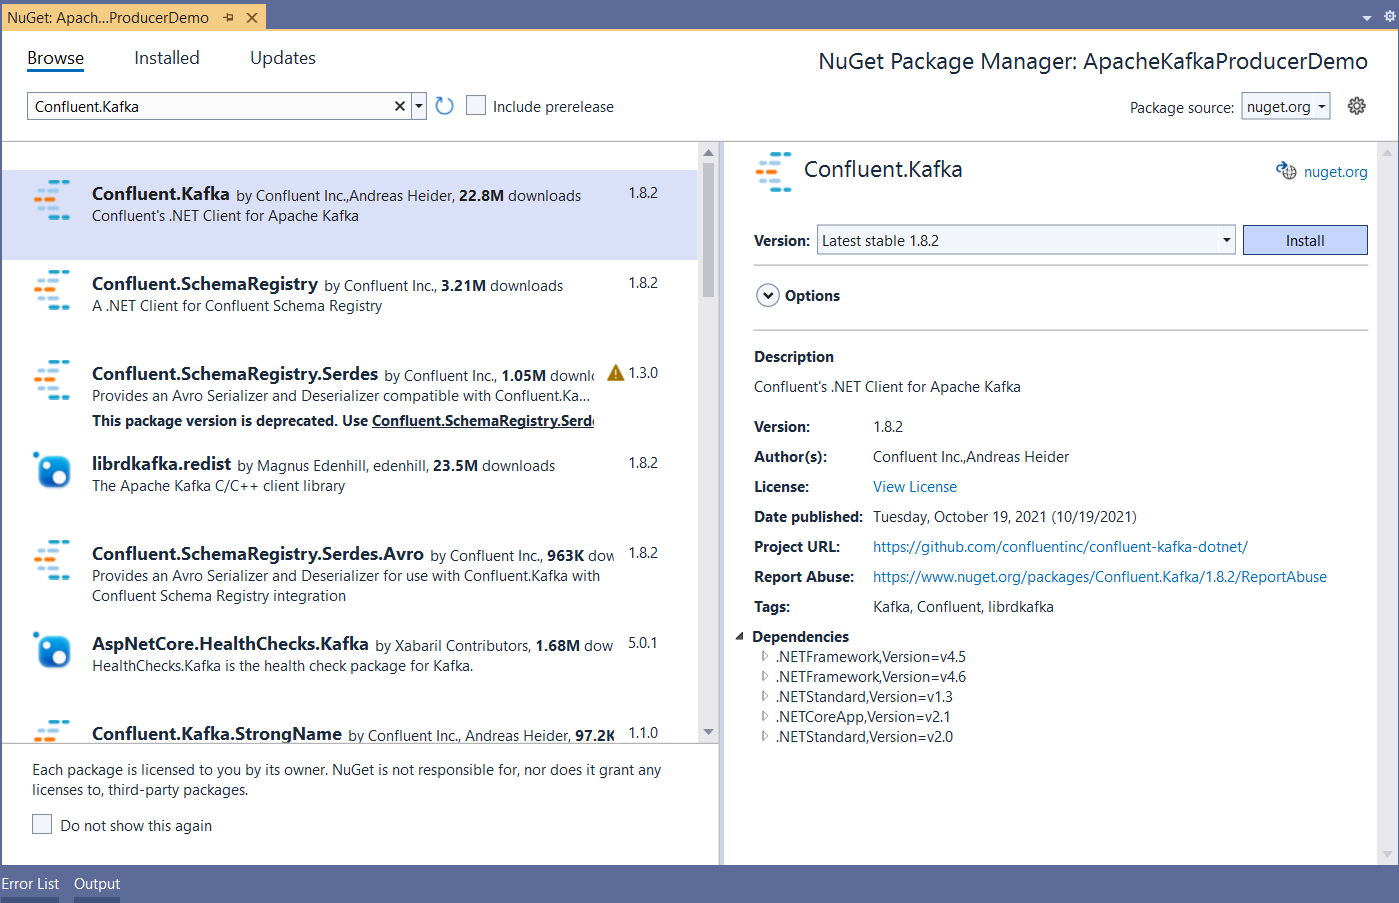
So far so good. The next step is to install the necessary NuGet package(s). To produce and consume messages, you need a client for Kafka. Use the most popular client: Confluent's Kafka .NET Client. To install the required packages into your project, right-click on the solution and select "Manage NuGet Packages for Solution…". Then type Confluent.Kafka in the search box, select the Confluent.Kafka package, and install it. You can see the appropriate screen in Figure 7.
Alternatively, you can execute the following command in the Package Manager Console:
PM> Install-Package Confluent.Kafka
Now you'll create the classes and interfaces for the two applications.
Building the ApacheKafkaProducerDemo Application
Create a class named OrderRequest in a file named OrderRequest.cs with the following code in there:
namespace ApacheKafkaProducerDemo
{
    public class OrderRequest
    {
        public int OrderId { get; set; }
        public int ProductId { get; set; }
        public int CustomerId { get; set; }
        public int Quantity { get; set; }
        public string Status { get; set; }
    }
}
Create a new controller named ProducerController in the ApacheKafkaProducerDemo application with the code found in Listing 1 in it.
Listing 1: Create a new API Controller
using Confluent.Kafka;
using Microsoft.AspNetCore.Mvc;
using System;
using System.Net;
using System.Text.Json;
using System.Threading.Tasks;
using System.Diagnostics;

namespace ApacheKafkaProducerDemo.Controllers {
    [Route("api/[controller]")]
    [ApiController]
    public class ProducerController: ControllerBase {
        private readonly string
        bootstrapServers = "localhost:9092";
        private readonly string topic = "test";

        [HttpPost]
        public async Task <IActionResult>
        Post([FromBody] OrderRequest orderRequest) {
            string message = JsonSerializer.Serialize(orderRequest);
            return Ok(await SendOrderRequest(topic, message));
        }
        private async Task < bool > SendOrderRequest
        (string topic, string message) {
            ProducerConfig config = new ProducerConfig {
                BootstrapServers = bootstrapServers,
                ClientId = Dns.GetHostName()
            };

            try {
                using(var producer = new ProducerBuilder
                <Null, string> (config).Build()) {
                    var result = await producer.ProduceAsync
                    (topic, new Message <Null, string> {
                        Value = message
                });

                Debug.WriteLine($"Delivery Timestamp:
                {result.Timestamp.UtcDateTime}");
                return await Task.FromResult(true);
            }
        } catch (Exception ex) {
            Console.WriteLine($"Error occured: {ex.Message}");
        }

        return await Task.FromResult(false);
    }
    }
}
Building the ApacheKafkaConsumerDemo Application
Create a new class named OrderProcessingRequest in a file having the same name and a .cs extension with the following content in it:
namespace ApacheKafkaConsumerDemo
{
    public class OrderProcessingRequest
    {
        public int OrderId { get; set; }
        public int ProductId { get; set; }
        public int CustomerId { get; set; }
        public int Quantity { get; set; }
        public string Status { get; set; }
    }
}
Next,you'll create a hosted service to consume the messages. Create a class named ApacheKafkaConsumerService in another new file having the same name with a .cs extension, as found in Listing 2. This class should extend the IHostedService interface.
Listing 2: Create an ApacheKafkaConsumer Service class
using Confluent.Kafka;
using Microsoft.Extensions.Hosting;
using System;
using System.Text.Json;
using System.Threading;
using System.Threading.Tasks;
using System.Diagnostics;

namespace ApacheKafkaConsumerDemo {
    public class ApacheKafkaConsumerService:IHostedService {
        private readonly string topic = "test";
        private readonly string groupId = "test_group";
        private readonly string bootstrapServers = "localhost:9092";

        public Task StartAsync(CancellationToken cancellationToken) {
            var config = new ConsumerConfig {
            GroupId = groupId,
            BootstrapServers = bootstrapServers,
            AutoOffsetReset = AutoOffsetReset.Earliest
            };

            try {
                using(var consumerBuilder = new ConsumerBuilder
                <Ignore, string> (config).Build()) {
                    consumerBuilder.Subscribe(topic);
                    var cancelToken = new CancellationTokenSource();

                try {
                    while (true) {
                        var consumer = consumerBuilder.Consume
                           (cancelToken.Token);
                        var orderRequest = JsonSerializer.Deserialize
                            <OrderProcessingRequest>
                                (consumer.Message.Value);
                        Debug.WriteLine($"Processing Order Id:
                            {orderRequest.OrderId}");
                    }
                } catch (OperationCanceledException) {
                    consumerBuilder.Close();
                }
            }
        } catch (Exception ex) {
            System.Diagnostics.Debug.WriteLine(ex.Message);
        }

        return Task.CompletedTask;
        }
        public Task StopAsync(CancellationToken cancellationToken) {
            return Task.CompletedTask;
        }
    }
}
Register the Hosted Service
You should register the hosted service in the ConfigureServices method, as shown in the code snippet given below:
public void ConfigureServices
(IServiceCollection services)
{
    services.AddSingleton
    <IHostedService, ApacheKafkaConsumerService>();
    services.AddControllers();
}
Execute the Application
Set appropriate breakpoints in the source code of both applications so that you can debug them. You should run the producer and the consumer applications separately because they are part of different solutions. To run the application, follow these steps:
- Execute the producer application.
- Execute the consumer application.
- Launch the Postman Http Debugger tool.
- Send an HTTP POST request to the producer API using Postman, as shown in Figure 8.
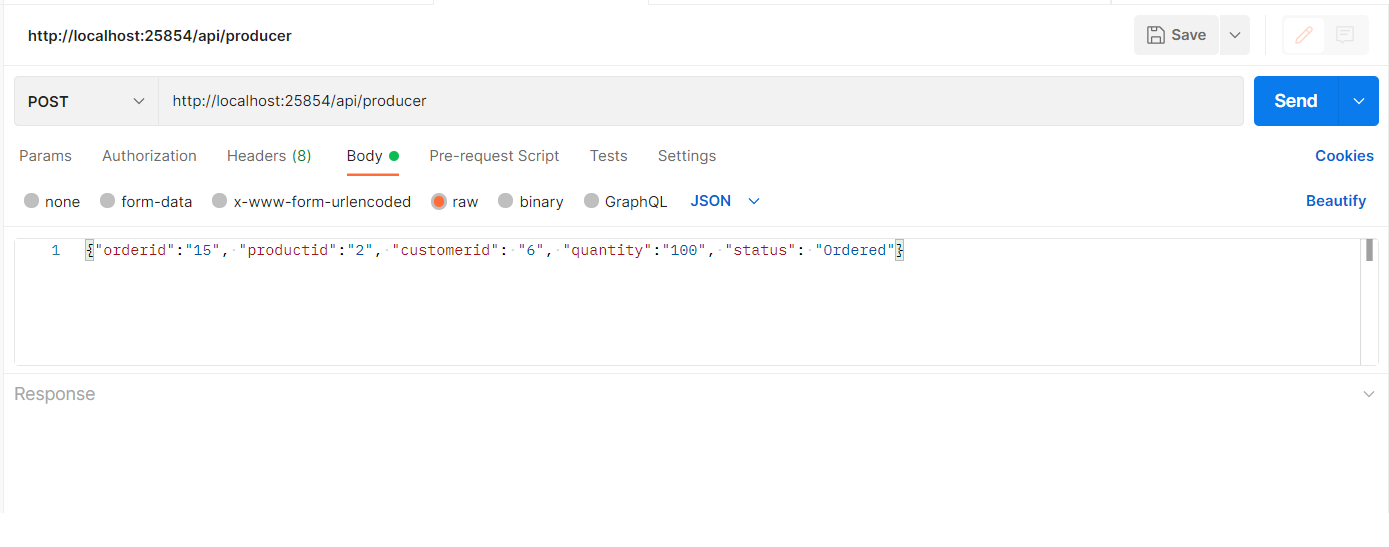
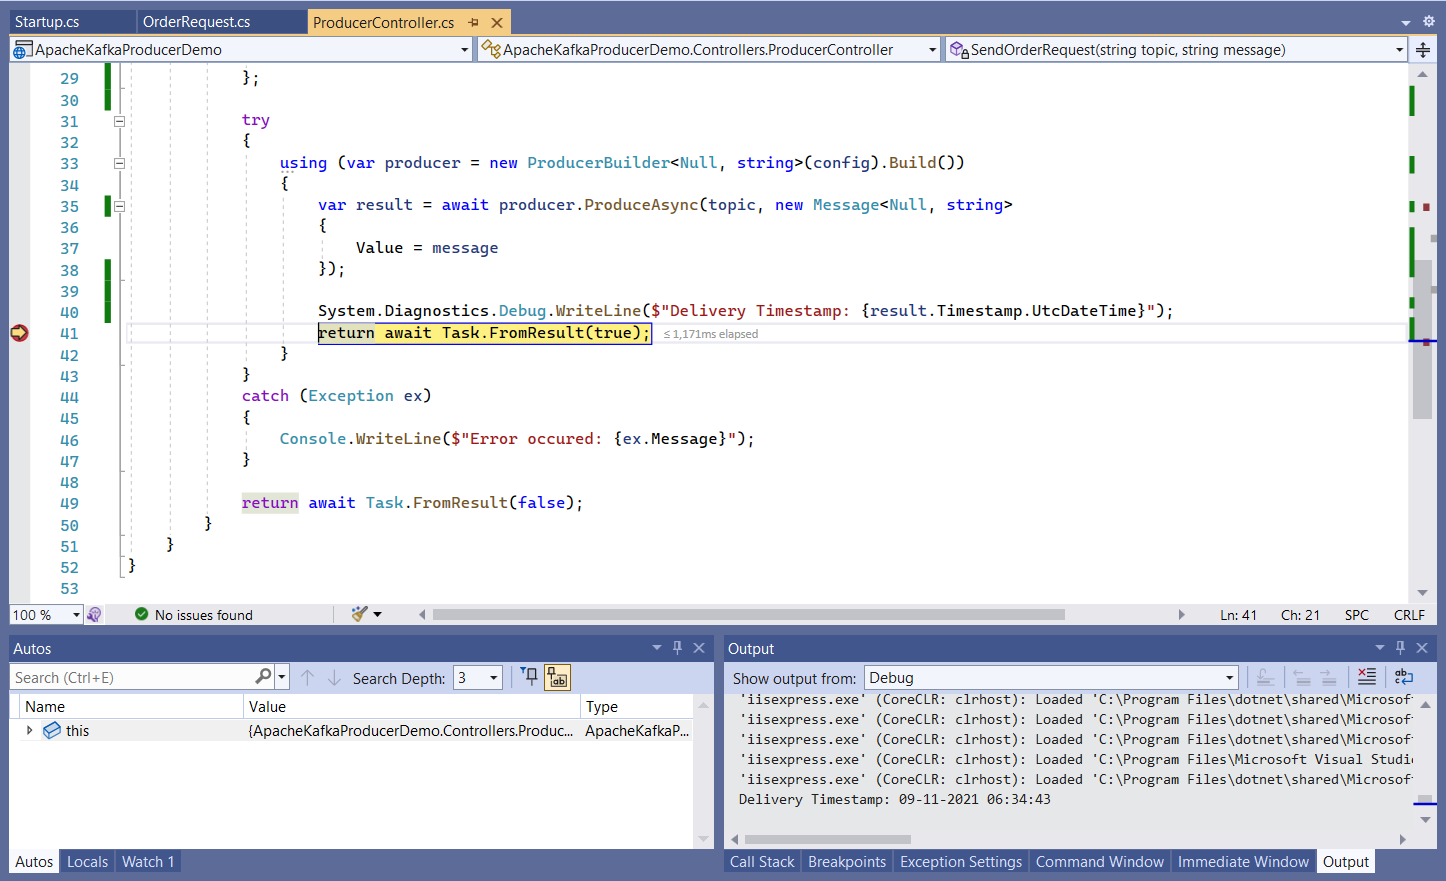
Figure 9 illustrates that the breakpoint has been hit in the producer application. Note the Timestamp value displayed in the Output window.
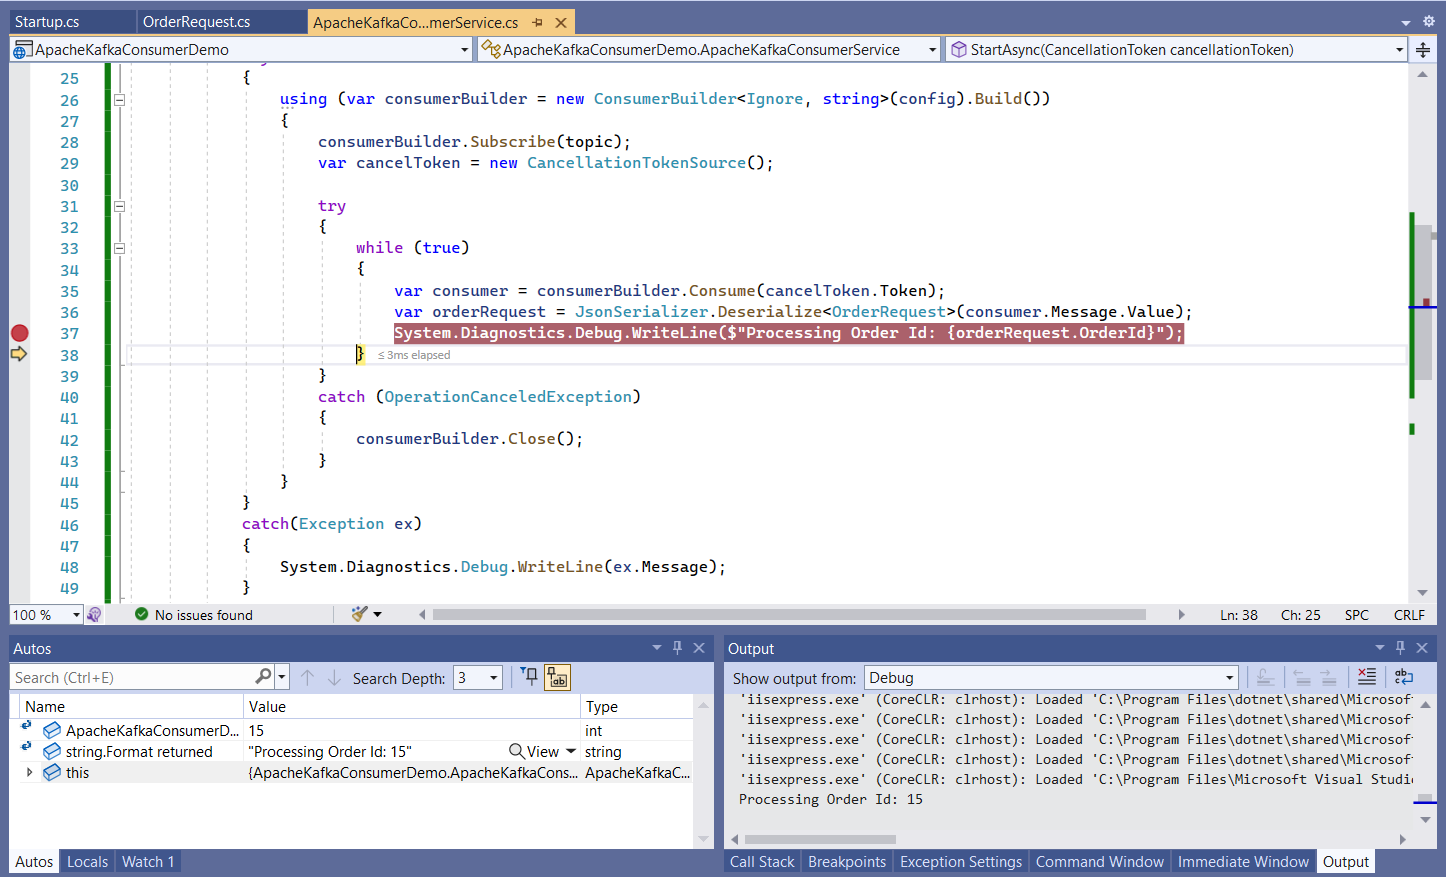
When you press F5, the breakpoint set in the consumer application will be hit and you can see the message displayed in the Output window, as shown in Figure 10.
Kafka CLI Administration
In this section we'll examine how we can perform a few administration tasks in Kafka.
Shut Down Zookeeper and Kafka
To shut down Zookeeper, use the zookeeper-server-stop.bat script, as shown below:
bin\windows\zookeeper-server-stop.bat
To shut down Kafka, you should use the kafka-server-stop.bat script as shown below:
bin\windows\kafka-server-stop.bat
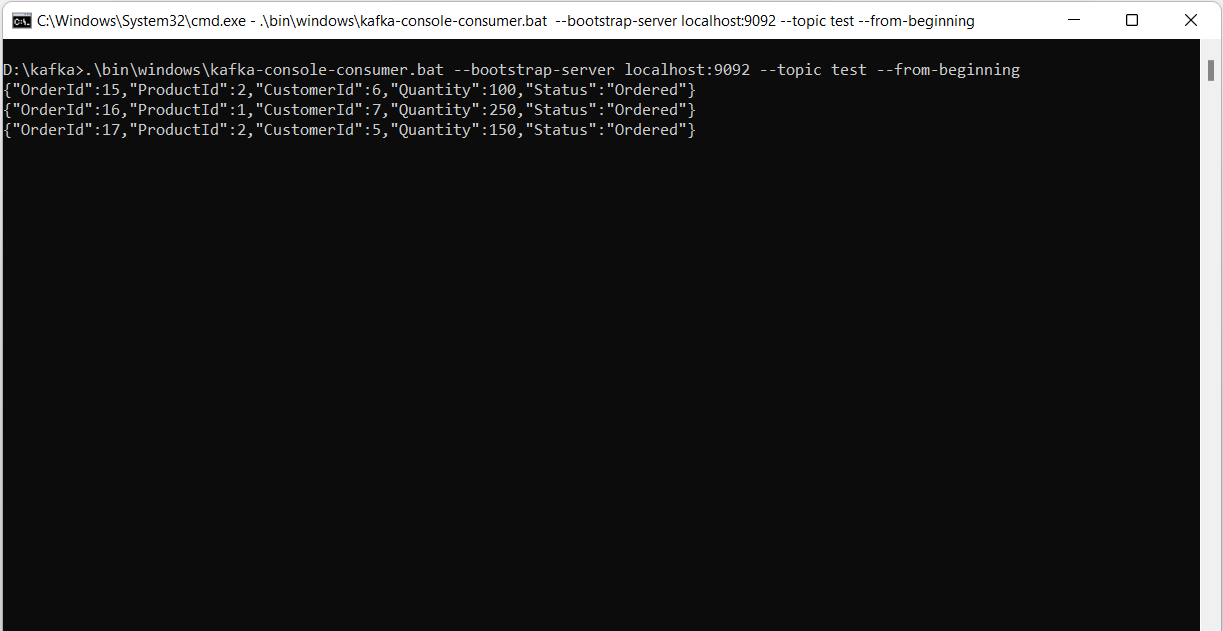
Display All Kafka Messages in a Topic
To display all messages in a particular topic, use the following command:
.\bin\windows\kafka-console-consumer.bat
--bootstrap-server
localhost:9092 --topic
test --from-beginning
Where Should I Go from Here
Kafka is a natural choice if you're willing to build an application that needs high performant, resilient, and scalable messaging. This post walked you through building a simple Kafka producer and consumer using ASP.NET 6. Note that you can set up Apache Kafka using Docker as well. You can know more about Apache Kafka from the Apache Kafka Documentation.
