


Caching is a technique that can be used to store relatively stale data for faster retrieval when needed by the application. You can have two approaches to caching data in ASP.NET 6: the in-memory cache and distributed cache. This article provides a deep dive on caching, why it's important, distributed and in-memory caches, and how to work with Azure Cache for Redis in ASP.NET Core 6.0.
Prerequisites
If you're to work with the code examples discussed in this article, you need the following installed in your system:
- Visual Studio 2022
- .NET 6.0
- ASP.NET 6.0 Runtime
- An Azure subscription. If you don't have one, you can get it from here: https://azure.microsoft.com/en-us/free/
If you don't already have Visual Studio 2022 installed in your computer, you can download it from here: https://visualstudio.microsoft.com/downloads/.
Scalability and Elasticity
An application's scalability is its ability to handle increased transaction loads without slowing down. In other words, it's the capacity to continue operating at the same speed even when a new workload has been introduced. A scalable application is adept at adapting to increasing demands, such as an increased number of concurrent users, and transactions per second, over time. One of the primary advantages of the microservices architecture is the ability to scale, i.e., the ability to withstand an increase in network traffic and other resource needs over time.
The terms “scalability” and “elasticity” might seem similar, but they are not the same. Although both refer to boosting the application's capacity to withstand workload, there are subtle distinctions. Scalability refers to the system's ability to handle increasing demands simply by adding resources, either by making hardware stronger (scale-up) or adding extra nodes (scale out). Elasticity is the capacity to fit the resources required to deal with demands dynamically.
Although scalability can help accommodate a static increase in workload, elasticity can handle dynamic changes in resource requirements. Elasticity is the ability to dynamically grow or shrink the infrastructure resources, i.e., increase or decrease computer processing, memory, and storage resources on demand. This can help you acquire resources when you need them and relinquish them when they're no longer required.
What Is Caching?
A cache is a component (either software or hardware) that stores data, usually for a short duration, to meet future demands for that data. Depending on whether the data searched for in the cache is available, a cache hit or a cache miss might occur. A cache hit refers to a situation when the requested data is available in the cache and a cache miss occurs when the data is not available in the cache. An application can leverage the benefits of caching if there are many more cache hits than cache misses.
Caching can dramatically increase an application's performance and scalability by minimizing resource consumption and the effort needed to generate content. Caching is a good choice when your data is relatively stable, i.e., it works best with data that rarely changes. ASP.NET Core supports several caches, such as in-memory caches and distributed caches. The IMemoryCache is the most basic cache and resides in your Web server's memory.
Unlike other caching strategies where your cache data resides on an individual Web server, a distributed cache is shared by several application servers, often managed independently of the application servers that use it. A distributed cache may provide a greater scale-out than an in-memory cache. Moreover, it can significantly improve the performance, scalability, and responsiveness of an ASP.NET Core application.
How Does It Work?
First, an application attempts to read data from the cache. If the requested data is unavailable in the cache, the application obtains it from the actual data source. The data is then returned and cached for future requests for the same piece of data. All subsequent requests for the same piece of data are served from the cache instead of the actual data source. Because data usually resides in memory, this enhances the application's performance and scalability. If the database is unavailable, requests for the data are served from the cache, thus enhancing the application's availability.
Distributed Caching
When your cached data is distributed, the data is consistent across server restarts and application deployments. The IDistributedcache interface pertaining to the Microsoft.Extensions.Caching.Distributed namespace represents a distributed cache. To manipulate the data stored in the distributed cache, you can use the following methods:
- Get or GetAsync: To retrieve items from the distributed cache based on its key
- Set or SetAsync: To store items into the distributed cache
- Refresh or RefreshAsync: To refresh an item in the distributed cache
- Remove or RemoveAsync: To delete an item from the distributed cache based on its key
The following types extend this interface:
- Microsoft.Extensions.Caching.Distributed.MemoryDistributedCache
- Microsoft.Extensions.Caching.Redis.RedisCache
- Microsoft.Extensions.Caching.SqlServer.SqlServerCache
- Microsoft.Extensions.Caching.StackExchangeRedis.RedisCache
What Is Redis and Why Should I Use It?
Redis is an open-source, high performance, in-memory data store available for commercial and non-commercial use to store and retrieve data in your applications. Redis supports several data structures such as hashes, lists, sets, sorted sets, bitmaps, etc. Used primarily as a database, cache, or message broker, you'll notice only negligible performance overhead when reading or writing data using Redis. Redis is an excellent choice if your application requires a large amount of data to be stored and retrieved, and memory availability is not an issue.
Comparing Managed Redis Services on AWS, Azure, and GCP
All three cloud giants provide Redis Cache services: Amazon, Azure, and Google Cloud.
Amazon ElasticCache is a caching solution in the cloud that works with both Memcached and Redis. ElasticCache helps you optimize application performance by allowing you to access data from fast, controlled in-memory caches rather than slower disk-based databases.
Azure Cache for Redis is a fully managed, open-source in-memory data storage solution that works with Azure database services like Cosmos DB. It's a cost-effective way of increasing your data layer's read and write throughput. With the help of the cache-aside approach, you can store and disseminate database queries, session states, static content, and so on.
The Redis service provided by Google Cloud Platform (GCP) is called Cloud Memorystore. Although you can export and import Redis RDB data between your servers and GCP, native backup options are not supported by Cloud Memorystore.
Set Up Azure Cache for Redis
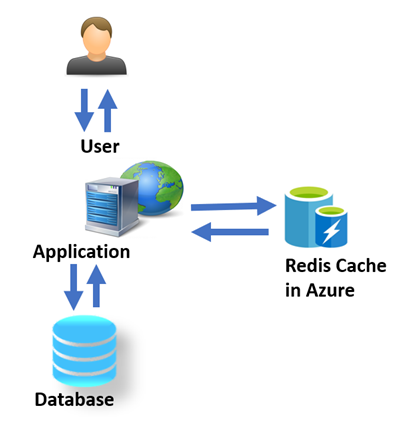
Azure Cache for Redis is secure in-memory cache for data storage and retrieval. It's fully managed, and you can use it to build high-performance applications that have scalable architectures. You can take advantage of Azure Cache for Redis to handle massive volumes of requests per second, as illustrated in Figure 1.
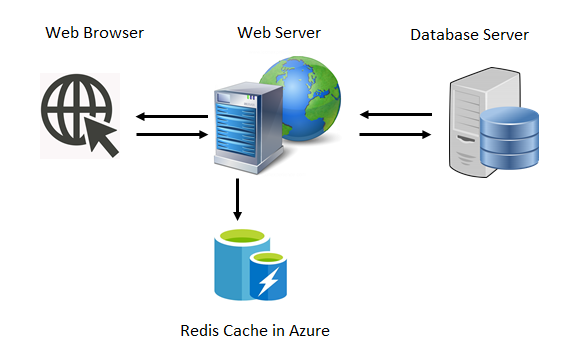
You can use it to build cloud or hybrid deployments to manage enormous volumes of requests per second. In this section, I'll examine how to set up Azure Cache for Redis. Figure 2 shows a Web server retrieving data from the database and then pushing the data (usually relatively stale data is stored in the cache) to Redis Cache resource in Azure.
Follow the steps outlined below to create a new Azure Cache for Redis resource.
- Sign-in to the Azure portal. If you don't have an account, you can create one for free (the link is in the Prerequisites section).
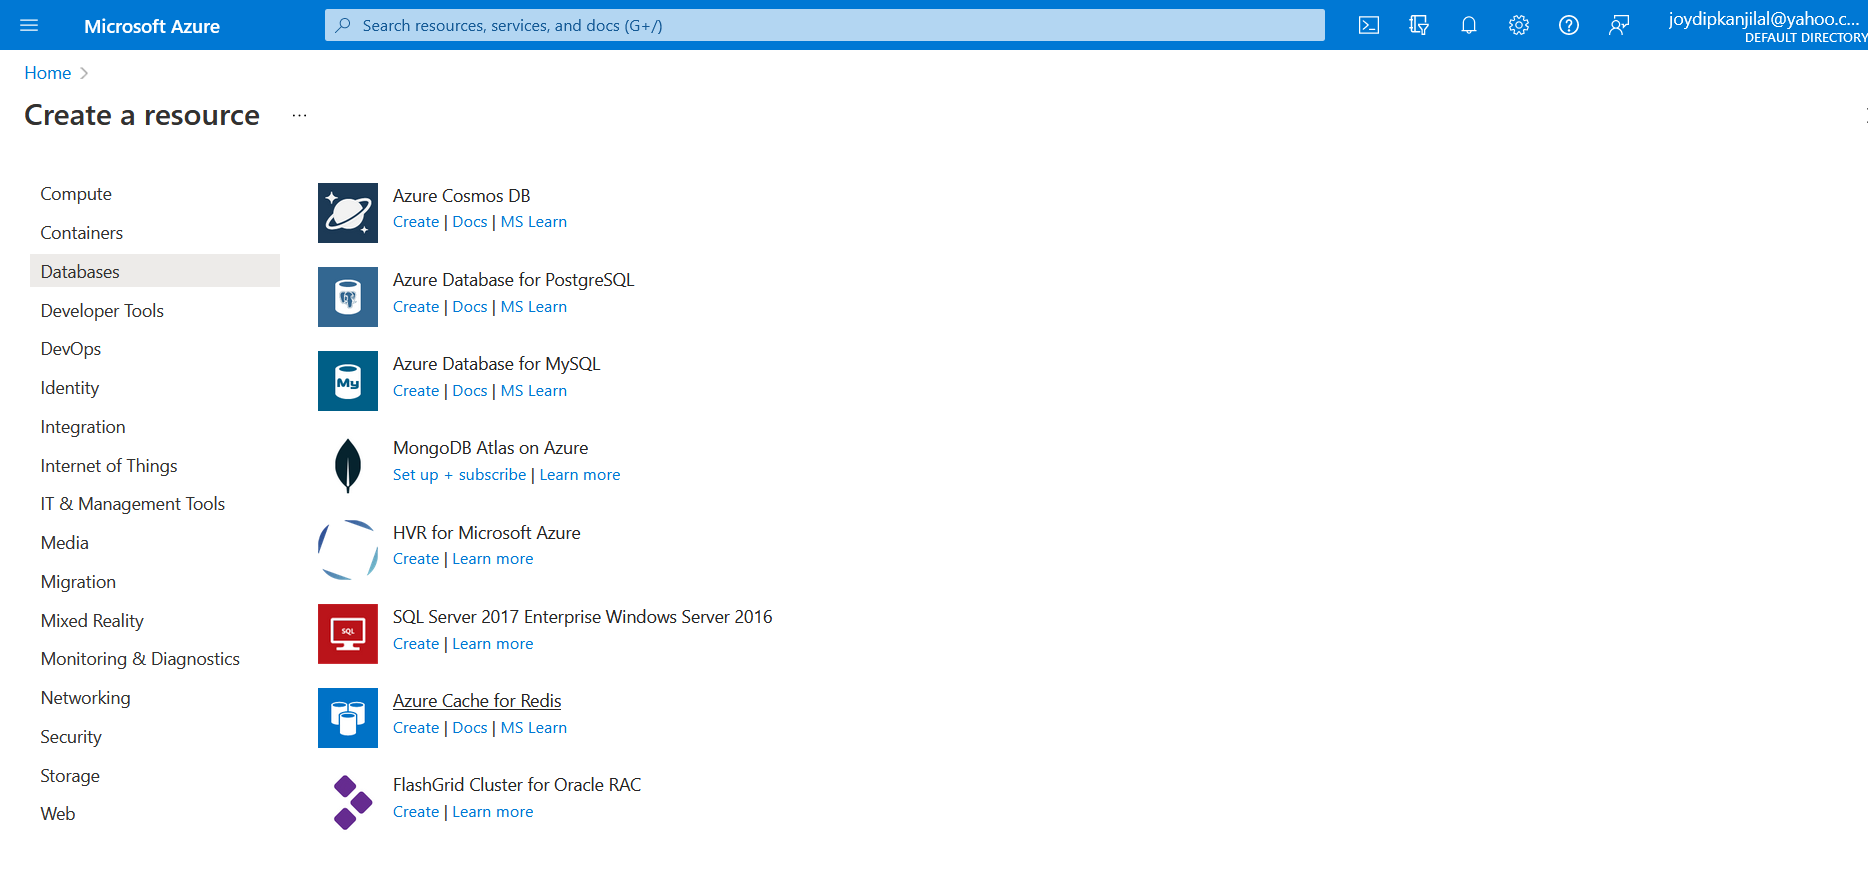
- Click Create a resource to create your Azure Redis resource.
- Click on Databases and then select Azure Cache for Redis.
Figure 3 illustrates creating a new resource.
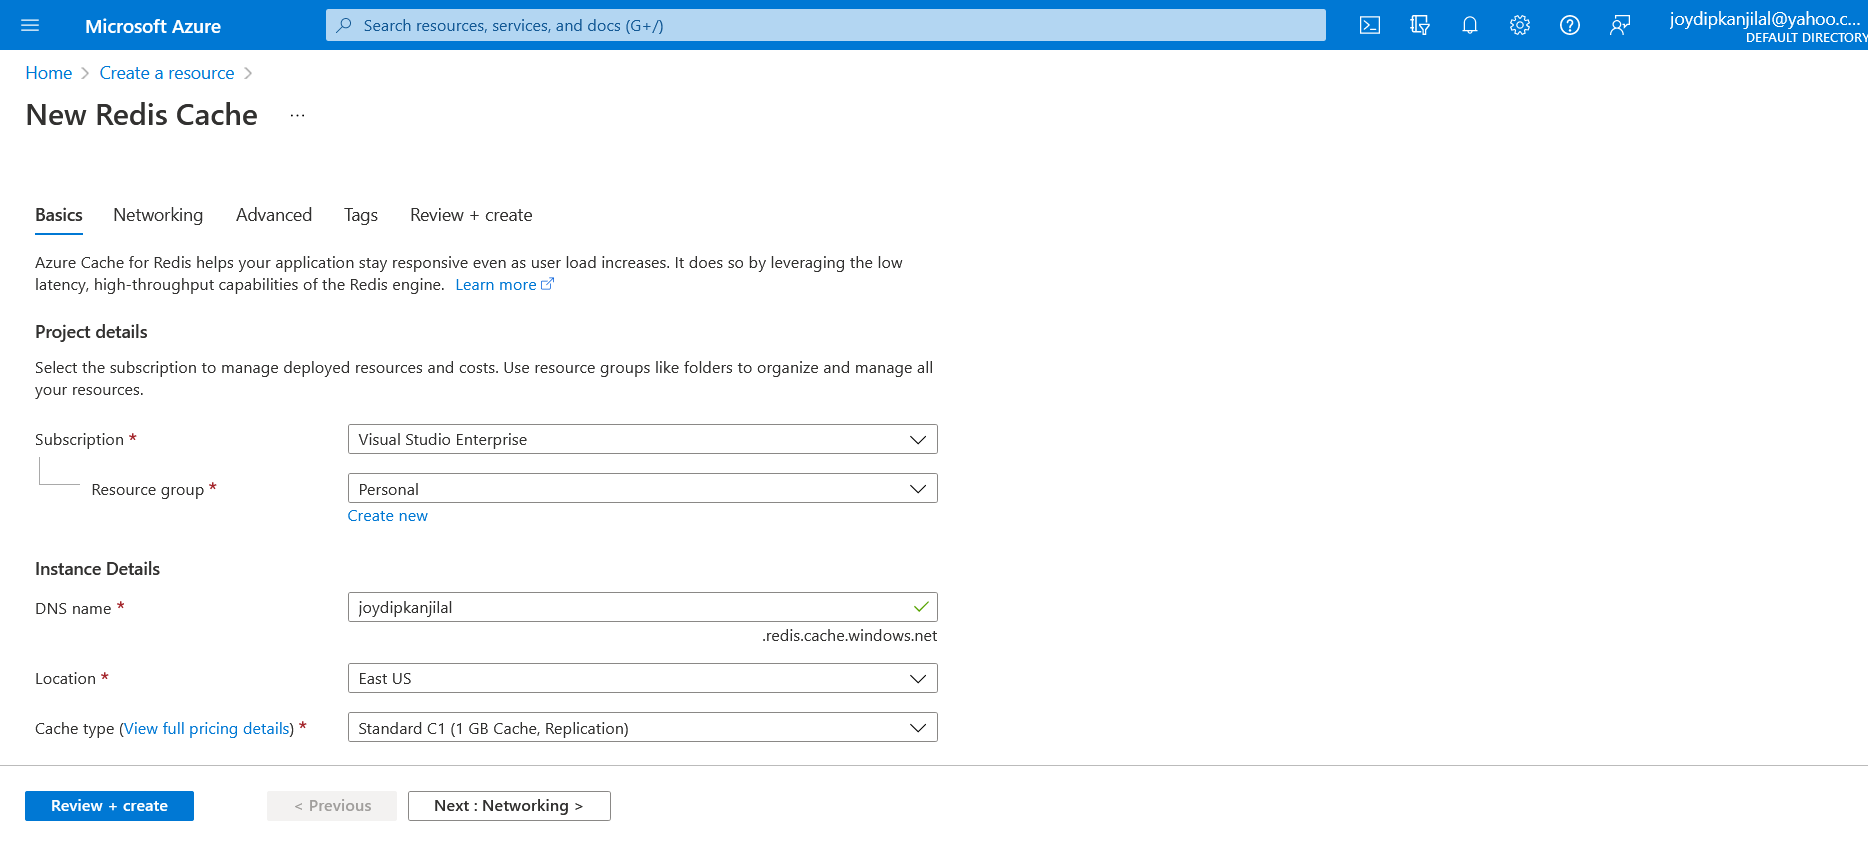
- In the New Redis Cache page, specify the subscription plan, the resource group (you can select an existing one or select one from the dropdown list), the DNS name, your server location for using Redis, and the cache type.
Refer to Figure 4 to see the items from Step 4.
- Next, choose the Network Connectivity to be used.
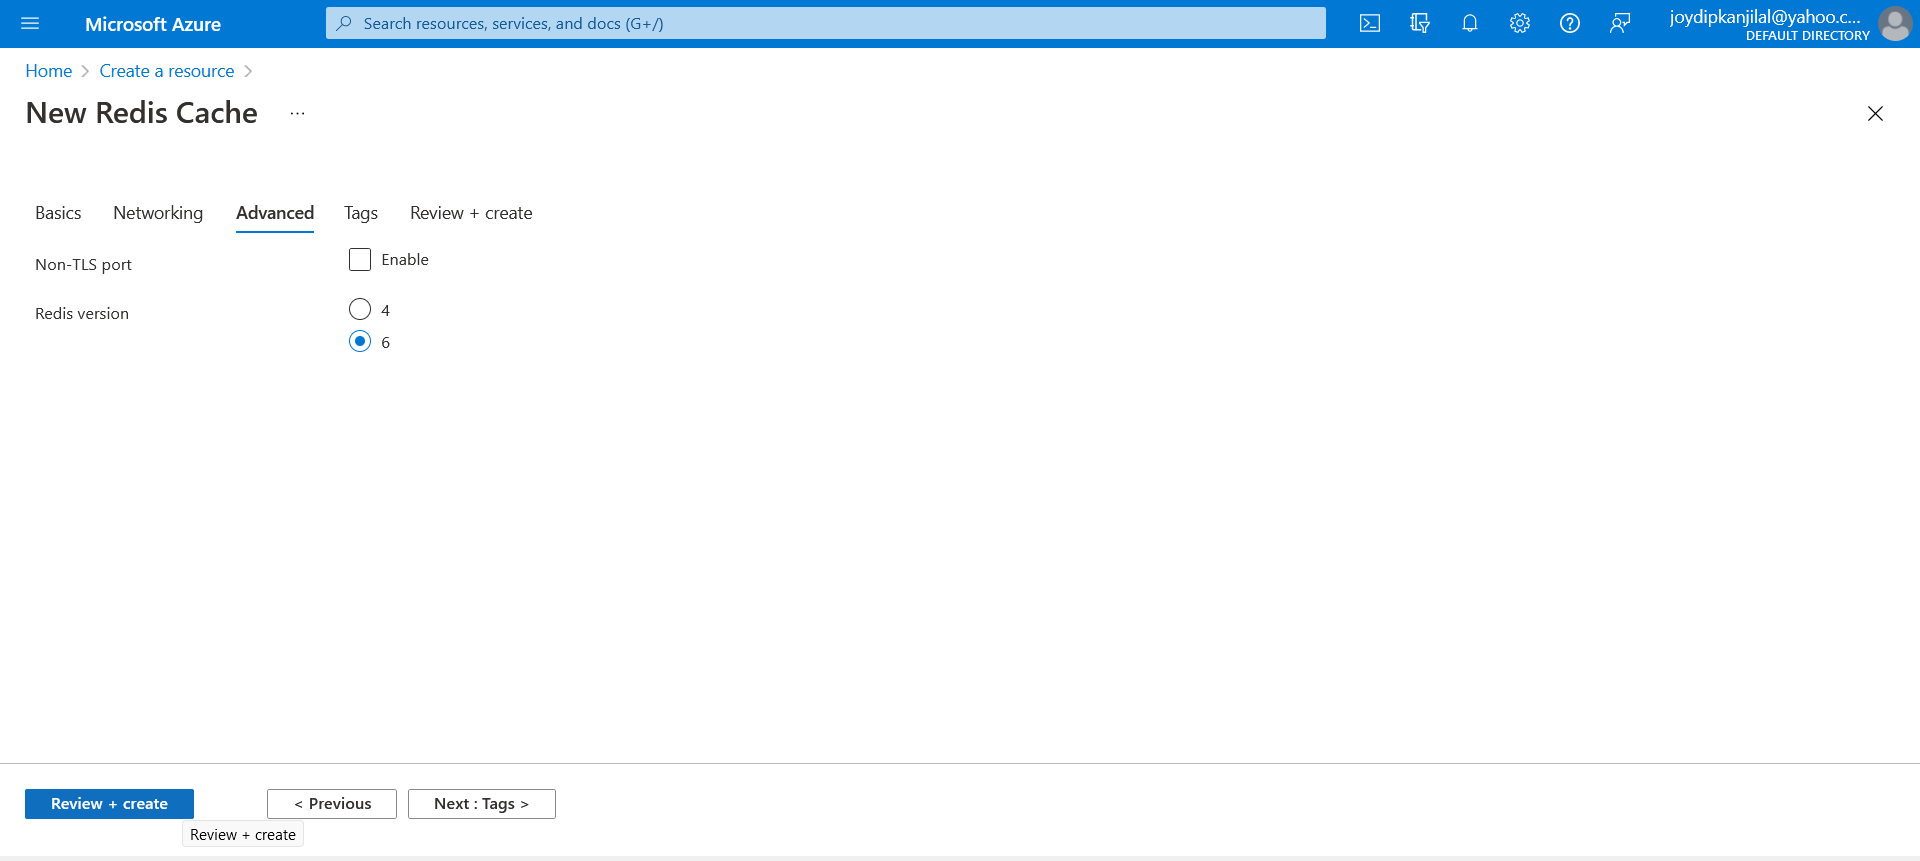
- In the Advanced tab, select the Redis version to be used.
- Finally click on Review + Create to create the Redis resource in Azure.
Figure 5 illustrates specifying the configuration details.
Configure Redis Cache Connection String
Now that you've created your Azure Redis Cache resource, the next step is to configure it. You should configure the newly created resource to specify the connection string. This is needed by any application to connect to your Azure Redis Cache resource. Follow the steps outlined below to connect to your Azure Redis Cache resource:
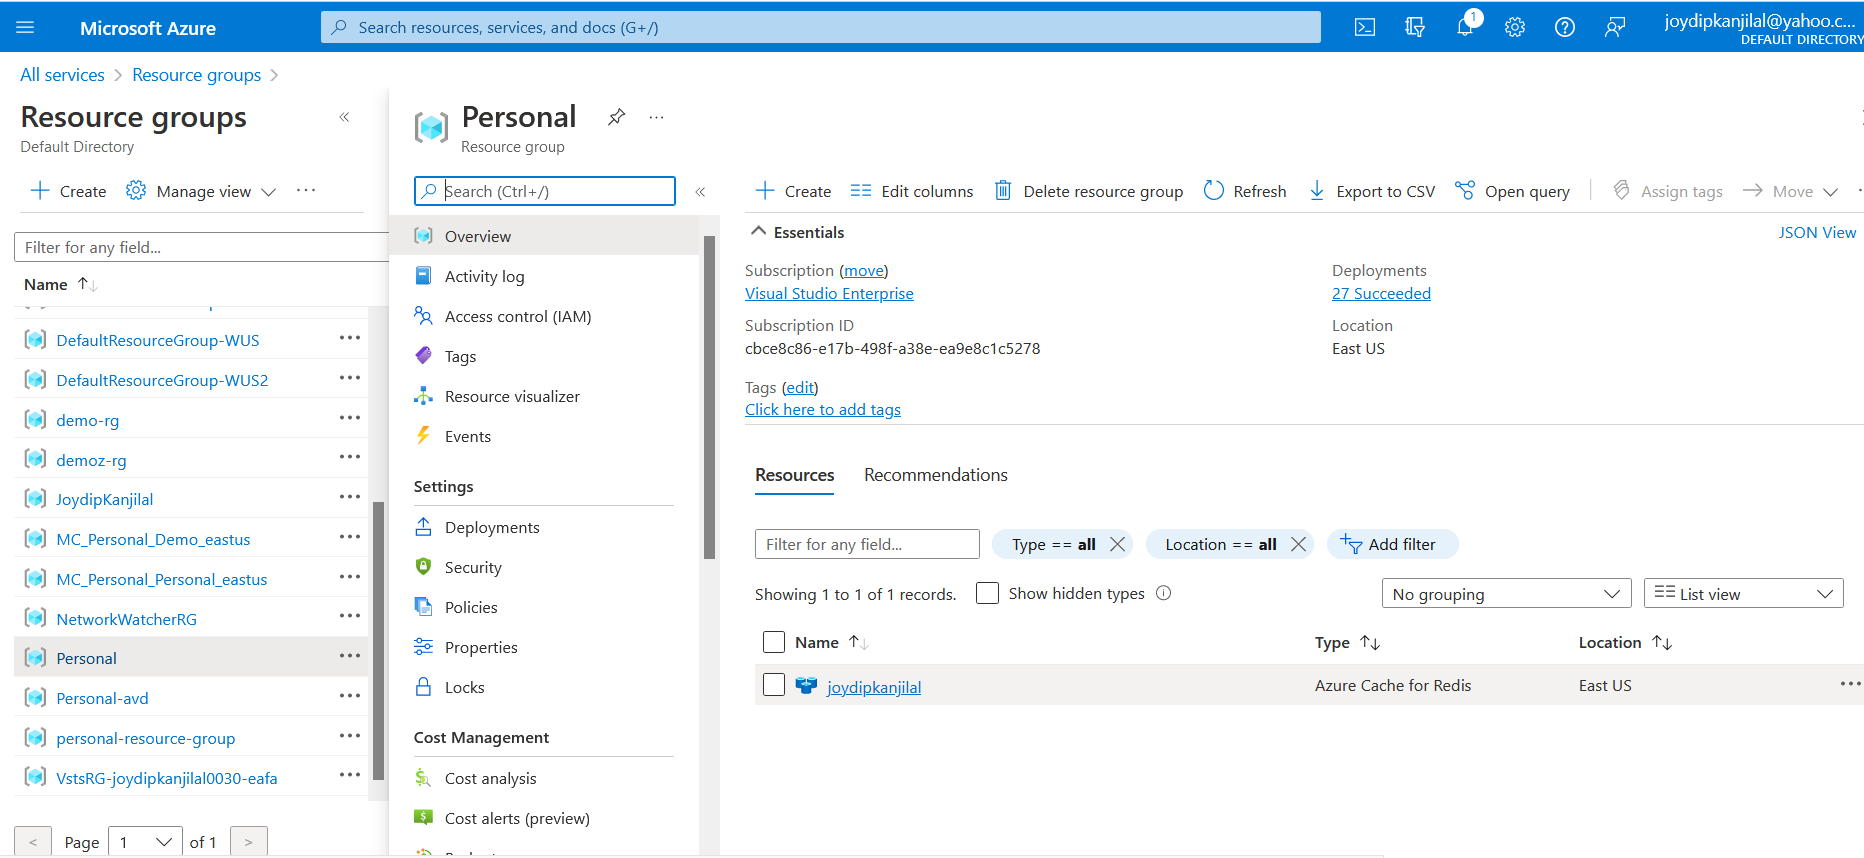
- On the home page of the Azure portal click on Resource groups.
- Once the Resource groups page is displayed, select the resource group that is associated with the Azure Redis cache resource you've just created.
Figure 6 illustrates the resource group for your Redis Cache resource.
- Click on the Azure Cache for Redis instance.
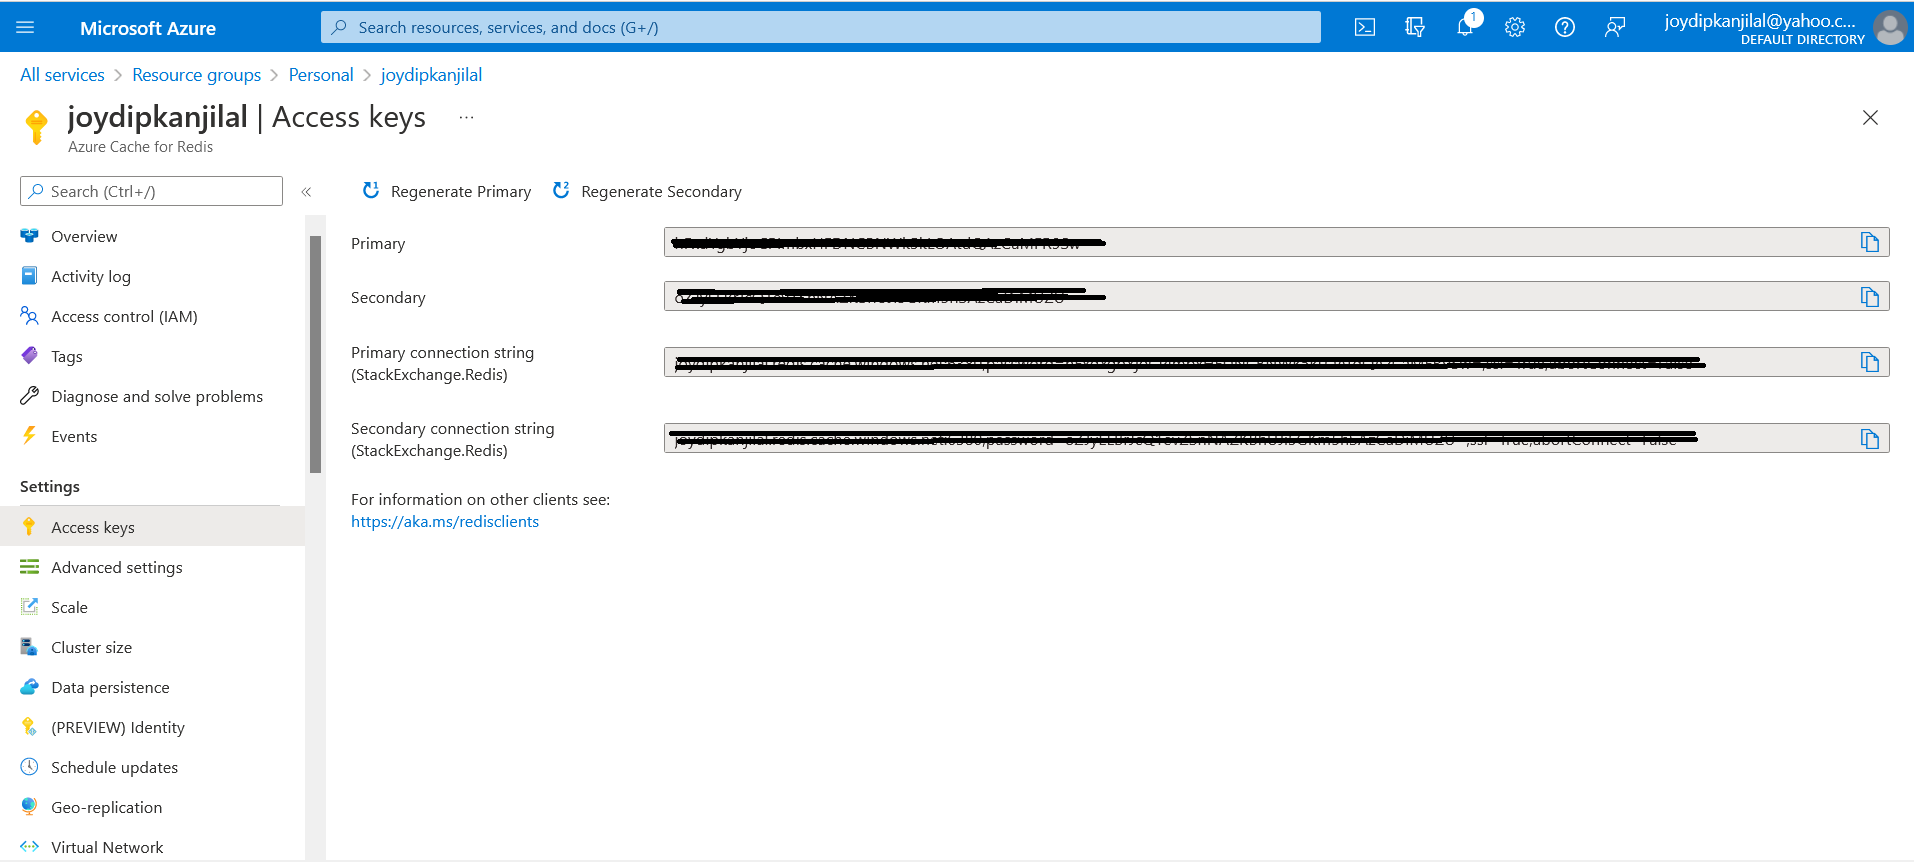
- Select Access keys under settings and copy the primary or secondary connection string from there.
Figure 7 shows you how to specify access keys.
In the next section, I'll examine how to use this connection string to connect to your Azure Redis Cache instance from ASP.NET Core 6 applications.
Programming Redis Cache in ASP.NET Core 6
In this section, you'll implement a simple application that takes advantage of the Azure Cache for Redis to cache relatively stale data. You'll be using ASP.NET Core 6 in Visual Studio 2022 IDE.
Create a New ASP.NET Core 6 Project in Visual Studio 2022
Let's start building the producer application first. You can create a project in Visual Studio 2022 in several ways. When you launch Visual Studio 2022, you'll see the Start window. You can choose Continue without code to launch the main screen of the Visual Studio 2022 IDE.
To create a new ASP.NET Core 6 Project in Visual Studio 2022:
- Start the Visual Studio 2022 Preview IDE.
- In the Create a new project window, select ASP.NET Core Web API, and click Next to move on.
- Specify the project name as AzureRedisCacheDemo and the path where it should be created in the Configure your new project window.
- If you want the solution file and project to be created in the same directory, you can optionally check the Place solution and project in the same directory checkbox. Click Next to move on.
- In the next screen, specify the target framework and authentication type as well. Ensure that the Configure for HTTPS, Enable Docker Support, and the Enable OpenAPI support checkboxes are unchecked because you won't use any of these in this example.
- Click Create to complete the process.
You'll use this application in the subsequent sections of this article.
Install NuGet Package(s)
So far so good. The next step is to install the necessary NuGet Package(s). To install the required packages into your project, right-click on the solution and the select Manage NuGet Packages for Solution…. Now search the two packages named Microsoft.Extensions.Caching.StackExchangeRedis and StackExchange.redis in the search box and install these packages one at a time. Alternatively, you can type the commands shown below at the NuGet Package Manager Command Prompt:
PM> Install-Package Microsoft.Extensions.Caching.StackExchangeRedis
PM> Install-Package StackExchange.Redis
Configure the Redis Cache Instance
You can use the following code snippet to specify the Redis connection string in the Program class.
services.AddStackExchangeRedisCache(option =>
{
    option.Configuration = Configuration.GetConnectionString
        ("Your_RedisCache_Connection_String");
    option.InstanceName = "master";
});
Note how the AddStackExchangeRedisCache service is registered, and the Configuration property is assigned the Azure Redis connection string.
Connect to the Redis Cache Instance
To connect to the Redis instance you can use the following code:
private static Lazy<ConnectionMultiplexer>
lazyConnection = new Lazy <ConnectionMultiplexer>(() =>
{
    string redisCacheConnection = _config["RedisCacheSecretKey"];
    return ConnectionMultiplexer.Connect(redisCacheConnection);
});

public static ConnectionMultiplexer Connection
{
    get
    {
        return lazyConnection.Value;
    }
}
Note how a single connected ConnectionMultiplexer instance is created in a thread-safe manner. A critical aspect of ConnectionMultiplexer is that it restores the connection to the cache immediately after the network outage or other issues are resolved.
The Product Class
Create a new file called Product.cs and write the following code in there:
public class Product
{
    public int Id { get; set; }
    public string? Name { get; set; }
    public double Price { get; set; }
    public int Quantity { get; set; }
}
You'll use the Product class as the model in the application you'll be building here.
The ProductResponse Class
To keep things simple, you'll have a controller class named ProductController with only one action method. This action method returns an instance of the ProductResponse class given below:
public class ProductResponse
{
    public HttpStatusCode StatusCode
    { get; set; }
    public string? Message
    { get; set; }
    public object? Data
    { get; set; }
    public bool IsDataFromCache
    { get; set; }
    public DateTime Timestamp
    { get; set; }
}
The ProductController Class
Create a new API controller class named ProductController with the code from Listing 1 in there.
Listing 1: The Product Controller Class
[ApiController]
[Route("[controller]")]

public class ProductController : ControllerBase
{
    private readonly List<Product> products = new List<Product>
    {
        new Product
        {
            Id = 1,
            Name = "Lenovo Laptop",
            Price = 175000.00,
            Quantity = 150
        },
        new Product
        {
            Id = 2,
            Name = "DELL Laptop",
            Price = 185000.00,
            Quantity = 250
        },
        new Product
        {
            Id = 3,
            Name = "HP Laptop",
            Price = 195500.00,
            Quantity = 200
        }
    };

    private readonly IDistributedCache _cache;

    public ProductController(IDistributedCache cache)
    {
        _cache = cache;
    }

    [HttpGet]
    public async Task<IActionResult> Get()
    {
        string? serializedData = null;

        var dataAsByteArray = await _cache.GetAsync("products");

        if ((dataAsByteArray?.Count() ?? 0) > 0)
        {
            serializedData = Encoding.UTF8.GetString(dataAsByteArray);
            var products = JsonSerializer.Deserialize
                <List<Product>>(serializedData);

            return Ok(new ProductResponse()
            {
                StatusCode = HttpStatusCode.OK,
                IsDataFromCache = true,
                Data = products,
                Message = "Data retrieved from Redis Cache",
                Timestamp = DateTime.UtcNow
            });
        }

        serializedData = JsonSerializer.Serialize(products);
        dataAsByteArray = Encoding.UTF8.GetBytes(serializedData);
        await _cache.SetAsync("products", dataAsByteArray);

        ProductResponse productResponse = new ProductResponse()
        {
            StatusCode = HttpStatusCode.OK,
            IsDataFromCache = false,
            Data = products,
            Message = "Data not available
            in Redis Cache", Timestamp = DateTime.UtcNow
        };

        return Ok(productResponse);
    }
}
The ProductController class contains one HttpGet action method that returns an instance of ProductResponse. The action method first checks whether the data is available in the cache. If it's available, the action method returns that data. If it isn't available in the cache, the data is fetched from the in-memory list called products, and the same data is persisted in the cache as well. Note how dependency injection is used to inject an instance of type IDistributedCache in the constructor of the ProductController class.
Cache Expiration
You can also implement cache expiration strategies in your application. A cache expiration strategy is used to specify how and when the data residing in the cache will expire. There are two ways in which you can implement cache expiration:
- Absolute Expiration: This denotes that maximum time period to store data in the cache. Once this time elapses, Redis deletes all keys and their corresponding data.
- Sliding Expiration: This denotes the maximum time period to store a piece of data when the application is not consuming the data.
You can write the following piece of code to implement cache expiration:
var expiration = new DistributedCacheEntryOptions{
    AbsoluteExpirationRelativeToNow = TimeSpan.FromSeconds(30),
    SlidingExpiration = TimeSpan.FromSeconds(25)};
Clean Up
Now that you're done using the resources in Azure, it's high time that you delete the resources you've used to avoid being billed. Follow the steps outlined below to delete the resources used in this example:
- Sign into the Azure portal.
- Select Resource groups.
- Enter the name of the resource group in the filter textbox.
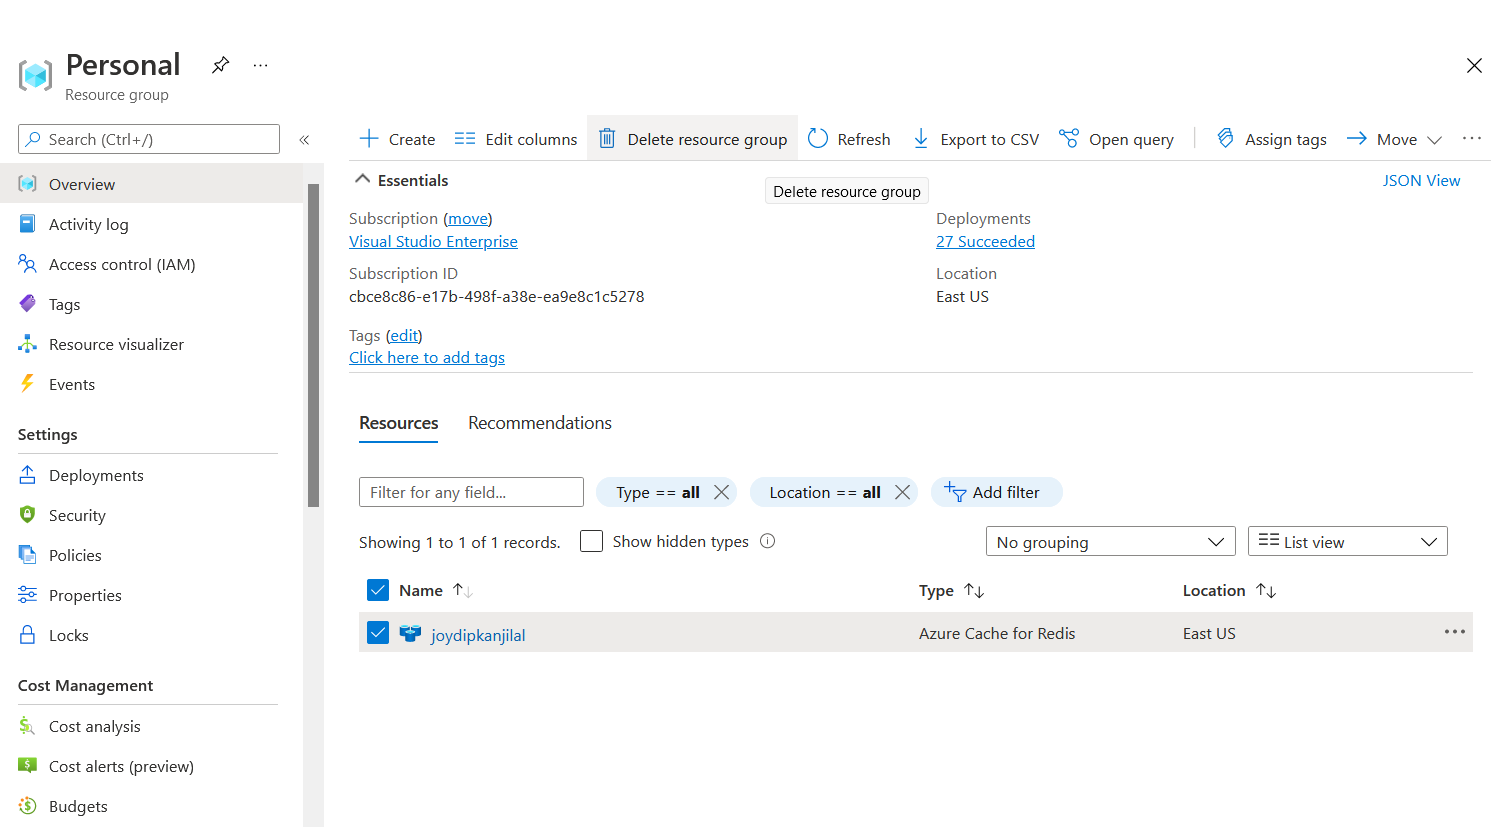
- When the resource group is listed in the results list, select it, and click “Delete resource group”.
Figure 8 illustrates how you can delete the resource group associated with your Redis Cache resource.
That's all you need to do! Your resource group will be deleted in a few minutes.
Where Should I Go from Here?
Now that you're aware of how to work with Azure Cache for Redis, you can take advantage of Application Insights in Azure to know the performance of your application over time. This will help you to analyze the performance improvement you'd gain by leveraging Azure Cache for Redis. You can also use a database in lieu of the in-memory data store you've used in this example to store data permanently.
Conclusion
Redis is a powerful distributed caching engine that provides key-value pair caching with very low latency. Redis may significantly improve application performance when used in the correct business context. Caching works better when the data changes infrequently, i.e., when the cached data doesn't change often. Remember, caching is a feature that helps speed up the performance, scalability, and responsiveness of your application but your application should be properly tested to never depend on cached data.
