


The benchmarking technique helps determine the performance measurements of one or more pieces of code in your application. You can take advantage of benchmarking to determine the areas in your source code that need to be optimized. In this article, I'll examine what benchmarking is, why benchmarking is essential, and how to benchmark .NET code using BenchmarkDotNet.
If you're to work with the code examples discussed in this article, you need the following installed in your system:
- Visual Studio 2022
- .NET 6.0
- ASP.NET 6.0 Runtime
- BenchmarkDotNet
If you don't already have Visual Studio 2022 installed on your computer, you can download it from here: https://visualstudio.microsoft.com/downloads/.
What's a Benchmark?
A benchmark is a simple test that provides a set of quantifiable results that can help you determine whether an update to your code has increased, decreased, or had no effect on performance. It's necessary to comprehend the performance metrics of your application's methods to leverage them throughout the code optimization process. A benchmark may have a broad scope or it can be a micro-benchmark that evaluates minor changes to the source code.
Why You Should Benchmark Code
Benchmarking involves comparing the performance of code snippets, often against a predefined baseline. It's a process used to quantify the performance improvement or degradation of an application's code rewrite or refactor. In other words, benchmarking code is critical for knowing the performance metrics of your application's methods. Benchmarking also allows you to zero in on the parts of the application's code that need reworking.
There are several reasons to benchmark applications. First, benchmarking can help to identify bottlenecks in an application's performance. By identifying the bottlenecks, you can determine the changes required in your source code to improve the performance and scalability of the application.
Introducing BenchmarkDotNet
BenchmarkDotNet is an open-source library compatible with both .NET Framework and .NET Core applications that can convert your .NET methods into benchmarks, monitor those methods, and get insights into the performance data collected. BenchmarkDotNet can quickly transform your methods into benchmarks, run those benchmarks and obtain the results of the benchmarking process. In the BenchmarkDotNet terminology, an operation refers to executing a method decorated with the Benchmark attribute. A collection of such operations is known as an iteration.
What's Baselining? Why Is It Important?
You can also mark a benchmark method as a baseline method and take advantage of baselining to scale your results. When you decorate a benchmark method with the Baseline attribute and set it to “true,” the summary report generated after the benchmark shows an additional column named “Ratio.” This column has the value 1.00 for a benchmark method that has been baselined. All other columns will have a value relative to the Ratio column's value.
Benchmarking Application Performance in .NET 6
It's time for some measurements. Let's now examine how to benchmark the performance of .NET 6 applications. You'll create two applications: a console application for writing and executing benchmarks and an ASP.NET 6 app for building an API that will be benchmarked later.
Create a New Console Application Project in Visual Studio 2022
Let's create a console application project that you'll use for benchmarking performance. You can create a project in Visual Studio 2022 in several ways. When you launch Visual Studio 2022, you'll see the Start window. You can choose Continue without code to launch the main screen of the Visual Studio 2022 IDE.
To create a new Console Application Project in Visual Studio 2022:
- Start the Visual Studio 2022 IDE.
- In the Create a new project window, select Console App, and click Next to move on.
- Specify the project name as BenchmarkingConsoleDemo and the path where it should be created in the Configure your new project window.
- If you want the solution file and project to be created in the same directory, you can optionally check the Place solution and project in the same directory checkbox. Click Next to move on.
- In the next screen, specify the target framework you would like to use for your console application.
- Click Create to complete the process.
You'll use this application in the subsequent sections of this article.
Install NuGet Package(s)
So far so good. The next step is to install the necessary NuGet Package(s). To install the required packages into your project, right-click on the solution and the select Manage NuGet Packages for Solution…. Now search for the package named BenchmarkDotNet in the search box and install it. Alternatively, you can type the commands shown below at the NuGet Package Manager Command Prompt:
PM> Install-Package BenchmarkDotNet
Create a Benchmarking Class
To create and execute benchmarks:
- Create a
Consoleapplication project in Visual Studio 2022. - Add the
BenchmarkDotNetNuGet package to the project. - Create a class having one or more methods decorated with the
Benchmarkattribute. - Run your benchmark project in Release mode using the
Runmethod of theBenchmarkRunnerclass.
A typical benchmark class contains one or more methods marked or decorated with the Benchmark attribute and, optionally, a method that's decorated with the GlobalSetup attribute, as shown in the code snippet given below:
public class MyBenchmarkDemo
{
    [GlobalSetup]
    public void GlobalSetup()
    {
        //Write your initialization code here
    }

    [Benchmark]
    public void MyFirstBenchmarkMethod()
    {
        //Write your code here
    }
    [Benchmark]
    public void MySecondBenchmarkMethod()
    {
        //Write your code here
    }
}
In BenchmarkDotNet, diagnosers are attached to the benchmarks to provide more useful information. The MemoryDiagnoser is a diagnoser that, when attached to your benchmarks, provides additional information, such as the allocated bytes and the frequency of garbage collection.
Here's how your benchmark class looks once you've added the MemoryDiagnoser attribute:
[MemoryDiagnoser]
public class MyBenchmarkDemo
{
    //Code removed for brevity
}
Note that BenchmarkDotNet works only with Console applications. It won't support ASP.NET 6 or any other application types.
Setup and Cleanup
You might want to execute some code just once and you don't want to benchmark the code. As an example, you might want to initialize your database connection or create an HttpClient instance to be used by other methods decorated with the [Benchmark] attribute.
BenchmarkDotNet comes with a few attributes that can help you accomplish this. These attributes are [GlobalSetup], [GlobalCleanup], [IterationSetup], and [IterationCleanup].
You can take advantage of the GlobalSetup attribute to initialize an HttpClient instance, as shown in the code snippet given below:
private static HttpClient _httpClient;
[GlobalSetup]
public void GlobalSetup()
{
    var factory = new WebApplicationFactory<Startup>()
    .WithWebHostBuilder(configuration =>
    {
        configuration.ConfigureLogging(logging =>
        {
            logging.ClearProviders();
        });
    });

    _httpClient = factory.CreateClient();
}
Similarly, you can take advantage of the GlobalCleanup attribute to write your cleanup logic, as shown in the code snippet below:
[GlobalCleanup]
public void GlobalCleanup()
{
    //Write your cleanup logic here
}
Benchmarking LINQ Performance
Let's now examine how to benchmark LINQ methods. Create a new class named BenchmarkLINQPerformance in a file having the same name with the code shown in Listing 1. This is a simple class that benchmarks the performance of the Single and First methods of LINQ. Now that the benchmark class is ready, examine how to run the benchmark using BenchmarkRunner in the next section.
Listing 1: Benchmarking performance of LINQ
public class BenchmarkLINQPerformance
{
    private readonly List<string>
    data = new List<string>();

    [GlobalSetup]
    public void GlobalSetup()
    {
        for(int i = 65; i < 90; i++)
        {
            char c = (char)i;
            data.Add(c.ToString());
        }
    }

    [Benchmark]
    public string Single() => data.SingleOrDefault(x => x.Equals("M"));

    [Benchmark]
    public string First() => data.FirstOrDefault(x => x.Equals("M"));
}
Execute the Benchmarks
As of this writing, you can use BenchmarkDotNet in a console application only. You can run benchmark on a specific type or configure it to run on a specific assembly. The following code snippet illustrates how you can trigger a benchmark on all types in the specified assembly:
var summary = BenchmarkRunner.Run(typeof(Program).Assembly);
You can use the following code snippet to run benchmarking on a specific type:
var summary = BenchmarkRunner.Run<BenchmarkLINQPerformance>();
Or you can use:
var summary = BenchmarkRunner.Run(typeof(BenchmarkLINQPerformance));
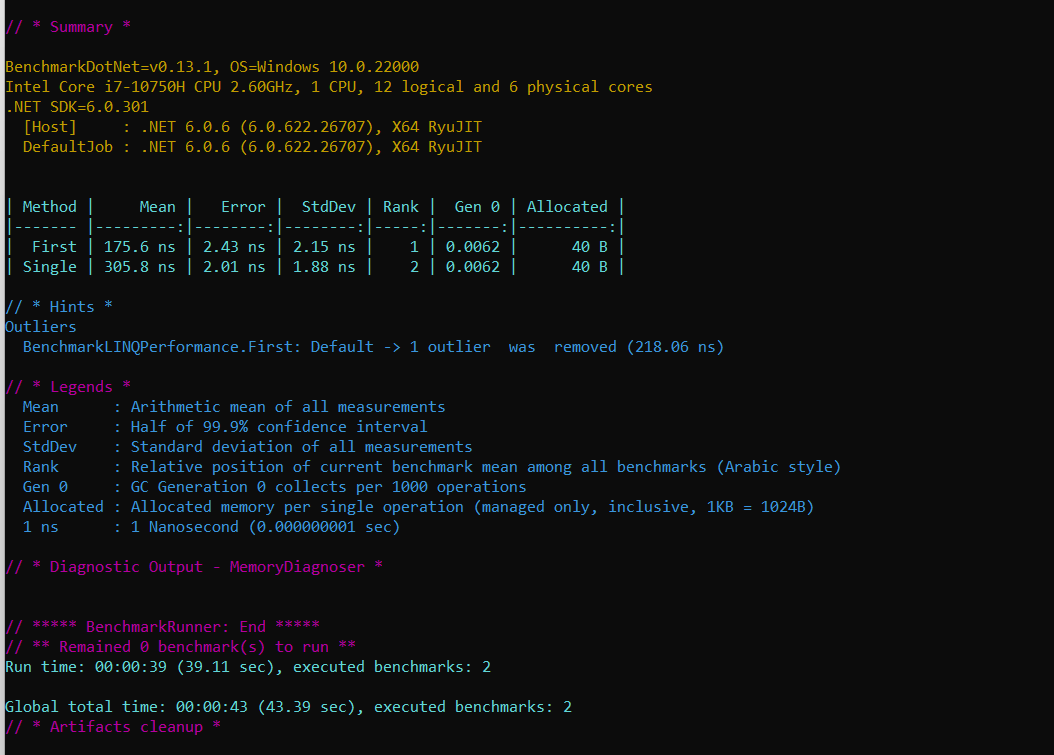
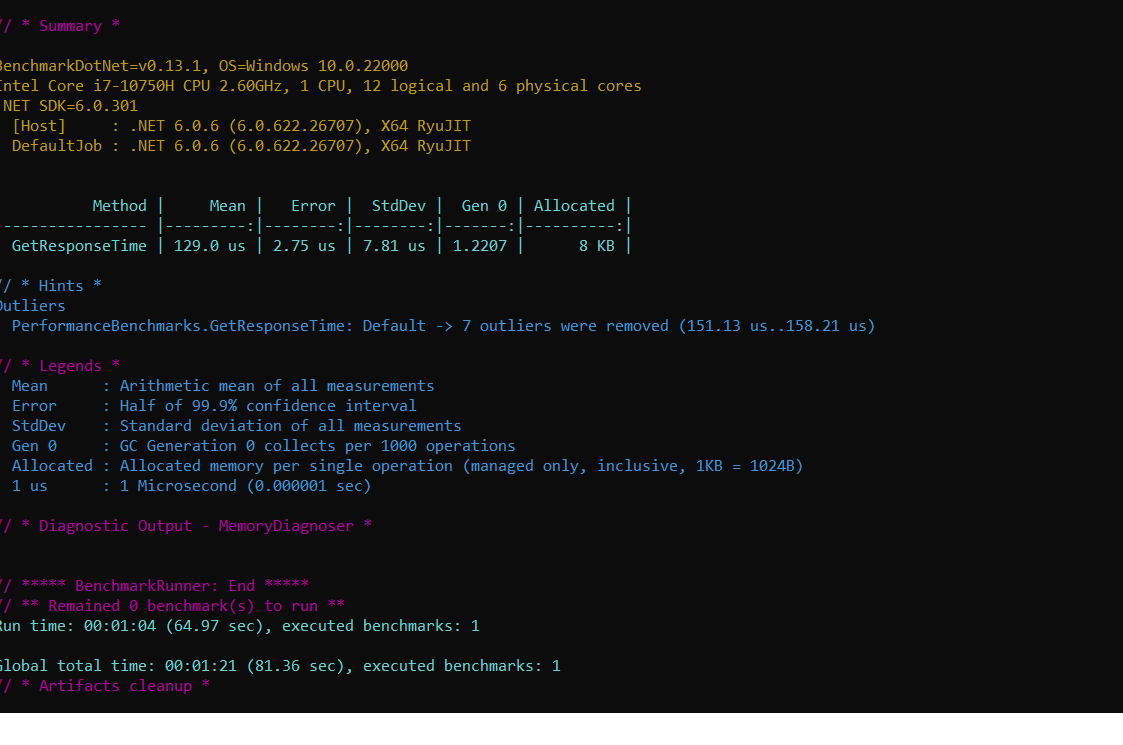
For the benchmark you created in the preceding section, you can use any of these statements in the Program class to execute the benchmark. Figure 1 shows the results of the benchmark:
Interpreting the Benchmarking Results
As you can see in Figure 6, for each of the benchmarked methods, a row of the result data is generated. Because there are two benchmark methods called using three param values, there are six rows of benchmark result data. The benchmark results show the mean execution time, garbage collections (GCs), and the allocated memory.
The Mean column shows the average execution time of both the methods. As is evident from the benchmark results, the First method is much faster than the Single method in LINQ. The Allocated column shows the managed memory allocated on execution of each of these methods. The Rank column shows the relative execution speeds of these methods ordered from fastest to slowest. Because there are two methods here, it shows 1 (fastest) and 2 (slowest) for the First and Single methods respectively.
Here's what each of the legends represent:
- Method: This column specifies the name of the method that has been benchmarked.
- Mean: This column specifies the average time or the arithmetic mean of the measurements made on execution of the method being benchmarked.
- StdDev: This column specifies the standard deviation, i.e., the extent to which the execution time deviated from the mean time.
- Gen 0: This column specifies the Gen 0 collections made for each set of 1000 operations.
- Gen 1: This column specifies the Gen 1 collections made for each set of 1000 operations.
- Gen 2: This column specifies the Gen 2 collections made for each set of 1000 operations. (Note that here, Gen 2 isn't shown because there were no Gen 2 collections in this example.)
- Allocated: This column specifies the managed memory allocated for a single operation.
Benchmarking StringBuilder Performance
Let's now examine how you can benchmark the performance of the StringBuilder class in .NET. Create a new class named BenchmarkStringBuilderPerformance with the code in Listing 2.
Listing 2: Benchmarking performance of StringBuilder and StringBuildercache
[MemoryDiagnoser]
[Orderer(BenchmarkDotNet.Order.SummaryOrderPolicy.FastestToSlowest)]
[RankColumn]
public class
BenchmarkStringBuilderPerformance
{
    const string message = "Some text for testing purposes only.";
    const int CTR = 10000;
}
Now, write the two methods for benchmarking performance of StringBuilder with and without using StringBuilderCache, as shown in Listing 3.
Listing 3: Continued from Listing 2
[Benchmark]
public void WithoutStringBuilderCache()
{
    for (int i = 0; i < CTR; i++)
    {
        var stringBuilder = new StringBuilder();
        stringBuilder.Append(message);
        _ = stringBuilder.ToString();
    }
}

[Benchmark]
public void WithStringBuilderCache()
{
    for (int i = 0; i < CTR; i++)
    {
        var stringBuilder = StringBuilderCache.Acquire();
        stringBuilder.Append(message);
        _= StringBuilderCache.GetStringAndRelease(stringBuilder);
    }
}
The complete source code of the BenchmarkStringBuilderPerformance class is given in Listing 4.
Listing 4: Benchmarking performance of StringBuilderCache
[MemoryDiagnoser]
[Orderer(BenchmarkDotNet.Order.SummaryOrderPolicy.FastestToSlowest)]
[RankColumn]
public class
BenchmarkStringBuilderPerformance
{
    const string message = "Some text for testing purposes only.";
    const int CTR = 10000;

    [Benchmark]
    public void WithoutStringBuilderCache()
    {
        for (int i = 0; i < CTR; i++)
        {
            var stringBuilder = new StringBuilder();
            stringBuilder.Append(message);
            _ = stringBuilder.ToString();
        }
    }

    [Benchmark]
    public void WithStringBuilderCache()
    {
        for (int i = 0; i < CTR; i++)
        {
            var stringBuilder = StringBuilderCache.Acquire();
            stringBuilder.Append(message);
            _= StringBuilderCache.GetStringAndRelease(stringBuilder);
        }
    }
}
Executing the Benchmarks
Write the following piece of code in the Program.cs file of the BenchmarkingConsoleDemo console application project to run the benchmarks:
using BenchmarkingConsoleDemo;
using System.Runtime.InteropServices;
class Program
{
    static void Main(string[] args)
    {
        BenchmarkRunner.Run<BenchmarkStringBuilderPerformance>();
    }
}
To execute the benchmarks, set the compile mode of the project to Release and run the following command in the same folder where your project file resides:
dotnet run -p
BenchmarkingConsoleDemo.csproj -c Release
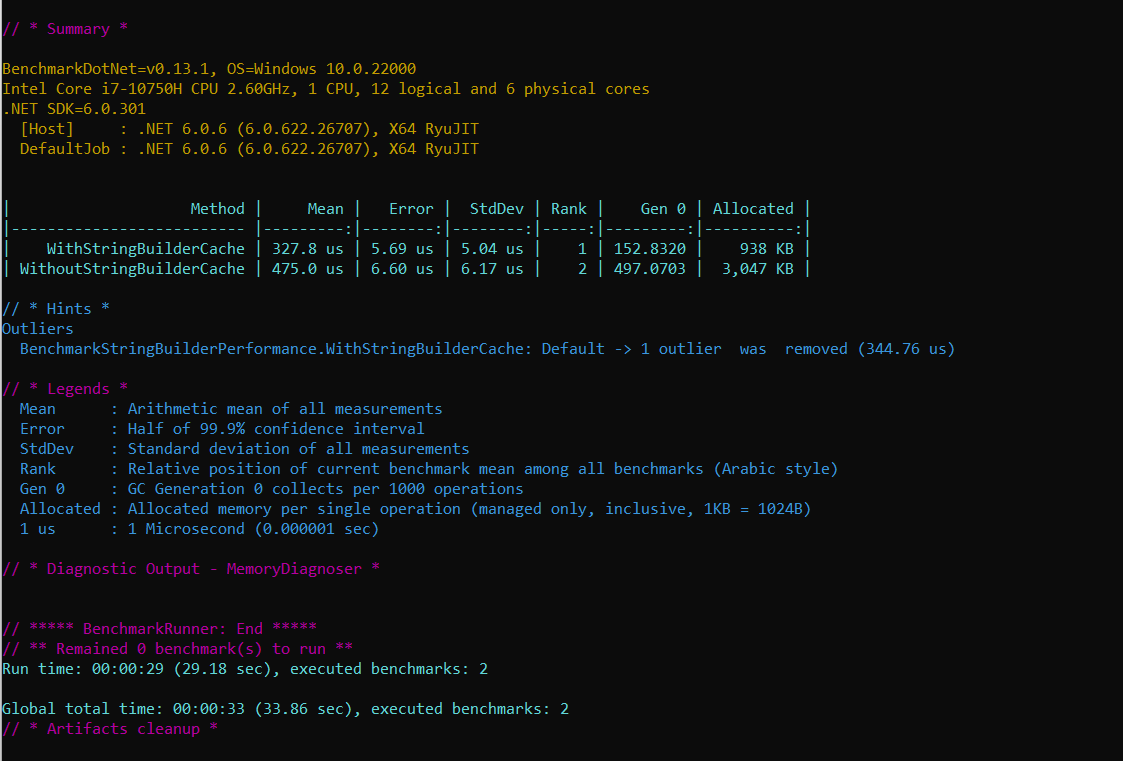
Figure 2 shows the result of the execution of the benchmarks.
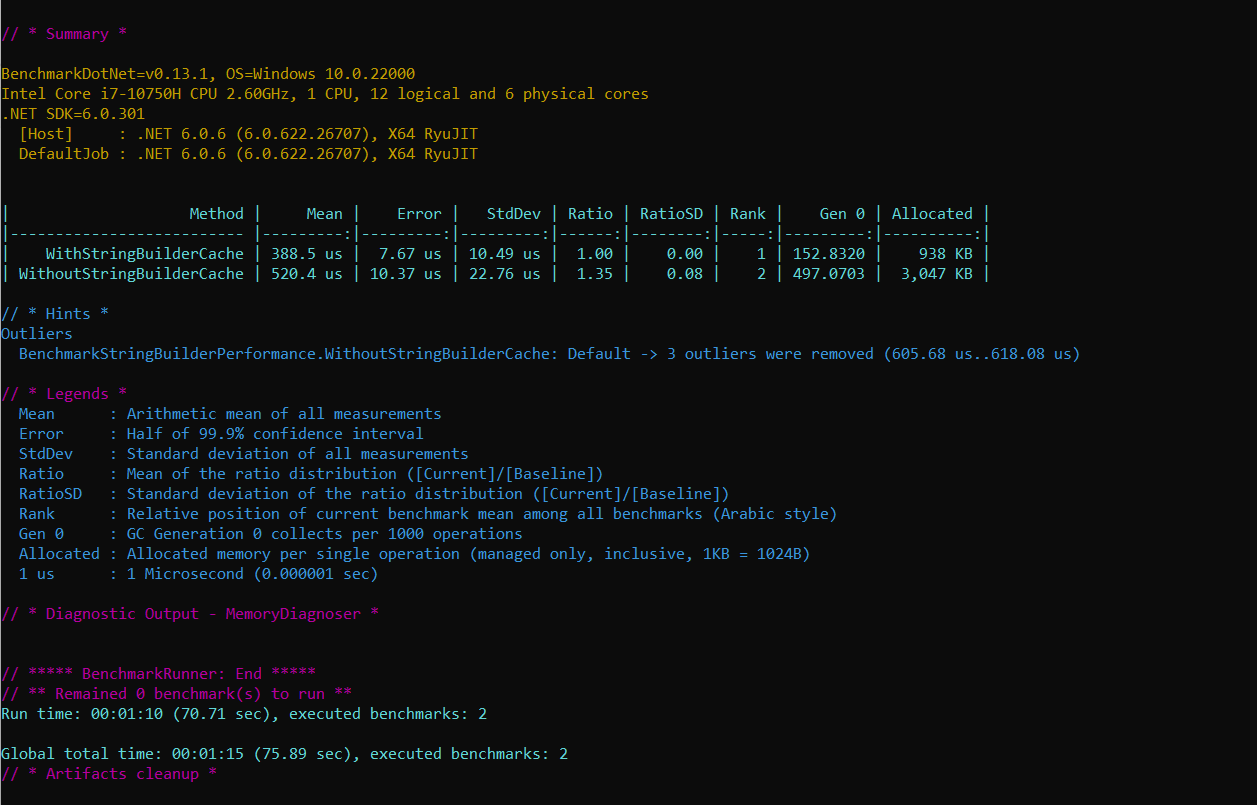
The following code snippet illustrates how you can mark the WithStringBuilderCache benchmark method as a baseline method.
[Benchmark (Baseline = true)]
public void WithStringBuilderCache()
{
    for (int i = 0; i < CTR; i++)
    {
        var stringBuilder = StringBuilderCache.Acquire();
        stringBuilder.Append(message);
        _= StringBuilderCache.GetStringAndRelease(stringBuilder);
    }
}
StringBuilderCache is an internal class that represents a per-thread cache with three static methods: Acquire, Release, and GetStringAndRelease. Here's the complete source code of this class: shorturl.at/dintW.
The Acquire method can acquire a StringBuilder instance. The Release method can store the StringBuilder instance in the cache if the instance size is within the maximum allowed size. The GetStringAndRelease method is used to return a string instance and return the StringBuilder instance to the cache.
When you run the benchmarks this time, the output will be similar to Figure 3.
Benchmarking ASP.NET 6 Applications
In this section, you'll examine how to benchmark ASP.NET 6 applications to retrieve performance data.
Create a New ASP.NET 6 Project in Visual Studio 2022
You can create a project in Visual Studio 2022 in several ways. When you launch Visual Studio 2022, you'll see the Start window. You can choose “Continue without code” to launch the main screen of the Visual Studio 2022 IDE.
To create a new ASP.NET 6 Project in Visual Studio 2022:
- Start the Visual Studio 2022 IDE.
- In the Create a new project window, select ASP.NET Core Web API and click Next to move on.
- Specify the project name as BenchmarkingWebDemo and the path where it should be created in the Configure your new project window.
- If you want the solution file and project to be created in the same directory, you can optionally check the Place solution and project in the same directory checkbox. Click Next to move on.
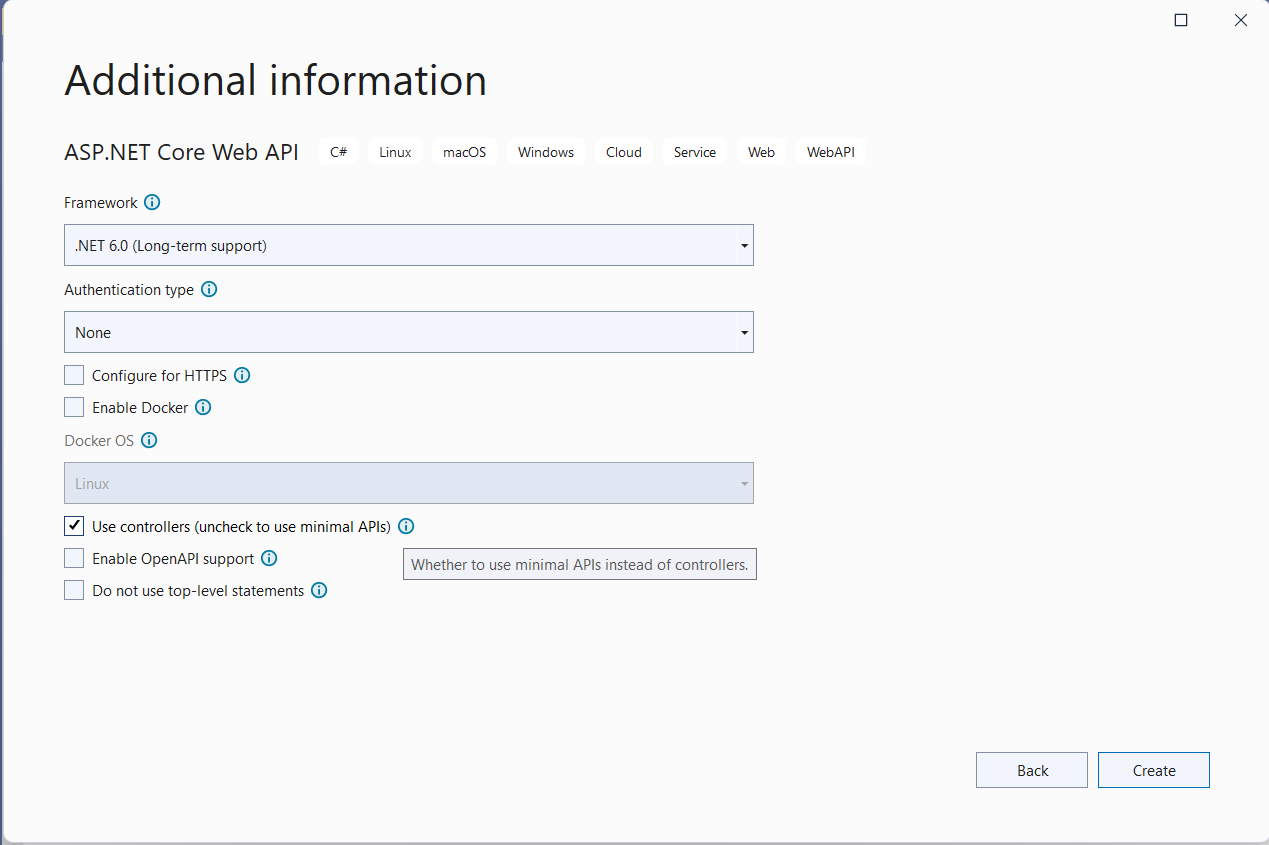
- In the next screen, specify the target framework and authentication type as well. Ensure that the Configure for HTTPS, Enable Docker Support, and the Enable OpenAPI support checkboxes are unchecked because you won't use any of these in this example.
- Because you'll be using minimal APIs in this example, remember to uncheck the Use controllers (uncheck to use minimal APIs) checkbox, as shown in Figure 4.
- Click Create to complete the process.
Minimal API is a new feature added in .NET 6 that enables you to create APIs with minimal dependencies. You'll use this application in this article. Let's now get started benchmarking ASP.NET applications with a simple method.
Get the Response Time in ASP.NET 6
You can easily get the response time of an endpoint using BenchmarkDotNet. To execute the ASP.NET 6 endpoints, you can use the HttpClient class. To create an instance of HttpClient, you can use the WebApplicationFactory, as shown in the code snippet given below:
var factory = new WebApplicationFactory
<Startup>()
    .WithWebHostBuilder(configuration =>
    {
        configuration.ConfigureLogging(logging =>
        {
            logging.ClearProviders();
        });
    });
_httpClient = factory.CreateClient();
To benchmark the response time of an endpoint, you can use the following code:
[Benchmark]
public async Task GetResponseTime()
{
    var response = await _httpClient.GetAsync("/");
}
The complete source code is given in Listing 5 for your reference. The benchmark results are shown in Figure 5.
Listing 5: Benchmarking response time of an API
public class BenchmarkAPIPerformance
{
    private static HttpClient _httpClient;

    [GlobalSetup]
    public void GlobalSetup()
    {
        var factory = new WebApplicationFactory
        <Startup>().WithWebHostBuilder(configuration =>
        {
            configuration.ConfigureLogging(logging =>
            {
                logging.ClearProviders();
            });
        });

        _httpClient = factory.CreateClient();
    }

    [Benchmark]
    public async Task GetResponseTime()
    {
        var response = await _httpClient.GetAsync("/");
    }
}
Real-World Use Case of BenchmarkDotNet
In this section, you'll examine how to take advantage of BenchmarkDotNet to measure the performance of an application, determine the slow running paths, and take necessary steps to improve the performance. You'll use an entity class named Product that contains a Guid field named Id. Note that a call to Guid.NewGuid consumes resources and is slow.
If you replace the Guid property with an int property, it consumes significantly fewer resources and improves performance. You'll create an optimized version of the Product class and then benchmark the performance of both these classes.
Create the Entity Classes
In the Solution Explorer Window, right-click on the project and create a new file named Product with the following code in there:
public class Product
{
    public Guid Id { get; set; }
    public string Name { get; set; }
    public string Category { get; set; }
    public decimal Price { get; set; }
}
Let's create another entity class named ProductOptimized, which is a replica of the Product class but optimized for improving performance. The following code snippet illustrates the ProductOptimized class:
public struct ProductOptimized
{
    public int Id { get; set; }
    public string Name { get; set; }
    public int Category { get; set; }
    public decimal Price { get; set; }
}
In the ProductOptimized class, you've changed the data type of the ID and the Category properties of the Product class with integers.
Create the Product Repository
Create a new class named ProductRepository in a file having the same name with a .cs extension. Now write the following code in there:
public class
ProductRepository : IProductRepository
{

}
The ProductRepository class illustrated in the code snippet below, implements the methods of the IProductRepository interface. Here is how this interface should look:
public interface IProductRepository
{
    public Task<List<Product>> GetAllProducts();
    public Task<List<ProductOptimized>> GetAllProductsOptimized();
}
The ProductRepository class implements the two methods of the IProductRepository interface:
public Task<List<Product>> GetAllProducts()
{
    return Task.FromResult(GetProductsInternal());
}

public Task<List<ProductOptimized>> GetAllProductsOptimized()
{
    return Task.FromResult(GetProductsOptimizedInternal());
}
Although the GetAllProducts method returns a list of the Product class, the GetAllProductsOptimized method returns a list of the ProductOptimized class you created earlier. These two methods call the private methods named GetProductsInternal and GetProductsOptimizedInternal respectively. These private methods return a List of Product and ProductOptimized class respectively.
The GetProductsInternal method creates a List of the Product class. It uses the Guid.NewGuid method to generate new Guids for the ID field. Hence, it creates 1000 new Guids, one for each instance of the Product class. Contrarily, the GetProductsOptimizedInternal method creates a List of the ProductOptimized class. In this class, the ID property is an integer type. So, in this method, 1000 new integer IDs are created. Create new Guids is resource intensive and much slower than creating an integer.
Note that this implementation has been made as simple as possible because my focus is on how you can benchmark the performance of these methods.
The source code given in Listing 6 illustrates the GetProductsInternal and GetProductsOptimizedInternal methods. Note that in the GetProductsOptimizedInternal method, a list of ProductOptimized entity class is created and the size of the list has been specified as well.
Listing 6: The GetProducts and GetProductsOptimized methods
private List<Product> GetProductsInternal()
{
    List<Product> products = new List<Product>();
    for(int i=0; i<1000;i++)
    {
        Product product = new Product
        {
            Id = Guid.NewGuid(),
            Name = "Lenovo Legion",
            Category = "Laptop",
            Price = 3500
        };
    }
    return products;
}

private List<ProductOptimized>
GetProductsOptimizedInternal()
{
    List<ProductOptimized> products = new List<ProductOptimized>(1000);

    for (int i = 0; i < 1000; i++)
    {
        ProductOptimized product = new ProductOptimized
        {
            Id = i,
            Name = "Lenovo Legion",
            Category = 1,
            Price = 3500
        };
    }
    return products;
}
Create the Endpoints
You'll create two endpoints, GetProducts and GetProductsOptimized, and then benchmark them. Because you're using minimal API in this example, write the following code snippet in the Program class of your ASP.NET 6 Web API project to create the two endpoints:
app.MapGet("/GetProducts", async (IProductRepository productRepository) =>
{
    return Results.Ok(await productRepository.GetAllProducts());
});
app.MapGet("/GetProductsOptimized", async (IProductRepository productRepository) =>
{
    return Results.Ok(await productRepository.GetAllProductsOptimized());
});
Create the Benchmarks
Let's now create the benchmarking class that contains the methods to be benchmarked using BenchmarkDotNet. To do this, create a class named BenchmarkManager in a file with the same name and a .cs extension and write the code shown in Listing 7 in there.
Listing 7: Benchmarking performance of GetProducts and GetProductsOptimized API methods
[MemoryDiagnoser]
public class BenchmarkAPIPerformance
{
    private static HttpClient _httpClient;

    [Params(1, 25, 50)]
    public int N;

    [GlobalSetup]
    public void GlobalSetup()
    {
        var factory = new WebApplicationFactory<Startup>()
            .WithWebHostBuilder(configuration =>
        {
            configuration.ConfigureLogging(logging =>
            {
                logging.ClearProviders();
            });
        });
        _httpClient = factory.CreateClient();
    }

    [Benchmark]
    public async Task GetProducts()
    {
        for(int i = 0;i < N; i++)
        {
            var response = await _httpClient.GetAsync("/GetProducts");
        }
    }

    [Benchmark]
    public async Task GetProductsOptimized()
    {
        for (int i = 0; i < N; i++)
        {
            var response = await _httpClient.GetAsync("/GetProductsOptimized");
        }
    }
}
The two methods that need to be benchmarked are the GetProducts and GetProductsOptimized methods. Note the Benchmark attribute on each of these methods. These two methods use the HttpClient instance to execute the two endpoints GetProducts and GetProductsOptimized respectively.
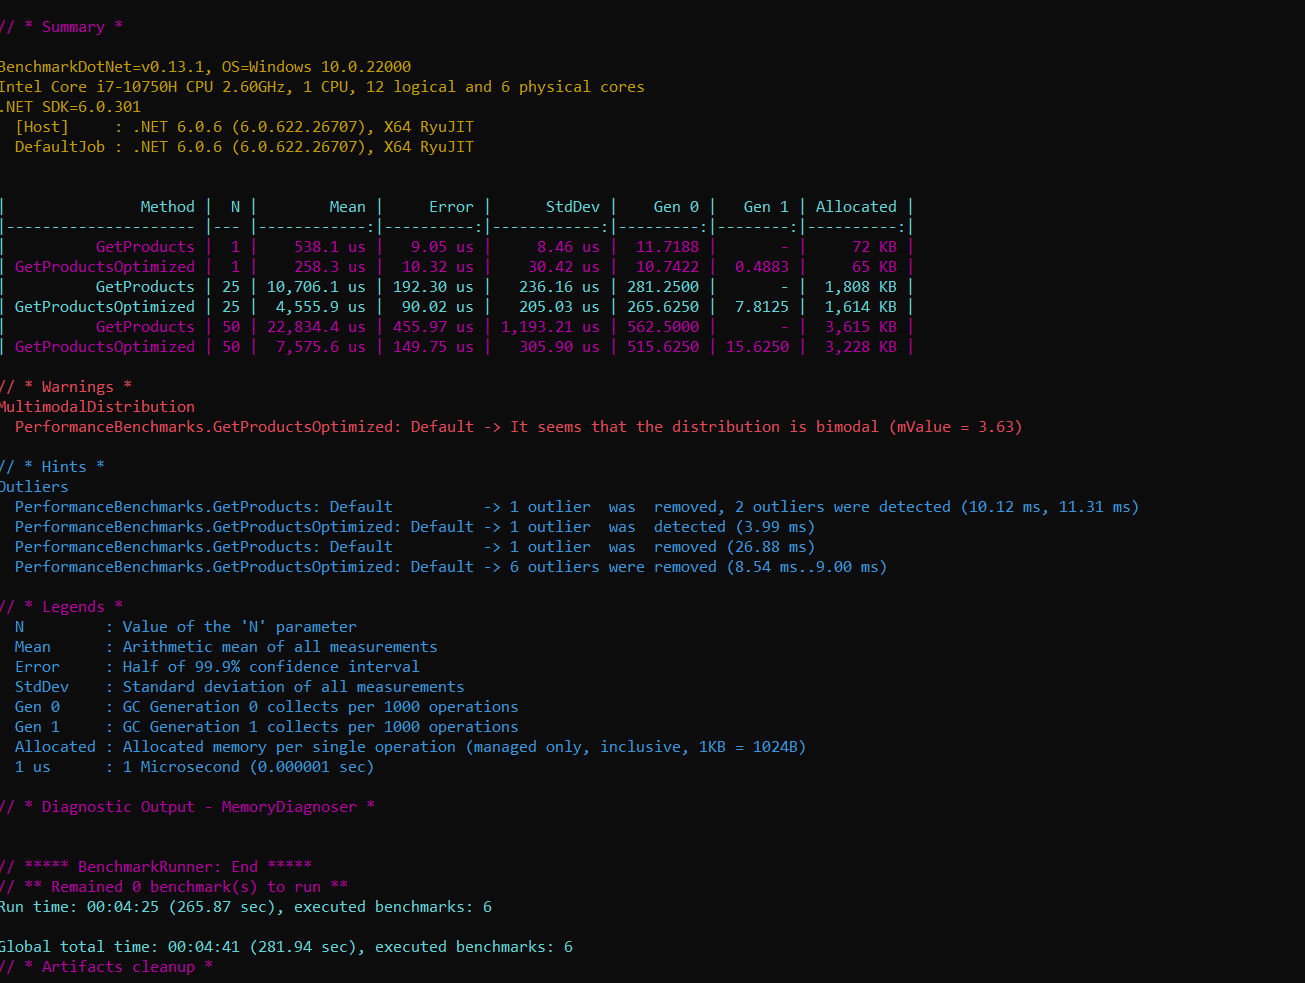
Figure 6 shows the output of the execution of benchmarks. As you can see, the GetProductsOptimized consumes less memory and is much faster than its counterpart, i.e., the GetProducts method.
Conclusion
BenchmarkDotNet is a compelling and easy-to-use framework to benchmark .NET code. You can execute a benchmark on a single method, module, or entire application to check the performance of the code without affecting its functionality. Remember that to improve the performance and scalability of your application, you must adhere to the best practices, if not, merely benchmarking your application's code won't help.
