


Four years ago, I wrote an article entitled "Understanding Blockchain: A Beginners Guide to Ethereum Smart Contract Programming". Since then, a lot of new developments have happened in the blockchain world, and new start-ups touting new tokens are literally popping up every single day. Today, we are bombarded with terms like DeFi (Decentralized Finance), DEX (Decentralized Exchange), DAO (Decentralized Autonomous Organization), Stable coins, tokens, ICO (Initial Coin Offering), Oracles, and more. Explaining all these terms is going to take a while, and I'll try to do it in another article.
Behind all these key terms is a key enabling technology: smart contracts. My focus for this article is to explain smart contracts in detail so that once you have a good grasp of what smart contracts can do, understanding the other terms becomes a walk in the park.
If you're not familiar with how blockchain works, I strongly suggest you read my earlier article before continuing with this one.
What's a Smart Contract?
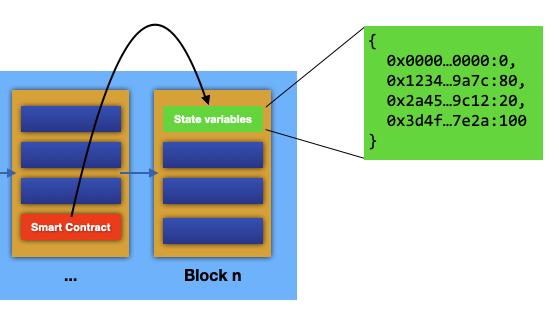
A smart contract is an application residing on the blockchain that can write values onto the blockchain itself. As all the data recorded on the blockchain is immutable and traceable, smart contracts allow you to make use of the blockchain as a backing store for storing data that's permanent (such as student examination results) so that you can use it as a proof later on.
Figure 1 shows the idea behind smart contracts.
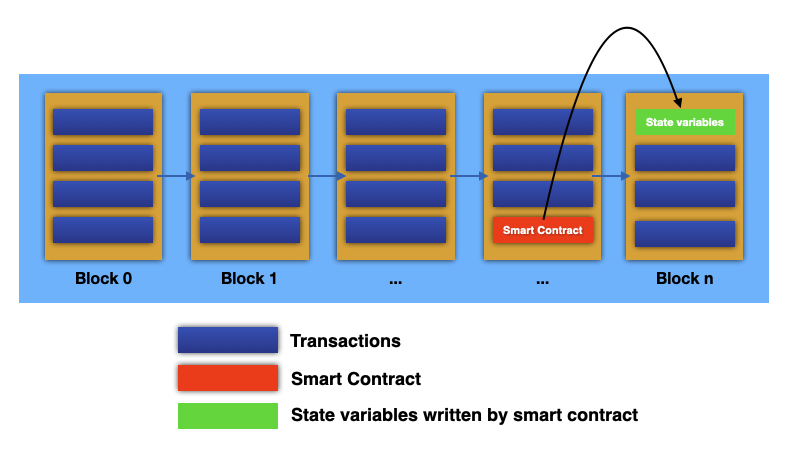
Besides storing transactions, a blockchain (such as Ethereum) can also store smart contracts. When a smart contract is invoked (every smart contract deployed onto the blockchain has an address), the smart contract can execute code much like an ordinary application can (although there are several restrictions on what a smart contract can and cannot do). Typically, a smart contract can write values (commonly referred to as state variables) onto the blockchain.
Besides writing values onto the blockchain, smart contracts can also transfer funds (such as tokens and cryptos) between accounts. This opens up a lot of possibilities for developers to write interesting applications that run on the blockchain. Decentralized lottery apps, anyone?
Creating a Smart Contract Using Remix IDE
The best way to understand how a smart contract works is to write one. Recall that data stored on the blockchain is immutable. Therefore, blockchain is a good store-of-proofs. A good use case is storing the educational credentials of students on the blockchain.
Recently, there have been many cases of job applicants submitting false degree qualifications to employers. Employers have no easy way to verify whether an applicant's qualification is genuine, and they must spend precious time verifying the authenticity of the qualifications. If an institution can record the educational credentials obtained by students onto the blockchain, it's easier for employers (or anyone) to verify the authenticity of potential employees' qualifications.
Consider the following simplified example of a student's examination result represented as a JSON string:
{
    "id": "1234567",
    "result": {
        "math": "A",
        "science": "B",
        "english": "A"
    }
}
The idea is to store the result onto the blockchain. However, it's not advisable to store the JSON string directly onto the blockchain for two key reasons:
- Storing the plain text onto the blockchain is expensive. Every additional character stored on the blockchain incurs additional gas fees. The aim is to only store only essential data.
- You should never store personally identifiable data on the blockchain. On public blockchains, all data is up for public scrutiny, and hence storing the result in plain text violates privacy regulations and laws.
Considering the privacy concerns, you should instead store the hash of the credentials onto the blockchain.
Never store encrypted data on the blockchain as they're susceptible to hacking. Storing the hash of the data is much safer.
To verify that the education credentials are authentic, pass in the JSON string representing the result and check whether the hash exists on the blockchain. If it exists, the result is authentic.
For operational reasons, I'll first encode the JSON string using base64 encoding before obtaining its hash. To try base64 encoding, you can use the following site: https://codebeautify.org/json-to-base64-converter. The above JSON string yields the following base64 encoded output:
ewogICJpZCI6ICIxMjM0NTY3IiwKICAicmVzdWx0Ijogewog
ICAgIm1hdGgiOiAiQSIsCiAgICAic2NpZW5jZSI6ICJCIiwK
ICAgICJlbmdsaXNoIjogIkEiCiAgfQp9Cg==
For this example, I'm going to use the Ethereum blockchain. Rather than deal with the mainnet (the main Ethereum network where you have to use real ethers–the cryptocurrency for the Ethereum blockchain), I'm going to use the Goerli testnet.
The Goerli testnet is the testnet you should use after the Merge (where Ethereum transitioned from Proof-of-Work to Proof-of-Stake). Other testnets, such as Ropsten, have since been deprecated.
Using the testnet allows you to test all the various features of the Ethereum blockchain without using real ethers. Also, for this article, I'll be using MetaMask (an Ethereum crypto-wallet) on Chrome.
If you're not familiar with MetaMask, check out my article Blockchain Series: Getting Started with MetaMask.
Once MetaMask is set-up on Chrome, you need to obtain some test ethers. You can get some from https://goerlifaucet.com/.
You need to setup a free Alchemy (https://www.alchemy.com/) account in order to request free Goerli test ethers.
To create the smart contract, I'll use the Remix IDE (https://remix.ethereum.org/). Be sure to load the Remix IDE using Chrome (or whatever browser has the MetaMask extension installed). This is to ensure that later on, when you deploy and test your smart contracts, you have a way to pay for the gas (transaction) fees.
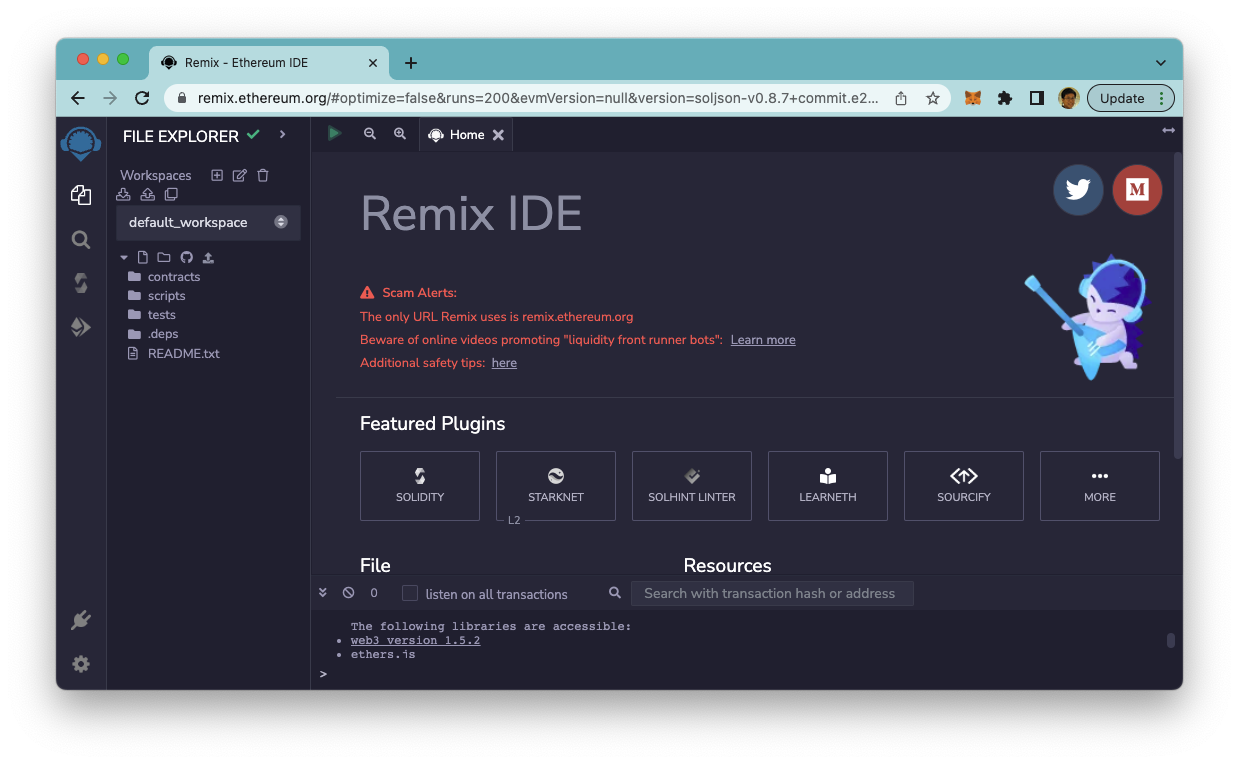
Remix IDE, is a web-based development environment for developing smart contracts. Using Remix IDE, you can compile, deploy, and test your smart contracts, all within your web browser.
When Remix IDE is loaded, you should have something like that shown in Figure 2.
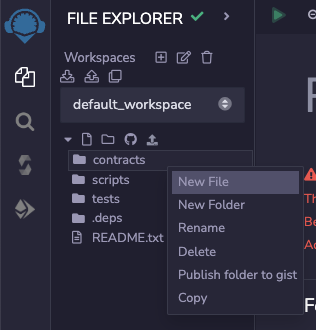
Right-click on the contracts item and select New File (see Figure 3).
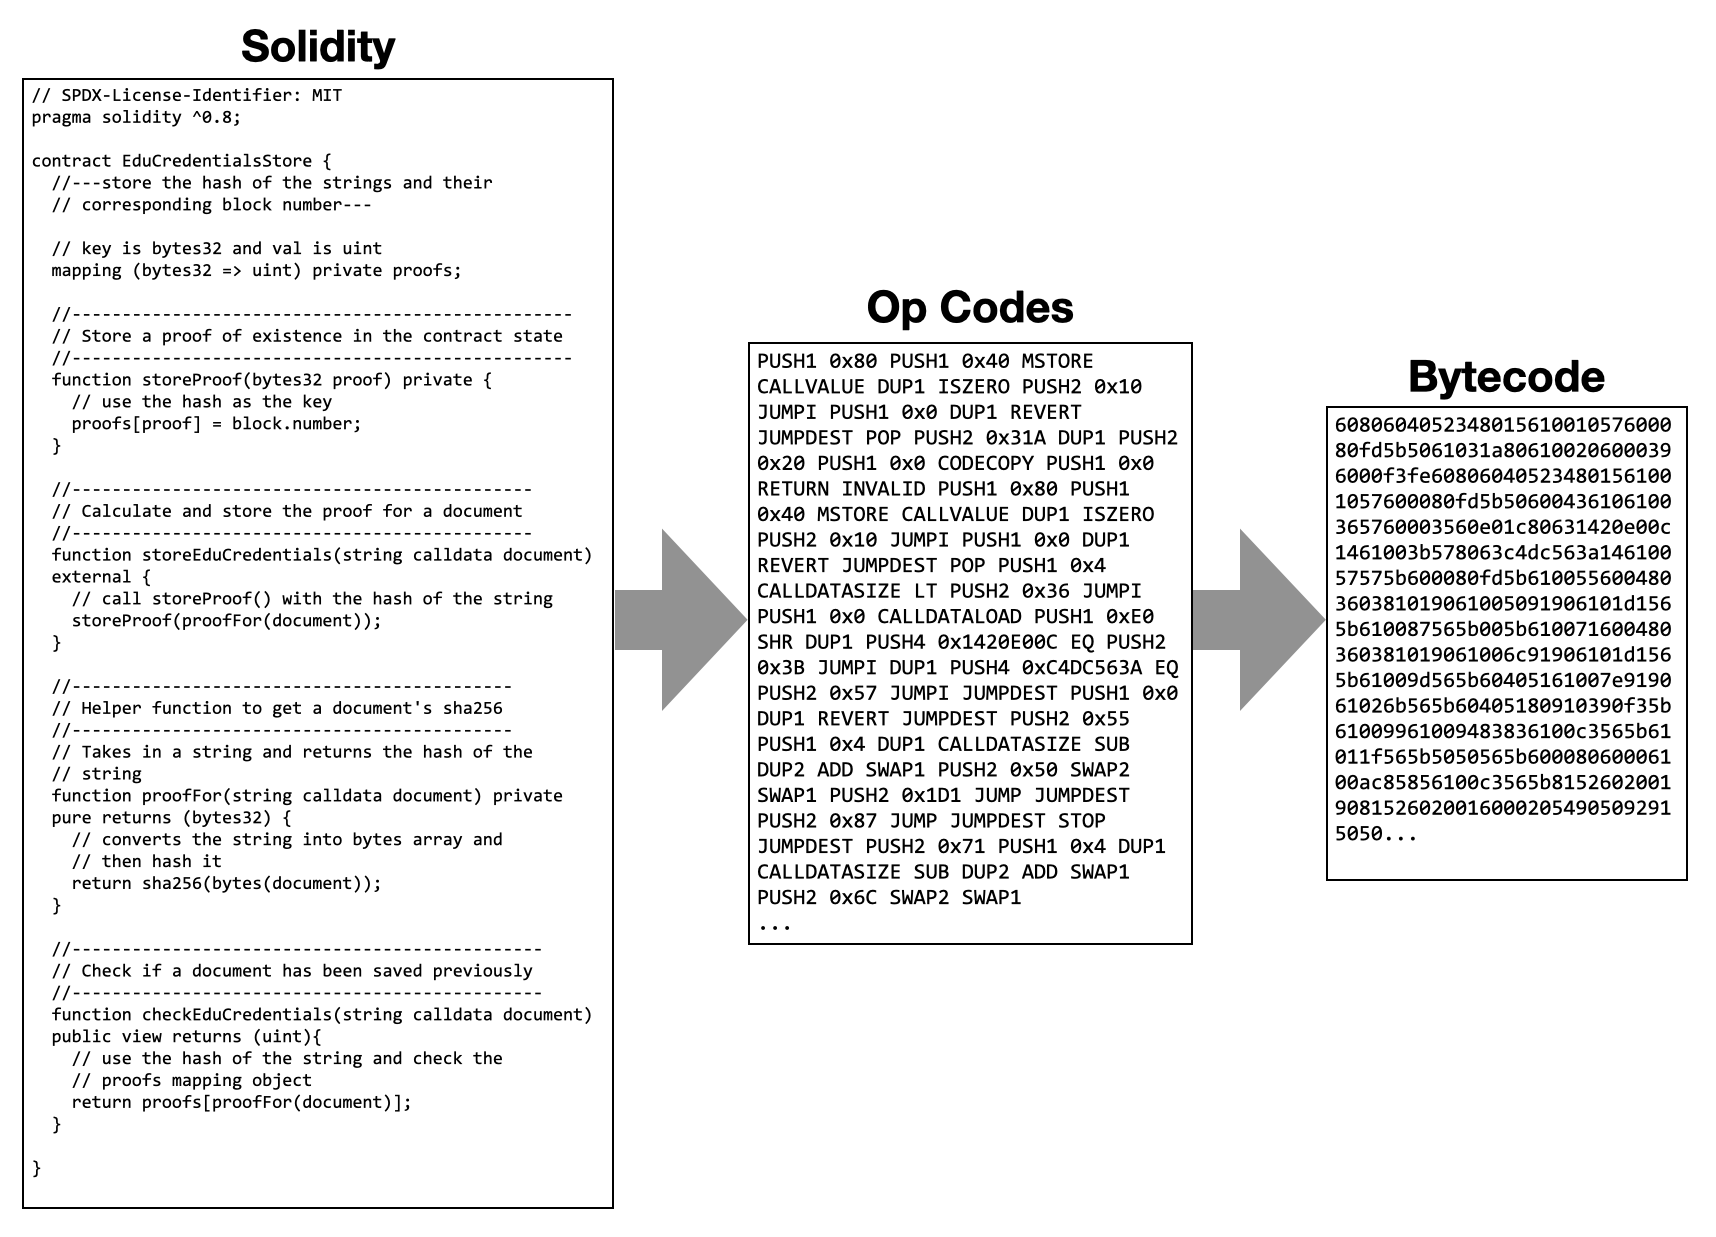
Name the new file as EduCredentialsStore.sol and populate it with the statements as shown in Listing 1.
Listing 1: The smart contract to save a person's educational credentials onto the blockchain
// SPDX-License-Identifier: MIT
pragma solidity ^0.8;

contract EduCredentialsStore {
    //---store the hash of the strings and their
    // corresponding block number---

    // key is bytes32 and val is uint
    mapping (bytes32 => uint) private proofs;

    //--------------------------------------------------
    // Store a proof of existence in the contract state
    //--------------------------------------------------
    function storeProof(bytes32 proof) private {
        // use the hash as the key
        proofs[proof] = block.number;
    }

    //----------------------------------------------
    // Calculate and store the proof for a document
    //----------------------------------------------
    function storeEduCredentials(string calldata document) external {
        // call storeProof() with the hash of the string
        storeProof(proofFor(document));
    }

    //--------------------------------------------
    // Helper function to get a document's sha256
    //--------------------------------------------
    // Takes in a string and returns the hash of the string
    function proofFor(string calldata document) private
    pure returns (bytes32) {
        // converts the string into bytes array and then hash it

        return sha256(bytes(document));
    }

    //-----------------------------------------------
    // Check if a document has been saved previously
    //-----------------------------------------------
    function checkEduCredentials(string calldata document)
    public view returns (uint){
        // use the hash of the string and check the proofs mapping object
        return proofs[proofFor(document)];
    }
}
Here's a summary of the smart contract (written in the Solidity programming language):
- The first line in the contract specifies the type of license the contract uses. This was introduced in Solidity 0.6.8. The MIT License is a permissive free software license originating at the Massachusetts Institute of Technology in the late 1980s. As a permissive license, it puts only very limited restriction on reuse and has, therefore, high license compatibility.
- The pragma solidity statement is a directive that tells the compiler that source code is written for a specific version of Solidity. In this case, it's compatible with version 0.8.x, e.g., versions 0.8.1, 0.8.17, etc. However, it's not compatible with versions such as 0.7 or 0.9.
- The contract has two private functions:
storeProof()andproofFor(). Private functions are denoted with theprivatekeyword. Private functions are only callable within the contract and not by users. - The contract has one external function (
storeEduCredentials()) and one public function (checkEduCredentials()). Public and external functions are both visible outside the contract and can be called directly by the user. The key difference between public and external is that public functions are also visible to subclasses of the contract and external functions are not visible to subclasses of the contract. - You'll notice the use of the
calldatakeyword in the functions parameter declaration. Besides thecalldatakeyword, you can also use thememorykeyword. Both thememoryandcalldatakeywords indicate that the parameter holds temporary value, and they won't be persisted onto the blockchain. The key difference between the two keywords is that parameter prefixed with thecalldatakeyword is immutable and cannot be changed, and parameters prefixed withmemoryis mutable. - You'll also notice that one function has the
purekeyword and another has theviewkeyword. Thepurekeyword indicates that the function does not read or write values onto the blockchain. Theviewkeyword, on the other hand, indicates that the function will read values from the blockchain. - The contract has a mapping object named
proofs. A mapping object in Solidity is like a dictionary object: it holds key/value pairs. The value of Proofs is persisted on the blockchain and is known as a state variable.
With all the different keywords for function access modifiers and parameters declaration, which should you use? Here's a quick guide:
- Use
calldatafor parameter declaration if the data passed into the function need not be modified. Declaring a function withcalldataparameters will save on gas fees. - Use external instead of public if there's no need for your functions to be called by subclasses of the contract. Due to the way arguments in public functions are accessed, declaring functions as external will incur lesser gas fees.
When smart contracts are deployed to the blockchain, you have to pay for gas fees based on the size of the contract. When users call the functions in a smart contract after it has been deployed, they also need to pay transaction fees, but the fee payable depends on the complexity of the function. Hence when writing your smart contract, it's always good to optimize your code so that the caller can minimize the transaction fees.
Figure 4 shows the conceptual flow of how your smart contract can be used.
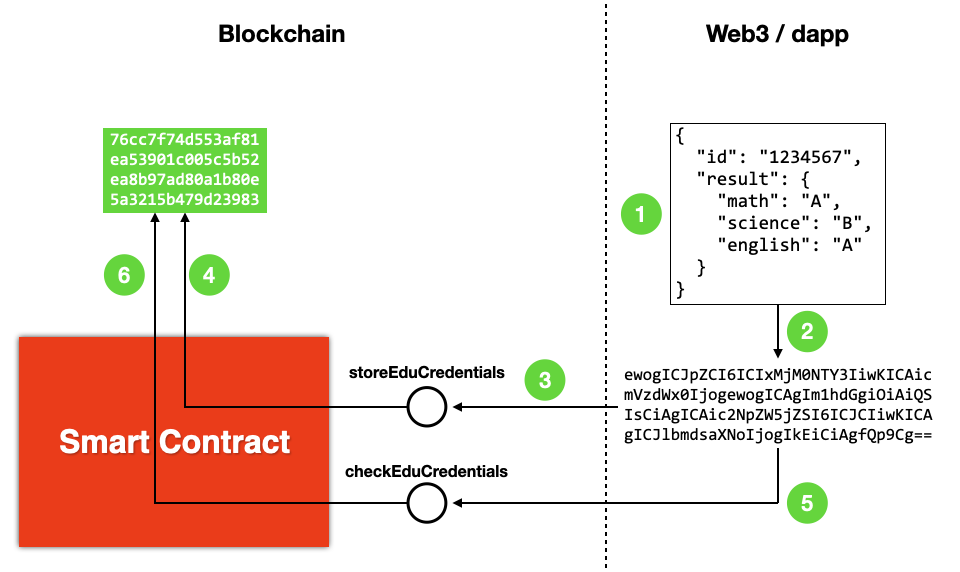
Note that:
- The result of a student is represented as a JSON string.
- The JSON string is encoded using base64 encoding.
- The base64 encoded string is passed into the
storeEduCredentials()function of the smart contract. - The
storeEduCredentials()function hashes the base64 encoded string and then stores the hash together with the block number (containing the transaction) onto the blockchain. - To check whether an educational credential is authentic, the based64 encoded string of the student's result is passed into the
checkEduCredentials()function. - The
checkEduCredentials()function hashes the base64 encoded string and then checks whether the hash already exists on the blockchain. The block number that contains the hash will be returned. If the hash is not found, a value of 0 is returned.
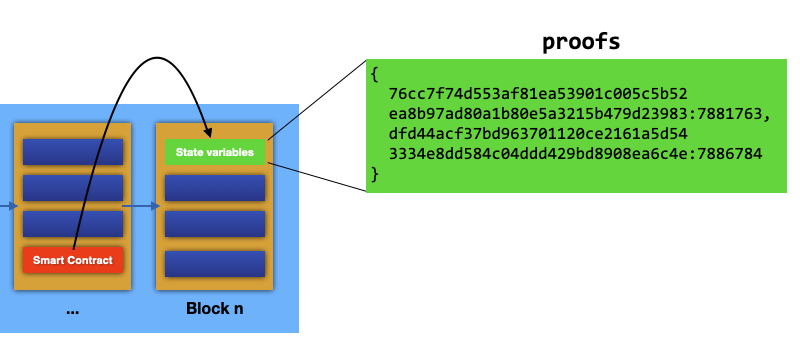
Figure 5 shows how the smart contract stores the hash of the credentials onto the blockchain. The state variable is a mapping object containing key/value pairs. The keys are the hashes and the values are the block numbers in which the hashes are written onto the blockchain.
Compiling the Contract
With the smart contract written, it's now time to compile it. In Remix IDE, click the Compiler tab (see Figure 6, step 1) and check Auto compile. Doing so enables Remix IDE to automatically compile your code every time you make changes to it.
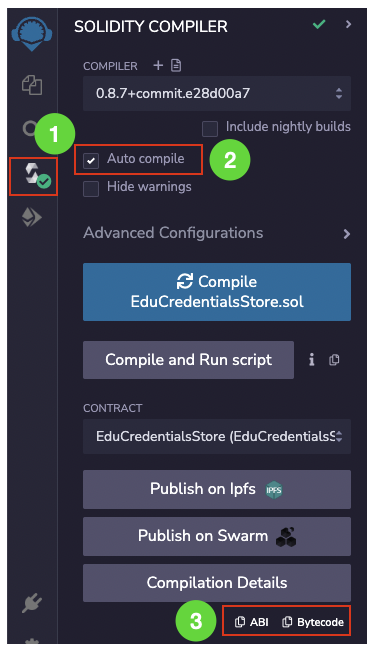
At the bottom of Figure 6, you'll see two items: ABI and Bytecode. Clicking on ABI copies the Application Binary Interface (ABI) to the clipboard. Paste it onto a text editor and it will look like this:
[
  {
    "inputs": [
      {
        "internalType": "string",
        "name": "document",
        "type": "string"
      }
    ],
    "name": "checkEduCredentials",
    "outputs": [
      {
        "internalType": "uint256",
        "name": "",
        "type": "uint256"
      }
    ],
    "stateMutability": "view",
    "type": "function"
  },
  {
    "inputs": [
      {
        "internalType": "string",
        "name": "document",
        "type": "string"
      }
    ],
    "name": "storeEduCredentials",
    "outputs": [],
    "stateMutability": "nonpayable",
    "type": "function"
  }
]
The use of the ABI is to provide details to front-end applications on how to call the smart contract. It contains a description of the external/public functions in the smart contracts, the parameters they accept, and the values they return. When you develop a Web3 dapp (Decentralized App), you need the ABI in order to invoke the contract.
Likewise, click the Bytecode button (bottom of Figure 6) and paste it onto a text editor. It will look like Figure 7.
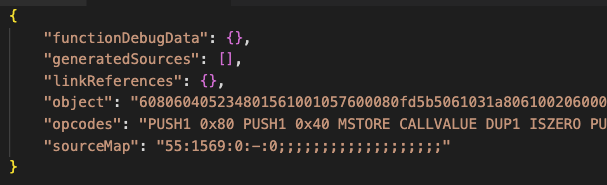
Specifically, the value of the object key contains the actual bytecode (think of it as machine language) of the contract that will be deployed onto the blockchain. Figure 8 shows the steps performed by Remix IDE when it compiles your smart contract.
Deploying the Smart Contract
You're now ready to deploy the smart contract to the Goerli testnet. In Remix IDE, click on the Deploy icon (see Figure 9; step 1). Then, make sure the environment is Injected Provider - MetaMask. By selecting MetaMask, this means that the contract will deploy to whichever network the MetaMask is connected to (make sure MetaMask is connected to Goerli). Finally, click the Deploy button (step 3).
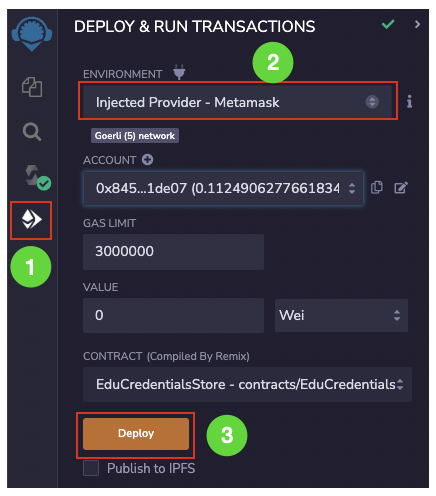
MetaMask prompts you to pay for the transaction. Click Confirm and wait a while for the transaction to confirm.
Testing the Smart Contract
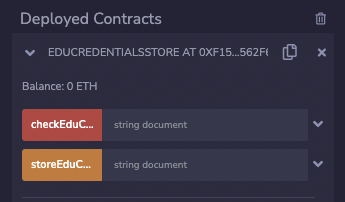
Once the smart contract is deployed, you'll see the contract under the Deployed Contracts section of the Remix IDE (see Figure 10). You'll also see the address of the contract displayed next to the contract name.
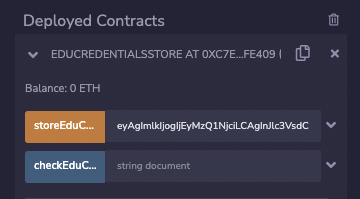
Let's now try to store the hash of the base64-encoded JSON string representing the result of a student onto the blockchain. Once the base64-encoded string is pasted into the textbox, click the storeEduCredentials button.
To call a smart contract on the blockchain, your dapp needs the address of the contract as well as its ABI.
MetaMask will prompt you to pay for the transaction. Click Confirm (see Figure 11).

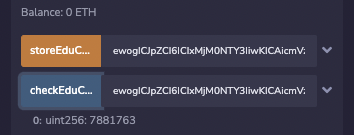
After a while, the transaction will be confirmed. You can now paste the same base64-encoded string into the textbox displayed next to the checkEduCredentials button (see Figure 12). Clicking the checkEduCredentials button displays the block number (7881763, in this example) in which the hash of the base64-encoded string was stored on the blockchain. If you see a result of 0, this means that the hash was not found on the blockchain.
What's the difference between the colors of the buttons? Orange buttons mean that you need to pay transaction fees (because you're modifying the state of the blockchain) and blue buttons mean that you don't have to (you're just reading data off the blockchain).
Restricting Access to Functions
Apparently, not everyone should be allowed to store the educational credentials of students on the blockchain. Ideally, only an educational institution (usually the one that deploys the smart contract) should be allowed to do that. You can make some changes to the smart contract ensuring that only the contract owner (the one that deploys the contract) is allowed to call the storeEduCredentials() function.
First, add in the following comment and variable to the contract:
contract EduCredentialsStore {
    // store the owner of the contract
    address owner = msg.sender;
The owner variable automatically stores the address of the account (msg.sender) that deploys it. Then, in the storeEduCredentials() function, add in the require() function, as follows:
  function storeEduCredentials(string calldata document) external {

      require(msg.sender == owner,
        "Only the owner of contract can store the credentials");

      // call storeProof() with the hash of the string
      storeProof(proofFor(document));
  }
The require() function first checks that whoever is calling this function (msg.sender) must be the owner, or else it returns an error message. If the condition is met, execution will continue, or else the execution halts.
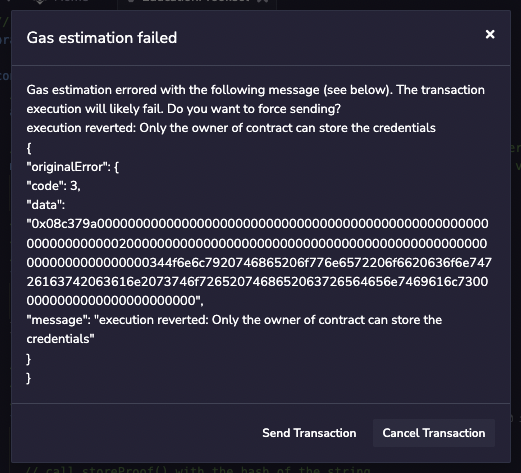
In the Remix IDE, you can try out the above modifications by first deploying the contract using Account 1. After the contract is deployed, switch to another account in MetaMask and try to call the storeEduCredentials() function. You'll see an error, as shown in Figure 13.
Note that smart contracts are not alterable. Once they're deployed, you won't be able to make any changes to it. When you redeploy a contract, a new contract is stored on the blockchain - you won't be able to access any of the state variables of the old contract in the new one.
Accepting Payments in Smart Contracts
Now that you've managed to write a smart contract that allows educational credentials to be written to the blockchain, you might want to see how you can financially benefit from such a contract. How about earning some ethers whenever someone needs to verify the educational credential of a potential employee? Well, that's easy.
Let's add the payable keyword to the checkEduCredentials() function and delete the view keyword:
  function checkEduCredentials(string calldata document)
      public payable returns (uint){
          require (msg.value == 1000 wei, "This call requires 1000 wei");
          // use the hash of the string and check
          // the proofs mapping object
          return proofs[proofFor(document)];
  }
At the same time, add the require() function to indicate that the caller must send in 1000 wei (represented in msg.value).
One ether is equal to 1,000,000,000,000,000,000 wei (18 zeros). Wei is the smallest denomination of ether.
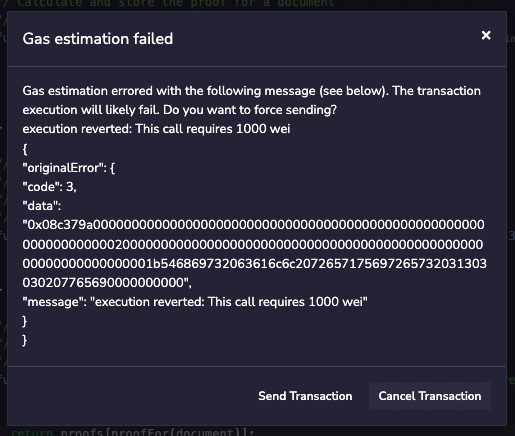
When you deploy this contract, observe that checkEduCredentials button is now red (see Figure 14).
If a function button is red, it indicates that besides paying for transaction fees, it may also require you to send ethers to it.
Just like what you've done previously, go ahead and paste the base64-encoded string and then click the storeEduCredentials button. When you now try to click the checkEduCredential button, you'll see the error message shown in Figure 15.
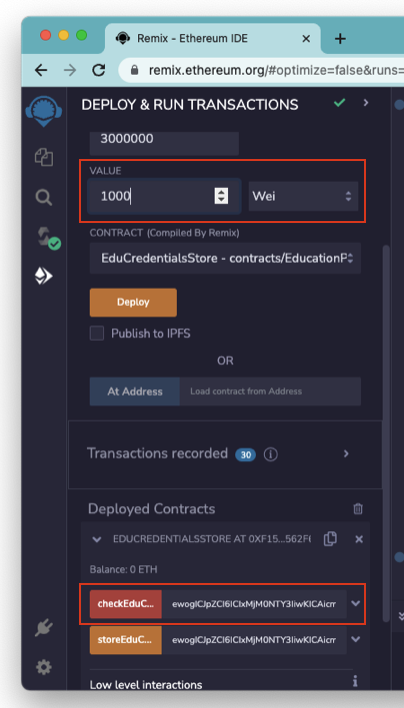
Apparently, this is because you didn't send 1000 wei to the contract. To fix this in Remix IDE, specify 1000 wei before you click the checkEduCredential button, as shown in Figure 16.
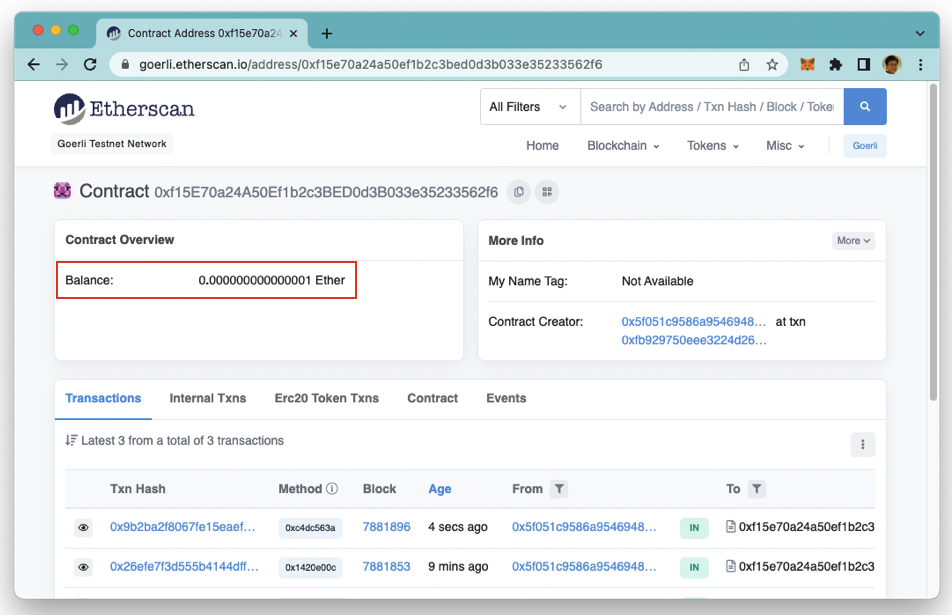
When the transaction is confirmed, you can go to Etherscan and view the balance of the contract. For example, the address of my contract is 0xf15e70a24a50ef1b2c3bed0d3b033e35233562f6. Hence, the details of my contract on Etherscan (for the Goerli testnet) is: https://goerli.etherscan.io/address/0xf15e70a24a50ef1b2c3bed0d3b033e35233562f6.
Etherscan is a blockchain explorer that allows you to view all the detailed transaction information that happened on the Ethereum blockchain (including the various testnets).
Figure 17 shows that the contract has a balance of 0.000000000000001 ether (which is 1000 wei). This proves that the contract has the ability to hold ethers.
Cashing Out
Now that your smart contracts holds ethers, you have a problem. The ethers are stuck forever in the contract as you didn't make any provisions to transfer them out. To be able to get ethers out of a contract, there are two main ways:
- Immediately transfer the ethers to another account the moment they're received in the
checkEduCredentials()function. - Add another function to transfer the ether to another account (such as the owner).
For this example, I'll use the second approach by adding a new cashOut() function to the contract:
  function cashOut() public {
      require(msg.sender == owner, "Only the owner of contract can cash out!");
      payable(owner).transfer(address(this).balance);
  }
In the cashOut() function, you first need to ensure that only the owner can call this function. Once this is verified, you'll transfer the entire balance of the contract to the owner using the transfer() function.
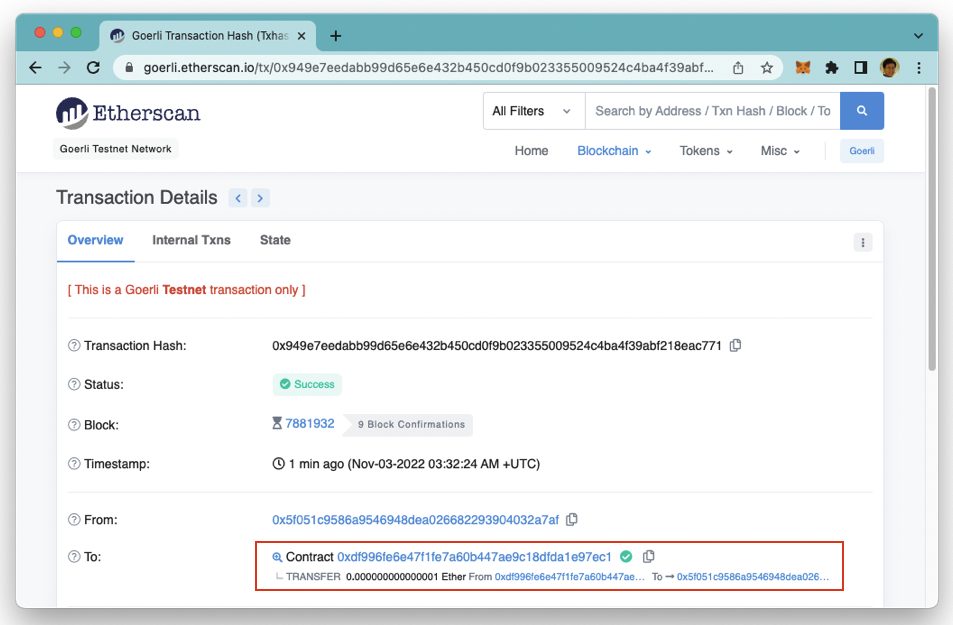
Once again, deploy the contract and then call the checkEduCredentials() function so that you can send 1000 wei to the contract. Then, click the cashOut button in the Remix IDE to transfer the ethers back to the owner. On Etherscan, you'll be able to see that there is a transfer of the balance to the owner of the contract (see Figure 18).
Events in Smart Contracts
A function in a smart contract can return a value back to the caller. Another way that a contract can return values back to the caller is through events. Events are usually used by smart contracts to keep front-end applications updated on what's happening to the smart contract.
For this example, let's define an event using the statements that begin //—define an event—:
// SPDX-License-Identifier: MIT
pragma solidity ^0.8;

contract EduCredentialsStore {
    // store the owner of the contract
    address owner = msg.sender;

    //---store the hash of the strings and their
    // corresponding block number---
    // key is bytes32 and val is uint
    mapping (bytes32 => uint) private proofs;

    //---define an event---
    event Document(
        address from,
        bytes32 hash,
        uint blockNumber
    );
The above defined an event named Document with three parameters: from, hash, and blockNumber. To fire this event, use the emit keyword. For example, you could fire this event in the storeProof() function after you update the proofs state variable:
function storeProof(bytes32 proof)
private {
    // use the hash as the key
    proofs[proof] = block.number;

    // fire the event to inform the frontend
    emit Document(msg.sender, proof, block.number);
  }
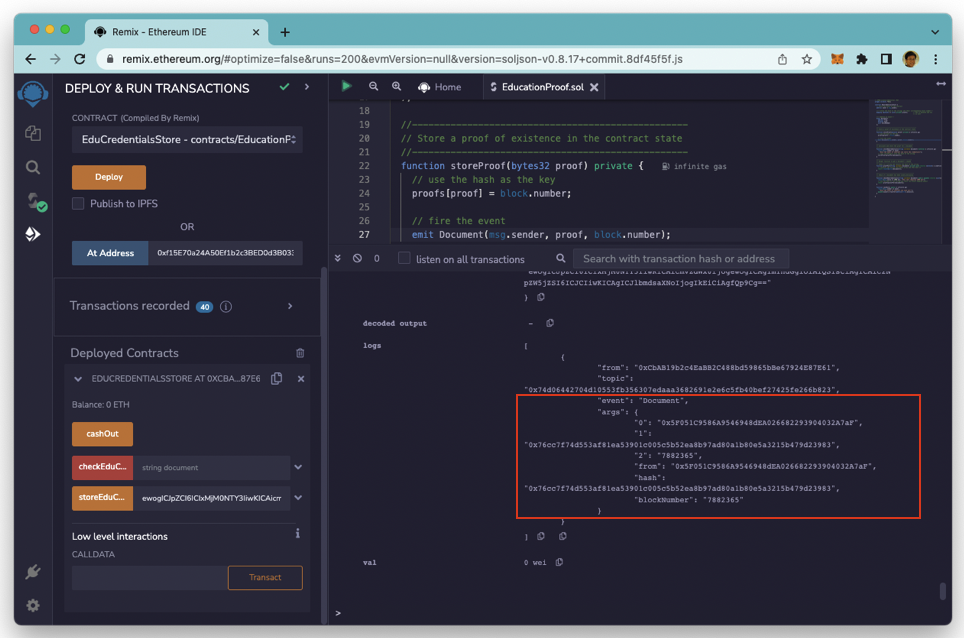
To try out the updated smart contract, deploy it and then call its storeEduCredentials() function. Remix IDE listens for the events and you can see it (see Figure 19).
ERC-20 Tokens
Now that you have a clear idea of how a smart contract works and its potential use case, let's move on to discuss another application of smart contracts. As you learned earlier, a smart contract allows you to store values on the blockchain, and in the case of the sample contract, the contract stores a mapping object on the blockchain. Let's take this idea one step further. Instead of storing key/value pairs of hashes and their associated block numbers, why not use the key/value pair to store account addresses and their respective balances (see Figure 20).
This is the idea behind tokens. A token is a representation of something (of value) on the blockchain. This something may represent assets, shares in a company, memberships in a club, or virtually anything you want to represent. In Figure 20, the number associated with each account address represents the quantity of tokens held by each account. As an example, say you're selling some items on the web. The only way customers could pay for your goods is through tokens, not cash. So in order to buy your items, your customers need to acquire tokens from you before they can buy from you.
How do you maintain the balance of each account token balance? You can do so through token contracts. A token contract writes the balance of tokens held by each account holder on the blockchain. To ensure that tokens can be easily exchanged with others on the Ethereum blockchain, create your tokens using the ERC-20 standard.
ERC-20 (ERC stands for Ethereum Request for Comments) was proposed by Fabian Vogelsteller in November 2015. It implements an API for tokens within smart contracts so that tokens can be transferred between accounts, approved for use, balances queried, etc.
Note that ERC-20 tokens are also known as fungible tokens, which means that a ERC-20 token is divisible (can be broken down into small units), interchangeable, and non-unique.
What's the difference between a coin and a token? A coin is the native cryptocurrency on a blockchain, such as ether on Ethereum. A token is an asset that's created on top of an existing blockchain that already has a native cryptocurrency. A good example of a token is USDC (U.S. Dollar Coin) that exists on the Ethereum blockchain.
ERC-20 Token Contracts
Now that you know what a token is, it's time to create one to see specifically how it works. Listing 2 shows the ERC-20 interface, which means that if you want to create an ERC-20 token, your contract must implement the set of functions and events as defined in the ERC-20 interface.
Listing 2: The ERC-20 Interface
contract ERC20Interface {
    function totalSupply() public constant
        returns (uint);
    function balanceOf(address tokenOwner) public constant
        returns (uint balance);
    function allowance(address tokenOwner, address spender) public constant
        returns (uint remaining);
    function transfer(address to, uint tokens) public
        returns (bool success);
    function approve(address spender, uint tokens)
        public returns (bool success);
    function transferFrom(address from, address to, uint tokens) public
        returns (bool success);

    event Transfer(address indexed from, address indexed to, uint tokens);
    event Approval(address indexed tokenOwner,
        address indexed spender, uint tokens);
}
Specifically, your ERC-20 token contract must implement the following functions:
- totalSupply(): Returns the total token supply
- balanceOf(address _owner): Returns the account balance of _owner
- transfer(address _to, uint256 _value): Transfers _value to _to and fires the Transfer event. The function should revert if the _from account doesn't have enough tokens to spend
- approve(address _spender, uint256 _value): Allows _spender to withdraw from the account several times, up to the _value amount
- transferFrom(address _from, address _to, uint256 _value): Transfers _value from _from to _to and fires the Transfer event. The function should revert unless the _from account has deliberately authorized the sender of the message via some mechanism.
- allowance(address _owner, address _spender): Returns the amount that the _spender is still allowed to withdraw from the _owner.
In addition, the token contract must also emit the following events:
- Transfer(address indexed _from, address indexed _to, uint256 _value): Must trigger when tokens are transferred, including zero-value transfers
- Approval(address indexed _owner, address indexed _spender, uint256 _value): Must trigger on any successful call to
approve(address _spender, uint256 _value)
Rather than implement all these functions and events yourself, OpenZeppelin has provided a base implementation for ERC-20. You can find this implementation at: https://github.com/OpenZeppelin/openzeppelin-contracts/blob/v4.0.0/contracts/token/ERC20/ERC20.sol/
OpenZeppelin is an open-source framework to build secure smart contracts. OpenZeppelin provides a complete suite of security products and audit services to build, manage, and inspect all aspects of software development and operations for decentralized applications.
If you're writing an ERC-20 token contract, you just need to import the base implementation from OpenZeppelin and inherit from it.
For this example, let's create a new contract in Remix IDE and name it token.sol. Populate it with the statements shown below:
// SPDX-License-Identifier: MIT
pragma solidity ^0.8;
import "https://github.com/OpenZeppelin/
openzeppelin-contracts/blob/v4.0.0/
contracts/token/ERC20/ERC20.sol";

contract MyToken is ERC20 {
    constructor(string memory name, string memory symbol)
    ERC20(name, symbol) {
        // ERC20 tokens have 18 decimals
        // number of tokens minted = n * 10^18
        uint256 n = 1000;
        _mint(msg.sender, n * 10**uint(decimals()));
    }
}
In the contract above, I'm creating 1000 tokens (value of n), and each token can go up to 18 decimal places of precision (because the decimals() function returns 18). Internally within the contract, the number of tokens minted is dependent on n and the precision. In this example, although the total supply is 1000 tokens, the total base units of tokens minted is equal to: 1000 x 1018 or 1000,000,000,000,000,000,000.
All operations involving tokens are based on the base units. For example, if I want to send one token to another account, I have to transfer 1,000,000,000,000,000,000 base units of my tokens to that account.
Deploying the Token Contract
To deploy the token contract, you must specify two arguments:
- The name (description) of the token
- The symbol of the token
Symbols of tokens are not unique and you should try to keep it to within three or four characters.
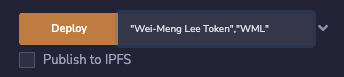
Figure 21 shows an example name and symbol for the token. Click Deploy to deploy the token contract.
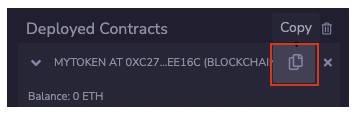
Once the contract is deployed, you can expand on the contract name to review the various functions (see Figure 22). These are the functions you need to implement in your ERC-20 token contract (which was implemented by the OpenZeppelin base contract).

Copy the address of the deployed token contract (see Figure 23).
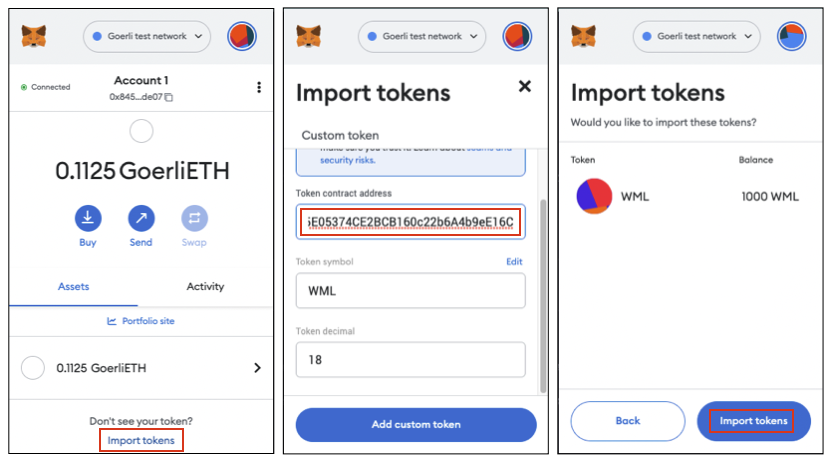
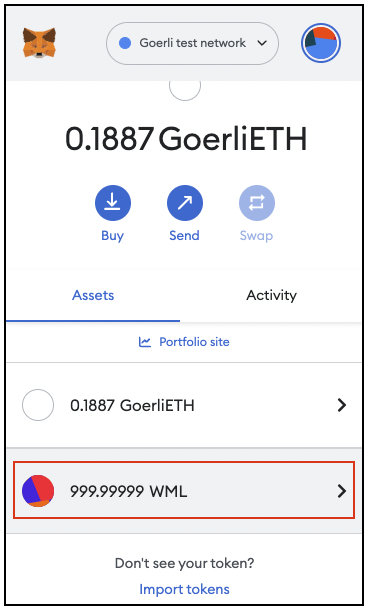
Adding the Token to MetaMask
In MetaMask, click the Assets tab and click the Import tokens link at the bottom of the screen (see Figure 24). In the next screen, paste the token contract that you have copied from Remix IDE. The token symbol is automatically displayed. Click the Add custom token button. You can see that your account has 1000 WML tokens. Make sure that the account you're adding the token to is the same account that deployed the token contract.
What Can You Do with the Token?
Now that you've created the token, what can you do with it? It's really up to you to create a utility for the token. You could promote your token as a form of investment, or a representation of an asset that you're selling (such as properties or securities).
To sell a token, you can ask the recipient to pay you in fiat currency and then transfer the token to him/her. Alternatively, you can also code your token contract to receive ethers and then programmatically transfer the token to the sender of the ether (this is beyond the scope of this article).
Using Tokens for Smart Contract Payments
In an earlier section of this article, you wrote a contract that accepts ether for a service (the checkEduCredentials() function). What if instead of accepting ether, you accept tokens for payment? This can be done quite easily (see Listing 3).
Listing 3: The modified smart contract now accepts payment using tokens
// SPDX-License-Identifier: MIT
pragma solidity ^0.8;

import "./token.sol";

contract EduCredentialsStore {
    // store the owner of the contract
    address owner = msg.sender;

    MyToken token = MyToken(address(0xc276658A795E05374CE2BCB160c22b6A4b9eE16C));

    //---store the hash of the strings and their
    // corresponding block number---
    // key is bytes32 and val is uint
    mapping(bytes32 => uint) private proofs;

    //---define an event---
          event Document(
              address from,
              bytes32 hash,
              uint blockNumber
          );

    //==========================================
    // return the token balance in the contract
    //==========================================
    function getBalance() public view returns (uint256) {
    return token.balanceOf(address(this));
    }

    //--------------------------------------------------
    // Store a proof of existence in the contract state
    //--------------------------------------------------
    function storeProof(bytes32 proof) private {
        // use the hash as the key
        proofs[proof] = block.number;

        // fire the event
        emit Document(msg.sender, proof, block.number);
    }

    //----------------------------------------------
    // Calculate and store the proof for a document
    //----------------------------------------------
    function storeEduCredentials(string calldata document) external {
        require(msg.sender == owner,
        "Only the owner of contract can store the credentials");
        // call storeProof() with the hash of the string
        storeProof(proofFor(document));
    }

    //--------------------------------------------
    // Helper function to get a document's sha256
    //--------------------------------------------
    // Takes in a string and returns the hash of the string
    function proofFor(string calldata document) private
    pure returns (bytes32) {
        // converts the string into bytes array and then hash it
        return sha256(bytes(document));
    }

    //-----------------------------------------------
    // Check if a document has been saved previously
    //-----------------------------------------------
    function checkEduCredentials(string calldata document)
    public payable returns (uint){

        // require(msg.value == 1000 wei, "This call requires 1000 wei");

        // msg.sender is the account that calls the token contract
        // go and check the allowance set by the caller
        uint256 approvedAmt = token.allowance(msg.sender, address(this));

        // the amount is based on the base unit in the token
        uint requiredAmt = 1000;

        // ensure the caller has enough tokens approved
        // to pay to the contract
        require(approvedAmt >= requiredAmt,
        "Token allowance approved is less than what you need to pay");

        // transfer the tokens from sender to token contract
        token.transferFrom(msg.sender,
            payable(address(this)), requiredAmt);

        // use the hash of the string and check the proofs mapping object
        return proofs[proofFor(document)];
    }

    function cashOut() public {
        require(msg.sender == owner, "Only the owner of contract can cash out!");
        payable(owner).transfer(address(this).balance);
    }
}
In Listing 3, you made the following changes to the EduCredentialsStore contract:
- Imported the
token.soltoken contract. This is the token contract that you deployed earlier. - Created an instance of the
MyTokencontract. You need to specify the address of the deployed token contract. - Added a function called
getBalance(). This allows you to know the token balance held by the smart contract. - Modified the
checkEduCredentials()function so that now, instead of accepting ethers for payment, you only accept tokens. To do so, you first check how many tokens the caller of the contract has approved for use in this contract. Then you check to make sure that the amount approved to be used is at least 1000 base units (this is the amount that you decide to charge for calling this service). If the amount approved is sufficient, you transfer the tokens to this contract.
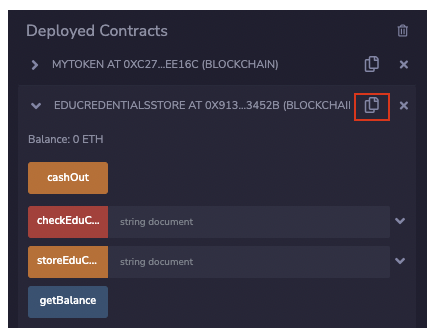
Re-deploy this EduCredentialsStore contract and take note of its address (see Figure 25). For my example, the deployed contract address is 0x913286326233118493F2D5eA62dCA2E90133452B.
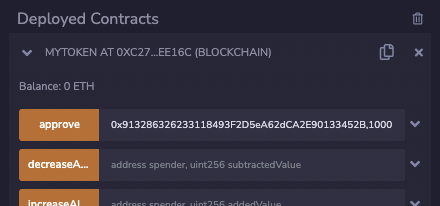
Before you can call the checkEduCredentials() function (which now requires a payment of 1000 base units of the tokens instead of 1000 wei), the token owner (you) needs to approve 1000 base units of the token to be paid to the smart contract. To do that, you need to call the approve() function of the token contract with the following values (see also Figure 26):
0x913286326233118493F2D5eA62dCA2E90133452B, 1000
The above value indicates that you want to approve 1000 base units of the token to be spent on the smart contract whose address is specified (0x913286326233118493F2D5eA62dCA2E90133452B).
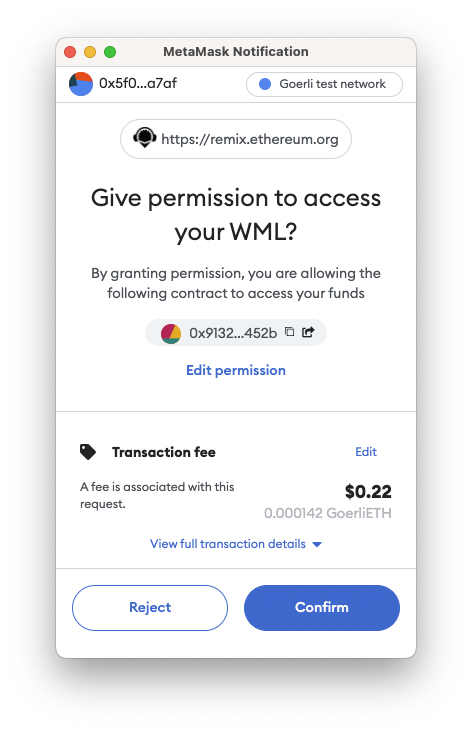
Click on the approve button and MetaMask shows the prompt, as shown in Figure 27. Click Confirm to grant permission for your tokens to be used on the smart contract.
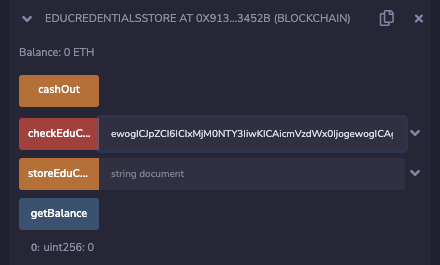
You will now be able to call the checkEduCredentials() function (see Figure 28).
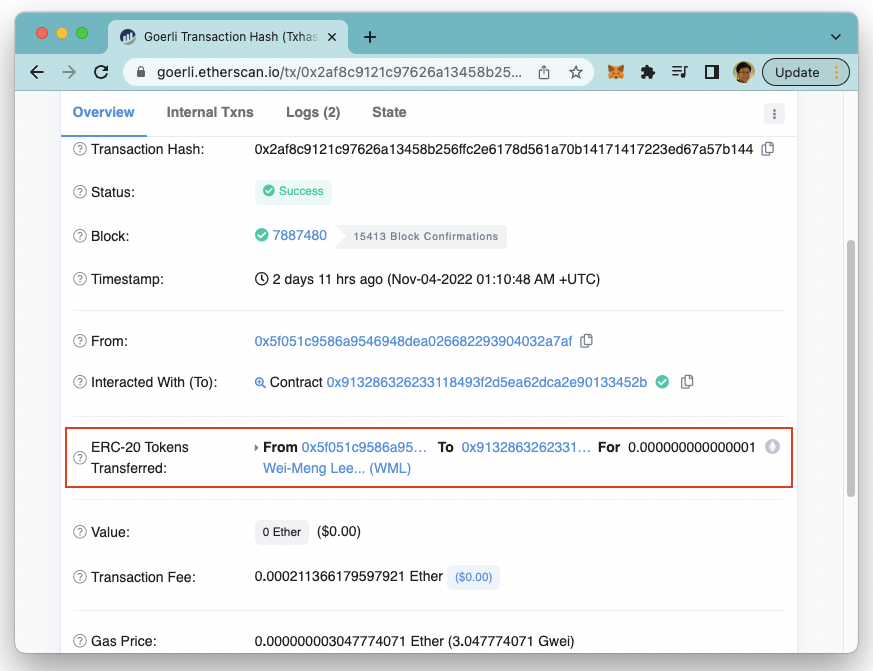
Once the transaction is confirmed, 1000 base units of the token will be transferred to the smart contract. If you examine the transaction on Etherscan, you can observe that there's a transfer of ERC-20 tokens (see Figure 29).
To verify that the contract did indeed receive the tokens, click the getBalance button (see Figure 30). You should see a value of 1000.

In MetaMask, you'll also see that the account holding on to the token has its balance reduced (see Figure 31). This is because 1000 base units of the tokens have been transferred to the smart contract as payment.
Summary
In this article, I've walked you through what a smart contract is, how it works, and some of the use cases for it. I also demonstrated one good use case of smart contracts - creating token contracts. Token contracts are what makes the blockchain world so exciting. A lot of tokens have since been created and this is the key technology that created stablecoins like USDC, USDT, and more. I'm excited to see what types of tokens you'll create after reading this article!
