


Today, businesses are required to be capable of handling increasing amounts of data in a fast, efficient, and reliable manner. Event-driven architecture (EDA) is an increasingly popular option to help companies process complex data streams in real-time. Event-driven architecture has been gaining traction in the software development world lately, and with good reason.
In today's digital age, it's increasingly important for developers to be able to create event-driven applications quickly and efficiently. One technology that's helping make this possible is the Distributed Application Runtime (Dapr). This open-source framework enables developers to build serverless and microservice applications using any language and runtime, making it an ideal platform for building modern cloud-native applications.
This article discusses event-driven architecture, its architectural components, the concepts related to Dapr, why it's useful, and how you can work with it in .NET 7 Core.
In order to work with the code examples discussed in this article, you need the following installed in your system:
- Visual Studio 2022
- .NET 7.0
- ASP.NET 7.0 Runtime
- Dapr Runtime
If you don't already have Visual Studio 2022 installed, you can download it here: https://visualstudio.microsoft.com/downloads/.
You'll be building two event-driven applications using Dapr. In this article, you'll:
- Understand the importance of event-driven applications
- Learn Dapr and its architectural building blocks
- Build a simple Minimal API application (named DaprDemo) in ASP.NET 7 Core
- Configure the DaprDemo application to provide support for Dapr
- Connect to the DaprDemo Minimal API application using Dapr HttpClient
- Connect to the DaprDemo Minimal API application using .NET HttpClient
- Connect to the DaprDemo Minimal API application using DaprClient
- Implement a Publish/Subscribe application using Dapr
From a Traditional Request-Response Model to an Event-Driven Approach
There are several challenges that modern-day web applications face:
- Availability: Whether one or more services are available - up and running - to serve incoming requests
- Scalability: The extent to which the application can serve requests by creating new instances of the application
- Synchronous model: The client sends an HTTP request to the web server and then waits until it receives a response.
The traditional communication pattern used in most web applications is the request-response approach. This model involves the client making a synchronous HTTP request to the web server and then waiting for a response. The request-response model is also used in a microservices architecture. Eventually, there's a chain or series of HTTP requests and responses working in a synchronous manner.
Now, let's assume that one of the requests in the chain waiting for a response times out because it doesn't receive a response from the web server. As a result, your application becomes non-responsive or blocked. An increase in the number of services increases synchronous HTTP requests and responses, which explains why a failure of one of the systems will also impact the other systems.
What Are Events and Notifications?
In the content of an event-driven applications, an event is defined as a significant change of state that can trigger an action. For example, a user enters login credentials in a login form and then presses the Login button. An event occurs when something happens, like a user clicks on a button or presses a key. The application waits for an event and when one occurs, it executes an appropriate handler. The handler can perform any task, including changing the application's state.
An event has the following characteristics:
- It serves as a record that something has occurred.
- It's lightweight, distributed, and encapsulates a change of state.
- It can be distributed via channels that include streaming and messaging.
- It's immutable, which means that it can't be altered or removed.
- It can be persisted indefinitely.
- It can be consumed an unlimited number of times by an event consumer.
A notification refers to a message used to inform the occurrence of an event within the application, such as a new record added to the database, an email sent, etc. Typically, this consists of a unique identifier, the details of an event, and the context, such as the date, time, location, etc. An event consumer can determine whether the event should be processed from this metadata.
Event Schema
An event schema denotes a specified format used to define an event record. Although the producers publish event records that comply with this schema, the consumers should know this format to read one or more events. Here's how a typical event would look:
{
   "message_type": "user_login",
   "email": "someuser@example.com",
   "content": "Thanks, you're now logged in!"
}
Event-Driven Architecture
An event-driven architecture is defined as a software architectural pattern in which a conglomeration of decoupled components is capable of publishing and subscribing to events asynchronously via an event broker. Event-driven architectures can create, identify, consume, and respond to events and can be asynchronous and message-based. An event-driven architecture is a good choice for building applications that are loosely coupled, such as microservices. Figure 1 shows the components of a typical event-driven architecture.
Benefits and Downsides
The primary advantages of an event-driven architecture include increased responsiveness, scalability, and agility. Responding to real-time information and integrating additional services and analytics can instantly improve business processes and customer experiences. Most organizations believe that the benefits of modernizing IT infrastructure outweigh the costs associated with event-driven architecture.
In an event-driven architecture, because the event producers and consumers are decoupled from each other, the outage of one service doesn't affect the availability of other services. As a result, even when consumers are unavailable, producers can continue to produce event messages. Likewise, a consumer listens for the availability of new event messages but isn't affected if the producer is down.
Event-driven architecture provides several benefits:
- Loose coupling
- Immutability
- Independent failure
- Scalability
However, there are certain downsides to using event-driven architecture:
- Increased complexity
- Difficulty in monitoring
- Difficulty in debugging and troubleshooting
Components of Event-Driven Architecture
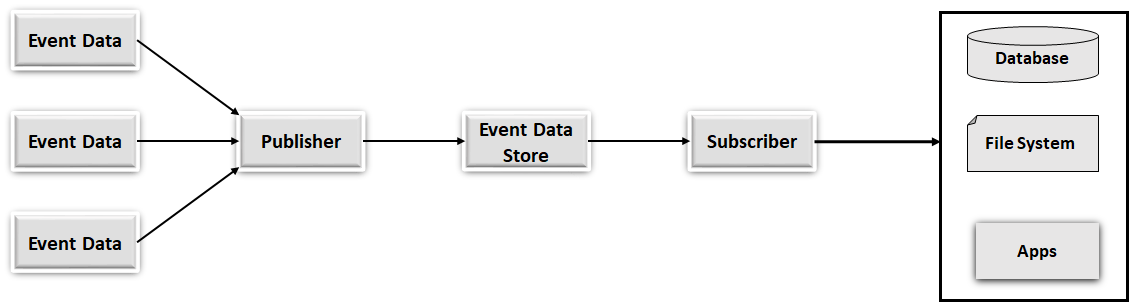
In an event-driven architecture, the producers and consumers are decoupled from one another, enabling the consumer to process the messages asynchronously. Typically, an event-driven architecture is made up of the producer, the message broker, and the consumer.
A publisher publishes or creates a message to describe the event, converts it into a message, and presents it to the event router for further processing. The event producer and the event consumer (also known as the event subscriber) are decoupled from each other.
A message broker acts as an intermediary to acquire, store, and deliver events to the event consumers. A message broker should be highly scalable and reliable and ensure that events are not lost during a system failure. It should be noted that the event broker is optional if you have a single event producer connected directly to a single event consumer, i.e., the event producer can send the messages to the event consumer directly.
There are two types of message brokers: store-backed and log-based. The former stores the events in a data store to serve one or more consumers and then purges the events once they have been delivered, and the latter stores the events in logs and persists the events even after they are delivered.
The consumer receives the message from the event broker and performs the appropriate action, i.e., processes the events asynchronously. In other words, a consumer receives notifications of newly created events and processes those events asynchronously. Figure 2 shows the producer, consumer, and event broker in action where two of the three consumers have subscribed to more than one producer.
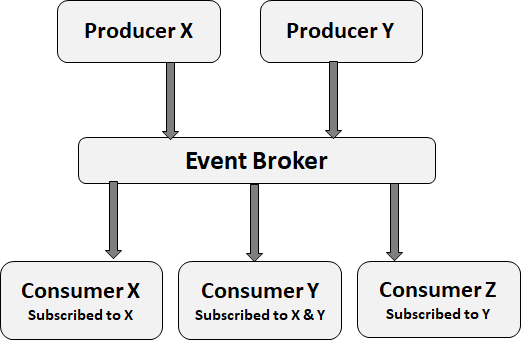
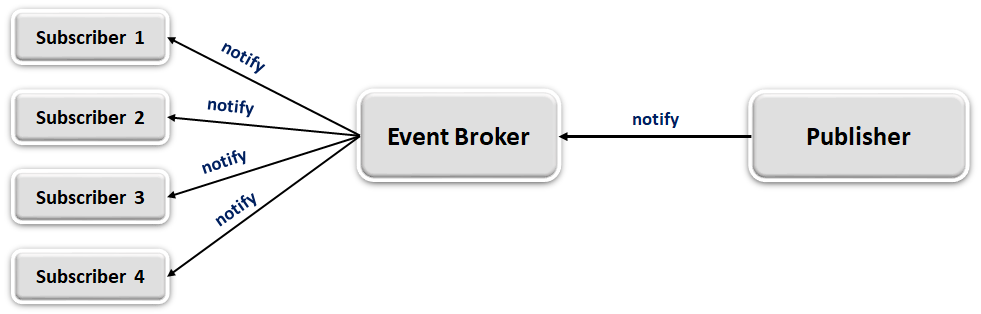
An event-driven architecture works asynchronously and in a decoupled manner, which allows it to scale efficiently. The producer sends a notification when an event occurs but it's not bothered about the destination of the notification, i.e., where the notification will eventually be delivered.
Instead, the event broker (also known as an event router) is responsible for distributing the events as appropriate. Event consumers (also known as sinks) start processing the events as they arrive. This allows all of the services to process the events asynchronously. Figure 3 illustrates how an event broker works.
Event-Driven Architecture Patterns
Event-driven architectures have two different architecture models: pub/sub and event streams.
In a pub/sub model, each consumer gets messages in a topic in exactly the same order that they were received. By subscribing to event streams, this messaging pattern enables asynchronous communication between disparate system components. When an event is published, an event notification is delivered to all subscribers who have subscribed to the event. It should be noted that multiple event subscribers can listen to the event.
An event streaming model involves processing a sequence of events in an asynchronous manner. Instead of delivering the events to the event subscribers, the published events are written to a stream store, usually a log. The event consumers check the stream store or the log to determine whether new messages are available to be processed. Additionally, because the events are persisted, the event consumers can join and start reading events from an event stream at any point of time.
Use Cases of Event-Driven Architecture
Some of the common use cases of event-driven architecture are:
- Real-time monitoring systems
- Microservices
- Parallel processing
- Connecting IoT devices for data ingestion/analytics
- Payment processing
- Fraud detection
What's an Event-Driven Application?
An event-driven application is one whose control flow is determined by events. It's an application that can listen to, process, and transmit events using a decoupled architecture. In a typical event-driven architecture, the application is a conglomeration of different components that communicate with each other via events. Events are messages sent between various components of the application. Events can be triggered using user interactions or triggers from external services via webhook.
Key Concepts: Publishers, Subscribers, Sources, and Sinks
In contrast to conventional architectures that react to user-initiated queries and deal with data in batches that are added and altered at predefined intervals, event-driven architecture-based applications respond to events as they occur. Publishers, subscribers, sources, and event consumers (sinks) are the essential principles of event-driven architecture.
A publisher is the component responsible for capturing event data and storing it in a repository. The subscriber is responsible for consuming the event data and responding to the event. A source denotes the component where the event originates, and sinks represent the destinations where the event subscribers send data.
How Do Event-Driven Applications Work?
Event-driven applications are governed by events that can ascertain the flow of program execution. An event can happen inside or outside the program that requires some action from the program. An event is any occurrence that requires the application to respond. A user, another external system, or the application can trigger events. Events can be anything from user input to a new file being uploaded to the server.
Events can also be generated by other systems outside the program, such as a database server that sends notifications when new data is available. When an event occurs, the program looks for an event handler - a piece of code that knows how to respond to the event - and executes it. An event-driven application contains an event loop that listens to events, and when it identifies one, it triggers a callback function.
Instead of delivering messages to a specific queue, event-driven apps publish messages to a common topic. You can then inform one or more event subscribers when an event occurs. Event-driven applications take advantage of an event broker responsible for transporting the events to their respective destinations. An event broker is defined as middleware that's responsible for delivering events to all subscribers.
Applications built on an event-driven model use a “push” model of communication rather than a “pull” model. In this model, the sender pushes messages to recipients as needed instead of waiting for them to request information. The advantage of this approach is that it allows many different processes to share information without any one process being overwhelmed by requests from its peers.
What's Dapr?
Dapr is an open-source, language-agnostic, event-driven runtime that enables developers to build resilient and distributed applications that are portable, reliable, and scalable. Dapr's runtime handles the underlying infrastructure, so developers can concentrate on developing their applications rather than focusing on the infrastructure. Built on the actor model, it allows loose coupling of components and helps to make your app more resilient when a failure occurs.
Dapr is a distributed application runtime that simplifies the development of cloud-native applications, enabling developers to focus on business logic rather than infrastructure components. Dapr has several architectural components that make it an ideal choice for developing applications in the cloud.
Sidecar Architecture
Dapr can coexist with your service by using a sidecar, which allows it to operate in its memory process or container. A sidecar refers to a secondary piece of software that can be deployed alongside the main application and run in tandem, typically in a separate process.
Because sidecars are external to the service they connect to, they may offer isolation and encapsulation without impacting the service itself. This isolation enables you to create a sidecar using many different programming languages and platforms while allowing it to have its runtime environment.
Why Use Dapr for Building Event-Driven Applications?
Dapr provides a number of benefits for developers building event-driven applications:
- Portability: Dapr applications can be deployed on any platform, including Kubernetes, Service Fabric, and Azure Functions.
- Scalability: Dapr can scale horizontally and vertically, meaning that applications can be scaled up or down as needed without requiring code changes.
- Resilience: The actor model used by Dapr helps to make your app more resilient against failures. If one component fails, the others can continue working, ensuring that your app remains responsive even in the face of adversity.
- Flexibility: Developers can choose from a variety of programming languages when building Dapr apps, including C#, Java, Node.js, and Python.
- Ease of use: Dapr apps can be deployed using a simple YAML file, making it easy to get started with event-driven development.
- Loose coupling: A Dapr-based application's components are loosely connected, meaning they may be built and deployed independently. As a result, your application will be more modular, manageable, and simpler to maintain and extend over time.
Dapr Architecture: The Building Blocks of Dapr
Dapr encompasses a set of building blocks:
- Service-to-service invocation: Responsible for performing secure, direct, service-to-service calls
- State management: Supports the creation of long-running stateful and stateless services
- Publish and subscribe: Provides support for scalable, secure messaging between the services
- Bindings: As part of the bindings building block, enables external resources to be attached to it for the purpose of triggering a service or being called from a service.
- Actors: Encapsulates the necessary logic and data to manage state in reusable actor objects
- Configuration: Used for easy sharing of application configuration changes, and for providing notifications when changes to the configuration are made
- Observability: Used to monitor and quantify message calls across applications, services, and components deployed using a Dapr sidecar.
- Secrets: Allows access to external secret stores in a secure manner.
Using Dapr in Distributed Applications
Dapr is a great fit for event-driven architectures. Its pub/sub model makes it easy to decouple services and scale them independently. Dapr uses a pub/sub model for communication between services. This means that each service can subscribe to events from other services, and publish its own events. Building blocks of Dapr provide capabilities that are common to distributed applications such as state management, service-to-service invocation, pub/sub messaging, etc.
Dapr reduces the inherent complexity associated with distributed microservice applications. Being event-driven, Dapr, plays an essential role in developing microservices-based applications because you can leverage Dapr to design an application that can react to events from external systems efficiently and produce events to notify other services of new facts.
Getting Started with Dapr
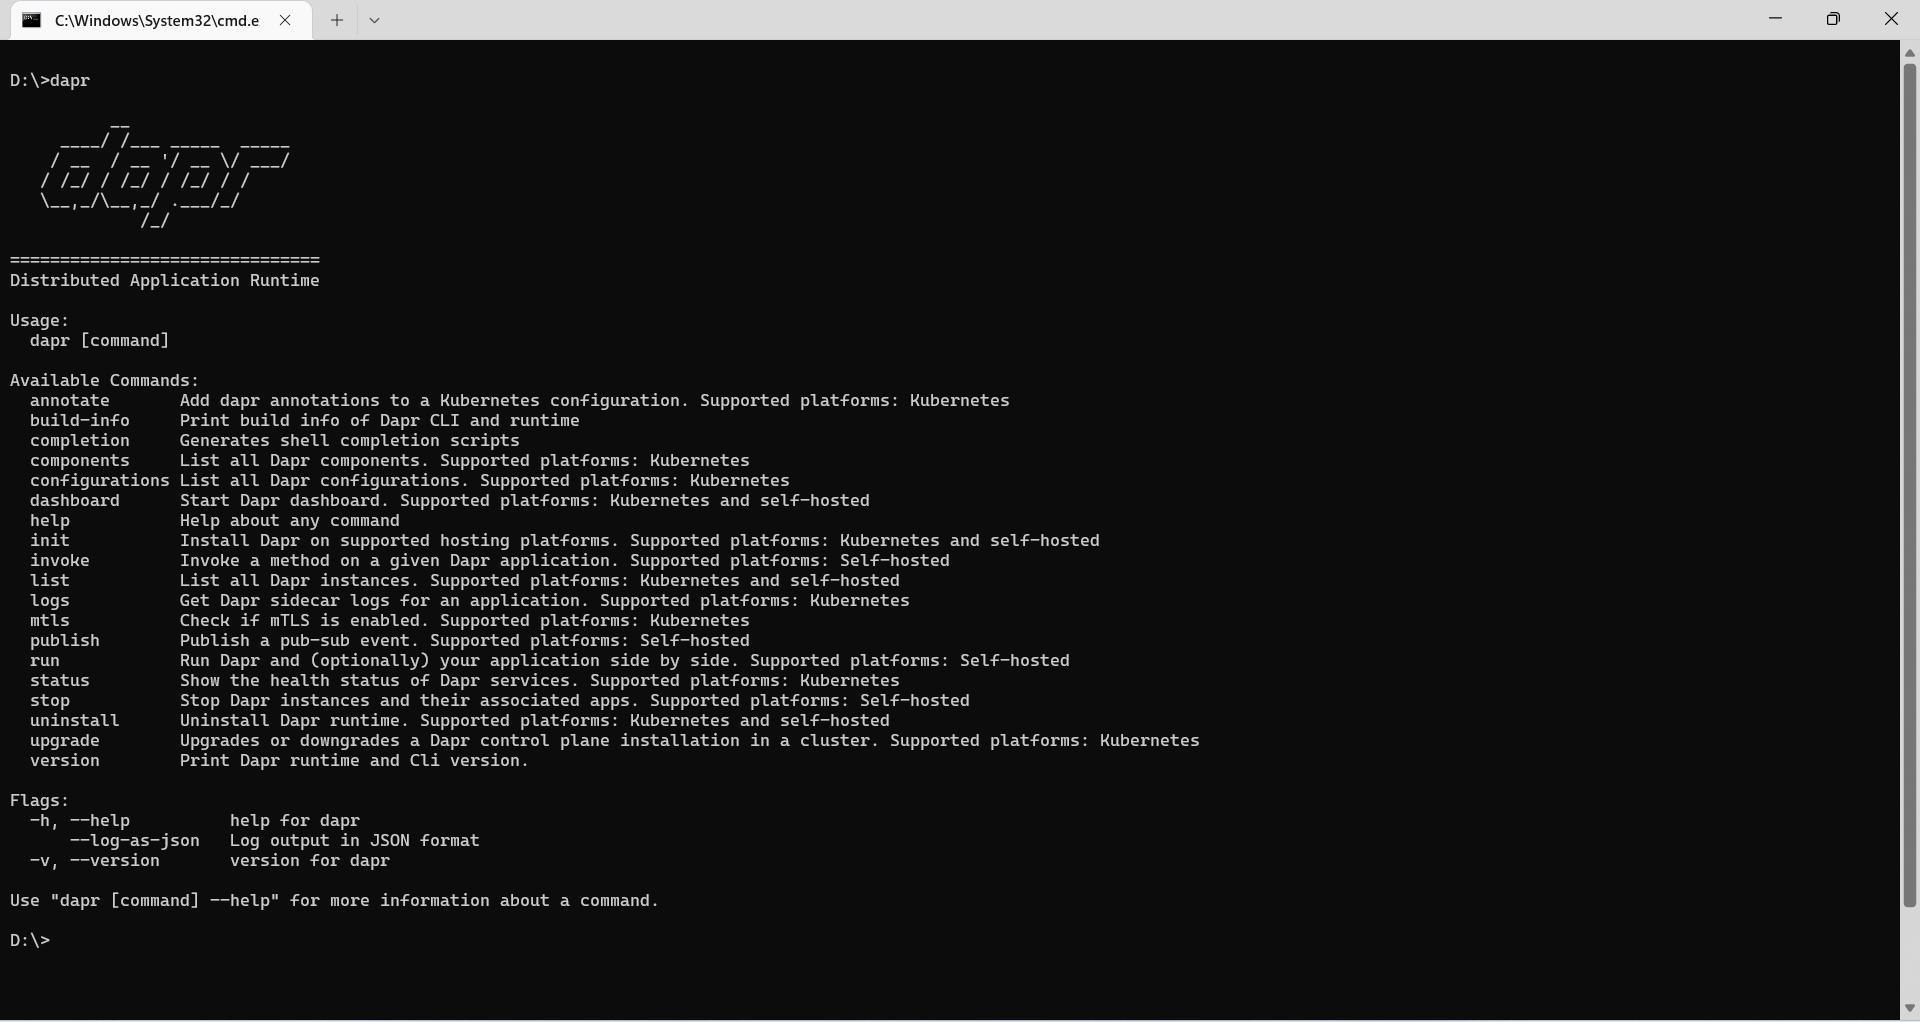
You can get started with Dapr locally using the Dapr Command-Line Interface (CLI). You can download a copy of it from here: https://docs.dapr.io/getting-started/install-dapr-cli/. You can configure Dapr to run in a self-hosted mode, as a serverless solution such as Azure Container Apps, or deployed in Kubernetes. To verify whether the Dapr CLI has been installed properly, use the following command at the console window or at the Windows PowerShell window:
dapr
Assuming Dapr has been installed successfully on your computer, when you run the Dapr executable at the Dapr CLI command prompt, a list of all available commands of the Dapr executable is displayed. Figure 4 captures the list of these commands at the Dapr CLI.
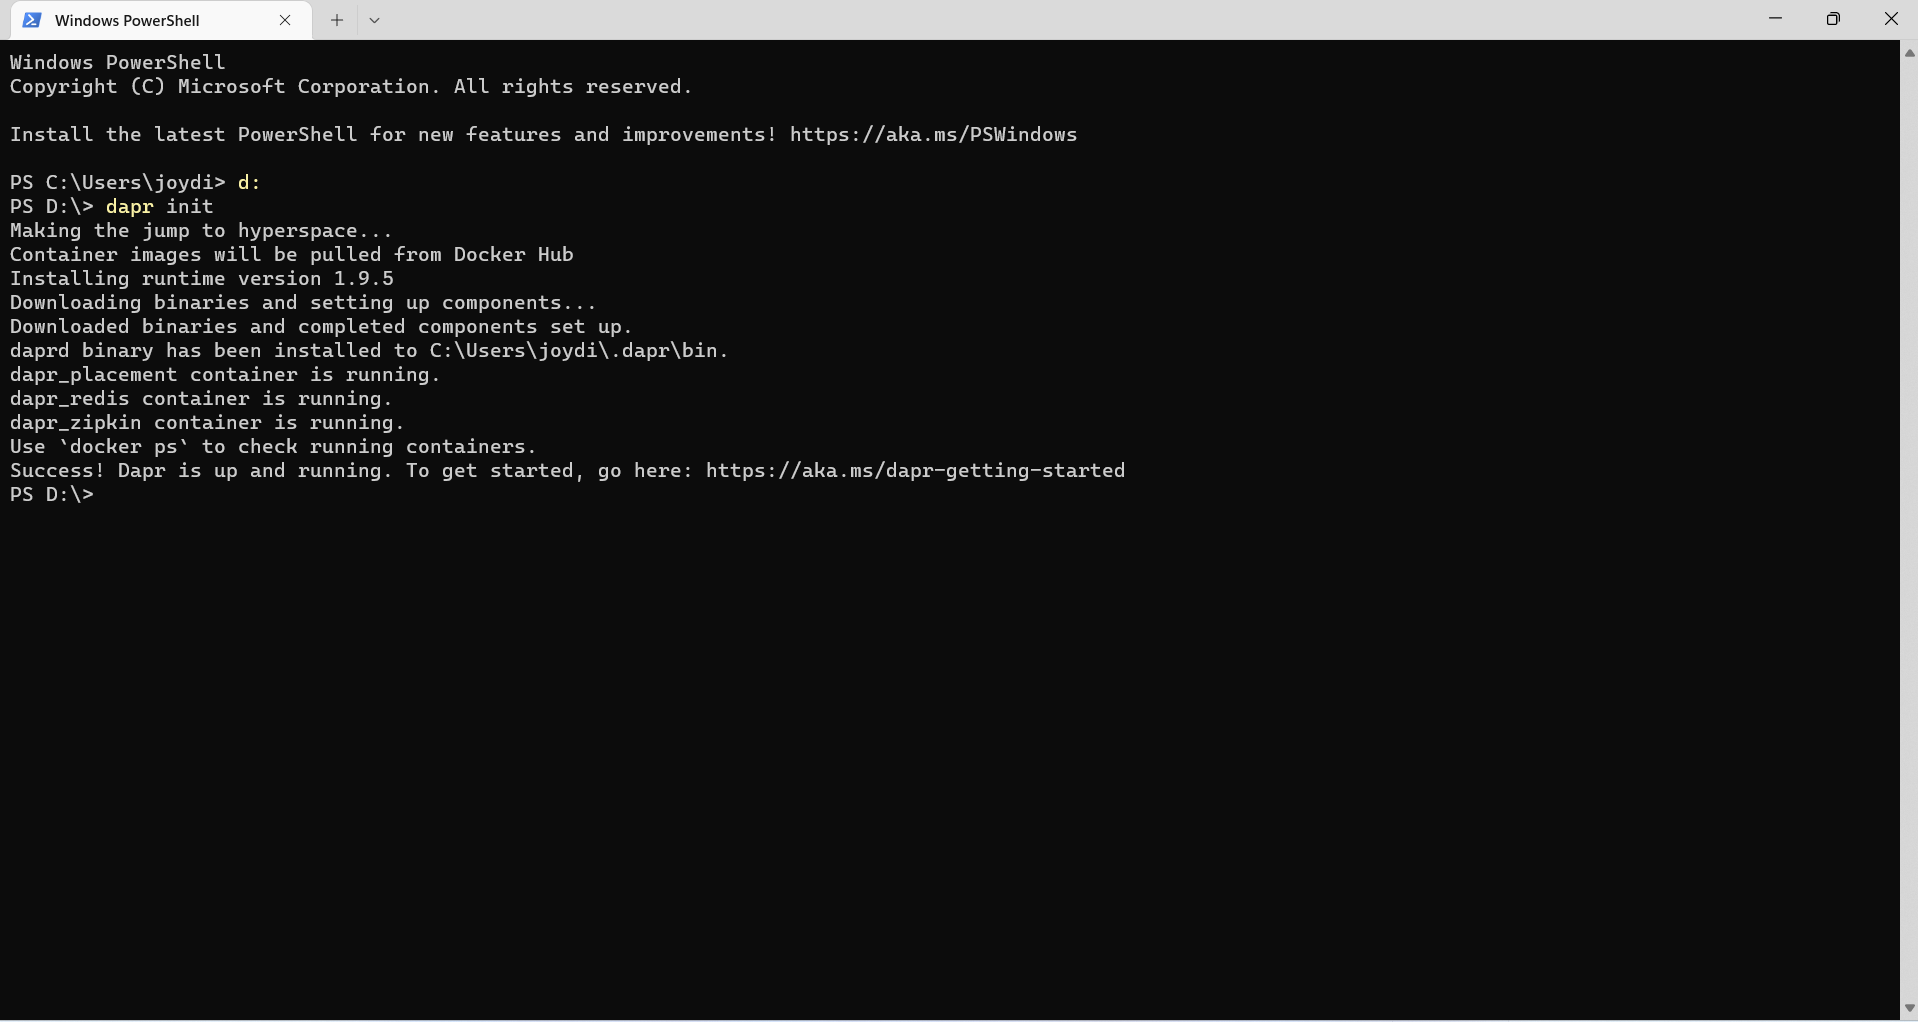
To initialize your Dapr environment, use the following command, as shown in Figure 5:
dapr init
If you'd like to initialize Dapr without using Docker, you can use the following command instead:
dapr init -slim
Building Event-driven Applications Using Dapr in ASP.NET 7
In this section, you'll examine how to use Dapr to build event-driven applications in ASP.NET 7.
Create a New ASP.NET 7 Project in Visual Studio 2022
You can create a project in Visual Studio 2022 in several ways. When you launch Visual Studio 2022, you'll see the Start window. You can choose “Continue without code” to launch the main screen of the Visual Studio 2022 IDE.
To create a new ASP.NET 7 Project in Visual Studio 2022:
- Start the Visual Studio 2022 IDE.
- In the Create a new project window, select ASP.NET Core Web API and click Next to move on.
- Specify the project name as DaprDemo and the path where it should be created in the Configure your new project window. If you want the solution file and project to be created in the same directory, you can optionally check the Place solution and project in the same directory checkbox. Click Next to move on.
- In the next screen, specify the target framework as .NET 7 (Standard Term Support) and the authentication type as well. Ensure that the Configure for HTTPS, Enable Docker Support, and the Enable OpenAPI support checkboxes are unchecked because you won't use any of these in this example.
- Because you'll be using minimal APIs in this example, uncheck the checkbox Use controllers (uncheck to use minimal APIs).
- Click Create to complete the process.
You'll use this application in the subsequent sections in this article.
Create the DaprDemo Minimal API
Open the Program.cs file or the Minimal API project you just created and replace the default-generated code with the code shown in Listing 1.
Listing 1: The Program.cs file of the Minimal API project
var builder = WebApplication.CreateBuilder(args);
var app = builder.Build();

app.MapGet("/allproducts", () =>
{
    List<Product> products = new List<Product>();

    products.Add(new Product
    {
        Id = Guid.NewGuid(),
        Name = "Sony TV",
        Quantity = 25,
        Price = 90000
    });

    products.Add(new Product
    {
        Id = Guid.NewGuid(),
        Name = "Samsung TV",
        Quantity = 50,
        Price = 65000
    });

    products.Add(new Product
    {
        Id = Guid.NewGuid(),
        Name = "LG TV",
        Quantity = 15,
        Price = 55000
    });
    return products;
});

app.Run();

public record Product
{
    public Guid Id { get; init; }
    public string Name { get; init; }
    public int Quantity { get; init; }
    public decimal Price { get; init; }
}
In Listing 1, I've created a record type named Product. This record type is used in the HTTP GET endpoint /allproducts that returns a list of records. You can update the profiles section of the launchsettings.json file to launch the endpoint when your application starts, like this:
  "profiles": {
      "http": {
          "commandName": "Project",
          "dotnetRunMessages": true,
          "launchBrowser": true,
          "launchUrl": "allproducts",
          "applicationUrl": "http://localhost:5239",
          "environmentVariables": {
              "ASPNETCORE_ENVIRONMENT": "Development"
          }
      },
      "IIS Express": {
          "commandName": "IISExpress",
          "launchBrowser": true,
          "launchUrl": "allproducts",
          "environmentVariables": {
              "ASPNETCORE_ENVIRONMENT": "Development"
          }
      }
  }
When you run the application, you'll see the list of product records displayed on your web browser.
Install NuGet Package(s)
You can install the packages inside the Visual Studio 2022 IDE by running the following command(s) at the NuGet Package Manager Console:
Install-Package Dapr.AspNetCore
Alternatively, you can install these package(s) from the NuGet Package Manager Window. To install the required packages into your project, right-click on the solution and the select Manage NuGet Packages for Solution…. Now search for these package(s) one at a time in the search box and install it/them.
Create a New Console Application Project in Visual Studio 2022
Let's create a console application project that you'll use for calling Dapr sidecar. You can create a project in Visual Studio 2022 in several ways. When you launch Visual Studio 2022, you'll see the Start window. You can choose Continue without code to launch the main screen of the Visual Studio 2022 IDE.
To create a new Console Application Project in Visual Studio 2022:
- Start the Visual Studio 2022 IDE.
- In the Create a new project window, select Console App, and click Next to move on.
- Specify the project name as DaprDemoClient and the path where it should be created in the Configure your new project window.
- If you want the solution file and project to be created in the same directory, you can optionally check the Place solution and project in the same directory checkbox. Click Next to move on.
- In the next screen, specify the target framework you would like to use for your console application.
- Click Create to complete the process.
You'll use this application in the subsequent sections of this article.
Install NuGet Package(s)
Because you'll be using Dapr Client in this example, you should install the Dapr.Client package. You can do this from inside the Visual Studio 2022 IDE or by running the following command(s) at the NuGet Package Manager Console:
Install-Package Dapr.Client
Alternatively, you can install these package(s) from the NuGet Package Manager Window. To install the required packages into your project, right-click on the solution and the select Manage NuGet Packages for Solution…. Now search for these package(s) one at a time in the search box and install it/them.
Using Dapr Sidecar with Dapr HttpClient
Lastly, open the Program.cs file of the console application project you just created and replace the default generated code with the source code provided in Listing 2.
Listing 2: The Program.cs file of the Dapr HttpClient
using Dapr.Client;
using System.Net.Http.Json;

var client = DaprClient.CreateInvokeHttpClient();

var products = await client.GetFromJsonAsync
<List<Product>>("http://productservice/allproducts");

Console.WriteLine ("Displaying product information");

foreach (var product in products)
{
    Console.WriteLine($"Id:{product.Id},
        Name:{product.Name},
        Quantity:{product.Quantity},
        Price: {product.Price}");
}

Console.Read();

public record Product
{
    public Guid Id { get; init; }
    public string Name { get; init; }
    public int Quantity { get; init; }
    public decimal Price { get; init; }
}
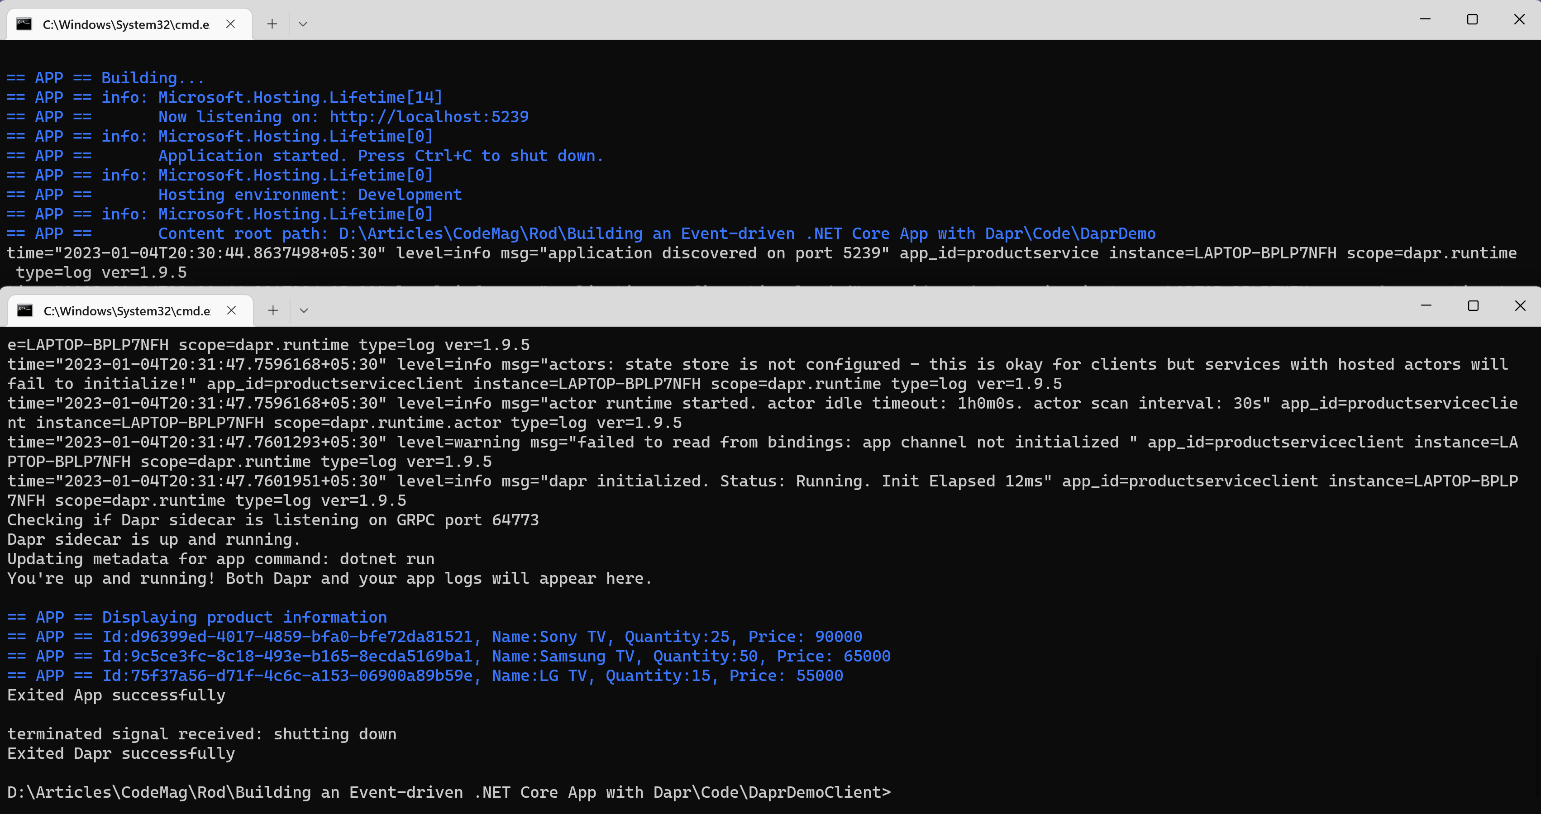
Execute the Application
Navigate to the directory that contains your MinimalAPI project file, and then execute the following command at the command window or the Windows PowerShell window to launch the productservice alongside a Dapr sidecar application:
dapr run --app-id productservice
--dapr-http-port 3500
--app-port 5239 -- dotnet run
Let's now understand the different options of the Dapr command you used:
- app-id: Specifies the application or service ID for service discovery
- dapr-http-port: Specifies the HTTP port that Dapr should listen to; 3500 in this example
- app-port: Specifies the port the application will listen to; 5239 in the example
- app-ssl: Optionally turns on HTTPS when Dapr invoked the application.
- dotnet run: Optionally executes your WebAPI.
Next, navigate to the directory where the DaprDemoClient project file resides and run the productserviceclient service alongside a Dapr sidecar:
dapr run --app-id productserviceclient
--app-protocol http
--dapr-http-port 3501 -- dotnet run
Figure 6 shows the output when both these applications are executed:
Using Dapr Sidecar with .NET HttpClient
To call Dapr sidecar with a HttpClient, replace the source code of the Program.cs file of the DaprDemoClient project with the code shown in Listing 3.
Listing 3: The Program.cs file of the .NET HttpCLient
using System.Net.Http.Json;

var client = new HttpClient();
var products = await client.GetFromJsonAsync<List<Product>>(
       "http://localhost:3500/v1.0/invoke/productservice/method/allproducts");

Console.WriteLine("Displaying product information");

foreach (var product in products)
{
    Console.WriteLine($"Id:{product.Id},
        Name:{product.Name}, Quantity:{product.Quantity},
        Price: {product.Price}");
}

Console.Read();

public record Product{
    public Guid Id { get; init; }
    public string Name { get; init; }
    public int Quantity { get; init; }
    public decimal Price { get; init; }
}
Using Dapr Sidecar with DaprClient
To call Dapr sidecar with a DaprClient, replace the source code of the Program.cs file of the DaprDemoClient project with the code given in Listing 4.
Listing 4: The Program.cs file of the DaprClient
using Dapr.Client;
using System.Net.Http.Json;

using var client = new DaprClientBuilder().Build();

var products = await client.InvokeMethodAsync<List<Product>>(
        HttpMethod.Get, "productservice", "allproducts");

Console.WriteLine("Displaying product information");

foreach (var product in products)
{
    Console.WriteLine($"Id:{product.Id},
        Name:{product.Name}, Quantity:{product.Quantity},
        Price: {product.Price}");
}

Console.Read();

public record Product
{
    public Guid Id { get; init; }
    public string Name { get; init; }
    public int Quantity { get; init; }
    public decimal Price { get; init; }
}
Implementing a Publish and Subscribe (Pub/Sub) Application
In this section, you'll build a simple pub/sub application. The application consists of two projects: a Minimal API project and a Console Application project. Follow the steps mentioned earlier to create the Minimal API and Console Application projects.
Create the Subscriber
Replace the default-generated source code of the Program.cs file pertaining to the Minimal API project (the Publisher in this example) with the code given in Listing 5.
Listing 5: The Subscriber Minimal API application
const string PUBSUB = "orderpubsub";
const string TOPIC = "orders";

var builder = WebApplication.CreateBuilder(args);
var app = builder.Build();

app.MapGet("/orderprocessing/subscribe", () => {
    Console.WriteLine
       ($"The Dapr pub/sub is now subscribed to pubsub:
        {PUBSUB}, topic: {TOPIC}");
});

app.MapPost("/orders", (Order order) => {
    Console.WriteLine
       ($"The subscriber received Order Id:
          {order.Id}");
    return Results.Ok(order);
});

await app.RunAsync();

public record Order
{
    public int Id { get; set; }
    public string? Product_Code { get; set; }
}
Create the Publisher
Replace the default-generated code of the Program.cs file pertaining to the Console Application with the piece of code shown in Listing 6.
Listing 6: The Publisher Console application
using System.Text;
using System.Text.Json;

var baseURL = "http://localhost:3500";
const string PUBSUB = "orderpubsub";
const string TOPIC = "orders";
const string APP_ID = "orderprocessing";

Console.WriteLine($"Publishing to baseURL:
    {baseURL}, Pubsub Name: {PUBSUB}, Topic: {TOPIC} ");

var httpClient = new HttpClient();
httpClient.DefaultRequestHeaders.
   Accept.Add(new System.Net.Http.Headers.
   MediaTypeWithQualityHeaderValue
   ("application/json"));
httpClient.DefaultRequestHeaders.Add
   ("dapr-app-id", APP_ID);

for (int i = 1; i <= 5; i++)
{ var order = new Order() { Id = i, Product_Code = "P000" + i.ToString()};
  var content = new StringContent(JsonSerializer.Serialize
     <Order>(order), Encoding.UTF8, "application/json");
  var response = await httpClient.PostAsync($"{baseURL}/orders", content);
  Console.WriteLine($"Published Order Id:
     {order.Id}");
}

public record Order
{
    public int Id { get; set; }
    public string Product_Code { get; set; }
}
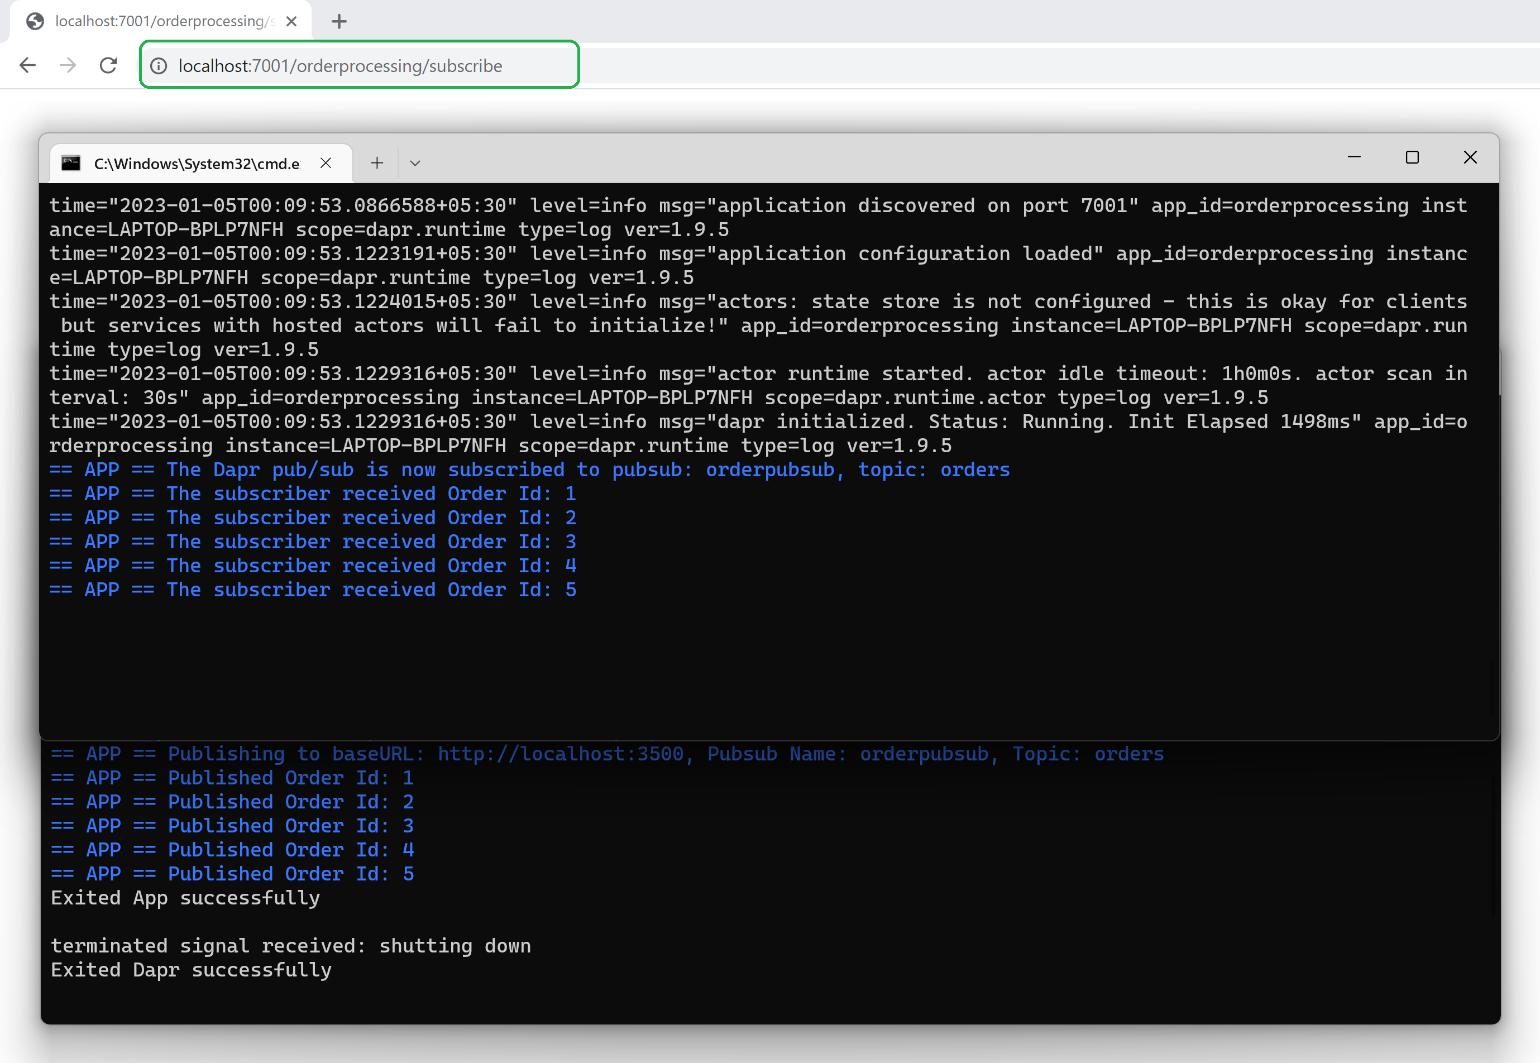
Execute the Publish and Subscribe Application
Navigate to the folder where the project file of the Minimal API project resides and execute the following command at the command window or the Windows PowerShell window to launch the orderprocessing service alongside a Dapr sidecar application:
dapr run --app-id orderprocessing
--app-port 7001 --dapr-http-port 3501
-- dotnet run
Next, navigate to the folder where the Console Application project file resides and run the orderpublisher service alongside a Dapr sidecar:
dapr run --app-id orderpublisher
--app-protocol http --dapr-http-port 3500
-- dotnet run
You can hit this endpoint using Postman or Fiddler or any other HTTP client. Alternatively, open your web browser and browse this link to register the Dapr pub/sub subscription: http://localhost:7001/orderprocessing/subscribe
When you run both the applications, you'll be able to see orders published in one command window and subscribed in another, as shown in Figure 7:
Conclusion
Dapr offers easy-to-use tools that make developing and deploying event-driven applications easy. With its strong focus on scalability, resiliency, and portability, Dapr is an ideal choice for developers looking to create robust, scalable, and distributed applications with .NET Core.
Note that, for the sake of simplicity, I've used Order and Product record types twice in the code examples - you can create a class library that contains these two types and then import them into your projects to avoid code redundancy.
