


I've been writing software for nearly 30 years. Over that time, I've learned a lot about what it takes to write code that works well, along with understanding that this educational journey is never over. One rule of thumb I follow is “automate successes.” Whenever I encounter a pattern or approach in the programming language I'm using that leads to an improvement, such as better performance or code that's easier to read, I reuse it in the future. What's even better is if I can find a way to enforce these good tactics without having to remember to do them manually.
In C# 9, a new feature called “source generators” was added. This allows developers to create code that generates new code during the compilation process. This can eliminate repetitive developer tasks and provide a way to improve performance in applications. In this article, I'll describe what source generators are, why they're useful, and how you build one that you can use in your own projects.
A Quick Overview of the Compiler API
Before I dive into source generators, I'll cover what the Compiler API, or Project Roslyn, is. Since the first version of C# was released in 2002, the underlying compiler was written in C++ and C. Over time, Microsoft started working on something called “Compiler as a Service” or Project Roslyn. This was a rewrite of the C# compiler such that it was written in C# itself. Moreover, the compiler had an API exposed to developers so they could reuse the different components of the compiler as they saw fit. In 2015, this project was finally released in C# 6, where the compiler (now named the Compiler API) switched to being a managed compiler.
Covering all aspects of this API surface would be daunting. The Compiler API is rich and vast, and there's a significant amount of functionality within. Essentially, the compiler translates your source code into a syntax tree. A syntax tree represents the contents of code - this includes all the “trivia” characters, like tabs. Figure 1 shows a truncated view of a C# syntax tree.
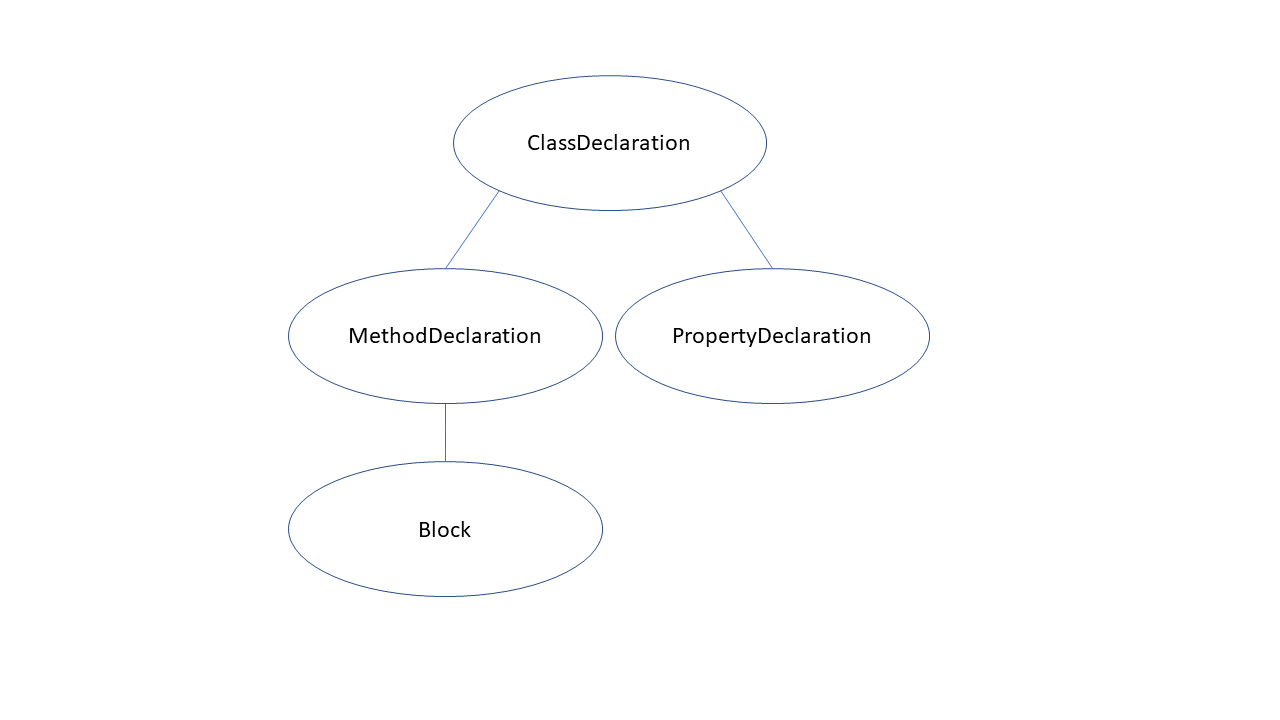
Type definitions, attributes, even whitespace - it's all captured in a tree structure. That's why Figure 1 is “truncated.” Showing the entire contents of a syntax tree for an appreciable amount of C# code would make the tree unreadable. Figure 1 demonstrates the format of a tree, like a class contains methods and properties and a method has a block body.
The typical result of this tree generation is to transform the tree into an assembly. However, there are APIs that allow you to extend and augment compilation:
- Analyzers: You can examine a syntax tree and find issues within that go beyond the issues that the C# compiler looks for. If diagnostics are created in your analyzer, they are manifested as warnings or errors, forcing you to address the problem in a timely manner.
- Code fixes: You can provide an automated correction when an analyzer creates a diagnostic. These code fixes can be applied across an entire solution, making it efficient to address analyzer issues.
- Refactorings: You can define a transformation to code that helps with readability or assists you move to new coding patterns. Well-known refactorings, such as the Extract method, allow a coder to highlight a section of code, change a method, and add a call to this method where the code block was extracted from. Other refactorings, like changing a verbatim string to a raw string literal, simplify the process of modernizing C# code to new features.
Source generators were added in 2020 when C# 9 was released. Generators provide a mechanism where you can build code based on the current state of a compilation. I'll explain what generators are in the next section.
The What and Why of Source Generators
Let's start the source generator journey by reviewing what source generators are at a high level. Source generators allow you to plug into the compilation pipeline to inspect the nodes of a syntax tree. These nodes are passed to your source generator, where you decide if a particular node is needed for what your generator needs to do. If that tree information is what you're looking for, you can create a whole new code file. Figure 2 provides a simple view of this process.
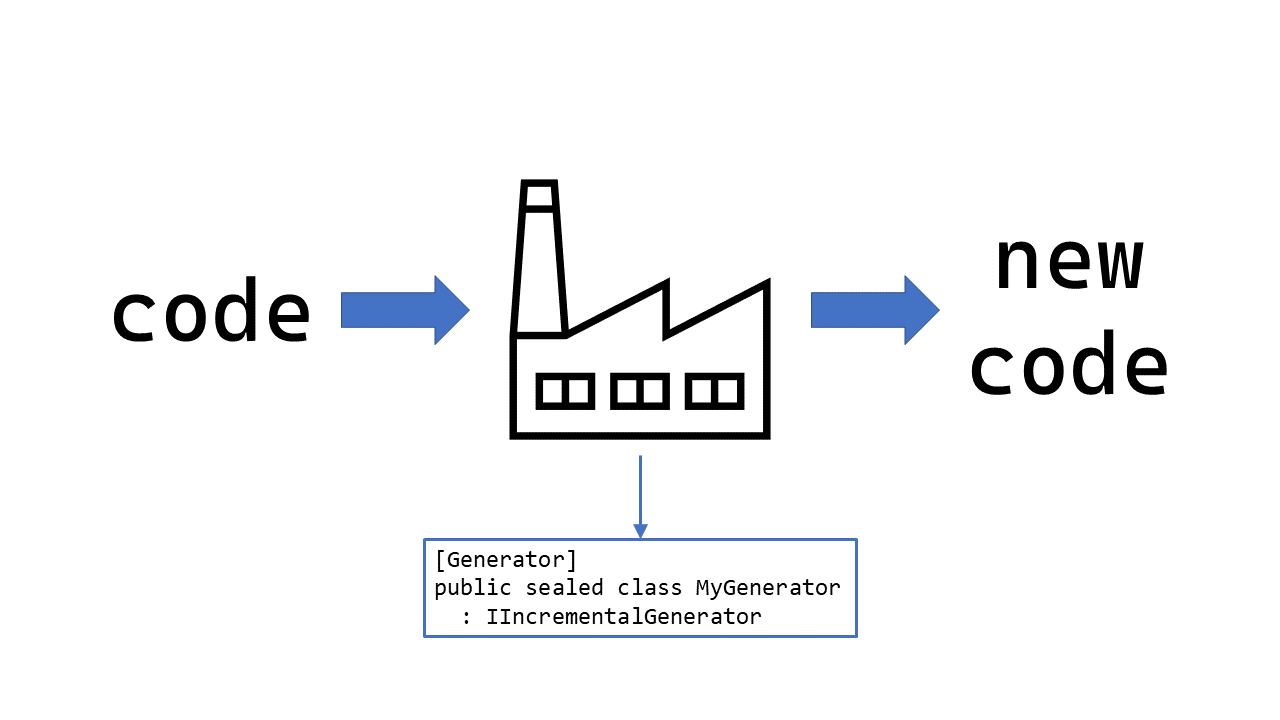
I'll cover the details of implementing a generator in the “Building a Source Generator” section. As you'll see in that section, writing a generator isn't trivial. However, keep in mind that the job of a generator is to get you from point A (a syntax tree) to point B (a new piece of code). Your generator is a factory that takes code as input and produces new code at the end of an assembly line.
At this point, it's worth spending the time answering the question: Why would I want to write a generator in the first place? There are two scenarios to consider: eliminating repetition and improving performance.
There are numerous times in code where I've encountered scenarios that required me to duplicate a design. For example, if you ever wrote applications in WPF, you may remember the INotifyPropertyChanged interface. It's a simple interface that has only one member: an event called PropertyChanged. You implement this interface so users of a particular object can receive notifications when a property value changes via the PropertyChanged event. However, the amount of boilerplate code you must write to implement this interface correctly is repetitive and tedious. You need to implement a property setter to determine if the incoming value is different from the current one, and, if so, raise the PropertyChanged event with the right property name. Listing 1 demonstrates an example of implementing INotifyPropertyChanged.
Listing 1: Implementing INotifyPropertyChanged
using System.ComponentModel;
using System.Runtime.CompilerServices;

public sealed class Customer : INotifyPropertyChanged
{
    private string? name;

    private void NotifyPropertyChanged([CallerMemberName] string name = "") =>
        this.PropertyChanged?.Invoke(this, new(name));

    public string? Name
    {
        get => this.name;
        set
        {
            if (value != this.name)
            {
                this.name = value;
                this.NotifyPropertyChanged();
            }
        }
    }

    public event PropertyChangedEventHandler PropertyChanged;
}
This is where a source generator makes your life simpler. You can create a generator that creates all the supporting code for property change notification with just one line of code. There's an example of a source generator from Microsoft that does just that - please refer to the “Source Generator Cookbook” article in the Resources table at the end of this article. In that example, you add one attribute to a field called AutoNotifyAttribute and the source generator takes care of everything. The following code snippet shows how simple it is to support INotifyPropertyChanged with this attribute:
public partial sealed class Customer
{
    [AutoNotify]
    private string? name;
}
Another situation where generators can help is with performance. There are numerous areas in software development where code examines assemblies and, based on the members within that assembly, it reacts accordingly. For example, a unit testing framework like NUnit typically looks for methods marked with a specific attribute - TestAttribute - and it invokes those methods at runtime. Mocking libraries, object mappers - all of these use runtime inspection and code generation techniques like reflection and dynamic expression compilation. Although these approaches are novel and provide useful features, there can be a performance penalty doing these computations while code is examined, and the dynamic code executes. If this dynamic code was generated at compile-time, it's possible that the result will be faster. This generated code can also be examined with other tools, like ahead-of-time compilation or AOT, for further optimizations. A recent example of this in .NET itself is regular expressions. You use the GeneratedRegexAttribute to specify a regular expression in .NET 7, and a source generator looks for the existence of this attribute, creating the necessary code to implement the regular expression. The “Regular Expression Improvements in .NET 7” article in the Resources table covers this new RegEx approach in detail.
Now that I've covered the essentials of source generators, let's see what it takes to write one. In the next section, I'll write a source generator that automatically adds Deconstruct() methods for the types defined in a project.
Building a Source Generator: AutoDeconstruct
In this section, I'll cover the implementation of a source generator I've created called AutoDeconstruct. You can find a link to the GitHub repository in the Resources table at the end of this article. This generator adds object deconstruction for your type definitions for free. By adding this source generator to your projects, you can deconstruct any type in that project.
Let's start by defining what object deconstruction is and how that relates to writing a source generator. Note that although I have code snippets in this article, I highly recommend you visit my GitHub repository to view the code in its entirety (https://github.com/jasonbock/AutoDeconstruct). Generators can be quite complicated to implement, and for brevity's sake, I've only shown key aspects of the generator in the code listings. Visit the repository link to see the full implementation.
Generator Goals
It's important to spend time to determine what the generator is going to do before you write any code to implement the generator. In this case, this means you need to understand the concept of object deconstruction and how it works in C#, including cases that you may not know of, or use, in your code. Object deconstruction is a way to split the state of an object into distinct parts. These deconstructed parts do not need to match the number of or explicitly map to the fields and/or properties on an object. It's up to you to determine what state is meaningful to provide in deconstruction. With deconstruction, you'll add a Deconstruct() method to the type, as seen in the following code snippet:
public class Person
{
    public void Deconstruct(out int age, out string name) =>
        (age, name) = (this.Age, this.Name);

    public required int Age { get; init; }
    public required string Name { get; init; }
}
A Deconstruct() method must be named using the word “Deconstruct,” it must return void, and all of its parameters must be Out parameters. Furthermore, method overloading with deconstruct methods doesn't follow the typical rules of methods in C#. Namely, Deconstruct() methods are overloaded purely by the number of parameters. It doesn't matter what the types of these parameters are or the order in which the parameters are listed.
With an object deconstructor in place, you can retrieve the state of the object using a tuple. This is shown in the next code snippet:
var person = new Person
{
    Age = 25,
    Name = "Joe Smith"
};
var (age, name) = person;
Console.WriteLine($"{age}, {name}");
Although you may have heard of object deconstruction and Deconstruct() methods, you may not have been aware that Deconstuct() methods can be extension methods. This can be useful if you want to provide a custom deconstruction for a type where you don't have access to the source code. The following code snippet is an alternative approach to declaring a deconstructor, where object deconstruction is done with an extension method:
public static class PersonExtensions
{
    public static void Deconstruct(this Person self,
        out int age, out string name) =>
            (age, name) = (self.Age, self.Name);
}
This is important, because the source generator should only generate a Deconstruct() if one doesn't currently exist for a given type. If you don't consider extension methods, your generator may do more work than necessary.
In general, with source generators, I strongly recommend spending the time thinking about what the generator needs to find in code and all the possible ways this can be done in C#. Some language features are done in multiple ways, and if you don't consider all of them, your generator may not act as expected by the user. For example, although you can add a Deconstruct() extension method for a type, it's arguably unusual to create a Deconstruct() extension method for a type in your current project where you have access to the code. However, this is allowed in C# and you must consider it as a valid possibility. If you don't, you may end up creating a Deconstruct() method that already exists somewhere in the project as an extension method.
For this generator, look for types that have accessible properties and generate a Deconstruct() method if one doesn't exist with the same number of parameters, either on that type definition, or as an extension method. In the next section, I'll cover tools that you can use to understand the syntax tree in the Compiler API.
Determining Targets in Source
Although every developer uses a compiler or an interpreter every day when they're writing code, very few have written such a tool. They are complex beasts that require taking individual characters in a text file to executable code. Every language has different features and nuances, but virtually all of them will, at some point, create a syntax tree to represent that text. Looking at the syntax tree that's provided by the Compiler API can be daunting at first glance. It's frustrating when you're trying to find that node that maps to something you've written as code.
There are a couple of tools you can use to assist you in finding your starting points. I'm a Visual Studio user at heart, and in Visual Studio, you can install the .NET Compiler Platform SDK from the Visual Studio Installer. The easiest way to find this SDK is to modify the current Visual Studio installation, select Individual components, and search for Compiler. Figure 3 is a screenshot of this installer screen:

Once you've installed this SDK, you'll get a number of available analyzer and refactoring project templates. This component also adds a window called the Syntax Visualizer. You can launch this window by traversing the View > Other Windows > Syntax Visualizer menu hierarchy. Figure 4 shows what this looks like:
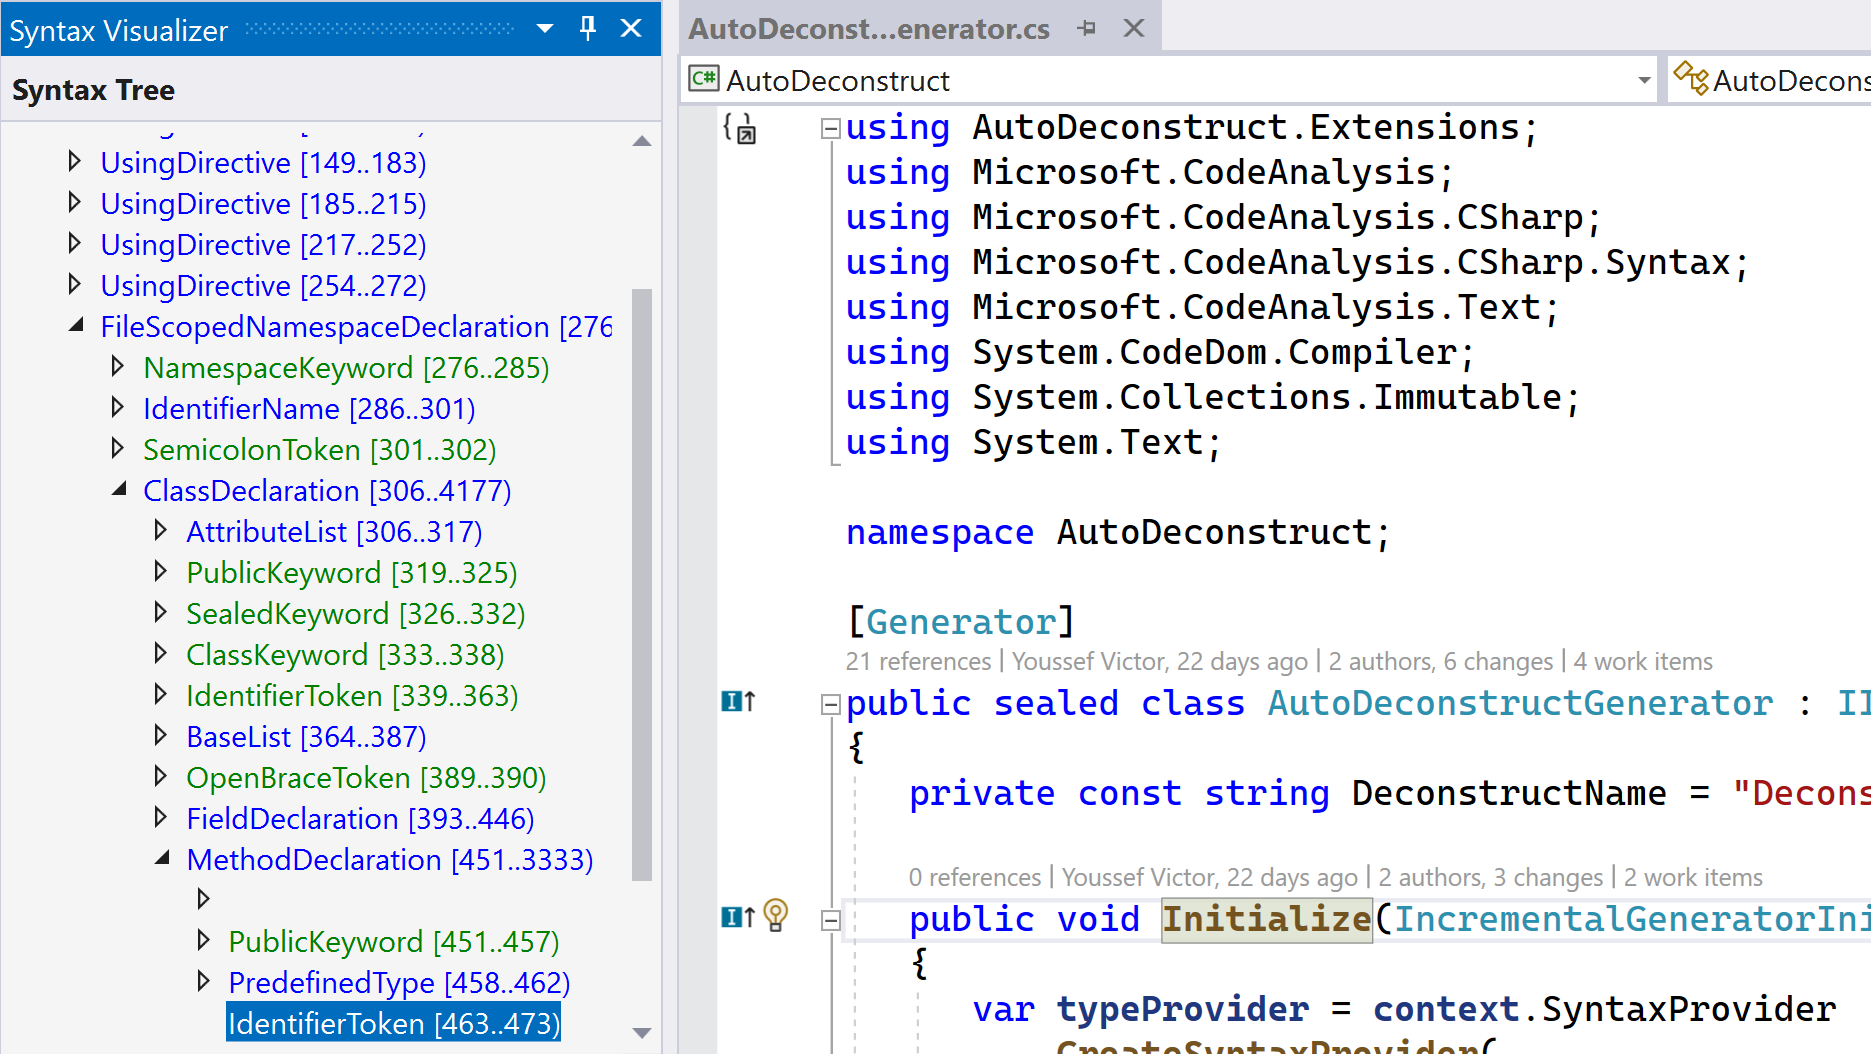
I can't demonstrate this tool dynamically in a magazine article - hopefully Figure 4 gives you a feel for what it does. If you click on a piece of code in Visual Studio, the Syntax Visualizer moves to the corresponding node or token in the tree. Conversely, you can click anywhere in the tree and the related code is highlighted. Furthermore, information about the node object is displayed. For example, when you click on a method, you'll discover that it's a MethodDeclaractionSyntax node. This is valuable knowledge, as you don't have to know every type that exists in a syntax tree. Just write some code, open the visualizer, and see how your code is represented in a syntax tree. The more you use this visualizer, the more you'll discover what can exist in a tree and where it lives.
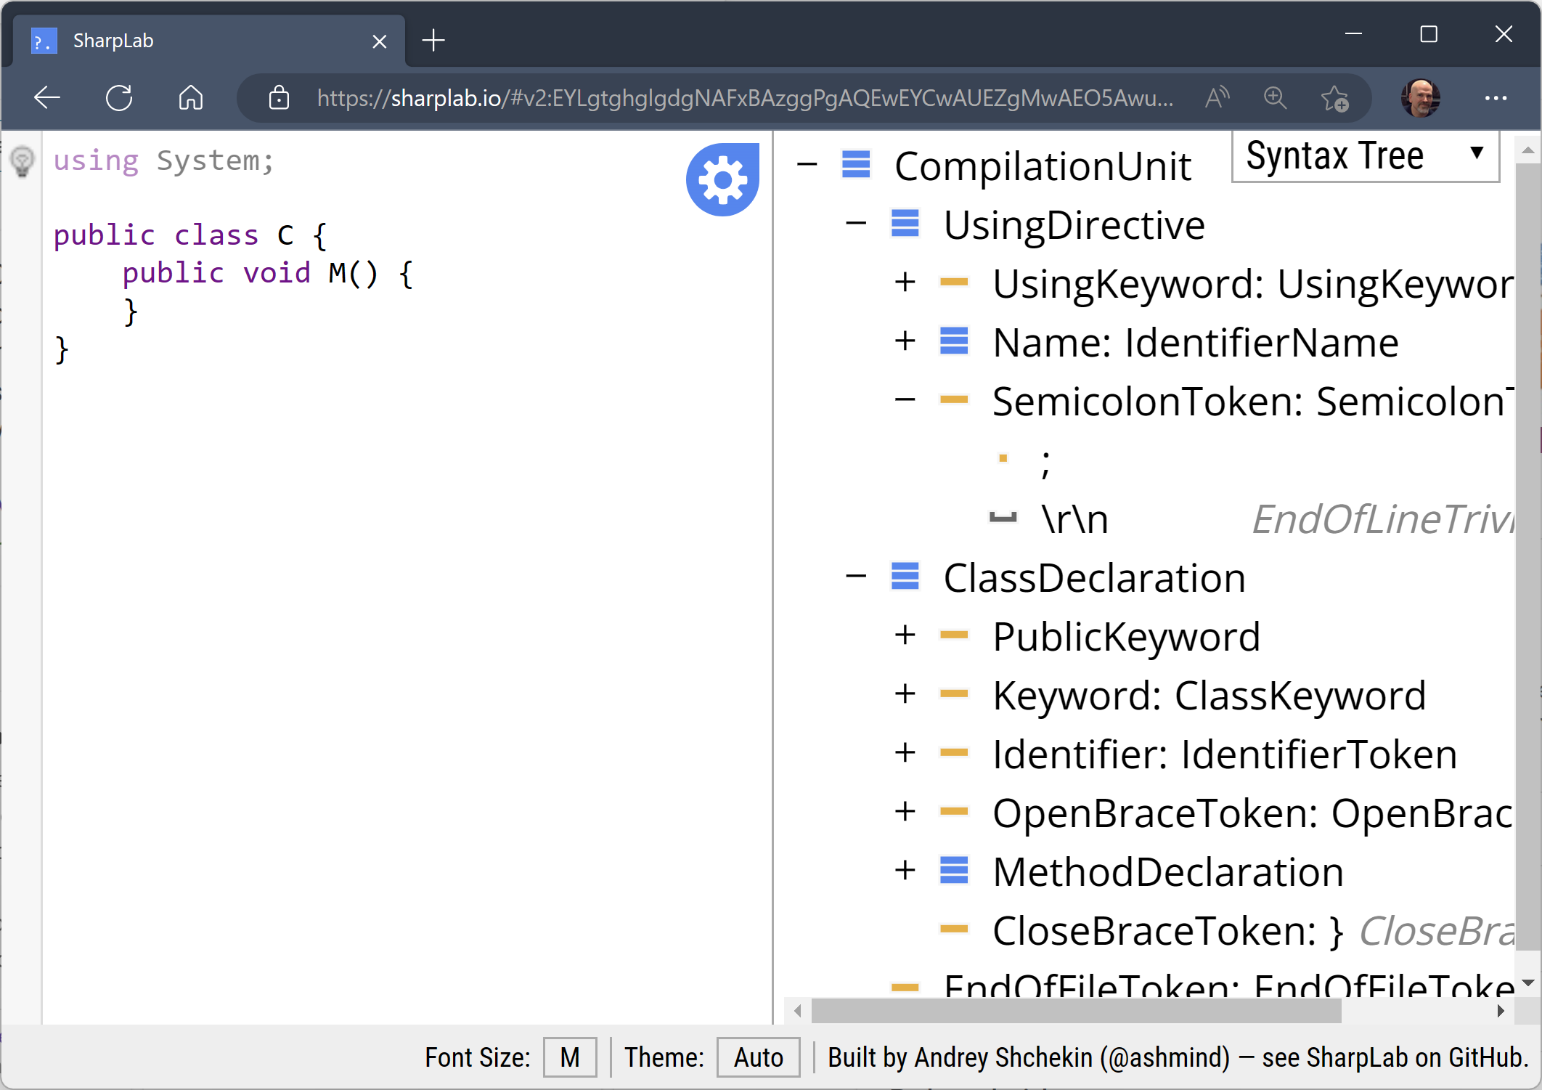
There's also a wonderful website called sharplab.io, which lets you explore C# code using experimental Compiler API branches and intermediate language (or IL) views. It also has a syntax tree visualizer, as shown in Figure 5.
I've found that I use both - it depends on the scenario. Sometimes, using sharplab.io is convenient when I'm thinking about writing a generator, but I don't have Visual Studio open. If I'm already in Visual Studio, I can write a piece of code in a file and quickly see how that's represented in the Syntax Visualizer.
For AutoDeconstruct, I've found that I need to look for TypeDefinitionSyntax nodes as my starting point. Then, I'll look for MethodDefinitionSyntax nodes within that type to see if it has Deconstruct() methods with a set of parameters equal to the number of accessible PropertyDefinitionSyntax nodes. I also need to look at individual MethodDefinitionSyntax nodes to find Deconstruct() extension methods. In the next section, you'll see how the AutoDeconstruct generator is defined.
Filtering Syntax Nodes
Now that you have a conceptual model in place for AutoDeconstruct, let's explore how the generator works. Generators are housed in class library projects that are typically deployed as NuGet packages for other projects to reference. A source generator implements the IIncrementalGenerator interface, which can be found by referencing the Microsoft.CodeAnalysis.CSharp NuGet package. This interface has one member: the Initialize() method. The following code snippet shows the definition of IIncrementalGenerator:
namespace Microsoft.CodeAnalysis
{
    public interface IIncrementalGenerator
    {
         void Initialize(IncrementalGeneratorInitializationContext context);
    }
}
Note that the first release of source generators defined an interface called ISourceGenerator. Although it's still available, you should ignore this interface and always use IIncrementalGenerator.
The Initialize() method lets you plug into an incremental compilation pipeline, where you can make step-wise decisions to determine if you need to create code based on the contents of a syntax tree. The incremental approach lets the pipeline optimize the operations if the results from the pipeline haven't changed from a previous invocation. Keep in mind that your generator will be invoked numerous times as developers change code in a project. However, these changes may not require your generator to regenerate code. If you can show the compiler that the content you're looking for is the same as before, the pipeline can catch this and determine that no further steps need to be taken. This means you should create your own object model that supports equality. This model should contain just enough information for your generator.
With AutoDeconstruct, you need to interrogate type definitions. This means that you need to filter for TypeDeclarationSyntax nodes. You could try to look at all the parts of a TypeDeclarationSyntax node, but syntax nodes can be a bit difficult to work with. Using compilation symbols provides more semantics around a given node. The next snippet shows how you can translate the current node in the pipeline to a symbol:
var typeProvider = context.SyntaxProvider.CreateSyntaxProvider(
    static (node, _) => node is TypeDeclarationSyntax,
    static (context, token) =>
    {
      var symbol = context.SemanticModel.GetDeclaredSymbol(
          (TypeDeclarationSyntax)context.Node, token);
In the Compiler API, you can use the semantic model, which provides rich information about a syntax node. In this case, if the node is a TypeDeclarationSyntax, and you can load an INamedTypeSymbol instance for that node through the semantic model, you can investigate the definition of that type to see if you need to generate an object deconstructor. This is shown in Listing 2.
Listing 2: Using Symbols for Interrogation
var attributeName = "AutoDeconstruct.NoAutoDeconstructAttribute";

if (symbol is null)
{
  return null;
}
else if (symbol is INamedTypeSymbol typeSymbol &&
  typeSymbol.GetAttributes().Any(a =>
      a.AttributeClass?.ToDisplayString() == attributeName))
{
  return null;
}

var accessibleProperties = symbol.GetAccessibleProperties();

if (accessibleProperties.IsEmpty ||
  symbol.GetMembers().OfType<IMethodSymbol>()
    .Any(m => m.Name == AutoDeconstructGenerator.DeconstructName &&
      !m.IsStatic && m.Parameters.Length == accessibleProperties.Length &&
       m.Parameters.All(p => p.RefKind == RefKind.Out)))
{
  // There is an existing instance deconstruct.
  return null;
}

return new TypeSymbolModel(
  symbol.ContainingNamespace.ToString(),
  symbol.Name,
  symbol.GetGenericParameters(),
  symbol.GetFullyQualifiedName(),
  symbol.GetConstraints(),
  symbol.IsValueType,
  accessibleProperties);
The GetAccessibleProperties() method is an extension method I wrote to find all of the public, readable properties on an INamedTypeSymbol instance. Note that the type of the return value is EquatableArray<PropertySymbolModel>. You can't use a collection type like an array because you need to be able to determine if the contents of that collection are “equal.” This custom EquatableArray<> type handles that scenario for you. This type comes from the PolySharp project, which is listed in the Resources table at the end of the article.
Our PropertySymbolModel definition contains just two values: the name of the property and the fully-qualified name of the property's type. The latter definition is shown in the next code snippet:
internal record PropertySymbolModel(
    string Name, string TypeFullyQualifiedName);
Because records automatically define equality for you, this is all that's needed to create the custom data model. Also, if you need to reference the name of a type in your generated code, you should always use fully-qualified names, like “global:: System.String”. This eliminates the possibility of name collisions, although it can make the generated code a bit hard to read. That said, developers typically won't read your generated code and will just use it for what it's designed to do.
Once you get all of the accessible properties, do a search on the type for IMethodSymbol instances; specifically, you're looking for methods that aren't object deconstructors with the same number of Out parameters. If you don't have that, you return a TypeSymbolModel instance - another custom record defined to contain just enough information to build a new object deconstructor. Let's see how that code is generated in the next section.
Generating Code
The code generation phrase of a source generator is arguably simpler, in that all you need to do is create C# code in a string. How you want to do that is completely up to you, so long as the product is a string that passed into a SourceText object. My preference is to use the IndentedTextWriter class, a custom TextWriter type from the System.CodeDom namespace. The IndentedTextWriter makes it easy to define indents and outdents in the lines of text. You may choose to use a templating engine like Scriban. As long as the result is a string, use whatever production strategy you're comfortable with.
To participate in the output portion of the pipeline, you define a callback method, which is passed to RegisterSourceOutput() on the IncrementalGeneratorInitializationContext object. Listing 3 shows what happens in the CreateOutput() callback method.
Listing 3: CreateOutput() Callback
private static void CreateOutput(
    ImmutableArray<TypeSymbolModel> types,
    ImmutableArray<TypeSymbolModel> excludedTypes,
    SourceProductionContext context)
{
    if (types.Length > 0)
    {
        using var writer = new StringWriter();
        using var indentWriter = new IndentedTextWriter(writer, "\t");
        indentWriter.WriteLines(
            """
            #nullable enable

            """);

        var wasBuildInvoked = false;

        foreach (var type in types.Distinct())
        {
            var accessibleProperties = type.AccessibleProperties;

            if (!excludedTypes.Contains(type))
            {
                AutoDeconstructBuilder.Build(indentWriter, type,
                    accessibleProperties);
                wasBuildInvoked = true;
           }
        }

        if (wasBuildInvoked)
        {
            context.AddSource("AutoDeconstruct.g.cs",
                SourceText.From(writer.ToString(), Encoding.UTF8));
        }
    }
}
The central point of CreateOutput() is the call to Build() on AutoDeconstructBuilder. This is where all of the generated code is built. For example, the following code snippet illustrates how all of the Out parameters for the object deconstructor are created:
var outParameters = string.Join(", ", properties.Select(p =>
    $"out {p.TypeFullyQualifiedName} " + $"@{p.Name.ToCamelCase()}"
    ));
As the Deconstruct() method you're generating is an extension method, the type that you're extending may be a reference type, which means that you might get a null value. With a generator, you can create code tailored for specific scenarios. This is demonstrated in the following code snippet:
if (!type.IsValueType)
{
  writer.WriteLine($"global::" +
      "System.ArgumentNullException" +
      $".ThrowIfNull(@{namingContext["self"]});");
}
In this case, if the target type isn't a value type, you can generate a null check such that you'll throw an ArgumentNullException if the Self parameter is null.
Also, notice that I have a VariableNamingContext object in my generator code. This is a custom type I've used in a number of source generators I've created to guarantee unique variable names. When you're generating code, you may need to create names for parameters or variables. You can try to come up with something unique, like using the string value of a new GUID, but most of the time, your choice of variable names won't collide. There's always a chance that a duplication will occur. This type provides either the desired name or a unique name for the desired name. Keep in mind that this only works within the scope that the VariableNamingContext is used. If you want to use this approach, you need to ensure that it's being used within the right scope, like a method body.
Once you have all of the code generated, call AddSource() on the SourceProductionContext object. Your generated code is now available to be used by the referencing project. Before you publish the NuGet package so others can use it, you should test the generator. I'll show you how to do this testing in the next section.
Testing Generators
Testing code is a standard practice I follow on any project I work on. With source generators, there are libraries produced by Microsoft that make generator testing easier. The AutoDeconstruct.Tests project uses the Microsoft.CodeAnalysis.CSharp.SourceGenerators.Testing.NUnit library to test generators for NUnit tests (there are libraries for xUnit and MSTest as well). Listing 4 shows a test where you can specify the generated code you expect to see when your generator runs.
Listing 4: Writing a Generator Test
var code =
  """

 using System;

  namespace TestSpace
  {
     public struct Test
     {
        public string? Namespace { get; set; }
     }
  }
  """;

  var generatedCode =
    """
    #nullable enable

    namespace TestSpace
    {
        public static partial class TestExtensions
        {
            public static void Deconstruct(
                this global::TestSpace.Test @self, out string? @namespace)
            {
                 @namespace = @self.Namespace;
            }
        }
  }

  """;

await TestAssistants.RunAsync(code, new[] {
    (typeof(AutoDeconstructGenerator), "AutoDeconstruct.g.cs", generatedCode)},
    Enumerable.Empty<DiagnosticResult>());
In this test, you expect that a code file should be generated with the content specified in generatedCode. You can also write tests where you can state that a set of diagnostics should be produced.
You can also write tests that let you write code that uses the generated code directly. These tests are defined in the AutoDeconstruct.IntegrationTests project. You need to reference your class library project with the OutputItemType attribute set to Analyzer, as shown in the following code snippet:
<ProjectReference
    Include="AutoDeconstruct.csproj"
    OutputItemType="Analyzer" />
When you do this, your generator runs directly against the code within that test project. Listing 5 shows how the generated object deconstructor is used to extract object state.
Listing 5: Writing Integration Tests
public static class NoDeconstructExistsTests
{
    [Test]
    public static void RunDeconstruct()
    {
        var id = Guid.NewGuid();
        var value = 3;

        var target = new NoDeconstructExists
        {
            Id = id,
            Value = value
        };
        var (newId, newValue) = target;

        Assert.Multiple(() =>
        {
            Assert.That(newId, Is.EqualTo(id));
            Assert.That(newValue, Is.EqualTo(value));
        });
    }
}

public sealed class NoDeconstructExists
{
    public Guid Id { get; set; }
    public int Value { get; set; }
}
I find it very satisfying when I get to the point where I can use the outputs of my source generator. It illustrates the power and flexibility of source generators. In this case, it's so nice to see where a developer doesn't have to write an object deconstructor if they don't want to. Furthermore, as an implementor of a generator, it's really nice to be able to view the generated code. If you want to see the results of your source generator, you can go to the Analyzers node in the Dependencies section of a project in the Solution Explorer window of Visual Studio. Figure 6 shows this list.
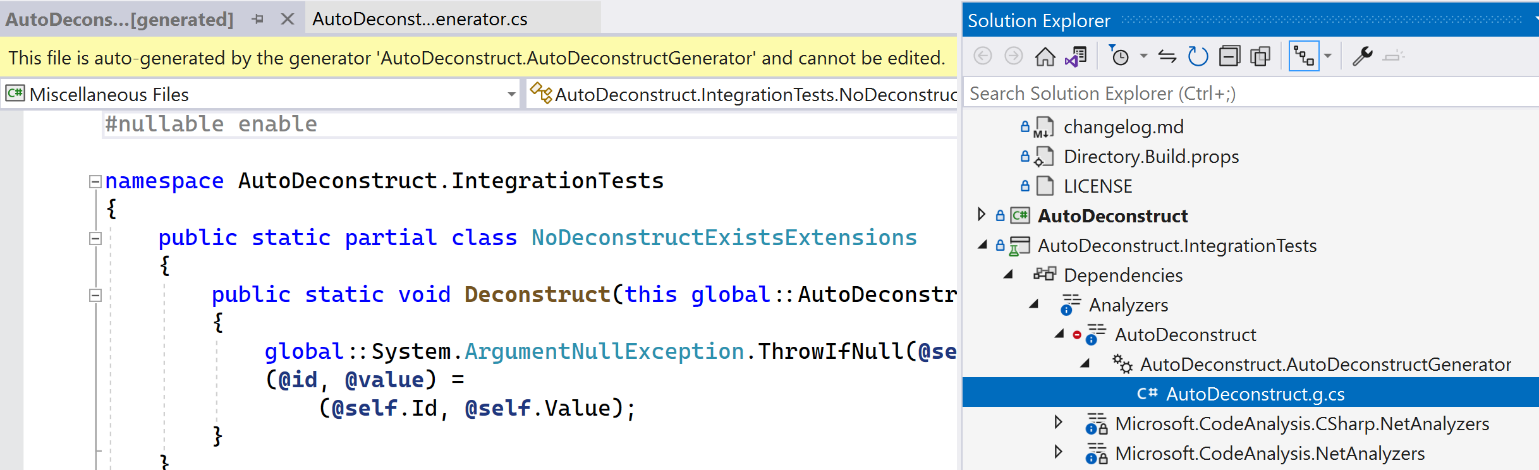
By default, these files are not saved to storage. If you want to persist the generated code files to disk, you set the EmitCompilerGeneratedFiles project setting to true. You can also specify a folder to save the files via the CompilerGeneratedFilesOutputPath property.
Not only can you view the generated code, but you can also step into this code in a debugging session. This is a tremendous advantage for a generator author compared to the other techniques I mentioned in the “The What and Why of Source Generators” section. Trying to figure out what isn't working correctly with Reflection or IL generation at runtime can be very tricky and difficult. With a source generator, it's the same as any other code in that project. If the generator emits incorrect code, the compiler finds that issue and I won't be able to build an assembly. This makes finding and fixing bugs arguably quicker.
One technicality with this second test approach is that Visual Studio tends to hold onto the assembly that contains your source generator, even after you've made changes to your generator. You may need to restart Visual Studio if you want to test changes in your generator. I've found that I'll write a number of unit tests first and only write integration tests when I feel like my changes are good. This minimizes the number of times I'd need to restart Visual Studio. It's an unfortunate aspect of testing generators that's due to how Visual Studio loads analyzer-based projects in other projects, but I've found that this is a minor inconvenience.
Start the Journey
In this article, I've covered source generators in C#. Generators can be used to reduce the amount of code a developer has to write or to define performant code at compile-time. Writing generators may seem daunting at first, and I'll freely admit that it can be quite frustrating to implement one. The amount of documentation on source generators is anemic at times and it can be confusing to figure out how to get to the point where you generate the code you want to. That said, source generators can be a positive addition to your coding experience. I encourage you to dive into source generators. Who knows: You may end up writing one that simplifies the code you write, or, more exactly, the code you no longer must write.
Table 1 provides a list of helpful resources on this subject.
Table 1: Resources
| "Refactoring" by Martin Fowler | https://martinfowler.com/books/refactoring.html |
| The .NET Compiler Platform SDK | https://learn.microsoft.com/en-us/dotnet/csharp/roslyn-sdk/">https://learn.microsoft.com/en-us/dotnet/csharp/roslyn-sdk/ |
| Source Generators Cookbook | https://github.com/dotnet/roslyn/blob/main/docs/features/source-generators.cookbook.md |
| Incremental Generators | https://github.com/dotnet/roslyn/blob/main/docs/features/incremental-generators.md |
| Regular Expression Improvements in .NET 7 | https://devblogs.microsoft.com/dotnet/regular-expression-improvements-in-dotnet-7/">https://devblogs.microsoft.com/dotnet/regular-expression-improvements-in-dotnet-7/ |
| AutoDeconstruct Code Repository | https://github.com/JasonBock/AutoDeconstruct |
| PolySharp | https://github.com/Sergio0694/PolySharp |
| Scriban | https://github.com/scriban/scriban |
