


In the last two parts of this article series (in the May/June and July/August issues of CODE Magazine), you created a web server using Node.js, Express, and JavaScript. You built a series of API routes to retrieve an array of products and a single product, searched for a set of products, and added, edited, and deleted products. The product data was retrieved from a connection to a SQL Server database. In this article, part three of the series, you'll build a website using Node.js and Express to serve web pages. You're going to see how to use a templating engine, Mustache, to create dynamic web pages from the data retrieved from API calls. To communicate from your website to your Web API server, you must configure cross-domain resource sharing (CORS). You'll see how to enable CORS in your Web API project. You'll then build a set of search, add, edit, and delete pages that make calls to your Web APIs.
Create a Node.js Web Project Using VS Code
Like my last two articles, this article is designed for you to follow along. You learn the most by doing, so please feel free to join me to create a website together. You only need a few tools, most of which you probably already have on your computer. You need to install Node.js and VS Code on your computer. You also need access to a SQL Server, so install one on your computer or use SQL Server Express. Everything else is downloaded as you go along. For more information about installing these tools, please go back and review the instructions in Part 1 of this article.
Let's get started creating this new website using Node.js and Express. Open a Command Prompt, the Windows PowerShell app, or some other terminal as appropriate for your computer and navigate to where you normally place your development projects. You can even open VS Code and use the terminal window in there. For this article, I'm using my folder D:\Samples to create the new Node.js project. After opening a command prompt within the development folder, create a new folder under that folder and navigate to that folder using the following two commands.
mkdir AdvWorks
Icd AdvWorks
Open the Visual Studio Code editor in this new folder using the following command. Note that this is the word code followed by a space and a period (.).
code .
From the menu system in VS Code, open a new terminal by selecting Terminal > New Terminal. Type in the following command in the terminal window to start building a new JavaScript project.
npm init
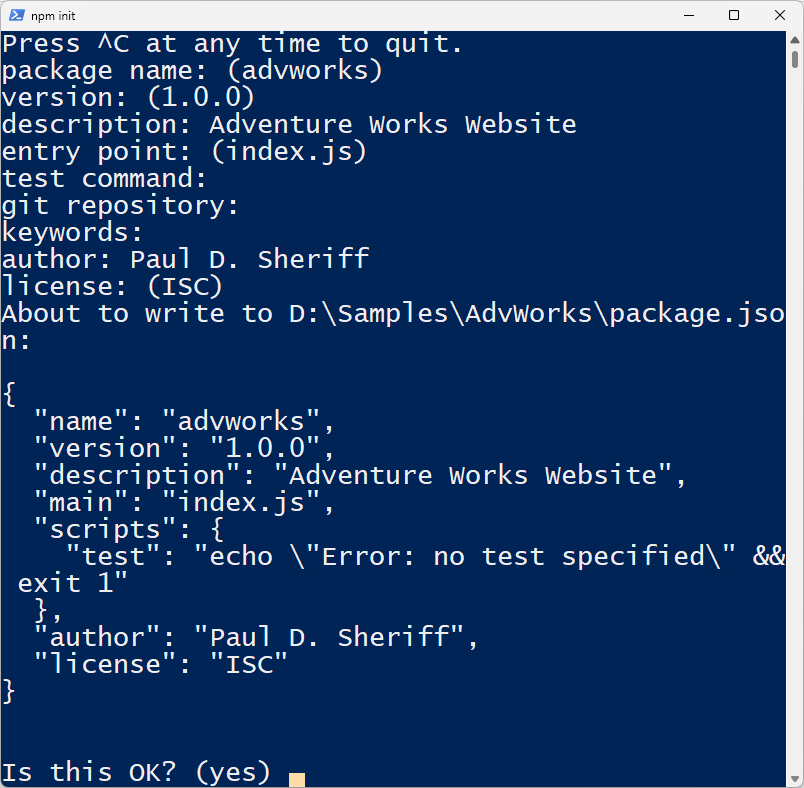
Within the terminal window, it asks for some information to describe this project. If you wish to accept the default answers, press the Enter key after each prompt; otherwise enter the appropriate information for your project, as shown in Figure 1. At the end, answer Yes to save a file called package.json in your new project folder. The package.json file contains meta-data about your project to help npm run the scripts in the project, install dependencies, and identify the initial JavaScript file used to start the application. The package.json file contains meta-data about your project to help npm run the scripts in the project, install dependencies, and identify the initial JavaScript file used to start the application.
Install Express and Nodemon
You're now ready to install any additional utilities you want to use in your application. You're going to use the Express framework for creating the web server, so install that now. From within the terminal window, install the Express framework using the following command:
npm install express
You're also going to use the nodemon utility to automatically detect changes to any files in your project and restart your web server when appropriate. Install nodemon by using the following command within the terminal window:
npm install nodemon
Modify the package.json File
Open the package.json file and you should now see Express and nodemon listed under the Dependencies property. Also, notice that there's a Main property that lists index.js as its value. This is the starting JavaScript file for the application. Because you want to use nodemon to watch for any changes in your js files, add a Start property under the Scripts property, as shown in the code snippet below.
"scripts": {
    "start": "nodemon index.js",
    "test": "echo \"Error: no test specified\" && exit 1"
},
Be sure to save the changes to the package.json file at this point.
Create Website Starting Point
Whether you're creating a Web API project or a website project, the starting code for Express is very similar. Just like before, you need to create a file named index.js as the starting point. Open the index.js file and add the code shown in Listing 1. There are only a few differences in this code from the Web API project created in the first part of this article series as you will notice as you build the website in this article. First, set the port number to a different value from that of your Web API project. Invoke the method app.use(express.static('public')) to set the location of where your static HTML files are located. Within the app.get() function, call the send() function with no parameters to send the HTML to the requesting browser.
Listing 1: In the index.js file is where you serve up the static HTML home page.
// Load the express module
const express = require('express');
// Create an instance of express
const app = express();
// Create an instance of a Router
const router = express.Router();
// Specify the port to use for this server
const port = 3010;

// Configure location(s) of static HTML files
app.use(express.static('public'));

/**
 * GET
 * @returns index.html file
 */
app.get('/', (req, res, next) => {
    res.status(200).send();
});

// Create web server to listen on the specified port
let server = app.listen(port, function () {
    console.log(`AdvWorks web server is running on http://localhost:${port}.`);
});
How does the Express server know to use a file called index.html from the app.get("/" ...) call? In the line of code app.use(express.static('public')), the express.static() function assumes that a file named index.html is within the public folder. Override this file name, if you wish, by passing in a second parameter to set the index property to the name of HTML file you wish to use. For example, if you rename the index.html file in the public folder to home.html, use the following code to use that file name:
app.use(express.static('public',
    {
        "index": "home.html"
    }
));
Create the HTML Home Page
Because you declared your intention to use a folder named public in the express.static('public') call, create a folder named public in your project and add a file named index.html. Add the code shown in Listing 2 to this new index.html file. Make sure you put the <script> tag that references the googleapi.com all on one line. I had to break the line because of formatting restrictions in this article.
Listing 2: Create the index HTML page.
<!DOCTYPE html>
<html>
    <head>
        <title>Product Maintenance</title>
        <link rel="icon" type="image/x-icon" href="#">
        <style>
            .text-center {
                text-align: center
            }
        </style>
    </head>

    <body>
        <div class="text-center">
            <h1>Product Maintenance</h1>

            <button onclick="getAllProducts();">
                Get All Products
            </button>
        </div>

        <div class="text-center">
            <textarea rows="10"
                      cols="80"
                      id="products">
            </textarea>
        </div>
        <script
            src="https://ajax.googleapis.com/ajax/
                 libs/jquery/3.6.3/jquery.min.js">
        </script>
        <script src="./scripts/index.js">
        </script>
    </body>
</html>
Create JavaScript File to Make API Call
At the bottom of the index.html file, there are two <script> tags. The first tag references the ajax library from Google to help make API calls. The second <script> tag references a local file called index.js into which you're going to write the code to make the API calls to the AdvWorksAPI project you created in the previous articles.
On the index.html file, you can see a button that calls a function named getAllProducts(). Create a file named index.js file in the public folder, and add the getAllProducts() function, as shown in Listing 3. The code in the getAllProducts() function should be very familiar to anyone that who's called APIs using jQuery. The asynchronous getJSON() method is passed in two parameters: the URL where the API call is located and a callback function if the call is successful. The getJSON() method returns a promise, so you can chain the .done() and .fail() methods to the call to respond if the code succeeds or fails. If data is returned from the API call, that data is passed to the anonymous function as the parameter named response. For now, you're just going to place the stringified version of the JSON data into the <textarea> named products.
Listing 3: Create the function to make the API call from your index.html page.
'use strict';

const url = 'http://localhost:3000/api/product';

function getAllProducts() {
    $.getJSON(url, function (response) {
        $('#products').val(JSON.stringify(response));
    })
        .done(function () {
            console.log("Success");
        })
        .fail(function (error) {
            $('#products').val(
                "Can't retrieve Products.Check Console Window " +
                JSON.stringify(error));
          console.error(error);
        });
}
Try It Out
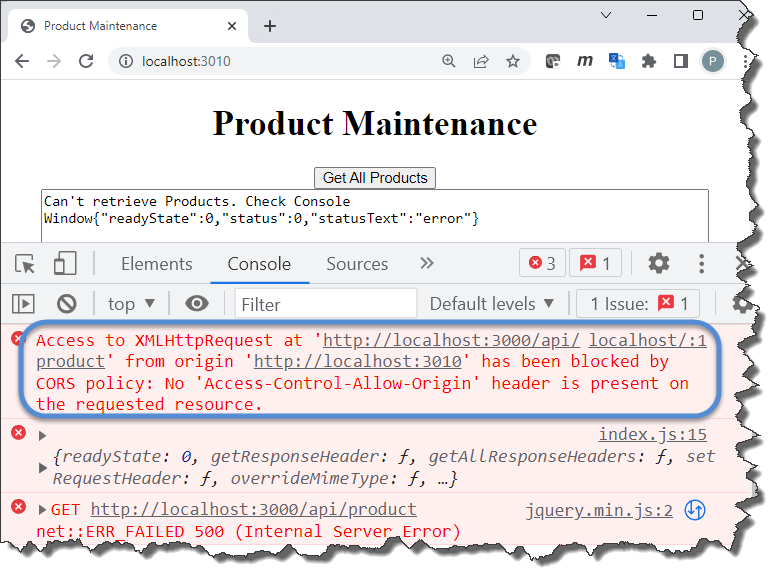
Save the changes you've made to all the files in your project and start the website in the terminal window of your editor by typing in npm start. Go to your browser and navigate to http://localhost:3010. You should see the HTML (Figure 2) from the index.html file appear on the screen. Click on the Get All Products button and you should receive the message Can't retrieve Products. Check Console Window. Open the F12 developer tools on your browser and check the Console tab. You should see a CORS error that looks like Figure 2.
Add CORS to the REST API Project
CORS stands for cross-origin resource sharing and is an HTTP header mechanism that allows a web server to indicate from which domains it will accept calls. By default, a server blocks all calls that don't originate from pages or callers with their own domain. When you add CORS to your Web API project, you specify all domains or only specific domains from which to accept remote calls. You can even specify which verbs (GET, POST, PUT, DELETE, etc.) to accept. Go back to the AdvWorksAPI project and open a terminal window in your editor. Type in the following command to install the CORS package.
npm install cors
Add a new file to the helpers folder named cors.js. Add the code shown in Listing 4 to this new file. There is a single function named configure() in this corsHelper object. I've put some different ways you can configure CORS within the function that you can refer to later. The first commented line is app.use(cors()). If you use this call, your server will allow calls from all domains. If you create a JSON Options object, you can add different properties to specify domains and methods that your server will allow.
Listing 4: Add a CORS helper object to initialize from what domains your server will allow calls.
// Load CORS module
const cors = require('cors');

/**
 * CORS Configuration Helper
 * @reference
 * https://expressjs.com/en/resources/middleware/cors.html
 */
let corsHelper = {};

/**
* Configure CORS usage
*/
corsHelper.configure = function (app) {
    // Enable CORS for all requests
    // app.use(cors());

    // Enable CORS for only one domain
    let options = {
        "origin": "http://localhost:3010"
    };

    // Enable CORS for only one domain
    // and only certain verbs
    // let options = {
    //     "origin": "http://localhost:3010", "methods": "GET,POST"
    // };

    // Pass options to cors() method
    app.use(cors(options));
}

module.exports = corsHelper;
You now need to call this configure() method from your index.js file so you can register CORS functionality within your Web API project. Open the index.js file and add the following code before you mount the routes:
// Configure CORS
const corsHelper = require('./helpers/cors');
corsHelper.configure(app);

// Mount routes from modules
router.use('/product', require('./routes/product'));
Try It Out
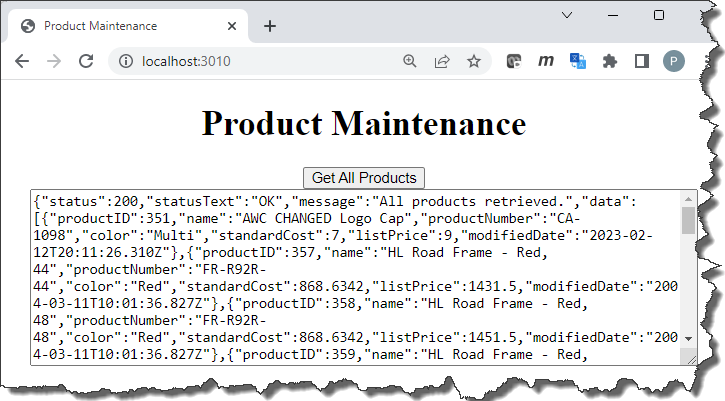
Save all changes made to your AdvWorksAPI project. Assuming that both projects are running, navigate to http://localhost:3010 and click on the Get All Products button. If you've done everything correctly, you should see the product array appear in the text area, as shown in Figure 3.
Did You Get an Error?
If you get an error message about not being able to make a connection, make sure that TCP/IP is enabled for SQL Server on your computer. By default, it's usually turned off. Open the Computer Management app (Figure 4) in Windows and expand the SQL Server Configuration Manager node, then expand the Protocols for MSSQLSERVER (or Protocols for SQLExpress if using SQLEXPRESS). Double-click on the TCP/IP protocol and in the dialog box, change the status to Enabled.

Getting Started with Templating
In the simple example you just coded, the product data is simply placed into an HTML text area. Most likely, you're going to want to display the products in an HTML table or a drop-down list. You can build the table or drop-down list by coding everything in JavaScript, but doing so can get very messy. If you've ever used ASP.NET MVC, you have a server-side templating language, Razor, to mix HTML and code to build tables, drop-downs, and forms dynamically.
There are several client-side templating engines that work similarly to the server-side templating languages. The most common client-side templating engines are EJS, Mustache, Handlebars, and Pug. These templating engines help you build web pages dynamically on the client-side. I'm going to introduce you to Mustache in this article because it's the one that I've used many times over the years. Once you learn one of these templating engines, you'll find that most of them look the same.
Mustache, and most of the templating engines, want you to create a folder named views. Create the views folder in your AdvWorks project, and within that folder, add a new file named product.mustache. Into this new file, place the HTML shown in Listing 5. For this first example, you're just going to use some hard-coded data. Eventually, you'll replace this hard-coded data with data from a Web API call, but first, let's learn how to call this page using Mustache.
Listing 5: Create a hard-coded product page.
<!DOCTYPE html>
<html>
    <head>
        <title>Product Maintenance</title>
    </head>

    <body>
        <h1>Product List</h1>

        <select size=10>
            <option id="345">HL Road Frame - Red, 58</option>
            <option id="346">Sport-100 Helmet, Red</option>
            <option id="348">Mountain Bike Socks, M</option>
        </select>
     </body>
</html>
Create a Route to Display the Mustache Page
As you did in the first article in this series, you're going to create modules to hold the different pieces of functionality for your web application. Add a new folder called routes and add a new file named product.js in this folder. Open the routes\product.js file add the code shown below:
// Create an instance of a Router
const router = require('express').Router();

// GET /product Route
router.get('/', (req, res, next) => {
    // Use the view engine to render the page
    res.render('product.mustache', {});
});

module.exports = router;
In this router.get() function, you call the render() function on the response (res) object, passing in the value 'product ' which corresponds to the file product.mustache located in the views folder. The second parameter to res.render() is the data that is to be used on the mustache file to create the page. There's no data for this page yet, so just pass an empty JSON object.
How does Express know to use the file named product.mustache and not product.html or some other file? The answer is that it doesn't yet, but it will as soon as you download Mustache and register it as your view engine. Let's do that next.
Add Mustache to Your Project
Add the mustache templating engine to your AdvWorks project by submitting the following command in the terminal window.
npm install mustache-express
Open the index.js file and add the code shown in Listing 6 after the definition of the port constant. In this code, you load the Mustache module, tell Express what view engine you're using with the app.set() function, and then register the engine using the app.engine() function. You now use the router.use() function to create the product route with the routes defined in your routes\product.js file.
Listing 6: Configure the mustache-express package as the view engine for this website.
// Configure Mustache Templating Engine
let mustacheExpress = require('mustache-express');
// The following is the default.
// Change the directory name if you wish
//app.set('views', `${__dirname}/views`);
// Tell express the view engine you are using
app.set('view engine', 'mustache');
// Set the engine to Mustache
app.engine('mustache', mustacheExpress());

// Mount routes from modules
router.use('/product', require('./routes/product'));

// Configure router so all routes have no prefix
app.use('/', router);
Remember how you use the tool nodemon to restart the node application if a file changes? Well, because you're now using .html, and .mustache files, you need to inform nodemon to monitor those files as well. Open the packages.json file and modify the Start property so it looks like the code shown below. The -e option passes a list of file extensions to the nodemon utility to monitor for changes. This is a comma-separated list of extensions. Do not put any spaces in between each. A space is what separates the extensions from the file to start with, namely, index.js.
"scripts": {
    "start": "nodemon -e mustache,js,html,json index.js",
    "test": "echo \"Error: no test specified\"
    && exit 1"
},
Install Mustache Template VS Code Extension
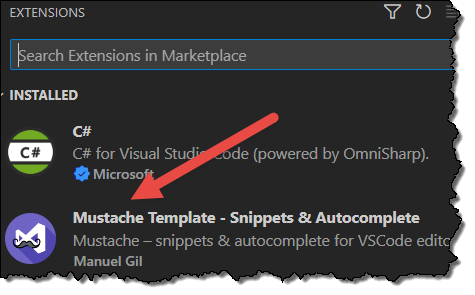
If you're using VS Code, you should install the Mustache Template – Snippets & Autocomplete extension to help you format and work with Mustache within VS Code. Click on the Extensions tab in VS Code and search for “Mustache”. Install this extension, as shown in Figure 5.
References for Mustache
There's a lot more to Mustache than I'm covering in this article. To learn more about the Mustache templating engine, I've listed a few links that provide you with more information:
- https://github.com/janl/mustache.js/
- https://mustache.github.io/mustache.5.html
- https://drewword.medium.com/express-mustache-quick-start-36c3421af91
Try It Out
Save all the changes made to the files in your project and restart the AdvWorks project. Type in the query http://localhost:3010/product and you should now see the HTML page with a list of hard-coded product data in a drop-down list.
Feed Data to the Mustache Page
Open the routes\product.js file replace the line of code res.render('product', {}) with the code shown in Listing 7. The second parameter to the res.render() method is now a hard-coded set of product data to be used to fill in the data you hard-coded in the <select> element. Eventually, you're going to replace this code with a call to the Web API, but let's first learn how to use the Mustache templating engine with hard-coded data.
Listing 7: Add some data to send to the Mustache page.
res.render('product',
    {
        "data": [
            {
                "productID": 354,
                "name": "Long-Sleeve Logo Jersey, L"
            },
            {
                "productID": 356,
                "name": "HL Road Frame - Red, 62",
            },
            {
                "productID": 358,
                "name": "HL Road Frame - Red, 48",
            }
        ]
    }
);
The second parameter passed to res.render() is an unnamed JSON object. Add a property to this object called data that's an array of product objects. The array in data is what you're going to tell Mustache to use to iterate over, and create each <option> in the <select> list. Open the views\product.mustache file and replace all the hard-coded <option> elements with the following code:
<select size = 10>
    {{#data}}
    <option id="{{productID}}">
        {{name}}
    </option>
    {{/data}}
</select>
This new code you've entered contains Mustache tokens. These tokens are variable names that either represent a collection of data {{#data}}, or a single property from within the array of objects such as {{productID}} and {{name}}. These tokens are replaced with the data from the object you passed to the second parameter of the res.render() function.
The token {{#data}} says to iterate over the array of product objects contained in the data property. For each product object, emit all the HTML within the starting {{#data}} token and the closing {{/data}} token. While iterating through each, replace each property within the tokens ({{productID}}, for example) with the data from that property in the product object.
Try It Out
Save all the changes to the files in your AdvWorks project, go to your browser, and refresh the page at http://localhost:3010/product. You should see a different set of products appear in your HTML list. These are now the products coming from the hard-coded product array in your router.
Using Partial Pages
A great feature of Mustache is that it allows you to break your HTML pages up into smaller chunks. This feature is called partial pages and is very similar to the way partial pages in ASP.NET Razor works. To illustrate, let's take the part of the product page that creates the list of products and move that off into a separate file. Open the views\product.mustache file and cut to the clipboard the entire <select>...</select> element. Where that code used to be, replace it with {{> _productList}}, as shown in the following code snippet:
<!DOCTYPE html>
<html>
    <head>
        <title>Product Maintenance</title>
    </head>
    <body>
        <h1>Product List</h1>

        {{> _productList}}
    </body>
</html>
This mustache token {{> ...}} tells Mustache to locate the file named after the greater than sign. In the code above, that means to look for a file named _productList.mustache and insert the contents at that file into this location in the product.mustache file. Add a new file in the views folder named _productList.mustache and add the code shown below.
<select size = 10>
    {{#data}}
    <option id="{{productID}}">
        {{name}}
    </option>
    {{/data}}
</select>
Try It Out
Save all the changes you made to your project files. Open your browser and refresh the page, and you should see the exact same page you did before. The difference is that you used two Mustache files to accomplish the same thing. You're going to see where this comes in handy as you work your way through this article.
Create a Table of Products
Open the routes\product.js file and add more properties to each of the product objects in the array, as shown in Listing 8. This provides better data to display in the _productList partial page. Now that you have more properties for each product object, an HTML table is more appropriate for displaying that data. Open the views\_productList.mustache file and replace the entire contents of the file with the HTML shown in Listing 9.
Listing 8: Create a route to send some data to a Mustache page.
res.render('product',
    {
        "data": [
            {
                "productID": 345,
                "name": "HL Road Frame - Red, 58",
                "productNumber": "FR-R92R-58",
                "color": "Red",
                "standardCost": 1059.3100,
                "listPrice": 1500.0000,
                "modifiedDate": "2019-09-11"
            },
            {
                "productID": 346,
                "name": "Sport-100 Helmet, Red",
                "productNumber": "HL-U509-R",
                "color": "Red",
                "standardCost": 13.0800,
                "listPrice": 34.9900,
                "modifiedDate": "2004-03-11"
            },
            {
                "productID": 347,
                "name": "Sport-100 Helmet, Black",
                "productNumber": "HL-U509",
                "color": "Black",
                "standardCost": 13.0863,
                "listPrice": 34.9900,
                "modifiedDate": "2004-03-11"
            }
        ]
    }
);
Listing 9: Add an HTML file with some templating in it to render the product data.
<table>
    <thead>
        <tr>
            <th>Product ID</th>
            <th>Product Name</th>
            <th>Product Number</th>
            <th>Color</th>
            <th class="text-end">Cost</th>
            <th class="text-end">Price</th>
        </tr>
    </thead>
    <tbody>
        {{#data}}
            <tr>
                <td>{{productID}}</td>
                <td>{{name}}</td>
                <td>{{productNumber}}</td>
                <td>{{color}}</td>
                <td class="text-end">{{standardCost}}</td>
                <td class="text-end">{{listPrice}}</td>
            </tr>
        {{/data}}
    </tbody>
</table>
Let's add a little bit of styling to the table. Open the views\product.mustache file and within the <head> element, add the following styles.
<style>
    table, th, td {
        border: 1px solid;
        border-collapse: collapse;
    }
    th, td {
        padding: 1em;
        text-align: left;
    }
    tr:nth-child(even) {
        background-color: #f2f2f2;
    }
    .text-end {
        text-align: right;
    }
</style>
Try It Out
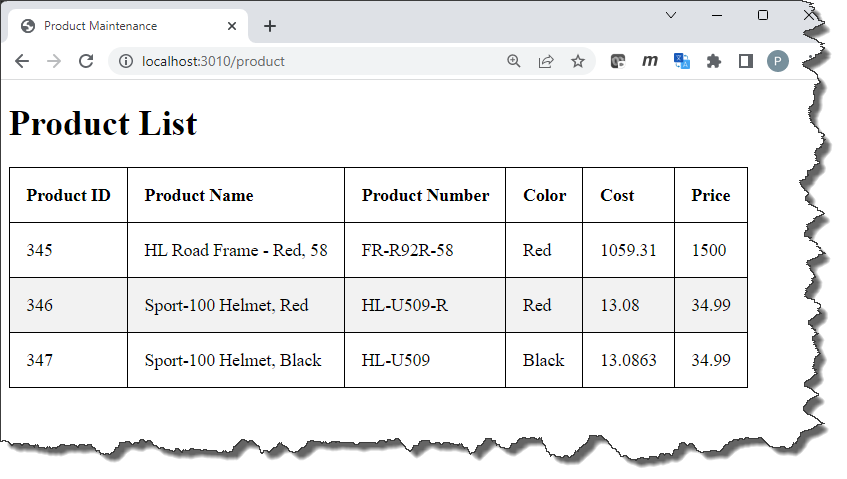
Save all the changes you have made to the files in your AdvWorks project. Go to your browser and refresh the page at http://localhost:3010/product. You should now see a page with the product data in a nicely formatted table, as shown in Figure 6.
Formatting Columns
In the HTML table, you can see that the standard cost and the list price fields are both right-justified. Because each of these values are dollar amounts, they should be formatted as currency values. Mustache is doing the rendering of the data via their tokens {{ and }}. Within these tokens, you're only allowed to use properties or functions that are attached to the object passed as the second parameter to the res.render() function. This means you need to add a couple of properties to that object to render the cost and the price as currency values. Open the routes\product.js file and add two new properties before (or after) the data property within the second parameter passed to the res.render() function, as shown in Listing 10.
Listing 10: Add two properties to retrieve numbers are currency values.
res.render('product', {
    "costAsCurrency": function () {
        return new Number(this.standardCost).toLocaleString("en-US",
            { "style": "currency", "currency": "USD" });
    },
    "priceAsCurrency": function () {
        return new Number(this.listPrice).toLocaleString("en-US",
            { "style": "currency", "currency": "USD" });
    },
    "data": [
        {
            "productID": 345,
            "name": "HL Road Frame - Red, 58",
            "productNumber": "FR-R92R-58",
            "color": "Red",
            "standardCost": 1059.3100,
            "listPrice": 1500.0000,
            "modifiedDate": "2019-09-11"
        },

        // REST OF THE OBJECTS HERE

    ]
}
Open the views\_productList.mustache file and change the last two columns that contain the {{standardCost}} and the {{listPrice}} tokens to the following code:
<td class="text-end">
      {{costAsCurrency}}
</td>
<td class="text-end">
      {{priceAsCurrency}}
</td>
As Mustache processes each row in the array of product objects, it calls the costAsCurrency function which uses the this keyword to get the standardCost property from the current row being processed. It uses the toLocaleString() method on the Number data type in JavaScript to convert the value to a U.S. currency format. It also calls the priceAsCurrency function, which uses the this keyword to get the listPrice property from the current row being processed and converts that to a U.S. currency format as well.
Another Method to Make API Calls
Instead of using the hard-coded data you put into the route, let's make a call to the Web API to retrieve the product data from SQL Server. There are many tools, such as the Google APIs used earlier, that allow you to make Web API calls within an Express application. I like using the tiny-json-http package as it has a very simple syntax. Within your AdvWorks project, open a terminal window and install this package by typing in the following command:
npm install tiny-json-http
References for tiny-json-http
There is much more to the tiny-json-http package than I'm covering in this article. Here are some references if you want to learn more about tiny-json-http:
- https://www.npmjs.com/package/tiny-json-http
- https://snyk.io/advisor/npm-package/tiny-json-http/functions/tiny-json-http.post
- https://github.com/brianleroux/tiny-json-http
Add an HTTP Call to the Product Route
Open the routes\product.js file and replace the entire contents with the code shown in Listing 11. The first line of code still sets up the router from express. Next, load the tiny-json-http module so you can use it within this module. Create a constant that has the URL for making the calls to the Web API project you created. Within the router.get() function, wrap the call to your Web API within a try...catch block. Call tiny.get() passing in a JSON object with the url property set to the url constant. The response object that's returned has a data property within the body that contains the array of product objects.
Listing 11: Call the Web API using the tiny JSON HTTP package.
// Create an instance of a Router
const router = require('express').Router();

// Load tiny-json-http module
const tiny = require('tiny-json-http');

// Create URL for Web API calls
const url = 'http://localhost:3000/api/product';

// GET /product
router.get('/', async (req, res, next) => {
    try {
        // Request data from Web API
        let response = await tiny.get({
            "url": url
        });
        // Get data from response
        let data = response.body.data;
        // Render the page
        res.render('product',
        {
            "isListVisible": true,
            "data": data,
            "costAsCurrency": function () {
                return new Number(this.standardCost).toLocaleString("en-US",
                    { "style": "currency", "currency": "USD" });
            },
            "priceAsCurrency": function () {
                return new Number(this.listPrice).toLocaleString("en-US",
                    { "style": "currency", "currency": "USD" });
            }
        }
    );
    } catch (err) {
        next(err);
    }
});

module.exports = router;
In this version of the res.render() function, the second parameter has four properties on this object: isListVisible, data, costAsCurrency, and priceAsCurrency. On the product.mustache page (Listing 12) you're going to use the {{#isListVisible}} token that says if this variable is a true value, then display whatever is contained within this token and its closing token {{/isListVisible}}. In this case, you display the HTML table in the _productList.mustache file.
Listing 12: Create a main page for display product data.
<!DOCTYPE html>
<html>
    <head>
        <meta charset="utf-8">
        <meta name="viewport" content="width=device-width, initial-scale=1">
        <title>{{title}}</title>
        <link href="https://cdn.jsdelivr.net/npm/bootstrap@5.2.3/dist/css
         /bootstrap.min.css"
              rel="stylesheet"
              integrity="sha384-rbsA2VBKQhggwzxH7pPCaAqO46MgnOM
                80zW1RWuH61DGLwZJEdK2Kadq2F9CUG65"
              crossorigin="anonymous">
    </head>

    <body>
        <div class="container">
            {{#isListVisible}}
            {{> _productList}}
            {{/isListVisible}}
        </div>

        <script src="https://cdn.jsdelivr.net/npm/bootstrap@5.2.3/dist
          /js/bootstrap.bundle.min.js"
                integrity="sha384-kenU1KFdBIe4zVF0s0G1M
                  5b4hcpxyD9F7jL+jjXkk+Q2h455rYXK/7HAuoJl+0I4"
                crossorigin="anonymous"></script>
    </body>
</html>
{{#isListVisible}}
{{> _productList}}
{{/isListVisible}}
Make a Nicer Looking Product List Page
Open the views\product.mustache file and replace the entire contents with the code shown in Listing 12. This HTML is like the code you wrote before, only you're now adding the Bootstrap 5.x CSS framework so you can take advantage of all the nice CSS classes available in this framework. Due to publishing constraints of this magazine, I had to break the values in the attributes of the <link> and <script> elements. Please make sure these are all on one line when you put them into your file.
Open the views\_productList.mustache file and at the top of the file, add the header shown in the following code snippet. Notice the use of the Bootstrap CSS classes row, col, and text-center.
<div class="row">
  <div class="col text-center">
    <h1>Product List</h1>
  </div>
</div>
Next, add the class attribute to the <table> element and add the Bootstrap classes shown in the following code. These classes make formatting your HTML table easy.
<table class="mt-2 table table-striped table-bordered">
  // REST OF THE TABLE HERE
</table>
Try It Out
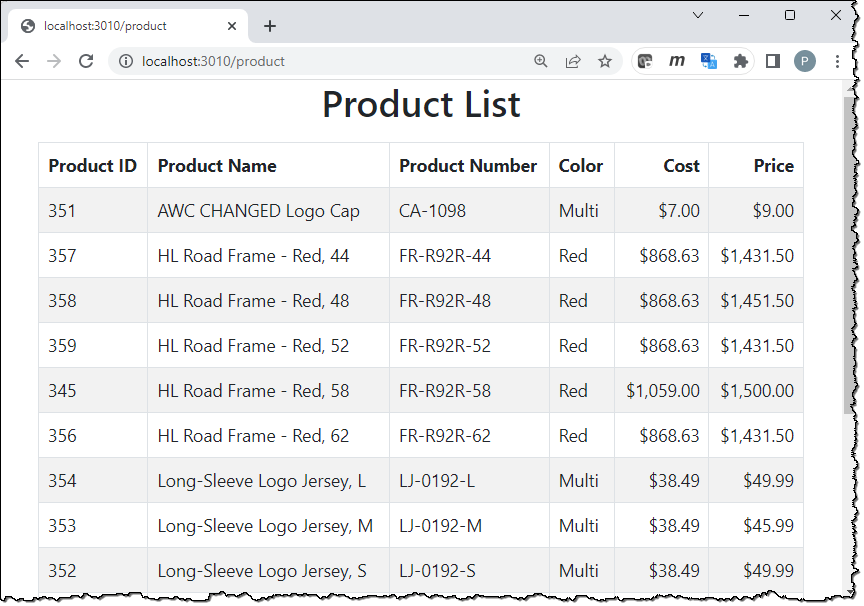
Save the changes you made to all the files in your AdvWorks project and start it up. Ensure that the AdvWorksAPI Web API project is still running. Go to your browser and navigate to http://localhost:3010/product. You should see a list of products that are coming from the Product table in your SQL Server. The look of the page should be nicer with the addition of the Bootstrap CSS framework, as shown in Figure 7.
Search for Products
In the Web API project, you created a search endpoint to allow you to search for products based on a partial name and/or if the list price is greater than a specified amount. Create a new file in the views folder named _productSearch.mustache and add the code shown in Listing 13 to this new file.
Listing 13: Add HTML to allow the user to input some search criteria.
<form class="mt-4" action="/product/search" method="get">
    <div class="card">
        <div class="card-header bg-primary text-light">
            <h5 class="card-title">
                Search for Products
            </h5>
        </div>
        <div class="card-body">
            <div class="form-group">
                <label for="searchName">
                    Product Name (or partial)
                </label>
                <input type="text"
                    id="searchName"
                    name="searchName"
                    class="form-control"
                    value="{{search.name}}" />
            </div>
            <div class="form-group">
                <label for="searchListPrice">
                    Greater Than Price
                </label>
                <input type="text"
                    id="searchListPrice"
                    name="searchListPrice"
                    class="form-control"
                    value="{{search.listPrice}}" />
            </div>
        </div>
        <div class="card-footer bg-primary text-light">
            <button class="btn btn-success">
                Search
            </button>
            <a href="/product" class="btn btn-secondary">
                Reset
            </a>
        </div>
    </div>
</form>
Open the views\product.mustache and within the {{#isListVisible}} tokens, add the token to bring in the new file you created. Make sure this file goes before the one that references the _productList file.
{{#isListVisible}}
{{> _productSearch}}
{{> _productList}}
{{/isListVisible}}
The HTML in the _productSearch file uses a Bootstrap panel to wrap up the search input fields. The form action attribute says to post the input fields within this form to a product/search route. When you click on the Search button, the data from these two input fields are posted to this new route.
Create the new search route by opening the routes\product.js file and add the code shown in Listing 14. Once again, due to the publishing constraints of this magazine some of the long lines that build the request variable should be on one line. If you are copying the code from the magazine, please make sure to fix these up. The search route function creates a search object from the values passed on the query line from the form post-back. It then determines which of the properties in the search object are filled in and builds the appropriate URL to submit to the Web API search route. Examples of what this URL could look like are http://localhost:3000/api/product/search?name=HL or http://localhost:3000/api/product/search?name=HL&listPrice=1499, or some variation thereof. This URL is then submitted to the Web API application and the data is returned to be displayed on the list page.
Listing 14: Create a function to search for product data.
// GET /search Route
router.get('/search', async (req, res, next) => {
    try {
        // Create search object with parameters from query line
        let search = {"name": req.query.searchName,
                      "listPrice": req.query.searchListPrice
        };
        if (search.name || search.listPrice) {let request = url;
            if (search.name && search.listPrice) {
                request += `/search?name=${search.name}
                &listPrice=${search.listPrice}`;
            }
        if (search.name && !search.listPrice) {
            request += `/search?name=${search.name}`;
        }
        if (!search.name && !search.listPrice) {
            request += `/search?listPrice=${search.listPrice}`;
        }

        // Request data from Web API
        let response = await tiny.get({"url": request});
        // Get data from response
        let data = response.body.data;
        // Render the page
        res.render('product',
        {
            "isListVisible": true,
            "search": search,
            "data": data,
            "costAsCurrency": function () {
                return new Number(this.standardCost).toLocaleString("en-US",
                { "style": "currency", "currency": "USD" });
            },
            "priceAsCurrency": function () {
                 return new Number(this.listPrice).toLocaleString("en-US",
                 { "style": "currency", "currency": "USD" });
            }
        });
      }
    else {
              // Redisplay the list
              res.redirect('/product');
         }
    } catch (err) {
        next(err);
    }
});
Try It Out
Save the changes made to your project files and ensure that the project is running. Navigate to the http://localhost:3010/product page and type into the Product Name (or partial) input field the value HL. Click the Search button and you should see a few rows that match this criterion displayed in your HTML table. Input the value 1439 into the Greater Than Price input field and click the Search button again. You should now see fewer rows. Finally, click the Reset button to see the whole list of products re-appear in the table.
Product Detail Page
Now that you've displayed the complete list of products from the Product table, it would be nice to be able to click on one of the products and display a detail page. You're going to use this detail page for adding and editing product data. First, let's display the product data in the appropriate input fields. Add a new file in the views folder named _productDetail.mustache and add the code shown in Listing 15. This is a typical input form with some hidden input fields for keeping track of properties that the user doesn't need to see. For example, the isListVisible property determines if the list or detail page is visible. The isAdding property determines if the user is adding a new product or updating an existing product.
Listing 15: Create a detail page to add/edit product data
<div class="mt-4 row text-center">
    <div class="col">
        <h2>Product Detail</h2>
    </div>
</div>

{{#detail}}
<form class="mt-4" action="/product" method="post">
    <input type="hidden"
           id="isAdding"
           name="isAdding"
           value="{{isAdding}}" />
    <input type="hidden"
           id="isListVisible"
           name="isListVisible"
           value="{{isListVisible}}" />
    <input type="hidden"
           id="productID"
           name="productID"
           value="{{productID}}" />

    <div class="form-group">
        <label for="name" class="form-label">
            Product ID
        </label>
        <input type="text" readonly disabled
               class="form-control"
               value="{{productID}}" />
    </div>
    <div class="form-group">
        <label for="name" class="form-label">
            Product Name
        </label>
        <input type="text"
               id="name"
               name="name"
               class="form-control"
               value="{{name}}" />
    </div>
    <div class="form-group">
         <label for="productNumber" class="form-label">
             Product Number
        </label>
        <input type="text"
               id="productNumber"
               name="productNumber"
               class="form-control"
               value="{{productNumber}}" />
    </div>
    <div class="form-group">
         <label for="color" class="form-label">
             Color
        </label>
        <input type="text"
               id="color"
               name="color"
               class="form-control"
               value="{{color}}" />
    </div>
    <div class="form-group">
        <label for="standardCost" class="form-label">
            Cost
        </label>
        <input type="number"
               id="standardCost"
               name="standardCost"
               class="form-control"
               value="{{standardCost}}" />
        </div>
    <div class="form-group">
         <label for="listPrice" class="form-label">
              Price
         </label>
         <input type="number"
                id="listPrice"
                name="listPrice"
                class="form-control"
                value="{{listPrice}}" />
    </div>

    <div class="mt-2 form-group">
        <button class="btn btn-primary">
            Save
        </button>
        <a href="/product" class="btn btn-primary">
            Cancel
        </a>
    </div>
</form>
{{/detail}}
To add the ability to navigate to the detail page, open the _productList.mustache file and just after first <tr> in the <thead> element, add the following <th>.
<th>Actions</th>
Then immediately after the first <tr> in the <tbody> element, add the following <td>. The href attribute within this anchor tag calls route product/ followed by the number of the product ID the user clicked on. For example, product/345 is called if the user clicked on a product with the product ID of 345. This route is going to return the detail page you just created filled in with the data for the product 345.
<td>
    <a href="product/{{productID}}" class="btn btn-primary">
        Edit
    </a>
</td>
Open the product.mustache file and just below the {{/isListVisible}} line, add the following code:
{{^isListVisible}}
{{> _productDetail}}
{{/isListVisible}}
The {{^isListVisible}} is the inverse of the {{#isListVisible}} token. This token says if the isListVisible property is false, display the contents between the two tokens. In this case, if the isListVisible property is false, the detail page is displayed instead of the product search and list page.
Open the routes\product.js file and after the other routes in this file, add the new route shown in Listing 16. The product is passed into this route by clicking on the anchor tag in the table. A call to the GET/id route in the Web API is made to retrieve the single product row. The res.render() function is called passing in the Product page and a second parameter with three properties. The isListVisible property is set to false so the templating engine displays the detail page instead of the list page. Because you just clicked on an existing product, the isAdding property is set to false - if you're going to save this data, you want to do an UPDATE and not an INSERT. The detail property is the single product object that's used in the tokens {{#detail}} and {{/detail}} on the detail page you created in Listing 15.
Listing 16: Create a route to retrieve a single product row.
// GET /id Route
router.get('/:id', async (req, res, next) => {
    try {
        // Build the request URL
        let request = url + `/${req.params.id}`;
        // Request data from Web API
        let response = await tiny.get({"url": request});
        // Get data from response
        let data = response.body.data;
        // Render the page
        res.render('product',
        {
            "isListVisible": false,
            "isAdding": false,
            "detail": data
        }
        );
    } catch (err) {
        next(err);
    }
});
Try It Out
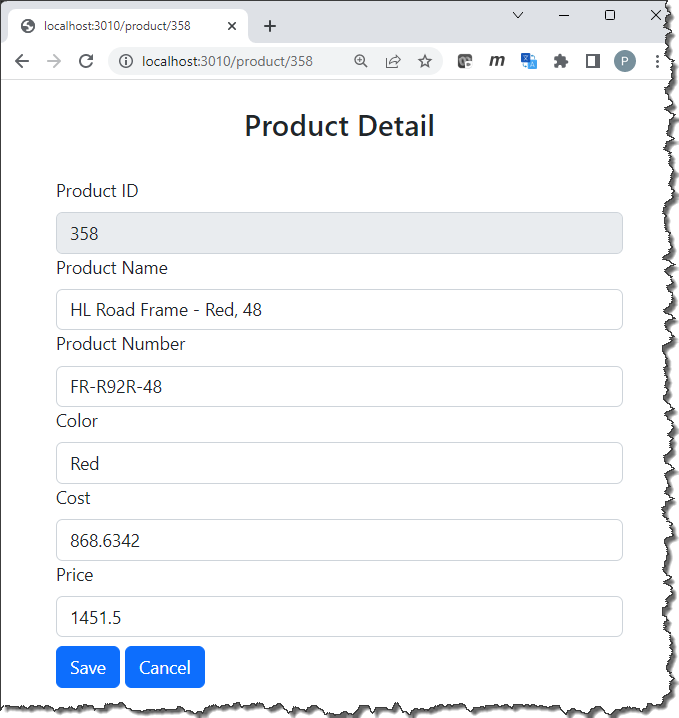
Save the changes made to your project files and ensure that the project is running. Navigate to the http://localhost:3010/product page and click on one of the Edit buttons to view the detail page (Figure 8). Click the back button on your browser and click on another Edit button to see the detail data for another product. You can click on the Save button, but nothing's going to happen yet. The Cancel button takes you back to the product list page.
Update a Product
When you click on the Save button, you want to post data from the detail form to the post() route you're going to create. To post data, you must add a module in Express to parse the data in the form body into a JSON object. Open the index.js file and after the line of code app.engine('mustache', mustacheExpress()), add the following code:
// Load body-parser module
// (required for post-backs)
const bodyParser = require('body-parser')
// Support JSON-encoded form body
app.use(bodyParser.json());
// Support URL-encoded form body
app.use(bodyParser.urlencoded({
  extended: true
}));
Add a POST Route
Open the routes\product.js file and add a new post route, as shown in Listing 17. Form data can only be posted (not put as in the Web API), so whether you're updating or inserting data, you only call the post() route. That's the reason for the isAdding property on the JSON object, so you know whether to call the post or put on the Web API. After calling either the post or put, you are going to redirect back to the product page so it can re-read the product data and display any changes in the HTML table.
Listing 17: Add an insert function to add a product to the SQL Server table.
// POST from Detail Page
router.post('/', async (req, res, next) => {
    try {
        // Declare the response object
        let response = {};
        // Get posted values from form
        let product = req.body;
        if (product.isAdding != 'false') {
            // POST a new product
            response = await tiny.post({
                "url": url,
                "data": product
            });
        }
        else {
            let request = url + `/${product.productID}`;
            // PUT an updated product
            response = await tiny.put({
                "url": request,
                "data": product
            });
         }
         // TODO: Handle a 404 or a 400

         // Redisplay the list
         res.redirect('/product');
    } catch (err) {
        next(err);
    }
});
Try It Out
Save the changes made to your project files and ensure that the project is running. Navigate to the http://localhost:3010/product page and click on one of the Edit buttons to view the detail page. Make some changes to one or two of the input fields and click the Save button. You should see the changes you made appear in the product table.
Insert a Product
You're going to need an Add button somewhere on the page to allow the user to insert a new product. Open the views\_productSearch.mustache file and add the following HTML just before the Search button:
<a href="product/add" class="btn btn-secondary">
    Add
</a>
In the href attribute of this anchor tag, you call a route named product/add. Open the routes\product.js file and add a new method BEFORE the router.get("/:id"...) route, as shown in Listing 18. In this route, render the product page passing in an object that sets the isAdding property to true and sets the detail property to all the input fields on the page that should be initialized to a valid value.
Listing 18: Add a function to display a blank detail form.
// GET /add Route
router.get('/add', async (req, res, next) => {
    try {
            res.render('product',
            {
                "isListVisible": false,
                "isAdding": true,
                "detail": {
                    "name": "",
                    "productNumber": "",
                    "color": "Red",
                    "standardCost": 1,
                    "listPrice": 2
                }
            }
            );
    } catch (err) {
        next(err);
    }
});
Try It Out
Save the changes made to your project files and ensure that the project is running. Navigate to the http://localhost:3010/product page and click on the Add button. Enter some valid data for each input field and click the Save button. You should see the product you created appear in the HTML product table.
Delete a Product
The last piece of functionality to create is to allow the user to delete a product. I like putting a Delete button at the end of the row of each column. Open the views\_productList.mustache file and just before the closing </tr> within the <thead> element, add a new <th>:
<th>Delete</th>
Just before the closing </tr> within the </tbody> element add a new <td> element with an anchor tag in it. This anchor tag is going to call the product/delete route with the product ID for the current row at the end of the route. Before it calls this delete method, it's a good idea to confirm with the user that they really want to delete this row.
<td>
    <a href="product/delete/{{productID}}"
        onclick = "return confirm('Delete this Product?');"
        class="btn btn-danger">
          Delete
    </a>
</td>
Add the new delete route (Listing 19) by opening the routes\product.js file and adding the new route BEFORE the router.get("/:id"...) route. This route extracts the ID passed in from the req.params.id property and uses that ID to build the call to the Web API delete route. After the delete has occurred, the product list page is once again displayed, minus the row just deleted.
Listing 19: Add a route to delete a product row from the table.
// GET /delete/id Route
router.get('/delete/:id', async (req, res, next) => {
    try {
        // Build the request URL
        let request = url + `/${req.params.id}`;
        // Request data from Web API
        response = await tiny.delete({"url": request});
        // TODO: Handle 404

        // Redisplay the list
        res.redirect('/product');
    } catch (err) {
        next(err);
    }
});
Try It Out
Save the changes made to your project files and ensure that the project is running. Navigate to the http://localhost:3010/product page and click on the Delete button next to one of the products. Respond that you wish to delete this row and you should see the product list re-displayed minus the product you just deleted.
Summary
In this series of articles, you built two web projects using Node.js and Express. The first web project is a set of API calls used to perform CRUD logic on a SQL Server table. You added middleware to handle exceptions and learned to read data from a configuration file. The second web project is a website used to serve up web pages for a user to interact with the product data. Using several different tools, you learned to call Web APIs from each page and create dynamic web pages using templating.
