


For real-time web applications, Server-Sent Events (SSE) provide an alternative to WebSockets and long polling, allowing server-side updates to be sent to clients without the need for clients to seek updates repeatedly. In this article, I'll discuss how to build real-time web applications with SSE in ASP.NET Core, including the core concepts of SSE, the features, benefits, and downsides of SSE, and how to implement real-time updates, etc.
If you're to work with the code examples discussed in this article, you'll need the following installed in your system:
- Visual Studio 2022
- .NET 7.0
- ASP.NET 7.0 Runtime
If you don't already have Visual Studio 2022 installed, you can download it from here: https://visualstudio.microsoft.com/downloads/.
Introducing Server-Sent Events (SSE)
Server-Sent Events (SSE or Event Source) is a W3C standard for real-time communication between servers and clients over HTTP. With SSE, the server may provide the client with real-time event-driven changes through an HTTP connection. SSE is a standardized push technology conceptualized first in 2004 and included as part of the HTML5 specification. It enables you to transmit notifications, messages, and events from a server to a client over HTTP.
A protocol for streaming events, SSE is supported by the majority of contemporary web browsers. These include Edge, Firefox, Chrome, and Safari. SSE eliminates the need to manually query the server or establish several connections to provide changes to the client by enabling unidirectional, real-time communication between the server and the client. Figure 1 demonstrates an overview of SSE works.
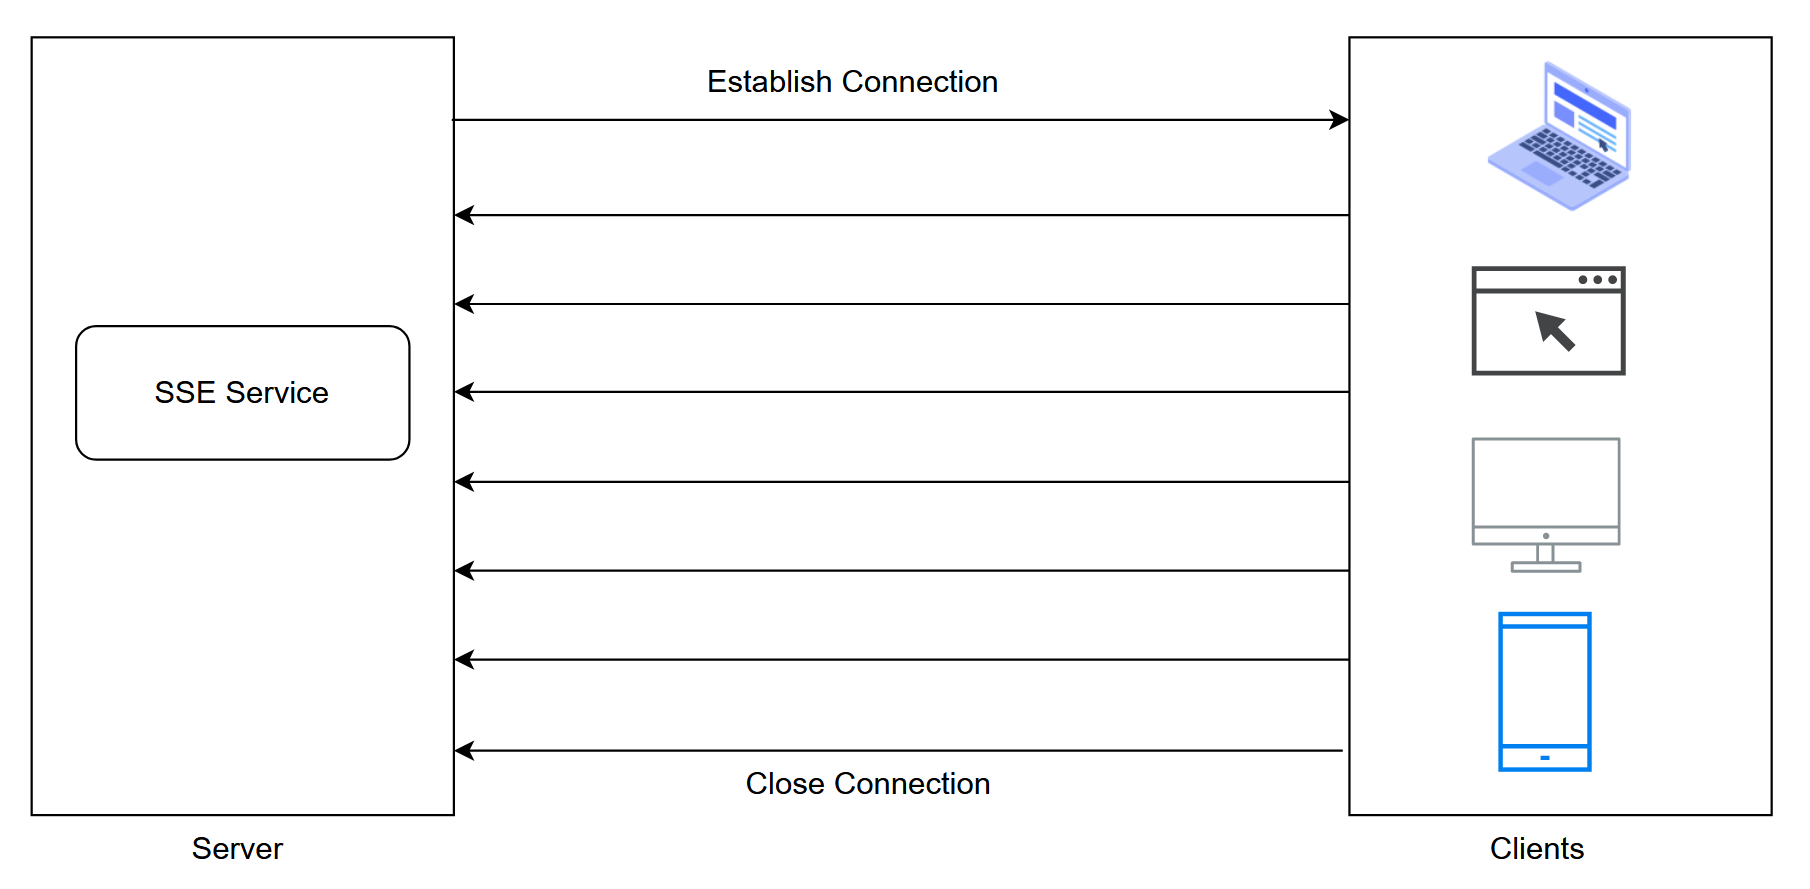
The Server-Sent DOM Events are the SSE foundation. By subscribing to events produced by a server using the EventSource interface, browsers may get alerts any time new events occur. When an EventSource attempts to get data, it accepts an HTTP event stream connection from a specific URL and keep the connection open. A server-sent event is one that is always pushed from the server to a web browser rather than retrieved or requested.
Message Format
The message format in SSE is defined by W3C. It should be noted that the SSE data sent by a server to a client should be in UTF-8 encoded format and have the following header:
Content-Type: text/event-stream
Cache-Control: no-cache
Connection: keep-alive
The data sent from the server to the client consists of several messages, each separated by \n\n characters. A field contains the following values:
- Data: Indicates the payload to be sent from the server to the client
- Retry: Optional and indicates the time the client will wait before it attempts for a reconnection in the event of a connection drop
- Event: Represents the event type defined by the application
- ID: Optional and represents the ID of the data transmitted from the server to the client
An event consists of a set of colon-separated key/value pairs, with each pair terminated by a new line. The event itself is separated by two new line characters.
The following is a template for a message comprising a single event:
id: <messageId>\n       (optional)
event: <eventType>\n    (optional)
data: <event data - plain text>\n  (mandatory)
\n
\n
The response is a series of events separated by a \n1 character, as shown here:
event: [event type]\n
data: [message]\n\n
The following is an example of an SSE response:
HTTP/1.1 200 OK
Content-Type: text/event-stream
event: event-1
data: This is a sample text.
event: event-2
data: {"code": "p001", "quantity": 456}
Why Server-Sent Events?
Here are some of the key benefits of SSE in web application development:
- Updates in real-time: SSE permits real-time communication between the server and client. Instead of the client continually querying the server for new information, it enables the server to send changes to the client as soon as they happen. For applications like live feeds, chat rooms, market tickers, and alerts where quick updates are critical, this real-time feature is essential.
- Simplicity: For server-to-client communication, SSE offers a straightforward and lightweight protocol. SSE offers a lower overhead than other real-time technologies, such as WebSockets, and doesn't need complicated handshakes or bidirectional communication. SSE messages are text-based, simple to read, and easy to use.
- Reduced load on the server: SSE allows the server to transmit updates to clients only when required, reducing the workload on the server. This lessens the need for clients to submit the server queries frequently, which lowers server load and enhances scalability. SSE is very effective for applications that have a lot of customers and need server resource optimization.
- Support for cross-origin communication: SSE enables cross-origin communication, enabling the client to get updates from several domains or origins. The ability to stream data from a server that is housed on a different domain or subdomain is handy in such situations. Cross-origin resource sharing (CORS) guidelines are followed by SSE to enable safe connection between several sources.
- Automatic reconnection: SSE connections are durable and can reestablish themselves if they are lost as a result of network problems or server restarts. In order to maintain an uninterrupted stream of updates without user intervention, the client will make an effort to reconnect the connection. A strong and dependable communication route is offered by the automatic reconnection capability.
- Browser compatibility: SSE is supported by the majority of current web browsers, including Chrome, Firefox, Safari, and Edge. It performs effectively in settings like limited networks or outdated browser versions where WebSockets may not be accessible or permitted. When WebSockets are not practical for real-time communication, SSE may be used as an alternative.
- Seamless integration: SSE is simple to incorporate into current web applications without requiring significant infrastructure modifications. It makes use of the already-existing HTTP infrastructure and doesn't call for any new network settings or unique server configurations. A number of server-side technologies, such as ASP.NET Core, Node.js, Django, and others, support SSE.
For real-time changes in web applications, Server-Sent Events provide a simple and effective option. Without the complexity of conventional real-time protocols, they let developers create responsive and engaging experiences, increase server effectiveness, and increase user engagement.
Key Features of SSE
Some of the best features include:
- Unidirectional communication: SSE offers a server-to-client unidirectional communication channel. In this type of communication, the server can transmit data to a connected client, but the client cannot send data back to a server.
- Text-based protocol: Because SSE is a text-based protocol, messages are sent via HTTP in plain text, which makes it simpler to debug and comprehend. Fields like “event,” “data,” and “id,” which are sent as a string of text lines in the form of event fields, make up an SSE message.
- Real-time updates: SSE enables servers to transmit updates depending on server events, allowing servers to provide event-driven updates to clients in real-time. A particular event name, data related to the event, and, optionally, an identity that may be given to the event are typically included in all updates. The client can listen for specific events or receive all events sent by the server.
- Connection persistence: SSE creates a durable HTTP connection between the client and server that endures for the same amount of time as the client. SSE maintains the connection open to permit continuous data streaming in the future, contrary to conventional HTTP requests, which are transient and are closed when a response has been received.
- Resilient: Because SSE connections are robust, if the connection is lost, SSE will automatically re-establish the connection. As soon as they become disconnected, clients will make an effort to rejoin to the server, ensuring that updates continue to flow consistently and seamlessly.
- Cross-origin support: Support for cross-origin communication: SSE allows for the client to receive updates from a domain or origin other than the website to which it is linked. You can configure cross-origin resource sharing (CORS) rules on the server to control access and security.
How Do Server-Sent Events Work?
Server-Sent Events (SSE) establish a long-lived connection between a server and its connected client. Once this connection is established, the server communicates event-driven changes to the client over a single HTTP connection. Thanks to the SSE connection management layer and parsing algorithms, a server can submit new events one by one while HTTP responses can remain open. Here are the series of steps that outline how SSE works:
- Server-Sent Events (SSE) establishes a persistent connection between a server and its client.
- Once this connection is established, the server communicates event-driven changes to the client over a single HTTP connection. As soon as the SSE connection is established, the server can start sending SSE events to the client.
- Once the server receives an SSE request, it processes the request. Once processing is over, the server responds with the appropriate SSE headers.
- Next, the server sets the response headers to indicate that SSE events will follow.
- When the client receives the SSE event, it extracts the event fields and takes appropriate action based on the data received.
Polling vs. Long Polling vs. WebSocket vs. Server-Sent Events
There are several techniques for real-time communication between clients and servers. Each of these techniques has its own characteristics and use cases. Polling and long polling are simple to use but they aren't as efficient as WebSocket and Server-Side Events. Here's how these techniques compare and contrast against each other.
Polling
- Polling involves a client sending requests to the server at regular intervals to check if there are any updates.
- On receiving the request, the server responds with new data if one is available or an empty response if no data has been updated.
- You can leverage simple AJAX requests and page reloads to implement polling in your applications.
- Clients repeatedly request updates even when there are none, resulting in unnecessary network traffic and increased server load.
- This approach is suitable for scenarios where updates are infrequent or a real-time response is not a priority.
Long Polling
- Long polling reduces unnecessary requests to the server and enables near real-time updates compared to regular polling.
- Servers hold requests open until an update is available rather than responding immediately to a client request.
- The server responds when an update is available. Then, the client sends a new request to keep the connection alive.
- When no updates are available within a particular timeframe, the server responds with an empty response. The client sends a new request and continues listening.
- Although long polling reduces the frequency of requests and enables a real-time response, it still involves frequent connections and overhead due to request/response cycles.
WebSocket
- WebSocket enables communication between servers and consumers over a single, persistent, reliable, and full-duplex connection.
- WebSocket is ideally suited for applications requiring continuous data transfers, such as chat applications and collaboration tools.
- Due to server-side infrastructure requirements, WebSocket isn't supported in all legacy or restricted environments such as older browsers and certain network configurations.
Server-Sent Events
- SSE provides a lightweight, unidirectional approach to server-client communication over HTTP.
- Contrary to WebSockets, communication between server and client in server-sent events runs in only one direction, from server to client.
- SSE enables real-time updates without the complexity of WebSockets.
- SSE is well suited for scenarios where communication is unidirectional, i.e., the server needs to forward updates to clients, such as news feeds, notifications, or real-time monitoring dashboards.
Use Cases
WebSockets provide bidirectional communication between a server and a client, which makes them suitable for real-time polling apps, chat apps, etc. Server-Sent Events support a unidirectional communication between client and server. This means that the messages are transmitted in single direction only, i.e., from server to client. They are often used for push notifications, news feeds, and other similar purposes.
Implementing SSE
The server must inform the client that the content type of the response should be text/event-stream. Upon establishing a connection between the server and client, the server keeps it active until HTTP requests are received. Unless a timeout occurs or there are no further events to process, the connection remains open. If a timeout occurs, the client can reconnect to the server using the built-in reconnection mechanism. Figure 2 illustrates a typical implementation of a SSE server and client.
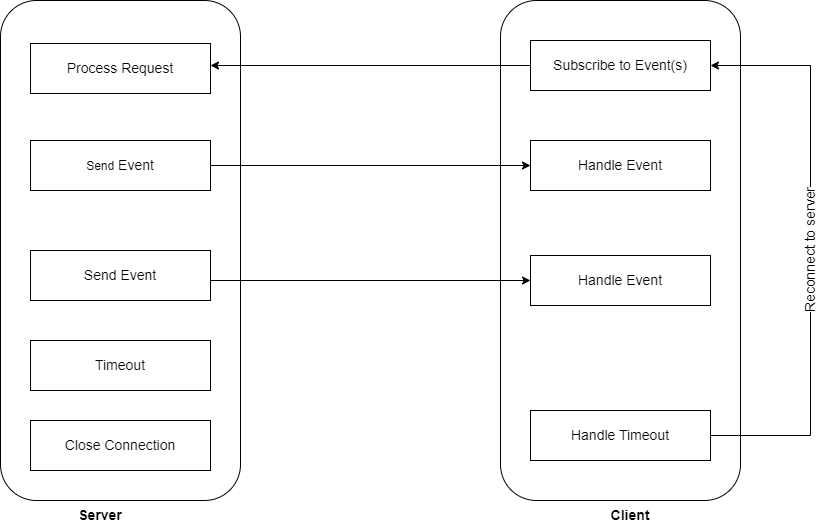
The first step is connecting to an EventSource, which is accomplished by initializing an EventSource instance with the URL of the stream to connect to. Under the hood, EventSource connects to the server by sending an HTTP request. The server responds to the request with a stream of event data having text/event-stream as the content type. Until the server determines there's no more data to send, or until the client actively closes the connection using EventSource.close, the connection between the server and client persists. A keep-alive message can be sent every minute or so to avoid a timeout.
Building a Simple Application Using SSE in ASP.NET 7 Core
It's time for writing some code. Let's now examine how to build a simple ASP.NET Core 7 Web API application using GraphQL.
Create a New ASP.NET Core 7 Project in Visual Studio 2022
You can create a project in Visual Studio 2022 in several ways. When you launch Visual Studio 2022, you'll see the Start window. You can choose “Continue without code” to launch the main screen of the Visual Studio 2022 IDE.
To create a new ASP.NET Core 7 Project in Visual Studio 2022:
- Start the Visual Studio 2022 IDE.
- In the “Create a new project” window, select “ASP.NET Core Web-App (Model-View-Controller)” and click Next to move on.
- Specify the project name as SSE_Demo and the path where it should be created in the “Configure your new project” window.
- If you want the solution file and project to be created in the same directory, you can optionally check the “Place solution and project in the same directory” checkbox. Click Next to move on.
- In the next screen, specify the target framework and authentication type as well. Ensure that the “Configure for HTTPS,” and “Enable Docker Support” checkboxes are unchecked because you won't use any of these in this example.
- Leave the “Do not use top-level statements” checkbox unchecked.
- Click Create to complete the process.
Creating the Controller
Listing 1 contains the complete source code of the HomeController.cs file.
Listing 1: The HomeController Class
using Microsoft.AspNetCore.Mvc;
using System.Collections.Concurrent;
using System.Text;
using System.Text.Json;

namespace SSE_Demo.Controllers
{
    public class HomeController : Controller
    {
        private readonly BlockingCollection<string>
          _producerConsumerCollection = new BlockingCollection<string>();
        public HomeController()
        {
            for (int i = 0; i < 10; i++)
            {
                _producerConsumerCollection.Add(string.Format(
                  "The product code is: {0}\n", Guid.NewGuid().ToString()));
            }
       }
        public ActionResult Index()
        {
            return View();
        }
        public ActionResult About()
        {
            return View();
        }
        public ActionResult GetMessage()
        {
            var result = string.Empty;
            var stringBuilder = new StringBuilder();

            if (_producerConsumerCollection.TryTake(out result,
              TimeSpan.FromMilliseconds(1000)))
            {
                var serializedData = JsonSerializer.Serialize(
                  new { message = result });
                stringBuilder.AppendFormat("data: {0}\n\n", serializedData);
            }

            return Content(stringBuilder.ToString(), "text/event-stream");
        }
    }
}
In the code example given in Listing 1, the HomeController class uses a BlockingCollection to store items. A BlockingCollection is a thread-safe collection that follows the producer-consumer pattern and enables items to be added or removed from the collection concurrently. In a typical Producer Consumer pattern, the producer is responsible for generating messages and storing them in a shared location. You can then have multiple consumers reading from the messages the shared location. The key advantage of this pattern is that the producer and the consumer are decoupled and disconnected from one another, in other words, they don't have any knowledge of the other.
Creating the View
Replace the source code of the Index.cshtml file with the source code given in Listing 2.
Listing 2: The Index.cshtml file
@{
    ViewBag.Title = "Home Page";
}
<script>
    function display() {
        var source = new EventSource('/home/getmessage');
        var ul = document.getElementById("sse");
        source.onmessage = function (e) {
            var li = document.createElement("li");
            var retrievedData = JSON.parse(e.data)
            li.textContent = retrievedData.message;
            ul.appendChild(li);
        }
    }
    window.addEventListener("DOMContentLoaded", display, false);
</script>
<ul id="sse">
</ul>
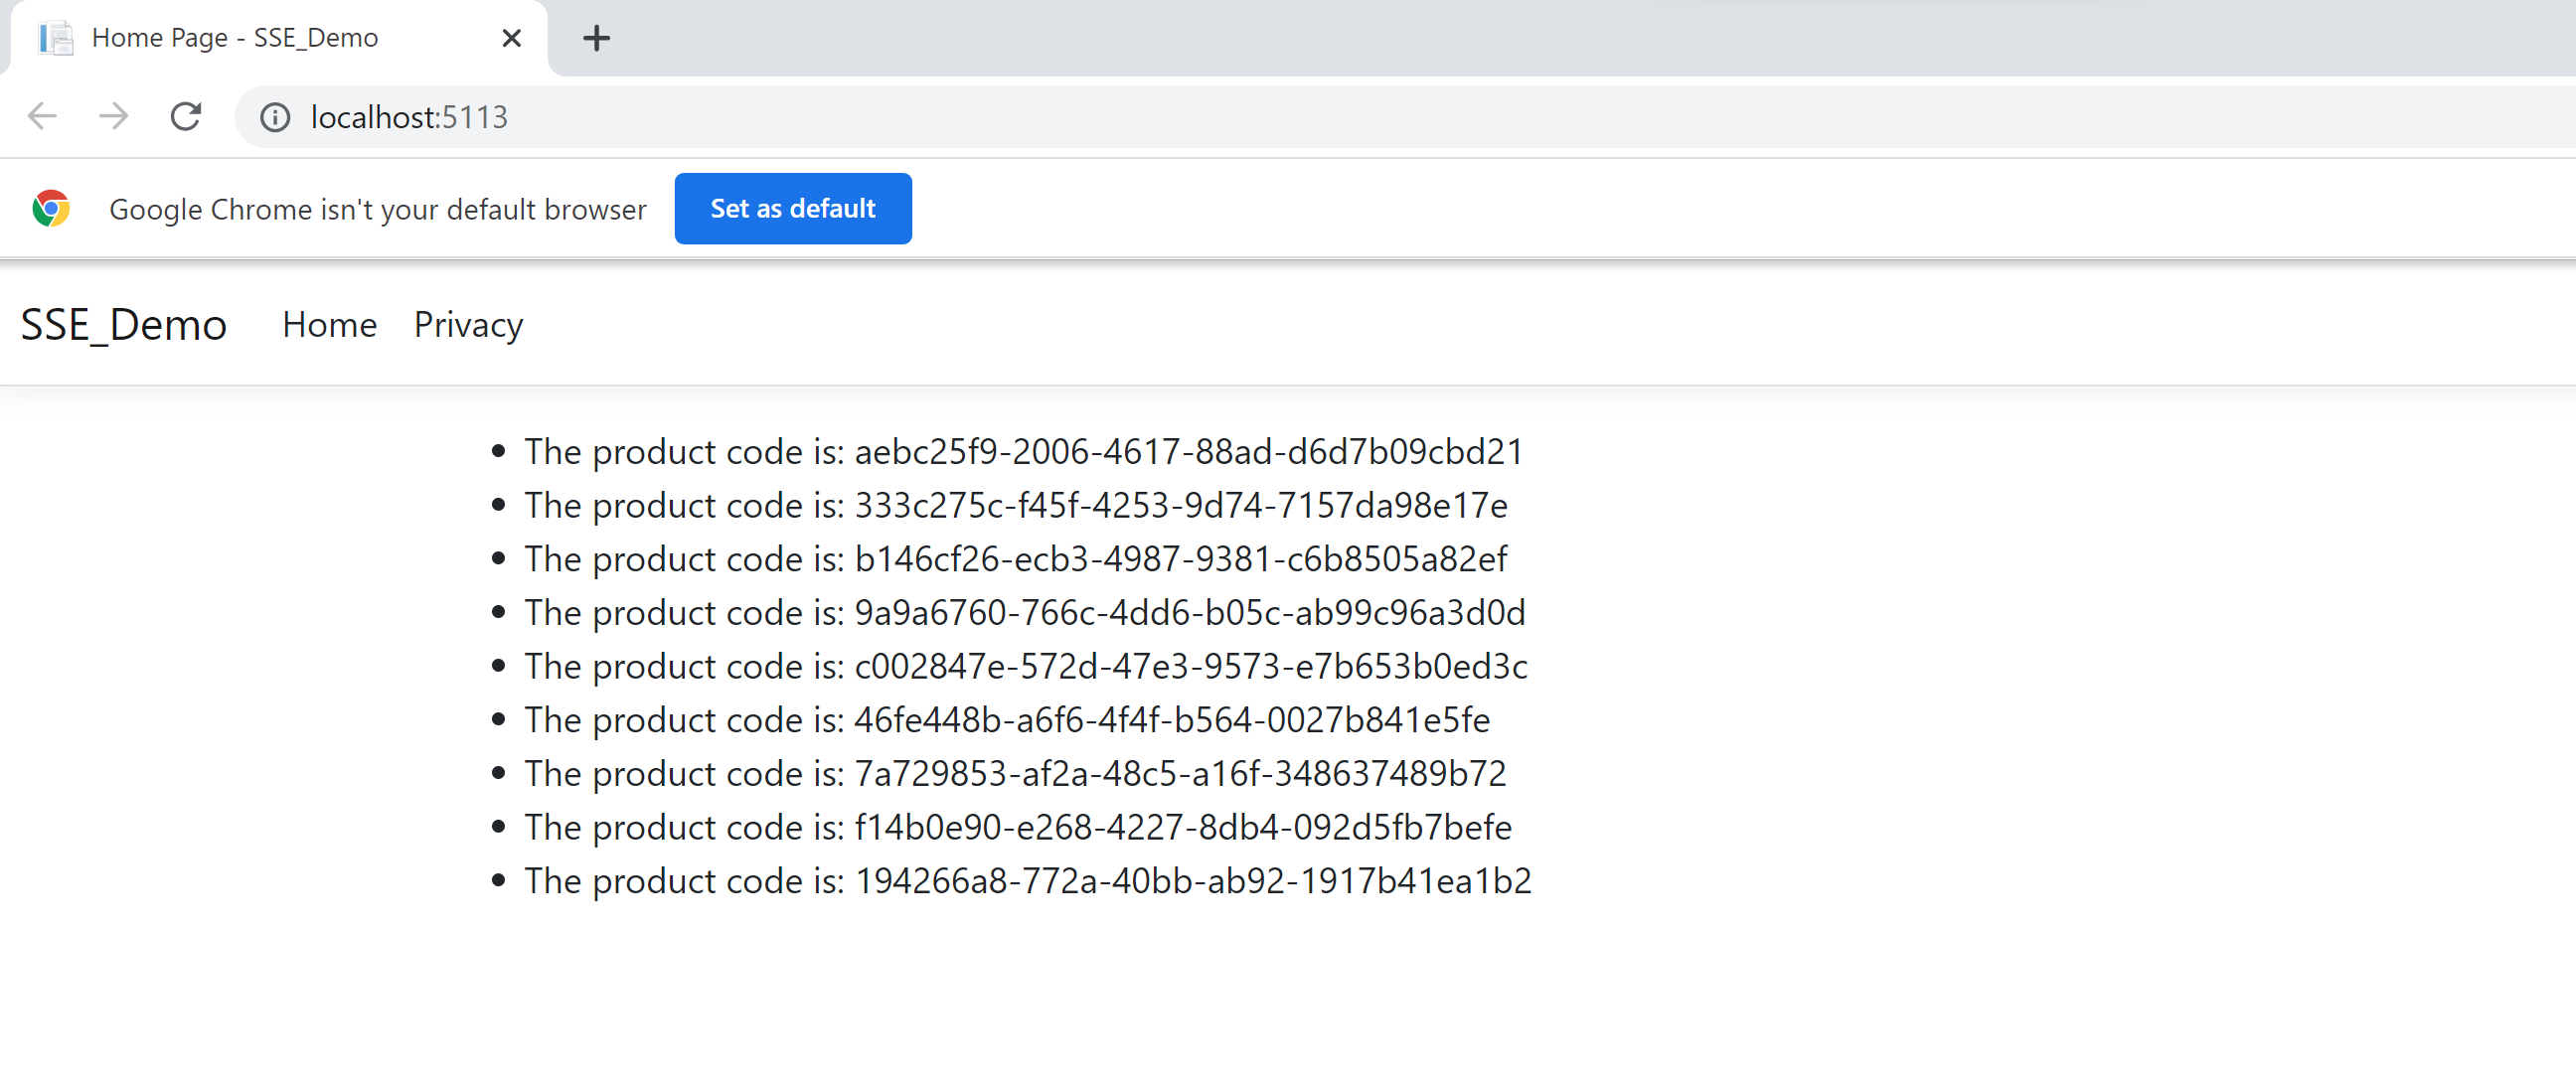
The EventSource instance establishes a persistent connection to an HTTP server in order to receive these events sent by the server in a text/event-stream format. The connection between the client and the server will stay open until closed by calling the EventSource.close() method. When you execute the application, the product codes generated by your controller will be displayed in the user interface. Figure 3 shows the product codes as displayed in the web browser:
Building a Real-Life Application Using SSE in ASP.NET Core 7
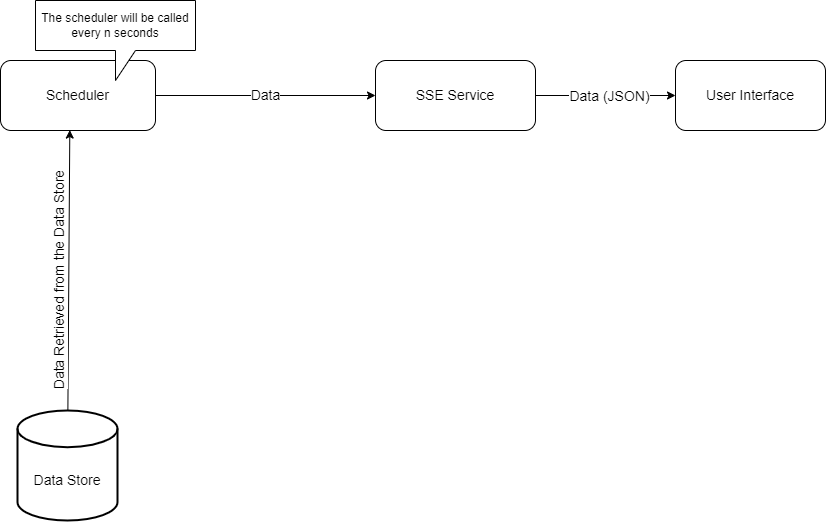
In this section, we'll examine how to build an application that sends out notifications to the connected clients at regular intervals of time. A scheduler runs in the background and pulls records from the database at pre-defined intervals of time. This data is then pushed to the connected clients using SSE. Figure 4 captures the complete flow:
Now that we know the flow of the application, let's examine the components of the application.
Application Components
In this application, there are three projects involved:
- SSE_Server
- SSE_Client
- SSE_Scheduler
Figure 5 shows the components of the application together with the classes and interfaces used to build the components.
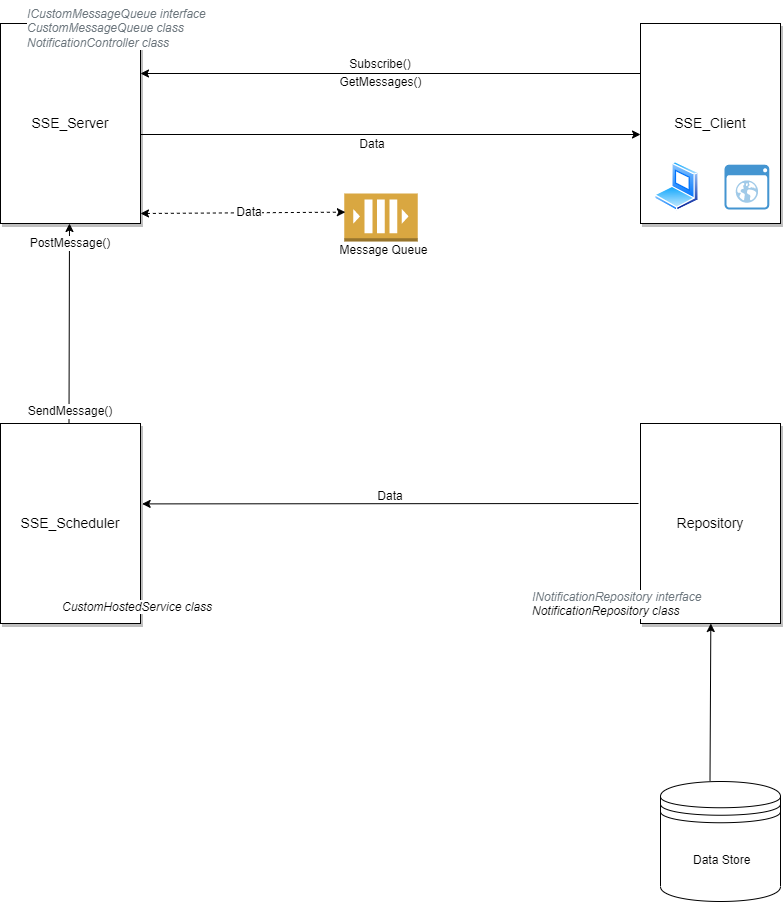
As evident from their names, SSE_Server is the server project that sends out messages when requested for all connected clients. SSE_Client is the client project that connects to the server to retrieve messages. SSE_Scheduler is used to send data to the server at regular intervals of time.
After a client has established a connection with the server, it calls the Subscribe method of the server to subscribe to notifications. Once this process is successful, the client can invoke either the GetMessage(id) to retrieve a message pertaining to a particular client or the GetMessages() method to retrieve all messages from the server.
In the sections that follow, you'll create the classes and interfaces for each of these projects mentioned earlier. I'll mention the class and interface names together with the name of the project they belong to.
Create the Notification Class (SSE_Scheduler)
Create a new class named Notification in a file having the same name with a .cs extension and write the following code in there:
  public class Notification
    {
        public string Id { get; set; }
        public string Message { get; set; }
        public DateTime MessageTime { get; set; } = DateTime.Now;
    }
Create the INotificationRepository Interface (SSE_Scheduler)
Create a new .cs file named INotificationRepository in your project and replace the default generated code with the following code snippet:
public interface INotificationRepository
{
   public Task<List<Notification>> GetNotifications();
   public Task<Notification> GetNotification(string Id);
   public Task AddNotification(Notification notification);
}
Create the NotificationRepository Class (SSE_Scheduler)
The NotificationRepository class implements the methods of the INotificationRepository interface. Create a new class named NotificationRepository in a file having the same name with a .cs extension. Now write the source code given in Listing 3 in there.
Listing 3: The NotificationRepository Class
    public class NotificationRepository : INotificationRepository
    {
        private List<Notification> _notifications = new List<Notification>();

        public NotificationRepository()
        {
            _notifications.Add(new Notification
            {
                Id = "1",
                Message = "This is the first message",
                MessageTime = DateTime.Now
            });

            _notifications.Add(new Notification
            {
                Id = "2",
                Message = "This is the second message",
                MessageTime = DateTime.Now
            });
        }

        public async Task<List<Notification>> GetNotifications()
        {
            return await Task.FromResult(_notifications);
        }

        public async Task<Notification> GetNotification(string Id)
        {
            return await Task.FromResult(_notifications
              .FirstOrDefault(x => x.Id == Id));
        }

        public async Task AddNotification
        (Notification notification)
        {
            _notifications.Add(notification);
        }
    }
Register the NotificationRepository Instance (SSE_Scheduler)
The following code snippet illustrates how an instance of type INotificationRepository is added as a singleton service to the IServiceCollection.
builder.Services.AddSingleton<INotificationRepository,
  NotificationRepository>();
You'll now create a hosted service in the scheduler project that reads messages from the repository and pushes them to the server after every n seconds. In this example, the value of n is hard-coded as 60. You can change it per your requirements.
Create the Hosted Service (SSE_Scheduler)
To create a custom hosted service, create a class that implements the IHostedService interface. It should contain definitions for the StartAsync and StopAsync methods. Listing 4 shows the complete source code of the CustomHostedService class.
Listing 4: The CustomHostedService Class
public sealed class CustomHostedService :
IHostedService, IAsyncDisposable
{
    private readonly
    INotificationRepository _notificationRepository;
    private Timer? _timer;
    public CustomHostedService(INotificationRepository notificationRepository)
        => _notificationRepository = notificationRepository;

    public async Task StartAsync(CancellationToken cancellationToken)
    {
        _timer = new Timer(SendMessage, null,
          TimeSpan.Zero, TimeSpan.FromSeconds(60));
    }
    private void SendMessage(object? state)
    {
        using var client = new HttpClient();
        new Uri("http://localhost:5101/" + "api/notification");
        var notifications = notificationRepository.
          GetNotifications().Result;

        foreach (var notification in notifications)
        {
            if (!notification.IsProcessed)
            {
                HttpContent body = new StringContent(JsonSerializer.
                  Serialize(notification), Encoding.UTF8, "application/json");
                var response = client.PostAsync("/api/notification/" +
                  "postmessage", body).Result;
            }
        }
    }
    public async Task StopAsync(CancellationToken cancellationToken)
    {
        await Task.Delay(TimeSpan.FromSeconds(60), cancellationToken);
    }
    public async ValueTask DisposeAsync()
    {
        _timer.Dispose();
    }
}
Register the CustomHostedService Instance
The following code snippet illustrates how the hosted service is registered.
builder.Services.AddHostedService<CustomHostedService>();
The Program.cs file (SSE_Scheduler)
Because you're using ASP.NET Core 7 in this example, all code necessary to add services to the container and configure the request processing pipeline should reside in the Program.cs file. Listing 5 shows the complete source code of the Program.cs file of the SSE_Scheduler project for your reference.
Listing 5: The Program.cs file of SSE_Scheduler Project
var builder = WebApplication.CreateBuilder(args);

// Add services to the container.

builder.Services.AddControllers();

builder.Services.AddSingleton<INotificationRepository, NotificationRepository>();
builder.Services.AddHostedService<CustomHostedService>();
var app = builder.Build();

// Configure the HTTP request pipeline.

app.UseAuthorization();

app.MapControllers();

app.Run();
Create the Message Queue (SSE_Server)
The following code snippet shows the ICustomMessageQueue interface:
public interface ICustomMessageQueue
{
    void Register(string id);
    void Deregister(string id);
    ICollection<string> Keys { get; }
    IAsyncEnumerable<string>
      DequeueAsync(string id, CancellationToken cancelToken = default);
    IAsyncEnumerable<string>
      DequeueAsync(CancellationToken cancelToken = default);
    Task EnqueueAsync(Notification notification, CancellationToken cancelToken);
}
The CustomMessageQueue class implements the methods of the ICustomMessageQueue interface. The code listing given in Listing 6 shows the CustomMessageQueue class.
Listing 6: The CustomMessageQueue Class
public class CustomMessageQueue : ICustomMessageQueue
{
    private ConcurrentDictionary<string, Channel<string>>_concurrentDictionary;

    public CustomMessageQueue()
    {
        _concurrentDictionary = new ConcurrentDictionary<string,
          Channel<string>>();
    }

    public void Register(string id)
    {
        bool success = _concurrentDictionary.TryAdd
          (id, Channel.CreateUnbounded<string>());

        if (!success)
        {
            throw new ArgumentException($"The client Id {id} is
              already registered");
        }
    }

    public ICollection<string> Keys
    {
        get { return _concurrentDictionary.Keys; }
    }
    public void Deregister(string id)
    {
        _concurrentDictionary.TryRemove(id, out _);
    }

    public async Task EnqueueAsync (Notification notification,
      CancellationToken cancelToken)
    {
        bool success = _concurrentDictionary.TryGetValue(notification.Id,
            out Channel<string> channel
        );

        if (!success)
        {
            throw new ArgumentException($"Error encountered " +
              $"when adding a new message to the queue.");

        }
        else
        {
            await channel.Writer.WriteAsync(notification.Message,
              cancelToken);
        }
    }

    public IAsyncEnumerable<string> DequeueAsync(string id,
      CancellationToken cancelToken = default)
    {
        bool success = _concurrentDictionary.TryGetValue(id,
          out Channel<string> channel);

        if (success)
        {
            return channel.Reader.ReadAllAsync(cancelToken);
        }
        else
        {
            throw new ArgumentException($"The client Id {id} isn't
              registered");
        }
    }

    public async IAsyncEnumerable<string> DequeueAsync(CancellationToken
      cancelToken = default)
    {
        IAsyncEnumerable<string> result;

        foreach (var keyValuePair in _concurrentDictionary)
        {
            await foreach (string str in DequeueAsync(keyValuePair.Key,
              cancelToken))
            {
                yield return str;
            }
        }
    }
}
Install NuGet Package(s)
So far so good. The next step is to install the necessary NuGet Package(s). To install the required packages into your project, right-click on the solution and the select Manage NuGet Packages for Solution…. Now search for the package named Lib.AspNetCore.ServerSentEvents in the search box and install it. Alternatively, you can type the command shown below at the NuGet Package Manager Command Prompt:
PM> Install-Package Lib.AspNetCore.ServerSentEvents
Alternatively, you can install these packages by executing the following commands at the Windows Shell:
dotnet add package Lib.AspNetCore.ServerSentEvents
Create the NotificationController Class (SSE_Server)
The NotificationController provides action methods that clients can invoke. A client can subscribe to the server to receive messages. The following code snippet shows the Subscribe method that accepts a client ID as a parameter. It then creates an instance of the Notification class and populates it with the client ID and a text message. This message is sent to the client to inform that it has been successfully subscribed to the server. The EnqueueAsync method is used to register the client.
Listing 7 shows the source code of the Subscribe action method.
Listing 7: The Subscribe Method
public async Task<IActionResult> Subscribe(string id)
{
   Response.StatusCode = 200;
   Response.Headers.Add("Cache-Control", "no-cache");
   Response.Headers.Add("Connection", "keep-alive");
   Response.Headers.Add("Content-Type", "text/event-stream");

            try
            {
                Notification notification = new Notification();
                notification.Id = id;
                notification.Message = $"Subscribed to" + $" client {id}";
                _messageQueue.Register(id);
                StreamWriter streamWriter = new StreamWriter(Response.Body);
                await _messageQueue.EnqueueAsync(notification,
                  HttpContext.RequestAborted);

                 await foreach (var message in _messageQueue.DequeueAsync
                   (id, HttpContext.RequestAborted))
                 {
                     await streamWriter.WriteLineAsync ($"Message received: " +
                         $"{message} at {DateTime.Now}");
                     await streamWriter.FlushAsync();
                }
            }
            catch (Exception ex)
            {
                return BadRequest(ex.Message);
            }
            finally
            {
                _messageQueue.Deregister(id);
            }

            return Ok();
}
The Scheduler posts messages to the server at pre-defined intervals of time by calling the PostMessage action method. Listing 8 contains the source code of the PostMessage action method.
Listing 8: The PostMessage Action Method
public async Task<IActionResult> PostMessage
  ([FromBody] Notification notification)
{
    try
    {
    _messageQueue.Register(notification.Id);
    await _messageQueue.EnqueueAsync(notification, HttpContext.RequestAborted);
    return Ok();
    }
    catch (Exception ex)
    {
        return BadRequest(ex.Message);
    }
}
Refer to the GetMessage(string id) and GetMessages() methods. Although the GetMessage(string id) method is used to retrieve message pertaining to a registered client, the GetMessages() method returns all messages pertaining to all clients available in the message queue.
Listing 9 contains the code listing for the GetMessage(string id) method. Listing 10 shows the GetMessages() method that returns all messages in the message queue. Listing 11 provides the complete source code of the NotificationController class.
Listing 9: The GetMessage(string) Action Method
public async Task<IActionResult> GetMessage(string id)
{
            Response.ContentType = "text/event-stream";

            try
            {
                StreamWriter streamWriter = new StreamWriter(Response.Body);
                await foreach (var message in _messageQueue.DequeueAsync
                  (id, HttpContext.RequestAborted))
                {
                    await streamWriter.WriteLineAsync($"{DateTime.Now}
                      {message}");
                    await streamWriter.FlushAsync();
                }
            }
            catch (Exception ex)
            {
                return BadRequest(ex.Message);
            }
            finally
            {
                _messageQueue.Deregister(id);
            }

            return Ok();
}
Listing 10: The GetMessages Action Method
public async Task<IActionResult>GetMessages()
{
        Response.Headers.Add("Content-Type", "text/event-stream");
        Response.Headers.Add("Cache-Control", "no-cache");
        Response.Headers.Add("Connection", "keep-alive");
        Response.StatusCode = 200;

        try
        {
            StreamWriter streamWriter = new StreamWriter(Response.Body);
            await foreach (var message in _messageQueue.DequeueAsync())
            {
                await streamWriter.WriteLineAsync ($"{DateTime.Now}
                  {message}");
                await streamWriter.FlushAsync();
            }

            return Ok();
        }
        catch (Exception ex)
        {
            return BadRequest(ex.Message);
        }
}
Listing 11: The NotificationController Class
[Route("api/[controller]")]
[ApiController]
public class NotificationController : ControllerBase
{
    private readonly ICustomMessageQueue _messageQueue;
    public NotificationController(ICustomMessageQueue messageQueue)
    {
        _messageQueue = messageQueue;
    }

    [HttpGet("subscribe/{id}")]
    public async Task<IActionResult> Subscribe(string id)
    {
        Response.StatusCode = 200;
        Response.Headers.Add("Cache-Control", "no-cache");
        Response.Headers.Add("Connection", "keep-alive");
        Response.Headers.Add("Content-Type", "text/event-stream");

        try
        {
            Notification notification = new Notification();
            notification.Id = id;

            notification.Message = $"Subscribed to " + $"client {id}";

            _messageQueue.Register(id);
            StreamWriter streamWriter = new StreamWriter(Response.Body);
            await _messageQueue.EnqueueAsync(notification,
              HttpContext.RequestAborted);

            await foreach (var message in _messageQueue.DequeueAsync
              (id, HttpContext.RequestAborted))
            {
                await streamWriter.WriteLineAsync
                  ($"Message received: {message} at {DateTime.Now}");
                await streamWriter.FlushAsync();
            }
        }
        catch (Exception ex)
        {
            return BadRequest(ex.Message);
        }
        finally
        {
            _messageQueue.Deregister(id);
        }

        return Ok();
    }

    [HttpGet("getmessage/{id}")]
    public async Task<IActionResult> GetMessage(string id)
    {
        Response.StatusCode = 200;
        Response.Headers.Add("Cache-Control", "no-cache");
        Response.Headers.Add("Connection", "keep-alive");
        Response.Headers.Add("Content-Type", "text/event-stream");

        try
        {
            StreamWriter streamWriter = new StreamWriter(Response.Body);
            await foreach (var message in _messageQueue.DequeueAsync(id))
            {
                await streamWriter.WriteLineAsync(
                  $"Client Id: {id} Message: {message}" +
                  $" Time: {DateTime.Now}");
                await streamWriter.FlushAsync();
            }
        }
        catch (Exception ex)
        {
            return BadRequest(ex.Message);
        }
        finally
        {
            _messageQueue.Deregister(id);
        }

        return Ok();
    }

    [HttpGet("getmessages")]
    public async Task<IActionResult> GetMessages()
    {
        Response.Headers.Add("Content-Type", "text/event-stream");
        Response.Headers.Add("Cache-Control", "no-cache");
        Response.Headers.Add("Connection", "keep-alive");
        Response.StatusCode = 200;

        try
        {
            StreamWriter streamWriter = new StreamWriter(Response.Body);
            await foreach (var message in _messageQueue.DequeueAsync())
            {
                await streamWriter.WriteLineAsync($"{DateTime.Now} {message}");
                await streamWriter.FlushAsync();
            }

            return Ok();
        }
        catch (Exception ex)
        {
            return BadRequest(ex.Message);
        }
    }

    [HttpPost]
    [Route("[action]")]
    public async Task<IActionResult>
    PostMessage([FromBody] Notification notification)
    {
        try
        {
            _messageQueue.Register(notification.Id);
            await _messageQueue.EnqueueAsync(notification,
              HttpContext.RequestAborted);
            return Ok();
        }
        catch (Exception ex)
        {
            return BadRequest(ex.Message);
        }
    }
}
Create a New Console Application Project in Visual Studio 2022
Let's create a console application project in Visual Studio 2022 that you'll use for building the client application. When you launch Visual Studio 2022, you'll see the Start window. You can choose Continue without code to launch the main screen of the Visual Studio 2022 IDE.
To create a new Console Application project in Visual Studio 2022 Preview:
- Start Visual Studio 2022.
- In the Create a new project window, select Console App, and click Next to move on.
- Specify the project name as SSE_Client and the path where it should be created in the Configure your new project window.
- If you want the solution file and project to be created in the same directory, you can optionally check the Place solution and project in the same directory checkbox. Click Next to move on.
- In the next screen, specify the target framework you would like to use for your console application.
- Click Create to complete the process.
Create a Console Client (SSE_Client)
The code given in Listing 12 shows the console client that would be used to connect to the SSE service, retrieve messages, and then display them at the console window:
Listing 12: The Program.cs file of the SSE Console Client Application
HttpClient client = new HttpClient();
client.Timeout = TimeSpan.FromSeconds(60);

string url = $"http://localhost:5101/" + $"api/notification/subscribe/1";

while (true)
{
    try
    {
        Console.WriteLine("Establishing connection" + " with the server.");
        using (var streamReader =
          new StreamReader(await client.GetStreamAsync(url)))
        {
            while (!streamReader.EndOfStream)
            {
                var message = await streamReader.ReadLineAsync();
                Console.WriteLine(message);
            }
        }
    }
    catch (Exception ex)
    {
        throw;
    }
}
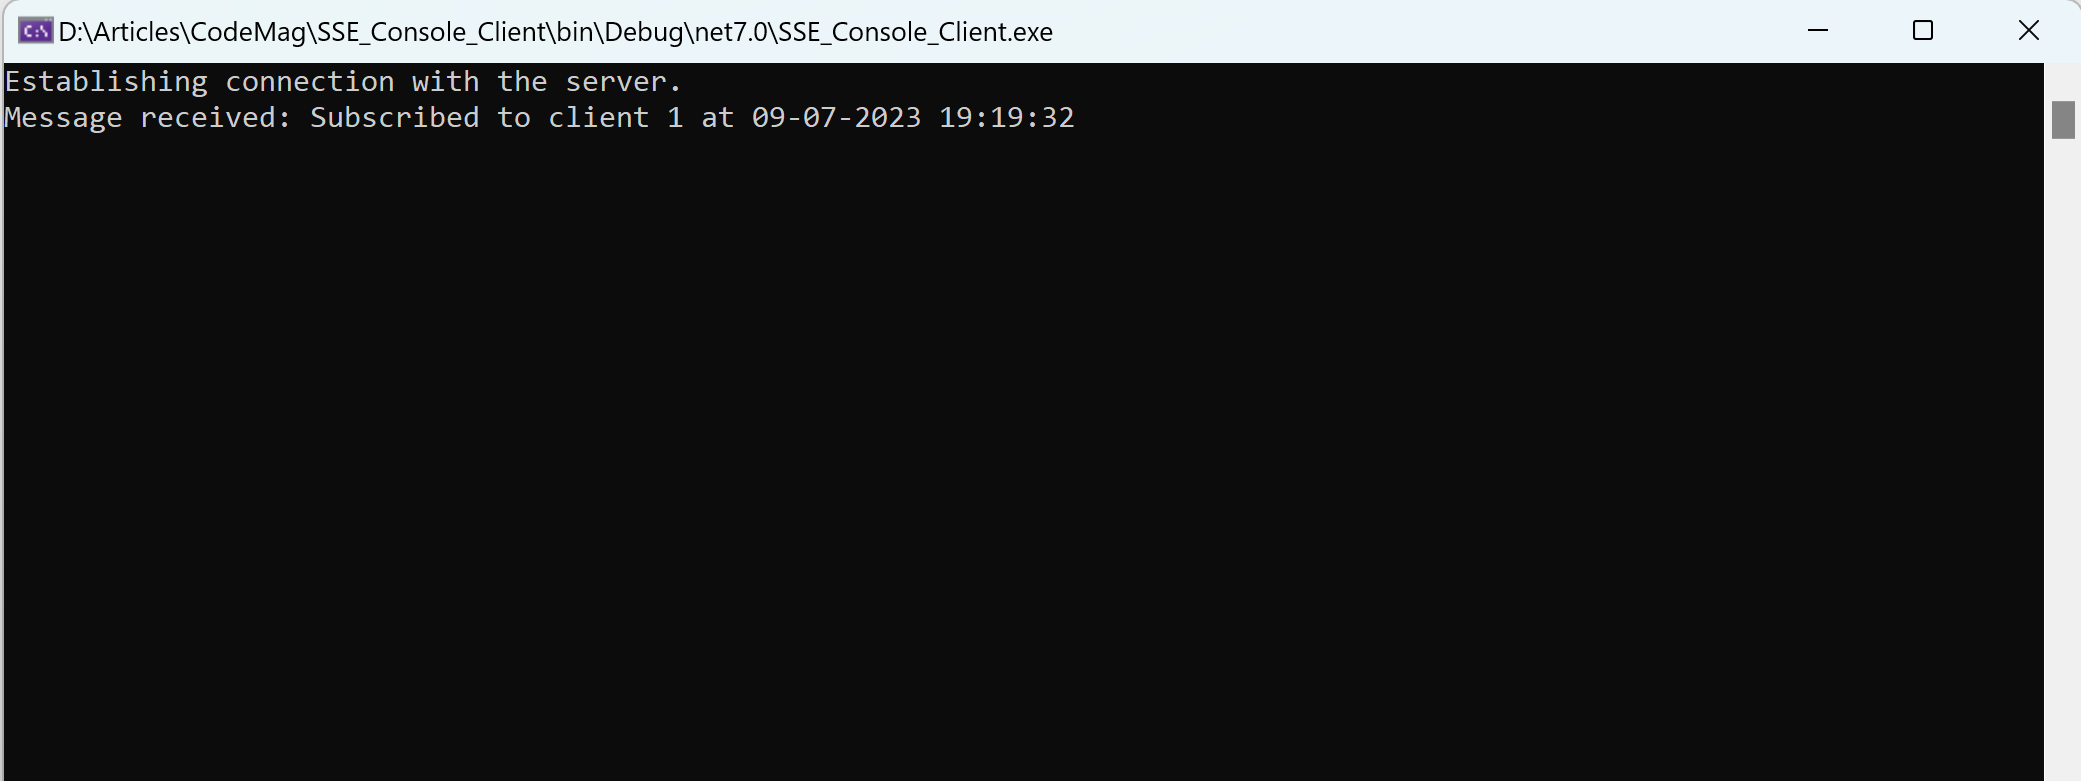
Executing the Application
Start the SSE_Server project followed by the SSE_Client console project. Figure 6 shows how the client has subscribed to receive messages from the server.
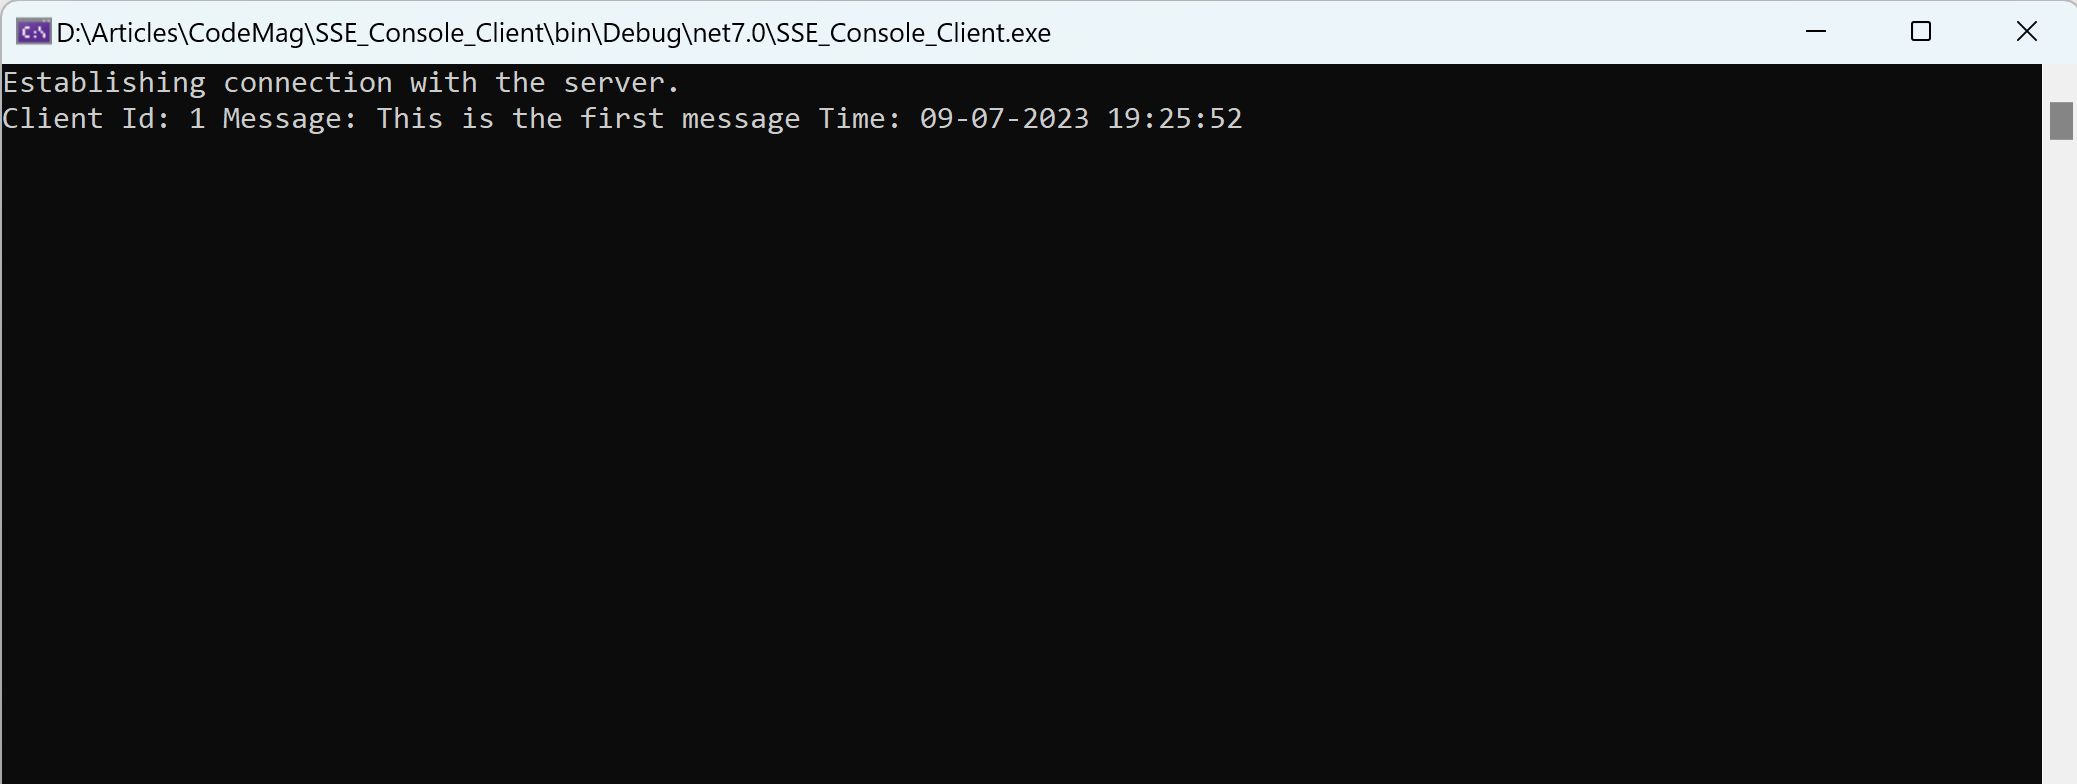
Change the URL in the console project to the following:
string url = $"http://localhost:5101/" + $"api/notification/getmessage/1";
Now, run the three projects SSE_Server, SSE_Scheduler, and SSE_Client in this order.
Figure 7 shows the message for client 1 displayed at the console:
Conclusion
SSE enables you to send notifications from an SSE server to the connected clients whenever an event occurs. Contrary to traditional polling techniques, SSE is beneficial because the server notifies the connected clients only when an event occurs. If you need bidirectional communication between a server and its clients, you should use WebSockets instead.
