


Many web developers use Vite to build their web applications, but as requirements change, you need to be able to make apps out of your websites. Luckily, Vite has a solution for you. At a high level, Vite is a development build environment and abstracts details from the underlying project framework. Because of this abstraction, you can achieve key features like packaging, offline use, and being able to install a website as an app outside the JavaScript framework you're using. In this article, I'll show you how.
What's a Progressive Web App
Although there's always been a difference between building mobile apps and building websites, Progressive Web Applications (PWAs) mean to fill in the gap between them. The basic features that PWAs offer to web developers include:
- Installation: Can be installed from the web or submitted to app stores. Web assets are installed on the local OS.
- Platform-agnostic: Can integrate with host OSs to give the user a more native experience.
- Offline: Supports running the PWA offline so you don't need a persistent network connection to launch the application.
- Background processing: Supports multiple threads via Service Workers.
- Versioning: PWAs can have a consistent way to see if the code needs to be updated.
- Protocol handlers: Associate files with the PWA.
To be clear, PWAs aren't magical. They're just web technologies so they have limitations about performance, and theming your application to look like the underlying OS is up to you. PWAs aren't meant to replace native apps or app frameworks like Flutter, MAUI, and Xamarin.
For a more in-depth explanation of PWAs,
see Chris Love's article.
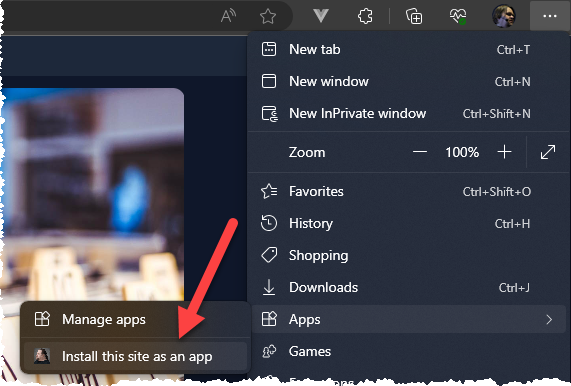
For a long time, you've been able to install a website as an application in most browsers. For example, in Edge (or any Chromium browser), you can add a website as an app, as seen in Figure 1.
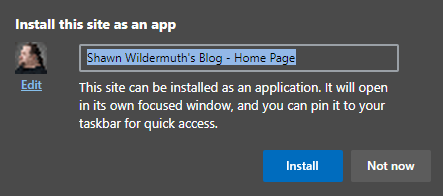
This just installs the website in an OS window. It asks for metadata because it only has the <title></title> as the name of the app, as seen in Figure 2:
This is great for certain projects, but PWAs extend this idea even further. Although hosting a website in its own window does some of what PWAs do, unless you write specific code to deal with offline usage, caching, and other features, this feature is not the same as a PWAs. As discussed earlier, unless you write custom code, PWAs can also use server workers for background processes, enable offline mode, and do updates in a more standard way. But this article is about using PWAs in your Vite project, so let's talk about Vite.
Vite
Vite (rhymes with ‘beat’) is taking the JavaScript world by storm. It presents a way to develop your applications in a very quick fashion. What might not be obvious is that Vite isn't a particular framework or library; it's simply a tool for running an application and reacting to changes. This isn't dependent on any specific way you write your own code. Instead, it's a development time tool for working with JavaScript or TypeScript.
If you want to learn more about Vite, see my article here.
Vite has a plug-in that can implement PWAs for you. The plug-in is called vite-plugin-pwa. The plug-in is specific to Vite, so it doesn't matter what web framework you're using. It's agnostic to the underlying application. So, this works if you're using Vite for React, Vue, Svelte-Kit, or even Vanilla JS. I like this approach because I can learn to handle a PWA in one place and apply it to multiple technologies.
Next up, let's add PWA support to a Vite project.
You can get the starting project from https://github.com/wilder-minds/vite-pwa.
Installing the PWA Plug-in
The PWA Plugin is just another Vite plug-in. You can install it via NPM like this:
npm install vite-plugin-pwa -save-dev
The purpose of the VitePWA plug-in is to enable creation of a manifest.webmanifest file and JavaScript files to set up and run the service worker. The VitePWA plug-in automatically creates these files without you having to understand the nature of the files.
This installs the actual package but doesn't configure it. Once the package is installed, you need to configure it in vite.config.js file. You'll need to import the VitePWA object into the file and call it to add the plug-in:
import { fileURLToPath, URL } from 'node:url'

import { defineConfig } from 'vite'
import vue from '@vitejs/plugin-vue'
import { VitePWA } from "vite-plugin-pwa";

// https://vitejs.dev/config/
export default defineConfig({
    plugins: [
        vue(),
        VitePWA()
    ],
  ...
})
This enables the plug-in, but only in actual Vite builds. If you start the Vite preview feature, you'll be able to look at the Application tab in the browser's developer tools, as seen in Figure 3.
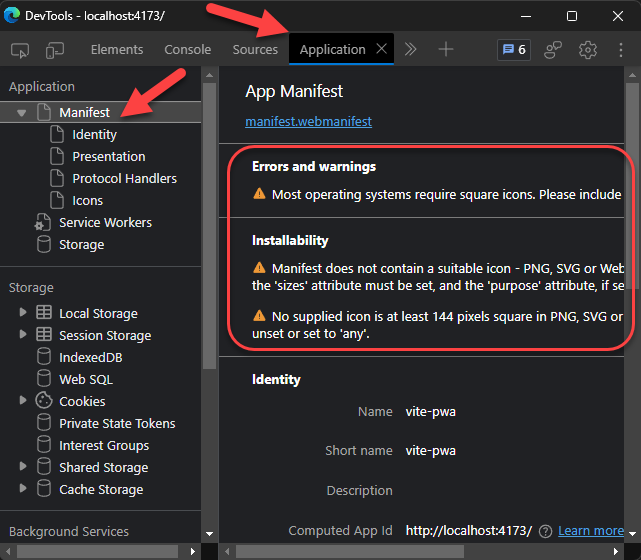
These errors occur because you haven't started configuring the plug-in. To do this, you can send in an options object to the VitePWA plug-in:
export default defineConfig({
    plugins: [
        vue(),
        VitePWA({
            manifest: {}
        }),
...
For most people, you'll want to be able to test and debug this in development mode. So the first real configuration that I'd suggest you do is to enable devOptions:enabled:
export default defineConfig({
    plugins: [
        vue(),
        VitePWA({
            manifest: {},
            devOptions: {
                enabled: true
            }
        }),
With this switch turned on, the manifest and associated files are created for you. In order to enable installation as a PWA, you'll need, at a minimum, a 512x512 icon. You can add several sizes of icons, but let's start with the first icon inside the manifest options:
export default defineConfig({
    plugins: [
        vue(),
        VitePWA({
            manifest: {
                icons: [
                    {
                        src: '/icons/icon-512x512.png',
                        sizes: '512x512',
                        type: 'image/png'
                    }
                ]
            },
            devOptions: {
                enabled: true
            }
        }),
If you run the Vite project (e.g., “vite dev”), you'll see that the app is now installable, as seen in Figure 4:

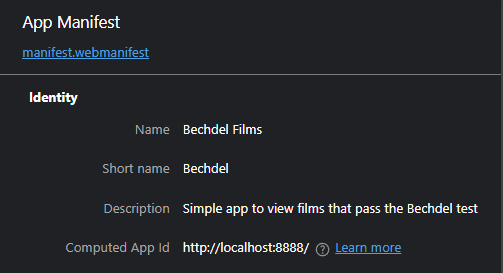
You'll notice that the browser has named the app “vite-pwa”. This is the default name. If you open the dev-tools in the browser, you can click on the Application tab and see information about the manifest, as shown in Figure 5.
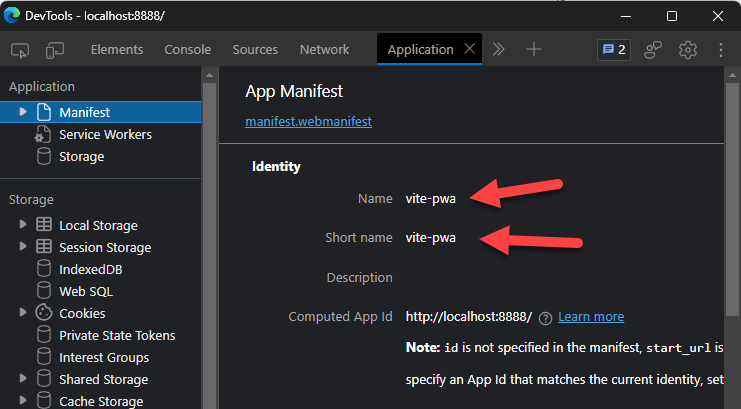
To set this up, you'll want to add the identity properties in the manifest configuration:
    VitePWA({
        manifest: {
            name: "Bechdel Films",
            short_name: "Bechdel",
            description: "Simple app to view films.",
            icons: [
                {
                     src: '/icons/icon-512x512.png',
                     sizes: '512x512',
                     type: 'image/png'
                }
            ]
        },
        devOptions: {
            enabled: true
        }
    }),
With these changes, you'll need to stop and restart the “vite dev” call in order for the VitePWA plug-in to recreate the manifest. Once you do that, you'll see the information in the browser tools, as seen in Figure 6.
With the basic metadata complete, you can see how installing the app works.
Installing a PWA App
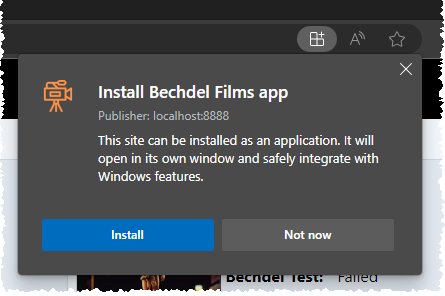
Now the fun part starts. You can install the app using that magic button in the address bar. This prompts you to install the site as an application, as shown in Figure 7.
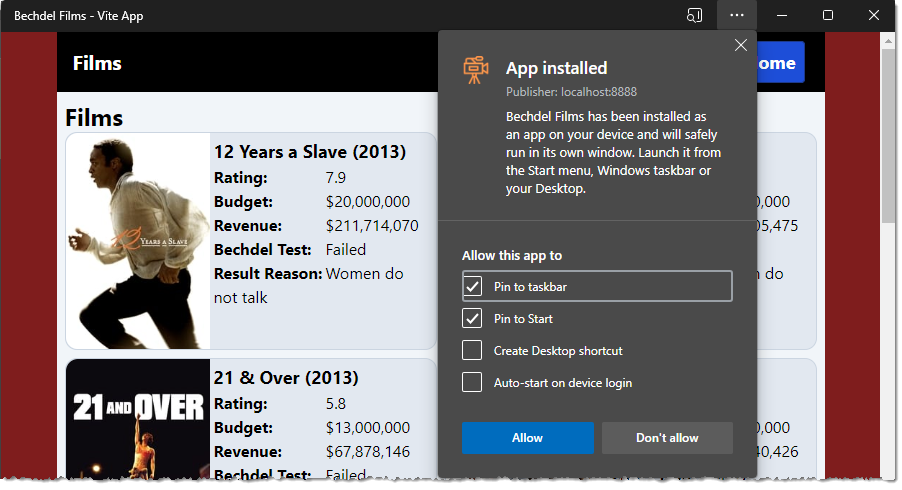
Once installed, depending on which browser and OS you use to install it, you'll get a prompt to about how to use it in the system. As seen in Figure 8, Edge allows you to install it into Windows Start Menu, Desktop, and Taskbar.
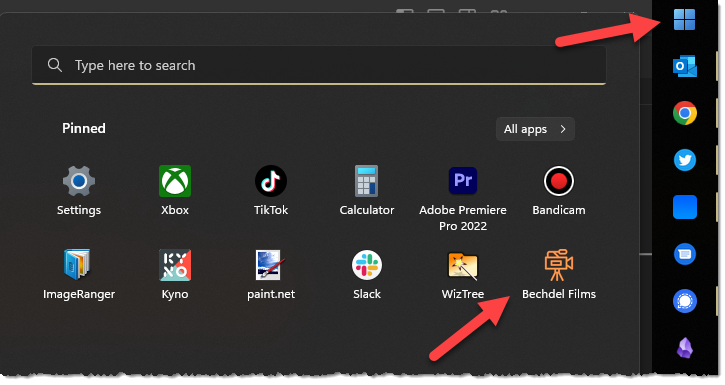
Once you install it, you'll be able to launch it from the device/OS (as seen in Figure 9, on Windows):
Installing the PWA is only the beginning. Now you need to make it act like an application.
Offline Support
Although you can certainly create a native application that doesn't support offline usage, a PWA has different requirements. While in the browser, caching can help load certain assets (e.g., HTML, JS, CSS), but typically, this still depends on checking the server for a new version even if there's a cache. In PWAs, all the assets to load the page need to be stored for offline use. To do this, it uses Cache storage. If you run the installed app, you can still load the dev tools. With this view, you can see the cache storage that's being used, as seen in Figure 10.
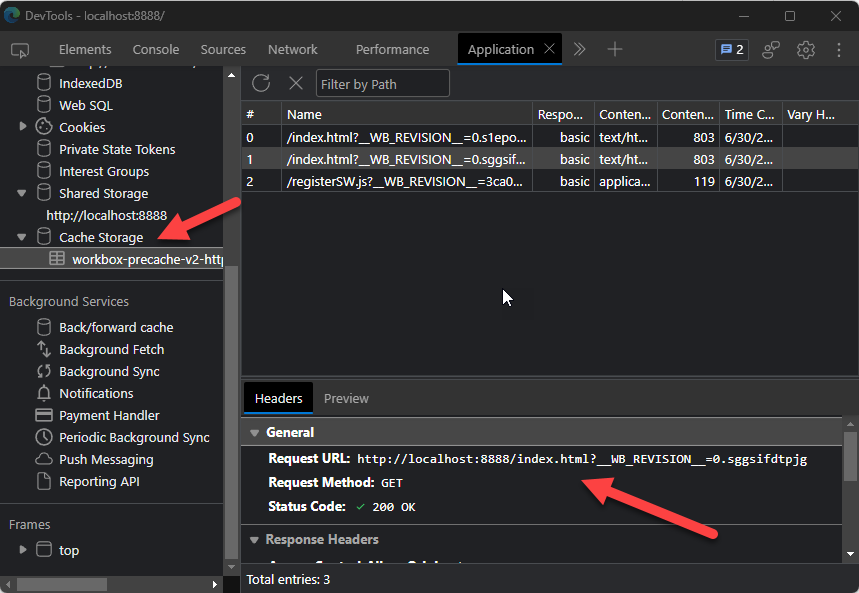
This cache storage stores the assets necessary to run the project. You'll notice that the cache storage is called “workbox-precache.” But what's the workbox? The workbox is simply a set of parameters inside which your application runs. This is important as it defines how the service worker interacts with the application and the server. Luckily, the PWA plug-in allows you to configure this.
By default, the PWA plug-in caches HTML, JS, and CSS. If you need other file types, you can configure the workbox to include other files:
VitePWA({
    ...
    workbox: {
        globPatterns: [ "**/*.{js,css,html,pdf}"]
    }
})
This allows you to help cache assets. In general, if an asset is in src/assets or public folders, it will be cached by the PWA.
Although supporting the site assets is a central part of the workbox, inevitably most websites also need to call APIs. The PWA plug-in allows you to configure runtime caching. First, you'll need to tell the plug-in which calls to cache by using the urlPattern property:
workbox: {
    globPatterns: ["**/*.{js,css,html,pdf}"],

    runtimeCaching: [{
        urlPattern: ({ url }) => {
            return url.pathname.startsWith("/api");
        }
...
In this example, I'm caching any calls from the JavaScript calls whose URL starts with “/api”. For me, this includes any API calls. Again, this caching strategy is helpful for offline support so that the JavaScript calls to fetch are intercepted and returned with the cache data when the real API isn't available. To make this work in the way you want, you need a couple more pieces of configuration.
First, define the cache handler:
workbox: {
    globPatterns: ["**/*.{js,css,html,pdf}"],

    runtimeCaching: [{
        urlPattern: ({ url }) => {
            return url.pathname.startsWith("/api");
        },
        handler: "CacheFirst" as const,
In this example, I'm using the CacheFirst handler. This handler type is defined in Chrome's workbox documentation. The most common handlers include:
- CacheFirst: Read the cache before falling back to calling the network.
- CacheOnly: Only read from the cache, never fallback to network.
- NetworkFirst: Call the network first and, if it fails, fallback to the cache.
- NetworkOnly: Always call the network, don't use the cache.
Finally, you'll want to add some options to the cache:
workbox: {
    globPatterns: ["**/*.{js,css,html,pdf}"],

    runtimeCaching: [{
        urlPattern: ({ url }) => {
            return url.pathname.startsWith("/api");
        },
        handler: "CacheFirst" as const,
        options: {
            cacheName: "api-cache",
            cacheableResponse: {
                statuses: [0, 200]
            }
        }
    }]
}
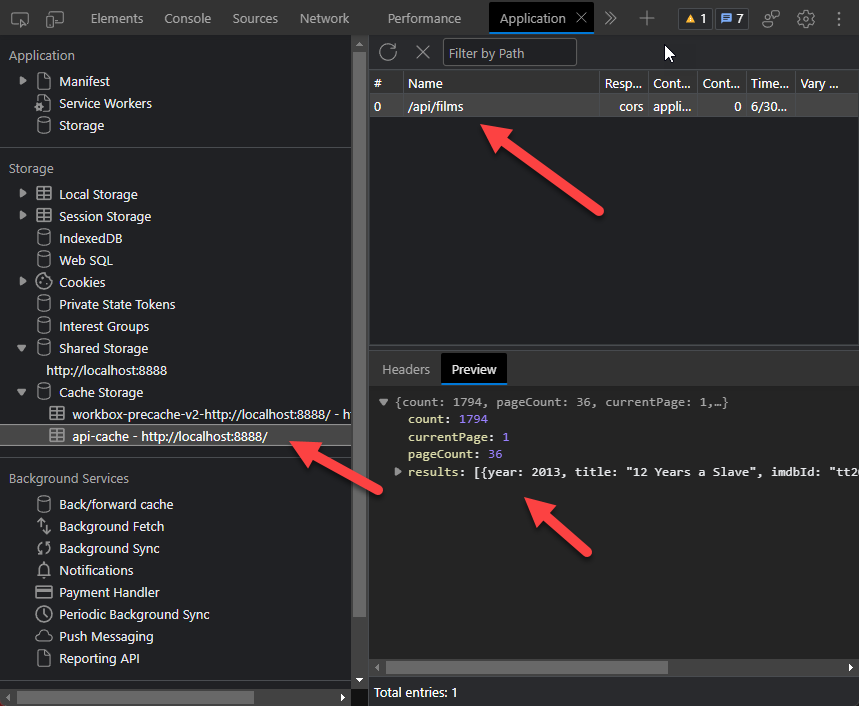
Although there are a number of options, naming the cache and specifying what HTTP Status Codes to actually cache is really common. By naming the cache, you can easily see the caching in the Application tab of the dev tools, as in Figure 11.
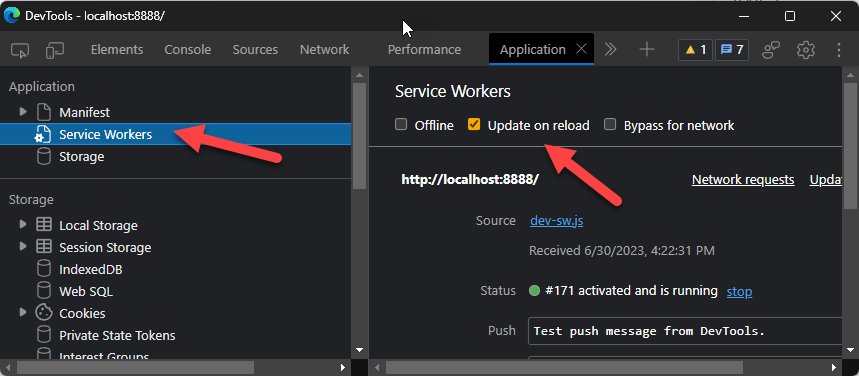
In order to see this work, you might need to force the service worker to update on reload (instead of using the cached version), as seen in Figure 12.
Now that you have that working, let's talk about handling updates to the application.
Configurating Updates
When the network is available and the code or markup has changed, you'll need a way of updating the cached code. By default, the behavior is to prompt the user to update the application by recreating the cache from the server. To get this behavior, you don't need to configure this option.
If you want the application to just get the newest version on every launch/reload, you can specify that the registration is to auto update by adding another configuration detail:
VitePWA({
    ...,
    registerType: 'autoUpdate'
})
For most applications, the autoUpdate is the correct behavior. To be clear, this doesn't just invalidate the markup, code, and CSS caches, but also invalidates the runtimeCaches as well. Clearing these caches is almost always the option you want, and is the default. It's strongly recommended you don't change this behavior.
Where Are We?
Creating, building, and debugging PWAs can be straightforward, no matter the underlying framework. The PWA plug-in for Vite represents a platform-agnostic way to accomplish creating a PWA and implementing many of the features at a higher level than inside your application. The plug-in should simplify how you want to support PWAs in your applications.
