


Telerik Kendo UI offers a powerful toolset for building mobile and Web applications with HTML5 and JavaScript. The toolset has over 70 jQuery widgets that are easily customizable according to your needs and requirements. Moreover, the widgets integrate seamlessly with AngularJS and Twitter Bootstrap. Also, Telerik delivers its widgets in several flavors such as ASP.NET MVC, PHP, and JSP controls. Throughout this article, the focus is on the native Kendo UI HTML5 widgets.
If you're a Web dev, you've probably noticed the amount of jQuery toolsets available in the market. Few of them are complete and offer good technical support (blogs, documentation, etc.); others are incomplete and are missing major widgets; yet others offer only a limited set of widgets. What distinguishes Telerik's Kendo UI is that it offers almost all of the widgets you might need to develop a Web or mobile app, so there's no need to install multiple libraries. Also, the technical support they offer is incredible, ranging from demos, rich documentation, blogs, forums, interactive dojos, and, of course, submitting tickets (available only for users with a purchased Telerik Kendo UI license).
Telerik Kendo UI Components
The components offered by Telerik Kendo UI are categorized by their type of usage. For instance, the Data Management widgets include Grid, ListView, and others. The Editors widgets include AutoComplete, ComboBox, DropDownList, DatePicker, and many other categories, not to mention Charting, Scheduling, Layout, Navigation, etc. One distinguished category is the Framework, which offers the DataSource component, Drawing API, MVVM framework (Model View ViewModel), Single Page Apps, PDF Export, and others. The DataSource plays a major role in developing Web apps. The Telerik demos are rich and are available on http://demos.telerik.com/kendo-ui/.
Telerik Kendo UI offers a rich toolset of highly usable HTML5 Web components to develop a modern Web application.
In almost every data-oriented Web app, a Grid is needed to display records stored either in the database or some other storage medium, and sometimes users edit the records too. The Grid widget offers two editing modes. One is inline editing and the other is pop-up editing. Figure 1 shows the behavior of the Grid when inline editing mode is enabled.
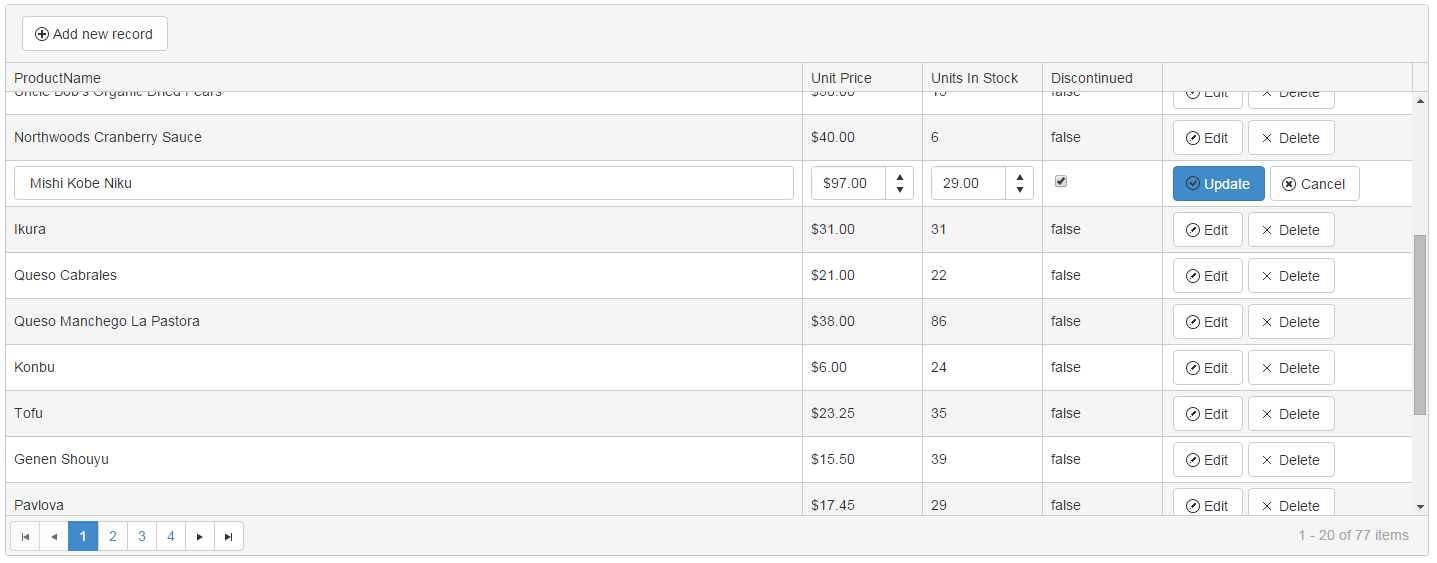
When the user clicks the Edit button, the Grid puts the record into edit mode and at the same time, displays two buttons: Update and Cancel.
The Grid offers a second mode of editing, pop-up editing, as shown in Figure 2.

When the user clicks the Edit button, the Grid opens a modal pop-up box so that they can edit the record's details.
In the complicated scenarios required by Web apps, the aforementioned editing methods are not enough. In fact, you're limited in designing the layout of the app by having only these two options. For instance, an app I'm working on requires the user to edit a record and some other related records all in one screen. The form to edit the records contains more than 30 placeholder controls! None of the above Grid editing modes is an option for this kind of traffic. Using the inline mode, you have to keep scrolling right and left across all of the columns. Also, the pop-up editing mode isn't an option, given the fact that the modal box is large, covering almost the whole screen.
This is the right time for you to think outside the box! Kendo UI offers a rich set of widgets that will seem like a necessity in almost every Web app that you develop because they make functionality like this easier. In addition to those widgets, Telerik offers a rich and extensive JavaScript API to all of its components. You gain the upper hand in making direct JavaScript calls to communicate and configure those widgets.
With the API in hand, you aren't limited anymore to what the widgets originally offered. You can extend the use of such widgets to satisfy complex and real-life scenarios. You can read more about the API here: http://docs.telerik.com/KENDO-UI/introduction.
DataSource, the Brains
Telerik's DataSource is a building block that plays a central role in every Web app built with Kendo UI widgets. The DataSource serves as an abstraction layer for data and is used as a data source for several widgets, such as Grid, DropDownList, ListView, and others. Every widget needs a DataSource to display and render a set of records. Not only is a DataSource used as a storage medium for widgets, it's also used as a read-write source to add new records, edit existing ones, and even delete them. For instance, the Grid widget has a tight coupling with the DataSource. When the user adds a new row on the Grid, the Grid internally adds the new record onto the DataSource it's configured to work with. Also, when the user edits or deletes a row, the DataSource is updated to reflect the changes accordingly. Bottom line: The Grid and DataSource are in sync!
The DataSource provides:
- Data storage for local data (coming out of a JavaScript array)
- Data storage for remote data (received by the Web Service as JSON, JSONP, OData or XML)
- Storage for the data internally in a structured manner with a dictated schema describing the record and its fields' data types
- Reading data remotely from a Web Service, provided that the DataSource is configured with all the needed information to handle such a task
- Sending all new records, and edited or deleted records to the server to save the changes, provided that the DataSource is configured properly with all URLs, etc.
- The capability of calculating aggregates, sorting, filtering on both the client-side and the server-side
- A rich filtering API to work around the data stored (locally and remotely)
For an overview on Telerik Kendo UI DataSource, see http://docs.telerik.com/kendo-ui/framework/datasource/overview.
Combing the Grid widget, DataSource and DataSource API, gives you the upper hand in developing complicated Web applications.
DataSource is a major building block for offline and single page applications
Getting Started
This article uses the Grid widget DataSource and its API to develop a Web app screen, and shows how to use the API to get around the widget's preset functionalities and extend them.
The Web app you'll build uses the Grid widget to display and list Employee records. If you recall from the sections above, the Grid widget offers two methods for editing/creating/deleting data records: inline and pop-up modes. For the sake of this demonstration, the Grid is responsible for displaying all the records stored and the user enlists a separate Form to edit an existing record or create a new record.
The Grid widget is bound to a DataSource component. The DataSource is configured to create/update records through direct communication with a Remote Web Service. You'll see shortly that the Web app takes a different road to load data onto the DataSource, a road that's independent of the DataSource component itself. The technique strives to optimize the performance in loading the entire data needed by all screen widgets in a single call to a Remote Web Service. The Service returns the Employee records and any other reference data that the screen needs to display and use. For instance, the Marital Status list of records is an example of additional data records loaded inside a single remote Web service call, side by side with the Employee records.
The Web App
Figure 3 shows the screen used to manage Employee records (edit/create).
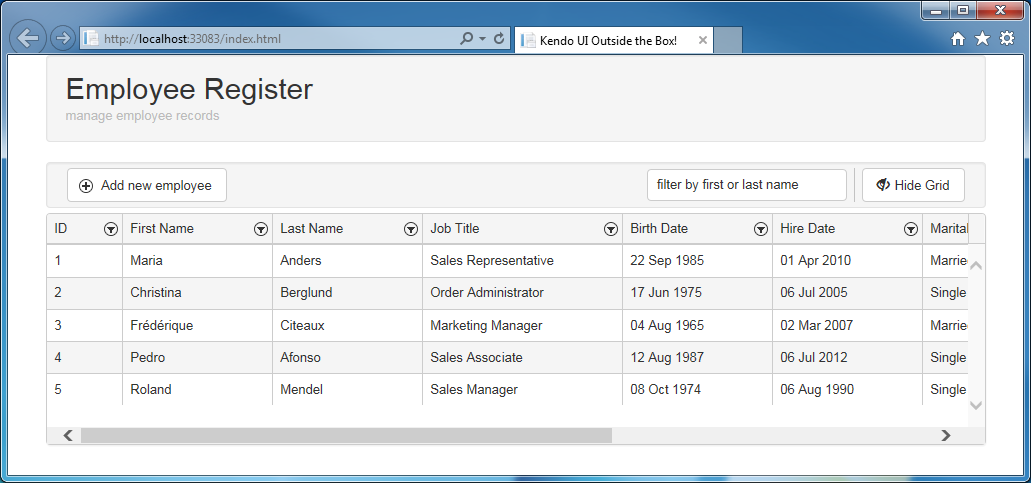
To add a new Employee record, the user clicks the Add new employee button to display a Form. You use the Form to fill in the Employee details to save later. When you select an existing record on the Grid to edit, the Web app uses the same Form to render and display the Employee record details. You then edit and save those details accordingly. Figure 4 shows the Form displayed upon either a Grid selection or Add new employee button is clicked.
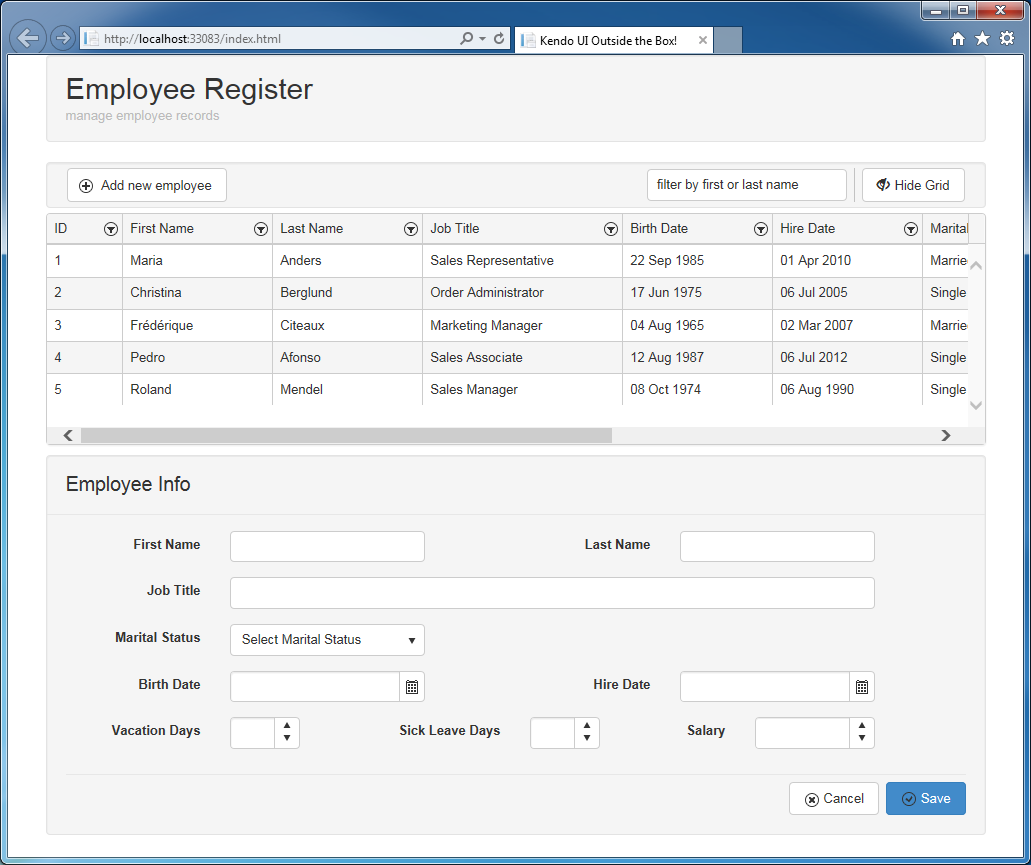
Click on the Cancel button to reset and hide the Form. Click the Save button to reset, hide, and submit all changes made locally to the server.
Armed by the knowledge of how the user uses the Web app, let's switch gears and take a walk through the source code.
Walk Through the Source Code
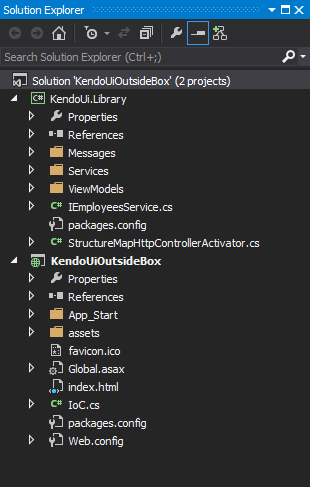
The Web App Visual Studio Solution contains two projects: a class library holding the business logic classes, Web API 2 classes, other helper classes. the Web project containing the HTML, and client-side resources (images, CSS, and JavaScript). Figure 5 shows the Web app structure.
For the sake of this demonstration, a single HTML page, the index.html, plays the role of the Shell page to host all widgets and components. The source code for the index.html page can be found in the downloadable source code package.
The HTML page uses the CSS resource files as shown in the code snippet.
    <link href="assets/css/bootstrap/bootstrap.min.css"
    rel="stylesheet" />
    <link href="assets/css/kendo/kendo.common-bootstrap.min.css"
    rel="stylesheet" />
    <link href="assets/css/kendo/kendo.bootstrap.min.css"
    rel="stylesheet" />
    <link href="assets/css/kendo/reset.css"
    rel="stylesheet" />
    <link href="assets/css/main.css"
    rel="stylesheet" />
The HTML page uses the Telerik Kendo UI Bootstrap theme. The theme is configured by adding a reference to the Twitter Bootstrap CSS resource file. After that, you add a reference to both the kendo.common-bootstrap.min.css and kendo.bootstrap.min.css CSS resource files representing the Bootstrap theme files. Telerik recommends adding a reset.css CSS file to reset some HTML elements so that Kendo UI widgets behave properly when nested inside the Twitter Bootstrap Grid layout. (See http://docs.telerik.com/kendo-ui/using-kendo-with-twitter-bootstrap. A complete example of using Telerik Kendo UI together with Twitter Bootstrap is offered for free and is available at http://demos.telerik.com/kendo-ui/bootstrap/.)
Telerik offers a set of ready-made themes that you can choose from, including the Twitter Bootstrap theme.
The Index.html page adds a few references to some JavaScript files. (The source code for index.html page can be found in the downloadable source code package on the CODE Magazine website). This code snippet shows the JavaScript files.
    <script src="assets/js/kendo/jquery.min.js">
    </script>
    <script src="assets/js/kendo/kendo.all.min.js">
    </script>
    <script src="assets/js/app.js"></script>
The snippet shows the jQuery file at the beginning of the Scripts section. Kendo UI Source Code (minified) follows the jQuery file. Finally, the snippet shows entry for the app.js JavaScript module. The module stores the Web App interaction and the logic required for it to function properly. The following section dissects the app.js module and illustrates how the Web app screen logic is developed.
The source code for the apps.js module can be found in the downloadable source code package. The code is embedded inside a jQuery Document Ready function, as shown in this next code snippet.
    $(function () {
        // code omitted
    });
Following the best practices in writing JavaScript code, the app.js module uses the self-executing anonymous function. All of the code that runs inside this function lives in a Closure, which provides privacy and variable scoping throughout the lifetime of the application. You are invited to use this pattern, especially when multiple JavaScript frameworks are all used at the same time and in one application.
Always make use of the JavaScript self-executing anonymous functions to isolate your code and protect it.
The app.js module contains several JavaScript functions. Toward the end, the module calls a few JavaScript functions, as shown in this code snippet.
    function configureDataSources() { }
    function configureForm() { }
    function configureGrid() { }
    function configureEventHandling(e) { }
The configureDataSources() function configures the Kendo UI DataSources used by the Web app. The function starts by defining the models, the DataSources used throughout the source code, as shown in Listing 1.
Listing 1: Configuring the model objects used in the app
configMap.ReferenceModel = kendo.data.Model.define({
      id: "Id",
      fields: {
        Id: { editable: false, defaultValue: 0 },
        Code: { type: "string" }
      }
   });

configMap.EmployeeModel = kendo.data.Model.define({
      id: "EmployeeId",
      fields: {
         EmployeeId: {
            editable: false,
            defaultValue: 0
         },
         FirstName: { type: "string" },
         LastName: { type: "string" },
         MaritalStatus: { defaultValue: {} },
         JobTitle: { type: "string" },
         HireDate: { type: "date" },
         BirthDate: { type: "date" },
         VacationDays: { type: "number" },
         SickLeaveDays: { type: "number" },
         Salary: { type: "number" }
      }
});
The app.js module uses the internal object configMap to hold the state of variables that the module uses throughout the code. For now, two variables are defined on the configMap to hold the models for ReferenceModel and EmployeeModel. You define a model in Kendo UI by stating the ID of the model (used for uniqueness of records) and by listing the fields attached to the model itself. Each field owns a different data type as per its use. To read more on how to define models, Telerik offers very good and rich documentation on their website (http://docs.telerik.com/kendo-ui/api/javascript/data/model).
Configuring the DataSources
Now that the models are defined, you need to define the DataSource to use in the code. The module uses two such DataSources: the maritalStatusDs and employeesDs, as shown in Listing 2.
Listing 2: Configuring the data sources
configMap.maritalStatusDs = new kendo.data.DataSource({
      transport: {
         read: function (options) {
            options.success(configMap.maritalStatus);
         }
      },
      schema: {
         model: configMap.ReferenceModel
      }
});

configMap.employeesDs = new kendo.data.DataSource({
       transport: {
           read: function (options) {
               options.success(configMap.employees);

               // update cid
               $.each(configMap.employeesDs.data(),
                   function (idx, record) {
                       if (!record.hasOwnProperty("cid") ||
                           !record["cid"]) {
                       record["cid"] = record["uid"];
                   }
               });
           },
           create: function (options) {
               $.ajax({
                  cache: false,
                  type: "POST",
                  url: "/api/Employees/Save",
                  contentType: "application/json; charset=utf-8",
                  dataType: "json",
                  data: JSON.stringify(options.data),
                  success: function (result) {
                    console.log("employees saved successfully");
                    options.success(result);
                  },
                  error: function (result) {
                      options.error(result);
                  }
              });
           }
       },
       schema: {
           model: configMap.EmployeeModel
       }
  });
You configure a DataSource in several different ways, depending on how the code uses the DataSource. For a complete reference on configuring a DataSource, Telerik offers documentation here: http://docs.telerik.com/kendo-ui/api/javascript/data/datasource.
The code configures the DataSource transport.read setting for both DataSources as a function that accepts the options parameter. The transport.read function executes when the DataSource needs to read data from the remote Web Service. Following a successful request to the server, the transport.read() function calls the options.success() function, passing to it the raw data read from the Server, which notifies the DataSource that the request to the server to read data was successful. In this example, the configMap.maritalStatus JavaScript array holds the Employee records received from the server. Continue reading to watch the demonstration of how the app.js module calls on the remote Web Service to return the data and store it in the aforementioned JavaScript array.
In addition to configuring the transport.read, the code defines the schema setting and configures it accordingly. In this case, the code defines the Model object to which the DataSource parses and formats the raw data. In other words, the DataSource uses the schema.model to parse the raw data received to convert it into a collection of objects. The object's fields then get populated as per the model setting definition. The DataSource parses a raw data record into a Model object and assigns a uid field to the newly created object that uniquely identifies the record inside the DataSource data collection.
The Marital Status DropDownList uses the maritalStatusDs DataSource to populate its elements. Whenever possible, use DropDownLists for fields to make data entry consistent and controlled. On the other hand, the Grid widget uses the employeesDs DataSource to populate itself with Employee records. The Web app allows the user to add new employee records and edit existing ones. Therefore, the code configures the employeesDs DataSource with the proper settings to use when saving new employee records or updating existing records on the server. For this to work, the code configures both the transport.create and transport.update settings to custom JavaScript functions. For the sake of brevity, the code that configures the transport.update setting is shown in the app.js module (and the source code for app.js module can be found in the downloadable source code package). More or less, the configuration for both transport.create and transport.update settings are almost the same.
The transport.create() function contains a single jQuery AJAX call to POST the employee record that the user creates on the client side to the remote Web service. The server responds to the create() request by assigning an ID for the record it creates on the storage medium. In my example, the DataSource uses the EmployeeModel to parse in the raw data received from the server, and the employee record sent to the server gets its EmployeeId property populated with a valid EmployeeId. As a result, upon a successful request, the DataSource updates its internal records for that specific employee record accordingly, by populating the EmployeeId field and reflects the changes onto the Grid widget. The DataSource sets the employee record dirty flag to a value of false to signal that the employee record is now considered an old and existing one. Once again, upon a successful request, the code notifies the DataSource about the successful request.
Loading Data from the Server
The rest of configureDataSources() function sends a GET request to the server to read the data needed by the Web app, in this case, the Employees and Marital Status data records. As mentioned earlier, the code uses a technique to minimize the number of requests sent to the server in such a way that it loads all of the needed data at once. This technique varies depending on the context of the application under study; in some applications a portion of the data might need to be loaded at once at the beginning and the rest later on. In other cases, the screen requires a large bucket of data to load from the server and it might not be feasible to retrieve them all at once. The option might be to split the requests for better performance.
The following code snippet shows a typical jQuery $.ajax function call to send a GET request to the server and retrieve the Employees data.
   $.ajax({
      type: "GET",
      cache: false,
      url: "/api/Employees/",
      contentType: "application/json;  charset=utf-8",
      dataType: "json",
      success: onSuccessRead,
         error: onErrorRead
   });
The next code snippet defines the OnSuccessRead() functions.
function onSuccessRead(data) {
   if (data.Employees) {
       configMap.employees = $.map(data.Employees,
           function (record, idx) {
               return record;
           });
           configMap.employeesDs.read();
   }
   if (data.MaritalStatus) {
       configMap.maritalStatus = $.map(data.MaritalStatus,
         function (record, idx) {
             return record;
        });
        configMap.maritalStatusDs.read();
    }
}
The server responds with content that consists of two properties: the Employees property and the MaritalStatus property. The code checks to see whether the Employees property exists, and accordingly maps all the data records included into the configMap.employees JavaScript array. Right after that, the code calls on the employeesDs.read() function to execute, which, in turn, calls on the transport.read() function configured previously. As a result, the employeesDs DataSource gets populated with employee records in the form of EmployeeModel records.
Similarly, the maritalStatusDs DataSource gets populated with the marital status records received from the server.
Always strive to optimize the loading of data from the server
Configuring the Form
The code defines another function, the configureForm() function. This function initializes some Kendo UI widgets with proper settings, as shown in the app.js module. (The source code for the app.js module can be found in the downloadable source code package.) The section that configures the Marital Status DropDownList is remarkable and worth a discussion. The next code snippet shows how the DropDownList widget gets bound the maritalStatusDs DataSource. The user can now select any Marital Status record received from the server and is displayed by the Marital Status DropDownList.
$container.find("select[id='MaritalStatus']")
    .kendoDropDownList({
        dataTextField: "Code",
        dataValueField: "Id",
        dataSource: configMap.maritalStatusDs,
        optionLabel: {
            Code: "Select Marital Status",
            Id: -1
        }
    });
The configureGrid() function configures the Grid widget. It specifies the back-end DataSource that the Grid widget uses and configures/lists the columns to appear on the Grid itself.
Finally the configureEventHandling() function hooks in some Buttons together with their corresponding Event Handlers. The buttons are: Add new employee, Hide/Show Grid, Save, and Cancel.
The code handles a Grid row selection, as shown in the next code snippet. The code is responsible for displaying a populated Form with the details of the row selected.
function showEmployeeDetails(data) {
   if (!data) return;
   reset(false); // reset first
   setUid(data.uid); // store ui on form
   // populate form with employee data
   populateEmployeeForm(data);
}
Most importantly, the code stores the selected record uid onto the .data() attribute of the Form. The uid value is used later to distinguish whether the user is editing an existing record or saving a new one. Right after that, the form gets populated with the Employee record details.
Saving and Editing Employee Records
The user clicks on the Add new employee button and the form appears. The user fills in the Employee information (as you saw back in Figure 4), and clicks on the Save button. The user uses the same form to edit an existing record. The user selects a row on the Grid and the form shows and renders the selected row information. When the user clicks on the Save button, the code handles saving the Employee record, as shown in the next code snippet. Once again, the user edits an existing record or creates a new record from scratch.
function handleSaveChanges(e) {
   // get uid for  currently displayed row
   var currentUid = getUid();
   // update employee record in DataSource
   updateEmployee(currentUid);
   reset(true);
    // save changes to server using DataSource
   getKendoGrid().saveChanges();
}
The function reads in the uid field attached onto the Form .data() attribute. If the user edits an existing record, the uid field contains the uid field of the currently edited record. The uid field's value is undefined for a newly added Employee record. The updateEmployee() function is then called, passing the value of the uid variable to it as a parameter, as shown in Listing 3.
Listing 3: Updating a single employee record
function updateEmployee(uid) {
   var model;
   if (uid) {
       // get current  data item
       model = configMap.employeesDs.getByUid(uid);
    }

    // new record
   if (typeof model === "undefined" ||
       model === null) {
           model = addEmployeeToDataSource();
      }

   if (typeof model === "undefined" ||
       model === null) return;

   model.set("FirstName",
       $(configMap.$form)
          .find("input[id='FirstName']")
          .val());

    // ...
}
The function checks the parameter uid for a valid value. If it exists, it uses the value of the uid parameter to retrieve the corresponding Employee record from the employeesDs DataSource. Otherwise, it initializes a new model and adds it to the employeesDs DataSource. In both cases, the end result is a valid Model object, either newly initialized or populated with an existing Employee record. The form now binds to the aforementioned model. The addEmployeeToDataSource() function uses the DataSource API to manipulate its data, as shown in the next code snippet.
function makeEmployeeModel() {
   var model = new configMap.EmployeeModel({
      EmployeeId: 0,
      MaritalStatus: new configMap.ReferenceModel({})
    });
    return model;
}
function addEmployeeToDataSource() {
   var model = makeEmployeeModel();
   configMap.employeesDs.add(model);
   return model;
}
The addEmployeeToDataSoruce() function calls the makeEmployeeModel() function. The function returns a newly initialized Employee record. The code then calls the employeeDs.add() function to add the newly created record. As a result, the employeeDs manages the new record and assigns to it a new uid value to uniquely identify it. The Grid widget automatically reflects the changes onto its corresponding DataSource by rendering a new row for the newly added record. You manipulate the Grid widget and its corresponding DataSource with a single and simple API call to implement the intended behavior.
The function finishes creating/updating the record inside the employeeDs DataSource and then resets the screen. Finally, the code calls on the Grid's saveChanges() function as shown in the next code snippet.
getKendoGrid().saveChanges();
The function getKendoGrid() retrieves the instance of the Grid widget found on the HTML page. It then calls on the Grid's saveChanges() function. Internally, this function triggers the bounded DataSource to execute either the transport.create() or transport.update() function. For instance, if the user adds a new record, then the transport.create() function executes; otherwise the transport.update() function executes.
Grid Filtering
Besides the many extended and custom functionalities that can be added, the code implements another feature using the Kendo UI API that allows the user to filter the Grid widget data based on keywords. The user can type a few keywords into a textbox and the Grid gets its row filtered accordingly, as shown in Figure 3. The figure shows a free-input textbox that says filter by first or last name. The code in Listing 4 shows how this feature is implemented using simple API calls.
Listing 4: Filtering data on the fly
function handleFilterChange(e) {
   var value = $(e.target).val();

   if (value.length > 0) {
      getKendoGrid().dataSource.filter({
         logic: "or",
         filters: [
         {
           field: "FirstName",
           operator: "contains",
           value: value
         },
         {
           field: "LastName",
           operator: "contains",
           value: value
         }
       ]
      });
   } else {
       getKendoGrid().dataSource.filter({});
   }
}
The function starts by reading the text that the user types in, and then it calls on the Grid's DataSource .filter() function and some filtering settings passing to it. In this case, the code uses a filter to find all records whose FirstName or LastName field contains the text entered by the user.
Telerik offers a rich API that gives you the upper hand in building customized and advanced solutions using their Kendo UI Web components and widgets.
It would take a lot of pages to go through all the code details in the app.js module, which is why the source code for the app.js module can be found in the downloadable source code package.
Conclusion
I introduced some of the most usable and needed widgets offered by Telerik Kendo UI. Also, I showed how the API could be used together with the widgets to offer some advanced scenarios that are valuable and much more realistic than what Telerik demos online. I recommend that you go through their documentation for a much deeper knowledge and understanding for the power of the API and functionality it offers.
