


I was surprised recently when a group of highly capable developers discussing the architecture of a new cloud-based system got stuck on the topic of how to do reports. Reporting isn't a sexy subject, but most business applications still need reports; sometimes they need lots and lots of reports. It's a subject that doesn't get much press and not many developers give it much thought anymore, as it's a subject widely considered to have been solved years ago.
These days, the attention goes to increasingly novel ways of delivering information. A few ideas were thrown out during the meeting about how to handle the system's reporting needs, ranging from rendering Web pages in a print-friendly format so that they can be printed from the browser, to using custom libraries to render the lists in PDF format, to offloading the whole endeavor to a tool like Crystal Reports that wasn't integrated into the system. None of the ideas were proposed with much enthusiasm and none were received with much enthusiasm either.
Visual Studio comes with a report designer, but that idea was scuttled early because Visual Studio's reporting capabilities are stuck in old technologies like WinForms and Web Forms and nobody wanted to go there. SQL Server Reporting Services (SSRS) fared a little better because it has powerful server-side rendering features and can be called as a service as well as having a native browser-based user interface, but it was set aside because it can be expensive to set up and run, especially in the cloud where it has to be run and maintained on expensive virtual machines. Surely, there had to be a good answer.
That's when I brought up Visual Studio reports again. Although I find the report designers in SSRS and VS to be a bit clunky and temperamental, I've always liked the way they store report definitions in a non-proprietary XML format and the fact that they're well known, built into the tools we use every day, and free.
In the past, our team had done all the usual work-arounds to use the ReportViewer control in our WPF and ASP.NET MVC apps and it worked okay, but when we stumbled across a bunch of articles while researching how to print reports without first pulling up the report within the control, a fun, new thought came to mind. The ReportViewer controls were designed to be placed on Windows Forms or Web Forms as a way to view reports, but the controls can also render the reports and export them to various formats. What if we used the controls as report generators instead of viewers? After all, like every UI control, they're just classes. There's nothing preventing us from instantiating a TextBox in code and never showing it on a screen (nor is there any reason I can think of to do so). Why not use the ReportViewer control in a service to render and export reports without a UI control? We'd already done something similar in some WPF applications to send reports directly to a printer without first displaying the ReportViewer control on screen, but that was all done in the client. Still, there was no reason it shouldn't work, and it did work.
Here's how to move your report generation into your services where you can run them on-premises or in the cloud and share them among browser, mobile, desktop, and B2B systems. In this article, I'll be exposing reports via Web API. I'll also create an ASP.NET MVC application to demonstrate calling the reports from a browser, so you're going to use that website to host the services and kill two birds with one website.
Of course, services are services, so you could just as easily host them in WCF or even as a classic Web Service. For this article, I'm going to keep it simple and only build for Web API, but see the sidebar about using CODE Framework, a free and open source .NET business application framework to see how you'd really build the services for maximum effectiveness.
Step 1: Create the Report
I'm going to save you a lot of time and research by telling you right off that the ReportViewer control isn't supported in MVC projects and that you won't be a happy camper if you try to use it one in an MVC project. As of Visual Studio 2015 Update 3, this is still the case. As a work-around, I'm going to create the reports in a different project. Pretty much any project type except MVC supports the ReportViewer control. I'm going to use the Class Library project template.
Create a new Solution with a Class Library project. Name the project CloudReporting.Reports and name the solution CloudReporting. Then edit the Class1.cs file generated by the template, rename both the file and the class to OrderInformation, and add properties to it, as shown in Figure 1.
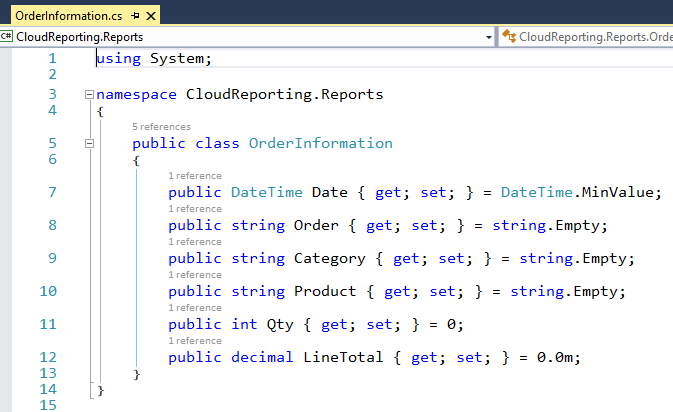
This will be the structure of the data you'll use for the report. Build the project, then right-click on the project and select Add > New Item… Under the Reporting category, choose the Report Wizard template. Name the report OrdersForProductCategory.rdlc. The Data Source Configuration Wizard appears, asking you to choose a Data Source Type. Choose Object, click Next, and select the OrderInformation class from the dialog box. If you don't see the class, it's probably because you either didn't build the project before running the wizard or because you didn't make the class or its properties public.
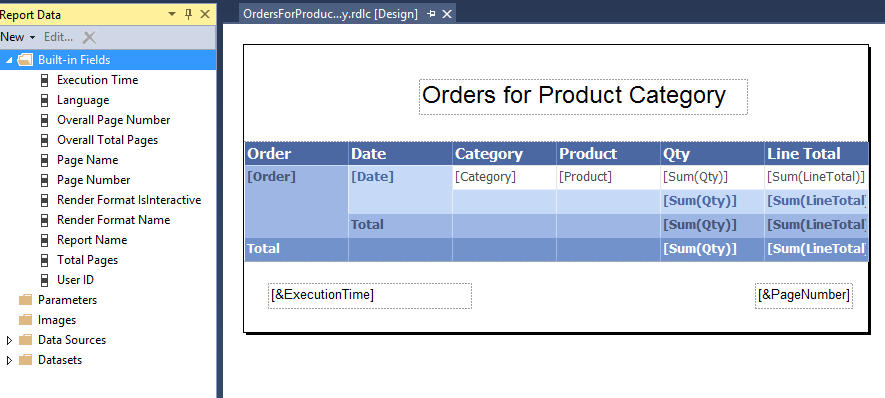
Click Next to get to the Arrange fields page of the Wizard. Drag the Order and Date fields to the Row groups list (in that order), then drag the Category, Product, Qty and LineTotal fields to the Values list (in that order). Click Next. Make sure to clear the Expand/collapse groups checkbox. You don't want a collapsed drill-down report when you generate a PDF. Choose a Style that you like and click Next again to finish the Wizard.
You can spruce up the report by adding page headers and footers by selecting them from the Report menu. If the Report menu isn't visible, click on the design surface and the menu should appear. Resize the body of the report to fit the height of the generated table. Open the Report Data window. It usually appears to the left of the design surface. If the window doesn't open automatically, you can open it from the very last line of the View menu. Open the Built-in Fields folder and drag the Execution Time and Page Number fields into the report footer. From the Toolbox, drag a Text Box onto the header and type, Orders for Product Category. That should be enough for this example.
Step 2: Get the Data
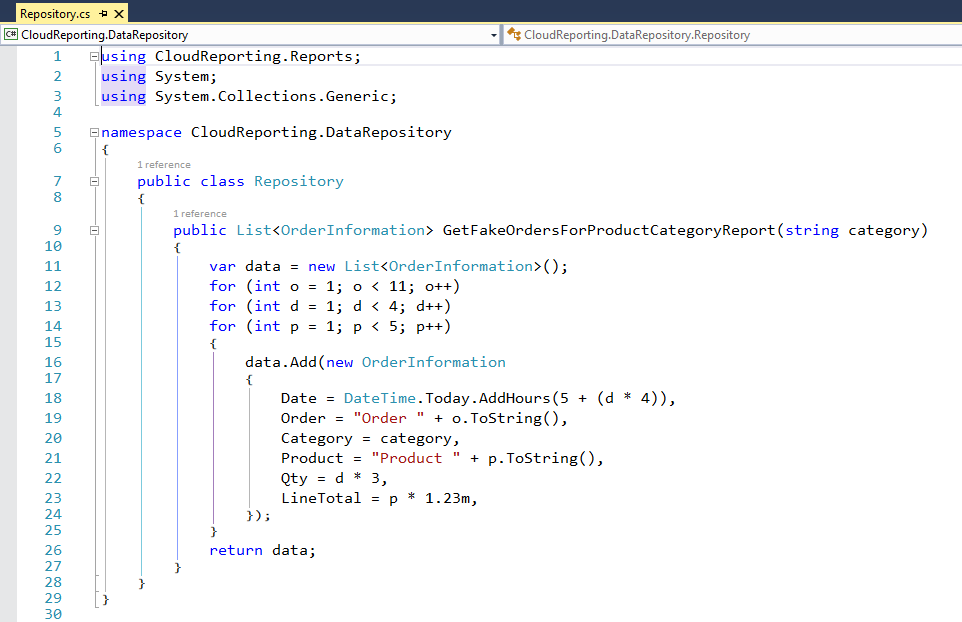
Right-click on the solution, add another new Class Library project, and name it CloudReporting.DataRepository. Right-click on References and add a reference to the CloudReporting.Reports project. Rename the generated Class1.cs file and the class to Repository.cs. Add the method shown in Figure 3, which generates fake data for the report. In a real-world scenario, you'd probably use Entity Framework to retrieve data from an Azure SQL Database. Check out my article “Azure's SQL Database: SQL Server in the Cloud” in the March/April 2016 issue of CODE Magazine to see how that's done.
Step 3: Create the Web API project
Add a new ASP.NET MVC Web Application project to the solution. Name the project CloudReporting.MVC. Choose the Web API project template. If you have an Azure account, check the Host in the cloud checkbox and choose App Service in the drop-down. You may choose not to deploy to Azure if you only want to run the solution locally. If so, uncheck the Host in cloud checkbox and skip the next paragraph.
Complete the wizard to create a new App Service to host the website and Web API calls. You'll have to give your site a globally unique name at .azurewebsites.net. I've used code-cloudreporting for mine. The Resource Group you choose isn't important for this example. When creating or choosing an App Service Plan, make sure that you choose at least the Basic 1 (B1) pricing tier and choose a location geographically near you for the best performance. Because the report rendering engine uses low-level GDI+ calls, Azure restricts you from generating reports on the Free or Shared service tiers for security reasons.
The project template creates both a website and a few sample Web API calls for you in the ValuesControler.cs file found in the Controllers folder. Edit this file and comment out the [Authorize] attribute on the ValuesController class near the top of the file. Once you're ready to publish the website, you'll check whether your users are logged in and authorized before allowing them to make service calls, but for now, you just want to work on the calls during development. Right-click on the project and make the MVC project your startup project. Press F5 to run the website. When your browser appears, add /api/values to the root URL to test the sample Get() call. Your browser should show some XML that contains the data returned from the Get method of the ValuesController. For now, it's enough to know that Web API is functional.
Step 4: Write the Service Call to Get the Data
One of the cornerstones of modern applications is the use of services to build a business infrastructure that can be leveraged by multiple user interfaces as well as external systems, so the first step in building these reporting services is to build the service call that retrieves the raw data for your report. This call not only powers our reports, but it can be used to power others' reports and can be leveraged by other systems for B2B interactions, for data exports, and even for other user interfaces.
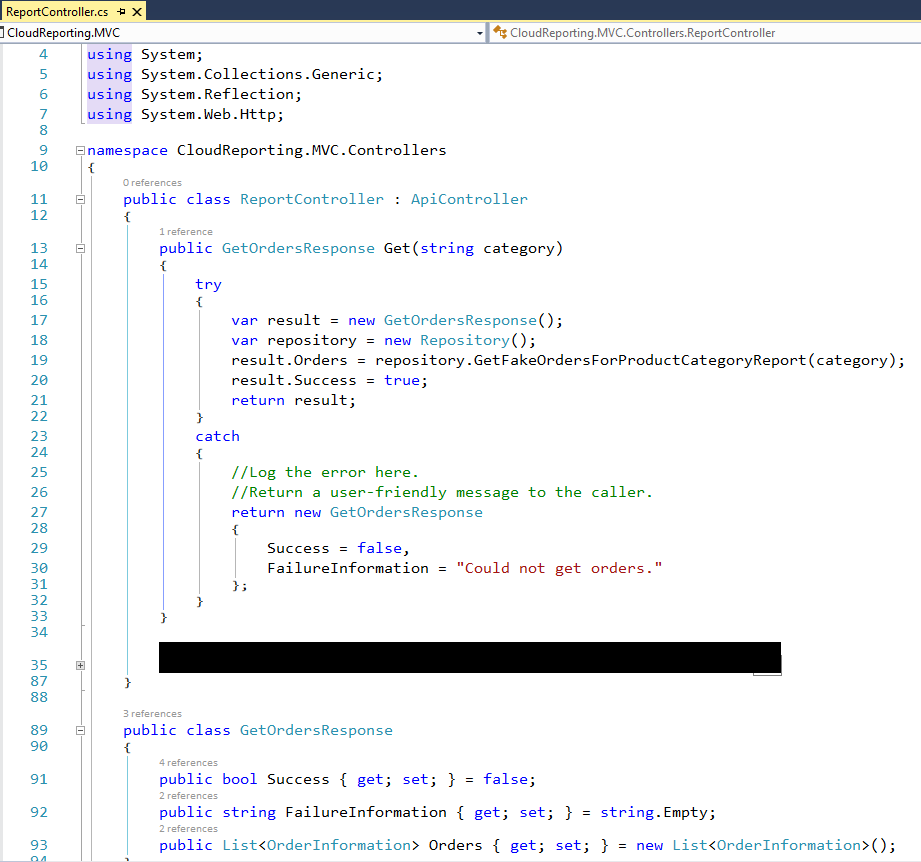
Right-click on the References folder in the MVC project and add a reference to both the CloudReporting.Reports and CloudReporting.DataRepository projects. Right-click on the Controllers folder and choose Add… > Web API Controller Class and name it ReportController. Delete all of the sample calls inside the ReportController class. Create a GetOrdersResponse class right here in the same file, just below the closing brace for the ReportController class and just above the closing brace for the namespace, as shown in Figure 4.
This class contains a Success flag, a FailureInformation string in case something goes wrong with the service call, and a list of order information. You'll have to add a Using directive to the CloudReporting.Reports namespace, which is where you created the OrderInformation class. In a WCF project, these would be your Data Contracts, defining the data you'll be returning from the service call. Next, add a Web API method to the now empty ReportController class, as shown in Figure 4.
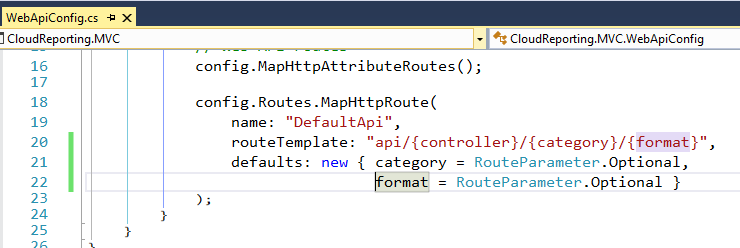
You'll need to add another Using statement for CloudReporting.DataRepository to the top of the file in order to use your Repository class. Notice that you're passing a parameter named Category to the method. This isn't the default name for a parameter for a Get method in Web API. You must change the default parameter name from ID to Category by changing the route in the WebApiConfig.cs file in the App_Start folder of the MVC project, and while you're add it, you'll add a second optional parameter named format, as shown in Figure 5. For more flexibility in naming parameters in Web API, check out the CODE Framework sidebar.
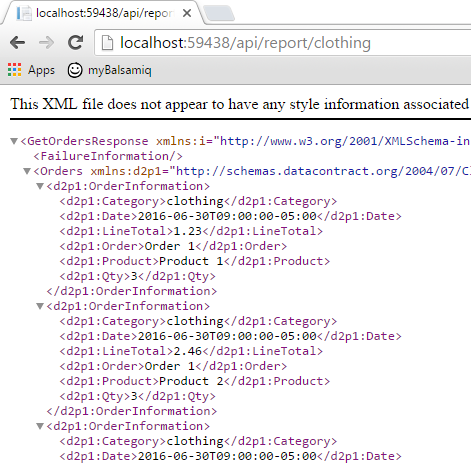
Press F5 again to run the app, and this time, add /api/report/clothing to the root URL. Report is the name of the controller class and clothing is passed to the method as the category parameter. The response should look something like Figure 6.
Step 5: Write a Service Call to Get the Generated Report
Add a reference to Microsoft.ReportViewer.WebForms to the MVC project. In these tests, the Windows Forms version of the control has not proven thread safe, whereas the WebForms control was built to run in a multi-threaded Web server. In Visual Studio 2015, it will be version 12. Open up the ReportController and add a new response class for retrieving a generated report file, as shown in Figure 7.

Next, add a second method call, as shown in Figure 8.
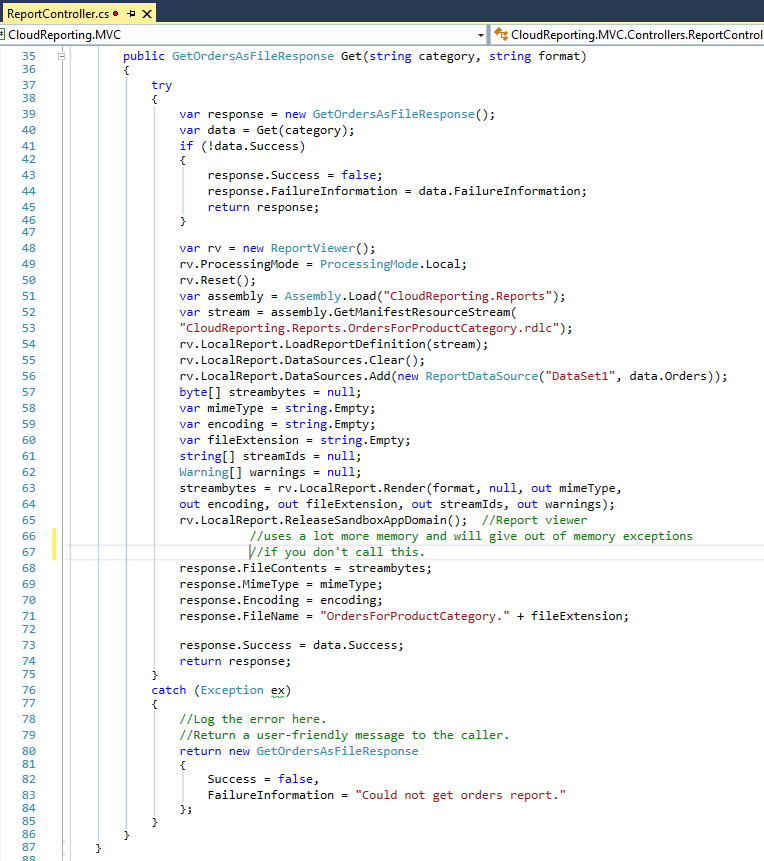
You'll have to add Using statements for Microsoft.Reporting.WebForms and System.Reflection. Notice how this call first calls the original Get method to get the data. If there's any issue getting the data, it returns a failure response to the user, otherwise it starts up an instance of the ReportViewer control and gets to work. First, you make sure that you're in local processing mode. This control is capable of working with a remote SSRS server and if the control is set to remote mode, your report won't work. Next, you call Reset() to make sure that the control is in a stable state. Then, you load the report layout you want to use. The layout is compiled into the CloudReporting.Reports.dll as an embedded resource. Next, you clear the data sources and add the List<OrderInformation> as the data source for this report. Then you initialize a few output variables that the ReportViewer control sets when the report is rendered, then render the report, passing in the output format that you want to produce. In this case, you're setting it to PDF, but you can also export to Excel. These are currently the only two formats supported by local mode of the ReportViewer control.
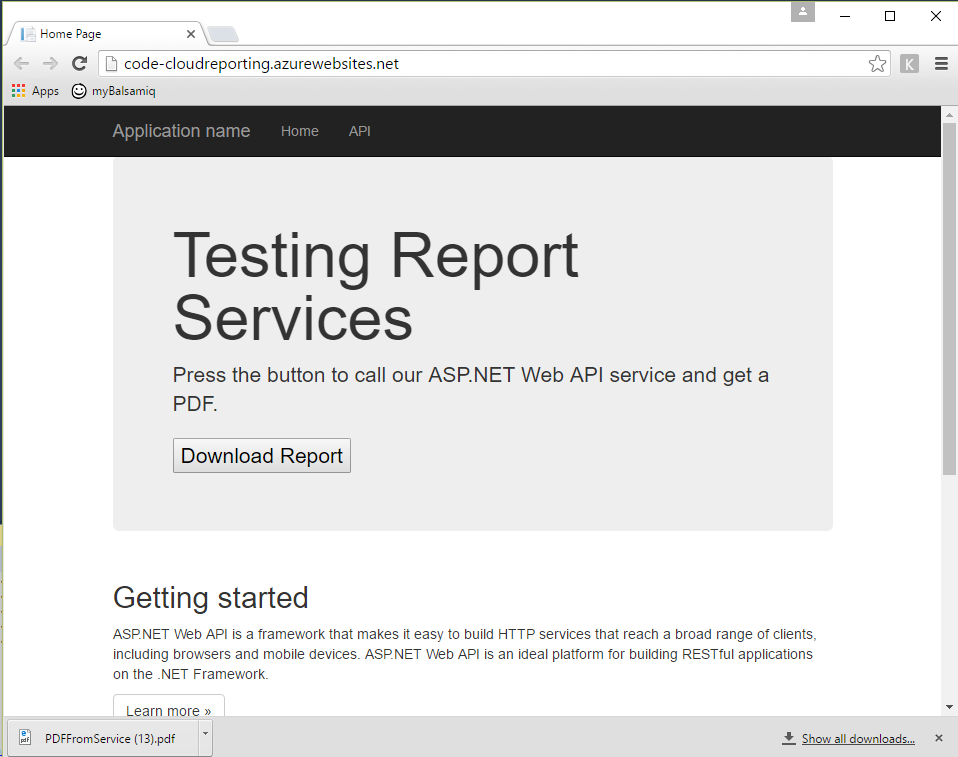
Press F5 and add /api/report/bikes/pdf to the root URL, and you should see output like that in Figure 9.
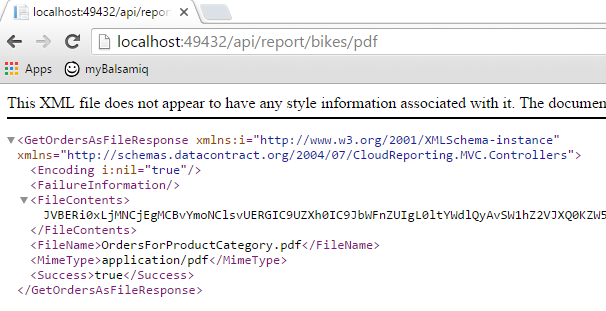
As you can see, the rendered PDF file is now returned in the response from the Web API call so that any caller to this service can obtain the rendered report. This makes the PDF available to browser, mobile, desktop, and B2B clients.
Step 6: Incorporate the Report into the Web Site
Because you're running your Web API services within your website, you could call the new service methods directly from within a controller without having to use Web API. Using this approach, the browser downloads or opens the PDF (depending on which browser you used). This works okay for a traditional MVC Web page, but let's take this example a step further and assume that you want to always download the file instead of opening it and that you want to call your services from the browser with JavaScript in a single page application (SPA)-style Web page.
Because the HTML 5 spec isn't fully implemented in all browsers, you're going to need a couple of JavaScript shims to allow you to reliably save the bits returned by your service to a file, regardless of the browser you choose. Right-click on the Scripts folder, create a new JavaScript file, and name it b64ToBlob.js. Cut and paste the code from: http://stackoverflow.com/questions/16245767/creating-a-blob-from-a-base64-string-in-javascript.
Create a second file named saveAs.js and cut and paste the code from: https://gist.githubusercontent.com/MrSwitch/3552985/raw/dc672bcc4c75729899367623ef00eb789e390728/saveAs.js. These files are included in the source code available for download.
Edit Index.cshtml in the Views/Home/ folder, modify the HTML in the first div tag, and add the JavaScript to the bottom of the file, as shown in Figure 10.
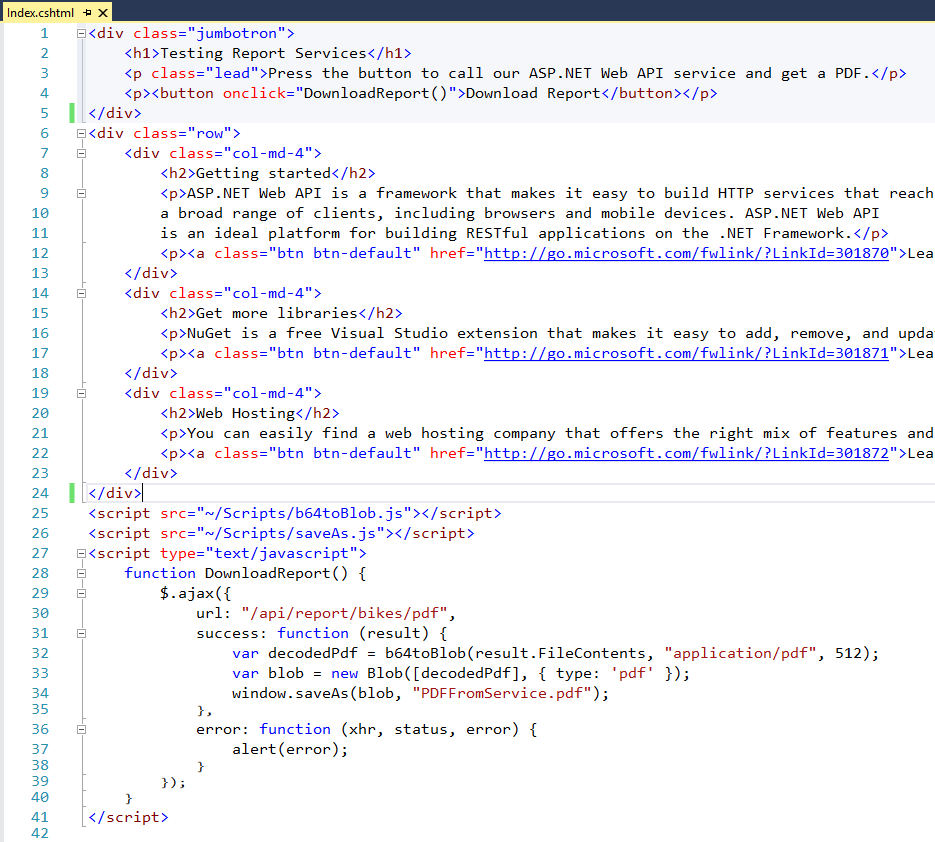
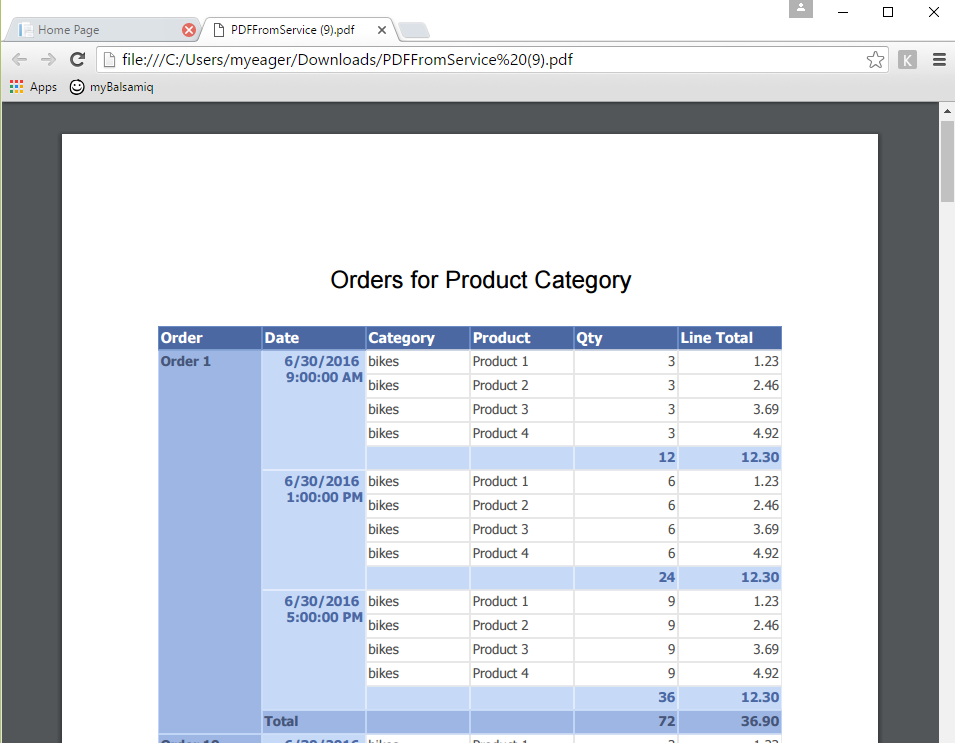
When the user clicks on the button, it calls Web API and returns the PDF file, encoded in base 64 for transport across HTTP. You decode the base 64 into its original state, read the PDF into an HTML 5 Blob, and save the blob as a downloaded file. It will look something like Figure 11.
Step 7: Deploy Web Site and Web API Calls to Azure
Before you deploy the website anywhere beyond your development computer, you're going to have to install the redistributable runtime package for the ReportViewer control, which is available through NuGet. Right-click on the MVC project, choose Manage NuGet Packages…, Select the Browse option at the top of the page and search for Microsoft.ReportViewer.2015. I came across two results for this search, but both contained the same redistributables for V12. Install the package.
If you have an Azure subscription and you checked the Host in the cloud checkbox in Step 3, Azure has already provisioned a Web server for you. Right-click on the MVC project and choose Publish…. You should find all of the information filled in by Azure. Click the Publish button. When publishing is complete, a browser should open to your website running in Azure, as seen in Figure 12.