


There was a time, not too long ago, when browser-based user interfaces were considered both the status quo and the Next Great Thing.
The demand for Windows Forms-based applications started to dwindle as the developer community fully embraced browser/server applications with their centralized server components and ubiquitous user interfaces. .NET, however, brings a much more powerful library of distributed communication technologies (such as Web services and remoting). As a result, .NET developers are seeing some of these traditionally browser-based applications becoming, more simply, Web-enabled and less tied to a browser. In short, developers can now see a very real business case for building distributed applications on Windows Forms technology.
As it happens, this article stemmed out of just such a business case. We were recently presented with a project that required a portion of the application to generate a visual representation of some data onto a Windows Form. Users of the application would then be able to move these graphical data elements around a page, add new elements, save, print, etc. All of these activities were second nature to a Windows Forms application and the System.Drawing namespace.
Instead of examining the intricacies of the System.Drawing namespace classes, we are going to start with a basic set of requirements that a developer might face. We will then detail how you can use the .NET namespaces and associated classes to create a solution to meet these requirements. As it happens, this article remains pretty focused on the System.Drawing namespace. However, we present a lot of good code here from the System.Windows.Forms and System.IO namespaces to name a few.
Let's get started by looking at a basic set of requirements.
The Requirements
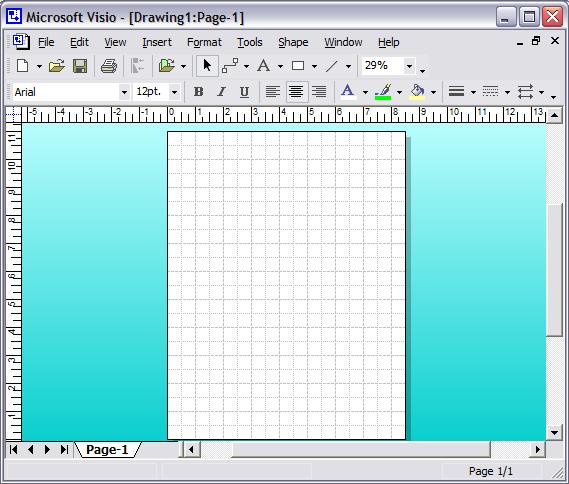
The first step is to determine what the basic requirements are for a drawing project. We started by examining a few drawing applications on our laptops in an attempt to visualize some of the problems these types of applications have to solve. We looked at Microsoft Word with its visual representation of a page. Some items of note included things like margins, scrolling, and zooming. Visio also contains many of the characteristics we are interested in (see Figure 1).
By examining Visio, it was evident that there are a lot of basic requirements that a drawing program will have to solve before it can be useful to its user base. We started listing these requirements and were at first overwhelmed. However, after trimming, we were able to cut the list back to a somewhat manageable subset (at least for the first release). The desired application will provide the following features:
- A visual illustration of a page's dimensions based on actual physical size of a printed piece of paper
- A visual indication of the page's margins
- A visual grid that sits in the background and allows users to
alignobjects - Draw shapes such as lines, rectangles, and ellipses
- Add blocks of text to the page as well as embed those blocks inside a graphical shape
- Select an object and move it about the form
- Save documents to disk and open them at a later time
- Print and print preview documents
- Zoom in and out on the page and continue drawing
- Rotate shapes and text on the page
- Scale shapes and text elements
You can see that an application that sounds pretty straightforward can soon suffer from major scope creep (and this was the pared-down list). From this list we knew we had to further narrow the requirements to a more manageable scope if we were going to make our deadline. (If you can't extend the schedule, you have to cut features!). In the end we cut the list down to the following features:
- A visual illustration of a page's dimensions based on actual physical size of a printed piece of paper
- Draw rectangles and ellipses
- Select an object and move it about the form
- Save documents to disk and open them at a later time
This subset will define the scope for this multi-part article. At the end we will have illustrated, and solved, a number of issues that developers will encounter when designing and coding a drawing application.
The Drawing Page User Control
The first technical design decision we made was to encapsulate the concept of a page as a user control. This will allow developers to add a page to any form or application and quickly expose, to their users, items like drawing, selecting, and moving graphical elements.
This user control will have to be able to react to user input, capture it, and be able to store that input. To capture some design decisions we constructed an object model to support the user control. Figure 2 shows the public interface into this control.

Each class in the object model encapsulates a specific portion of the functionality that the user control will provide. The following describes each of these classes relative to their intended features:
PageControl: The
PageControlclass provides the visual representation of the control (or page). It is the actual user control that a user can drop onto another form. Users of the control will draw on it with a mouse, and therefore the control's main purpose is to respond to that type of input. Each instance of thePageControlclass works directly with an instance of theDocumentclass.Document: The
Documentclass, as its name implies, represents an actual document. In our case, a document is aphysicalfile that can contain graphical elements, can be saved to disk, and can be re-opened at a later time. TheDocumentclass works with an instance of theElementsclass to represent the group of graphical elements in the document.Elements: The
Elementsclass is simply acollectionclass (derived from CollectionBase) that represents all of the graphical elements in a given document. TheElementsclass groups Element items.Element: The
Elementclass is an abstractbaseclass (‘MustInherit’ in Visual Basic .NET) that represents an element in a document (like a rectangle). This class defines the basic make-up of all elements that you can place into a document. A number of classes will derive from thisbaseclass. At the moment, only the ellipse and rectangleelementclasses are defined as concrete versions of Element. In the future, we may add a number of additionalderivedclasses.
Now that we had a basic object model in place, we set about solving some of the other key requirements for the control.
Drawing Rectangles and Ellipses
To draw shapes onto the screen we needed more detail about our requirements. We again took inspiration from Visio:
- The user should be able add shapes with the mouse (rather than via dialog boxes).
- The user should be able to see what they are drawing as they draw it. That is, the application should draw an outline of the drawing as the mouse moves.
- The user should be able to pick their fill color, pen color, and line thickness.
- Drawing elements should imply a natural order (or zOrder). That is, an element drawn last would be on top of other elements that it might overlap. This will allow the developer to add
layeringfunctionality (send-to-back / bring-to-front) to the application.
Capturing Mouse Events
To satisfy the first requirement, we knew we had to write code that captures mouse movements and clicks. These mouse events have to provide functionality for the users to draw, select, and move graphical elements about the page. The mouse events that our application needs to capture include:
- Mouse Down: Triggered when a user pushes the left mouse button down.
- Mouse Move: Triggered when a user moves the mouse in any direction.
- Mouse Up: Triggered when a user releases the left mouse button (after pressing down).
The MouseDown Event
For the MouseDown event you simply need to capture the fact that a user has clicked the mouse button. The MouseMove event will use this information to allow drawing based on dragging the mouse. You first expose a property of the PageControl class called Draw. This property is of the type DrawType: an enumeration created to indicate what a user might want to draw. The values for an enumeration are Rectangle, Ellipse, and Nothing. The next step is to initialize a local variable for the Draw property and set its default value to DrawType.Nothing. Before a user can draw anything, they will have to indicate to the control (via the Draw property) what exactly they want to draw.
The next step is to wire up the MouseDown event via a private method, OnMouseDown. Listing 1 shows the complete code for this event.
For drawing purposes you only need to capture two facts inside the event, mouse down and position. Set the local Boolean member variable, m_capture, to true to indicate the user had clicked their mouse. The MouseMove event uses this variable to know when it is in “capture” mode.
You also capture the position (or point) on the screen of the user's cursor where he/she pressed the mouse button. Store this in a member variable to the control called m_sP (for starting point) and make its type is a System.Drawing.Point object. This structure allows you to store both the x and y coordinates of where the mouse was pressed. These coordinates represent a fixed starting point on the form for whatever a user might draw.
The MouseMove Event
Now that you can tell when a user presses the mouse button down, you use this information inside of the MouseMove event to simulate drawing while a user drags their mouse. First, you capture another point to represent the position to where the mouse moved. This point is passed to you on the event's signature via the type MouseEventArgs (e). To store this value, create a new local variable as follows:
Point mp = new Point(e.X, e.Y);
Once you have captured both the starting point (from the MouseDown event) and the moved-to point, you can use these points to calculate the distance that the mouse moved vertically (height) and horizontally (width) as follows:
int w = Math.Abs(mp.X - m_sP.X);
int h = Math.Abs(mp.Y - m_sP.Y);
Using this information you can paint an object (rectangle or ellipse) that represents the user's dragging. You use a member variable called m_captureR to contain the bounds of these two points as a System.Drawing.Rectangle instance. All that is left is to construct this Rectangle instance in the MouseMove event and then draw the same rectangle to the screen via the form's Paint event.
However, one challenge remains. A user can move the mouse in any direction from the fixed starting point captured in the MouseDown event. For instance, a user might drag the mouse down and to the right. This would result in a drawing that moved from left to right and top down. However, the user could just as easily move the mouse to the left and up (or any other combination across the x and y axis). To handle this, you need some basic code that will check which direction the mouse is moving (based on positive and negative comparisons) and then create the rectangle accordingly. For example, if the mouse is moving up and to the left relative to the fixed starting point, you need to set the bounding rectangle's upper left corner to the move point and its bottom right corner to the start point. You can see the full source code for these checks in Listing 2.
The Paint Event
Now that you know how to capture the bounds of the mouse's movement via a corresponding Rectangle (m_captureR), you need to display this rectangle to the user. To do so, force the control to re-paint using the following line of code inside the MouseMove event:
this.Invalidate();
The Invalidate method of the Control class allows a specific region of the control to be invalidated, which forces it to be repainted. You can intercept this repaint inside the control's Paint event. You can see a complete listing of this event in Listing 3.
The code to display the drawn shape to the user turns out to be pretty straightforward. You first have to verify that the application is in capture mode by checking the member variable, m_capture. You also have to make sure that the user has indicated that they intend to draw something (m_draw). The resulting If statement looks like this:
if (m_capture & m_draw != DrawType.Nothing)
{
DrawCaptureR(g);
}
Drawing the captured rectangle is just as simple. You create a private routine that takes a reference to a valid System.Drawing.Graphics instance as a parameter (passed in from the PaintEventArgs in the Paint event). This routine, called DrawCaptureR, renders the captured rectangle to the control.
To accomplish this rendering feat, first create an instance of the System.Drawing.Pen class. This class, as its name implies, represents a pen that has an ink color and line thickness. For the ink color, let's use a green brush provided by the System.Drawing.Brushes class. Set the pen's thickness (or width) to 1 point as follows:
Pen p = new Pen(Brushes.Green, 1);
Next use the System.Drawing.Drawing2D.DashStyle enumeration to make the pen look like a series of dashes:
p.DashStyle = System.Drawing.Drawing2D.DashStyle.Dash;
Finally, verify what the user intended to draw to the control (via the local m_draw) and then output the element to the control's surface using the appropriate method of the Graphics class (in this instance, DrawRectangle):
if (m_draw==DrawType.Rectangle)
g.DrawRectangle(p, m_captureR);
else
g.DrawEllipse(p, m_captureR);
The MouseUp Event
Now that you have successfully captured the drag effect of the mouse and rendered the results to the page control's surface, you need to lock these results to the page once the user releases their drag (by releasing the mouse button). In addition, you need to store this element so it could be re-drawn to the screen later if need be.
To handle these tasks, you intercept the control's MouseUp event. Inside this event (complete code in Listing 4), you turn off capture mode by setting m_capture to false. This stops the control from processing further mouse movement via the MouseMove event. Next, you need to store the resulting graphical element in the object. To do so, you create a variable of the type Element. Then, based on the current drawing type (rectangle or ellipse), you cast that variable as the concrete Element class.
el = new RectElement(
m_captureR.Location, m_captureR.Size,
new Pen(Brushes.Black, 2), m_fill);
Now you need to store this element inside the Document. If you remember from the object model, the Document class that you create maintains a reference to the Elements collection. And of course, the PageControl class holds a reference to the Document class. Therefore, from within the PageControl's MouseUp event you have to add the newly created Element instance to the Elements collection as follows:
m_doc.Elements.Add(el);
One requirement for each Element instance is that it can draw itself. Therefore, all that was left to do in the MouseUp event was force the control to repaint. The control's Paint event will then handle drawing any elements stored in the associated Document instance.
To draw these stored elements, look at the private routine inside the PageControl class?DrawElements. The PageControl's Paint event calls DrawElements, passing it a handle to the control's Graphics surface. This routine simply loops through the Elements collection and calls the Draw method of each Element instance (forwarding it the Graphics handle).
The Draw methods for each of the Element classes are all very similar. First create a GraphicsContainer instance with the call:
GraphicsContainer gc = g.BeginContainer();
This call to BeginContainer allows you to cache subsequent calls to the Graphics handle before rendering to the screen.
Next, create a System.Drawing.Rectangle instance and draw it to the Graphics surface, then fill accordingly. These calls are as follows:
Rectangle r =
new Rectangle(this.Position, this.Size);
g.DrawRectangle(
new Pen(new SolidBrush(this.PenColor),
this.PenThickness), r);
g.FillRectangle(
new SolidBrush(this.FillColor), r);
Finally, call the EndContainer method of the Graphics class to indicate that your application can now render the given element to the user's screen:
g.EndContainer(gc);
Selecting and Moving Elements
The next requirement to tackle is to allow a user to select and then drag a graphical element on the page. This will again involve our mouse events (MouseDown, MouseMove, and MouseUp). From an algorithm perspective, the code needs to handle the following sequence of events:
The first requirement is obviously the simplest, just an If statement inside of the MouseDown event (see Listing 1).
As for the second requirement, you need to write code to solve a common problem called “hit-testing.” Hit-testing involves capturing the point of the user's cursor at the time of their click and then determining if that captured point is within the bounds of any other element.
For simplicity sake, in this version, the code only supports single item select (no multi-select) and drag. In addition, elements are hit-tested in the reverse order that they were drawn to the screen (or added to the Elements collection class). This way, if two elements overlapped, the top-most Element would be selected every time. Let's look at the code that handles this.
First, add a routine to the Elements collection class called GetHitElement. This routine takes a Point (testPoint) type that represents the user's click (and our testing point). The routine returns the hit (or user selected) element (or a null in the case of no selection). You call this method from the MouseDown event on the control:
Element el =
m_doc.Elements.GetHitElement(m_sP);
Inside the GetHitElements method you simply loop the collection backwards and call each Element's internal HitTest method as follows:
//search the list backwards
for (int i=this.List.Count; i>0; i--)
{
Element e = (Element)this.List[i-1];
if (e.HitTest(testPoint))
return e;
}
Next you need to make each concrete Element class expose their own HitTest method. This is required because each element's shape can be different (rectangle vs. ellipse, for example). Thankfully, GDI+ makes hit-testing pretty simple. First create a System.Drawing.Drawing2D.GraphicsPath instance:
GraphicsPath gp = new GraphicsPath();
You'll use the GraphicsPath object to contain a version of the given Element. Therefore, you add the element to the graphics path:
gp.AddRectangle(
new Rectangle(this.Position, this.Size));
Next, you check the value of the IsVisible property of the GraphicsPath instance to determine if the user's click point is inside the element:
return gp.IsVisible(testPoint);
If the call to IsVisible returns true, you have a hit. Once you have determined the user's selected object, you need to indicate that visually to the user. To do this you'll add code to the PageControl's MouseDown event. Once again you'll leverage the object model. Now set the hit element to the Document's SelectedElement property, which allows you to add code to the control's OnPaint event that checked to make sure that a SelectedElement exists. If so, the Paint event tells the selected element to draw itself as follows:
if(m_doc.SelectedElement != null)
m_doc.SelectedElement.DrawSelected(g);
Of course, you have to create a DrawSelected method for each concrete Element class. In this case, to represent selection the code will just draw the object's outline in blue since the application does not allow the user to create objects with anything other than black pens.
Finally, to illustrate movement of the selected element about the page, you reset the selected element's Position property to that of the newly moved-to position. Before doing this, you need to set the moved point's offset values based on a difference calculated in the MouseDown event:
mp.Offset(m_xDiff, m_yDiff);
m_doc.SelectedElement.Position = mp;
Saving and Opening a Document
The last requirement of this control's library was that it be able to save a document to disk and re-open it at a later time. To give users this ability, you will add both a Save and Open method to the PageControl. These methods save and open instances of the PageControl's Document class to create and open binary versions of the Document class.
To manage this you will first mark the Document class (and its associated classes) as Serializeable. This allows the .NET Framework to serialize and de-serialize an object into one of multiple formats (in our case binary). You mark the class via an Attribute class as follows:
[Serializable()]
public class Document
Next, create the Save routine. This routine uses BinaryMessageFormatter to serialize the Document class out to a file as follows:
public void Save(string fileName)
{
Formatters.Binary.BinaryFormatter bf =
new Formatters.Binary.BinaryFormatter();

bf.Serialize(
new FileStream(fileName,
FileMode.Create), this.m_doc);
}
To open the serialized class you need to create another binary formatter. This time you call the Deserialize method and cast the results into a new Document instance that gets stored as the PageControl's associated Document instance. The code looks like the following:
Formatters.Binary.BinaryFormatter bf =
new Formatters.Binary.BinaryFormatter();

m_doc = new Document();

m_doc = (Document)bf.Deserialize(
new FileStream(fileName, FileMode.Open));
Surprisingly, you've done everything necessary for saving and opening instances of the custom Document class. Users can save their documents and open them at a later time. Of course, a developer that consumes the PageControl will still have to wire up the actual interaction with the file system.
The Application Container (Main)
You now have a fully functioning, version 1 PageControl. However, to see it in action (and to test it) you need to create an application that consumes the control. Keeping in mind the Visio paradigm, it makes sense to create a container for the application that could host multiple new documents. To handle this requirement you simply create a standard Windows Form and set its IsMdiContainer property to true. An MDI container also offers a very familiar paradigm to users.
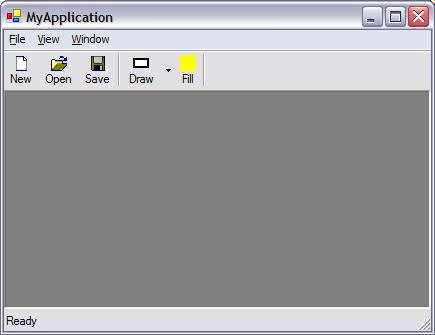
You can add a number of controls to this main form to make it more useful. To handle basic navigation, add a menu bar and toolbar. Next, add the open and save common dialog controls. These controls will help you quickly and consistently write the code for interacting with the file system during opening and saving a Document. Finally, let's add the color dialog control to allow users to choose a fill color for drawing elements that they'll draw on a page. Figure 3 shows an example of this MDI container.
Wiring up these controls resulted in some pretty basic code (although showing the currently selected fill color on the toolbar required a little GDI+ work). This code is included in the sample download.
The Page Host
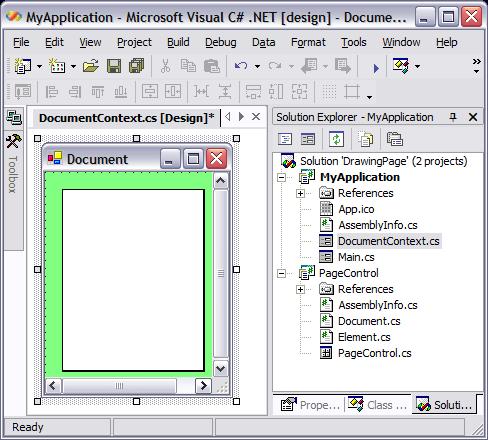
Now that you have a document hosting environment with an MDI interface, you must create a host for the actual PageControl user control. This host will be another Windows Form, and we'll call it DocumentContext. Its main job is to contain the newly created PageControl and act as a MDI child window to the MDI container. Figure 4 provides a screen shot of the DocumentContext MDI child form and our PageControl class in action.
This child window has one requirement: maintain the page in its center. Similar to Visio or Word, when a user re-sizes the form (DocumentContext), the page should remain in the center of the form with a standard border on both sides. This provides the application a more polished feel.
At first glance, the standard docking and anchoring properties available in Windows Forms applications appear to provide the necessary mechanism to make this feature happen. After some monkeying around, however, it soon becomes apparent that additional code was in order. Thankfully, the Layout event lends itself handily to the problem. This event gets fired when you need to move on the form, such as a user resizing the form.
The code added to this event represents some straightforward math: Capture the new width of the DocumentContext form and subtract the width of the page control (set based on the Orientation property) and divide by 2 to provide an equal border on both the left and the right. Use the resulting value to set the page control's Left property. You can find the complete code for this event in Listing 5.
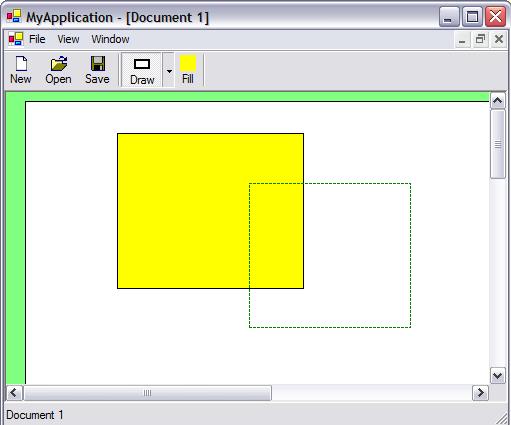
Summary
In this article you've created the foundation for a drawing page control (see Figure 5 for a final look). In Part 2 you will learn how to tackle a number of other requirements for the control including adding text blocks, zooming in and out on the page, and scaling elements. Each of these requirements will present themselves with a whole new set of issues.
Download the complete source code for this article at: www.brilliantstorm.com/resources
Listing 1: MouseDown event
private void OnMouseDown(object sender,
System.Windows.Forms.MouseEventArgs e)
{

//purpose: capture the mouse down event

//indicate we are capturing
m_capture = true;

//get the down-point of the cursor (starting point)
m_sP = new Point(e.X, e.Y);

//release any selected elements
m_doc.SelectedElement = null;
this.Invalidate();

//verify it is time to draw
if (this.Draw == DrawType.Nothing)
{
//test for "hits" (selected elements)
Element el = m_doc.Elements.GetHitElement(m_sP);
if (el != null)
{
//set the selected item
m_doc.SelectedElement = el;

//set offset differences in case of moving the object
m_xDiff = m_doc.SelectedElement.Position.X - m_sP.X;
m_yDiff = m_doc.SelectedElement.Position.Y - m_sP.Y;

//change the cursor
this.Cursor = Cursors.SizeAll;

//force the form to re-draw
this.Invalidate();
}
}
}
Listing 2: MouseMove event
private void OnMouseMove(object sender,
System.Windows.Forms.MouseEventArgs e)
{

//purpose: capture the mouse move event

//determine if we are in capture mode
if (m_capture)
{

//create a point that is the mouse moved point
Point mp = new Point(e.X, e.Y);

//calculate the width of the move
int w = Math.Abs(mp.X - m_sP.X);

//calculate the height of the move
int h = Math.Abs(mp.Y - m_sP.Y);

//verify the start point of the rectanlge
// as the user can move in any direction relative
// to the starting point (mouse down)
if (mp.X > m_sP.X & mp.Y > m_sP.Y)
{
m_captureR = new Rectangle(m_sP.X, m_sP.Y, w, h);
}
else if (mp.X < m_sP.X & mp.Y < m_sP.Y)
{
m_captureR = new Rectangle(mp.X, mp.Y, w, h);
}
else if (mp.X > m_sP.X & mp.Y < m_sP.Y)
{
m_captureR = new Rectangle(m_sP.X, mp.Y, w, h);
}
else if (mp.X < m_sP.X & mp.Y > m_sP.Y)
{
m_captureR = new Rectangle(mp.X, m_sP.Y, w, h);
}

if(m_doc.SelectedElement != null)
{
//we are not drawing, and we have a selected an object
//  reset the position of the selected object
//  using offset values stored at the
//time of mouse-down
mp.Offset(m_xDiff, m_yDiff);
m_doc.SelectedElement.Position = mp;

}

//cause the page control to be repainted
this.Invalidate();

}
}
Listing 3: Paint event
protected override void OnPaint	System.Windows.Forms.PaintEventArgs e)
{

//get reference to graphics object
Graphics g = e.Graphics;

//draw page
this.DrawPageBounds(g);

//re-draw all elements
this.DrawElements(g);

//draw the rectangle if capturing in draw mode
if (m_capture & m_draw != DrawType.Nothing)
{
DrawCaptureR(g);
}
else
{
//draw the selected element if applicable
if(m_doc.SelectedElement != null)
m_doc.SelectedElement.DrawSelected(g);
}
}
Listing 4: MouseUp event
private void OnMouseUp(
object sender, System.Windows.Forms.MouseEventArgs e)
{

//purpose: capture the mouse up event

//indicate to stop capturing
m_capture = false;

if (m_draw != DrawType.Nothing)
{

//define an element var
Element el = null;

if (m_draw == DrawType.Rectangle)
{
//create a new rectangle element
el = new RectElement(m_captureR.Location,
m_captureR.Size,
new Pen(Brushes.Black, 2), m_fill);
}

if (m_draw == DrawType.Ellipse)
{
//create a new ellipse element
el = new EllipseElement(m_captureR.Location,
m_captureR.Size,
new Pen(Brushes.Black, 2), m_fill);
}

//add the element to the local collection
m_doc.Elements.Add(el);

}

if (m_doc.SelectedElement != null)
{
//change the cursor back
this.Cursor = Cursors.Default;
}

//allow the page to re-paint
this.Invalidate();

}
Listing 5: MDI child (DocumentContext) layout event
private void DocumentContext_Layout
(object sender, System.Windows.Forms.LayoutEventArgs e)
{

//purpose: respond to the layout event
//used to center the page control on the host

//calculate the left position of the page
int leftPos = (this.Width - pgControl.Width)/2;

//do not go below frame size
if (leftPos < pgControl.FrameSize)
{leftPos = pgControl.FrameSize;}

//position the control on the form
pgControl.Left = leftPos;
pgControl.Top = 0;

//force redraw of the control
pgControl.Invalidate();

}
