Enterprise Application Integration (EAI) is a collection of architectural principles combined to integrate new and existing applications both within the enterprise and in business to business or partner integration scenarios.
Building on the principles introduced in Part 1 (May/June issue of CoDe Magazine), I’ll provide a step-by-step example of how to implement a solution that addresses a business case and suggest some real-world patterns and techniques for fulfilling the business case.
In Part 1 (May/June issue of CoDe Magazine) of this article, I discussed what Enterprise Application Integration is all about along with a bird’s eye view of some of the common challenges associated with integrating legacy applications with new systems and building transport agnostic, workflow-modeled software in a loosely coupled manner. This is especially important when integrating existing investments with new applications and systems.
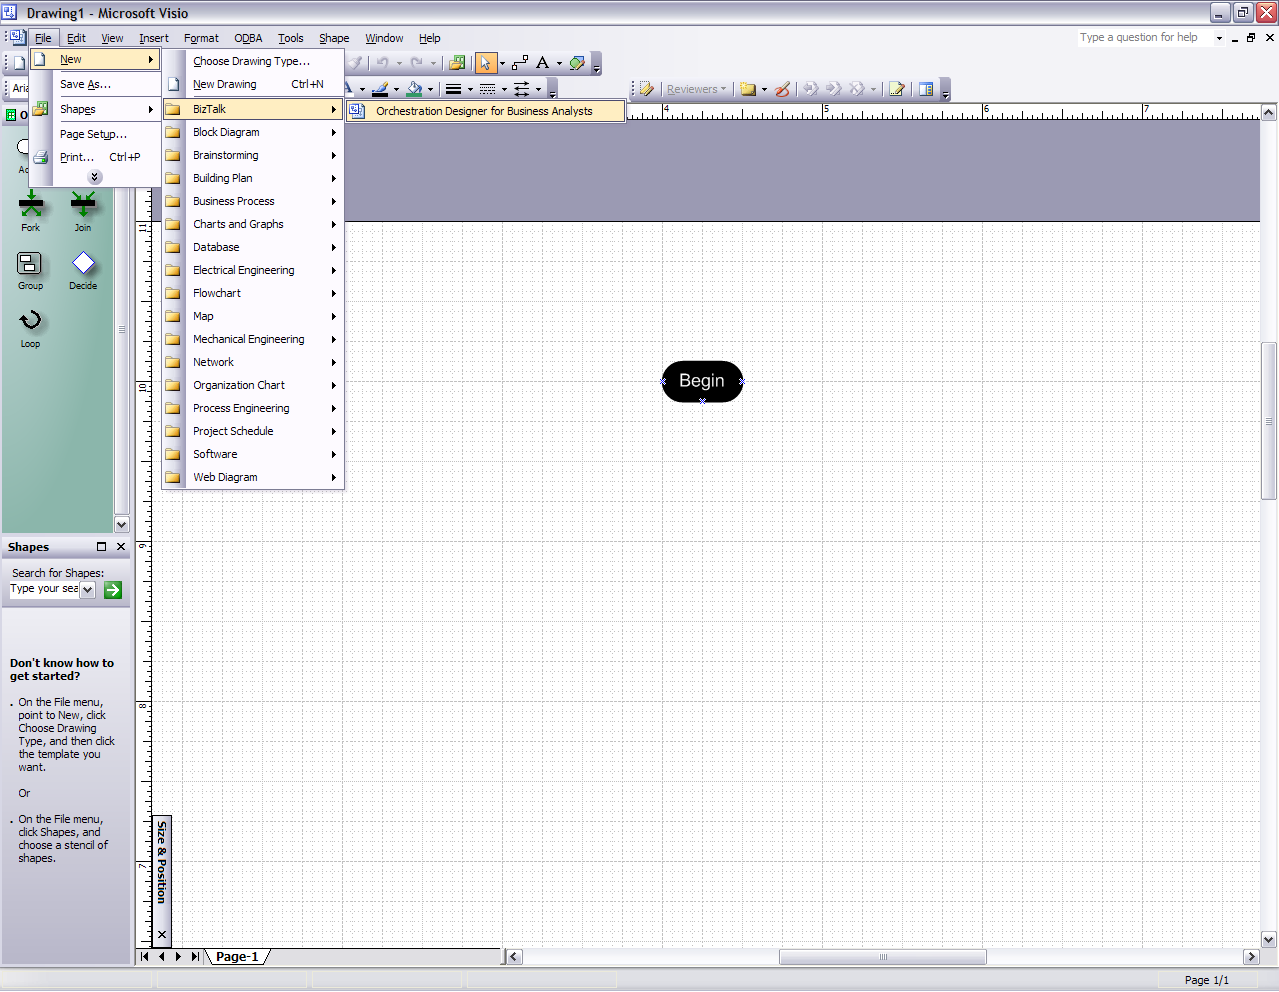
BTS 2006 provides an optional Microsoft Visio add in, known as the Orchestration Designer for Business Analysts (ODBA). The tool is intended for facilitating collaboration between developer, analyst, and stakeholder in designing Orchestrations around business processes.
I presented a high-level look at how Microsoft BizTalk Server 2006 provides a robust platform and complimentary toolset for building elegantly connected applications while addressing many common EAI chores. Specifically, I explained how the Messaging Engine and Orchestration Engine work together to address discrete aspects of the problem domain in a loosely coupled manner.
I wrapped up Part 1 with an overview of the Visual Studio 2005 Project System, which consists of tools that enable you to work with BizTalk Server 2006. In Part 2 I’ll move beyond the theory and put into practice a simple (yet common) integration scenario that will help to form a foundational understanding of how to leverage BizTalk Server 2006 within your own application integration projects. I’ll use BizTalk Server to streamline an existing business process and increase automation by focusing more closely on the business domain and less on the plumbing itself.
Streamlining and Automating an Order and Fulfillment Process
Northwind Traders, purveyors of gourmet foods and other fine goods, have vendors all over the world so that they may provide customers with the best selection of products available.
While the company has been very successful, the sales team conducts most business over the phone and e-mail as well as through their award-winning mail order catalog. Some existing relationships go so far back that some customers still place their orders in person.
Until now, how the sale was made hasn’t really mattered all that much because once a sale is made, it is entered into a purchase order template within a spreadsheet that has been used successfully for several years. A use case diagram (Figure 1) shows the business process (clockwise).
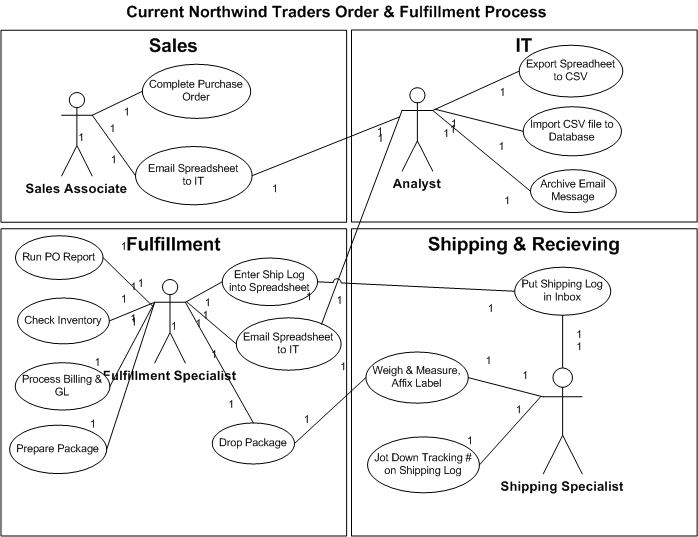
The sales person enters the items in the purchase order, saves it, and then simply sends an e-mail with the purchase order spreadsheet attached to the IT team. The IT team takes the spreadsheet (given a very strict service level agreement (SLA) of course) and imports the spreadsheet into the Orders table in the company database. The e-mail message containing the purchase order is archived just in case the order gets lost along the way. With purchase orders hitting the company database at any given time, the fulfillment department runs intra-day reports. Members of the fulfillment team proactively monitor the report for purchase orders hitting their region and promptly act on them. Upon taking ownership of a purchase order, the fulfillment team takes several actions:
The use case in Figure 1 represents an overview of Northwind Trader’s current business process. Perhaps not unlike the reader, many of the business analysts and stakeholders have identified several opportunities for improving the Northwind Traders’ business process:
- Orders take too long to fulfill.
- The IT team is too slow in processing purchase orders and sometimes purchase orders just seem to “disappear”.
- The fulfillment team is understaffed and overworked and too much of their job is manual and clerical in nature.
- There is a lack of visibility as to where an order is within each step of the process. This leads to confusion and frustration for members of all teams.
- Many times orders are shipped late because the fulfillment and shipping team is overwhelmed with packages that need to be prepared and staged for shipment.
- The fulfillment team is frustrated that they have to enter the tracking id’s from the shipping log and it often takes a couple of hours each morning to get all tracking IDs entered, which prevents the sales team from accurately answering customer inquiries on the status of orders in a timely manner. (Sometimes, this information is not available in the database until mid-morning the next business day.)
Furthermore, the marketing team is convinced that if the business process was streamlined using a more robust back office, orders could be fulfilled more rapidly, and, with some automation improvements, the timing would be great to put together an online store front which would, in turn, drive revenues even higher.
Looking for a better way to streamline the business process and improve morale while increasing revenue and expanding the reach to customers all over the world (via the Internet), the leadership team at Northwind Traders commissions a new project that will provide enhanced business process automation and better visibility through closely instrumented business process management. They identify several nifty applications as part of the new vision for a faster, more responsive, and transparent business process:
- Design and deliver a new, public-facing Web site along with a number of applications and services to support the new online store.
- New applications and services should interface with each other as well as with middle-tier services that the IT department will implement as part of the business process automation and management streamlining effort.
- It is critical that existing operations are not disrupted. As such, during development (and after delivery), things must remain business as usual from an order fulfillment perspective.
- The company must maintain their legacy database.
- Sales associates (the lifeblood of the company) must be able to continue submitting purchase orders via the spreadsheet templates. It is likely that one day the spreadsheets will be phased out, but until then, they must be fully supported and still benefit from the new investments in automation. To this end, once the online store front is complete, the IT team will start using it as their new interface for entering new purchase orders so that data entry and processing is consistent.
While the marketing team works with a design firm to come up with a snazzy new Web site, let’s focus on the middle-tier applications and services that will drive this new era of productivity!
Requirements and Scope
One of the primary roles of application integration is to integrate new and existing applications to support the business process. In this case there are a number of components and services that need to be developed and integrated to support the new and improved Northwind Traders business process. Assume that another team is building the new Web site, so the deliverable that this article will address is an entry point, or a gateway to the middle-tier components and services. I’ll show you how to use the .NET Framework, Visual C#, SOAP Web services and BizTalk Server to build, orchestrate, and deploy the foundation for the company’s business process engine.
Sequence diagrams and object models provide a useful system and API aspect to the design, but the business process, or workflow, must also be modeled to ensure that the business process is implemented correctly.
The best way to communicate the requirements for these new middle-tier components and services is by looking at the proposed business process depicted in Figure 2, which provides a “happy path” for the new and improved order fulfillment process at Northwind Traders.
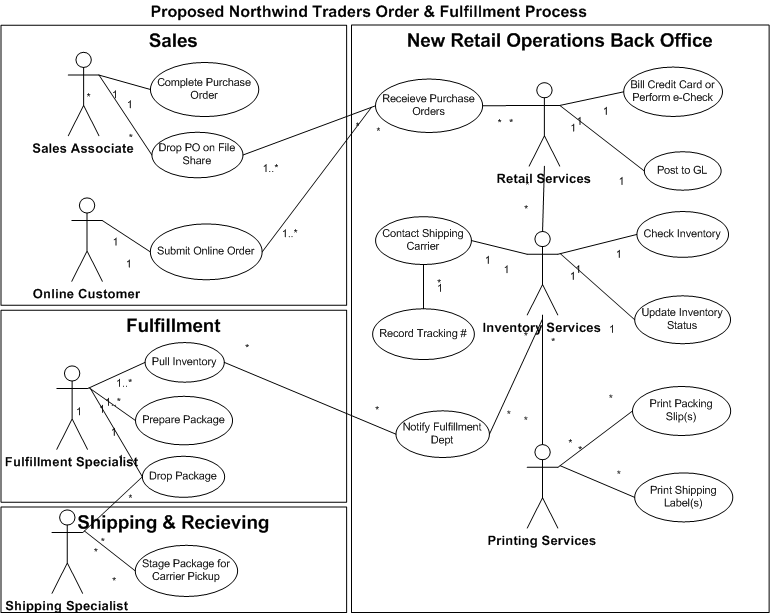
From the use case diagrams it is clear that the IT department must design and develop a number of components and services to support the new Retail Operations application. This is the Northwind Trader’s business process at its core, and as such represents a blueprint-representative of the desires and expectations of it’s stakeholders-for addressing a technical solution. This kind of interactive dialogue with the business and stakeholders is critical, because they are not so much concerned with the technology or architecture as they are in getting the results they expect. The fact that this article has no user interface deliverables will make it even more important to maintain the right focus on the component and service definitions and APIs so that they can be consumed as easily as possible by the developers of the Web site that will leverage the Retail Operations application as it’s middle-tier.
Designing the Solution
After digesting the requirements it is time to perform some pragmatic modeling. This step is critical in not only understanding the business domain, but in thinking about how, technically, the requirements will be met.
There are several great options for capturing this information. Figure 3 depicts an informal sketch of a system-level sequence diagram. Architects use sequence diagrams to think about and communicate time and interaction between platforms and components to depict synchronous versus asynchronous calling patterns. Method signatures may change during development, but because this is a system-level aspect diagram, we will be able to discern the various components and services being proposed for each interaction that comprise the Retail Operations application.
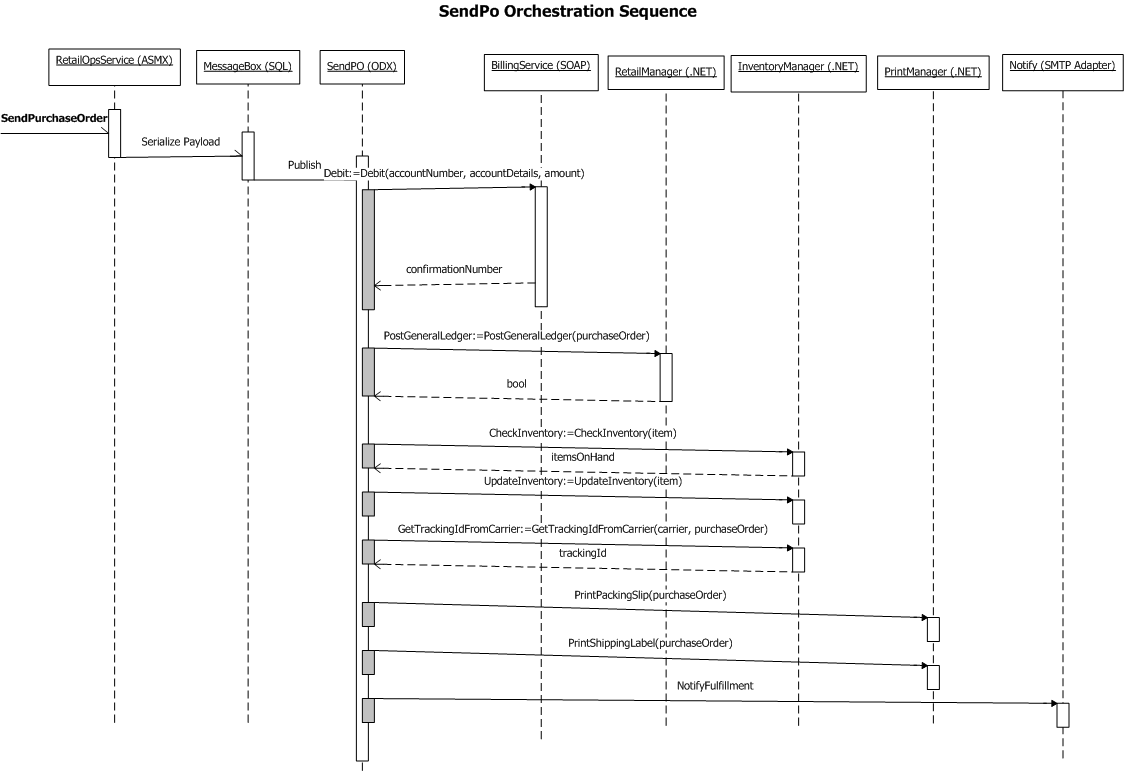
Figure 4 provides a light object model of the required components/services. This model serves as a basic API reference for architects, developers, program managers, and analysts. Although object models will undoubtedly change somewhat during the development process, initial drafts should capture all of the major operations that will be supported. In fact, the API should be somewhat simple to correlate to the use case diagram.
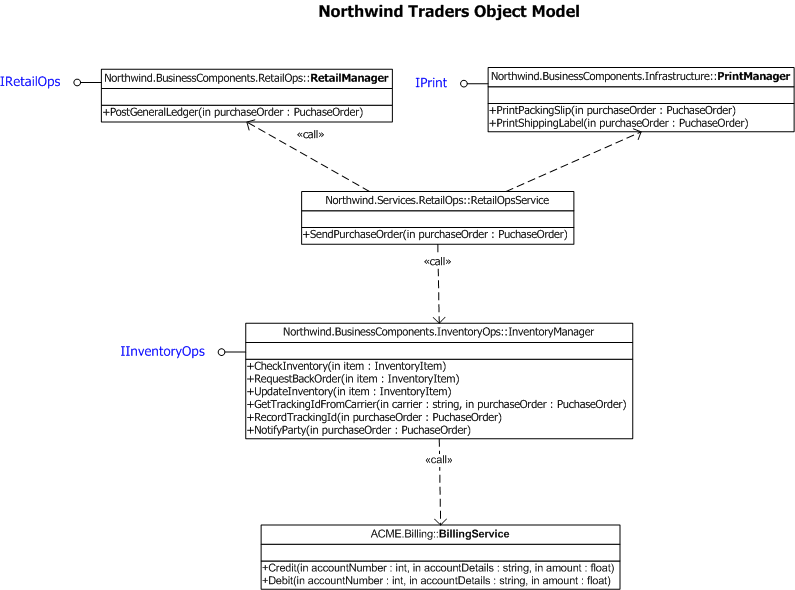
The goal of this modeling exercise is not to provide academically accurate UML 2.0 diagrams; but rather to be pragmatic in communicating the proposed design and other relevant aspects to the appropriate audience. See sidebar, Agile Modeling, for a great reference to these and other modeling diagrams.
Sequence diagrams and object models provide a useful system and API aspect to the design, which is useful mostly to architects, developers, program managers, and analysts. The business process, or workflow, must also be carefully modeled to ensure that all of the artifacts depicted in the previous models are implemented such that they actually support the business process. It goes without saying that getting the business process right is critical, and as such should be a very collaborative exercise between architects, developers, program managers, analysts, and business stakeholders. To do so, I’ll use a business process model diagram to communicate the workflow of the proposed business process.
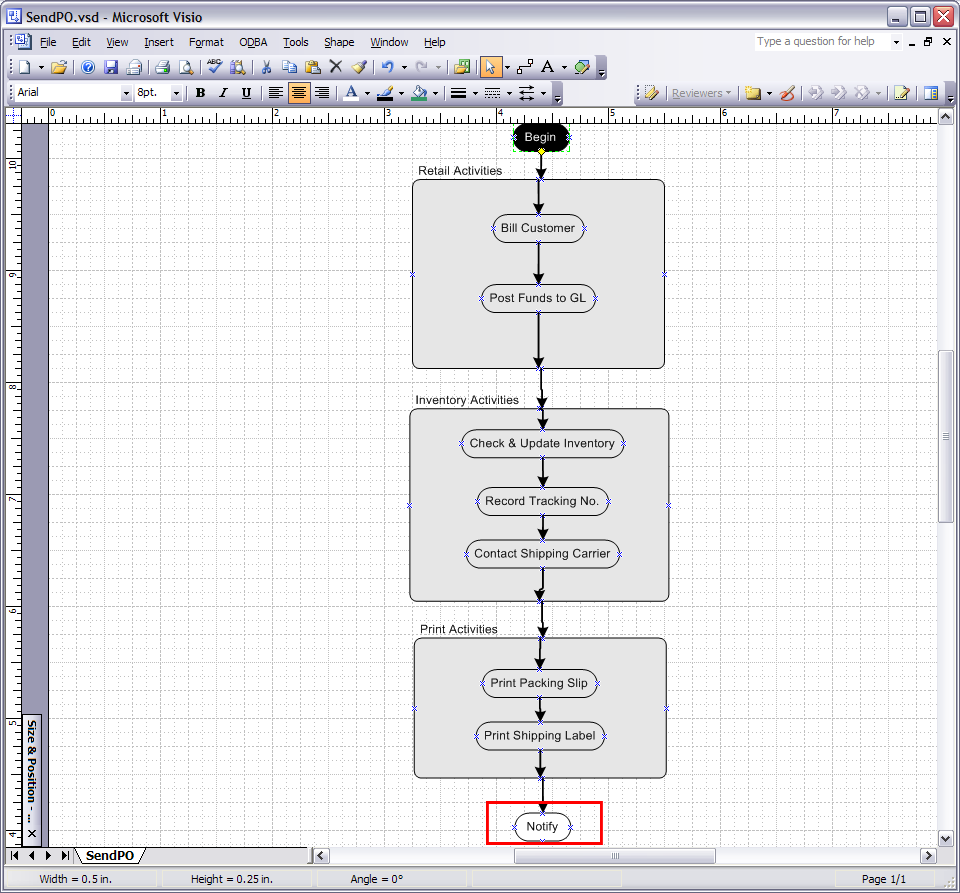
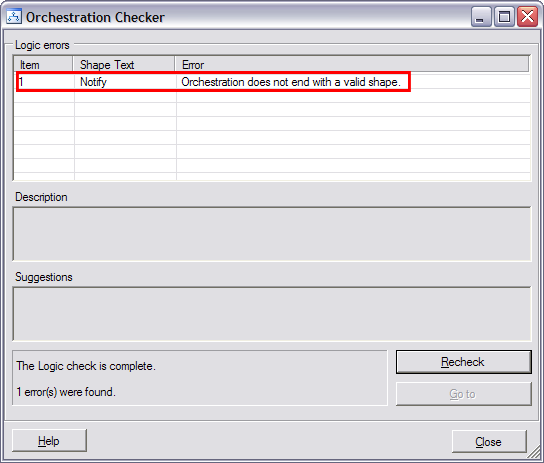
Business process modeling facilitates the ability for both engineering and business roles to collaborate and verify that the model is accurate and reflects the current (or proposed) business process. The BizTalk Orchestration Designer has an extremely intuitive design surface that naturally resembles business process models very well. In addition, BTS 2006 provides an optional Microsoft Visio add in, known as the Orchestration Designer for Business Analysts (ODBA). The tool facilitates collaboration between all roles in planning the design of Orchestrations around business processes.
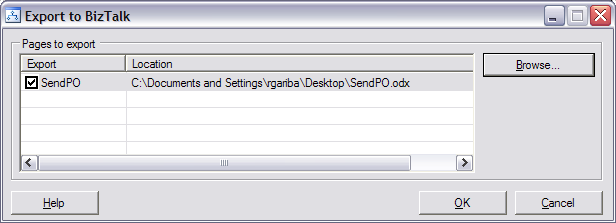
I will use the ODBA to model the business process and workflow depicted in the proposed use case in Figure 2. Later, I’ll show you how to import the diagram into Visual Studio 2005 and use it as a blueprint for implementing the Orchestration itself.
Using ODBA to Model the Business Process
Note: ODBA is free, but you must have Microsoft Visio 2003 in order to use ODBA. Installation is completely MSI-based and takes under two minutes. If you would like to skip this walkthrough and use the Orchestration Designer to create the general workflow, you may do so. Keep in mind that the fully functional Visual Studio 2005 solution is also available for download and can be used as a reference as well.

Implementing the Design
To proceed, BizTalk Server 2006, including Developer Tools must be installed on your local development environment in which Visual Studio 2005 is installed. See the sidebar, Installing BizTalk Server 2006 from Part 1 of this article, for more information on installing the required development and server components.
Whether data comes in naturally as an XML document or it is converted by brute force, Orchestration can only work with serializable types or XML itself.
Let me take a quick moment to review the work that lies ahead. First, you’ll learn to create an application that encapsulates the business rules and workflow of the new Retail Operations business process. This service will be implemented as a BizTalk Server Orchestration (called SendPO.odx) that will be exposed (at least initially) as a SOAP Web service endpoint.
Create the Orchestration
As part of the design phase of the solution, you created a business process diagram (Figure 8) of what the SendPO workflow might look like using the ODBA.
To add the Orchestration to Visual Studio 2005, complete the following steps:
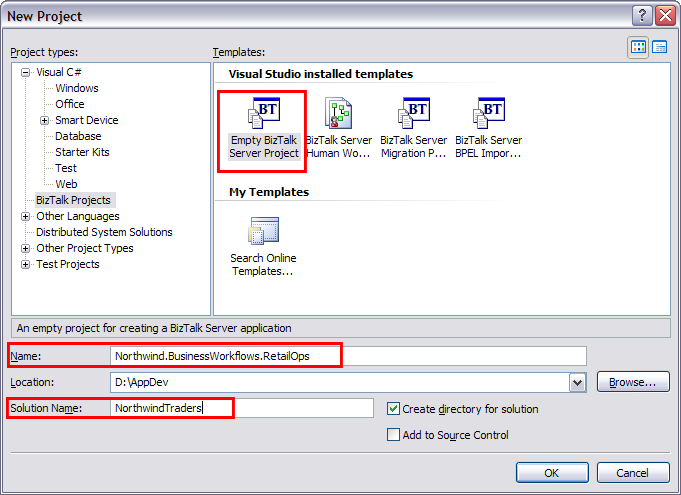
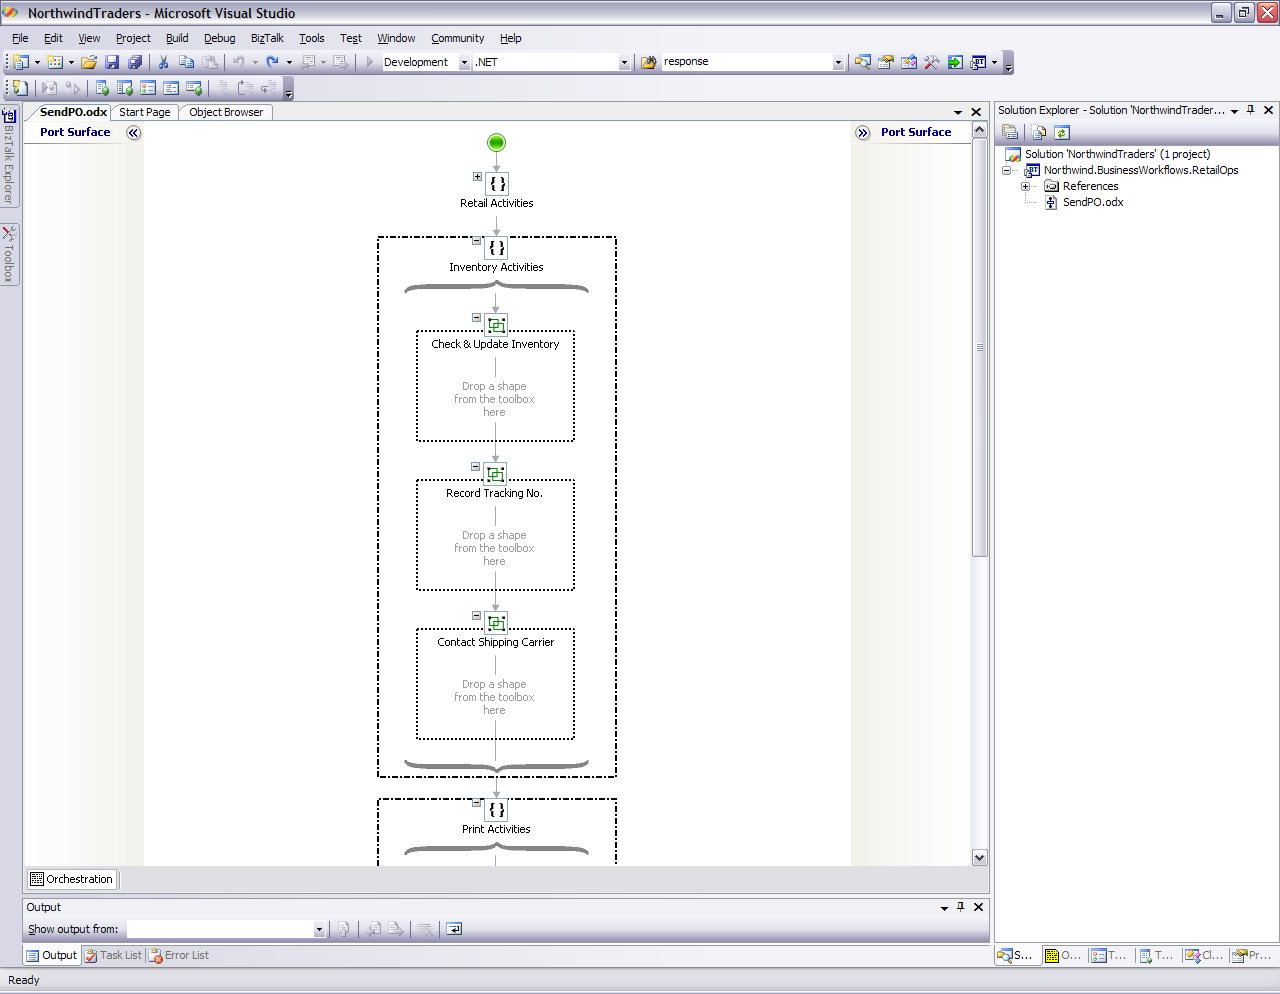
Before I continue, I want to point out one very important Orchestration property. Recall that in BizTalk Orchestrations, there are two types of transactions: atomic and long-running. Although I’ll limit the scope of this article to the successful processing of a purchase order (the happy path), there are many future enhancements (and things that can go wrong) within the order fulfillment process that makes opting for a Long Running Transaction a good choice.
4. Right-click anywhere in the **Orchestration Designer** and select **Properties**. Set the values for the **Transaction Identifier** and **Transaction Type** to *SendPOTx* and *Long Running* respectfully.
Working with .NET Components and SOAP Services
With the exception of some business entities listed in Table 1 (which I will create as special C# classes) it is beyond the scope of this article to focus too much on the particulars of each service that the SendPO Orchestration will coordinate. Table 2 shows a list of classes, SOAP endpoints, and assemblies that are provided as part of the article download. From your perspective as the reader, you will merely consume or invoke these components/services as if they’ve already been built (they are built in the download). It is important, however, to distinguish between the types of services that will be implemented and consumed:
- .NET Components: This project will expose the majority of the services via vanilla .NET components. In both theory and practice, these components should adhere to the principles of component-oriented programming (Binary Compatibility, Language Independence, Location Transparency, Concurrency Management, Version Control, and Component-based Security). Whether internally, each component itself is making local intra-process calls to perform work within the CLR, or out-of-band calls across process boundaries to components that are hosted using remoting technologies such as ASP.NET Web services (SOAP), .NET remoting or Windows Communication Foundation is immaterial. As interface-based components, the implementation of each service is completely abstracted from the caller, leaving the caller to only be concerned with the contract presented.
Note: Because BizTalk Server 2006 loads all .NET resources from the Global Assembly Cache (GAC), any artifacts used as part of a BizTalk Server solution must be strongly named (you will notice a strong named key called Northwind.snk within the Visual Studio 2005 solution that is available for download). This requirement nicely enforces the component-oriented principle of version control. See the sidebar, Principles of Component-Oriented Programming, for more information on the effective use of .NET components.
- SOAP Services: The SendPO Orchestration is exposed as an ASMX Web service called RetailOpsService.asmx. To provide a comprehensive overview of how Orchestration interacts with other pseudo-protocols on the Send side, the solution will implement the Acme.Billing.BillingService service as a SOAP Web service using the BizTalk SOAP Adapter. Obviously, the decision to implement services as .NET components, custom or vendor-provided SOAP services will vary by scenario. See the sidebar, Tenets of Service-Oriented Programming, for guiding principles for exposing applications as contract-based services.
To add the components and services to the BizTalk Project, right-click the References folder within the Northwind.BusinessWorkflows.RetailOps project and add a reference to each relevant project, assembly or service endpoint just as you would for a class library or other Visual Studio 2005 project type. The artifacts that will be used in this solution are listed in Table 2. The NorthwindTraders solution already contains all of the source projects so you may either reference the pre-compiled assemblies or use project references (for ease of use, the latter is used by default in the solution available for download).
Note: You are welcome to extend any of the components as necessary; however, for the purposes of this article, what the components are actually doing internally is not important-it is the interface/contract and the ability to coordinate their work within a workflow that is important.
Create the Domain Entities
Due to the graphical nature of the BizTalk design-time experience there isn’t usually a lot of programming required within Orchestration itself (of course components and services to be used in the workflow must still be developed). However, you must still create entities that describe the data being consumed, sent, and received. A common approach is to create domain-specific business entities using either XSD schema or .NET classes. Since many organizations will already have significant class-specific code bases, it is not always practical or necessary to strictly use XSD schema for modeling entities. In my opinion, while XSD schema has its place in messaging, the esoteric and cumbersome nature of building and maintaining this schema makes using it desirable only when higher level APIs are not available to abstract the messaging details. Thanks to .NET’s rich support for serializing and de-serializing types, using classes is perfectly acceptable for creating entities within Orchestration.
Since you’ve added the references to pre-existing .NET components and classes that will be used as part of the Orchestration, you must now create the business entities you’ll use as data transfer “objects” within the solution.
using Microsoft.XLANGs.BaseTypes;
- Next, decorate each class name with the Serializable attribute class:
InvetoryItem class:
  [Serializable]
    public class InventoryItem
    {…}
PurchaseOrder class:
  [Serializable]
    public class PurchaseOrder
    {…}
- For each public property within each class, distinguish each property using the DistinguishedFiled attribute class as shown below (this will make these properties available to the BizTalk Orchestration at run time):
    [Serializable]
    public class InventoryItem
    {
        private int m_ItemNumber;
        private decimal m_price;

        [DistinguishedField()]
        public int ItemNumber
        {
            get
            {
                return m_ItemNumber;
            }

            set
            {
                m_ItemNumber = value;
            }
        }
    }
Defining Messages
The Purchase Order class is the heart of this workflow because it will be used to store and transport order details from the client application to the Retail Operations application. As a result, you must define it as a Message at the global Scope within the Orchestration.
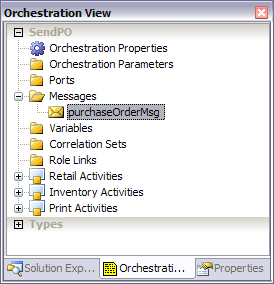
In the Northwind.BusinessWorkflows.RetailOperations project, double-click the “SendPo.odx” file. Click the Orchestration View tab, right-click the Messages folder and click New Message. A new Message artifact is created. Right-click the new Message artifact and click “Properties Window” or, if visible, click the Properties tab.
Note that this is the last time I will go into such detail for bringing up artifact properties. All subsequent actions will consist of creating new artifact types or dragging shapes onto the design surface of the Orchestration Designer and setting the corresponding properties.
Under Message Type, expand .NET Classes and click “Select from Referenced Assemblies”. Select Northwind.BusinessEntities.RetailOps.PurchaseOrder as the Type and enter purchaseOrderMsg for the Name. You can see the result of this step in Figure 12. This step is the equivalent of creating a traditional variable declaration, except that BizTalk distinguished variables from messages (due to the fact that each is handled a bit differently). The purchaseOrderMsg Message Variable will be used to initialize purchase order Message data and move the Message around within the Orchestration.
Wiring Up the SendPO Orchestration
With the .NET components and services referenced and ready to go, you’ll wire up these components within the workflow, paying close attention to transaction semantics. For now just completely ignore Messaging concerns such as Ports, Adapters, and Receive Locations until you’re done with the Orchestration itself. This will allow you to focus on solving the business problem, leaving the configuration of these lower-level artifacts as a deployment-time exercise.
As discussed in Part 1 of this article, you can use Scope Shapes to further demarcate activities and change the transaction type at the Scope level (if you need a refresher on transaction types, please refer to Part 1 of this article). This provides a logical grouping and isolation of the constituent activities within a given Scope.
In the interest of interoperability, the trend with vendors (including Microsoft) is to abstract as much about the XML itself from the design-time experience and leave to the plumbing the task of adhering to a specific standard or schema.
Most of the activities are going to be orchestrated as calls to .NET components, which can be called within an Atomic Scope that is either the outer-most scope in an Orchestration or is nested within a parent Scope which is marked as Long Running. A Long Running Scope can consist of other nested Long Running or Atomic Scopes, but an Atomic Scope cannot contain any child transactions (although nesting Scopes with Transaction Type set to None is acceptable).
The only exception is the Bill Customer activity which will be fulfilled by our fictitious payment processing vendor via the Acme.Billing.BillingService SOAP endpoint. This activity will simply inherit the Transaction Type property set to Long Running (if this just went over your head, don’t worry, after creating your first scope below, this will be much more clear).
- Click the Retail Activities Scope and note the properties. Change the Transaction Type to Long Running and provide a useful name for the Transaction Identifier such as RetailTx. Perform the same steps for each of the remaining Scopes (Inventory and Print), but instead of Long- Running, choose Atomic. Notice that when changing the Transaction Type to atomic, the Isolation property was changed to Serialized.
Going back to the Retail Activities Scope, an excellent example of Scope nesting is the Post Funds to GL Activity/Group. Since the IRetailOps interface will be used to bind to the RetailManager component, the Post Funds to GL Activity/Group will need to be isolated within an Atomic Scope. This is because interfaces cannot be marked for serialization as it cannot ever be assumed that the implementation of an interface would itself be serializable:
- Right-click the line directly above the Post Funds to GL Activity/Group and insert a Scope Shape. Name the Scope Post Funds, provide a Transaction Identifier of PostFundsTx, and set the Transaction Type to Atomic. Now, simply drag the Post Funds to GL Activity/Group inside the new Post Funds Scope.
The Post Funds to GL activity will still execute within the RetailTx long-running transaction; however, it will be executed as a nested Atomic transaction within its own Scope. This approach is perfectly legal as Atomic Scopes can be nested within Long-Running transaction Scopes; however, remember that the same is not true for the inverse.
Consuming SOAP Services within Orchestration
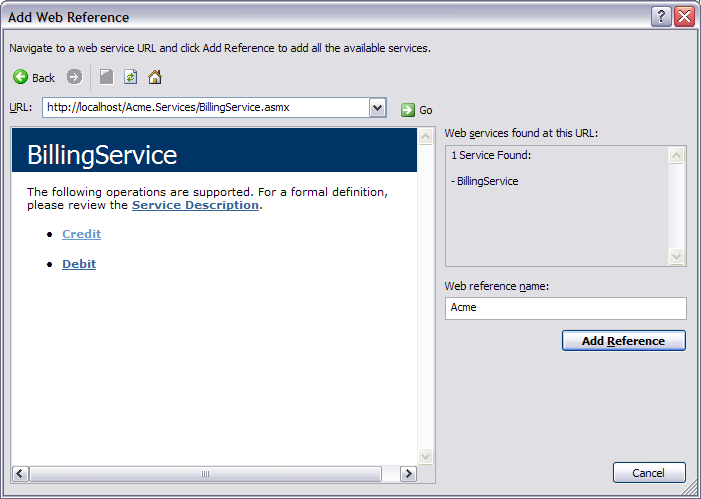
Now that we have prepared our Scope, it is time to start consuming the components and services that will perform the heavy lifting in our Orchestration. This exercise demonstrates how to use the SOAP Adapter for consuming external SOAP services to simulate the billing services provided by our fictitious third-party vendor.
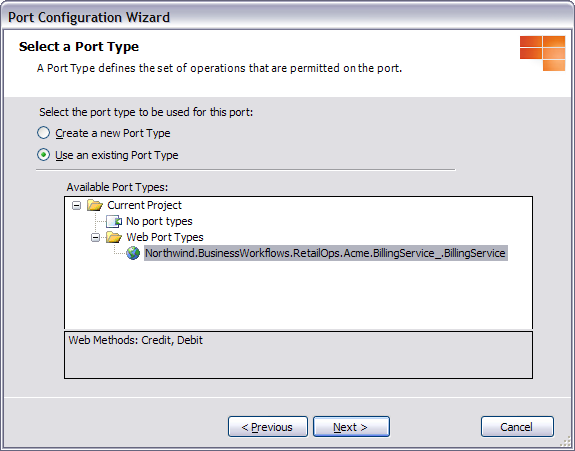
Working with Expression Shapes
Expression Shapes provide a C#-like scripting syntax for working with .NET types and Orchestration variables. You’ll use Expression Shapes to instantiate the business components and cast to the appropriate interface.
debitRequestMsg.accountNumber =
purchaseOrder.AccountNumber;
debitRequestMsg.accountNumberDetails =
purchaseOrder.AccountDetails;
debitRequestMsg.amount = purchaseOrder.Amount;
The expression consists of a simple mapping from the current instance of the purchaseOrder entity to the debitRequestMsg entity that will be sent to the ACME billing service. The reason that the properties are available to us from the instance of the purchaseOrder entity is because they were marked as Distinguished. At run time, the Orchestration Engine will populate an instance of the debitRequestMsg variable with these values.
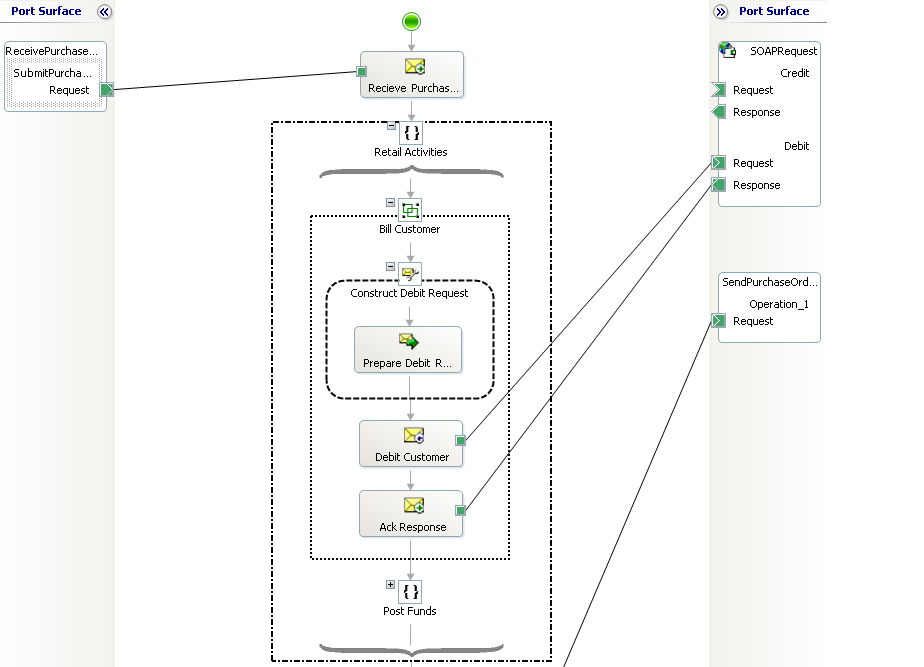
Within the Bill Customer activity, but outside of the Construct Message Shape, add a Send Shape (that will call the Billing Service) and a Receive Shape directly after that.
Drag the Send Shape connector to the Web Port so that it locks with the Request. Take the same step to establish a connection between the Receive Shape and the Response. At this point, the Orchestration looks like Figure 15.
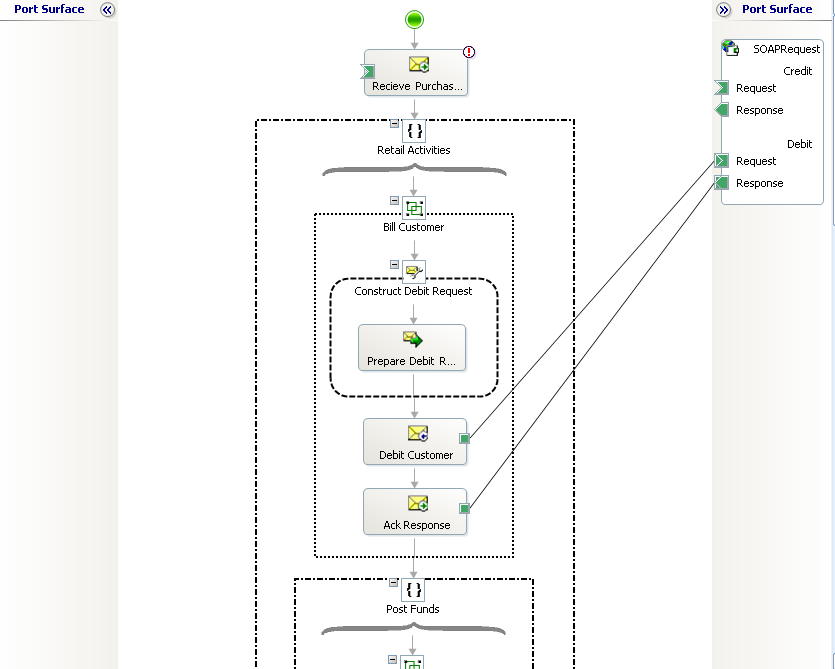
Now only simple wiring activities remain. You’ll add an Expression Shape to each activity and call the appropriate .NET component to do the work. Because you are dealing with .NET components, you must first configure the interface that you wish to bind to as a variable (as opposed to a Message Variable):
On the Orchestration View, under Retail Activities, right-click Variables and create a new variable. Any variables created here are not global and are scoped to the Scope in which they are created. The same is true for Message Variables.
Select .NET Class and browse to the Northwind.BusinessComponents.RetailOps. Interfaces package. Select the IRetailOps interface and click OK. Name the variable retailService.
In a roundabout way you’ve defined a variable, retailService, as an IRetailOps interface, just as you would with any .NET type. The Orchestration Engine initializes it at run time, just as if it were in a C# or Visual Basic interface.
- Add an Expression Shape within the Post Funds to GL activity, and add the following code, which is the equivalent of an implicit interface cast in C#:
retailService = new
Northwind.BusinessComponents.
RetailOps.RetailManager();
The IRetailOps.PostGeneralLeadger method takes an instance of the PurchaseOrder class (purchaseorder), performs some work, and returns a Boolean value indicating success or failure. As with any program, you need a variable to store the response so that you can use it as needed:
Again, within the Retail Activities Scope, under Orchestration View, create a new variable, this time of type Boolean and provide a name, such as generalLedgerSuccess.
Now simply place the call to the retailService instance, passing the purchaseOrder variable (which contains the actual purchase order submitted) and return the response to the generalLedgerSuccess variable:
generalLedgerSuccess =

retailService.PostGeneralLedger
(purchaseOrderMsg);
Using the object model as a reference, cross checking with the use case and business process diagram, you’ll take the same approach for the remaining activities for both Inventory and Print Scopes. The calling patterns are identical, only the variables and types change. Remember to always use implicit casting of the interfaces to keep the calls type-safe.
Because the API is modeled after the business domain, the steps should be fairly intuitive. If you do get lost or stuck, you may reference the solution which is available in the download.
The last thing to do from an Orchestration perspective is to implement the Notify Activity/Group.
- Right click anywhere inside the Notify Activity/Group and select a Send Shape. Specify the purchaseOrderMsg as the Message and Send Purchase Order as the Name.
This solution will simply pass through the processed purchaseOrderMsg as a way to notify that the Orchestration has completed successfully. Obviously, this is a somewhat primitive notification technique, but it will provide the ability to simulate a notification action and at the same time fully test one way, asynchronous invocation of the Orchestration.
Configuring the Orchestration to Receive Messages
Although it is largely a matter of preference, I like to try to leave logical Port configuration last so that the focus can remain on the business process itself. Whether you configure Ports before or after creating and wiring up your workflow is up to you.
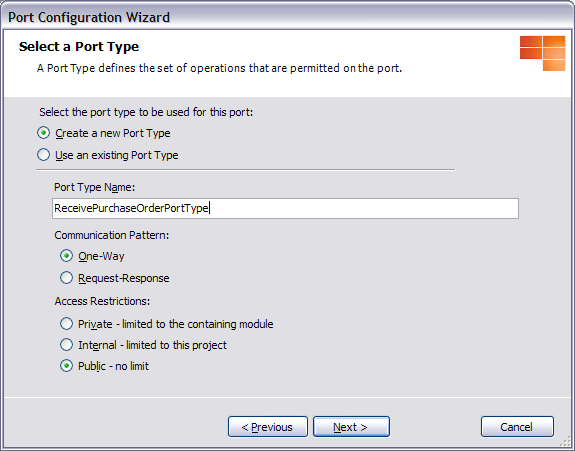
This sample solution will use a Receive Shape to actually receive the purchase order from the originating client. On the left Port Surface, right-click anywhere to create a new Configured Port. Provide a Port Name of ReceivePurchaseOrderPort and Port Type called ReceivePurchaseOrderPortType. Specify the communication pattern as One Way as shown in Figure 16. Specify the intent to use the Port to receive messages and leave the default to specify bindings later. You will notice that under the ReceivePurchaseOrderPortType, BizTalk created an Operation called Operation_1. Rename the Operation to something a bit more intuitive such as SubmitPurchaseOrder.
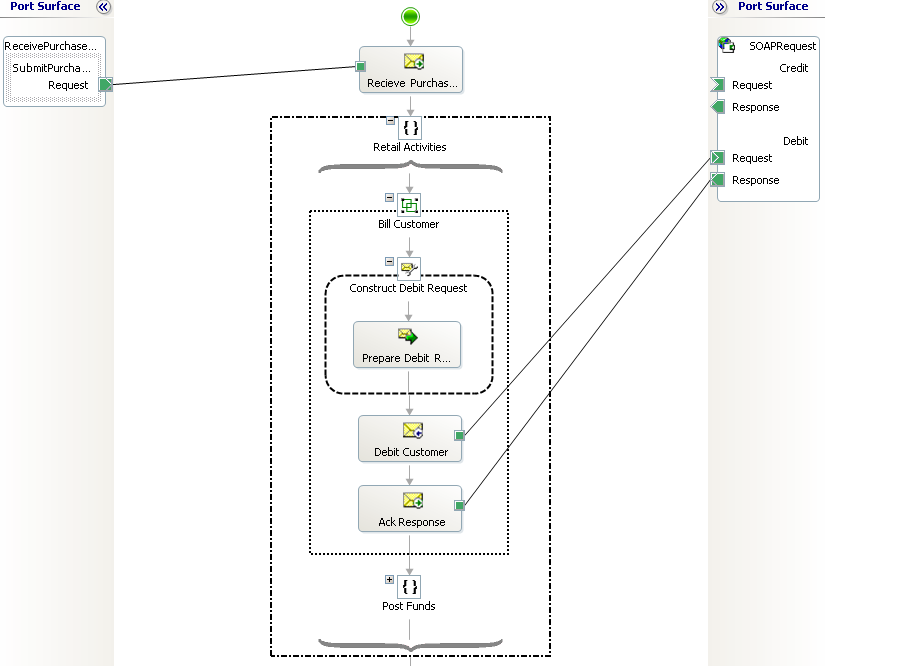
Notice that the Port is completely logical and has no physical bindings or knowledge of any Adapters. This is the beauty of Orchestration in that it requires absolutely no commitments regarding transport or other plumbing, leaving these largely as mere deployment details.
Connect the new Receive Port to the Receive Purchase Order Receive Shape. Figure 17 provides a snapshot of the Orchestration after adding the logical Receive Port.
Configuring the Orchestration to Send Messages
Similarly to the Receive Purchase Order One Way Receive Port created above, right-click the right Port Surface and create a corresponding One Way Send Port called SendPurchaseOrderPort. Connect the new Send Port to the Send Purchase Order Send Shape. The Orchestration should now resemble Figure 18. This Send Port will simply pass through the original instance of the purchaseOrderMsg to a destination that we will configure as a file drop during deployment.
Deployment
In BTS 2006, an Application is a group of related artifacts (Orchestrations, Pipelines, resources, etc.) that are managed as a single unit. When deploying a solution, you can choose the default BizTalkApplication 1 application, or create your own.
Remember to always use implicit casting of the interfaces to keep the calls type-safe.
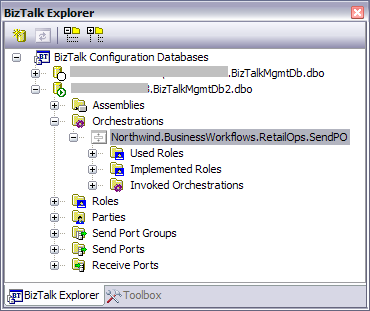
BTS 2006 offers two options for deploying BizTalk applications. The most common in production deployment scenarios is via the BizTalk Server 2006 Administration Console which is an MMC snap-in style administrative console. During design time, however, developers may use the BizTalk Explorer, which provides a light version of the BizTalk Server 2006 Administration Console for use within the Visual Studio IDE.
Using Visual Studio 2005 to Deploy a BizTalk Application
In practical terms, it is very unlikely that a solution will use the BizTalk Explorer for deployment chores outside of the local development environment. Often an organization will use BizTalk Server on a single or multiple server class machines that are separate from the development environment. BizTalk Explorer does not lend itself well to distributed deployments; however, for developing locally it is the perfect tool to deploy and test a solution and will help to isolate some of the complexity inherent to using the fully featured BizTalk Server Administration Console.
At this point the example Orchestration is not very useful. With the exception of the SOAP Port you created for the Billing Service, there is no physical correlation between the logical Send and Receive Ports and the physical endpoint(s) (Adapters) that will be the interface between this application and the rest of the world.
Exposing the Orchestration as an ASMX Web Service
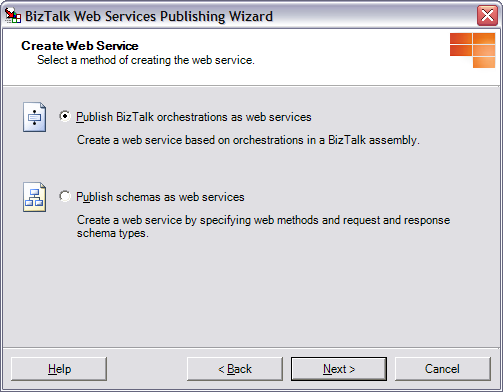
Deploying an Orchestration as a SOAP ASMX Web service is simply a matter of invoking the BizTalk Web Services Publishing Wizard. There are two options for doing this. One is to deploy an endpoint that is bound explicitly to the Orchestration. Because you’ve defined the primary message, purchaseOrderMsg, as a serializable .NET type, exposing the Orchestration directly is a perfect choice.
Note that publishing an Orchestration itself as a Web service may not be the best approach if you are making heavy use of XSD schema or you want to preserve XSD semantics on the incoming document. Note, however, that the trend with vendors (including Microsoft) is to abstract as much about the XML itself from the design-time experience and leave to the plumbing the task of adhering to a specific standard or schema. Although there are passionate debates over using XSD versus XML serializable types (and vice-a-versa), anyone working heavily with XSD can testify to its cumbersome nature. That said, XSD is a very common sure-fire approach to maintaining strict control over the message while guaranteeing interoperability and is especially useful in maintaining contract-based semantics where traditional interfaces are either unpopular or unsupported. If maintaining entities/messages as XSD schema is the chosen approach, the second option will allow you to publish schema as a Web service and provides more control over the naming, request, and response schema used.
Since we’ve opted for exposing the Orchestration directly, we’ll choose the first option below:
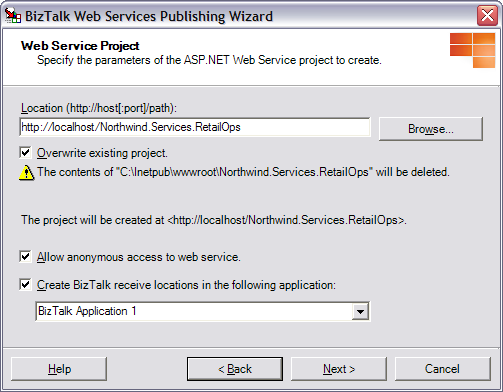
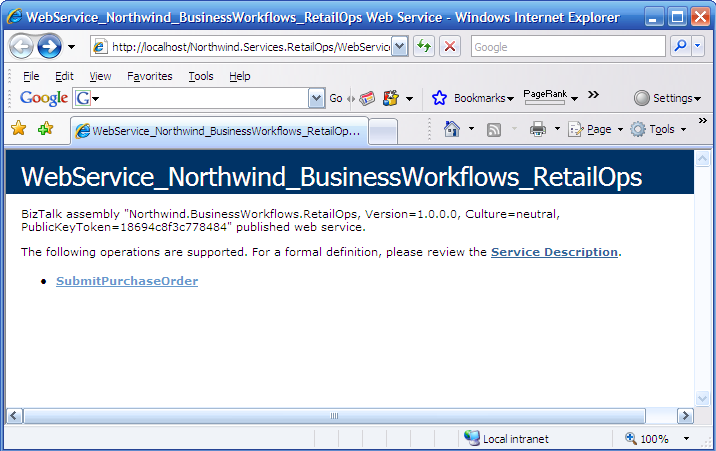
This results in the deployment (and creation) of an IIS application that hosts the Northwind.Services.RetailOps Web service. If you followed the naming guidance, the URL should be http://localhost/Northwind.Services.RetailOps/WebService_Northwind_BusinessWorkflows_RetailOps.asmx . Navigating to the URL loads a familiar WSDL discovery page as shown in Figure 21.
Binding the SOAP and File Drop Locations
Thanks to the indirection provided by the logical Ports, you can begin by supporting the submission of purchase orders via HTTP SOAP. You can leverage this same indirection to support additional protocols and file formats.
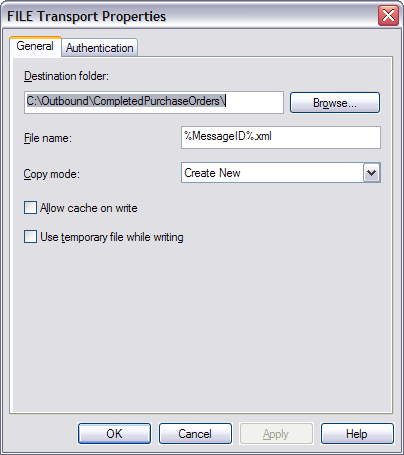
At this point, the only thing left to do is associate the logical ReceivePurchaseOrderPort and SendPurchaseOrderPort with the respective HTTP URL and physical file drop URI.
Verifying Bindings, Enlisting, and Starting the Orchestration
To verify Orchestration bindings, refer to Figure 24 which provides a snapshot of all required bindings and settings.
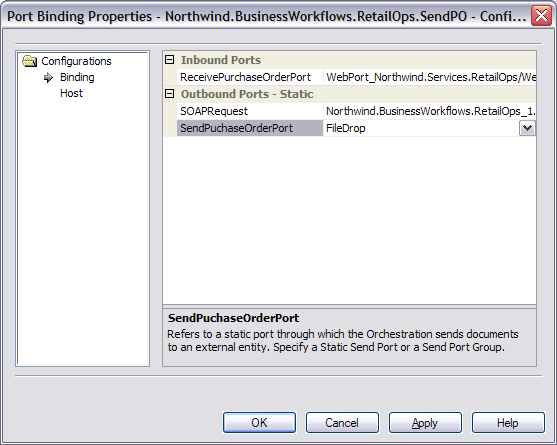
The process of enlistment associates Ports and Orchestrations with the appropriate Host and creates the corresponding subscriptions within the configuration database.
Testing
You’ll need to perform some testing to verify that the Orchestration and all services meet the functional requirements.
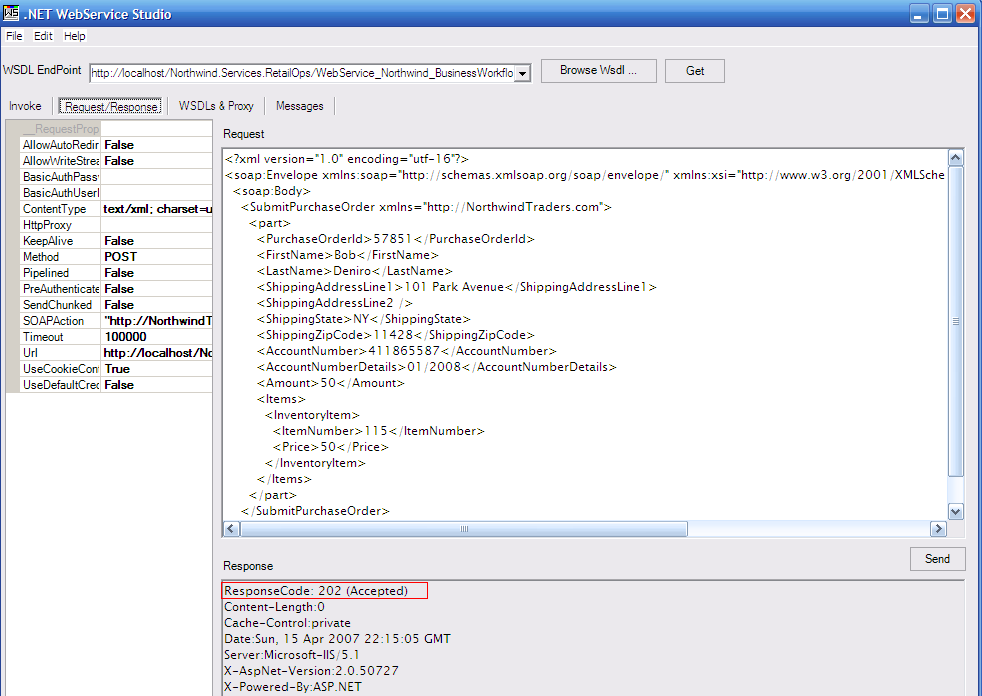
First, you should be able to submit a purchase order for processing via a SOAP service endpoint. To test this, I use a great tool called Web Services Studio (see the sidebar, .NET Web Services Studio). This tool makes a fantastic, no-frills test harness for exercising SOAP services. The value and necessity of using test harnesses to provide interactive testing of services that make up a complex application cannot be overstated. After querying the WSDL file at the endpoint, I have a contract that I must fulfill as shown in Figure 25. Populating all relevant fields, I submit the purchase order to simulate the interface that the new online storefront will use.
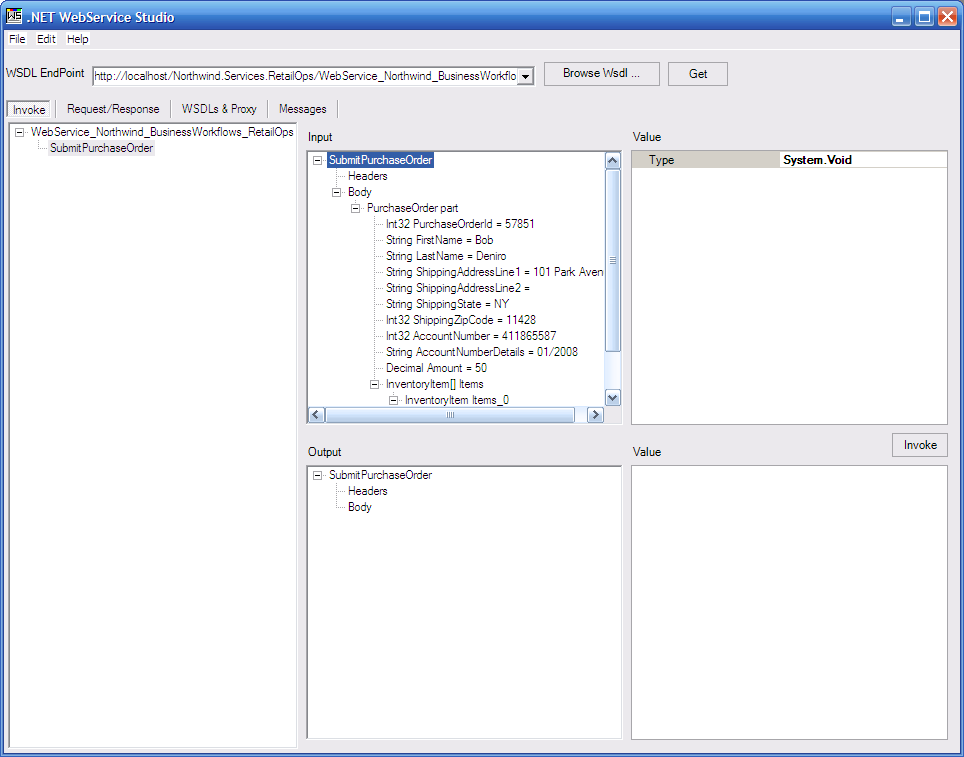
Since this is a one way, asynchronous call, I do not expect any response via SOAP other than HTTP 202 Accepted (any errors in receiving the message would have resulted in a SOAP fault). Figure 26 shows the expected response from the RetailOpsService.
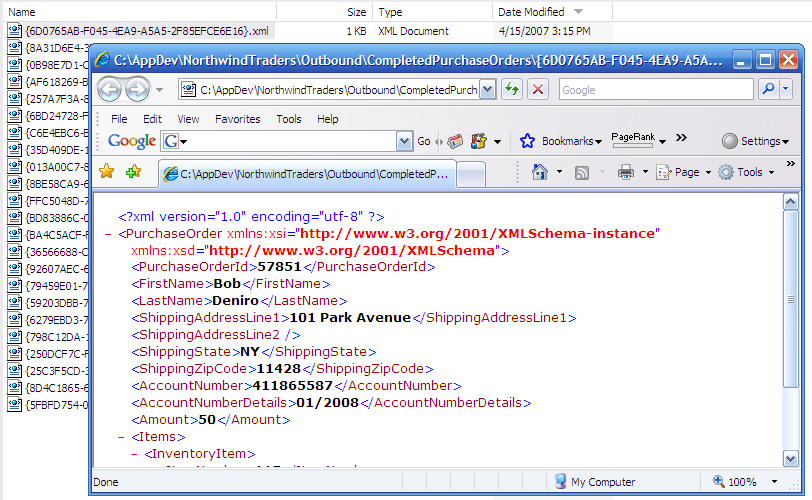
Finally, to ensure that the purchase order was processed, inspect the “C:\Outbound\CompletedPurchaseOrders” folder (or physical location you configured in the bindings) for an XML file corresponding to the purchase order submission. As shown in Figure 27, there should be one .xml file for each submission made during the test. Opening the XML document reveals the details of the purchaseOrderMsg payload.
Delivery
At this point, the Retail Operations application is ready to be turned over for integration with the new online store front! Leveraging the Retail Operations application is simply a matter of consuming the service endpoint and invoking the service. In addition, the foundation has been laid for integrating various other applications with the new and improved Northwind back-office, all the while increasing transparency and increasing automation so that the business process can be managed more efficiently.
In addition to a very solid Messaging Engine, I demonstrated how the Orchestration Engine is a very flexible tool for getting the most out of messaging while naturally supporting the implementation of complex business process via intuitive and easy-to-use workflows.
After a high-level overview (in Part 1 of this article), you leveraged both the Messaging Engine and Orchestration Engine by jumping into a common integration scenario and demonstrated how a new, automated workflow, along with .NET, and ASMX SOAP Web services could be implemented to streamline existing business process while providing the building blocks for improved business process management.
Furthermore, you now understand the foundation for integrating the new solution with existing business process to drive value without abandoning legacy systems, providing virtually endless possibilities for connecting new and existing services and applications without impacting the business process itself.
Finally, you applied some design techniques allowing you to address the problem domain in a loosely coupled manner that can be extended to support new workflows, components, and services as the needs of the organization change and grow.
Although our scenario has been grossly simplified for the purposes of illustration, it is a good example of similar integration scenarios that are prevalent in the enterprise today. It is clear that BizTalk Server 2006 is a very practical solution for addressing many of these EAI chores and goes far beyond messaging to provide a toolbox for addressing the integration spaghetti that exists as a result of the evolution of new and existing investments in enterprise software.
Final Thoughts
During the introduction (see the May/June issue of CoDe Magazine), I suggested that the Orchestration Designer provides a hint as to what the future of building software might look like. As a matter of fact, Windows Workflow Foundation (WF), a new workflow modeling framework that is part of .NET 3.0, builds upon what Microsoft, and the industry as a whole, has learned from BizTalk Orchestration. Looking even further into the future, I believe that workflow-modeled software will become a mainstay in developing line-of-business applications, and we will start to see a number of specializations emerge in the industry, creating a distinction between traditional programmers and future information workers.
New technologies, including WF and Windows Communication Foundation (WCF) will no doubt be relevant to BizTalk Server, but I believe that by leveraging BizTalk Server 2006 as the integration glue for developing new applications that assimilate with legacy systems today, while laying a solid foundation for future enterprise application integration projects in the future, BizTalk will continue to provide tremendous value as an application server platform.
I hope that you have developed an appreciation for the depth and breadth of the core functionality and features available in BizTalk Server 2006 and that you will consider it for your future adventures in application integration!
Acknowledgments
I would like to thank Todd Sussman, Principal Consultant and BizTalk VTS, for teaching me what the books and hands-on experience could not. Those coffee breaks, instant messaging sessions and white board discussions have been invaluable.
In addition, I would like to thank Tim Heuer and Diane Faigel at Microsoft for their help with the BizTalk Server 2006 documentation which is referenced throughout the article.
Last, but certainly not least, I would like to acknowledge Juval Lowy, who over the course of a week in the summer of 2005 changed my career forever. His books, articles, classes, and lectures continue to provide valuable insight and mentoring; the fruits of which are interwoven throughout this article and my work at large.
Listing 1: The InventoryItem entitiy class
using System;
using System.Collections.Generic;
using System.Text;
using Microsoft.XLANGs.BaseTypes;


namespace Northwind.BusinessEntities.RetailOps
{
    [Serializable]
    public class InventoryItem
    {
        private int m_ItemNumber;
        private decimal m_price;

        [DistinguishedField()]
        public int ItemNumber
        {
            get
            {
                return m_ItemNumber;
            }

            set
            {
                m_ItemNumber = value;
            }
        }

        [DistinguishedField()]
        public decimal Price
        {
            get
            {
                return m_price;
            }

            set
            {
                m_price = value;
            }
        }
    }
}
Listing 2: The PurchaseOrder entitiy class
using System;
using System.Collections.Generic;
using System.Text;
using Microsoft.XLANGs.BaseTypes;


namespace Northwind.BusinessEntities.RetailOps
{
    [Serializable]
    public class PurchaseOrder
    {
        private int m_PurchaseOrderId;
        private string m_FirstName;
        private string m_LastName;
        private string m_ShippingAddressLine1;
        private string m_ShippingAddressLine2;
        private string m_ShippingState;
        private int m_ShippingZipCode;
        private int m_AccountNumber;
        private string m_Expiry;
        private InventoryItem[] items;

        [DistinguishedField()]
        public int PurchaseOrderId
        {
            get
            {
                return m_PurchaseOrderId;
            }
            set
            {
                m_PurchaseOrderId = value;
            }
        }

   // Remaining properties

}
Table 1: .NET design-time artifacts that will be implemented as part of the BizTalk Server 2006 solution.
| Artifact | Purpose |
|---|---|
| IRetailOps.cs | A .NET interface that provides a contract for processing PO and managing billing and funds posting procedures. |
| RetailManager.cs | A .NET class that implements IRetailOps. |
| IInventoryOps.cs | A .NET interface that provides a contract for performing inventory operations including checking, updating and ordering inventory, contacting shipping carriers, and recording parcel-tracking information. |
| InventoryManager.cs | A .NET class that implements IRetailManager. |
| IPrint.cs | A .NET interface that provides a contract for printing packing slips and shipping labels. |
| PrintManager.cs | A .NET class that implements IPrint. |
| PurchaseOrder.cs | A .NET class that represents a Purchase Order entity. |
| InventoryItem.cs | A .NET class the represents an Inventory Item entity. |
Table 2: Packaging and deployment of the relevant artifacts that will be implemented as part of the BizTalk Server 2006 solution.
| Artifact | Packaging | Deployment |
|---|---|---|
| RetailOpsService.asmx | Northwind.Services.RetailOps.dll | Private Assembly (IIS) |
| SendPO.odx | Northwind.BusinessWorkflows.RetailOps.dll | BizTalk Database |
| IRetailOps.cs | Northwind.BusinessComponents.RetailOps.Interfaces.dll | GAC |
| RetailManager.cs | Northwind.BusinessComponents.RetailOps.dll | GAC |
| IInventoryOps.cs | Northwind.BusinessComponents.InventoryOps.Intefaces.dll | GAC |
| InventoryManager.cs | Northwind.BusinessComponents.InventoryOps.dll | GAC |
| IPrint.cs | Northwind.BusinessComponents.Infrastructure.Interfaces.dll | GAC |
| PrintManager.cs | Northwind.BusinessComponents. Infrastructure.dll | GAC |
| BillingService.asmx | http://localhost/ACME.Billing/BillingService.asmx | Private Assembly (IIS) |


