Getting friendly with HTML in ASP.NET MVC just got a whole lot easier.
In this article, I’ll delve into the Spark View Engine, an alternate view engine for the ASP.NET MVC Framework. Spark’s main goal is to allow HTML to dominate the flow of view development while allowing code to fit in seamlessly.
Developing views for your ASP.NET MVC application should not be hard. However, as you develop your MVC application, you quickly come to realize that you are spending a significant amount of time developing the View. With each new feature that you implement, your HTML is becoming heavier and heavier and harder to read - this is known as the “Bracket Tax” (angle brackets that dominate your screen). The view is a conglomerate of HTML, output notation, binding and code brackets. Eventually the view ends up resembling “Tag Soup”. Looking at the view inside of Visual Studio resembles a mish-mash of yellow highlighting signifying some output notation or expressions. Put simply, it’s hard to look at and it is difficult to discern the intent of the code inside of the view.
This article will expose you to the Spark View Engine’s inner workings. From basic output notation to Partials and Layouts, I will cover how to set up ASP.NET MVC to use the Spark View Engine. But first, a basic understanding of ASP.NET MVC is recommended.
Why Another View Engine?
Spark originated from a blog post - “Code Based Repeater” by Phil Haack, where a commenter stated that the Web forms view engine syntax was ugly. Louis Dejardin, the author of Spark, replied to the comment with his take on what a view would look like if the language could fit in seamlessly. (http://haacked.com/archive/2008/05/03/code-based-repeater-for-asp.net-mvc.aspx#67581)
The default view engine in ASP.NET MVC is completely capable of rendering output as necessary for most projects including some very large sites. However, upon further looking at the Web forms view you will notice that the syntax for the default view engine is rather ugly. Your clean, elegant HTML rapidly becomes a confusing mess with the introduction of even the simplest loop structure, as shown below:
<table>
    <% var rowIndex = 0; %>
    <% foreach (var order in Model.Orders) { %>
    <tr class="<%=Html.GetRowClass(rowIndex) %>">
        <td><%=order.OrderTotal %></td>
        <td><%=order.OrderShipToZipCode %></td>
    </tr>
    <%rowIndex++; %>
    <% } %>
    <tr>
        <td colspan="2">
            Total: <%=Model.TotalOfAllOrders %>
        </td>
    </tr>
</table>
At first glance the intent of the view is not immediately known. After a brief inspection you can figure out that the HTML is displaying a table of orders with the order total, destination zip code and total of all orders. The row style gets changed via a custom HtmlHelper extension method Html.GetRowClass. The exact same view is much easier to read when using the Spark View Engine, as shown below:
<table>
    <tr each="var order in Model"
            class="alt?{orderIndex % 2 == 0}">
        <td>${order.OrderTotal}</td>
        <td>${order.OrderShipToZipCode}</td>
    </tr>
    <tr>
        <td colspan="2">
            Total: ${Model.TotalOfAllOrders}
        </td>
    </tr>
</table>
The intent of the view is much easier to discern when using the Spark View Engine. This example illustrates many aspects of Spark, which I will cover in more detail in this article. Above, the HTML has dominated the flow of the screen and it reads like an HTML document. The idea behind the Spark View Engine is to allow the HTML to dominate the flow and the code to fit in seamlessly. A side effect of this approach to view development is readability.
The idea behind the Spark View Engine is to allow the HTML to dominate the flow and the code to fit in seamlessly.
Looking at the code snippet above, it is immediately apparent what is happening. As a result of Spark’s output notation, the code is seamlessly placed into HTML resulting in a cleaner view. Juxtapose this with the default view engine output notation (angle brackets and percent signs) and it is immediately evident that Spark’s output is much more desirable as the resulting view is much easier to read and understand. The entire C# language is available in a way that doesn’t interfere with the harmony and balance of the markup.
Spark Fundamentals
The first fundamental change in comparison to the Web forms view engine is that all Spark view files have the .spark extension. This includes the views, master layouts and partials (which I will cover soon). This is the only naming convention that Spark has.
In order to use the Spark View Engine you will need to download the Spark binaries from http://www.sparkviewengine.com. Once you have the binaries, you will need to set a reference to the following in your ASP.NET MVC application:
- Spark.dll
- Spark.Web.Mvc.dll
Before using the Spark View Engine, you must register the view engine with the ASP.NET MVC ViewEngines.Engines collection as well as configure Spark in the web.config.
SparkEngineStarter.RegisterViewEngine(ViewEngines.
Engines);
The preview line uses Spark’s RegisterViewEngine method to add itself to the ViewEngineCollection. At this point there are two engines inside of the view engine collection: the Web forms view engine (the default ASP.NET MVC view engine) and the Spark View Engine. It is possible to run many view engines in your ASP.NET MVC application. The ASP.NET MVC Framework will query the view engine collection with a path asking each view engine if it knows how to handle the request. This means that you can have the Web forms view engine running side by side with the Spark View Engine in the same project. This is very helpful if you are migrating your project from one view engine to another (such as from the Web forms view engine to the Spark View Engine).
<configSections>
  <section name="spark"
type      ="Spark.Configuration.SparkSectionHandler,
Spark"/>
</configSections>

<spark>
  <compilation debug="true"/>
</spark>
You need to add the above keys to the web.config in order to enable debugging and to configure the Spark View Engine.
At the ground level of view development, developers rely on the HTML and the output notation of the view engine for rendering items to the output. The output notation that Spark follows is that of a dollar sign followed by curly braces which encloses an expression. The code below displays a string that is stored in the categoryName variable.
<p>${categoryName}</p>
As juxtaposed with the Web forms view engine:
<p><%=categoryName%></p>
The Spark View Engine also supports the Web forms view engine output syntax. Therefore both of the lines above would work inside of a Spark view. The Spark syntax is preferred as it supports one of Spark’s goals, readability. It is important to note that since Spark supports both output notations, the migration path from the Web forms view engine to Spark is quite simple. Adding the Spark View Engine to the ViewEngineCollection and recompiling will have no adverse affects on your application - your app will continue to run. This enables you to migrate at your will when you have time. The only items in the view that need to be changed are the items that are particular to the Web forms view engine, such as asp:Content tags and @Page directives.
Element Constructs
In order to maintain the notion that HTML should dominate the flow, Spark has implemented element constructs that represent common operations of the underlying C# language. The basic premise behind the element constructs is to allow your code to fit into the HTML seamlessly as shown below.
<viewdata model="Product"/>
<var foo="4" />
<var bar="2" type="string" />
The first element, viewdata, represents the strongly typed Product in the ViewData. The second two lines create locally typed variables in the scope of the page. The first variable, foo, has a value of 4. The second is a typed string variable which contains the value of 2.
Various element constructs exist in the Spark View Engine such as viewdata, variables, expressions, partial rendering, namepaces, global, and many more. Some example element constructs are: viewdata, var, global, if, for, and use.
Accessing View Data
In the Spark View Engine the view retrieves data from the ViewDataDictionary object in various ways, such as:
${ViewData["customerName"]}
In this example, the customerName string is accessed via keyed value in the ViewDataDictionary and is output to the screen.
<viewdata      customerFirstName="string"
            customerLastName="string" />
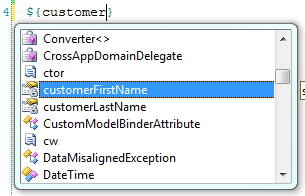
The viewdata element construct as shown above creates locally typed variables in the view. The developer can utilize as many locally typed variables from viewdata as needed. The key value in the ViewDataDictionary is the name of the locally typed variable and the type of the variable is enclosed within quotes. These locally typed variables can be verified via Sparks IntelliSense features in the view as shown in Figure 1.
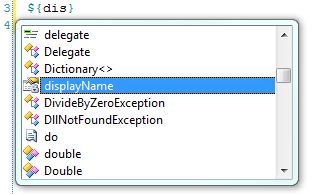
<viewdata customerFullName="string displayName"/>
The viewdata keyed value can also be given an alternate property accessor name for use within the view. The example above allows developers to access the customerFullName value as a locally typed variable by the name of displayName as shown by IntelliSense in Figure 2.
The model that is contained within the viewdata is also a strongly typed object which can be retrieved via the Model attribute of the viewdata element construct as shown below.
<viewdata model="Product" />
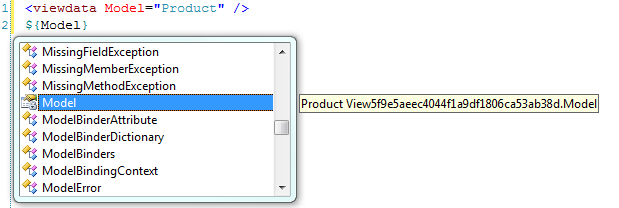
In this example, the viewdata’s model is typed to the Product class that exists within our solution. Reviewing the IntelliSense reveals that the Model - is of type Product, as Figure 3 outlines. Please note that Figure 3 displays the view’s name as View{Guid}. Spark compiles all views into C# classes behind the scenes. This is the name that is given to the view.
Simple Spark Expressions
At its core, Spark is a template engine that allows developer to quickly and cleanly express their intent inside of views. Two of the most common scenarios in view development are if/else conditionals and looping.
Spark provides a very easy-to-learn syntax for conditional statements. The syntax is so-self describing that HTML fluent designers can identify the intent while modifying HTML. In the following example, a Product is tested to see how much it is and the result will change upon the price of the product.
<viewdata model="Product" />
<if condition='Model.Price > 100'>
      <h1>This is expensive.</h1>
</if>
<else if='Model.Price > 50'>
     <h2>This is not too bad.</h2>
</else>
<else>
     <p>This is a DEAL!</p>
</else>
The snippet above illustrates that the if element construct is readable within the HTML, and the intent is easily discernible. There is no need to explain what is happening since the code is seamless with the surrounding HTML.
A similar syntax exists for conditional evaluation as well. The test element construct has the exact same functionality as the if element construct but with different syntax. The following is identical in functionality to the example above.
<test if='Model.Price > 100'>
      <h1>This is expensive.</h1>
<else if='Model.Price > 50' />
      <h2>This is not too bad.</h2>
<else/>
      <p>This is a DEAL!</p>
</test>
Note the enclosing test element and self-closing else elements.
A third and final method of conditional evaluation exists as an inline attribute. The functionality below renders the same output as above, but with inline if and elseif attributes.
<h1 if='Model.Price > 100'>This is expensive</h1>
<h2 elseif='Model.Price > 50'>This is not
too bad.</h2>
<else>
      <p>This is a DEAL!</p>
</else>
Looping within Spark can take on many forms; however, the most commonly used method is to use the each attribute that can be decorated on any HTML element. The each attribute is used verbatim as shown below (so it must have the type, variable name, the “in” keyword and the collection).
<viewdata model="IEnumerable<Product>" />
<style>
alt { background-color: tan; }
</style>
<div each="var product in Model"
      class="alt?{productIndex % 2 == 0}">
      <p>Name: ${product.Name}</p>
      <p>Price: ${product.Price}</p>
</div>
By decorating the div element above with the “each” attribute you are instructing Spark to create a div element for each Product in the model. Listing 1 displays the HTML output for the above loop.
Spark provides four optional variables to developers when looping through the set. Their name is always the same as the looping variable, plus the suffixes “Index”, “Count”, “IsFirst” and “IsLast”. The loop variables are scoped to the loop itself. Only the ones used within the scope of the view will be created at runtime. The example above has a loop variable named productIndex, which identifies the current index of the loop. On the first iteration it is zero, second iteration the value is 1, third iteration the value is 2, etc.
We are not using the other variables. However, it is important to note that the Count and IsLast variables need to know how many items are in the collection before the iteration begins. For collections that resolve to IEnumerable<T>, the LINQ extension method .Count() will be used, and for regular IEnumerable collections, Spark will enumerate the collection and increment an integer to get the count.
The loop above also exposes Spark’s conditional attribute output functionality. The syntax ?{Boolean} can only be used within the text of an HTML attribute as shown here:
<p class="expensive?{product.Price > 100}">
      Name: ${product.Name}</p>
The class expensive and the HTML class attribute will only be shown if the product’s price is greater than 100. If the product’s price is less than 100, the class attribute as well as the value of the attribute will not be output. Text and code that exist prior to the condition and up to and including the previous whitespace will be controlled by the result of the Boolean expression. To illustrate this, assume the price is 105; therefore the output will look like this:
<p class="expensive">Name: Foo</p>
If the price is less than 100, the output will look like this:
<p>Name: Foo</p>
Another method of looping is also supported - the for element construct.
<style>
.fav {font-weight: bold;}
</style>
<var       isFav      ="false" />
<for       each      ="var product in Model"
       isFav="product.Name == 'Foo'">
      <p class="fav?{isFav}">${product.Name}</p>
      <p>Price: ${product.Price}</p>
</for>
The for element construct in the example above follows the same syntax as the previous inline loop example except an explicit for element is declared. This example also exposes the var element construct which allows you to define a locally typed variable. The syntax is variableName=”value*”.* This creates a dynamically typed variable. The code <var isLoggedIn=”true” /> creates a local isLoggedIn Boolean variable. The code <var foo=”bar” /> creates a local string foo variable, <var age=”15” /> creates a local age integer variable. Using this locally typed variable, we expose another feature of the for element construct - the ability to set a variable as an attribute on the loop (in this case, the isFav variable) which will be evaluated as a variable assignment upon each loop iteration. A great example of when this might be useful is when working within a grid where a user selects a row and you need to maintain that css class after the page refreshes. This can help you identify which row might need to be highlighted based upon the current state of the loop.
Inline Code
Basic output notation is nothing without a language to support it. Spark supports the full C# language and can be accessed and output as shown in this example:
<p>${Guid.NewGuid().ToString("n")}</p>
However, there may be times when standard output notation just will not cut it. In these cases, Spark provides a last-resort alternative. You can escape into C# at any time through the # operator or the aspx-like syntax version is also available.
Having said that, even though the entire C# language is available, please use it with caution. One of the goals of ASP.NET MVC is separation of concerns and connecting to a Web service from your view isn’t exactly following those recommendations. By connecting to a Web service from within your view you are giving the View a responsibility it should not have. You should move this type of logic/code into another logical layer of your application and the View should be kept strictly for presentation purposes.
<viewdata model="Product" />
# if (System.Diagnostic.Debugger.IsAttached)
#   System.Diagnostic.Debugger.Break();
<p>Name: ${Model.Name}</p>
<p>Price: ${Model.Price}</p>
The code above is escaping into C# and telling the debugger to break when it reaches a certain line if the debugger is attached. You could accomplish the same thing with the aspx-like syntax <% statements %> as well.
Organizing Spark Content
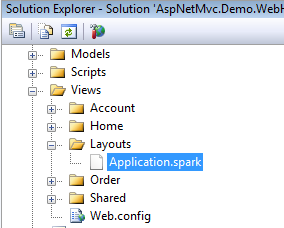
Spark follows the ASP.NET MVC convention of placing views into their respective folders named appropriately after their controller. However, Spark’s content management strays from the default view engine in regards to layouts (also known as master pages in the Web forms view engine). Instead of a master page, Spark uses master layouts. In the essence of convention over configuration, when Spark is rendering a view it will automatically look for a layout file by the name of Application.spark (located in either the View/Layouts or Views/Shared directory) when rendering a view.
Inside of the Application.spark file you would find HTML similar to what is below.
<html>
      <head>
            <title>A Spark Site</title>
      </head>
      <body>
            <use content="view">
      </body>
<html>
When the Application.spark file is located in Views/Shared or Views/Layouts directories it is considered to be Spark’s general-purpose master template, but this can be configured at the controller or view level - giving the developer the utmost control of what template should be rendered at runtime. The use element construct in the example above denotes where the contents of the view are to be rendered inside of the master layout. Figure 5 gives an example of what a views directory would contain if it had an Application.spark file in a Views/Layout directory.
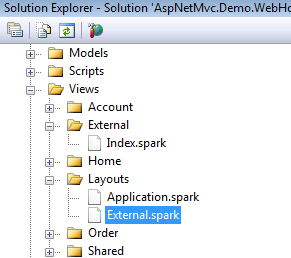
If the general purpose master layout does not fit your needs you can configure Spark to use different master layouts. A real-world example of when you might need an alternate layout is where a WPF application needs to consume a portion of your website but you do not want the header, footer or styling of your Web application visible within the WPF application. In this instance, the Application.spark contains all of the styling and the headers and footers. The end goal is to have a white page with some data on it that is pulled from your MVC site. To do this, create a layout file in the Views/Layouts or Views/Shared directory that has the same name as the controller. If the name of your controller is ExternalController.cs, the name of your Spark layout file would be External.spark as shown in Figure 5. When any view is requested from the External Controller, Spark will render the view with the External.spark as its master layout.
Another alternative is to provide the master layout name as the second argument when you return a View() as the ActionResult. This would be done like this:
return View("DifferentMaster", "External");
This renders the DifferentMaster.spark view with the External.spark master layout.
A final approach is to configure the view to use a particular master page.
<use master="External" />
This is from User Master in View.
This is the strongest mechanism for wrapping a view in a particular layout. This will override the conventional mechanisms (shown previously) for master layout selection.
Rendering the Content of Your Views
Spark utilizes a concept known as named content. Shown in the Application.spark example, the use element construct is capturing the view content in a content variable named view. When Spark renders a view, the view gets rendered first, then Spark renders the master layout and replaces what is in the <use content=”view” /> with what is in the view content variable. Alternate named syntax also exists.
<use:view />
The syntax above is identical in functionality to <use content=”view” />. The view content variable is used by convention and should be used in place of a custom named content area as Spark will automatically replace the content view variable with the contents of the view. This requires no up-front configuration from the developer.
By defining additional named content sections the developer is able to provide extensible blocks or regions in a master layout. A great example of this is including various css and js files at runtime in part of your site. The following code illustrates how multiple content sections help organize content.
<html>
      <head>
            <title>A Spark Site</title>
            <use content="head" />
      </head>
      <body>
            <div id="pageContent">
                  <use content="view" />
            </div>
            <div id="sideBar">
                  <use content="sidebar" />
            </div>
      </body>
<html>
The developer can add content to the head content variable as well as the sidebar content variable while within their views.
<content name="head">
      <script type="text/javascript"
                  src="path/to/file.js"></script>
</content>

<content name="sidebar">
Sidebar Jazz
</content>

<p>And .. now for the regular view content. </p>
In this example, the content is rendered as such to the HTML output:
<html>
      <head>
            <title>A Spark Site</title>
            <script type="text/javascript"
                  src="path/to/file.js"></script>
      </head>
      <body>
            <div id="pageContent">
                  <p>And .. now for the
                        regular view content. </p>
            </div>
            <div id="sideBar">Sidebar Jazz</div>
      </body>
<html>
Notice how the head content has been rendered in the head area, the sidebar content has been rendered in the sidebar div and the rest of the content was rendered in the view content area. The end result is clean, legible HTML.
How Named Content Output Works
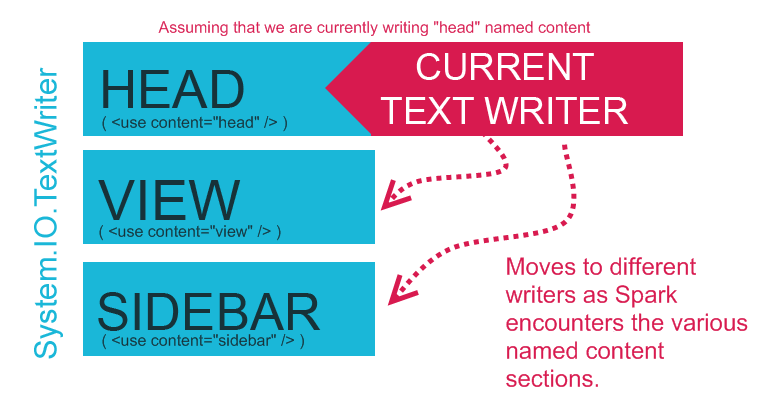
Under the hood, Spark has a spool of TextWriters that represent each of the named content variables. When Spark encounters a named content section such as head, Spark will switch its current TextWriter to the head TextWriter and then write the output into that TextWriter. When Spark reaches the end of the named content area, control will switch back to the intrinsic view TextWriter. At the completion of the named content section rendering, Spark will replace the named content areas in the Application.spark file with relevant content HTML. Take a look at Figure 6 for a clearer picture of what happens under hood.
Spark Partials - User Controls on Steroids
At first glance, Spark partials appear to be nothing more than user controls renamed as .spark. However, partials provide a vast wealth of functionality that include reusability, extensibility, wrapped-content rendering and readability as well as the ability to take advantage of named content sections (as described above). Partial files allow developers to include blocks of functionality into various parts of the site as well as break the site apart into more maintainable view chunks. Spark partials are included in-line with other HTML and template files.
There are various reasons why you’d keep your HTML organized in separate partial files, but the two most important are reusability and manageability.
The easiest way to get started with partials is to create a .spark file inside of your /Views/Shared folder that starts with an underscore as shown in Figure 7.
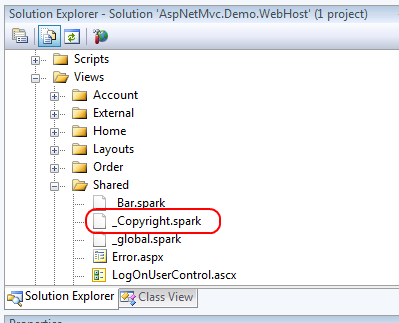
This file, _Copyright.spark, contains basic copyright information for the site. Note that the filename begins with an underscore. This is not required for Spark partials, but any partials that begin with an underscore can be treated as a custom construct in HTML as shown below.
<div id="footer">
      <Copyright/>
</div>
Anytime Spark finds this construct in any other template it will replace the construct with the contents of the _Copyright.spark file. By adding this to the footer of the Application.spark file you now have a copyright added to each page on the site.
The contents of the _Copyright.spark are:
&copy; 2009 Example Spark Project
Partials have the ability to handle parameters which makes them even more useful. Taking the previous example a bit further - what if you wanted to have your copyright identify a range of years in which the copyright was valid? Such as: 2009-2012. The only stipulation is that the ending year must be configurable.
<div id="footer">
      <Copyright EndYear="DateTime.Now.Year + 3"/>
</div>
Above, the partial file accepts the parameter as a local variable and can be accessed via the same name when within the partial file.
&copy; 2009 - ${EndYear} Example Spark Project
When the view is rendered, the copyright will display a range of years, such as 2009-2012.
Partial files can also be restricted in scope to the controller that is utilizing the partial. For example, assume that a given partial only exists and is only needed when an action on the OrderController is called. There would be no need to put this partial in the /Views/Shared directory. This partial, _foo.spark, can exist within the controllers views directory under a shared directory as such: /Views/Order/Shared/_foo.spark. Spark will probe the controllers views folder for a /Shared directory and if it exists, it will attempt to look for any partials in there prior to walking further down the view hierarchy and eventually into the /Views/Shared directory.
Please note, if you have Spark IntelliSense installed you will not receive IntelliSense on partial parameters as they are inferred from the caller as a parameter. Think about this point for a second. This means that the partial file is extensible to have many uses. Spark has the ability to accept a complex type as a parameter, such as a Customer object. If you want to display a list of customers you might want to abstract the address view into its own partial named _MailingAddress.spark. As you loop through the customers you’ll pass the customer object to the _MailingAddress.spark partial as a parameter.
<viewdata model="IEnumerable<Customer>" />

<div each="var customer in Model">
Customer Name: ${customer.Name}<br/>
<MailingAddress record="customer" />
<hr/>
</div>
The partial contents accept the value of customer as its local record.
Address: ${record.Address}<br/>
City: ${record.City}<br/>
State: ${record.State}<br/>
Postal Code: ${record.PostalCode}<br/>
Country: ${record.Country}<br/>
The key thing to note here is that the type is inferred from the caller. This has a very interesting side effect in such that if the record has the same signature as requested within the partial it can be rendered. Therefore, as long as the record has an Address, State, City, PostalCode and Country the partial will render correctly. If there is another object, Company, that has same property signature, it will render the partial correctly if it is set as the record.
<viewdata model="IEnumerable<Company>" />

<div each="var company in Model">
Company Name: ${company.CompanyName}<br/>
<MailingAddress record="company" />
<hr/>
</div>
The above will render the _MailingAddress.spark partial the same as it would a customer. The partial has now been utilized by two different types with a similar signature. Neither object shares the same base type or interface but both are able to use the same partial.
At times it is necessary to pass extra information to the partial as well as a type to do its job. This can be accomplished with a partial. Partials have the ability to render wrapped content. Within the partial a <render/> call is made and anything that is enclosed within the open and close tags of the partial gets replaced where the <render/> tag is located. Imagine that you want to centralize all rounded corner logic into one partial. You can do that by creating a _Rounded.spark partial and placing all of the logic into there.
<!-- Imagine some fancy css/jQuery
       rounding here -->
<div class="rounded">
<render />
</div>
The <render /> construct identifies where the content should be rendered. Example usage:
<Rounded>
My text here should have a rounded corner.
</Rounded>
The output of the HTML is as follows:
<!-- Imagine some fancy css/jQuery
       rounding here -->
<div class="rounded">
My text here should have a rounded corner.
</div>
Partials can also accept named sections inside of themselves which allows developers to have different sections in which they can place content or other partials. This enables partials to act as micro templates themselves. Building up a library of useful templates such as rounded corners, AJAX effects, formatting, etc., can streamline development time and improve the ROI on your MVC project.
<!-- Imagine some fancy css/jQuery
       rounding here -->
<div class="rounded">
<render section="top" />
<hr/>
THIS IS THE MIDDLE
<hr/>
<render section="bottom" />
</div>
You can pass content or another partial into the named sections as such:
<Rounded>
      <section name="top">
            My text here should
            have a rounded corner.
      </section>
      <section name="bottom">
            <SomeOtherPartial/>
      </section>
</Rounded>
The HTML output results in:
<!-- Imagine some fancy css/jQuery
       rounding here -->
<div class="rounded">
My text here
should have rounded corners.
<hr/>
THIS IS THE MIDDLE
<hr/>This is some other partial! Woo!
</div>
Partials allow for robust modular functionality that can be extended by other partials as I’ve shown above. Partials are the powerhouse of Spark; they offer the extensibility, modularity, and micro template system that you need in today’s Web development arena.
Partials are the powerhouse of Spark; they give us the extensibility, modularity, and micro template system that you need in today’s Web development arena.
That’s Not All Folks
Spark gives you the flexibility and rich feature set you need to create compelling ASP.NET MVC applications with less work and more attention to what your presentation layer should be doing - displaying HTML. Spark has many features, and even though I only covered a few in this article, you’ll find a wealth of knowledge on the Spark website, the development group, and in the samples that are included with the download.
Other features that Spark currently supports include the JavaScriptViewResult (where JavaScript is returned via a view result for consumption on the client), caching, macros, support for IronRuby and IronPython, MonoRail support, pre-compilation of views, modularity and general template usage (such as e-mail templates, etc.). I strongly encourage you to take the time to download the bits, play with the samples and utilize Spark in your next project or give it a shot on your current one. Remember, you can run two view engines at once!
Listing 1: Output from for each loop
<style>
alt { background-color: tan; }
</style>
<div class="alt">
      <p>Name: Item1</p>
      <p>Price: 3</p>
</div>
<div>
      <p>Name: Item2</p>
      <p>Price: 6</p>
</div>
<div class="alt">
      <p>Name: Item3</p>
      <p>Price: 9</p>
</div>
<div>
      <p>Name: Item4</p>
      <p>Price: 12</p>
</div>
<div class="alt">
      <p>Name: Item5</p>
      <p>Price: 15</p>
</div>


