


Forms are essential and deceptively simple, but they can also be incredibly involved. They're just a <form/> tag with a bunch of input controls, right? Wrong. Things can become quite complex quickly once you consider issues such as data-binding, validations, change tracking, etc. You need to consider that you're in a browser, disconnected from the server and you need to worry about change tracking. Even validations can be simple validations, or they could be validations that you write code for, that need an asynchronous call, or that involve multiple controls. See? Their simplicity is deceptive!
Forms are a very important part of any framework, and therefore it's reasonable to expect that Angular 2 has rich support for forms. Angular2 lets you support forms in two different ways:
- Template-driven forms, which you can think of as very similar to how Angular 1 let you write forms
- Model driven forms, which is the new functional reactive way
In this article, I'll write a simple ToDo application and illustrate both ways of writing the form. First, let me start describing what the application is all about. You should, at this point, clone the git repo at: https://github.com/maliksahil/AngularExamples, which is the associated code for this article.
Strawman ToDo Application
ToDo applications are the new HelloWorld because everyone knows what they are. I don't have to explain the business problem, so you can focus your energy on understanding the technical problem. Also, ToDo applications provide enough flexibility to allow me to craft up nearly any canonical example.
In this strawman application, you'll have a form that lets you edit an array of Todo objects. The Todo objects are loaded using an AJAX call from a JSON file. You can see the structure of the data in Listing 1.
Listing 1: Structure of the data
[
    {
        "id": 0,
        "title": "Steal donut truck"
    },
    {
        "id": 1,
        "title": "Speed on the freeway"
    },
    {
        "id": 2,
        "title": "Get caught by cop"
    }
]
Start with a simple read-only application that you can find in the associated code download under the Start folder. Clone the github repository for the associated code download. The code is way too wordy for me to explain every single aspect here, but I'll mention some high-level portions.
The code for the Start application is quite simple. It contains two components. The first is a TodoComponent, which renders a single Todo that it receives as an input from the startup component, which is the TodosComponent.
The second is the TodosComponent, which relies on the TodoService to get an observable of Todo[]. The TodoService populates this Observable whenever it queries the backend with an Ajax call. The reason I preferred to use Observables over promises here is because it greatly simplifies the code. Perhaps the most interesting part here is the service itself, which can be seen in Listing 2.
Listing 2: The TodoService
@Injectable()
export class TodoService {
    private _todos: Subject<Todo[]> = new Subject<Todo[]>();
    todos: Observable<Todo[]> = this._todos.asObservable();

    constructor(private _http: Http) {
        this._http.get('data/todos.json').subscribe(res => {
            this._todos.next(res.json());
        });
    }
}
I used a special class called the Subject. The Subject is both an Observer and Observable. IUsing a Subject is a very convenient way to convert the results of the HTTP GET operation, massage the results as need be, and populate the massaged Todos, which are ready to be consumed as an Observable using the asObservable method, which I expose as a public property.
Go ahead and get the Start application working on your computer. This code is extremely simple, but do ensure that you understand it well before proceeding further.
Enhancing the Service
Now that the simple example is in place, I want to aim higher. I want to give the user the ability to edit, delete. And add ToDos. To support these operations, the first thing I'll do is change the implementation of the TodoService. Note that this section of this article applies to both template-driven forms and model-driven forms.
In addition to supporting Observables for GET operations, it needs to support additions, modifications, and deletions. Deletions? But if Observables are the end of a read-only pipe, how are you going to handle deletions? Well, it's easy! First of all, most likely, you're not deleting in the browser only; you probably want to mark the objects as added, deleted, or modified, and to change their value. You can add more intelligent change tracking if you wish, but marking the row state is enough for the purposes of this article.
To support row states, add a property called rowState in the Todo business object, as can be seen in Listing 3.
Listing 3: Adding the rowState property
export class Todo {
    public id: number;
    public title: string;
    public rowState:string;
    constructor(todo?: Todo) {
        Object.assign(this, todo);
        this.rowState = "ADDED";
    }
}
Next, turn your attention to the service, which needs to support deletes, adds, and modify operations.
Because you need to handle deletes and modify operations eventually, you need to remember the overall state of the application. Note that I'm not using Redux. To remember state, simply create a variable at the top of your service, as shown in the next snippet:
let allTodos: Todo[] = [];
There's an alternate pattern called Redux that gives you a very standardized way of handling state and actions on the state. I'll leave that for a future article.
Let's tackle getting objects from the server and adding them. This's easy with a kink, which will become clear quite soon.
In your TodoService, add a property called newTodo as shown in the next snippet:
newTodo: Subject<Todo> = new Subject<Todo>();
This is an Observable (a subject is both an Observer and an Observable), which always shows the last added Todo. Why are you adding this? Because when you add objects into an array, you want to notify all the interested parties that a new object is available. Wait a minute! I thought you wanted to notify the rest of the parts of the application that the Todo array has changed. Yes indeed! But what does the notification? For now, let's name that mythical character who does this notification “Piggie.” Piggie dearest needs to notify the TodosComponent that the Todo array has changed. And the newTodo Observable can notify Piggie that a new Todo is available, and then, in turn, Piggie can notify the TodosComponent.
So, now there's a newTodo > Piggie > TodosComponent?
No, that isn't enough! You not only want to notify in the case of additions, you also wish to notify in the case of deletions and modifications. In fact, let's call these by the generic name Todos Operation, which you can conveniently represent using an interface. Now you can add the following Todos operation in your TodoService file.
interface ITodosOperation extends Function {
    (todo: Todo[]): Todo[];
}
If you're familiar with redux, you might be thinking that this looks shockingly similar to a reducer function. Yeah, it is! But Redux is this plus a few more things. Let's leave that for another day.
With this newTodo in place, you also need similar Subjects to handle updates and creations. To handle updates, add the following Subject to your service:
updates: Subject<ITodosOperation> = new Subject<ITodosOperation>();
To handle new Create operations, add the following Subject:
create: Subject<Todo> = new Subject<Todo>();
The eagle-eyed among you might have caught an oddity above. The first snippet has a Subject of type ITodosOperation, and the other has a Subject of type Todo. You need this because Create always creates new Todos, but an Update receives operations that need to be applied to all Todos. Doing it this way means that you've chosen to generically represent that as an interface.
Next, add a new Todo to notify the creation subject. This is easy to do with the following line of code:
this.newTodo.subscribe(this.create);
In other words, whenever there's a new thing happening on newTodo, like when a new Todo is added, it calls this.create. The creation operation is shown as next.
this.create.map(
    function (todo: Todo): ITodosOperation {
        return (todos: Todo[]) => {
            return todos.concat(todo);
        };
    }).subscribe(this.updates);
This puts the Create operations on the updates stream. You're effectively subscribing your Updates stream to listen to the Create stream. In other words, if Create gets a new Todo (by virtue of the newTodo subject), it emits an ITodosOperation, which will be received to the updates stream.
Now, you need to handle the Updates stream. This can be seen in the next snippet:
this.todos = this.updates
.scan((todos: Todo[], operation: ITodosOperation) => {
        return operation(todos);
    }, allTodos)
.publishReplay(1).refCount();
What you're doing here is watching all the Updates and the accumulation the Operations on Todos. You're replaying the last change using the publishReplay(1) method, which you're setting to this.todos, which is the Observable that you're databinding to in the TodosComponent.
Putting all this together, my TodoService now looks like Listing 4.
Listing 4: The Todoservice
export class TodoService {
    // All Todos
    todos: Observable<Todo[]>;
    // Latest Todo
    newTodo: Subject<Todo> = new Subject<Todo>();
    // Receives changes that can be applied to all Todos
    updates: Subject<ITodosOperation> =
        new Subject<ITodosOperation>();
    // action stream
    create: Subject<Todo> = new Subject<Todo>();

    constructor(private _http: Http) {
        // Hydrate todos
        this._http.get('data/todos.json').subscribe(res => {
            allTodos = res.json();
            allTodos.forEach((todo) => {
                let toAddTodo = new Todo(todo);
                this.addTodo(toAddTodo);
            });
        });

        // watch the updates and accumulate operations on the todos
        this.todos = this.updates
            .scan((todos: Todo[], operation: ITodosOperation) => {
                return operation(todos);
            }, allTodos)
            .publishReplay(1).refCount();

        this.create.map(function (todo: Todo): ITodosOperation {
            return (todos: Todo[]) => {
                return todos.concat(todo);
            };
        }).subscribe(this.updates);

            this.newTodo.subscribe(this.create);
    }

    addTodo(todo: Todo): void {
        todo.rowState ="ADDED";
        this.newTodo.next(todo);
    }
}
After all this effort, deletes and updates become really simple. You can see the delete and update methods in Listing 5.
Listing 5: Delete and Update operations
updateTodo(todo: Todo): void {
    this.todos.subscribe((_todos: Todo[]) => {
        _todos.forEach((_todo) => {
            if (_todo.id === todo.id) {
                _todo.title = todo.title
                _todo.rowState = "UPDATED"
            };
        });
    });
}

// deletes
delete: Subject<Todo> = new Subject<Todo>();
removeTodo(todo: Todo) {
    // console.log(todo);
    this.todos.subscribe((_todos: Todo[]) => {
        _todos.forEach((_todo) => {
            if (_todo.id === todo.id) {
                _todo.rowState = "DELETED";
            };
        });
    });
}
As can also be seen in Listing 5, you are simply iterating over the ToDos, and if you find the matching ToDo, you're updating or deleting it. Well, you're also marking the row state, but that's the equivalent of deleting in a disconnected system.
Now with the service ironed out, you'll reuse the same service for both Template-driven forms and Model-driven forms.
Template-Driven Forms
Angular 1 provided many directives, one of which was ng-model and which gave us two-way databinding. The biggest advantage of ng-model-based forms or controls was that they were simple. They were simple to write and simple to understand.
Angular2 has an identical mechanism using ngModel. To see it in action, let's extend the “Start” application to allow you to edit, add, and delete ToDos. You'll find the finished code for the template-driven form in the Template folder of the associated code download for this article.
Template-driven forms are quite similar to how you wrote forms in Angular 1. The first thing to do is to make the TodoComponent support two-way data binding. I'm doing this because I wish to also edit the Todo and the edited value needs to be reflected back to the parent TodosComponent.
The TodoComponent
The first change you need to make is to the todo.component.html file. This can be seen in Listing 6.
Listing 6: The todo.component.html file for Template-driven forms
<span>
    <span *ngIf="!isEdit">
        {{todo.id}}. {{todo.title}}
    </span>
    <span *ngIf="isEdit">
        {{todo.id}}. <input name="title" [(ngModel)]="todo.title"/>
    </span>
    <a href="#" (click)="toggleEdit($event)">Edit</a>
</span>
You may have guessed by looking at Listing 6 where I'm headed. I've added a simple Edit/Save functionality that sets a Boolean isEdit, which shows/hides the Textbox that allows the user to edit the Todo's title. In addition, I've used the “banana in a box” ngModel syntax to two-way databind my textbox to todo.title. The code backing this in todo.component.ts is shown in Listing 7.
Listing 7: The todo.component.ts for template-driven forms
@Component({
    selector: "todo-control",
    templateUrl: './app/Components/todo.component.html',
    directives: [FORM_DIRECTIVES]
})

export class TodoComponent {
    @Input() todo: Todo;
    @Output() todoChange: EventEmitter<Todo> = new EventEmitter<Todo>();

    private isEdit: boolean = false;
    toggleEdit($event) {
        this.isEdit = !this.isEdit;
        $event.srcElement.innerText = this.isEdit ? "Save" : "Edit";
        this.todoChange.emit(this.todo);
    }
}
As can be seen in Listing 7, I've enabled this to be a two-way databound component, which provides basic Edit/Save functionality for the Todo.
The TodosComponent
Next, let's focus on the TodosComponent. I've added some code at the bottom of my TodosComponent that allows me to see the databound business object, which can be seen in Listing 8.
Listing 8: Viewing the business object
<table>
    <thead>
        <td><b>Business Object</b></td>
    </thead>
    <tr>
        <td>
            <pre>{{_todos | async | json}}</pre>
        </td>
    </tr>
</table>
And that's where the easy part ends! Just kidding. Or at least, that's where the elegant part ends, and that unfortunately I'm not kidding about. The rest of the TodosComponent can be seen in Listing 9.
Listing 9: Todos Component with Template-driven forms
<form #f="ngForm" (ngSubmit)="onSubmit(f.value)">
    <div *ngFor="let todo of _todos | async; let i = index">
        <todo-control [todo]="todo"
        (todoChange)="updateTodo($event)"
        name="todo{{i}}" ngDefaultControl ngModel>
        </todo-control>
    </div>

    <div>
        <h2>Add a todo:</h2>
        <label for="todoTitle">Title</label>
        <input type="text" id="todoTitle" name="title" ngModel>
    </div>
    <button type="submit">Submit</button>
</form>
The first thing that sticks out in Listing 9 is that it really pollutes your HTML, doesn't it? But let's leave the pros and cons for the end. Essentially what happens here is that I've declared a variable called #f (or just f in typescript) to represent my form. And wherever I specify a Name attribute, it becomes a Property on my form. As long as I can databind using ngModel, the user interface shows the new values and the underlying business object changes. When you hit submit, you're logging the value of f.value, as shown in the next snippet:
onSubmit(formData:any) {
    console.log(formData);
}
At this point, go ahead and run the application. You probably want to use the code from the Template folder of the associated code download.
When you run the application, it should load a user interface as shown in Figure 1.
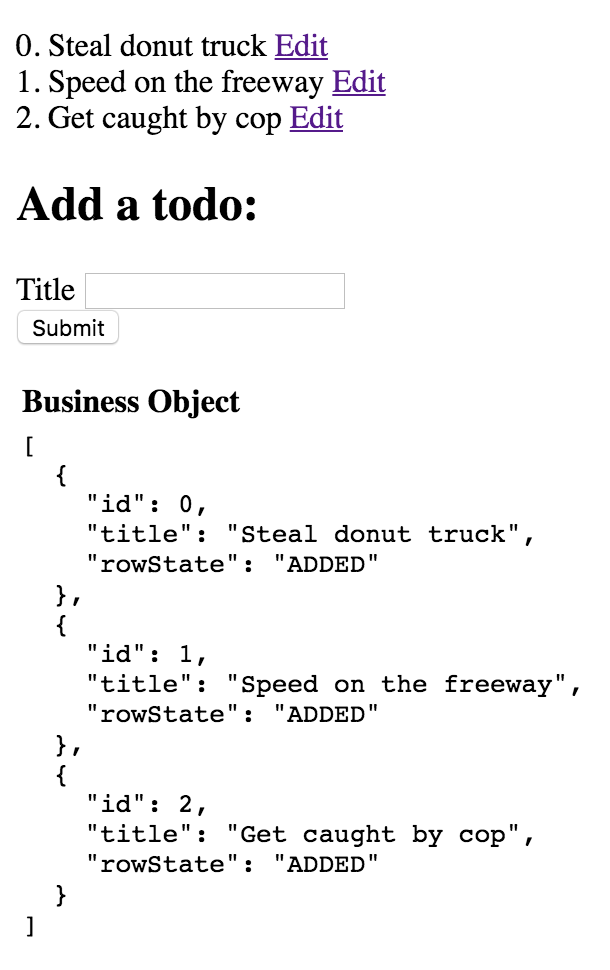
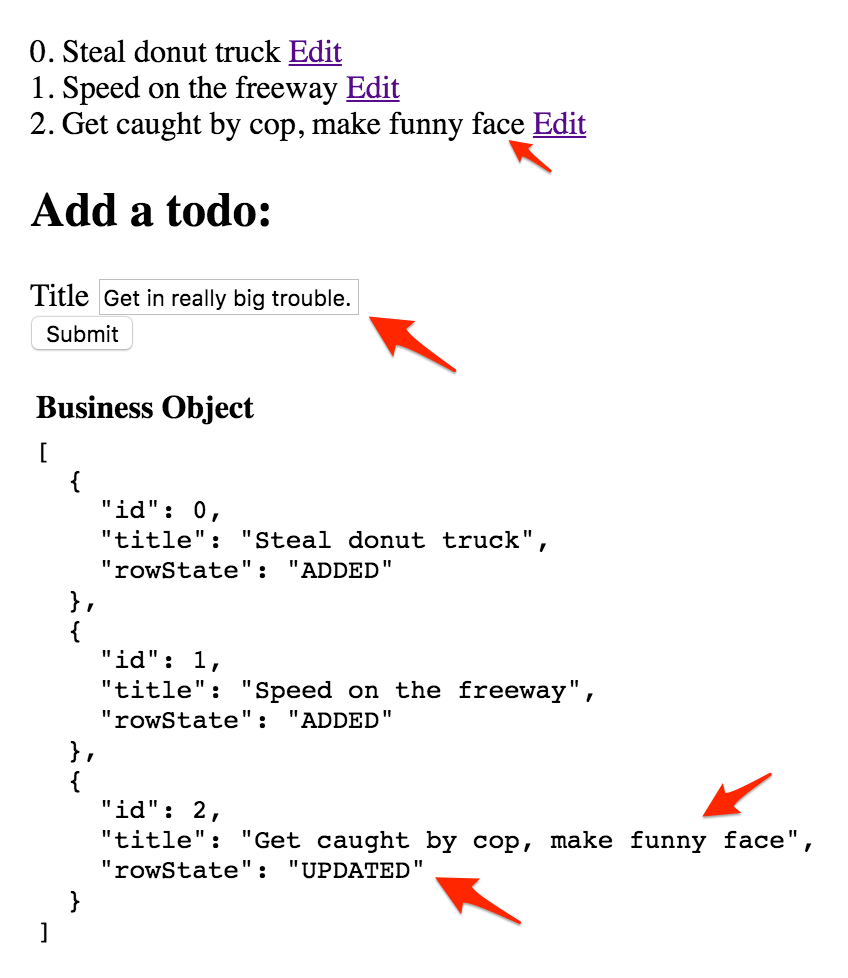
Now go ahead and add a new Todo and add some text in the new Todo field. As you can see in Figure 2, the business object stays in sync. That's great! You can also add validations just like you did in Angular 1, and you have various properties on the form object to help you out, along with CSS classes in the UX. It didn't take a lot of code to make this happen.
You'll note that, for brevity sake, I've chosen not to show the delete and add functionality. They're going to be simple method calls to the service methods that you've already written, but that brings me to a big downside of this approach of creating forms. Go ahead and click the Submit button. You should see an output like that shown in Figure 3.

Hmm, that's not quite what you were expecting, right? This looks nothing like the object you were working with. In fairness, in the databound object, the Todos Observable is where you can look for proper data structure, but that gets quickly out of hand because you effectively have to tie your UX to your business object structure. That means that you have to model your components to reflect the object structure. This brings me to the pros and cons of template-driven forms.
Pros and Cons
The template-driven form is easy to understand but has the following disadvantages:
- In order to TDD, you need the DOM.
- Your components structure invariably end up getting affected by your business object structure. Changing the business object structure can cause huge changes in your application.
- Validations etc., make the form less and less readable.
- None of the validation logic is easy to unit test.
On the other hand, template-driven forms are simple! That, in my eyes, is a big win.
Model-Driven Forms
Next, let's look at being able to create the very same form using the model-driven forms approach. The first thing you need to know here is that the service is not going to change. This is the reward you get for modeling your code nicely and separating the heavy lifting into the service. The only changes are in the components. This time, I'll start with the parent TodosComponent.
The TodosComponent
The one big difference between template-driven forms and model-driven forms is that model-driven forms work on their own business object of data type FormGroup. This may sound like a negative, because after all, don't you then have to write lots of plumbing code to keep your business object and this FormGroup in sync? Luckily, that's not the case. Because you wrote the service to use Observables, and because model-driven forms understand Observables very nicely, bridging the two together is very easy. In other words, with very little plumbing code, the business object stays in sync with the form and vice versa.
In the form, you'll have variable called myForm of data type FormGroup representing the form's data. Listing 10 shows some diagnostic databinding code that helps you view both the databound object and the business object side-by-side. This code goes in the todos.component.html file.
Listing 10: The todos.component.html examining our objects
<table>
    <thead>
        <td><b>Databound data</b></td>
        <td><b>Business Object</b></td>
    </thead>
    <tr>
        <td>
            <pre>{{ myForm.valueChanges | async | json}}</pre>
        </td>
        <td>
            <pre>{{_todos | async | json}}</pre>
        </td>
    </tr>
</table>
In order to construct the myForm variable, make use of an Angular service called FormBuilder.
Start by injecting an instance of FormBuilder into the constructor of TodosComponent, as shown in the next snippet:
constructor(
    private _todoService: TodoService,
    private _fb: FormBuilder) { }
Now, use the life cycle hooks of the component, and leverage the ngOnInit method to make a call to the service to get the Todos. This can be seen in Listing 11.
Listing 11: Hydrating Todos and creating controls
ngOnInit() {
    this.myForm = this._fb.group({
        'todos': this._fb.array([])
    });

    this._todoService.newTodo.subscribe((todo) => {
        const control = <FormArray>this.myForm.controls['todos'];
        control.push(this.initTodoControl(todo));
    });

    this._todos = this._todoService.todos;
}
Listing 11 does some really interesting things. First, it creates a control array called todos. You're writing some code here to mimic the business object and keep things understandable, but your business object structure could be different from the UX if you desire it to be. Next, subscribe to the newTodo observable. Whenever a new Todo appears, you're adding a new control under the todos control array.
How does the code know that this new control is tied to the TodoComponent? That information is embedded in the HTML template, which I'll discuss momentarily. First, I want to talk about the initTodoControl method. This can be seen in Listing 12.
Listing 12: The initTodoControl method
initTodoControl(todo: Todo) {
    var formGroup = this._fb.group({
        id: [todo.id],
        title: [todo.title, Validators.required]
    });
    formGroup.valueChanges.subscribe((todo) => {
        this._todoService.updateTodo(todo);
    });
    return formGroup;
}
As you saw in Listing 12, the initTodoControl method adds a Validator indicating that the title is required for the newly added Todo. But most interestingly, on this new FormControl, it subscribes the valueChanges. This Observable fires whenever the value of the underlying object changes. How interesting! Now, if only there were a way to sync this to the business object. That's the next line of code, which you can see in the next snippet.
this._todoService.updateTodo(todo);
Yeah, that's really it! That's all it took to sync the form with the business object. You could always add more logic here if your application gets more complex. But this is a degree of magnitude simpler and more powerful than trying to do the same thing in template-driven forms. Do note that this approach works well with Observables only, which is another reason I'm a fan of Observables.
The logic for deletion and addition of new Todos is also quite simple, and can be seen in Listing 13.
Listing 13: The addTodo and removeTodo methods.
addTodo(todo: Todo) {
    this._todoService.addTodo(todo);
}

removeTodo(todoFormGroup: FormGroup, i: number) {
    let deletedTodo: Todo = todoFormGroup.value;
    const control = <FormArray>this.myForm.controls['todos'];
    control.removeAt(i);
    this._todoService.removeTodo(deletedTodo);
}
The add method calls the service and adds a Todo there. The service churns through its logic and publishes the update to the Todo Observable on which the form is databound, and that refreshes the UI.
The delete method is slightly more complex if you intend to delete the object only in the UX but not in the underlying business object. Why are you doing this? Well, you don't have to! Most Web-based UIs are disconnected. You want the UX to differ from the business object for one reason: You haven't gone back to the server to save the changes yet. This flexibility is yet another power you gain by disassociating the UX with the business object and yet keeping them linked via Observables.
The update logic is encapsulated in the TodoComponent. Before we go there, let's quickly look at the HTML template for the TodosComponent first. This can be seen in Listing 14.
Listing 14: The todos.component.html file for Model driven forms.
<form [formGroup]="myForm" novalidate (ngSubmit)="onSubmit(myForm)">
    <div formArrayName="todos">
        <div *ngFor="let todo of myForm.controls.todos.controls; let i=index">
            <div [formGroupName]="i">
                <todo-control [group]="myForm.controls.todos.controls[i]">
                </todo-control>
                <button
                    *ngIf="myForm.controls.todos.controls.length > 0"
                    (click)="removeTodo(myForm.controls.todos.controls[i],i)">
                    Delete
                </button>
            </div>
        </div>
    </div>
    <hr/>
    <button(click)="addTodo({'id':myForm.controls.todos.controls.length,'title':''})">
        Add New
    </button>
    <hr/>
    <button type="submit">Submit Form</button>
</form>
As can be seen in Listing 14 at the very top, you're associating the form with the myForm variable using the [formGroup] tag. Then you use properties such as formArrayName to associate the object with a Form Controls array. Inside there, you're creating instances of the Todo-control component. All the while, you're working with the myForm object, not the Todos object. With the help of Observables, the two always stay in sync anyway.
TodoComponent
The TodoComponent follows the same theme. Both the HTML and TS (Typescript) for the TodoComponent can be seen in Listing 15.
Listing 15: The TodoComponent for model-driven forms
<span [formGroup]="todoForm">
    <span *ngIf="!isEdit">
        {{todoForm.value.id}}.
        {{todoForm.value.title}}
    </span>
    <span *ngIf="isEdit">
        {{todoForm.value.id}}. <input formControlName="title"/>
    </span>
    <button (click)="toggleEdit($event)">Edit</button>
</span>
..
..
export class TodoComponent {
    @Input('group')
    public todoForm: FormGroup;
    private isEdit:boolean = false;

    toggleEdit($event) {
        this.isEdit = !this.isEdit;
        $event.srcElement.innerText = this.isEdit ? "Save" : "Edit";
    }
}
As can be seen in Listing 15, the TodoComponent gets its own formGroup. This allows you to treat this underlying component completely independent of the parent. The underlying object has no knowledge about the business object and it doesn't care about the rest of the form. Via the usual data-binding code, it works by editing this formGroup.
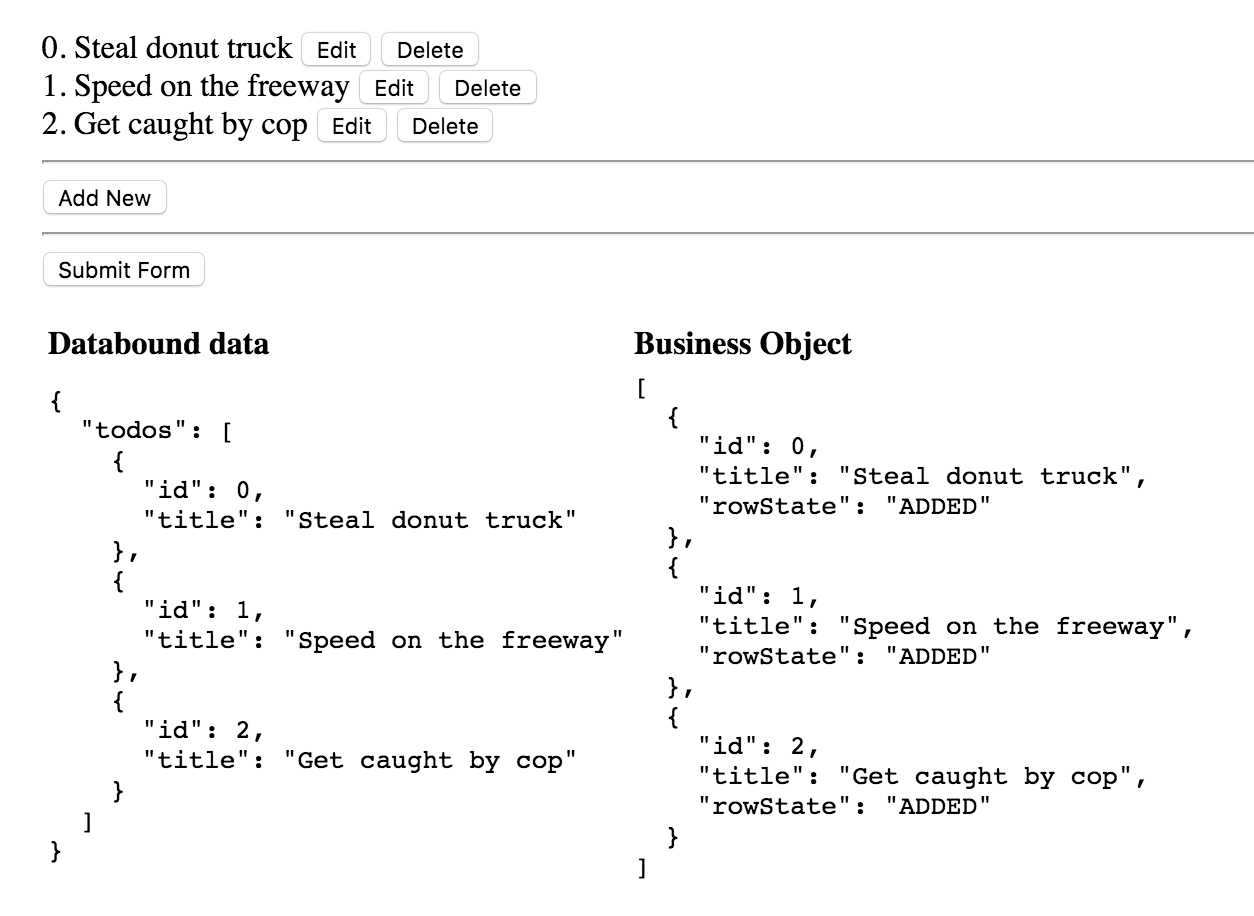
Now let's go ahead and run the application. When you start the application, it shows a user interface, as shown in Figure 4. Clearly, with much less code and much cleaner HTML, you were able to produce even more functionality than the template-driven form equivalent. Imagine what it's like when your application grows more complex.
Now, add a Todo, edit a Todo, and delete a Todo. The results can be seen in Figure 5. Note that Todo #4 is something I added, edited, and deleted. Its final state is DELETED.
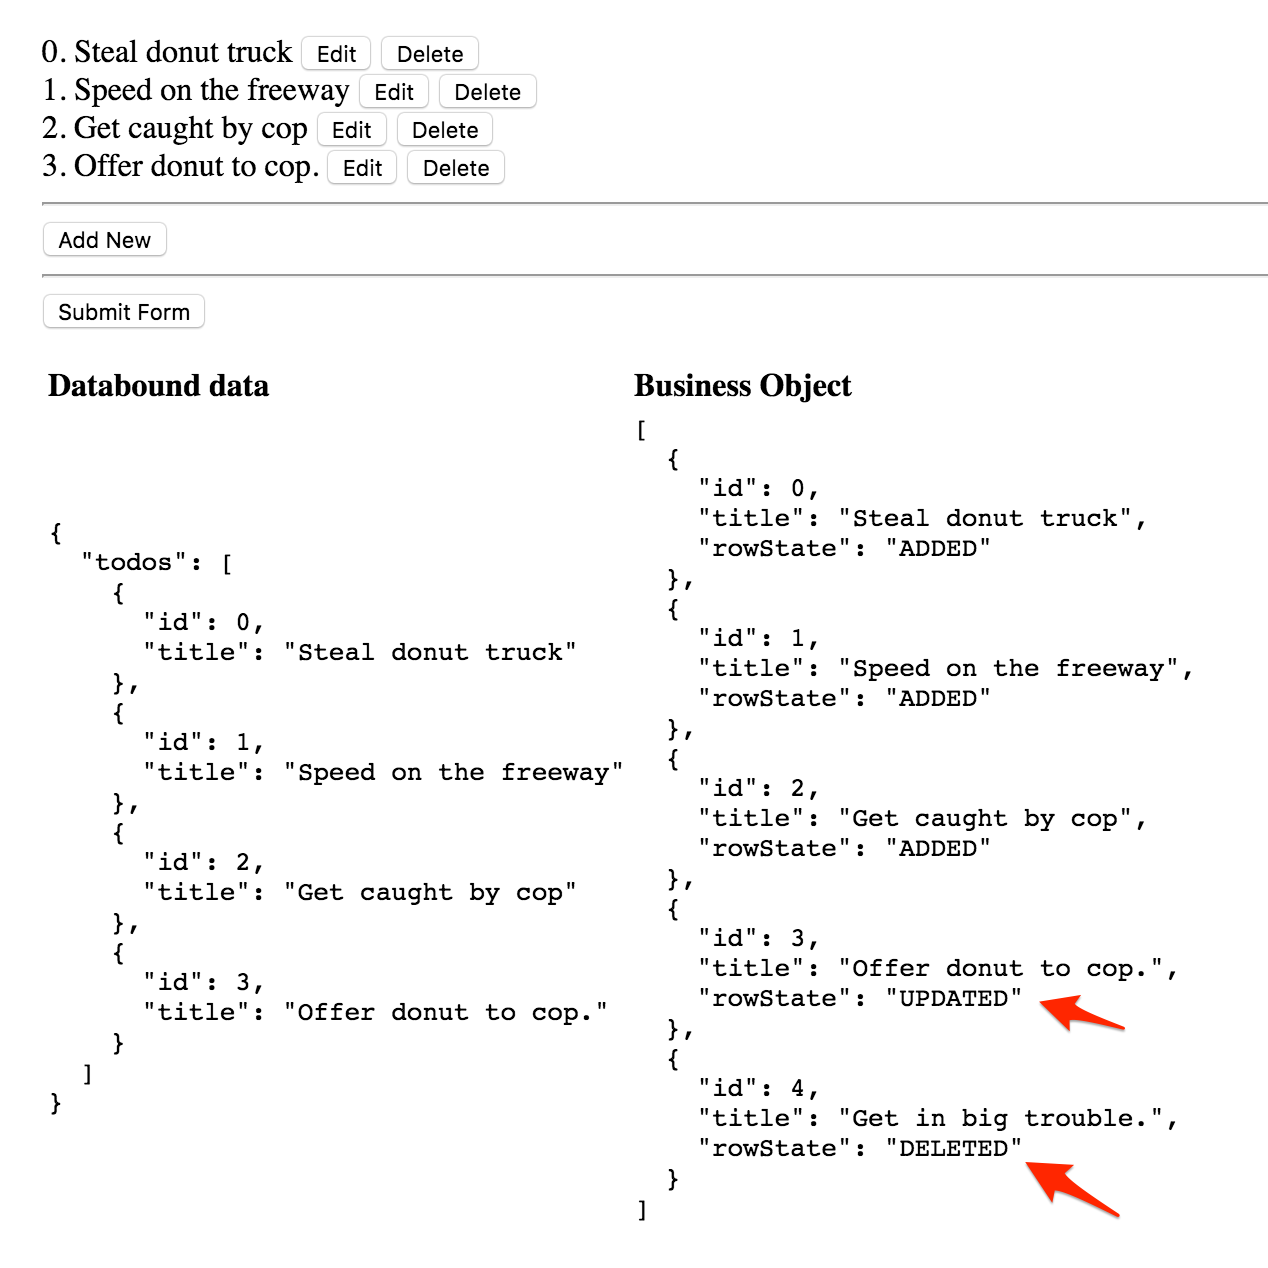
The underlying business object is now a lot easier to process for the service when you send these changes to the server. Also, just like template-driven forms, you have all the Validators, or even custom Validators, available to you.
Pros and Cons
Model-driven forms requires some learning. Maybe creating the form also requires some thought. But you gain several things:
- Because the business object and the form object are separate, you gain a lot of flexibility here. Two-way data-binding isn't all that it's cracked up to be if you don't have a processing pipe in the middle. A good example is where deletion doesn't mean deletion; that's when it only means marked for deletion.
- Both the form and object are streams of values. They can both be independently tested or processed. For instance, you could only subscribe to values that are invalid and act accordingly, which is really easy to do because you can use the
.filtermethod on Observables to help you out. How would you do this in template-driven forms? - Your validation logic can also now be testable.
I feel that there's no absolute way forward that suits all cases. If your form or application is very simple, perhaps template-driven forms are the right approach. They are simple and they require less code if your needs are also very simple. But as the application gets more complex and TDD becomes a requirement, model-driven forms are a far better alternative.
Summary
Forms are complex and important. That's why any good framework, including Angular, provides you with rich functionality to support forms. In this article, I showed you how to write forms using two approaches in Angular 2. The template-driven forms approach is very similar to what we had in Angular 1. That's still supported and is perhaps an easy migration path. But model-driven forms are much more powerful and flexible, and end up requiring less code for more complex applications, especially when paired with reactive Extensions and Observables.
There are additional patterns such as Redux that can also be used to manage and structure your applications. In future articles, I hope to talk more about reactive programming and RxJS in general.
Until then, happy coding!
