


Ah, the cloud! So much power, so many things you can authenticate with. And how do you usually authenticate? Well, there's a secret, a secret key, right? Oh, you talk of access tokens, but those access tokens also originate from keys. We just call them client secrets.
Additional Azure related articles: Microsoft Azure CODE articles
The challenge is where to store these numerous secrets. Not in the code, certainly. That leaves the config file, which, over the years, has become a mishmash of many settings. And they're settings you don't want to lose, so you end up checking that config file into source control.
Before you know it, that source control file is being used, along-with your secrets, because someone decided to open source the project on GitHub.
Thankfully, in the Microsoft Azure ecosystem, there's a better solution, and that's managed identities.
What is Managed Identity in Azure?
Managed identities in Azure provide an Azure AD identity to an Azure managed resource. Once that resource has an identity, it can work with anything that supports Azure AD authentication.
This is really powerful because although your Azure resource now has an identity, there are none of the headaches usually associated with that identity. There's no password to manage and you can control permissions or revoke that identity centrally. This identity doesn't pollute your code and it doesn't end up in config files. Increasingly, Azure resources are beginning to support managed identity.
What about those old-timey things that still need a user name and password? For instance, there's a lot of code that leverages CSOM with SharePoint or Office 365. Well, even those can work with managed identity, with a twist. For instance, an Azure function using the v2 runtime can have a managed identity. This Azure function can use its managed identity to authenticate to a key vault, which is a service in Azure to securely store secrets. And it can gain credentials securely as a “last mile problem” and call CSOM.
This is great because at no point did you need to hardcode environment-specific credentials into your code or even your config. And you had a central place to manage credentials and permissions.
Best of all, it's free! There's no additional cost to using managed identities in Azure.
There are two kinds of managed identities, a system-assigned managed identity and a user-assigned managed identity.
System-Assigned Managed Identity
A system-assigned identity is enabled directly on an Azure resource instance. Frequently, it's as simple as toggling a slider button. You just tell Azure, “Hey, I'd like to have a managed identity here.” By doing so, credentials are provisioned on the Azure resource instance. And now the identity is married to the Azure resource instance. When you delete the instance, the identity is cleaned up with it.
A User Assigned Managed Identity
Not all Azure resources currently support managed identities, but that number is gradually shrinking. Even if they did all support managed identities, sometimes you need a stand-alone identity. Sometimes you may want to create an identity and assign it to one or more Azure resource service instances. Although this gives you a great amount of flexibility, now you're responsible for the life cycle of this identity.
Either way, your code can use the managed identity to request tokens that support Azure AD authentication. The best part is that you never concern yourself with managing passwords, etc. Azure takes care of rolling the credentials for you.
Before you see managed identities in action, let's understand how managed identities work.
How Managed Identities Work
Enabling a managed identity involves the following steps:
Congratulations, your managed identity is now provisioned. How do you use it?
There are three ways you can use the managed identity:
- To call the Azure resource manager, use role-based access control (RBAC) in Azure AD to assign the appropriate role to the service principal.
- To call the Key Vault, grant your code access to the specific secret or key in Key Vault.
- Use the IMDS service to request an access token. The request is made to http://169.254.169.254/metadata/identity/oauth2/token. This request is made using the client ID and certificate of the service principal, and you get your usual JWT token that you can use to do your usual Azure AD authentication.
As you can see, managed identities can be used to work with nearly every conceivable scenario. There's lots of flexibility. Not to mention that more and more Azure services are adding support for managed identities. One of my favorites is Azure functions v2 runtime that now supports managed identity.
Managed Identity in Action
Although managed identities can be used in numerous scenarios, I'll demonstrate how you can use managed identities in Azure functions.
Start by creating a new Function App. Ensure that you create one with the following settings:
- Put it in its own resource group, which makes clean up easier.
- Choose Windows OS. Although Linux function apps are possible, they are currently in preview.
- A runtime stack of .NET. managed identities are certainly possible with JavaScript.
- Create an associated storage account - you won't be making much use of it, but function apps need this for things like durable functions, etc.
- You can go with the consumption plan or app service plan. I went with the B1 basic app service plan.
My function app is called sahilfunctionapp.
Assigning a Managed Identity
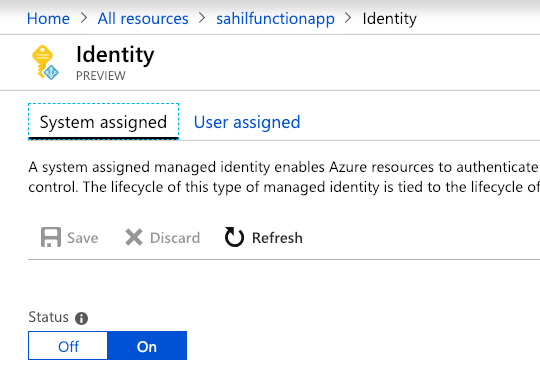
Once your function app is created, you'll enable managed identity for the function app. You can do so using either PowerShell, Azure CLI, or directly via the Azure Portal.
Additionally, you can choose to enable either system-assigned managed identity, or a user-assigned managed identity for a function app. User-assigned managed identities are currently in preview.
In order to assign a system-assigned managed identity:
You can also choose to assign managed identity to a function app via Azure CLI as follows:
az webapp identity assign
--name sahilfunctionapp
-–resource-group sahilresourcegroup
Alternatively, if PowerShell is your pill, you can use the following command:
Set-AzureRmWebApp
-AssignIdentity $true
–Name sahilfunctionapp
–ResourceGroupName sahilresourcegroup
Configuring the Identity
Great! Now you have a managed identity, but what can you do with it?
- Access Cosmos DB
- Call a Web API protected by Azure AD
- Call Azure AD Graph API
- Call Azure resource manager
- Access Azure storage
- Access data lake
- Access SQL products in Azure
And more.
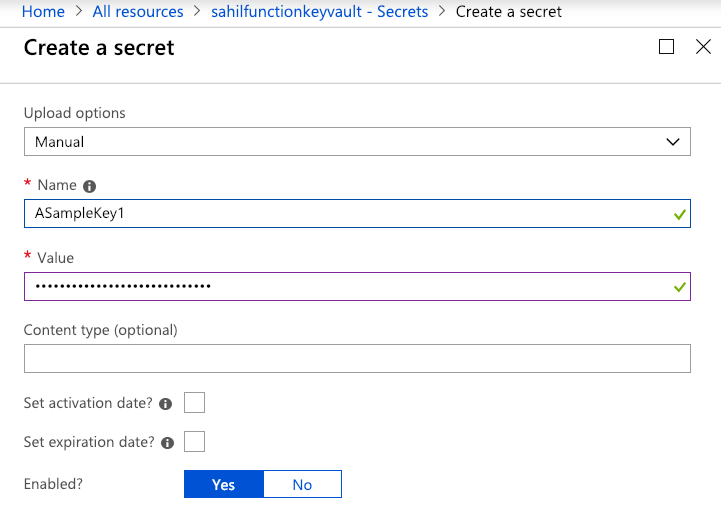
Let's see how my function app can access Azure key vault. Go ahead and provision an Azure key vault for yourself. Once the key vault is created, choose to create a secret. I created one manually, called it “ASampleKey,” and gave it a super-secret value, as can be seen in Figure 2. That value can be anything, but to keep the suspense, I'll read this value from my Azure function and reveal the secret at the end of the article.
Use Managed Identity to Read Secrets
In order to read the secret from the Azure function using its system-assigned managed identity, there are two steps you need to take.
First you need to give the service principal for your Azure function the necessary access rights to read the secret. Just navigate to your key vault and add an access policy, as shown in Figure 3. Note that the system-assigned managed identities don't show up by default; you'll have to search for them. Also leave the “authorized application” part blank.

The second thing you need to do is to author an Azure function that reads this key vault secret. You already have an Azure function app. This is the same app where you created the system-assigned managed identity. In this function app, choose to add a new function. Because the runtime you picked was .NET, choose to add a C# function, and choose to use the “in-browser” editing experience using an HTTP Trigger.
This should give you the canonical function app code, which accepts a request with a “name” parameter and returns "Hello {name}".
Let's edit this function to allow it to read the Azure key vault. There are many ways to write Azure functions, and by far my favorite is to use either VSCode or Visual Studio. Visual Studio for Mac currently supports authoring Azure functions in preview. For the purposes of this article, I'll show you how to author your function using Monaco, the in-browser editing experience.
Select your function app, go to Platform Features, and click on Log Streaming under the monitoring section, as shown in Figure 4.
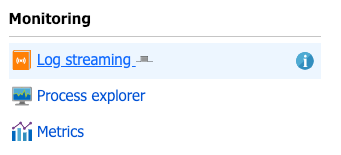
Open this in a tab and keep it on a separate monitor. I'll be honest, sometimes log streaming is finicky. It may work or it may not. My personal preference is to view the logs using Kudu with a watch + tail command. But I'll leave that for an advanced functions article. Let's just pretend that log streaming is working for you, because in 70% of the cases, it works, and if it doesn't, just refresh it. If it still doesn't work, ignore it or Google up “how to read streaming Azure function logs” or tweet me. shrugs
The reason I want you to view streaming logs is because as NuGet packages get installed or, if errors occur, this is your window into all that information. Without this, you'd be a bit lost. Anyway, your other option is to follow the subsequent instructions carefully and fly blind. Let's go!
Also in the same area, click on the App service editor link under Development tools as shown in Figure 5.
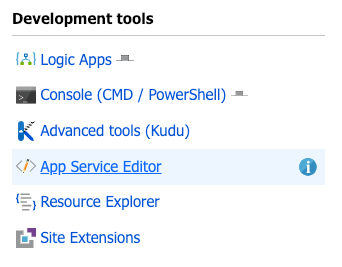
This should launch a Web-based editor that looks somewhat similar to VSCode. Under your HttpTrigger1 folder, add a file called function.proj as shown in Figure 6. The location and name of this file is critical and must match exactly, as shown in Figure 6.
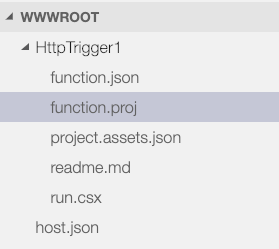
The purpose of function.proj is equivalent to a C# project file: It allows you to specify what NuGet packages you wish to take dependency on. Go ahead and place the code shown in Listing 1 in this function.proj file.
Listing 1: The NuGet packages in function.proj
<Project Sdk="Microsoft.NET.Sdk">
<PropertyGroup>
    <TargetFramework>netstandard2.0</TargetFramework>
    <AzureFunctionsVersion>v2</AzureFunctionsVersion>
</PropertyGroup>

  <ItemGroup>
    <PackageReference
        Include="Microsoft.Azure.Services.AppAuthentication"
        Version="1.0.3"/>
    <PackageReference
        Include="Microsoft.Azure.KeyVault"
        Version="3.0.2"/>
  </ItemGroup>

</Project>
As can be seen from Listing 1, I have taken a dependency on two NuGet packages:
- The
Microsoft.Azure.Services.AppAuthenticationpackage and - The
Microsoft.Azure.KeyVaultpackage
If you had the log streaming window open at this point, you'd see a lot of output stream informing you of NuGet packages being installed in your function app. If, for any reason, your log streaming isn't working, you can verify the NuGet packages being installed properly by going to Kudu\Debug Console and look at D:\home\data\Functions\packages\nuget. You can access Kudu from the platform features tab, under Development tools, right above the app service editor link I showed you in Figure 5.
Your NuGet packages directory listing should look like Figure 7.
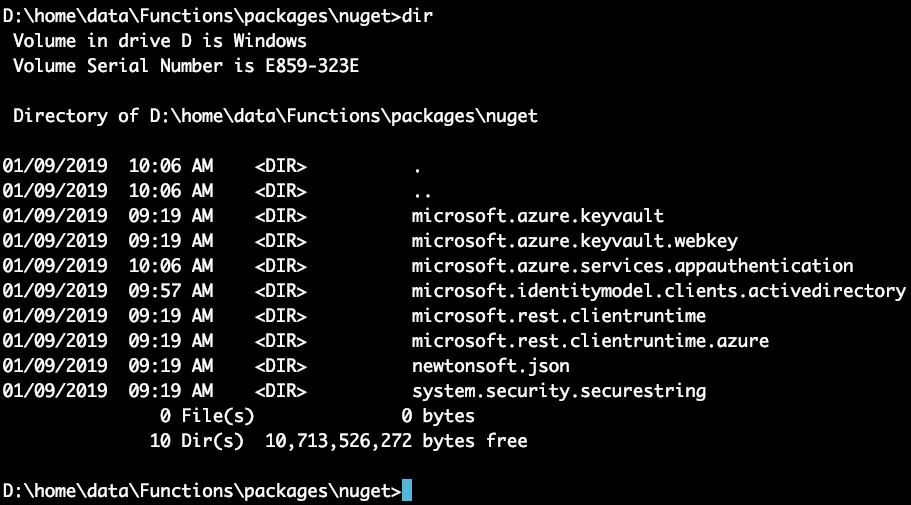
Because I created a Windows function app, my Figure 7 looks like a Windows console, because that's exactly what it is. I should emphasize, though, that you're welcome to try this on Linux. The steps are shockingly similar. Just remember to use ls -l instead of dir.
Okay, so my NuGet packages are installed. Let's now make some code changes. In the run.csx file, place the code shown in Listing 2. The code in the function app is pretty much as simple as it gets! It's the “Hello world” example of reading a secret out of the key vault, which should succeed because you set the access policy in Figure 3.
Listing 2: The C# function app code
using System.Net;
using Microsoft.AspNetCore.Mvc;
using Microsoft.Extensions.Primitives;

using Microsoft.Azure.Services.AppAuthentication;
using Microsoft.Azure.KeyVault;

public static async Task<IActionResult> Run(HttpRequest req, ILogger log)
{
    log.LogInformation("C# HTTP trigger function processed a request.");

    try
    {
        var AzureServiceTokenProvider = new AzureServiceTokenProvider();
        var kv = new KeyVaultClient(
            new KeyVaultClient.AuthenticationCallback(AzureServiceTokenProvider.KeyVaultTokenCallback
            ));
        var secretURI = "..removed..";
        var secret = await kv.GetSecretAsync(secretURI);

        return (ActionResult)
        new OkObjectResult($"Secret vaue:, {secret}");
    }
    catch (Exception e)
    {
        return (ActionResult)
            new OkObjectResult(e.ToString());
    }
}
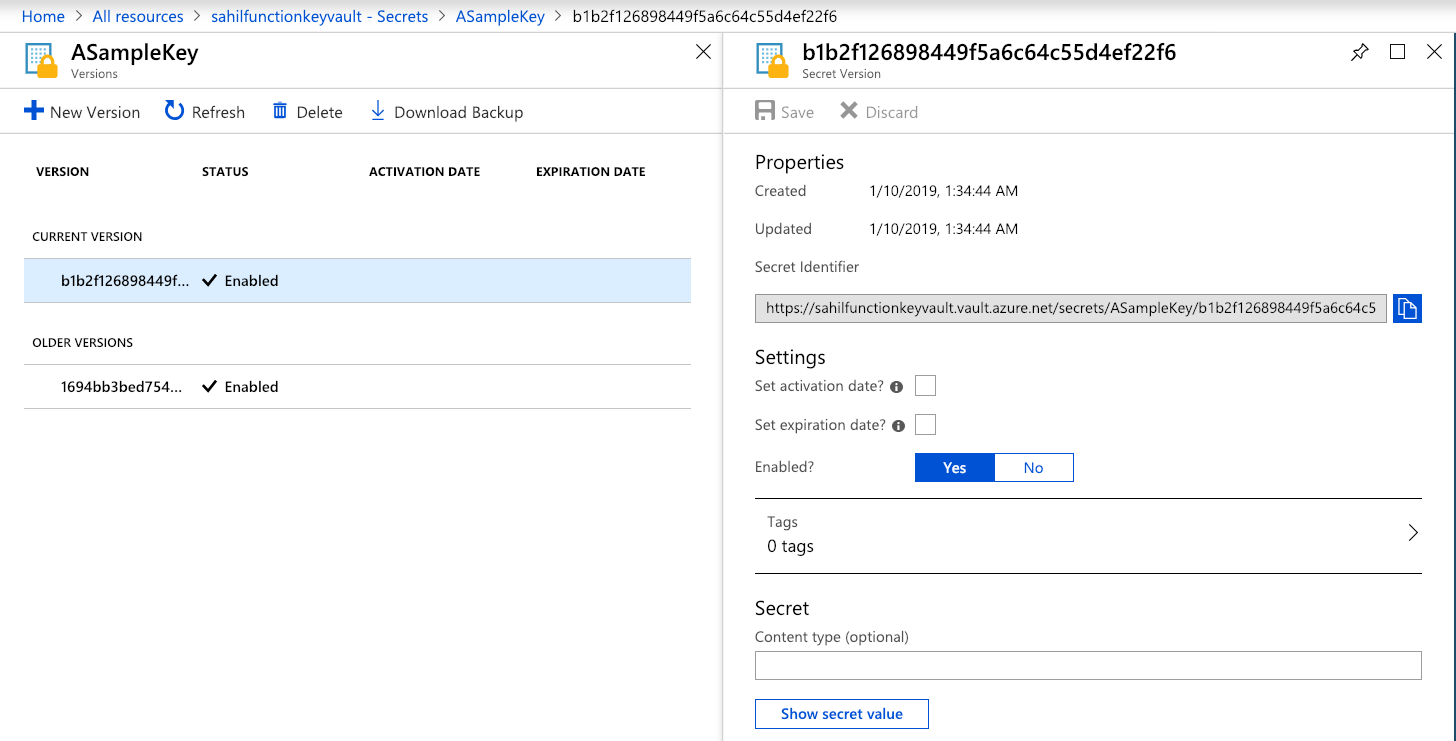
A notable omission in Listing 2 is the URI of the secret. This will be specific to your secret. Let me show you how to get the URI for your secret. Navigate to the secret itself and select the version of the secret you're interested in, you can grab the URI from the secret identifier field, as shown in Figure 8.
All that's left is to execute the function. Get the function URL, put it in the browser, and hit Enter. You should see an output like that shown in Figure 9.
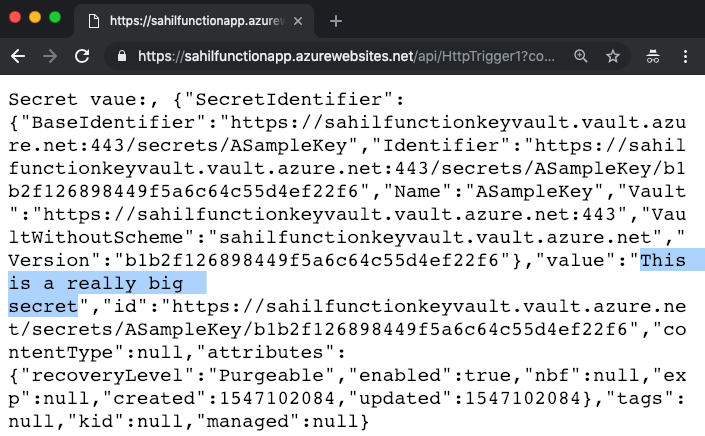
As you can see from Figure 9, you get a JSON object back and you can view the secret value. Surely you can also use the REST API.
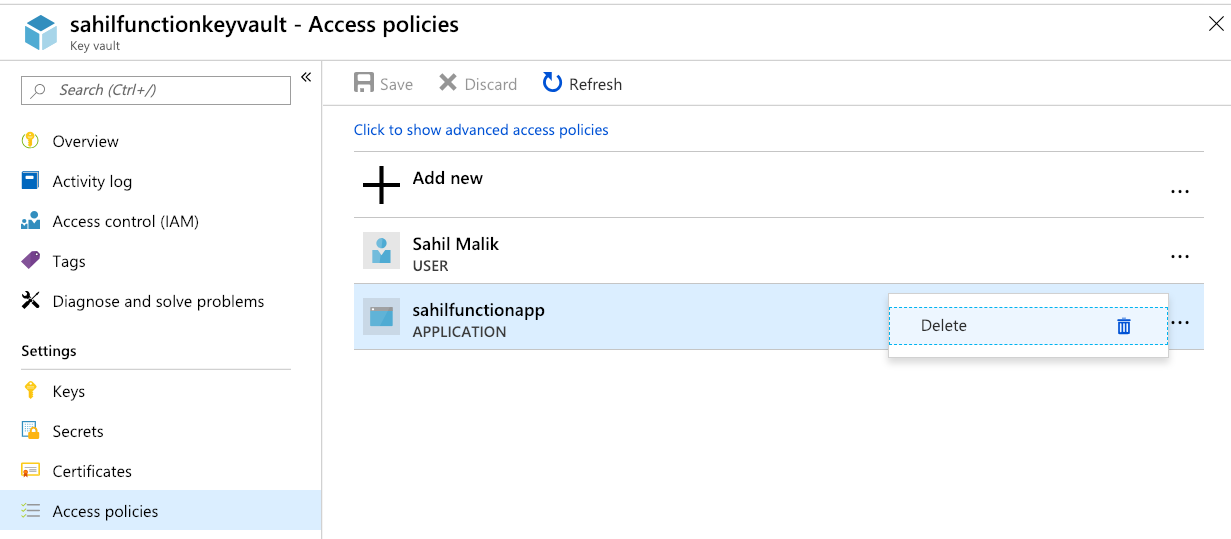
Now because we are engineers and we like to break things, let's remove the access policy for the system-managed identity and retry this operation.
Under your key vault, choose to delete the access policy you created in Figure 3. The delete operation can be seen in Figure 10. Remember to hit Save.
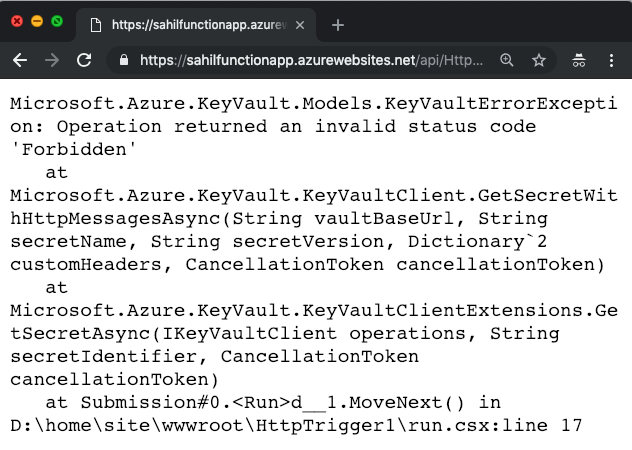
Now come back to the browser instance where you were able to see the key vault secret value and hit refresh. You should see a forbidden response, as can be seen in Figure 11.
Now you may say, yeah this works, but what's the big deal? There are three big deals here:
- At no point did I ever have to manage a password of the managed identity.
- This example showed an Azure function calling Key vault, but the possibilities apply to nearly every Azure resource out there.
- This is a great way of keeping secrets out of your code and aligns perfectly with good devops practices. Now you can check in code, free of fear of leaking secrets on GitHub, etc.
I don't know about you, but when I see convenience and security in a single package, it's a rare win-win that I can't say no to.
Summary
When was the last time your life depended on code? Think hard. Guess what, your life depends on software with every breath you take. That plane flying in the sky, that MRI machine, the electricity you are using right now, your water supply, food logistics, your local grocery store, your bank - they all depend on software.
What's the value of securing that software? And let's be honest, security is twiddly, there are 100 ways to do it and 99 are wrong. Not wrong because they don't work, but because they're either not standards-compliant or are too complex, leaving a big surface area to attack.
Security is extremely important, and we're witnessing the death of passwords. Managed identity goes a long way in eliminating the complexity out of security, thereby making things more secure, while keeping everything standards compliant.
I can only say this with full conviction: You should strongly consider using services such as managed identity and key vault in your Azure-based solutions.
Until next time, happy coding and be secure!
