


Containers have been around for a long time - I remember running a PHP application in a Linux container somewhere around 2004. But ever since Docker came into existence in 2012-2014, containers took off big time. And when .NET Core came about in 2016, all of a sudden, C# Web applications can run in a containerized environment as well!
In this article, I'll look at several things, such as what Docker containers are, how you can containerize an ASP.NET Core application, and how to use an IDE like JetBrains Rider to build and debug applications in a Docker container.
What are Docker Containers?
Everyone is probably familiar with the concept of a virtual machine (VM) - a computer that runs its own operating systems and applications, creating a virtual system. VMs provide high-density hosting, where multiple VMs can share CPU memory and storage resources from their host. They also provide great isolation, provided by the hypervisor software that runs on the host computer. Each VM has its own operating system, so a Linux VM can run on the same host as a Windows VM.
VMs have their drawbacks though. They are a full (virtual) computer, so a simple application of 5 MB requires an operating system that's several GB in size. VM needs to be managed and configured. And its configuration could be different from developer computers, resulting in the famous saying when things do not work in production: “but it works on my machine!”
Containers are different: Instead of virtualizing an entire computer, they virtualize an operating system. They share a common base operating system on which each container can add its own additional software, configuration, and file system entries. These additions are called layers and are described in a Dockerfile. When you're ready to run your application in a container, the Dockerfile is executed and built into a container image. This image can then be deployed and run as a container on your developer computer, as well as in staging or production, making the image very portable.
Prerequisites and Getting Started
To start working with Docker, ASP.NET Core, and JetBrains Rider, there are a couple of things you'll need:
- Docker Desktop, which can be downloaded for Windows or Mac and will run containers on your own computer
- .NET Core, which you will need to develop locally
- JetBrains Rider, which is the IDE you'll be using to develop, build, and debug the containers
When running Docker on Windows, there's also the choice of running Windows containers or Linux containers. For this article, you'll be using Linux containers. Switching the container operating system can be done from the Docker icon in the taskbar.
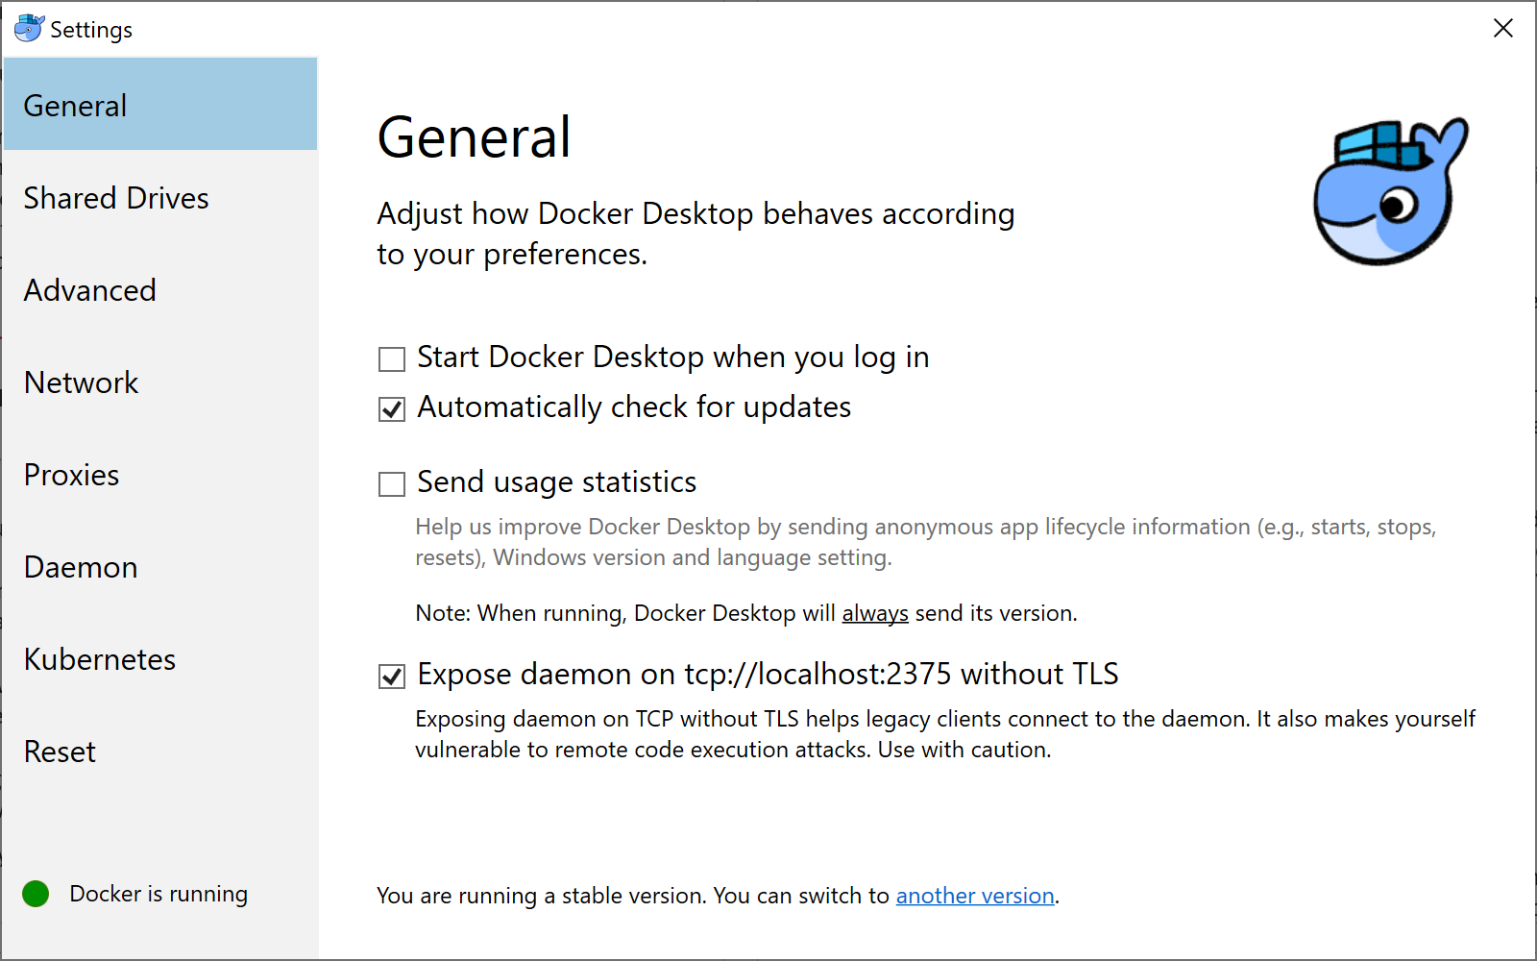
Docker runs the Docker Engine, which is the process that spawns and manages containers on your computer. To be able to manage that Docker Engine from the IDE later on, you'll need to enable one setting in Docker: expose daemon on tcp://localhost:2375 without TLS, as shown in Figure 1.
Let's skip .NET for a bit and start the first container just to get an idea of the very basics. From the command line, run the following:
docker run hello-world
This does three things:
- Checks the cache on your local computer to see whether the image “hello-world” must be downloaded or not
- Downloads the image if it's not cached locally
- Starts a new container with a random name, running what's in the “hello-world” image
You can see the name of that container, its identifier, and status by running:
docker run hello-world
In Rider, you can open the Docker tool window from the View > Tool Windows > Docker menu. If you don't have that entry, you may need to install the Docker plug-in from Rider's settings. The first time you use Docker integration in Rider, you'll have to configure it to connect to your local Docker daemon. From the settings, under Build, Execution, Deployment > Docker, you can add a new connection to Docker. All you'll need to configure it is the engine API URL, which is the tcp://localhost:2375 you enabled previously.
Once connected to the Docker Engine, Rider shows a list of all containers, as well as all images that are cached locally. You can see the container you just ran, and inspect its log and properties. You can also see the “hello-world” image, as shown in Figure 2.
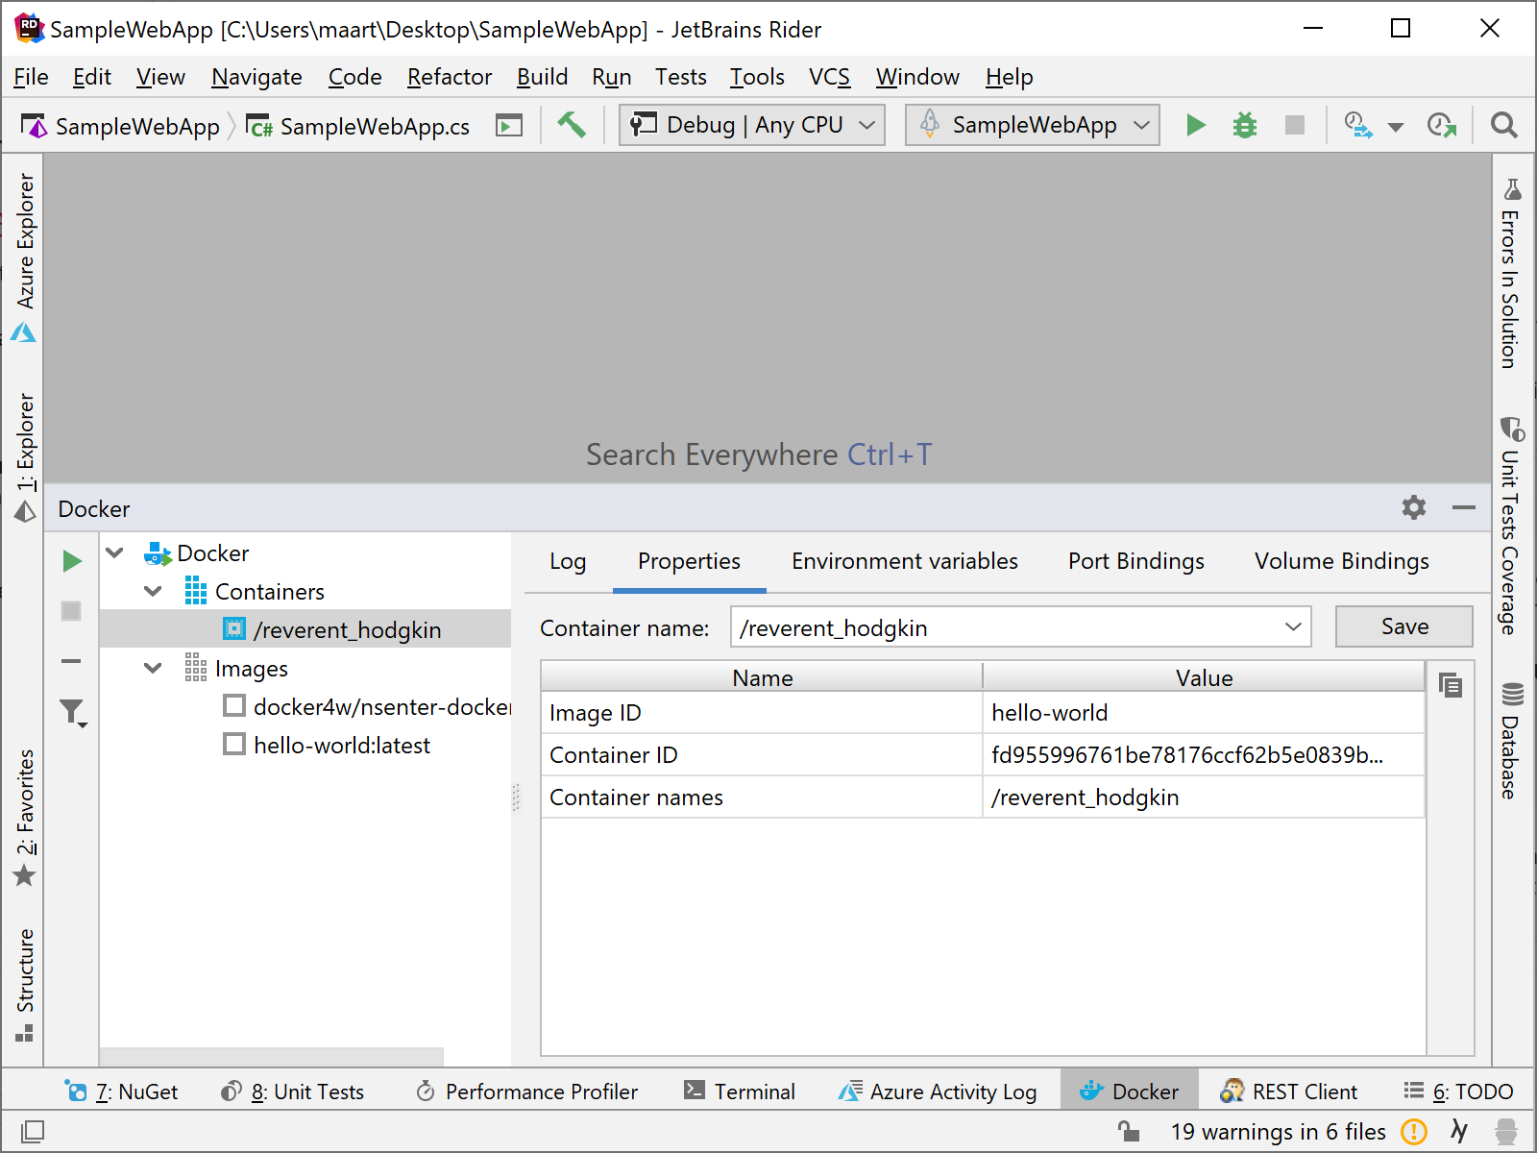
From the Docker tool window, you can use the context menu and toolbar to manage containers and images, similar to some of the command-line tools that Docker provides.
The “hello-world” container is a very simple container that outputs some text. It's built from a Dockerfile similar to this:
FROM scratch
COPY hello /
CMD ["/hello"]
This Dockerfile can be built as a container image that has a base image, called scratch, and has two additional layers where the first one copies a binary file named hello into the container image, and where the second layer runs that binary.
Great! But not very useful yet. A typical Dockerfile contains additional layers. For .NET Core applications, for example, you'd typically perform a NuGet restore, then build your app, optionally run unit tests, and then start the application. So...let's do that.
Dockerizing an ASP.NET Core Application
For this article, you'll build a Docker container for an existing ASP.NET Core application from scratch. After opening any ASP.NET Core application in Rider, you can add a new file in the root of your project, named Dockerfile (no file extension!). Paste in the following contents (note that some lines have been broken for the sake of publishing):
FROM microsoft/dotnet:2.2-sdk
WORKDIR /app

COPY . ./
RUN dotnet restore
RUN dotnet publish -c Release -o out --no-restore

ENTRYPOINT ["dotnet", "out/SampleWebApp.dll"]
This Dockerfile will use the microsoft/dotnet:2.2-sdk image (https://hub.docker.com/r/microsoft/dotnet/) as its base. In Table 1, let's go over each line separately to see what it does.
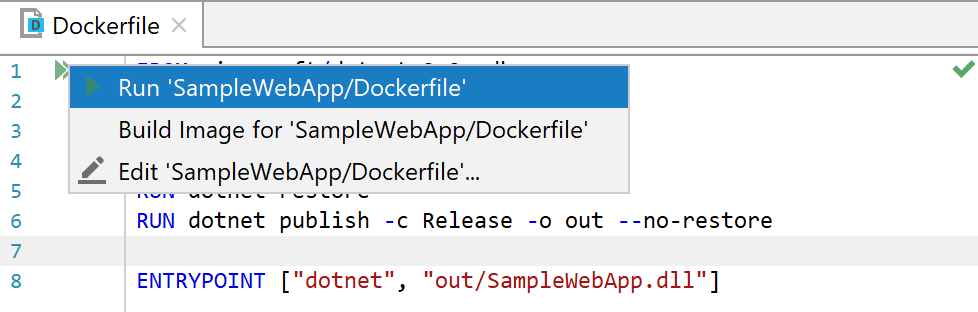
From the gutter in Rider, you can now choose to build or run the container, as seen in Figure 3. Let's run it!
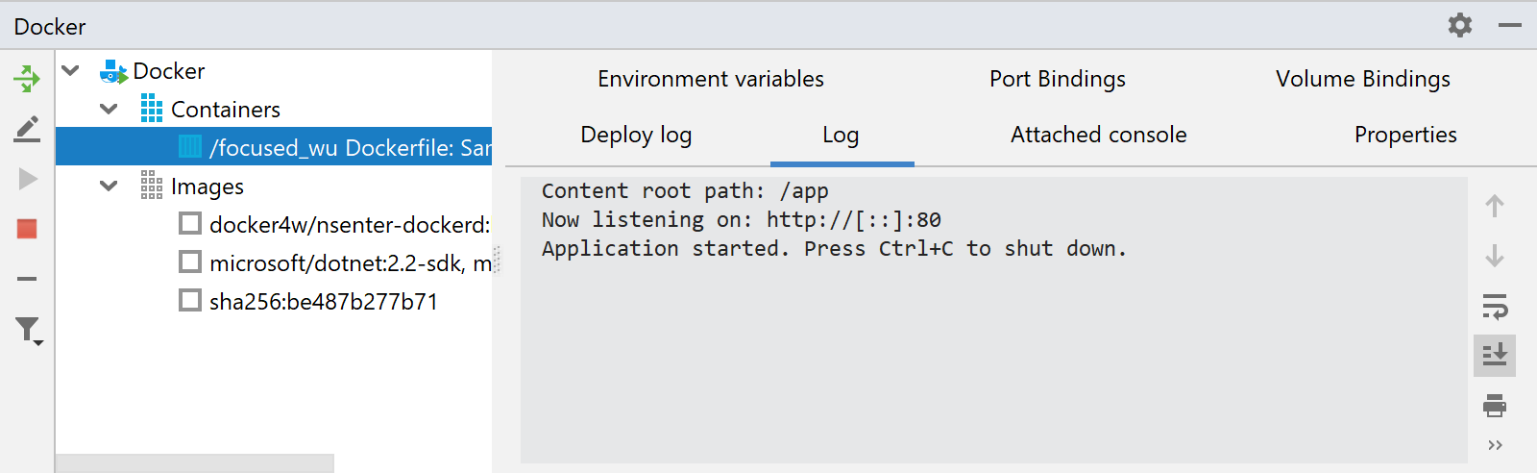
You'll now see a lot of things happen. The base image microsoft/dotnet:2.2-sdk is downloaded, and every step from the Dockerfile is executed as well. And in the end, the container runs and says it's listening on port 80 (see Figure 4), which means that you should be able to access it!
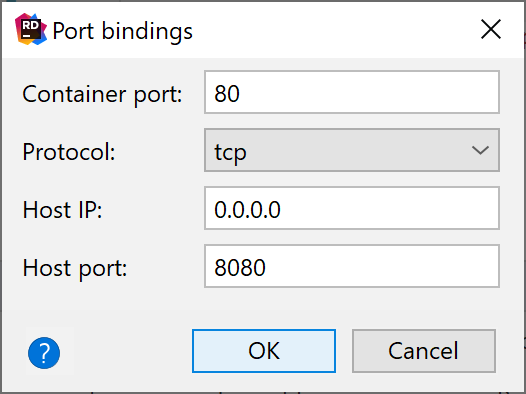
Unfortunately, you're not there yet. A Docker container doesn't automatically expose any ports to the outside world. The port 80 that's mentioned here means that if you would log into the container, you can access port 80 there, but not from your own developer computer or from the outside world. From the Port Bindings tab, you can add a new port binding. The idea is that you will expose the container's port 80 to the outside world, say on your local computer's port 8080, as shown in Figure 5.
Once you save it, you'll see that Rider updates the container, and you can now access http://localhost:8080 and see the ASP.NET Core application in action, served from within the Docker container. You could publish this container image to a repository, and then run the application on a production computer or anywhere else.
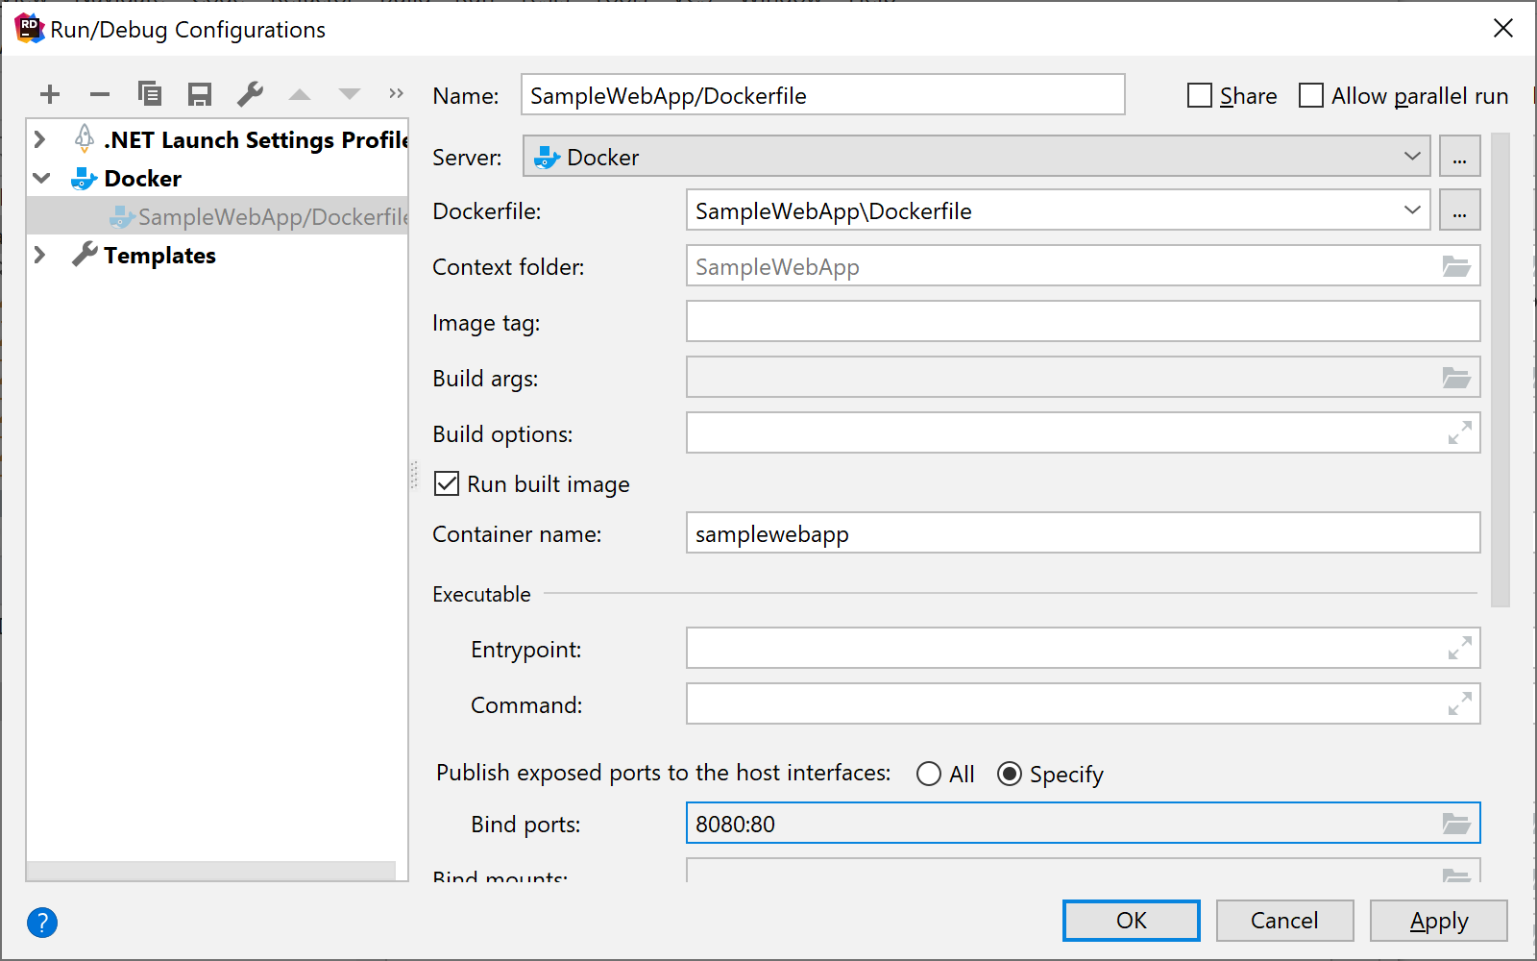
It would be nice to always expose port 80 in the container when you run it on your computer, so you don't have to configure it every time. From the Run > Edit Configurations… menu, you can configure the arguments passed into the Docker engine whenever you run the container from Rider. This configuration screen is seen in Figure 6.
Let's make a few changes here:
- Container name can be set to the name of your application. By default, Docker starts the application in a new container with a random name, and to keep a bit of an overview in the list of running and stopped containers. Having your application name never hurts.
- Bind ports is where you can again configure your container's port 80 to be mapped to host port 8080.
Once saved, you can now use this run configuration to start the container in the future.
Note: When trying to run a Dockerfile that was generated with Visual Studio, chances are that running the container may not work immediately, typically with an error similar to Failed to deploy ‘such file or directory.
Multi-Staged Docker Containers
Although the container works, it's currently too big. Its base contains the full .NET Core SDK where the app runs fine with just the runtime. And you're copying all of the project's sources into the container image as well, where just the assembly is enough to be able to run it.
Ideally, the .NET Core build part of the container image would be separate from the runtime part. You can use multi-staged containers for that! Let's replace the Dockerfile with the following:
FROM microsoft/dotnet:2.2-sdk AS build
WORKDIR /app

# Restoring packages can be done from just csproj
COPY *.csproj ./
RUN dotnet restore

# Copy everything else to build/publish
COPY . ./
RUN dotnet publish -c Release -o out --no-restore

# Build runtime image containing build/publish output
FROM microsoft/dotnet:2.2-aspnetcore-runtime
WORKDIR /app
COPY --from=build /app/out .
ENTRYPOINT ["dotnet","SampleWebApp.dll"]
This Dockerfile is now multi-staged (note the two FROM statements in there). The first stage uses the full microsoft/dotnet:2.2-sdk image as its base, which contains the full .NET Core SDK and all build tools. Note the AS where you're aliasing this stage as build. The second stage uses a slimmer microsoft/dotnet:2.2-aspnetcore-runtime image as its base, containing everything needed to run an ASP.NET Core application but not the build tools and so on. Let's break things down in Table 2 (jump to table at the end of this online article).
You can build this container and see that everything keeps on working fine. The resulting container image size is much smaller though, because it contains only the runtime and published artifacts.
There's one additional thing to note here. In the Dockerfile, the restore step uses only the .csproj file, whereas the build step uses all sources. With .NET Core, the .csproj typically only changes when you manually edit it or when adding additional dependencies. Unless you make a change to the .csproj file, Docker can cache all steps prior to the copy and build steps, which will speed up the overall container image build.
Debugging ASP.NET Core in Docker
So far, you've created a Dockerfile, exposed a port from inside the container, configured a multi-stage image, and you're able to build and run it on your computer. One thing is missing, still: How do you debug the application you're building?
Because you already have a run configuration for the container, all you need to do is use the Run > Debug… menu instead of just Run. This will launch the container and it attaches the debugger to the application running inside of it. All that's left to do is set a breakpoint anywhere in the codebase, and once you navigate to the application, you'll be able to debug it, step through code and inspect variables, as seen in Figure 7.
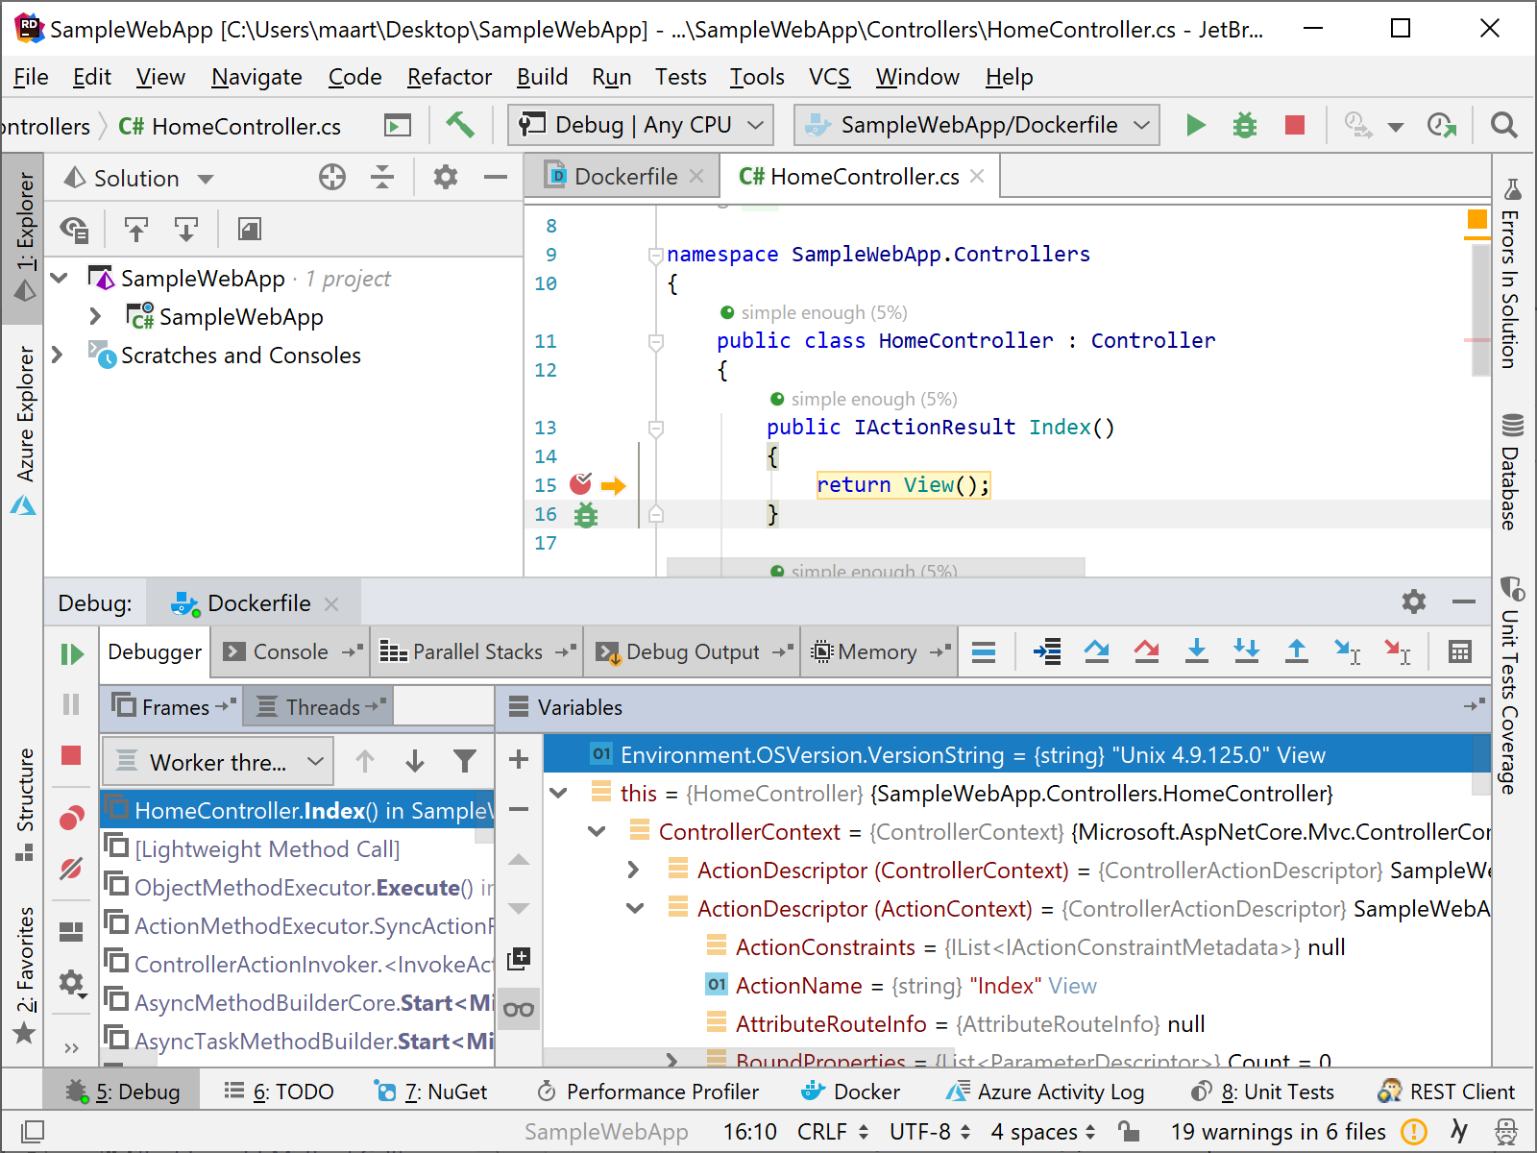
When a breakpoint is hit, you can step through the code, inspect variables, look at the call stack - all things you do when debugging an application running on your own computer. In Figure 7, you can see that the current operating system is listed as Unix, while you're using Rider on Windows. Works on my computer? Works on all computers!
What's Next?
In this article, I've merely touched the basics of containers and Docker. Although you're now able to use JetBrains Rider to develop ASP.NET Core applications on Docker, there's much more to learn!
One interesting tool is Docker Compose, which lets you define multiple containers and how they work together. For example, you can define one container that runs the application, define an additional one that runs SQL Server for Linux, and then have them communicate. This approach lets you build a development environment that's identical to the production environment, with the one difference being that all containers run on the local Docker Engine instead of a production cluster.
There's much more information in Docker's own Getting Started/Docker orientation (https://docs.docker.com/get-started/): it covers additional Docker commands, creating services, swarms where containers can be deployed in a more resilient way, and so on.
And then there is Kubernetes (https://kubernetes.io/docs/tutorials/kubernetes-basics/), a container orchestrator which allows deploying containers to a cluster, handle fail-over, resource limits and more.
Give JetBrains Rider a try as well. It's a full-featured NET IDE that can be used on Windows, Mac OS X, and Linux, and integrates nicely with development targeting containers. There's a free trial available at https://www.jetbrains.com/rider.
Table 1: Breakout of Dockerfile
| WORKDIR /app | Creates and sets the current working directory inside of the container to /app. |
| COPY . ./ | `Copy` files from the current folder on the computer into the current working directory in the container. |
| RUN dotnet restore | Runs a package restore command inside of the container, to make sure all dependencies from NuGet are restored. |
| RUN dotnet publish -c Release -o out --no-restore | Builds and publishes the ASP.NET Core application into the out folder. Because you're in the /app folder already, this means that the published application will go into /app/out. You're also adding the --no-restore flag here as you already restored NuGet packages in the previous step. |
| ENTRYPOINT ["dotnet", "out/SampleWebApp.dll"] | Runs the application. Note that "SampleWebApp.dll" is the name of your application's entry point artifact. |
Table 2: Multi-staged Dockerfile
| Stage 1 | |
| WORKDIR /app | Creates and sets the current working directory inside of the build container to /app. |
| COPY *.csproj ./ | Copies just the `.csproj` file into the build container, as that file is all you need for a NuGet package restore. |
| RUN dotnet restore | Runs a package restore command inside of the container, to make sure that all dependencies from NuGet are restored. |
| COPY . ./ | `Copy` files from the current folder on your computer into the current working directory in the container. This is done because you need all source code to perform the build. |
| RUN dotnet publish -c Release -o out --no-restore | Builds and publishes the ASP.NET Core application into the out folder. Because you're in the /app folder already, this means that the published application will go into /app/out. You're also adding the --no-restore flag here as you already restored NuGet packages in the previous step. |
| Stage 2 | |
| WORKDIR /app | Creates and sets the current working directory inside of the runtime container to /app. |
| COPY --from=build /app/out . | Copies the /app/out folder from the first stage (named build) into the current working directory in the container. This is done because you need all source code to perform the build. |
| ENTRYPOINT ["dotnet", "SampleWebApp.dll"] | Runs the application. Note that the SampleWebApp.dll is the name of the application's entry point artifact. |
