


In my previous article (https://www.codemag.com/Article/1907021/Azure-Machine-Learning-Service), I discussed the Azure Machine Learning Service. The Azure Machine Learning Service is at the core of custom AI. But what really ties it together is the Azure Machine Learning workspace.
The process of AI involves working with lots of data, cleaning the data, writing and running experiments, publishing models, and finally collecting real-world data and improving your models. The machine learning workspace provides you and your co-workers with a collaborative environment where you can manage every aspect of your AI projects. You can also use role-based security to define roles within your teams, you can check historical runs, versions, logs etc., and you can even tie it to your Azure DevOps repos and fully automate this process via ML Ops.
In this article, I'll introduce you to all of these and more.
Provision an ML Workspace
Creating an ML workspace is extremely easy. Log into portal.azure.com using an account with a valid Azure subscription, search for Machine Learning Service Workspace, and click on the Create button in the provided blade. You'll be asked to provide a name; for the purposes of this article, choose to create it in a new resource group. The names I picked were sahilWorkspace for the name of the workspace and ML for the name of the resource group. And in just about a minute or so, your Azure Machine Learning service is created.
You may also create an Azure Machine Learning service workspace using the Azure CLI. In order to do so, you first must install the Azure CLI machine learning extension using the command:
az extension add -n azure-cli-ml
You can then create an Azure Machine Learning workspace like this:
az group create -n ML -l eastUS
az ml workspace create -w sahilWorkspace -g ML
Once the workspace is created, you'll notice a number of newly created resources in your subscription, as can be seen in Figure 1.
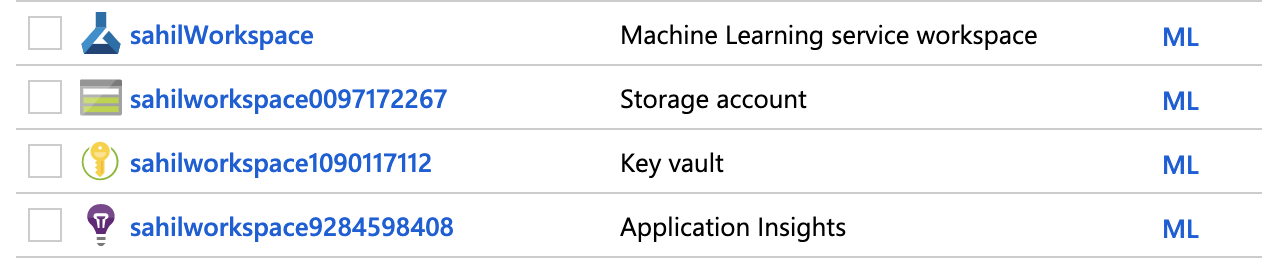
As you can see from Figure 1, the Azure Machine Learning workspace depends on a number of other services in Azure. It needs a storage account where it stores details of runs, experiments, logs etc. It needs application insights to provide you with an inflight recorder. It uses a key vault and managed identities to securely talk to all resources it needs. Behind the scenes, you'll also see service principals backing the managed identities. You shouldn't be changing the permissions of those service principals manually or you'll ruin it all.
As you continue to use your machine learning workspace, you'll notice that new resources get created or removed. You'll especially see loads of resources appear when you provision an AKS cluster to serve your models.
Walkthrough of the ML Workspace
At this time, you've only created a workspace; you haven't yet put anything in it. So before you go much further, let's examine the major components of the ML workspace. I won't dive into every single aspect here, but just focus on the interesting major players. Go ahead and visit the workspace. Within the workspace you should see a section like that shown in Figure 2.
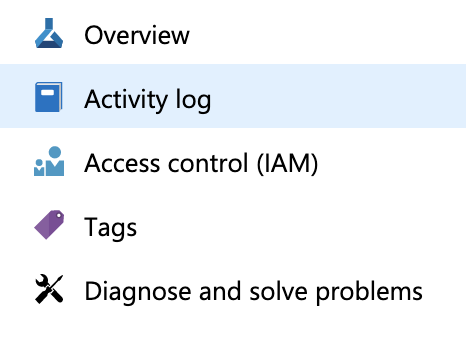
As can be seen in Figure 2, the Activity Log is a great place to learn what activities have been performed in the workspace. Remember, you're not the only one using this workspace - it's a collaborative area that you share with your co-workers. When an experiment goes awry and starts giving out awful results, this is where you can go and find out exactly what happened recently.
Remember, AI projects need to be secured just like any other project. Perhaps even more so, because as we move forward in time, we will rely more, not less, on AI. In fact, AI systems will be used to hack non-AI systems, such as your friendly local powerplant. It's crucial that you know and preserve a history of activities going on in your environment.
The second interesting thing you see here is the Access Control (IAM) section. Azure Machine Learning workspace relies on the usual Azure Identity and Access Management (IAM) to secure resources and provide resources. You can define your own roles as well, but the Azure Machine Learning workspace comes with numerous useful prebuilt roles. For instance, you don't want just anyone to deploy a model, right? Additionally, perhaps you want the log readers, well, to just read - not edit, not even accidentally - the experiment. All of this can be neatly tied down using regular Azure IAM.
Perhaps a superfluous point here is that the Azure Machine Learning workspace is part of the Azure portal. It's therefore protected by your Azure AD and gains all the benefits of Azure AD, such as MFA, advanced threat protection, integration with your corporate on-premises identities, etc.
The Azure Machine Learning workspace is part of the Azure portal and therefore protected by your Azure AD.
Publish and Deploy Using Azure CLI
The next important section is the assets section, as can be seen in Figure 3.
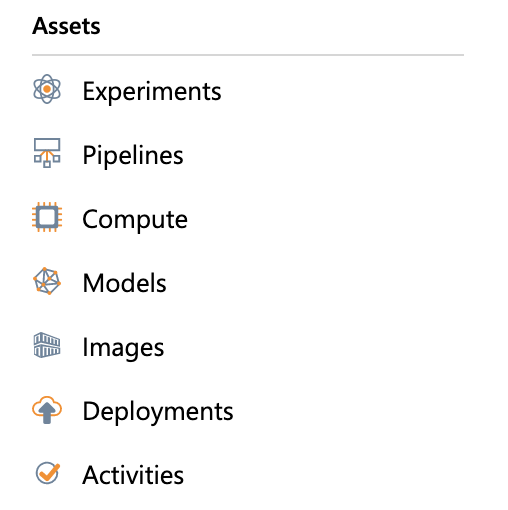
This area is where you can view and manage your actual work: your experiments, your models, the compute you provision, etc. To understand this section better, let's publish and run an experiment and see the entire process end-to-end.
Create a Model
Remember that for the purposes of this article, the actual experiment is unimportant. The same instructions apply to any kind of problem you may be attempting to solve. I'll use an openly available diabetes dataset that's available at https://www4.stat.ncsu.edu/~boos/var.select/diabetes.tab.txt. This dataset includes: ten baseline variables, age, sex, body mass index, average blood pressure, and six blood serum measurements that were obtained for each of n = 442 diabetes patients, as well as the response of interest, a quantitative measure of disease progression one year after baseline. Using this data, I can create a simple regression model to predict the progression of the disease in a patient given the ten baseline variables about the patient. The code for this experiment is really straightforward and can be seen in Listing 1.
Listing 1: The regression experiment
from sklearn.datasets import load_diabetes
from sklearn.linear_model import Ridge
from sklearn.metrics import mean_squared_error
from sklearn.model_selection import train_test_split
from azureml.core.run import Run
from sklearn.externals import joblib
import os
import numpy as np
import mylib

os.makedirs('./outputs', exist_ok=True)

X, y = load_diabetes(return_X_y=True)

run = Run.get_context()

X_train, X_test, y_train, y_test=train_test_split(X, y, test_size=0.2, random_state=0)
data = {"train": {"X": X_train, "y": y_train}, "test": {"X": X_test, "y": y_test}}

alphas = mylib.get_alphas()

for alpha in alphas:
    # Use Ridge algorithm to create a regression model
    reg = Ridge(alpha=alpha)
    reg.fit(data["train"]["X"], data["train"]["y"])

    preds = reg.predict(data["test"]["X"])
    mse = mean_squared_error(preds, data["test"]["y"])
    run.log('alpha', alpha)
    run.log('mse', mse)

    model_file_name = 'ridge_{0:.2f}.pkl'.format(alpha)
    # save model in the outputs folder
    with open(model_file_name, "wb") as file:joblib.dump(value=reg,filename=os.path.join('./outputs/', model_file_name))

    print('alpha is {0:.2f}, and mse is {1:0.2f}'.format(alpha, mse))
The next step is to submit this as an experiment run. You can do so easily using the portal Azure ML SDK or via the Azure CLI. I'll show you how to do this using the Azure CLI.
First, attach yourself to the resource group and folder. This command isn't 100% necessary, but it'll help by not requiring you to specify the resource group and folder over and over again every time you wish to execute a command.
az ml folder attach -w sahilWorkspace -g ML
Once you've run the above command, you can now go ahead and request to have an Azure ML compute resource created for you. Note that a compute resource comes in many shapes and sizes. Here, you're creating a standard VM compute with one node. You can create this resource using this command:
az ml computetarget create
amlcompute -n mycomputetarget
--min-nodes 1 --max-nodes 1
-s STANDARD_D3_V2
It's worth pointing out that the ML workspace gives you full control over virtual network settings, so you can keep this compute resource or associated storage accounts etc. in their own virtual network, away from the prying eyes of the Internet. Your InfoSec team will probably be happy to hear that their valuable and sensitive training data will always be secure.
Once the above command finishes running, you should see a compute resource provisioned for you, as shown in Figure 4.
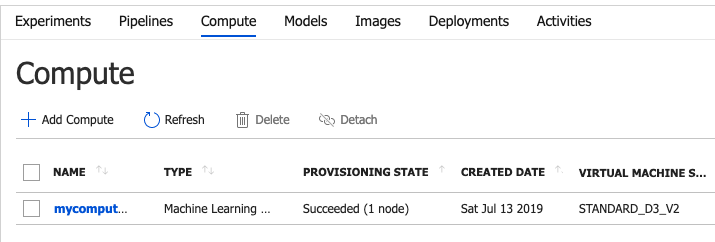
The name of the compute resource is important. Now I wish to be able to submit my experiment and in order to submit it, I need to supply a configuration. This configuration file resides in the .azureml folder in a file called sklearn.runconfig. You can see my sklearn.runconfig in Listing 2. Of special note in Listing 2, is the value of “target”. Look familiar? That's the name of the compute target you created earlier.
Listing 2: The sklearn.runconfig file
{
    "script": "train-sklearn.py", "framework": "Python", "communicator": "None",
    "target": "mycomputetarget", "environment": {
        "python": {
            "interpreterPath": "python", "userManagedDependencies": false,
                "condaDependencies": {
                    "dependencies":[
                        "python=3.6.2",
                        "scikit-learn",
                        {
                        "pip":["azureml-defaults"]
                        }
                    ]
                }
        },
        "docker": {
            "baseImage":"mcr.microsoft.com/azureml/base:0.2.4",
            "enabled": true,
            "gpuSupport": true
        }
    }
}
You also need to provide the necessary dependencies your experiment depends on. I've chosen to provide those in a file called training-env.yml, the contents of which can be seen in Listing 3.
Listing 3: The dependencies file training-env.yml
name: project_environment
dependencies:
    - python=3.6.2
    - pip:
        - azureml-defaults
        - scikit-learn
        - numpy
Assuming that you have a config.json in your .azureml folder pointing to the requisite subscription and ML workspace, you can submit an experiment using the following command.
az ml run submit-script
-c sklearn -e test
-d training-env.yml
train-sklearn.py
By running the above command, you'll get a link to a Web view where you can track the status of the submitted run. At this time, you can just wait for this command to finish, or observe the status of the run under the “Experiments” tab under your ML workspace.
Once the run completes, notice that the ML workspace automatically stores a lot of details for the run, as can be seen in Figure 5.
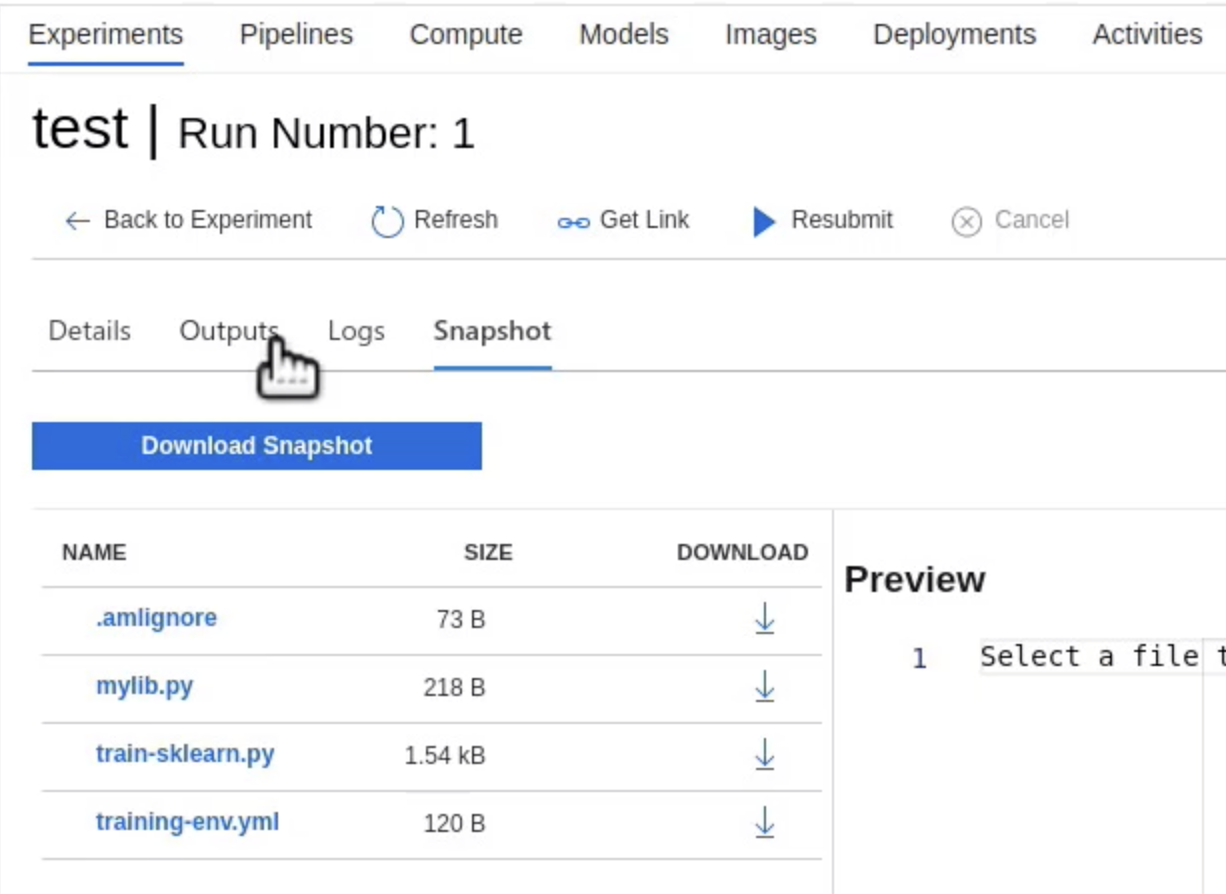
Here are some of the details that the Azure ML workspace automatically keeps of a track of for you.
It stores all the runs, along with who initiated them, when it was run, and whether or not it succeeded. It also plots the metrics as charts for you, so you can visually tell the output of a run.
Under the outputs tab, it stores all logs and outputs. The outputs can be the models, for instance. And finally, as you saw in Figure 5, it stores a snapshot of what was run to produce those outputs, so you have a snapshot in time of what you're about to register and deploy next.
Register a Model
In the tabs shown in Figure 5, under the Outputs tab, you can find the created models. Go ahead and download any one of the models, which should be a file ending in .pkl. The next thing you need to do is use this file and register the model.
In order to register the model, you can use either the ML SDK, Azure CLI, or do it directly through the browser UI. If you choose to do this using Azure CLI, you can simply use the following command:
az ml model register -n mymodel -p sklearn_regression_model.pkl -t model.json
This command relies on three inputs. First is the name of the model you're creating, which is mymodel. The model file itself is sklearn_regression_model.pkl. The model.json file is a simple JSON file describing the version and workspace for the model. It can be seen here:
{
"modelId": "mymodel:2", "workspaceName": "sahilWorkspace", "resourceGroupName": "ML"
}
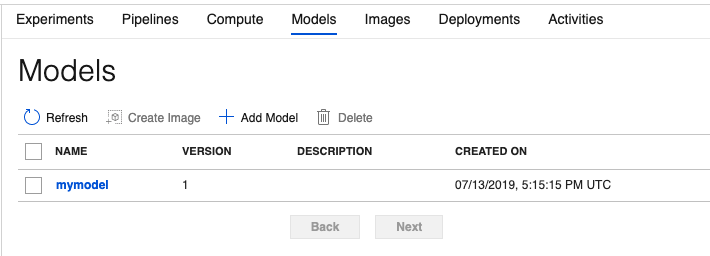
Once you run the Azure CLI command successfully, you should see the model registered, as can be seen in Figure 6.
Deploy a Model
Now that you have a model, you need to convert it into an API so users can call it and make predictions. You can choose to run this model as a local instance for development purposes. Or you can choose to run that container as an Azure container instance for QA testing purposes, or as a an AKS cluster for production use.
There are three things you need to deploy your model:
- The entry script, which contains the scoring and monitoring logic. This is simply a
Pythonfile with two methods in it. One is to load the model as aglobalobject and the other is to serve predictions. You can see thescoringfile entry script in Listing 4. - The inference
configfile, which has various configuration information such as: what is the runtime location, what dependencies are you using, etc. You can see the inference configuration I'm using in Listing 5. - The deployment configuration, which contains information about where you're deploying this endpoint to and under what configuration. For instance, if you're deploying to an Azure container instance or an Azure Kubernetes cluster, you'd include that information here. You can see the deployment configuration I'm using in Listing 6.
Listing 4: The scoring file
import json
import numpy as np
from sklearn.externals import joblib
from sklearn.linear_model import Ridge
from azureml.core.model import Model

from inference_schema.schema_decorators import input_schema, output_schema
from inference_schema.parameter_types.numpy_parameter_type import NumpyParameterType

def init():
    global model
    model_path = Model.get_model_path('mymodel')
    model = joblib.load(model_path)

input_sample =  np.array([[10, 9, 8, 7, 6, 5, 4, 3, 2, 1]])
output_sample = np.array([3726.995])
@input_schema('data', NumpyParameterType(input_sample))
@output_schema(NumpyParameterType(output_sample))
def run(data):
    try:
        result = model.predict(data)
        return result.tolist()
    except Exception as e: error = str(e)
        return error
The following command will deploy your model to an ACI instance:
az ml model deploy
-n acicicd
-f model.json
--ic inferenceConfig.yml
--dc aciDeployment.yml
--overwrite
Listing 5: The inference config file
entryScript: score.py
runtime: python
condaFile: scoring-env.yml
extraDockerfileSteps:
schemaFile:
sourceDirectory:
enableGpu: False
baseImage:
baseImageRegistry:
Listing 6: The deployment configuration file
---
containerResourceRequirements:
    cpu: 1
    memoryInGB: 1
computeType: ACI
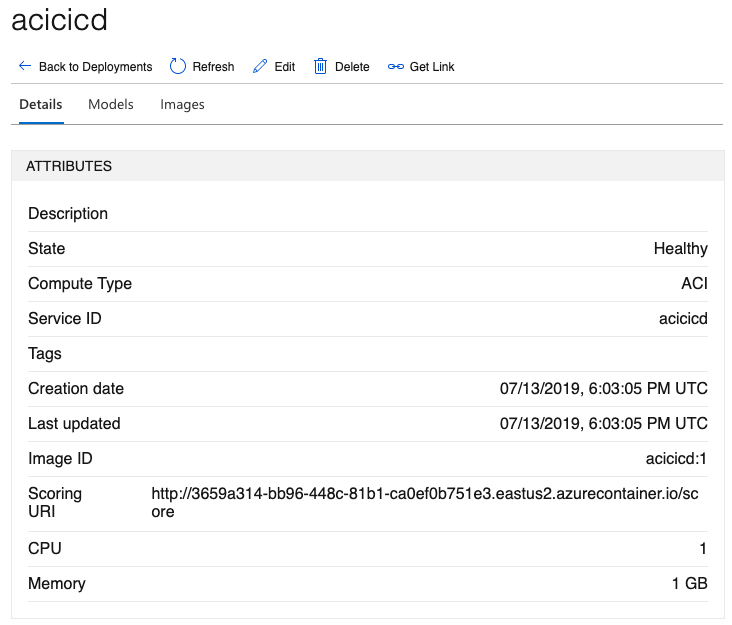
Once you run the above command, you should see an image created for you, as you can see in Figure 7.
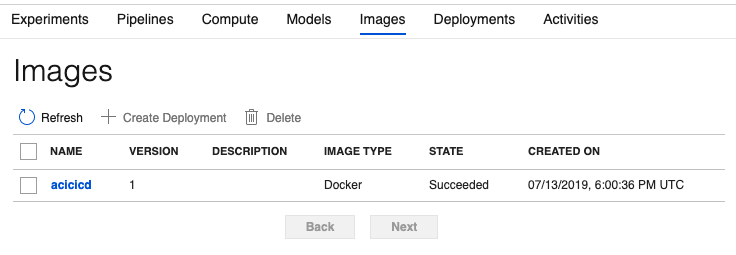
In each such created image, you're able to see the specific location on which the image resides. This is usually an auto-provisioned Azure container registry, and the workspace authenticates to it using a service principal. You can have more than one deployment per image, and you can track that in the properties of the created image as well.
Additionally, you can find a new deployment created for you, as can be seen in Figure 8.
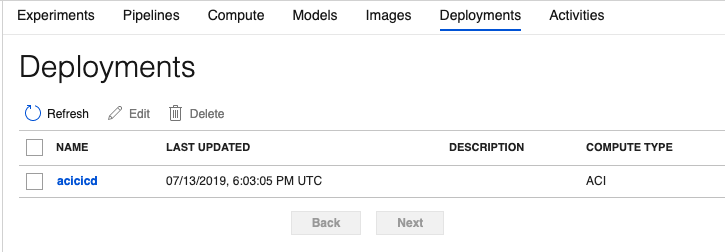
For each deployment, the workspace allows you to track which model the deployment is from and when it was created or updated. This way, you can completely back-trace it to which experiment version and dataset the model came from, and who deployed it. At any point, you can choose to update the deployment, and it will track these changes also.
Finally, as you can see in Figure 9, you can grab the scoring URI for your newly deployed model. It's this scoring URI that your clients can make POST requests to, in order to make predictions against your model.
Automating Using ML Ops
So far in this article, I've shown you how to use Azure CLI to run an experiment, create a model, create an image, and deploy a model. In this process, I demonstrated all of the value that Azure Machine Learning workspace adds to the overall process.
But at the center of any AI project is lots of data and algorithms. Data is usually managed in some sort of data store, it could be anything, as long as your code can talk to it. But the brain trust is in the algorithms. The algorithms are written as code, usually Jupyter notebooks. And like any other project, you'll need to source-control them.
Like any other project, you'll need to source-control algorithms.
A great way to manage any software project is Azure DevOps. It lets you manage all aspects of a software project. Issues are a big part of DevOps, sprint planning is another, and source control is also an important aspect. A rather interesting aspect of DevOps is pipelines. Pipelines let you automate the process of building and releasing your code via steps. All of these important facets, code, sprints, issues, and pipelines can work together with each other.
An AI project is just like any other software project. It needs code, it needs data, it needs issue tracking, it needs testing, it needs automation. And DevOps can help you automate this entire process, end to end.
For AI specifically, you can use MLOps to automate everything you've seen in this article so far, via a DevOps pipeline. For MLOps to work, there are four main things you need to do.
First, you need to get your code into the DevOps repository. This is not 100% necessary, because DevOps can work with other source control repositories. However, let's just say that you get your code in some source code repository that DevOps can read from, and because DevOps does come with a pretty good source control repository, perhaps just go ahead and use that.
Secondly, install the Machine Learning extension in your DevOps repo from this link https://marketplace.visualstudio.com/items?itemName=ms-air-aiagility.vss-services-azureml.
Once this extension is installed, create a new Azure Resource Manager Service connection, as can be seen in Figure 10.
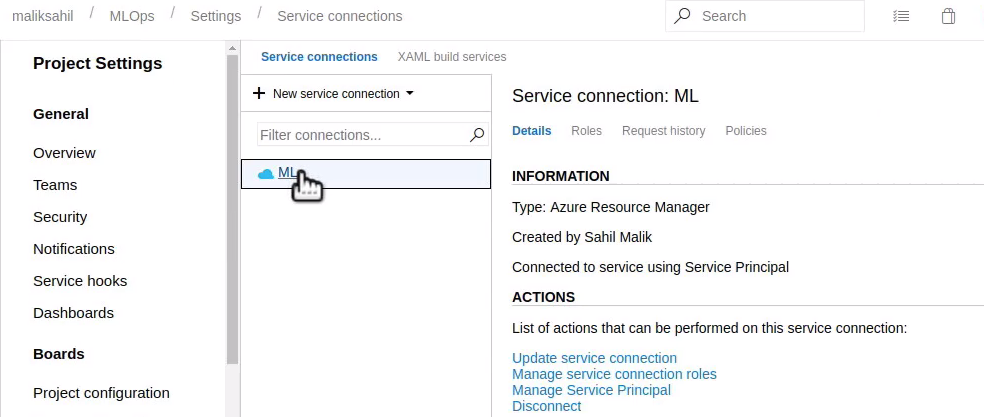
Provisioning this connection creates a service principal in your Azure tenancy, which has the ability to provision or deprovision resources, as needed, in an automated fashion. It's this service connection, called ML that is used by the pipeline.
Finally, create a pipeline with the code as shown in Listing 7. Let's walk through what this pipeline is doing. The first thing you note is that it's using Azure CLI, and it's doing so using the service connection you created earlier. Besides that, it's running on an Ubuntu agent.
Listing 7: The DevOps pipeline
trigger:
- master

pool:
    vmImage: 'Ubuntu-16.04'

steps:
- task: UsePythonVersion@0
    displayName: 'Use Python 3.6'
    inputs: versionSpec: 3.6

- script: |
        pip install flake8
        pip install flake8_formatter_junit_xml
        flake8 --format junit-xml
    --output-file
        $(Build.BinariesDirectory)/flake8_report.xml
    --exit-zero
    --ignore E111
         displayName: 'Check code quality'

- task: PublishTestResults@2
    condition: succeededOrFailed()
    inputs:
        testResultsFiles: '$(Build.BinariesDirectory)/*_report.xml'
        testRunTitle: 'Publish test results'

- task: AzureCLI@1
    inputs:
        azureSubscription: 'ML'
        scriptLocation: 'inlineScript'
        inlineScript: 'az extension add -n azure-cli-ml'
        workingDirectory: 'model-training'

- task: AzureCLI@1
    inputs:
        azureSubscription: 'ML'
        scriptLocation: 'inlineScript'
        inlineScript: 'az ml folder attach -w sahilWorkspace -g ML'
        workingDirectory: ''

- task: AzureCLI@1
    inputs:
        azureSubscription: 'ML'
        scriptLocation: 'inlineScript'
        inlineScript: 'az ml computetarget create amlcompute -n mycomputetarget
            --min-nodes 1 --max-nodes 1 -s STANDARD_D3_V2'
        workingDirectory: 'model-training'

- task: AzureCLI@1
    inputs:
        azureSubscription: 'ML'
        scriptLocation: 'inlineScript'
        inlineScript: 'az ml run submit-script -c sklearn -e test -d training-env.yml train-sklearn.py'
        workingDirectory: 'model-training'

- task: AzureCLI@1
    inputs:
        azureSubscription: 'ML'
        scriptLocation: 'inlineScript'
        inlineScript: 'az ml model register -n mymodel -p sklearn_regression_model.pkl -t model.json'
        workingDirectory: 'model-deployment'

- task: AzureCLI@1
    inputs:
        azureSubscription: 'ML'
        scriptLocation: 'inlineScript'
        inlineScript: 'az ml model deploy -n acicicd -f model.json
                      --ic inferenceConfig.yml
                      --dc aciDeploymentConfig.yml --overwrite'
        workingDirectory: 'model-deployment'

- task: AzureCLI@1
    inputs:
        azureSubscription: 'ML'
        scriptLocation: 'inlineScript'
        inlineScript: 'az ml computetarget delete -n mycomputetarget'
        workingDirectory: ''
It first installs Python 3.6 and then installs all the necessary dependencies that the code depends on. It does so using pip, which is a package installer for python. Then it adds the Azure CLI ML extensions. This step is necessary because the agent comes with Azure CLI but doesn't come with ML extensions.
It then attaches itself to the workspace and resource group. This step could be automated further by provisioning and deprovisioning a workspace and resource group as necessary.
It then creates a compute target, followed by running the experiment, registering the model as an image, and creating a deployment, and when you're done, you delete the compute so you don't have to pay for it.
All of this is set to trigger automatically if a code change occurs on the master branch.
The end result of all this is that as soon as someone commits code into the master, the whole process runs in an automated fashion, and it creates a scoring URI for you to test. You get notified of success and failure, and basically all of the other facilities that Azure DevOps offers.
Summary
The Azure Machine Learning workspace is an incredible tool for your AI projects. In a real-world AI project, you'll most likely work with multiple collaborators. You will have well-defined roles. Your data will need to be kept secure and you'll have to worry about versions. That's versions not just of your code but also your data, your experiments, details of all your deployments, created models, etc.
The Azure ML workspace automates all of this for you, and it records all of it behind the scenes for you as a part of your normal workflow. Later, if your customers come and ask you a question such as, “Hey why did you make such prediction at such a time,” you can easily trace your steps back to the specific deployment, specific algorithm, specific parameters, and specific input data that caused you to make that prediction.
Did you know that researchers once fooled a Google image recognition algorithm by replacing a single picture of a turtle, so Google would interpret it as a rifle? These kinds of attacks are new to AI. And the ML workspace helps you track all of this kind of thing very well. You still have to put in the work to secure your artifacts end to end, but the ML workspace is a great management tool.
Finally, I showed you how to automate this entire process end to end using an MLOps pipeline like you would do in any other software project.
Until next time!
