


Let me introduce you to something that we all use and we all hate: passwords. You'd think this problem is recent, but it isn't. In World War 2, Germans had a tool called the enigma machine, the main purpose of which was encrypted communication. The military version had a switchboard in the front. The two communicating parties had to agree ahead of time on the pattern that they'd use. Pattern, password: same thing, different smell. In reality, and in the daily struggle of war, which, frankly, our jobs feel like sometimes, they got sick of changing passwords, and they just stuck with one easy-to-guess password. Guess how they ended each message. With “Heil Hitler.” Those two bits of information made it possible for the allies to decrypt their messages. Imagine how much damage they sustained because they were too lazy to change a password?
Fast forward to today. You still have organizations insisting on super complex passwords that must be changed every two months. Some of my utility companies force me to do that. It's mind boggling. My only recourse is to write it down somewhere or I'll simply forget it. So where do we write it down? A password manager! Yes, what a great idea, let's collect all of our valuable passwords, protected by yet another password.
I fully realize that attempts are being made to get around this password drama, but let's be honest, we are far from it. There may be technical solutions available, but have you entered a password anywhere earlier today?
Passwords suck! They are hard to remember, they are hard to secure, they expire, rotating them is a pain, etc., etc.
But then, a big part of our architecture includes headless processes. Or programs that need to access resources securely. For instance, something trying to access a password manager of sorts. Let's say that in Azure there's something called a Key Vault, which lets you manage secrets and certificates. And your code wishes to access Key Vault securely.
You could, of course, access it as an interactive user. But how would that code work with DevOps? You'd have to put the password in some config file, I guess. Or maybe a refresh token, which is, well, almost like a password. And then you'd have to somehow make sure that you don't accidentally check it into source control.
Looks like we are back to square one.
Wouldn't it be nice if you had something that gave all the advantages and possibilities of having an identity for your running code, without the headache of credential management?
That very thing is managed identity.
What Is Managed Identity?
Managed identity is a feature of Azure Active Directory that lets you assign an identity to various Azure resources, without the headache of managing the identity's credential. You can use this identity to authenticate to any service that supports Azure AD authentication, such as Microsoft Graph, Key Vault, custom APIs, etc.
As you may know, when you protect an API using Azure AD, you're doing so by validating an incoming access token. For instance, when you make a call to Microsoft Graph, Microsoft Graph, being yet another API, expects you to include an access token in the authorization header. This token must be for the audience Microsoft Graph. When making such a call using managed identity, such a token must be for an audience of Microsoft Graph (or any other API you wish to target).
There is one other key important point. When making calls to protected APIs, you have the ability to make such a call using delegated permissions or application permissions. Delegated permissions, as you may know, require the user identity to be present. Application permissions, on the other hand, require only the application's identity to be present. Managed identities can only make calls that use application permissions.
There are two kinds of manage identities available in Azure AD. A system-assigned managed identity and a user-assigned managed identity.
A system-assigned managed identity is enabled directly on an Azure service instance. When the identity is enabled, Azure creates an identity for the instance in the Azure AD tenant that's trusted by the subscription of the instance. After the identity is created, the credentials are provisioned onto the instance. The lifecycle of a system-assigned identity is directly tied to the Azure service instance that it's enabled on. If the instance is deleted, Azure automatically cleans up the credentials and the identity in Azure AD.
A user-assigned managed identity is created as a standalone Azure resource. Through a create process, Azure creates an identity in the Azure AD tenant that's trusted by the subscription in use. After the identity is created, the identity can be assigned to one or more Azure service instances. The lifecycle of a user-assigned identity is managed separately from the lifecycle of the Azure service instances to which it's assigned.
If you read between the lines, there's a key advantage to using a user-assigned managed identity. That advantage is that you can manage the lifecycle of the managed identity separately from the Azure resources that the identity is assigned to. In other words, not only can you share that identity across multiple Azure resources, but perhaps a bigger advantage is that you know the identity involved ahead of time, since it wasn't auto-provisioned for you. This means that you can set up the permissions, RBAC (role-based access control) assignments, etc., ahead of time. Now, this may be anecdotal, or just one person's opinion, but I find system-assigned managed identity is great for demos and user-assigned managed identity is great for real world scenarios.
Another very key player in the managed identity world is the Azure instance metadata service or IMDS for short. IMDS is a REST endpoint accessible to all IaaS VMs created via the Azure Resource Manager. The endpoint is available at a well-known non-routable IP address (169.254.169.254) that can be accessed only from within the VM. Whenever any code running on a virtual machine with a managed identity needs to ask for an access token for the managed identity, instead of asking the AzureAD endpoints, it asks for their token from this IMDS endpoint. Although this reduces the workload on Azure AD endpoints, this itself this has two significant downsides.
- IMDS will give you a cached view of what it thinks Azure AD knows about this identity. This cache view may be a little out of date. This cache, at the time of writing this article, is up to eight hours old, although efforts are underway to reduce this latency.
- Any program running on the virtual machine has equal rights to this IMDS endpoint. In other words, you can't say within one virtual machine that you have two managed identities, one for each running program. If you need two identities, you will need two virtual machines.
Now, I use the term virtual machine very loosely here. In fact, managed identities in Azure apply to way more than just virtual machines. You can assign a managed identity to a docker image, to an Azure function, to app services, or to a virtual machine, etc. Additionally, a number of services in Azure AD understand incoming managed identity. You can find a list of the current services here https://docs.microsoft.com/en-us/azure/active-directory/managed-identities-azure-resources/services-support-managed-identities. Undoubtedly, this list will continue to increase as time moves forward. Managed identity is a very key investment for Azure AD.
How Do Managed Identities Work?
Managed identity is a service principal of a special type reserved for use with Azure resources. The key difference between a managed identity service principal and a normal service principal is that when a managed identity is created, the managed identity resource provider issues a certificate internally to the identity. Now your code can freely use the managed identity to request access tokens for services that support Azure AD authentication. You never have to worry about rolling the credentials, because that's the responsibility of Azure. The default period for credential rotation is 46 days, but the individual resource provider can choose to wait longer if necessary. At this point, when your code wishes to get an access token using the managed identity, it simply requests it from the IMDS endpoint at http://169.254.169.254/metadata/identity/oauth2/token.
Managed Identity Calling Microsoft Graph
Next let's wrap up your understanding with a real-world example. Frequently in our applications, we end up writing services, also known as Cron jobs. These are applications that don't have a user interface. They're like services that run behind the scenes doing important stuff, stuff that cannot be done synchronously and must be handled by a service.
Usually, when you'd like to have a service perform call an API securely for you, you get an access token using something called a client credential flow. Client credential flow, by definition, requires you to present a credential. This credential can either be a password or it can be a certificate. And with that, you're back to the headache of managing that credential.
Managed identities give you the advantages of a real identity without the headache of managing a credential. In this example, I'm going to show you how you can use managed identity, working as a daemon, accessing Microsoft Graph.
Microsoft Graph has a huge API surface. I'm going to show you a very simple example of how to call the endpoint that gives the details of all users in the tenant. In order to do, so I'll have to go through some steps. I'll have to create a managed identity. I'll have to assign that managed identity to something that understands that managed identity; in this case, I'll use a function. I'll have to write some code that's able to get an access token for Microsoft Graph on behalf of this managed identity. And, of course, I'll need to make sure that my managed identity has the permissions to call Microsoft Graph.
As you can see, it doesn't matter what I'm calling in Microsoft Graph, or, for that matter, what I'm calling on any API protected by Azure Active Directory. The steps are identical. From what I'm about to present here in this article, you should be able to extrapolate in calling any Azure Active Directory protected API.
The Main Steps
In order for my example to work, let's outline the main steps I need to accomplish. There are five main steps.
- Create the function app in Azure.
- Create a user-assigned managed identity.
- Assign the managed identity to the function app.
- Grant permissions to the managed identity to call Microsoft Graph.
- Author the function app that runs on a timer, gets an access token, and calls MSGraph.
It's worth mentioning that everything I'm about to show here will work with the system-assigned managed identity as well. However, I've chosen to go with a user-assigned managed identity because I feel that it's a little bit more practical, a bit more real world.
Additionally, I choose to show you this code example in NodeJS. Although I must emphasize that any of these concepts are platform-agnostic. Everything I'm showing here will work in Python, .NET Core, or any other language you prefer. And because I'm going to use functions as my managed identity host, you need to make sure that you work with something that functions can support.
Finally, a function app can be triggered by a number of possible triggers. The easiest possible implementation is the HTTP trigger, because all the project templates are designed to give you an HTTP trigger very easily. I'll keep it a little more real-world by using a timer trigger. This is because I intend to use this managed identity as a serverless process, and a timer job makes the most sense here.
Enough background. Let's get our hands dirty with some code.
Create the Function App in Azure
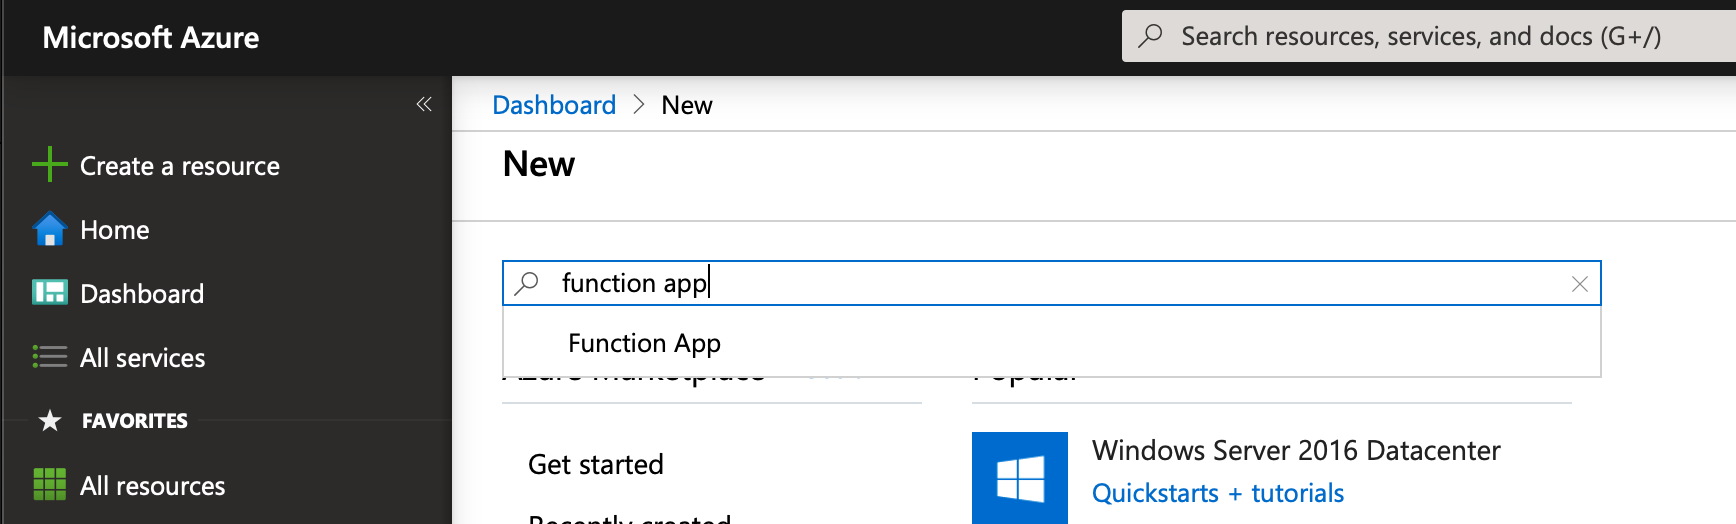
This part is easy. Just go to Azure and create a new function app. To do so, simply search for function app and click the Create button. This can be seen in Figure 1.
The Azure portal with them shows you a user interface, like that shown in Figure 2. Go ahead and provide the details. As you can see, my function app is called “sahiltimerapp” and it runs on NodeJS version 12.

Create a User-Assigned Managed Identity
This is also pretty simple. Just search for “user-assigned managed identity” in Azure Portal, as can be seen in Figure 3. Of course, you may also choose to create this from Azure CLI or PowerShell or Microsoft Graph. There are many ways to achieve this goal.
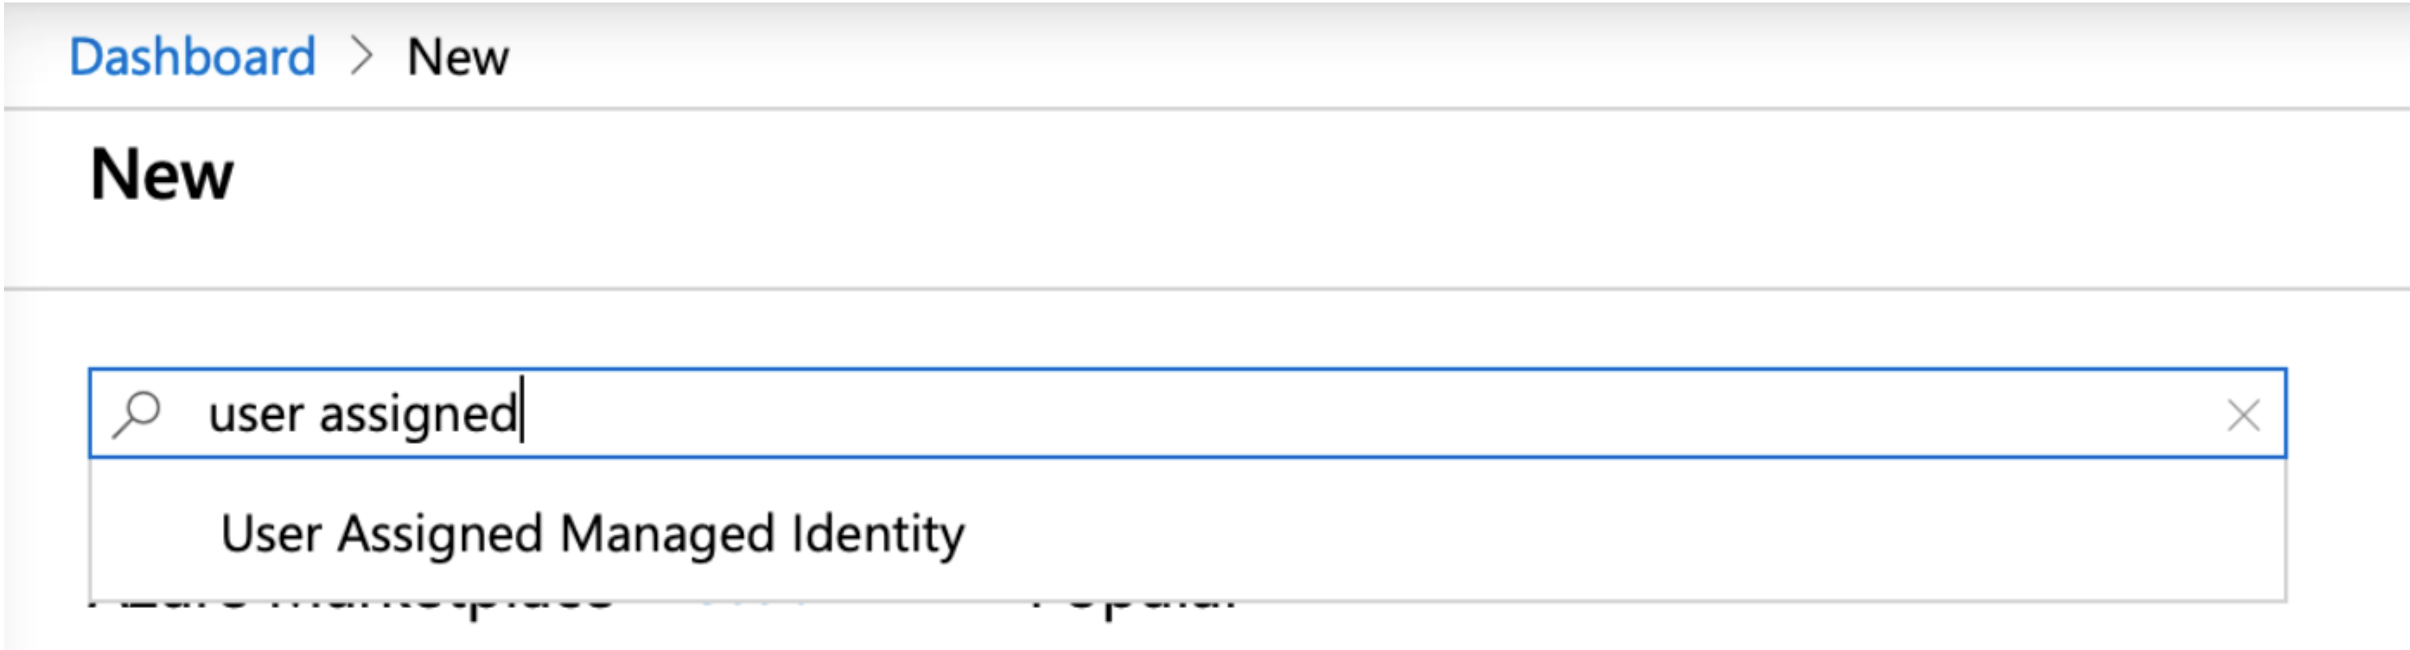
When creating a user-assigned managed identity, you will be asked to provide a name for it. I called my managed identity sahiltimerfunctionidentity.
Once you provide all the details and create the managed identity, in the Azure Portal, go to its properties, and get its Client ID and Object ID. You'll need both in a moment. Mine looks like Figure 4.

Assign the Managed Identity to the Function App
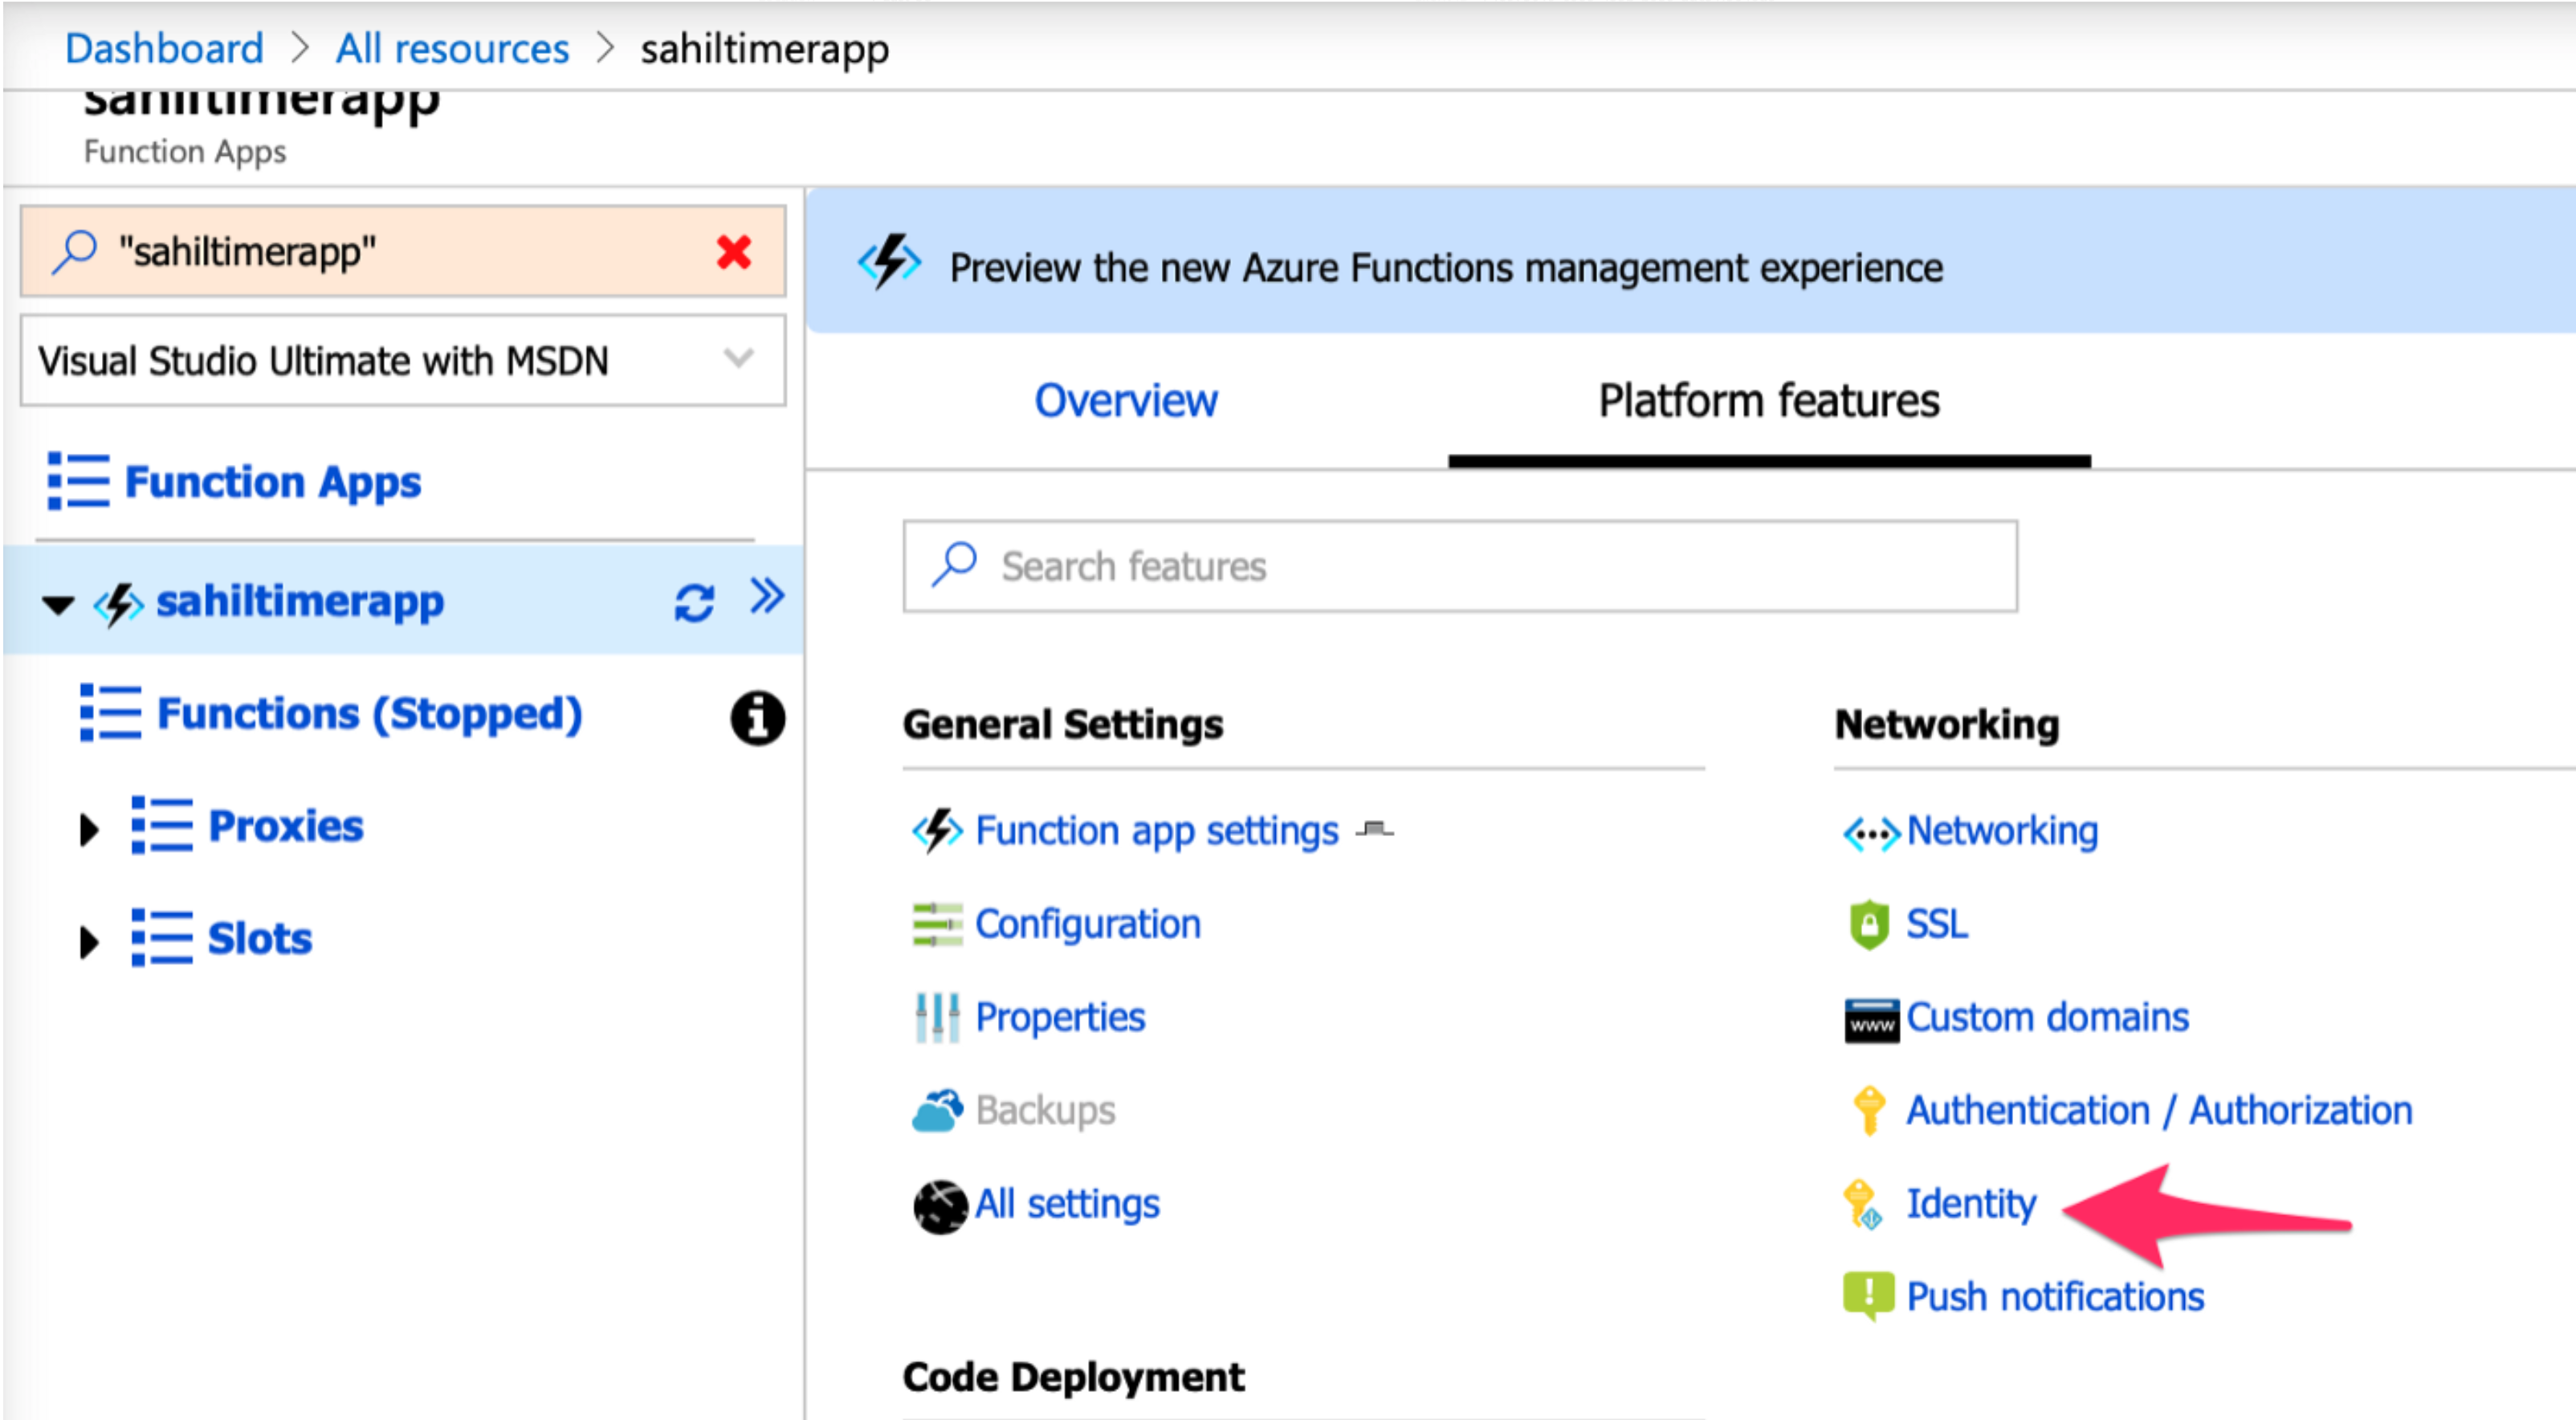
You have a function app and you have a managed identity. It's now time to assign this newly created managed identity to your function app. This is quite simple to do. In the Azure portal, navigate to your function app. And under its properties, go to platform features. Over there, look for identity, as shown in Figure 5.
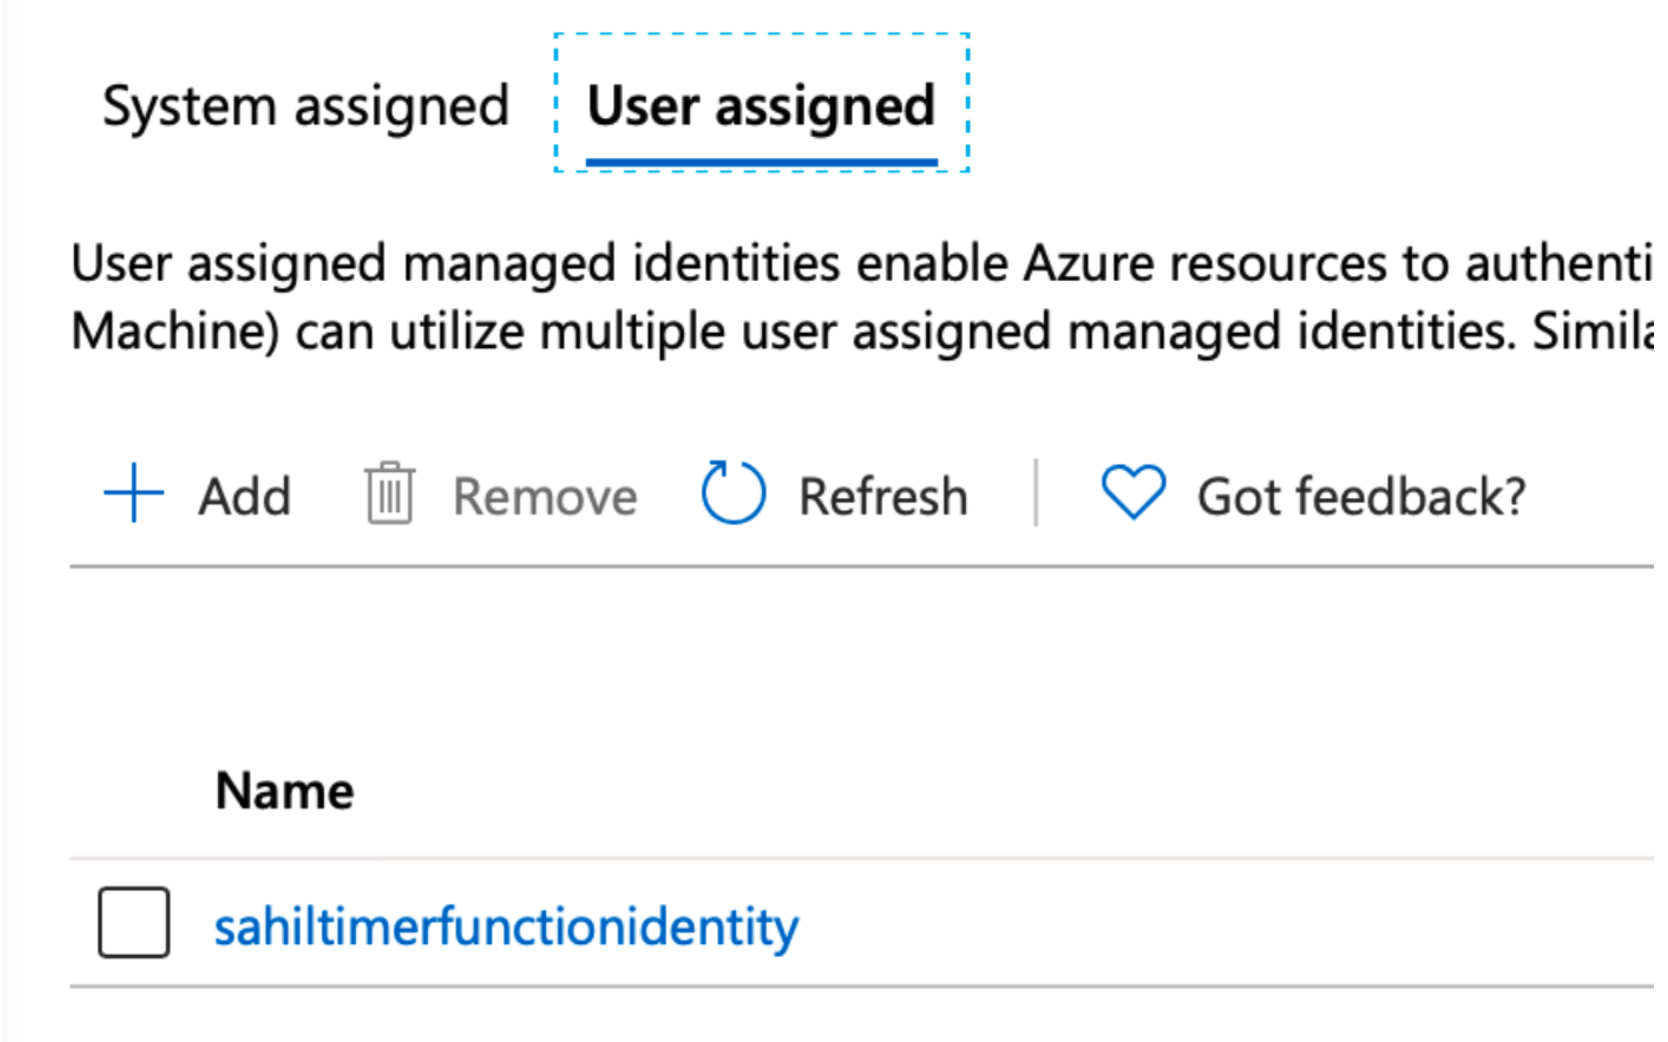
Under the identity section of the function app, choose to assign the user-assigned managed identity to the function app, as shown in Figure 6.
Grant Permissions to the Managed Identity to Call Microsoft Graph
Unfortunately, at the time of writing this article, there's no easy user interface built inside of the Azure portal to grant permissions to a managed identity. Note that you can view the permissions, but you can't grant the permissions through the user interface at this time. Additionally, there's no direct commandlet in Azure CLI to achieve this either.
Currently, there are two ways to grant permissions to a managed identity to any arbitrary API. One is using PowerShell, and other is using Microsoft Graph. Because Microsoft Graph is a cross-platform approach and I'm on a Mac, I choose to show you how to do this using Microsoft Graph.
To work with Microsoft Graph, I'm going to need an access token. There are many ways to get access tokens, but by far the simplest is Azure CLI. I showed this trick and many other Azure CLI tricks in a previous CODE Magazine article at Azure CLI.
On a computer with Azure CLI installed, first log in as an administrator to your Azure AD and issue the following command:
az account
  get-access-token
  --resource https://graph.microsoft.com
 | jq .\accessToken
 | pbcopy
This grabs an access token for you, with the necessary permissions, targeted for Microsoft Graph, and puts it in your clipboard.
With this token, I can grant permissions to my managed identity. This is simply a CURL command that issues a POST to Microsoft Graph, as shown in Listing 1.
Note that I am targeting a beta API, which is subject to change as it moves to a v1 API.
Easy right? Uhm, not so much! There are so many magic GUIDs in Listing 1 that I can't possibly move on without explaining each one of them. Let's slice and dice the command you see in Listing 1, bit by bit.
Listing 1: Grant permissions to my managed identity
curl --location --request POST 'https://graph.microsoft.com/beta/servicePrincipals/9654473a-512a-4c6a-8525-02cc112c5b08/appRoleAssignments' \
     --header 'Authorization: Bearer <token_you_got_from_above>' \
     --header 'Content-Type: application/json' \
     --data-raw '{ "principalId": "8f5f9081-66af-4ff0-89dc-800b738efd6a", "resourceId": "9654473a-512a-4c6a-8525-02cc112c5b08", "appRoleId": "df021288-bdef-4463-88db-98f22de89214"}'
You're making a call to Microsoft Graph's service principal and making the necessary appRoleAssignments. 8f5f9081–66af-4ff0–89dc-800b738efd6a is the ObjectID of your managed identity service principal. 9654473a-512a-4c6a-8525–02cc112c5b08 is the GUID for Graph. And df021288-bdef-4463–88db-98f22de89214 is the GUID that represents User.Read.All.
Oh my! But how do you remember all those GUIDs? I don't! I look them up. Here is how.
The ObjectID of the managed identity is from Figure 4.
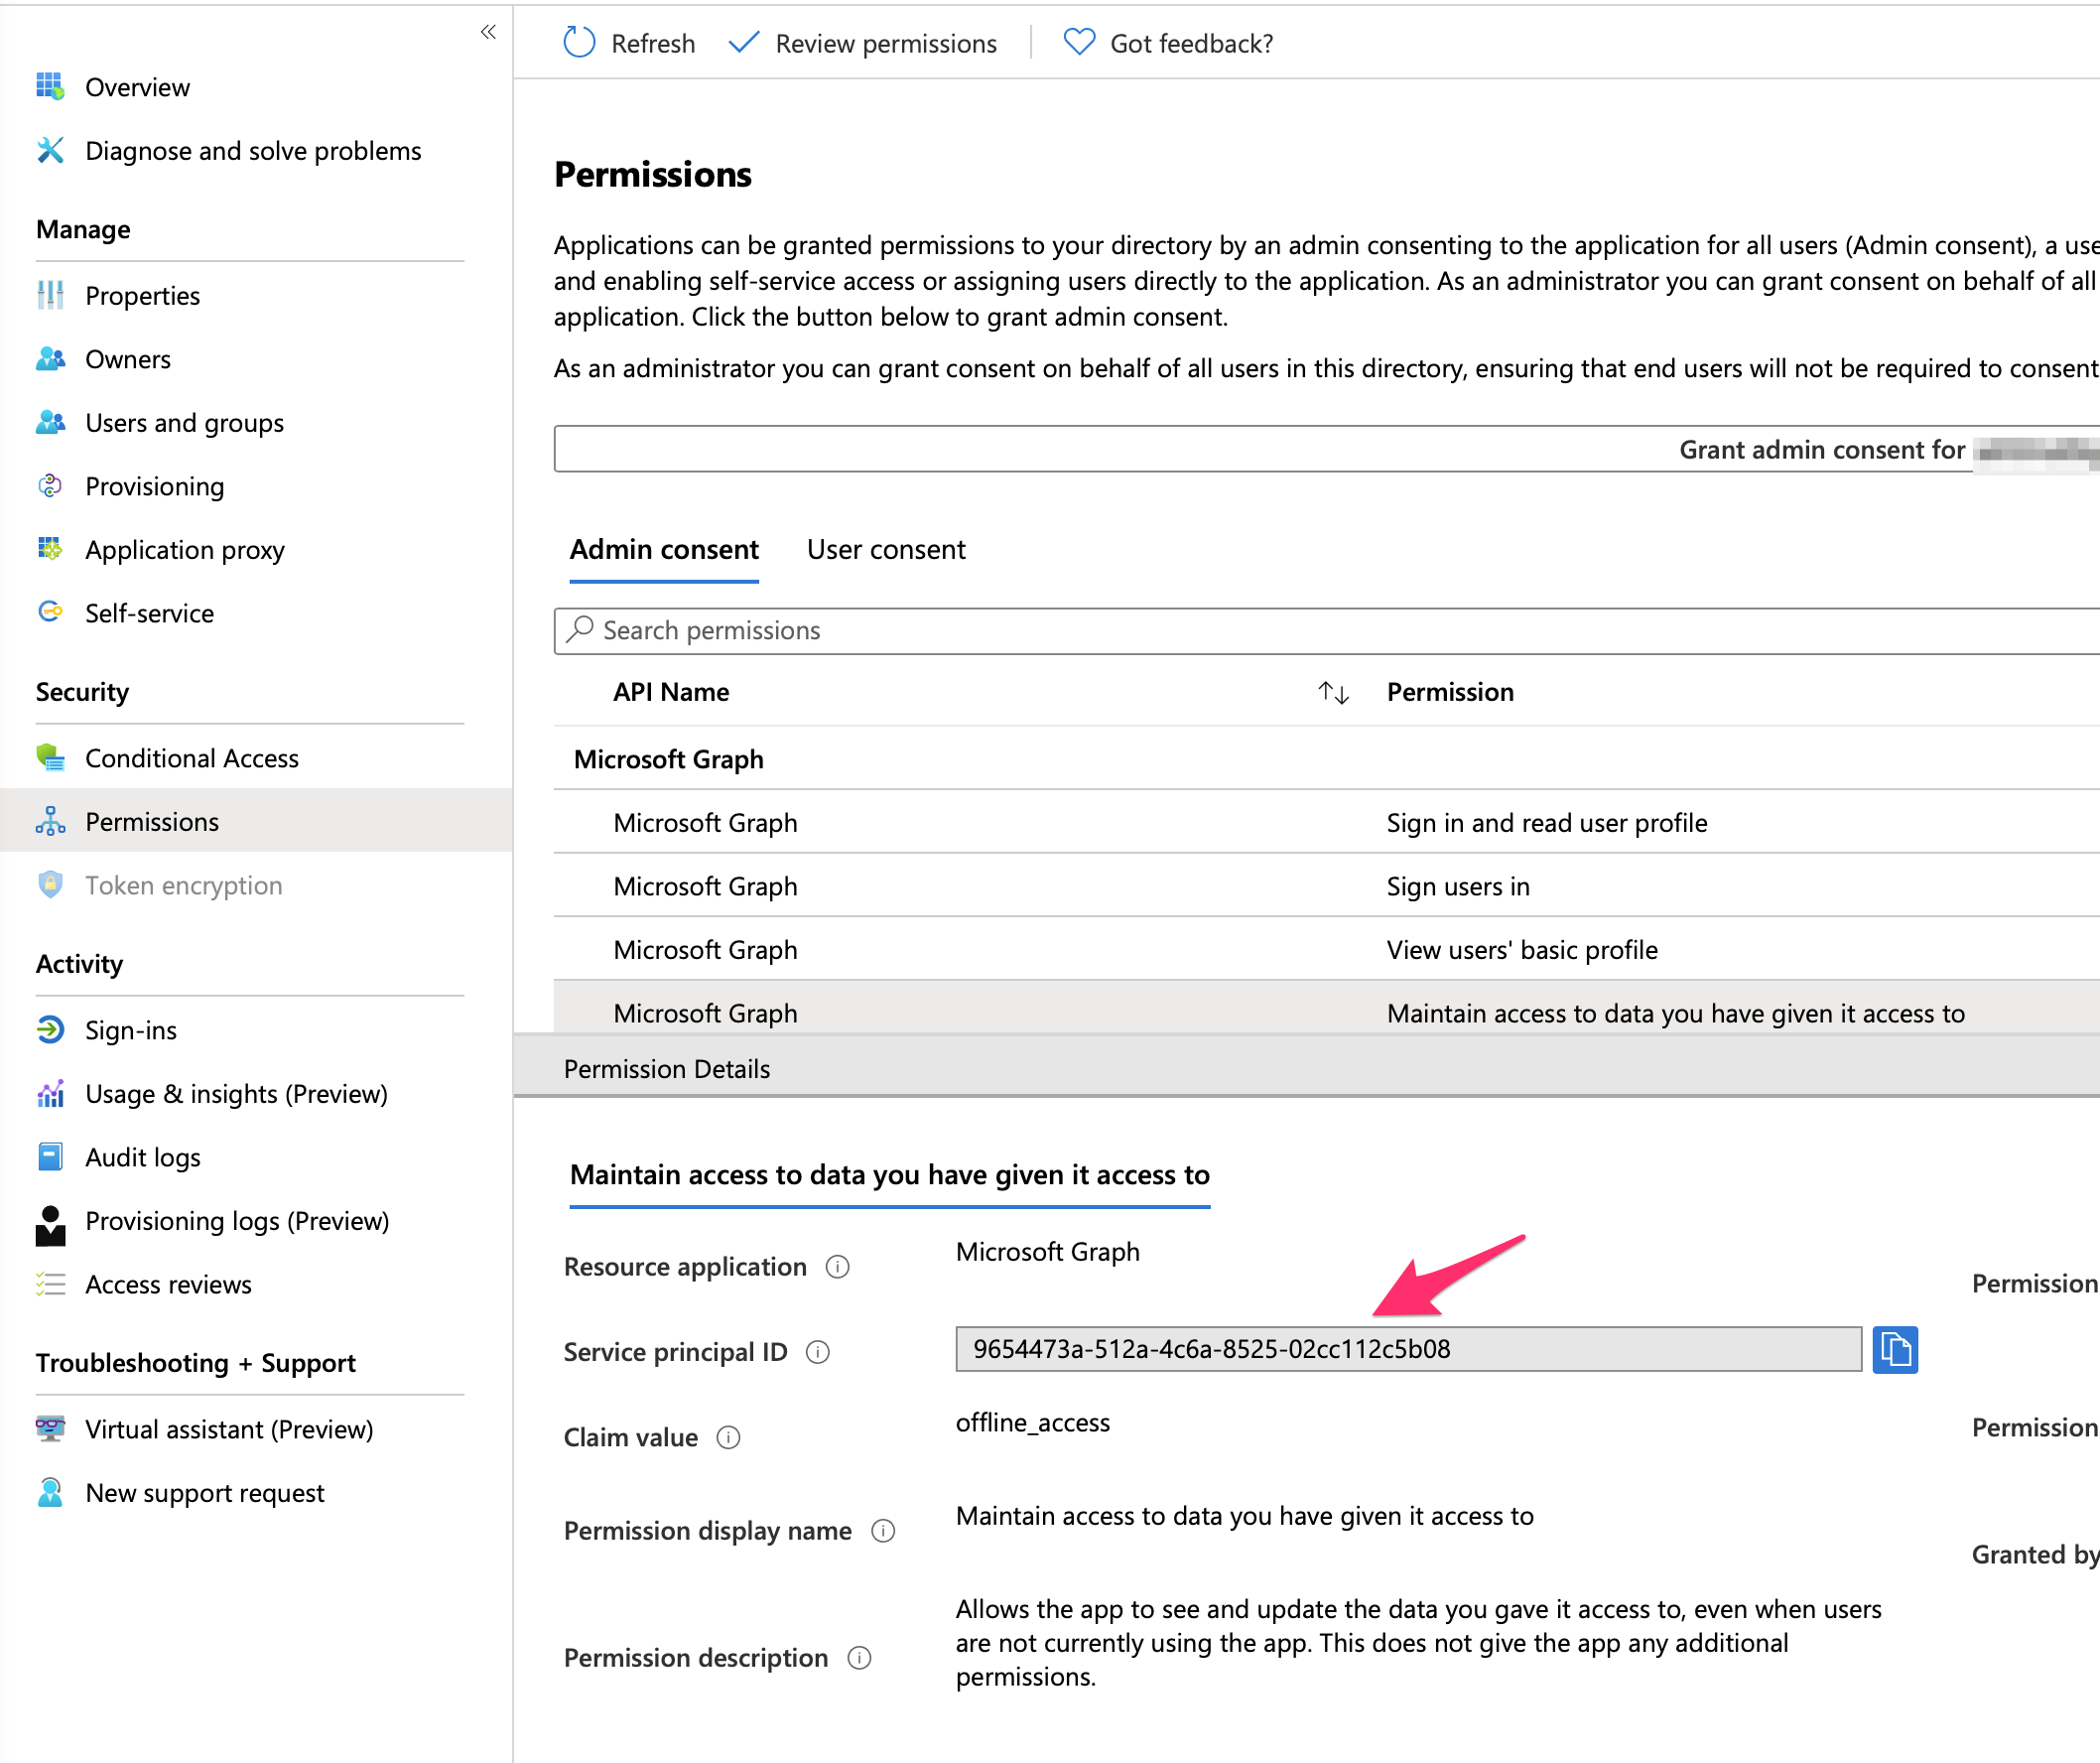
Getting the GUID for the service principal associated with Microsoft Graph is a bit more complex, but not too bad. And you can use these steps for any API. First, register an app in Azure AD and ensure that it has some kind of access to Microsoft Graph. Then, visit that app's service principal, and under there look for the Permissions menu item in the blade. There, choose Microsoft Graph, and you should see the service principal ID for Microsoft Graph. This can be seen in Figure 7.
Finally, to find the GUID that represents the application permission User.Read.All, grant this admin permission to any app, and open its manifest.xml. You should be able to grab that GUID from the requiredResourceAccess section.
Once you execute the command in Listing 1, you should get an output as shown in Figure 8.
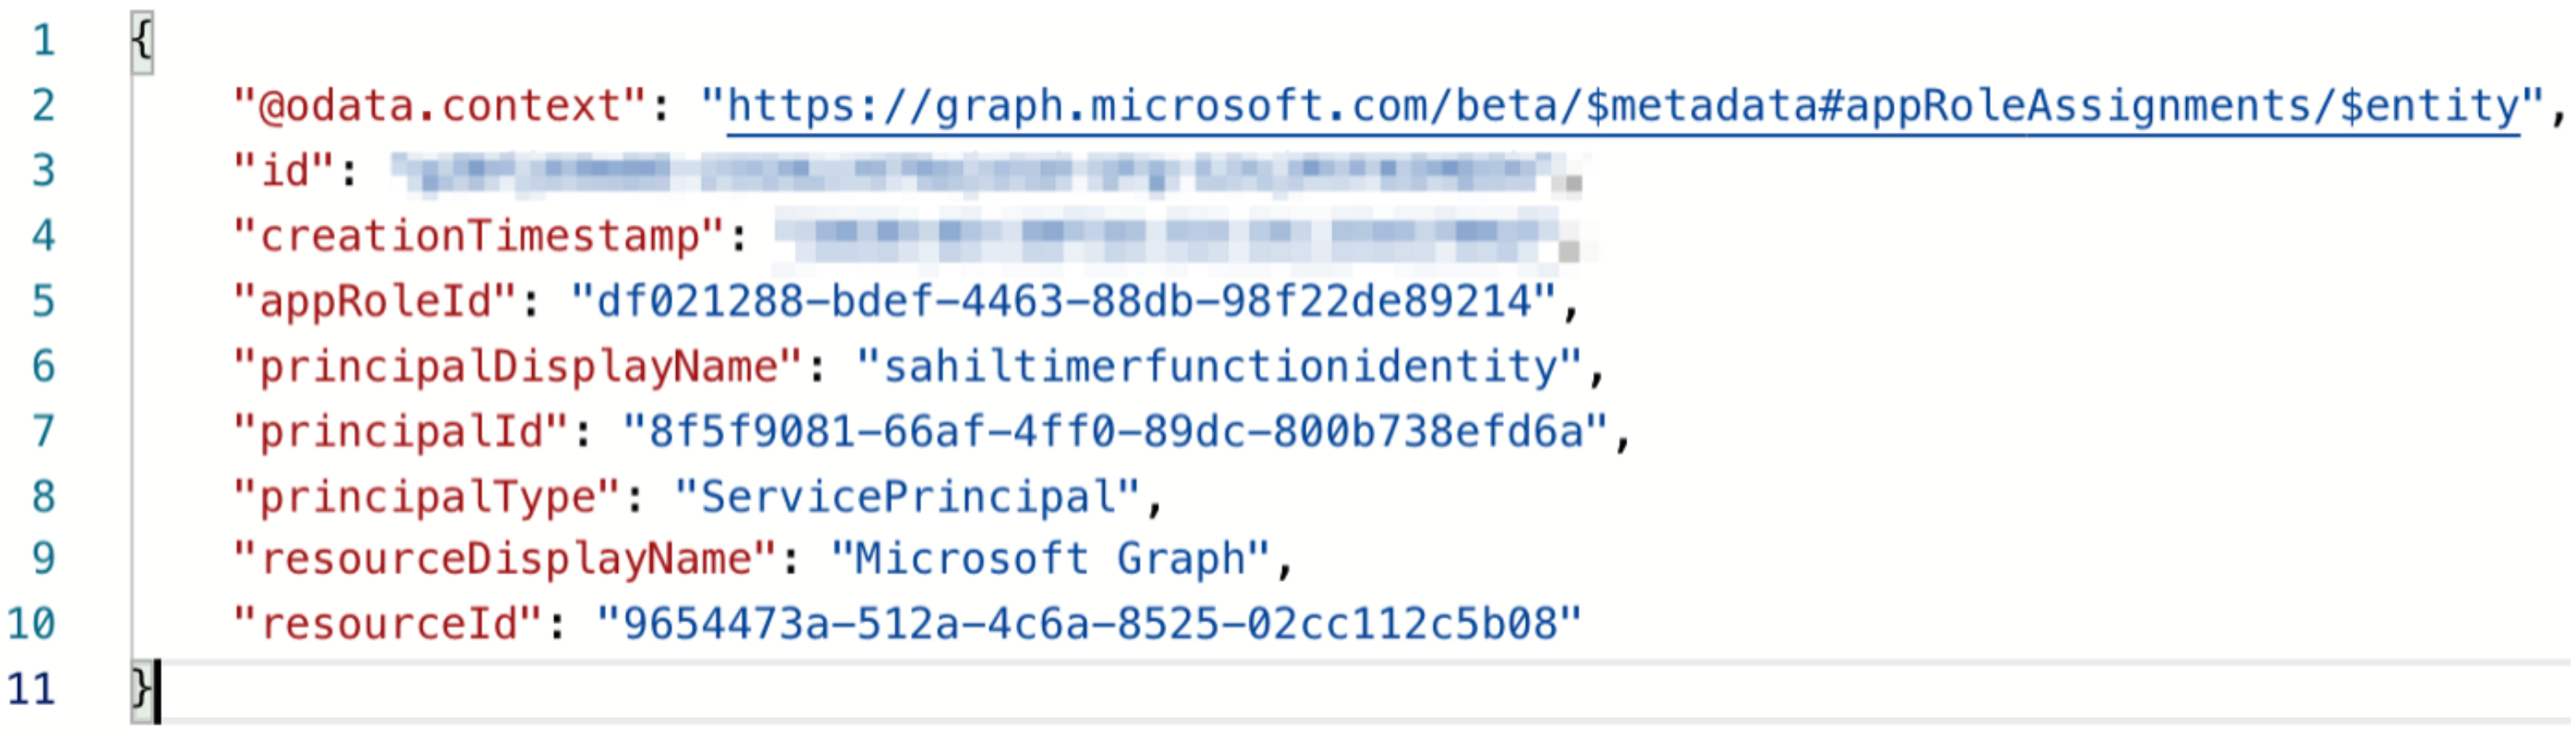
You can verify the permissions by issuing an authenticated GET request to the same URL you sent a POST to.
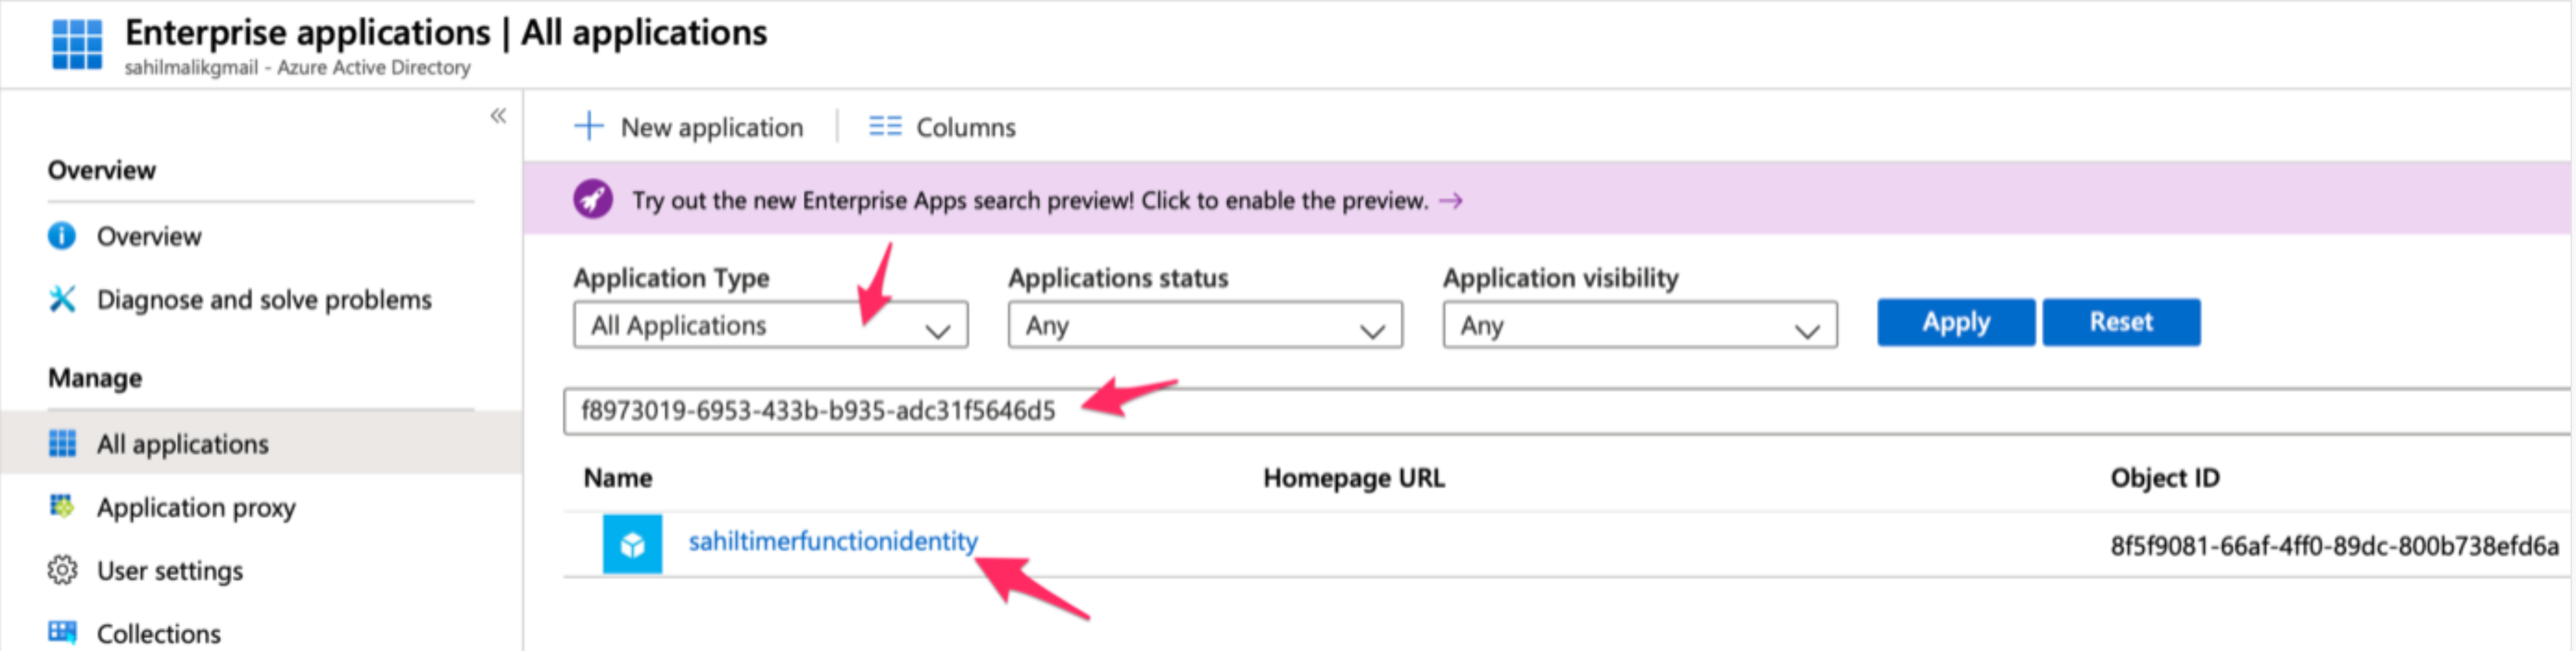
Alternatively, you can verify the permissions by going to enterprise applications and searching for your managed identity using its client ID, as shown in Figure 9. Note that you can grab the client ID of this managed identity from Figure 4.
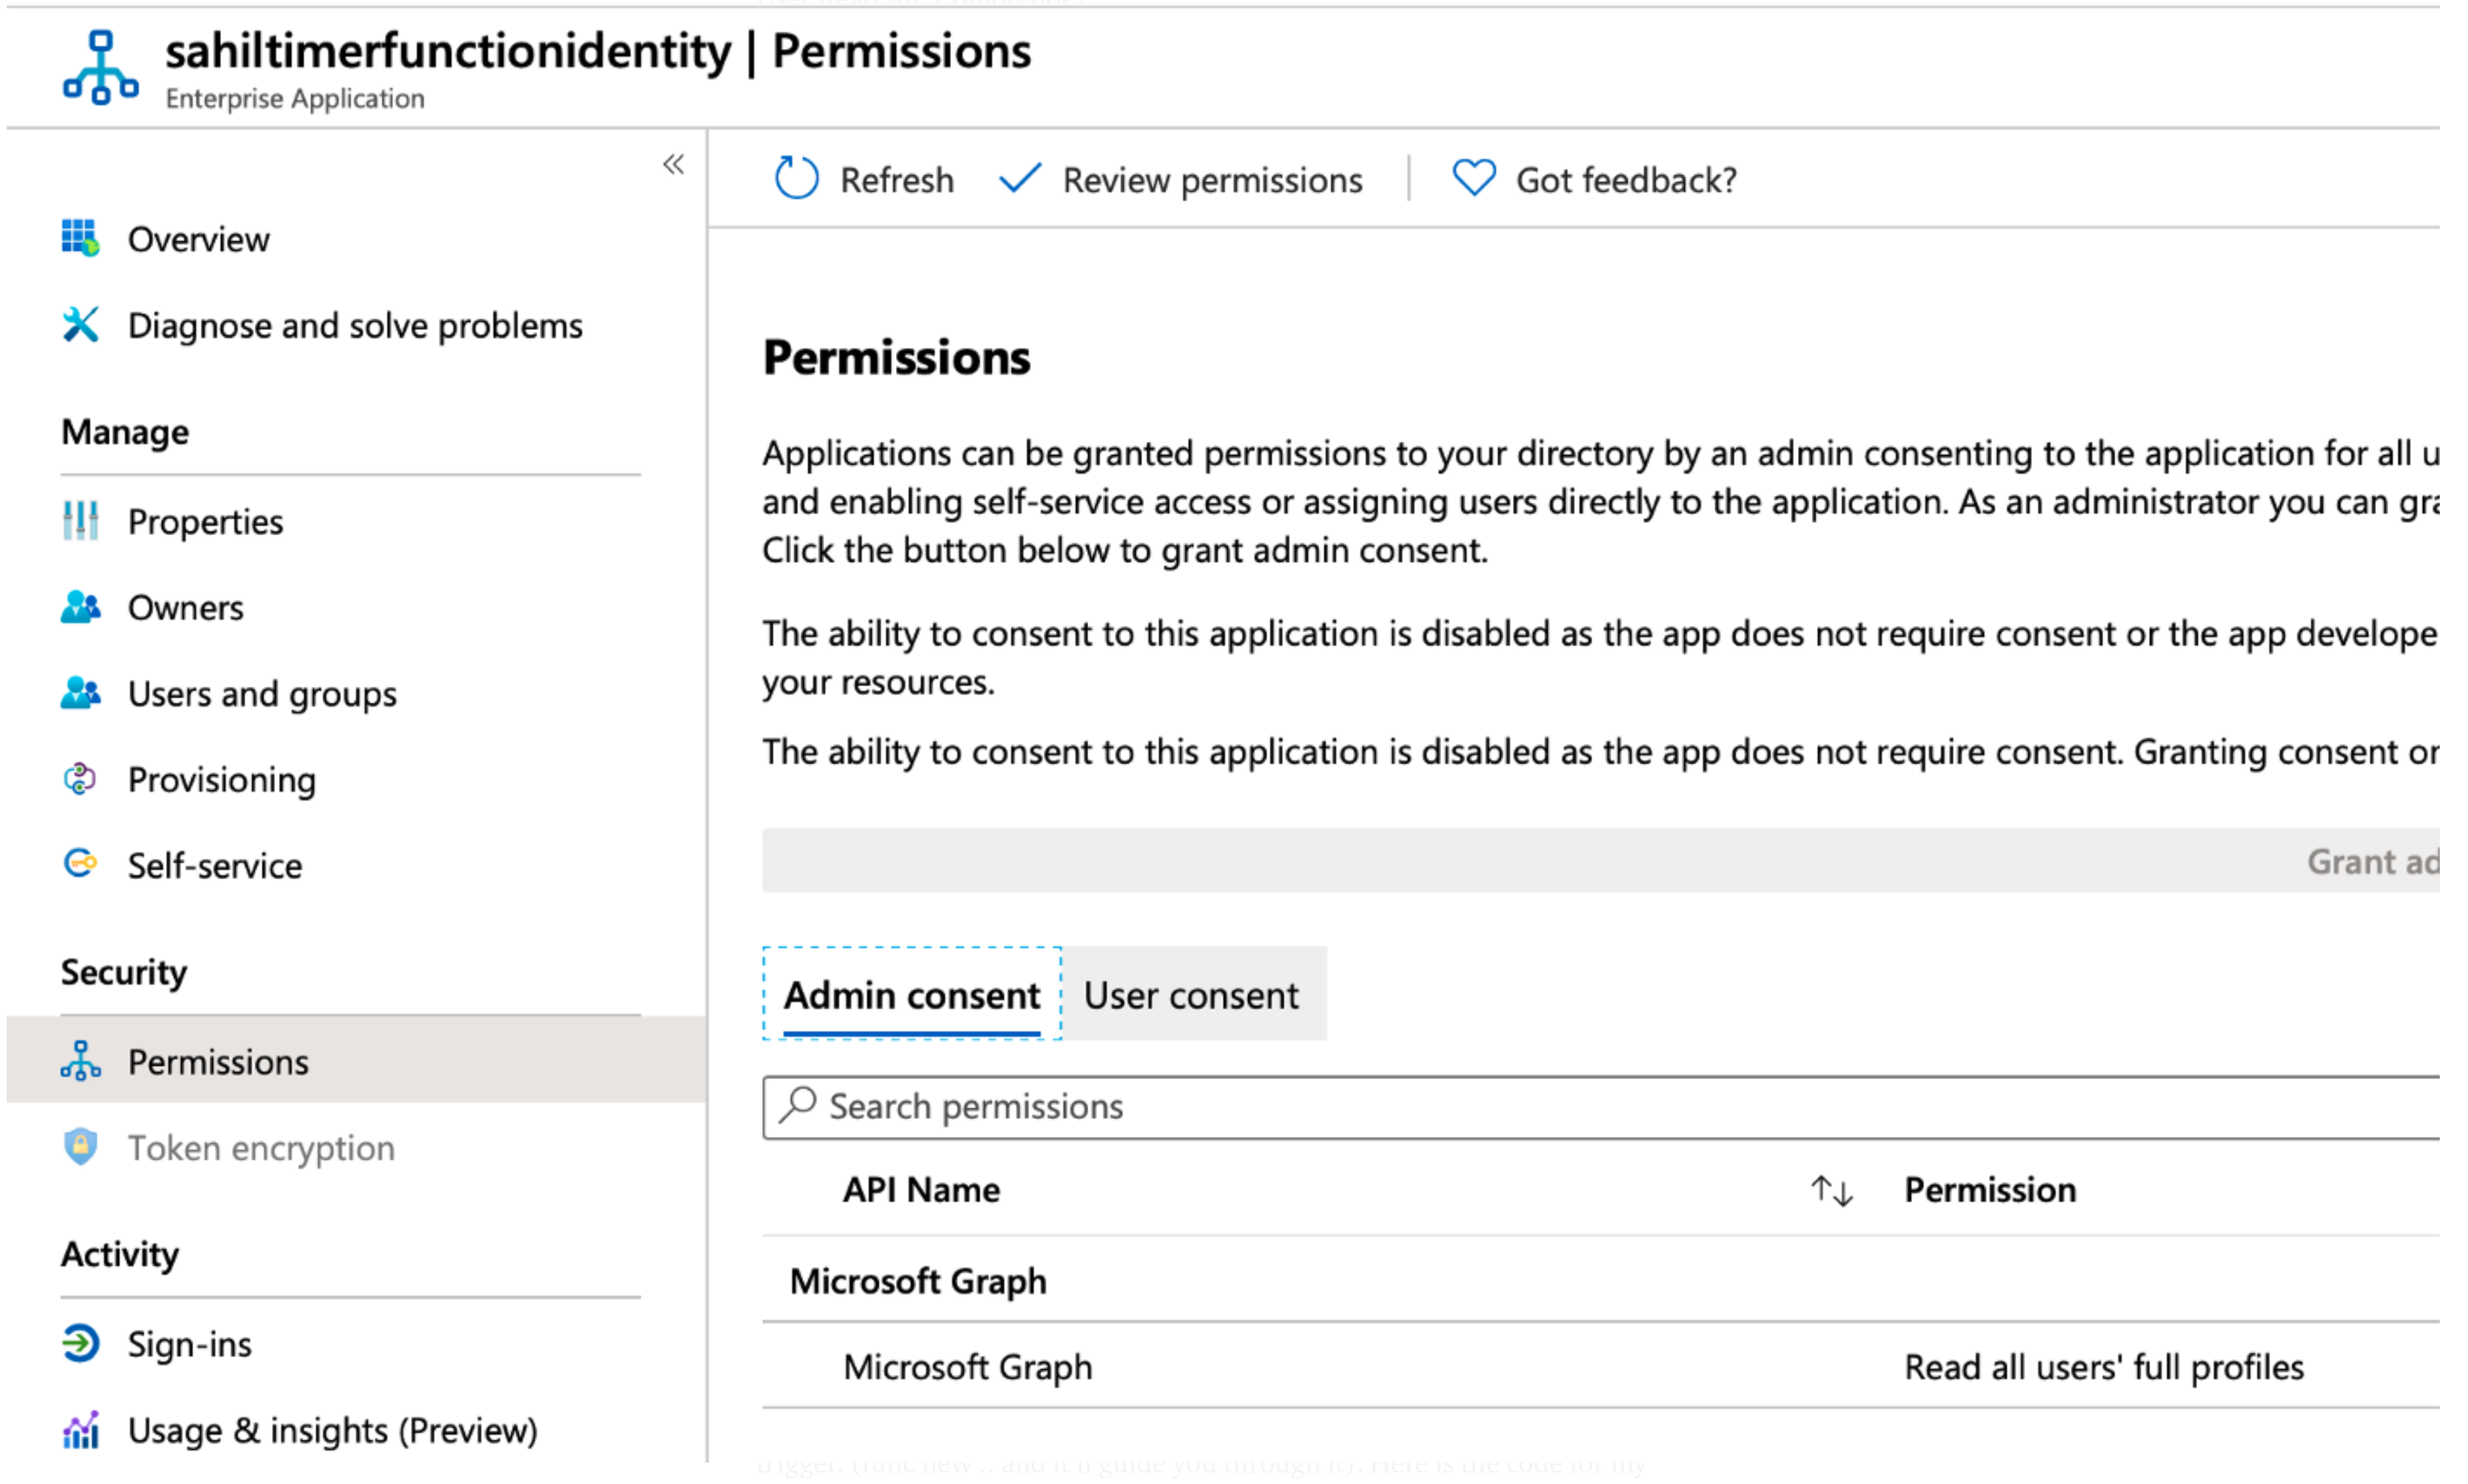
Once you open the app that represents the managed identity, you can look for its permissions, as shown in Figure 10.
One important note: Just like any service principal or headless process that has no user identity, managed identity permissions must be applications permissions and granted ahead of time.
Author the Function App
All the plumbing is in place and all that's left to do is to author the function app. This part is perhaps the easiest. If you've installed the Azure function CLI on your computer, just type “func new” on terminal and it'll guide you through. Ensure that you choose to create a function app that accepts a timer trigger. The code for my function app using a timer trigger, can be seen in Listing 2.
Listing 2: The function app code
const identity = require('@azure/identity');
const request = require('request');

module.exports = async function (context, myTimer) {
    var timeStamp = new Date().toISOString();
    context.log('Timer function called', timeStamp);

    var promise = new Promise((resolve, reject) => {
        const managedIdentityAppID = "f8973019-6953-433b-b935-adc31f5646d5";
        const credential = new identity.ManagedIdentityCredential(managedIdentityAppID);
        context.log('getting access token');
        credential.getToken("https://graph.microsoft.com/.default")
                  .then(response => {
                      context.log(response);
                      request.get('https://graph.microsoft.com/v1.0/users', {
                          'auth': {'bearer': response.token}
                      },
                      function (error, response, body) {
                        if (error) {
                            reject(error);
                        }
                        context.log(timeStamp + body);
                        resolve(body);
                      })
                  },
                  err => {
                    context.log(err);
                    reject(err);
                  });
    });

    await promise;
};
This line from Listing 2 is especially interesting!
const managedIdentityAppID = "f8973019-6953-433b-b935-adc31f5646d5";
That's the AppID of my user-assigned managed identity.
For this code to work, I've had to take a dependency on a specific node package. My package.json looks like this:
{ "dependencies": { "request": "2.88.2", "@azure/identity": "^1.1.0" }}
Running the Code Example
At this point, all my code changes are done. Now simply go ahead and deploy the function app and connect to it streaming logs. You should see an output like that in Figure 11.

As can be seen from Figure 11, you're able to get an access token for the managed identity to come up with the necessary permissions and were able to call Microsoft Graph with it.
This is incredibly powerful. You have just authored a timer function, which is a headless process for which you'd never need to manage any credentials. No more key rotation headache. No more headache of securing that credential. Everything is contained neatly inside Azure.
Summary
A platform such as Azure is full of golden nuggets everywhere. I've been working with Azure for many years now and yet I feel I've only scratched the surface of it. Every day I learn so many more new and interesting ways of solving customers' problems.
Managed identity is a very powerful feature of Azure. It allows you to write secure applications because you have no credentials to manage. There's no danger of polluting environment variables. There's no danger of accidentally checking in credentials into source code for the world to see. It promotes better architecture. It promotes better patterns. It reduces stupid mistakes.
Although this article showed you one possible usage of managed identity, using it as headless process to call protected APIs, the possibilities are truly endless. I'm sure you'll use your own ingenuity and creativity to come up with some amazing examples of managed identity put to real use.
I look forward to seeing them. Stay in touch and happy coding.
