


Globalization and localization are two important concepts that you should be aware of to internationalize your applications. In essence, globalization and localization are concepts that help you reach a wider audience. The former relates to building applications that support various cultures and the latter relates to how you can build your application that can support a particular locale and culture. In other words, an application takes advantage of globalization to be able to cater to different languages based on user choice. Localization is adopted by the application to adapt the content of a website to various regions or cultures.
Broadly, the three steps you should follow to localize your application include:
- Sift through your application to identify the localizable content.
- Create localized resources for the languages and cultures the application has support for.
- Implement a strategy that can be used to select a language or a culture per request.
I'll discuss each of these points in this article as I show you how you can build multilingual applications in ASP.NET Core.
You should have Visual Studio 2019 (an earlier version will also work but Visual Studio 2019 is preferred) installed on your system. You can download a copy of it from here: https://visualstudio.microsoft.com/downloads/
Getting Started
First off, let's create a new ASP.NET Core MVC project in Visual Studio. There are several ways to create a project in Visual Studio 2019. When you launch Visual Studio, you'll see the start window and you can choose “Create a new project” from there. Alternatively, you can choose “Continue without code” to launch the main screen of the Visual Studio 2019 IDE. I'll choose the first option in this example.
To create a new ASP.NET Core 3.0 MVC project in Visual Studio 2019, follow the steps outlined below.
- Start Visual Studio 2019 IDE.
- Click on the “Create new project” option.
- In the next screen, select “ASP.Net Core Web Application” from the list of the templates displayed.
- Click Next.
- Specify the name and location of your project in the “Configure your new project” screen.
- In the “Create a New ASP.NET Core Web Application” screen, select .NET Core as the runtime and ASP.NET Core 3.0 (or later) from the drop-down list at the top.
- Select “Web Application (Model-View-Controller)” as the project template to create a new ASP.NET Core MVC application.
- Uncheck “Enable Docker Support” and “Configure for HTTPS.” You won't be using either of these here.
- Specify authentication as “No Authentication.” You won't be using authentication here either.
- Click Create to complete the process.
A new ASP.NET Core project will be created in Visual Studio 2019. You'll use the project you've just created later.
Configuring Startup
It should be noted that localization in ASP.NET Core is an opt-in feature and is not enabled by default. The ASP.NET Core framework provides a middleware that is meant for localization. You can add this middleware to the request processing pipeline by calling the UseRequestLocalization method on the IApplicationBuilder instance.
First off, you should add localization services to the application. To add localization services to your application, you can use the following code.
public void ConfigureServices(IServiceCollection services)
{
    services.AddControllersWithViews();
    services.AddLocalization(opt => { opt.ResourcesPath = "Resources";  });
}
The preceding code snippet illustrates how the localization services are added to the service container. Note how the ResourcesPath property has been used to set the path to the folder where resource files (for various locales) will reside. If you don't specify any value for this property, the application will expect the resource files to be available in the application's root directory.
There are three methods used to configure localization in ASP.NET Core. These include the following:
- AddDataAnnotationsLocalization: This method is used to provide support for DataAnnotations validation messages.
- AddLocalization: This method is used to add localization services to the services container.
- AddViewLocalization: This method is used to provide support for localized views.
I'll discuss more on each of these soon.
Define the Allowed Cultures
In .NET, you can take advantage of the CultureInfo class for storing culture-specific information. You should now specify the languages and cultures that you would like your application to provide support for. To do this, create a list of type CultureInfo to store the supported cultures, as shown below.
List<CultureInfo> supportedCultures = new List<CultureInfo>
{
    new CultureInfo("en"),
    new CultureInfo("de"),
    new CultureInfo("fr"),
    new CultureInfo("es"),
    new CultureInfo("en-GB")
};
Table 1 lists some of the widely used cultures.
Next, add the request localization middleware in the ConfigureServices method of the Startup class.
services.Configure<RequestLocalizationOptions>(options => {
    List<CultureInfo> supportedCultures = new List<CultureInfo>
    {
        new CultureInfo("en-US"),
        new CultureInfo("de-DE"),
        new CultureInfo("fr-FR"),
        new CultureInfo("en-GB")
    };
    options.DefaultRequestCulture = new RequestCulture("en-GB");
    options.SupportedCultures = supportedCultures;
    options.SupportedUICultures = supportedCultures;
});
To add or remove localization providers, use the RequestLocalizationOptions class. Note that where a culture is used for number and date formats, a UI culture is used for reading culture-specific data from the resource files. The complete source code of the ConfigureServices method is given in Listing 1 for your reference.
Listing 1: Add the request localization moiddleware in the ConfigureServices method
public void ConfigureServices(IServiceCollection services)
{
    services.AddControllersWithViews();
    services.AddLocalization(opt =>
    {
        opt.ResourcesPath = "Resources";
    });

    services.Configure<RequestLocalizationOptions>(options =>
    {
        List<CultureInfo> supportedCultures = new List<CultureInfo>
        {
            new CultureInfo("en-US"),
            new CultureInfo("de-DE"),
            new CultureInfo("fr-FR"),
            new CultureInfo("en-GB")
        };

        options.DefaultRequestCulture = new RequestCulture("en-GB");
        options.SupportedCultures = supportedCultures;
        options.SupportedUICultures = supportedCultures;
    });
}
Working with Request Culture Providers
The request localization middleware in ASP.NET Core pertaining to the Microsoft.AspNetCore.Localization namespace takes advantage of certain components to determine the culture of a particular request. These components are called RequestCultureProviders and few are added by default.
These pre-defined providers include the following:
AcceptHeadersRequestCultureProvideris used to retrieve culture information from the Accept-Language header of your browser.QueryStringRequestCultureProvideris used to retrieve the culture information from the query string.CookieRequestCultureProvideris used to retrieve culture information from a cookie.CustomRequestCultureProvideris yet another request culture provider that takes advantage of a delegate to determine the current information.
Note that the request culture providers are called one after the other until a provider is available that's capable of determining the culture for the request. You can specify both the available cultures and the RequestCultureProviders using the app.UseRequestLocalization extension method.
You can also define the default request culture. The following code snippet shows how this can be achieved.
services.Configure<RequestLocalizationOptions>(options =>
{
     options.DefaultRequestCulture = new RequestCulture("en-US");
});
You should also use the UseRequestLocalization extension method in the Configure method of the Startup class to set the culture information automatically based on the information provided by the Web browser. The following code snippet illustrates how this can be achieved.
var options = app.ApplicationServices.GetService<IOptions<RequestLocalizationOptions>>();
app.UseRequestLocalization(options.Value);
The complete source code of the Configure method is given in Listing 2.
Listing 2: Using the UseRequestLocalization extension method in the Configure method
public void Configure(IApplicationBuilder app, IWebHostEnvironment env)
{
    app.UseStaticFiles();
    app.UseRouting();
    app.UseAuthorization();

    var options = app.ApplicationServices.GetService<IOptions<RequestLocalizationOptions>>();
    app.UseRequestLocalization(options.Value);

    app.UseEndpoints(endpoints =>
    {
        endpoints.MapControllerRoute(name: "default", pattern: "{controller=Home}/{action=Index}/{id?}");
    });
}
Use the CustomRequestCultureProvider Class
You might often want to use a custom request culture provider in your applications. Let's say that you want to store the language and culture information in the database - this is exactly where a custom request culture provider can help. The following code snippet illustrates how you can add a custom provider.
const string culture = "en-US";
services.Configure<RequestLocalizationOptions>(options => {
    List<CultureInfo> supportedCultures = new List<CultureInfo> {
        new CultureInfo("en-US"),
        new CultureInfo("de-DE"),
        new CultureInfo("fr-FR"),
        new CultureInfo("en-GB")
    };

    options.DefaultRequestCulture = new RequestCulture(culture: culture, uiCulture: culture);
    options.SupportedCultures = supportedCultures;
    options.SupportedUICultures = supportedCultures;
    options.AddInitialRequestCultureProvider(new CustomRequestCultureProvider (async context =>
    {
        //Write your code here
        return new ProviderCultureResult("en");
    }));
});
Create a Custom Request Culture Provider
Note that the culture providers AcceptHeadersRequestCultureProvider, QueryStringRequestCultureProvider, and CookieRequestCultureProvider are configured by automatically by default. You can also create your own custom culture provider.
Before you add your custom culture provider, you may want to clear the list of all the culture providers. Your custom culture provider is just like any other class that inherits the RequestCultureProvider class and implements the DetermineProviderCultureResult method. You can write your own implementation, i.e., resolve the culture for a request inside the DetermineProviderCultureResult method as shown in Listing 3.
Listing 3: The Custom Request Culture Provider
public class MyCustomRequestCultureProvider : RequestCultureProvider
{
    public override async Task<ProviderCultureResult> DetermineProviderCultureResult (HttpContext httpContext)
    {
        await Task.Yield();
        return new ProviderCultureResult("en-US");
    }
}
Listing 4 illustrates how you can clear all default culture providers and add the custom culture provider to the RequestCultureProviders list.
Listing 4: Add the Custom Culture Provider to the RequestCultureProviders list
services.Configure<RequestLocalizationOptions>(options =>
{
    List<CultureInfo> supportedCultures = new List<CultureInfo>
    {
        new CultureInfo("en-US"),
        new CultureInfo("de-DE"),
        new CultureInfo("fr"),
        new CultureInfo("en-GB")
    };

    options.DefaultRequestCulture = new RequestCulture (culture: "de-DE", uiCulture: "de-DE");
    options.SupportedCultures = supportedCultures;
    options.SupportedUICultures = supportedCultures;
    options.RequestCultureProviders.Clear();
    options.RequestCultureProviders.Add(new MyCustomRequestCultureProvider());
});
Create Resource Files for Each Locale
There are various ways in which you can create resource files. In this example, you'll take advantage of the Visual Studio Resource Designer to create an XML-based .resx file. Select the project in the Solution Explorer Window and create a new folder named Resources in it. Resources in .NET are comprised of key/value pair of data that are compiled to a .resources file. A resource file is one where you can store strings, images, or object data – resources of the application.
Next, add a resources file into the newly created folder. Name the resource file as Controllers.HomeController.en-US.resx. Create another resource file named Controllers.HomeController.de-DE.resx. Store the name value pairs as shown in Table 2
Accessing a Localized String in Your Controller
To access a localized string in the controllers of your application, you can take advantage of dependency injection to inject an instance of IStringLocalizer<T>. The IStringLocalizer and IStringLocalizer<T> interfaces were introduced in ASP.NET Core to work with localized applications. In other words, the IStringLocalizer and IStringLocalizer<T> abstractions in ASP.NET Core can be used to retrieve localized data based on the names of the resource. The IStringLocalizer interface takes advantage of the ResourceManager and ResourceReader classes (pertaining to the System.Resources namespace) to provide culture-specific information.
The following code snippet illustrates how you can retrieve a localized string from IStringLocalizer<T>.
string localizedString = _localizer["Hello World!"];
Here's how it works. It searches for a resource file matching the current culture. If it finds one and there's a matching row with the Name as "Hello World!", it returns the Value. It then searches for the parent culture and if a value is found, it returns that. As a fallback, the string “Hello World!” is returned if there's no match. Culture fallback is a behavior in which if the requested culture is not found, the application selects the parent of that culture.
Replace the content of the Views/Home/Index.cshtml file with the following:
@{
    ViewData["Title"] =  @ViewData["Title"];
}
<div class="text-center">
    <h1 class="display-4">@ViewData["Title"]</h1>
    <p>Learn about <a href="<a href="https://docs.microsoft.com/aspnet/core">https://docs.microsoft.com/aspnet/core</a>">
building Web apps with ASP.NET Core</a>.</p>
</div>
Listing 5 illustrates how you can access localized string in your controller.
Listing 5: Accessing localized strings in the controller
public class HomeController : Controller
{
    private readonly IStringLocalizer<HomeController> _stringLocalizer;

    public HomeController(IStringLocalizer<HomeController> stringLocalizer)
    {
        _stringLocalizer = stringLocalizer;
    }

    public IActionResult Index()
    {
        string message = _stringLocalizer["GreetingMessage"].Value;
        ViewData["Title"] = message;
        return View();
    }

    //Other action methods

}
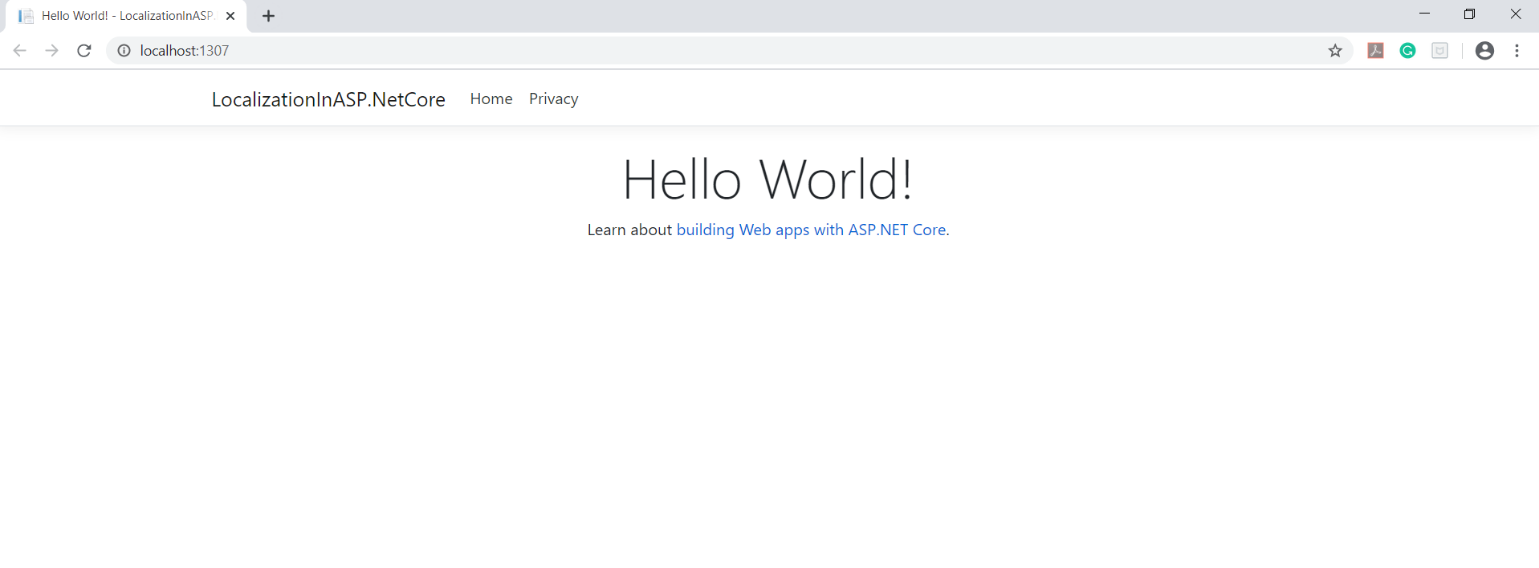
When you run the application, the message “Hello World” will be displayed in the Web browser, as shown in Figure 1.
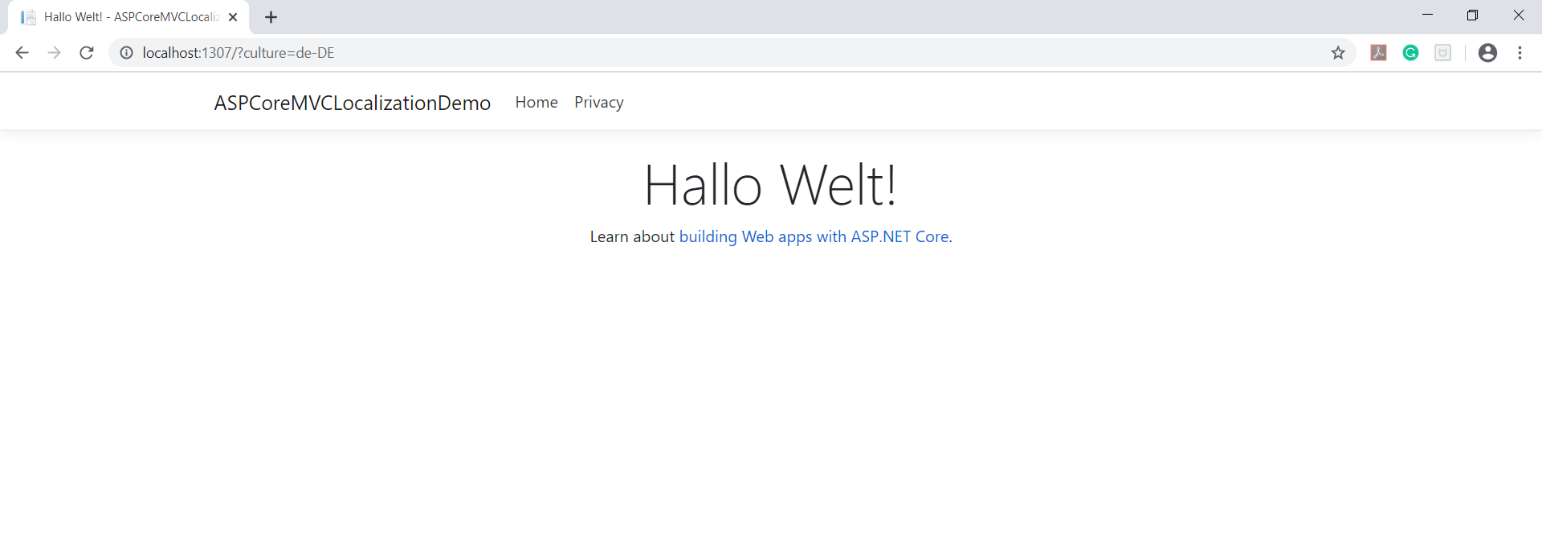
Now specify the culture you'd like the application to use in the URL as shown here: http://localhost:1307/?culture=de-DE
Remember, you've already added the list of supported cultures and this is one of them. When you run the application, you can observe the string “Hello World” in German, as shown in Figure 2.
Using Localization in Views
You can localize a view in two different ways: Either localize the entire view or localize strings, much the same way you would do when localizing strings in a controller (as discussed in the preceding section). Note that when localizing views, you should take advantage of IViewLocalizer in lieu of IStringLocalizer<T> – you should inject IViewLocalizer into the view. To inject IViewLocalizer into your view, you can use the following code.
@inject IViewLocalizer Localizer
Remember that the ViewLocalizer class inherits HtmlLocalizer and is used in razor views. You can take advantage of the Localizer property in your views as shown in the code snippet.
<p>@Localizer["PageTitle"]</p>
The following code snippet illustrates how IViewLocalizer can be used in the Index.cshtml file.
@using Microsoft.AspNetCore.Mvc.Localization
@model AddingLocalization.ViewModels.HomeViewModel@inject

IViewLocalizer Localizer@
{
    ViewData["Title"] = Localizer["PageTitle"];
}

<h2>@ViewData["Title"]</h2>
You can have localized views – separate views for each culture, i.e., different razor files per culture. Setting this up is quite straightforward; here's what you need to specify in the ConfigureServices method:
public void ConfigureServices(IServiceCollection services)
{
    services.AddMvc().AddViewLocalization(LanguageViewLocationExpanderFormat.Suffix);
}
Next, you create a view for each culture such as About.en-US.cshtml, About.en-GB.cshtml, About.de-DE.cshtml, etc.
DataAnnotations Localization
DataAnnotations is a feature in .NET (introduced in .NET 3.5) that enables you apply data attributes on your models. You can localize data annotation error messages with IStringLocalizer<T> as well.
Now consider the following class.
public class AuthorViewModel
{
    [Display(Name = "FirstName")]
    [Required(ErrorMessage = "{0} is required")]
    public string FirstName { get; set; }

    [Display(Name = "LastName")]
    [Required(ErrorMessage = "{0} is required")]
    public string LastName { get; set; }

    [Display(Name = "BooksAuthored")]
    [Range(1, 99, ErrorMessage = "{0} must be a number between {1} and {2}")]
    public int BooksAuthored { get; set; }
}
The ErrorMessage that you see for each of the ValidationAttribute is used as a key here to search for the localized message as appropriate. Note how the RangeAttribute has been used to specify the minimum and maximum number of books authored by an author.
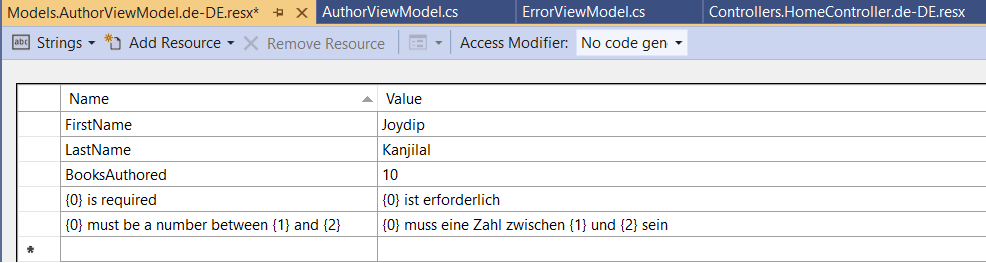
Next, you create a resource file. Let's create one for the German locale and name it Models.AuthorViewModel.de-DE.resx with the content shown in Figure 3.
For DataAnnotationsLocalization to work, call the AddDataAnnotationsLocalization() method. If you're using ASP.NET Core or ASP.NET Core MVC 2.0 or 2.2, here's what you need to specify in the ConfigureServices method of your Startup class.
services.AddMvc().AddDataAnnotationsLocalization();
services.AddLocalization(o => { o.ResourcesPath = "Resources"; });
Here's what to specify in the ConfigureServices method if you're using ASP.NET Core or ASP.NET Core MVC version 3.0 or upward.
services.AddLocalization(opt => { opt.ResourcesPath = "Resources";});
services.AddControllersWithViews().AddDataAnnotationsLocalization();
Using the RouteDataRequestCultureProvider
You can also specify culture as part of the URL, as shown here: http://localhost:1307/en-US/Home/Index and here: http://localhost:1307/de-DE/Home/Index.
To do this, you might want to take advantage of the RouteDataRequestCultureProvider – yes, you read it right! The following code snippet illustrates how you can set up this provider in the Configure method of the Startup class.
var requestProvider = new RouteDataRequestCultureProvider();
requestLocalizationOptions.RequestCultureProviders.Insert(0, requestProvider);
Listing 6 shows the complete source code of the Configure method for your reference.
Listing 6: Specifying the RouteDataRequestCultureProvider in the Configure method
public void Configure(IApplicationBuilder app, IWebHostEnvironment env)
{
    app.UseStaticFiles();
    app.UseRouting();
    app.UseAuthorization();

    IList<CultureInfo> supportedCultures = new List<CultureInfo>
    {
        new CultureInfo("en-US"),
        new CultureInfo("de-DE"),
        new CultureInfo("fr"),
        new CultureInfo("en-GB")
    };

    var requestLocalizationOptions = new RequestLocalizationOptions
    {
        DefaultRequestCulture = new RequestCulture("en-US"),
        SupportedCultures = supportedCultures,
        SupportedUICultures = supportedCultures
    };

    var requestProvider = new RouteDataRequestCultureProvider();
    requestLocalizationOptions.RequestCultureProviders.Insert(0, requestProvider);
    app.UseRequestLocalization(requestLocalizationOptions);
    app.UseEndpoints(endpoints =>
    {
        endpoints.MapControllerRoute(name: "default", pattern: "{culture=en-US}/{controller=Home}/{action=Index}/{id?}");
    });
}
Summary
ASP.NET Core and ASP.NET Core MVC provide excellent support for internationalization. Implementing it in your applications isn't difficult either. You can take advantage of the built-in support for globalization in ASP.NET Core and ASP.NET Core MVC to build applications that can cater to various locales. ASP.NET Core provides support for globalization through the Microsoft.Extensions.Localization assembly.
Table 1: A brief list of cultures
| Culture Name | Description |
| en-US | English (United States) |
| en-GB | English (Great Britain) |
| de-DE | German (Germany) |
| de-CH | German (Switzerland) |
| fr-FR | French (France) |
| fr-CH | French (Switzerland) |
Table 2: The name value pair for Controllers.HomeController.en-US.resx
| Resource File Name | Name | Value |
| Controllers.HomeController.en-US.resx | GreetingMessage | HelloWorld! |
| Controllers.HomeController.de-DE.resx | GreetingMessage | Hallo Welt! |
