


With the surge in APIs and their consumption globally, API security is extremely important these days. JWT authentication is a standard way for protecting APIs - it's adept at verifying the data that's transmitted over the wire between APIs and the clients that consume the APIs. You can even safely pass claims between the communicating parties as well.
JSON Web Tokens (commonly known as JWT) is an open standard to pass data between client and server, and enables you to transmit data back and forth between the server and the consumers in a secure manner. This article talks about how you can take advantage of JWTs to protect APIs.
You can download the source code for this article posted in GitHub: https://github.com/joydipkanjilal/jwt-aspnetcore
Prerequisites
If you're to work with the code examples discussed in this article, you should have the following installed in your system:
- Visual Studio 2019 (an earlier version will also work but Visual Studio 2019 is preferred)
- .NET 5.0
- ASP.NET 5.0 Runtime
You can download Visual Studio 2019 from here: https://visualstudio.microsoft.com/downloads/. You can download .NET 5.0 and ASP.NET 5.0 runtime from here: https://dotnet.microsoft.com/download/dotnet/5.0.
What Are JSON Web Tokens (JWT)?
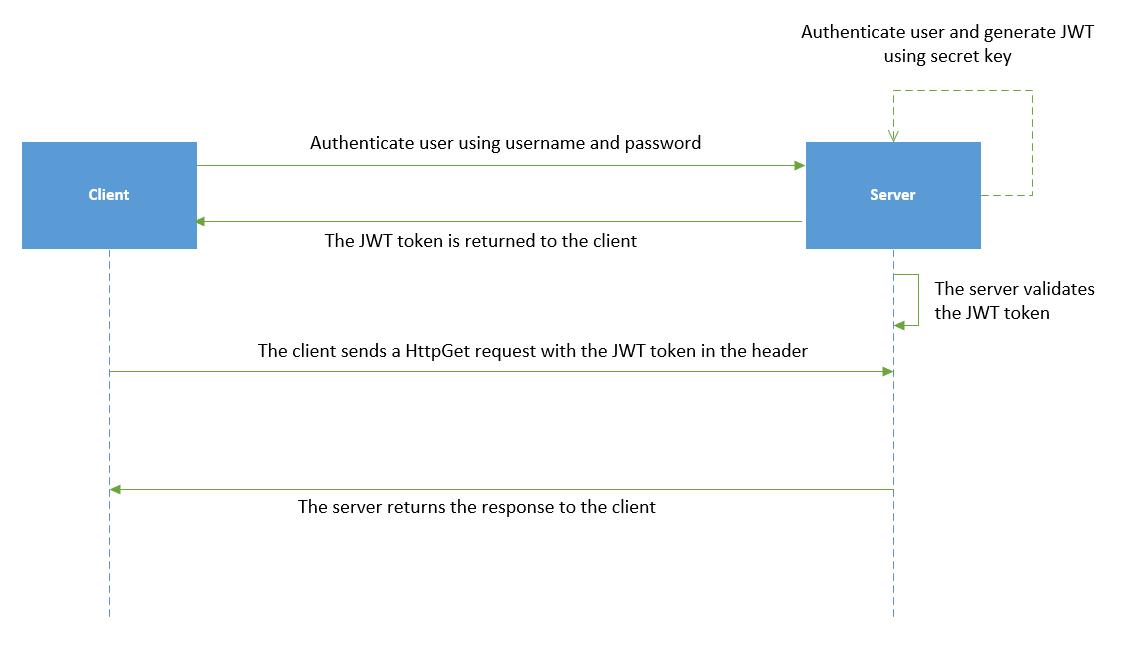
JSON Web Token is an open standard (RFC 7519) that defines a safe, compact, and self-contained, secured way for transmission of information between a sender and a receiver through a URL, a POST parameter, or inside the HTTP Header. It should be noted that the information to be transmitted securely between two parties is represented in JSON format and it is cryptographically signed to verify its authenticity. JWT is typically used for implementing authentication and authorization in Web applications. Because JWT is a standard, all JWTs are tokens but the reverse is not true. You can work with JSON Web Tokens in .NET, Python, Node.js, Java, PHP, Ruby, Go, JavaScript, etc.
Figure 1 illustrates how a typical JWT authentication works.
JWT is represented as a combination of three base64url encoded parts concatenated with period ('.') characters and comprises the following three sections:
- Header
- Payload
- Signature
Header Section
This section provides metadata about the type of data and the algorithm to be used to encrypt the data that is to be transferred. The JWT header comprises three sections - these include: the metadata for the token, the type of signature, and the encryption algorithm. It comprises two properties, i.e., “alg” and “typ”. Although the former relates to the cryptography algorithm used, i.e., HS256 in this case, the latter is used to specify the type of the token, i.e., JWT in this case.
{
  "typ": "JWT",
  "alg": "HS256"
}
Payload
The payload represents the actual information in JSON format that is to be transmitted over the wire. The code snippet given below illustrates a simple payload.
{
  "sub": "1234567890",
  "name": "Joydip Kanjilal",
  "admin": true,
  "jti": "cdafc246-109d-4ac9-9aa1-eb689fad9357",
  "iat": 1611497332,
  "exp": 1611500932
}
The payload typically contains claims, the identity information of the user, the allowed permissions, etc. You can use claims to transmit additional information. These are also called JWT claims and are of two types: Reserved and Custom. Here's a list of the reserved claims:
- iss: This represents the issuer of the token.
- sub: This is the subject of the token.
- aud: This represents the audience of the token.
- exp: This is used to define token expiration.
- nbf: This is used to specify the time before which the token must not be processed.
- iat: This represents the time when the token was issued.
- jti: This represents a unique identifier for the token.
You can also use custom claims, which can be added to the token using a rule.
Signature
The signature adheres to the JSON Web Signature (JWS) specification and is used to verify the integrity of the data transferred over the wire. It comprises a hash of the header, the payload, and the secret, and is used to ensure that the message was not changed while being transmitted. The final signed token is created by adhering to the JSON Web Signature (JWS) specification. The encoded JWT header and as well as the encoded JWT payload is combined and then it's signed using a strong encryption algorithm such as HMAC SHA 256.
Getting Started
First, create a new ASP.NET Core MVC 5 project in Visual Studio 2019. You can create a project in Visual Studio 2019 in several ways. When you launch Visual Studio 2019, you'll see the Start window. You can choose “Continue without code” to launch the main screen of the Visual Studio 2019 IDE. In the menu of the main screen, you can select File > New > Project to launch the screen shown in Figure 2.
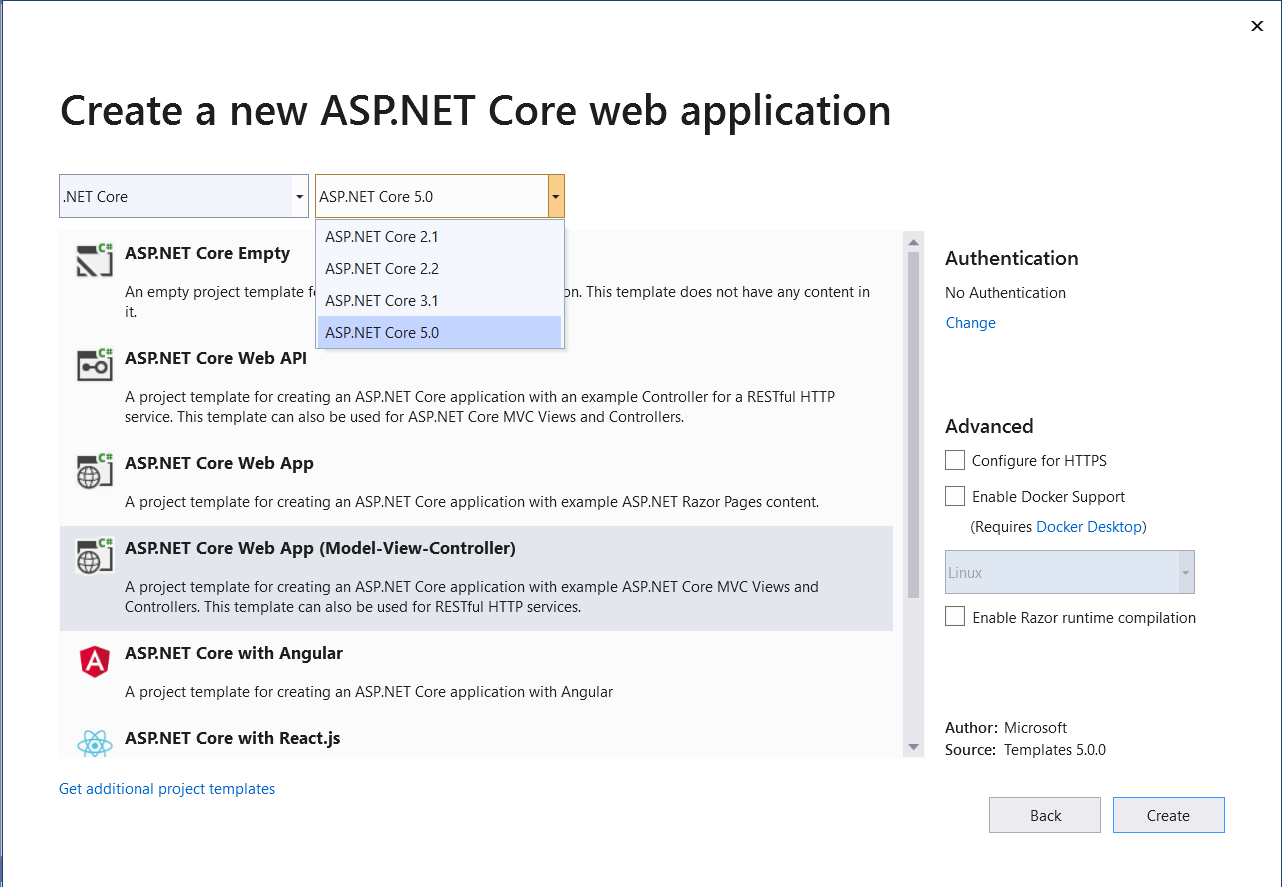
Next, follow the sequence of steps in Visual Studio 2019 to create a new ASP.NET Core MVC 5 project. I'll use this project throughout this article.
Install NuGet Package
So far so good. The next step is to install the necessary NuGet Package(s). A NuGet package is represented as a file that has a .nupkg extension and is comprised of compiled code (also called DLLs), other related files, and a manifest that provides information related to the package such as version number, etc.
To install the required packages into your project, execute the following commands at the NuGet Package Manager Console.
- dotnet add package Microsoft.AspNetCore.Authentication
- dotnet add package Microsoft.AspNetCore.Authentication.JwtBearer
Implementing JWT in ASP.NET Core 5 MVC
In this section, I'll examine how you can implement JWT authentication in ASP.NET Core MVC 5 application. In this example, you'll be using the following classes and interfaces:
- HomeController: This is the controller class that contains all the action methods.
- ITokenService: This is an interface that contains the declaration of two methods, i.e.,
BuildTokenandIsTokenValid. The former is used to build the token and the latter is used to check whether a given token is valid. - TokenService: This class extends the
ITokenServiceinterface and implements its methods. - IUserRepository: This interface contains the declaration of the
GetUsermethod that's used to get anUserDTOinstance based on the username from an instance ofUserModelclass. - UserRepository: The
UserRepositoryclass extends theIUserRepositoryinterface and implements theGetUsermethod. It also contains the sample data used by the application as a list of theUserDTOclass.
Creating the Model Classes
There are two entities you can use in this application: the UserModel and the UserDTO classes. The following code snippet shows how the UserModel class looks:
public class UserModel
{
    [Required]
    public string UserName { get; set; }

    [Required]
    public string Password { get; set; }
}
Next, create a class named UserDTO with the following content:
public class UserDTO
{
    public string UserName { get; set; }
    public string Password { get; set; }
    public string Role { get; set; }
}
The UserDTO represents the user data transfer object and contains three string properties: UserName, Password, and Role. You'll use this class at several places in your application.
Configuring JWT in the AppSettings File
Create a section in the appsettings.cs file called Jwt with the following content inside:
"Jwt": {
    "Key": "This is where you should specify your secret key, which is used to sign and verify Jwt tokens.",
    "Issuer": "www.joydipkanjilal.net"
}
Replace the text mentioned in “Key” above with the actual key you would like to use as a secret. After you've added the new section your appsettings.cs file would look like this:
{
    "Logging": {
        "LogLevel": {
            "Default": "Information",
            "Microsoft": "Warning",
            "Microsoft.Hosting.Lifetime": "Information"
        }
    },
    "Jwt": {
        "Key": "ThisismySecretKey",
        "Issuer": www.joydipkanjilal.net
        "Audience": "http://localhost:36145/"
    },
    "AllowedHosts": "*"
}
Configure Authentication with Bearer and JWT
In the ConfigureServices method of the Startup class, I should mention that you'll use the AddAuthentication feature as well as JwtBearer using the AddJwtBearer method, as shown in the code snippet below.
services.AddAuthentication(JwtBearerDefaults.AuthenticationScheme).AddJwtBearer(options =>
{
    options.TokenValidationParameters = new TokenValidationParameters
    {
        ValidateIssuer = true,
        ValidateAudience = true,
        ValidateLifetime = true,
        ValidateIssuerSigningKey = true,
        ValidIssuer = Configuration["Jwt:Issuer"],
        ValidAudience = Configuration["Jwt:Issuer"],
        IssuerSigningKey = new
        SymmetricSecurityKey
        (Encoding.UTF8.GetBytes
        (Configuration["Jwt:Key"]))
    };
});
The following code can be used in the ConfigureServices method of the Startup class to add a transient service of type IUserRepository and IITokenService respectively.
services.AddTransient<IUserRepository, UserRepository>();
services.AddTransient<ITokenService, TokenService>();
Once these instances have been added, you can take advantage of dependency injection in the constructor of the HomeController class to retrieve these instances from the container.
The complete code of the ConfigureServices method is given in Listing 1.
Listing 1: The ConfigureServices Method
public void ConfigureServices(IServiceCollection services)
{
    services.AddControllers();
    services.AddTransient<IUserRepository, UserRepository>();
    services.AddTransient<ITokenService, TokenService>();
    services.AddAuthentication(JwtBearerDefaults.AuthenticationScheme).AddJwtBearer(options =>
    {
        options.TokenValidationParameters = new TokenValidationParameters
        {
            ValidateIssuer = true,
            ValidateAudience = true,
            ValidateLifetime = true,
            ValidateIssuerSigningKey = true,
            ValidIssuer = Configuration["Jwt:Issuer"],
            ValidAudience = Configuration["Jwt:Issuer"],
            IssuerSigningKey = new SymmetricSecurityKey(Encoding.UTF8.GetBytes(Configuration["Jwt:Key"]))
        };
    });
}
You'll take advantage of session state in this example to store the generated token. You should make a call to the UseSession extension method in the Configure method of the Startup class to enable session state for your application. The code snippet below shows how you can retrieve the generated token from the session and then add it as a bearer token in the request header.
app.Use(async (context, next) =>
{
    var token = context.Session.GetString("Token");
    if (!string.IsNullOrEmpty(token))
    {
        context.Request.Headers.Add("Authorization", "Bearer " + token);
    }
    await next();
});
Listing 2 illustrates the complete source code of the Configure method - note how you can specify that session state, authentication, and routing that will be used.
Listing 2: The Configure Method
public void Configure(IApplicationBuilder app, IWebHostEnvironment env)
{
    if (env.IsDevelopment())
    {
        app.UseDeveloperExceptionPage();
    }
    else
    {
        app.UseExceptionHandler("/Home/Error");
    }
    app.UseSession();
    app.Use(async (context, next) =>
    {
        var token = context.Session.GetString("Token");
        if (!string.IsNullOrEmpty(token))
        {
            context.Request.Headers.Add("Authorization", "Bearer " + token);
        }
        await next();
    });
    app.UseStaticFiles();
    app.UseRouting();
    app.UseAuthentication();
    app.UseEndpoints(endpoints =>
    {
        endpoints.MapControllerRoute(name: "default", pattern: "{controller=Home}/{action=Index}/{id?}");
    });
}
Create the Views
Replace the source code of the Index.cshtml with the code in Listing 3.
Listing 3: The Login View
@model CodeMagazineMVCDemo.Models.UserModel
@{
    ViewData["Title"] = "Index";
}

<hr />
<div class="row">
    <div class="col-md-4">
        <form asp-action="Login">
            <div asp-validation-summary="ModelOnly" class="text-danger"></div>
            <div class="form-group">
                <label asp-for="UserName" class="control- label"></label>
                <input asp-for="UserName" class="form-control" />
                <span asp-validation-for= "UserName" class="text-danger"></span>
            </div>
            <div class="form-group">
                <label asp-for="Password" class="control-label"></label>
                <input asp-for="Password" type="password" class="form-control"/>
                <span asp-validation-for="Password" class="text-danger"></span>
            </div>
            <div class="form-group">
                <input type="submit" value="Login" class="btn btn-primary" />
            </div>
        </form>
    </div>

</div>

@section Scripts {@{await Html.RenderPartialAsync("_ValidationScriptsPartial");}}
Next, create a view named MainWindow.cshtml and write the following code in there:
<html>
<head>
<meta name="viewport" content="width=device-width" />
<title>CodeMag JWT Demo</title>
</head>
<body>
@{
ViewBag.Title = "Demonstrating JWTs in ASP.NET Core MVC 5";
}
<p>You're logged in as: @User.Identity.Name</p>
<p>@ViewBag.Message</p>
</body>
</html>
Lastly, create a view named Error.cshtml and write the following code in there:
<html>
<head>
    <meta name="viewport" content="width=device-width" />
    <title>Error...</title>
</head>

<body>
  <p>@ViewBag.Message</p>
</body>
</html>
Create the UserRepository Class
A repository class is an implementation of the Repository design pattern and is one that manages data access. The application takes advantage of the repository instance to perform CRUD operations against the database. In this example, the HomeController interacts with the UserRepository to retrieve a user based on the username and password.
Create a file named IUserRepository.cs with the following content inside:
public interface IUserRepository
{
    UserDTO GetUser(UserModel userMode);
}
The UserRepository class extends the IUserRepository interface and implements the GetUser method, as can be seen in Listing 4. It also builds a list of UserDTO objects. Note that the password here has been hardcoded for simplicity.
Listing 4: The UserRepository Class
public class UserRepository : IUserRepository
{
    private readonly List<UserDTO> users = new List<UserDTO>();

    public UserRepository()
    {
        users.Add(new UserDTO
        {
            UserName = "joydipkanjilal",
            Password = "joydip123",
            Role = "manager"
        });
        users.Add(new UserDTO
        {
            UserName = "michaelsanders",
            Password = "michael321",
            Role = "developer"
        });
        users.Add(new UserDTO
        {
            UserName = "stephensmith",
            Password = "stephen123",
            Role = "tester"
        });
        users.Add(new UserDTO
        {
            UserName = "rodpaddock",
            Password = "rod123",
            Role = "admin"
        });
        users.Add(new UserDTO
        {
            UserName = "rexwills",
            Password = "rex321",
            Role = "admin"
        });
    }
    public UserDTO GetUser(UserModel userModel)
    {
        return users.Where(x => x.UserName.ToLower() == userModel.UserName.ToLower()
            && x.Password == userModel.Password).FirstOrDefault();
    }
}
Create the TokenService Class
Create an interface called ITokenService with the following content:
cs
public interface ITokenService
{
    string BuildToken(string key, string issuer, UserDTO user);
    bool ValidateToken(string key, string issuer, string audience, string token);
}
The TokenService class extends the ITokenService interface and implements its methods as shown in Listing 5.
Listing 5: The TokenService Class
public class TokenService : ITokenService
{
    private const double EXPIRY_DURATION_MINUTES = 30;

    public string BuildToken(string key, string issuer, UserDTO user)
    {
        var claims = new[] {
            new Claim(ClaimTypes.Name, user.UserName),
            new Claim(ClaimTypes.Role, user.Role),
            new Claim(ClaimTypes.NameIdentifier,
            Guid.NewGuid().ToString())
        };

        var securityKey = new SymmetricSecurityKey(Encoding.UTF8.GetBytes(key));
        var credentials = new SigningCredentials(securityKey, SecurityAlgorithms.HmacSha256Signature);
        var tokenDescriptor = new JwtSecurityToken(issuer, issuer, claims,
            expires: DateTime.Now.AddMinutes(EXPIRY_DURATION_MINUTES), signingCredentials: credentials);
        return new JwtSecurityTokenHandler().WriteToken(tokenDescriptor);
    }
    public bool IsTokenValid(string key, string issuer, string token)
    {
        var mySecret = Encoding.UTF8.GetBytes(key);
        var mySecurityKey = new SymmetricSecurityKey(mySecret);
        var tokenHandler = new JwtSecurityTokenHandler();
        try
        {
            tokenHandler.ValidateToken(token,
            new TokenValidationParameters
            {
                ValidateIssuerSigningKey = true,
                ValidateIssuer = true,
                ValidateAudience = true,
                ValidIssuer = issuer,
                ValidAudience = issuer,
                IssuerSigningKey = mySecurityKey,
            }, out SecurityToken validatedToken);
        }
        catch
        {
            return false;
        }
        return true;
    }
}
Create the HomeController Class
Finally, we come to the controller class. In the HomeController class, you'll take advantage of dependency injection to be able to use instances of the Configuration, TokenService, and UserRepository classes. Create the following read-only instances for each of the three interfaces as shown below:
private readonly IConfiguration_config;
private readonly ITokenService_tokenService;
private readonly IUserRepository_userRepository;
The ITokenService and IUserRepository instances are created in the ConfigureServices method of the Startup class, as shown in the code snippet given below:
services.AddScoped<ITokenService, TokenService>();
services.AddScoped<IUserRepository, UserRepository>();
The IConfiguration interface is declared in the Startup class as a read-only property, as shown below:
public IConfiguration Configuration { get; }
Here's how constructor injection is used in the HomeController class for each of the instances discussed earlier.
public HomeController (IConfiguration config, ITokenService tokenService, IUserRepository userRepository)
{
    _tokenService = tokenService;
    _userRepository = userRepository;
    _config = config;
}
The complete source code of the HomeController class is given in Listing 6.
Listing 6: The HomeController Class
public class HomeController : Controller
{
    private readonly IConfiguration _config;
    private readonly IUserRepository _userRepository;
    private readonly ITokenService _tokenService;
    private string generatedToken = null;

    public HomeController (IConfiguration config, ITokenService tokenService, IUserRepository userRepository)
    {
        _config = config;
        _tokenService = tokenService;
        _userRepository = userRepository;
    }

    public IActionResult Index()
    {
        return View();
    }

    [AllowAnonymous]
    [Route("login")]
    [HttpPost]
    public IActionResult Login(UserModel userModel)
    {
        if (string.IsNullOrEmpty(userModel.UserName) || string.IsNullOrEmpty(userModel.Password))
        {
            return (RedirectToAction("Error"));
        }
        IActionResult response = Unauthorized();
        var validUser = GetUser(userModel);

        if (validUser != null)
        {
            generatedToken = _tokenService.BuildToken(_config["Jwt:Key"].ToString(), _config["Jwt:Issuer"].ToString(), validUser);
            if (generatedToken != null)
            {
                HttpContext.Session.SetString("Token", generatedToken);
                return RedirectToAction("MainWindow");
            }
            else
            {
                return (RedirectToAction("Error"));
            }
        }
        else
        {
            return (RedirectToAction("Error"));
        }
    }

    private UserDTO GetUser(UserModel userModel)
    {
        // Write your code here to authenticate the user
        return _userRepository.GetUser(userModel);
    }

    [Authorize]
    [Route("mainwindow")]
    [HttpGet]
    public IActionResult MainWindow()
    {
        string token = HttpContext.Session.GetString("Token");
        if (token == null)
        {
            return (RedirectToAction("Index"));
        }
        if (!_tokenService.IsTokenValid(_config["Jwt:Key"].ToString(), _config["Jwt:Issuer"].ToString(), token))
        {
            return (RedirectToAction("Index"));
        }
        ViewBag.Message = BuildMessage(token, 50);
        return View();
    }

    public IActionResult Error()
    {
        ViewBag.Message = "An error occured...";
        return View();
    }

    private string BuildMessage(string stringToSplit, int chunkSize)
    {
        var data = Enumerable.Range(0, stringToSplit.Length / chunkSize).Select(i => stringToSplit.Substring (i * chunkSize, chunkSize));
        string result = "The generated token is:";
        foreach (string str in data)
        {
            result += Environment.NewLine + str;
        }
        return result;
        }
    }
Refer to the code listing of the HomeController class in Listing 6. The BuildMessage method is used to split the generated token in multiple lines. The GetUser method of the HomeController class calls the GetUser method of the UserRepository class to retrieve an instance of the UserDTO class based on the user credentials entered in the Login screen shown in Figure 3.
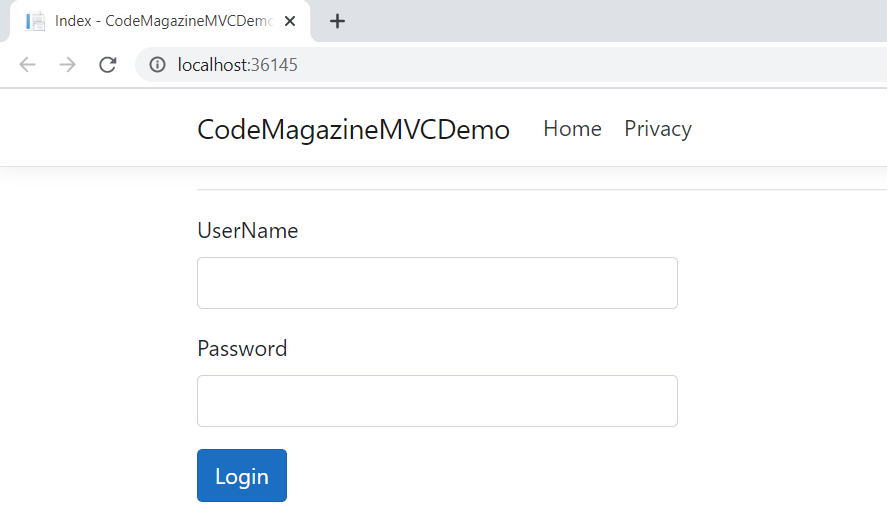
Run the Application
Now run the application by pressing on Ctrl + F5 or just F5. Figure 3 shows how the output looks in the Web browser.
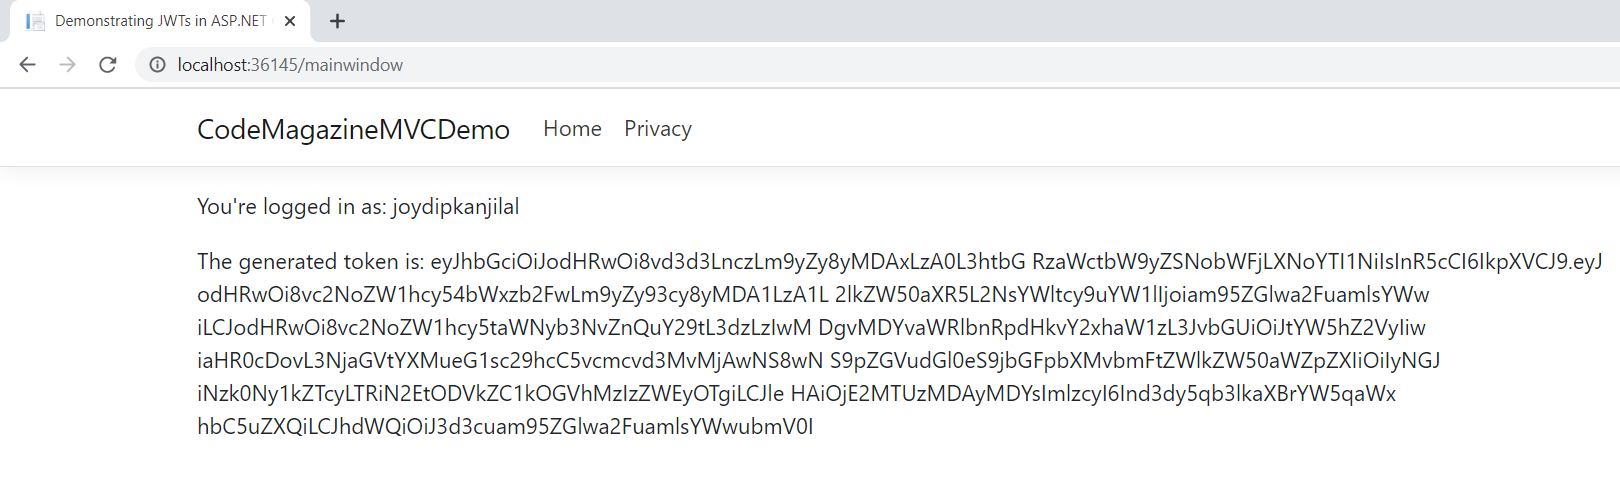
Once you specify the user's credentials and click on Login, you'll be redirected to another Web page that shows the name of the logged in user and the generated token, as shown in Figure 4.
Summary
JSON Web Token (JWT) is an open standard (RFC 7519) that defines how you can securely transfer information between two parties. You must use SSL/TLS together with JSON Web Tokens (JWT) to combat man-in-the-middle attacks. In most cases, this should be sufficient to encrypt the payload before it is transferred over the wire. You can take advantage of JWT as an additional layer of security as well.
