


Azure Storage is one of the key services in Azure. I don't remember when it was introduced in Azure, but it was right around when Azure was introduced, so it's been around for a while. As a result, many customers, and I'm sure many services that Microsoft has built for themselves, and Microsoft's customers, have taken a dependency on Azure Storage. What this means to you as a customer is an assurance that this, because it's a key component of Azure, will always get the attention it needs. Not only that, but here's something else we love to hear: It's cheap and it's versatile.
Azure storage has many components. You have Azure Blobs, which is a massively scalable object store for text and binary data. Azure Data Lake Storage Gen 2 for big data analytics also uses Azure Blobs. You have Azure Files, which are managed file shares for cloud and on-prem deployments. Think of this as the network share, but in the cloud. You have Azure Queues, which is a messaging store for reliable messaging between application components. You have Azure Tables, which is a NoSQL store for schema-less storage of structured data. And you have Azure Disks, which are, as the name suggests, storage volumes for Azure virtual machines.
Now when it comes to securing Azure Storage, you need to group the conversation into two halves. First, around authentication and second, around encryption. First, let's tackle authentication.
Authentication
The classic definition of authentication is identifying the user. For the purposes of this article, I'll relax the definition a little bit. Here, I'm going to talk about how you gain access to Azure storage. I'm mixing authorization and authentication concepts for simplicity.
There are many ways to authenticate with Azure storage. I'll just name them here and then talk about them more fully in a moment.
First, there's anonymous access. This is technically not authentication, but it's useful when you're serving images on a website or similar scenarios.
Second is authorization using a shared key. This is not my favorite authentication mechanism because it's hard to secure.
Third is shared access signature, or SAS for short. This is somewhat better than shared key.
Fourth is authentication using Azure Active Directory. This is by far my favorite way of accessing Azure storage.
And finally, specific to Azure files, you have Azure AD-based authorization over SMB, or you can use Azure Active Directory domain services.
Anonymous
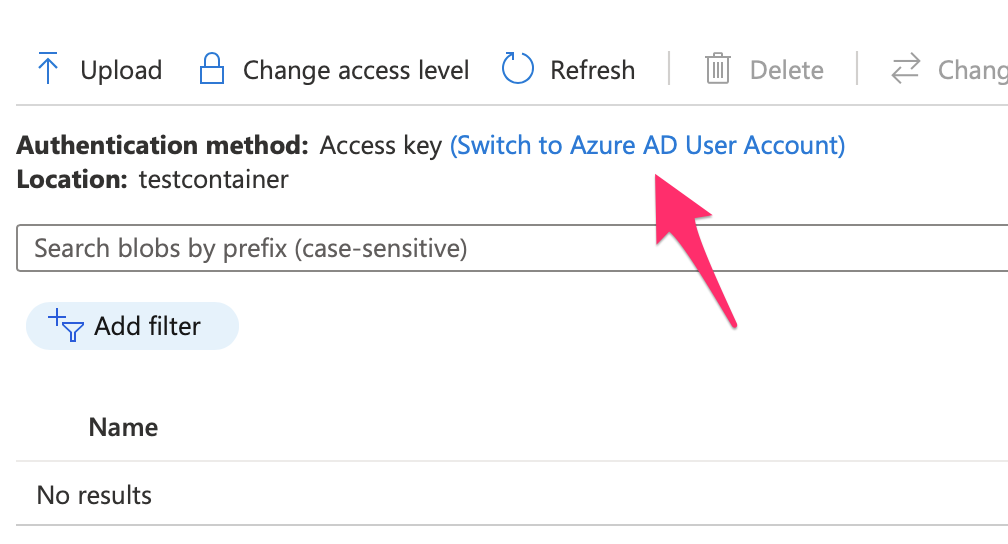
Anonymous is exactly what the name suggests. Using a simple GET request to an HTTP URL, you're able to access Azure storage contents. Knowing that Azure storage can be backed with a CDN (content delivery network), this gives you world-class storage for your website and other systems for just pennies. You can set anonymous access very easily on a container by clicking on the change access level button. This can be seen in Figure 1.

Shared Key
A shared key is a very long string. You can simply access Azure storage by using this long string. It's almost like a password. Actually, it's worse: this is a master password. It gives you all sorts of rights on the Azure storage account. You can imagine why this isn't my favorite mechanism of accessing Azure storage. What happens when this key is compromised? You don't get an alert. Perhaps you can set up monitoring to see misuse of your Azure storage account. But it's still less than an ideal situation. Alerts will tell you of damage after it has already occurred.
Still, you can't beat the convenience of a simple password. Azure storage accounts give you a pair of access keys when you provision the storage account. This can be seen in Figure 2.
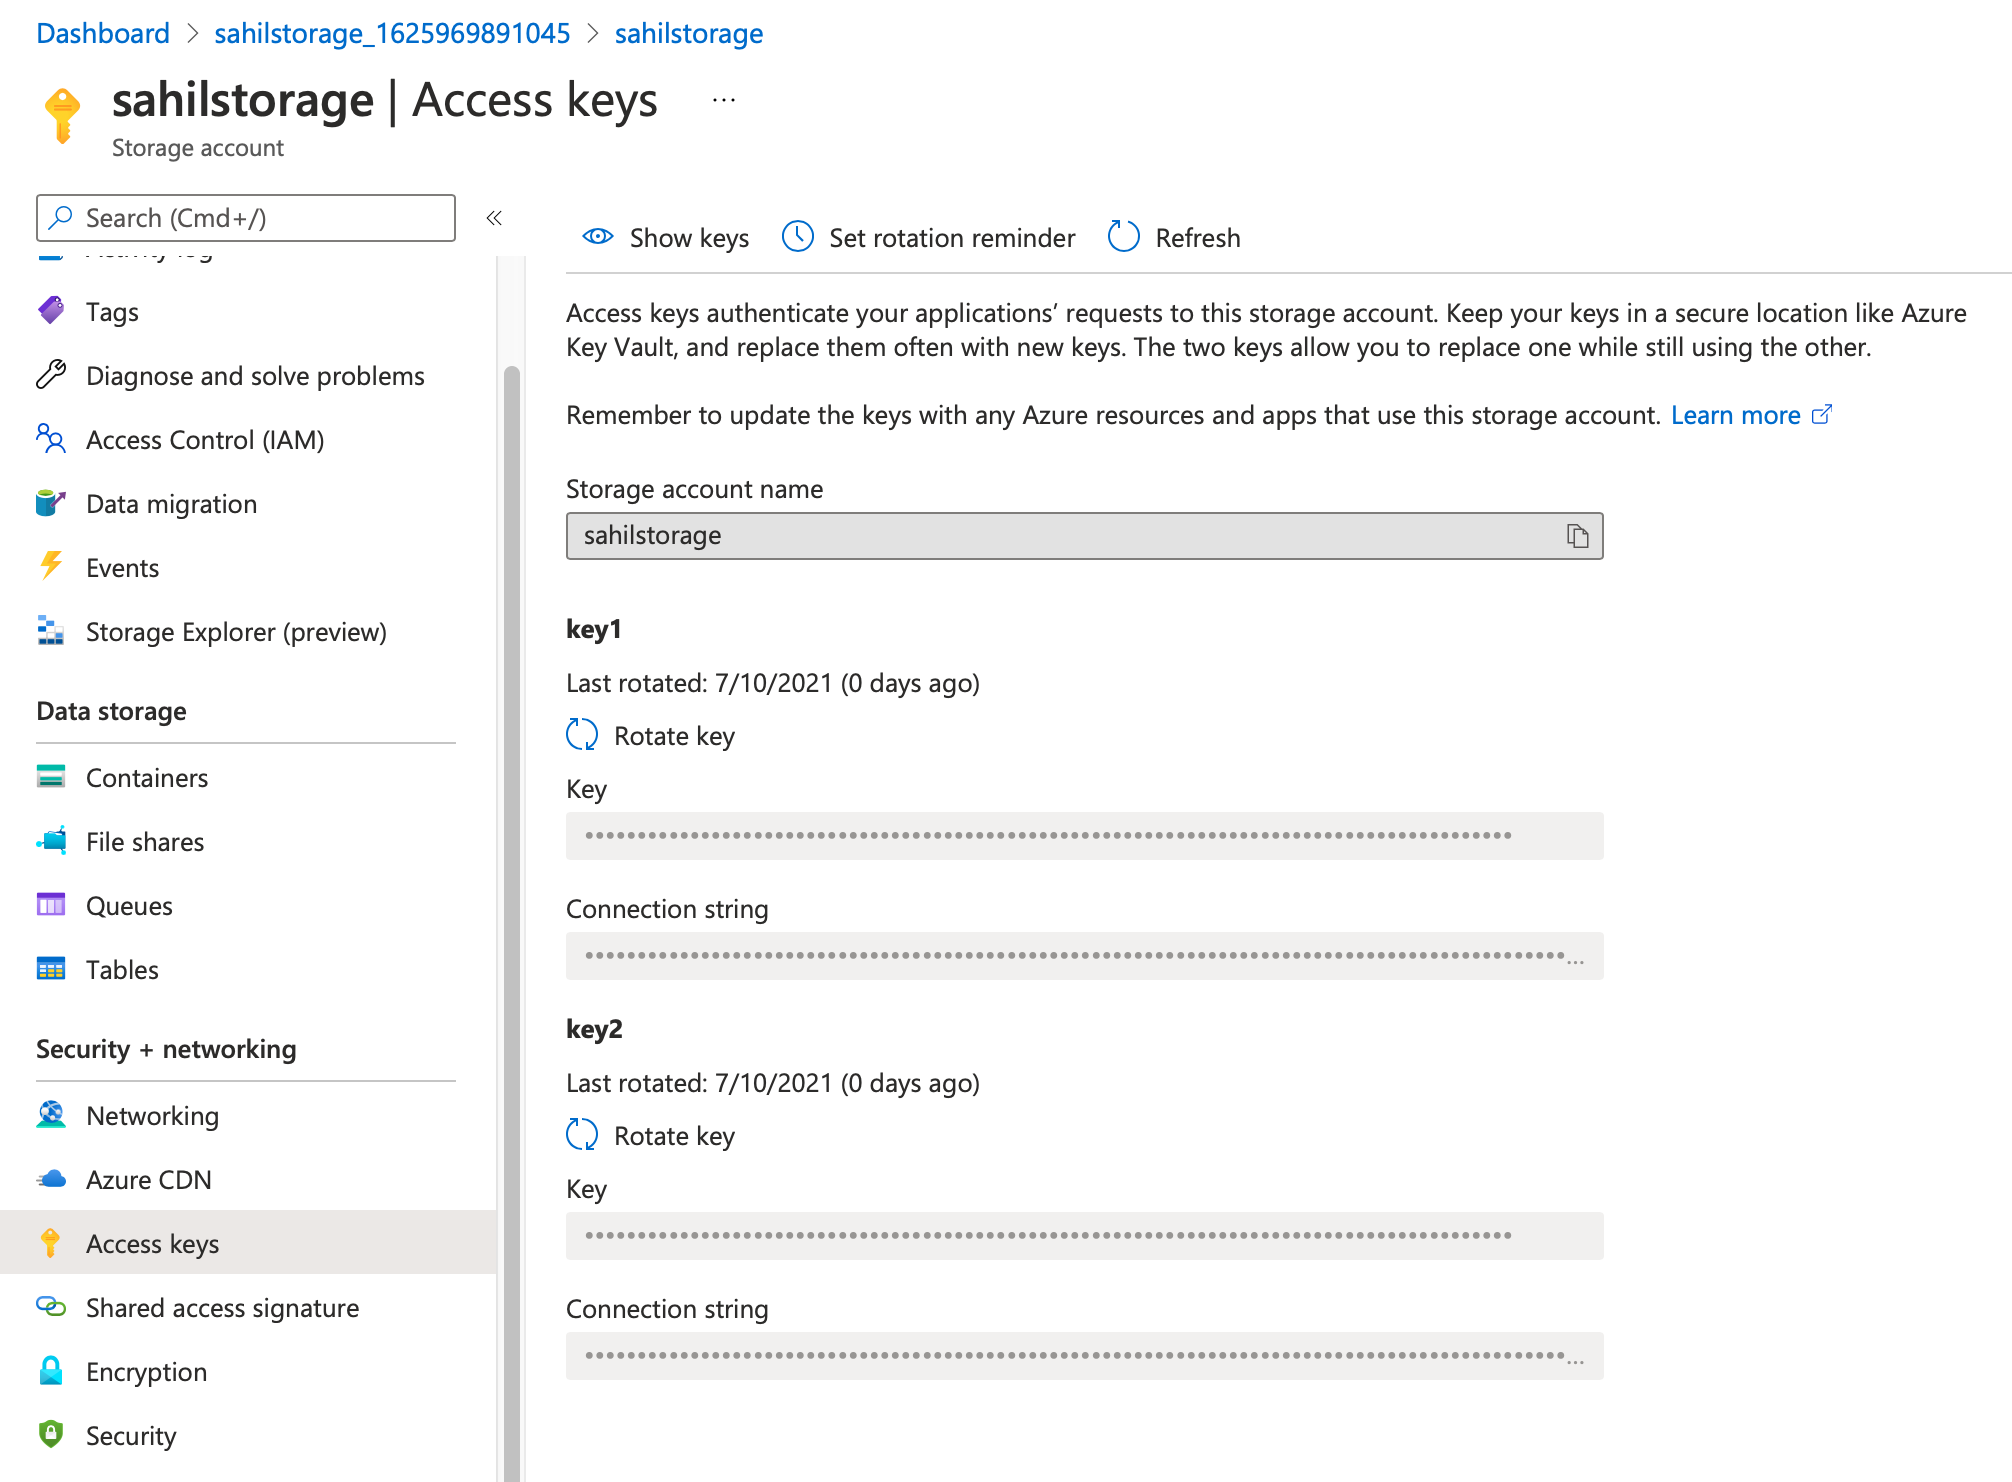
These two keys are identical in their capabilities. They give you two keys to facilitate rotation. The idea is that when you intend to rotate one key, applications can continue to operate with the second key. You distribute the second key in advance of rotating off of the first key. Once you have rotated off of the first key, your applications start using the new first key, and you can subsequently rotate the second key.
As you'll see later, using Azure Active Directory-based authentication for Azure storage is a much better mechanism for accessing Azure storage. Using that mechanism, you access Azure storage using an access token. And that access token is tied to either a user identity or a service principal identity that can also be a managed identity. This means that your applications can request access to Azure storage without you ever having to manage a credential. No credential to manage, no credential to leak. Of course, this depends upon following the best practices established by Azure Active Directory, but at least a very secure implementation is possible using that mechanism. More on that later.
For now, let me just say that if you must use key-based access, I highly recommend that you store this key in a key vault. And that you access this key using a managed identity.
Shared Access Signature
A shared access signature (SAS) is somewhat better than a shared key. It lets you create secure delegated access to resources in your storage account. With SAS, you can have granular control on what and how your client can access data. For example, you can restrict what resources the client can access, or what permissions they have to the resources, or even how long the provided SAS is valid. This makes it a better alternative to a shared key for many scenarios.
A SAS key, while having a narrower scope than a shared key, must still be protected like a shared key. This means that you should prefer to use best practices, such as key vault and managed identities, to secure access to shared access signatures and prevent unintended distribution or leakage of SAS keys.
There are three kinds of SAS: user delegation, service, and account.
A user delegation SAS is secured with Azure AD credentials and specific permissions specified for the SAS. When a client accesses storage resources using a user delegation SAS, the request to Azure storage is first authorized with Azure AD credentials that were used to create the SAS. The RBAC (role-based access control) permissions granted for that Azure AD account, together with the permissions explicitly granted on the SAS, determine the client's access to the resource. The effective permissions are an intersection of the permissions granted to the security principal and the permissions granted on the SAS resource.
The biggest advantage of using a user delegation SAS is that you don't need to store the account access key in your code. This makes it a highly preferred approach for securing access to Azure AD.
A service SAS delegates access to a resource in a specific Azure storage service, such as blob, table, or queue for files. The URI for a service-level SAS consists of the URI to the resource for which the SAS will delegate access, followed by the SAS token. Additionally, you can embed information in the query string that lets you specify additional criteria, such as the resource that the client can access, the permissions, and the time interval validity.
An account SAS requires the client application to possess the account key and it allows account-level operations that are usually not possible with a service account SAS. For example, accessing more than one service, such as both blob and storage, with a single SAS key.
As you can see, SAS keys are a better alternative than account keys because they let you carve out a narrower scope of access and bind it with constraints, such as time. But this leaves me with a nagging question. What if you create a SAS key, issue it, and then it gets compromised? Is there anything you can do as an administrator from the server side after such a SAS key was generated? This is exactly what stored access policies let you accomplish. A stored access policy gives you an additional level of control over service-level SAS keys. The idea is that you can issue SAS keys but bind them to a server-side policy. Using this policy, you can then change the start time, expiry time, permissions, or even revoke it after the SAS key is issued.
What if you create a SAS key, issue it, and then it gets compromised? Stored access policies let you correct it from the server side.
Azure Active Directory
Azure Active Directory is a central part of the Microsoft identity platform. Not only is it used by customers around the world, but it's also used for various critical Microsoft systems. As a mature identity platform that processes billions of transactions, it's responsible for running some of the most critical infrastructure around the world, and you can be assured that it's a safe platform to rely on when it comes to protecting your assets.
It's therefore no surprise that securing access to Azure storage via Azure Active Directory is a pretty good alternative. Here are some advantages of using Azure Active Directory to secure access to Azure storage.
- The paradigm works for both user accounts and system accounts, also known as service principles. This means that you can leverage user RBAC for interactive applications, or power services accessing Azure storage protected by Azure Active Directory.
- You no longer have to manage credentials. You get to use every facility that Azure Active Directory offers you. This means you can use concepts such as multi-factor authentication for users, or even go passwordless. And for service accounts, you have the option of using managed identities where you don't have to manage credentials yourself.
- You are protected using features such as conditional access. This gives you best-in-the-world capabilities for protecting key critical assets.
- You can use products such as Azure Sentinel and all monitoring capabilities of Azure Active Directory. This means that you have the power of artificial intelligence powered by billions of transactions analyzed by Microsoft, all keeping your data secure.
- You have every other facility of Azure Active Directory at your fingertips. For instance, using entitlement management and asset reviews paired with privileged identity management, you can be assured, as an administrator, that your data is securely locked down to only the applications that should have access to it. Additionally, you have an audit log telling you exactly what permissions were changed at what time.
- Last but not least, Azure Active Directory is a modern identity platform. This means that it supports all the modern authentication protocols you care for, and it comes with great support in great SDKs that allow you to easily integrate access to Azure Storage, protected by using Azure Active Directory in your custom applications on any platform.
Can you tell that this is my favorite way of securing storage to Azure Storage? Let's dive in deeper by understanding how you can protect access to Azure Storage using Azure Active Directory.
There are three main steps involved:
- Register and configure an application.
- Setup permissions in Azure Storage.
- Write the code to put it all together.
Let's start with registering and configuring your application.
First, the application is going to need an access token. This access token will be issued by Azure Active Directory. And although it's issued to the application and the logged-in user, the access token is intended to be used by Azure Storage. To put it generically, Azure Active Directory needs to issue an application consumable by a specific API. Azure Active Directory already knows about the API. This API is Azure Storage. But it knows nothing about your application. So, the first thing you need to do is inform Azure Active Directory of the application. This process is called app registration.
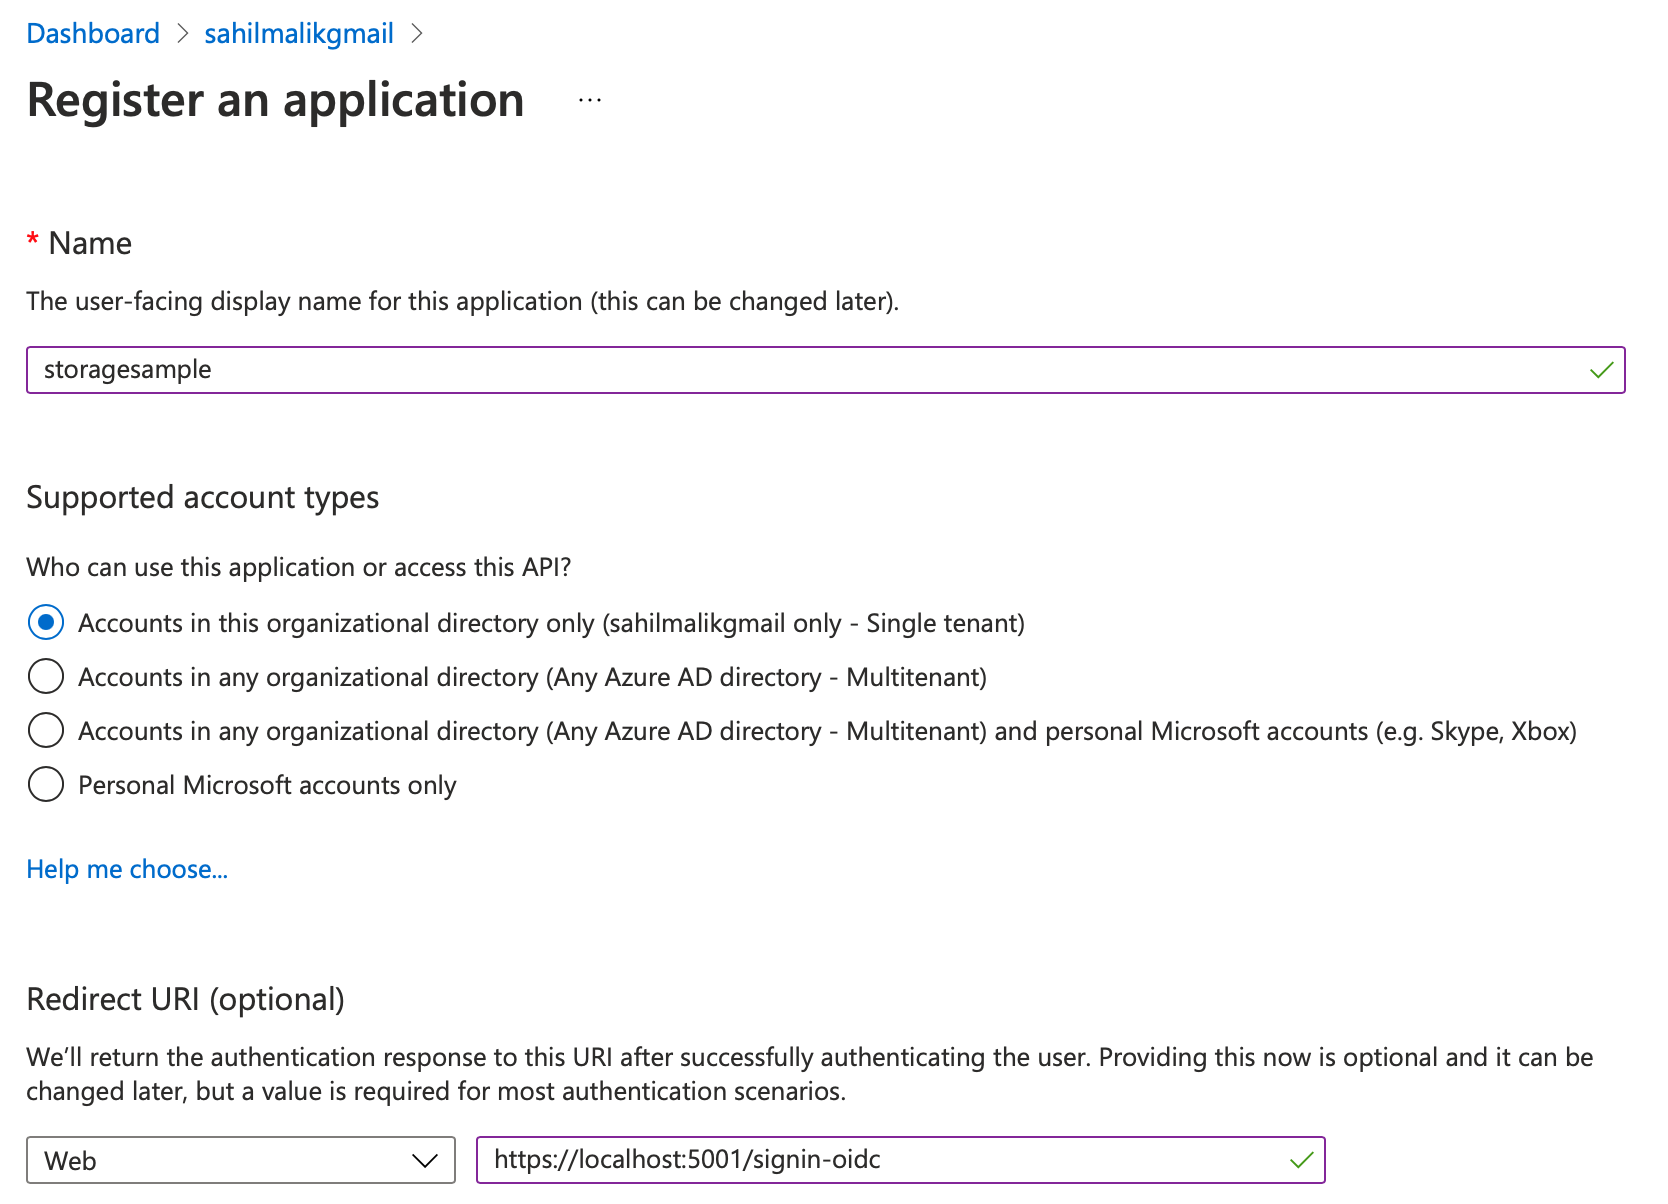
Go ahead and log into your Azure portal, navigate to Azure Active Directory, and navigate to the app registration area. Choose to register a new application; I'll call it storagesample.
When registering an application in Azure Active Directory, you can optionally specify a redirect URI. Let me explain what that does. These days, most modern authentication scenarios use OpenID Connect. OpenID Connect isn't a single protocol; in fact, it's a grouping of many protocols, and the list continues to increase slowly over time to accommodate new standards and scenarios. The good news is that this is a well-accepted group of standards that no single company owns. Specifically, my scenario over here is a Web application, also known as a confidential client because it can store secrets securely, which will allow a user to log in and request an access token that has the ability to talk to Azure storage. In order to do, so I'll use a specific OpenID Connect flow, called the auth code flow. When you use the auth code flow, Azure Active Directory is going to send you some important bits of information. Specifically, it'll send you an authorization code, an id_token reflecting the user's identity, and an access token. It may also send you a refresh token if you ask for it. All of these tokens are sent to you over standard HTTP protocol. Azure Active Directory needs to know where to send these tokens. These tokens are sent to a white-listed list of URIs known as redirect URIs. They must be HTTPS and they can't use wildcards.
In this case, in my development environment, I'll choose to send the tokens to a URI, where the application is listening for them. This URI in this case will be https://localhost:5001/signin-oidc. Therefore, in your application registration, go ahead and provide the redirect URI as https://localhost:5001/signin-oidc. This can be seen in Figure 3. This is, of course, re-configurable in the code and in the app registration.
Once the application is registered, note down a few things from the registration screen. Specifically, note down the client ID and the tenant ID. You're going to need these in your application when you request a token. These can be seen in Figure 4. Ensure that you don't confuse ObjectID for client ID.

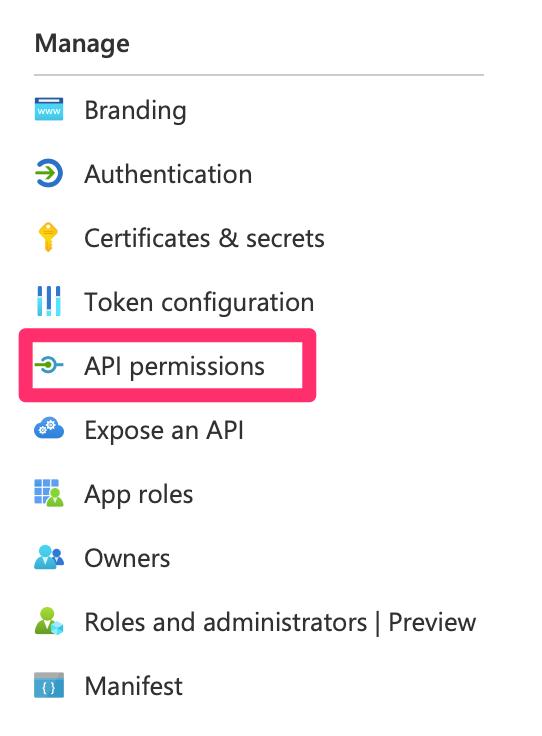
Once the app registration is done, you need to allow your application to call certain APIs. Specifically, in this case, you wish to call Azure storage under the user's permission. To do so, navigate to the API permissions area under your app registration section. This can be seen in Figure 5.
Once in that section, locate the “Add a permission” button, and look for Azure storage. Notice that there are many APIs exposed by Microsoft. You can use similar concepts to call any other API exposed by Microsoft. In fact, you can also choose to expose your own APIs, and grant access in a similar fashion. I'll leave that for another day. For now, as shown in Figure 6, locate the Azure storage section under APIs.
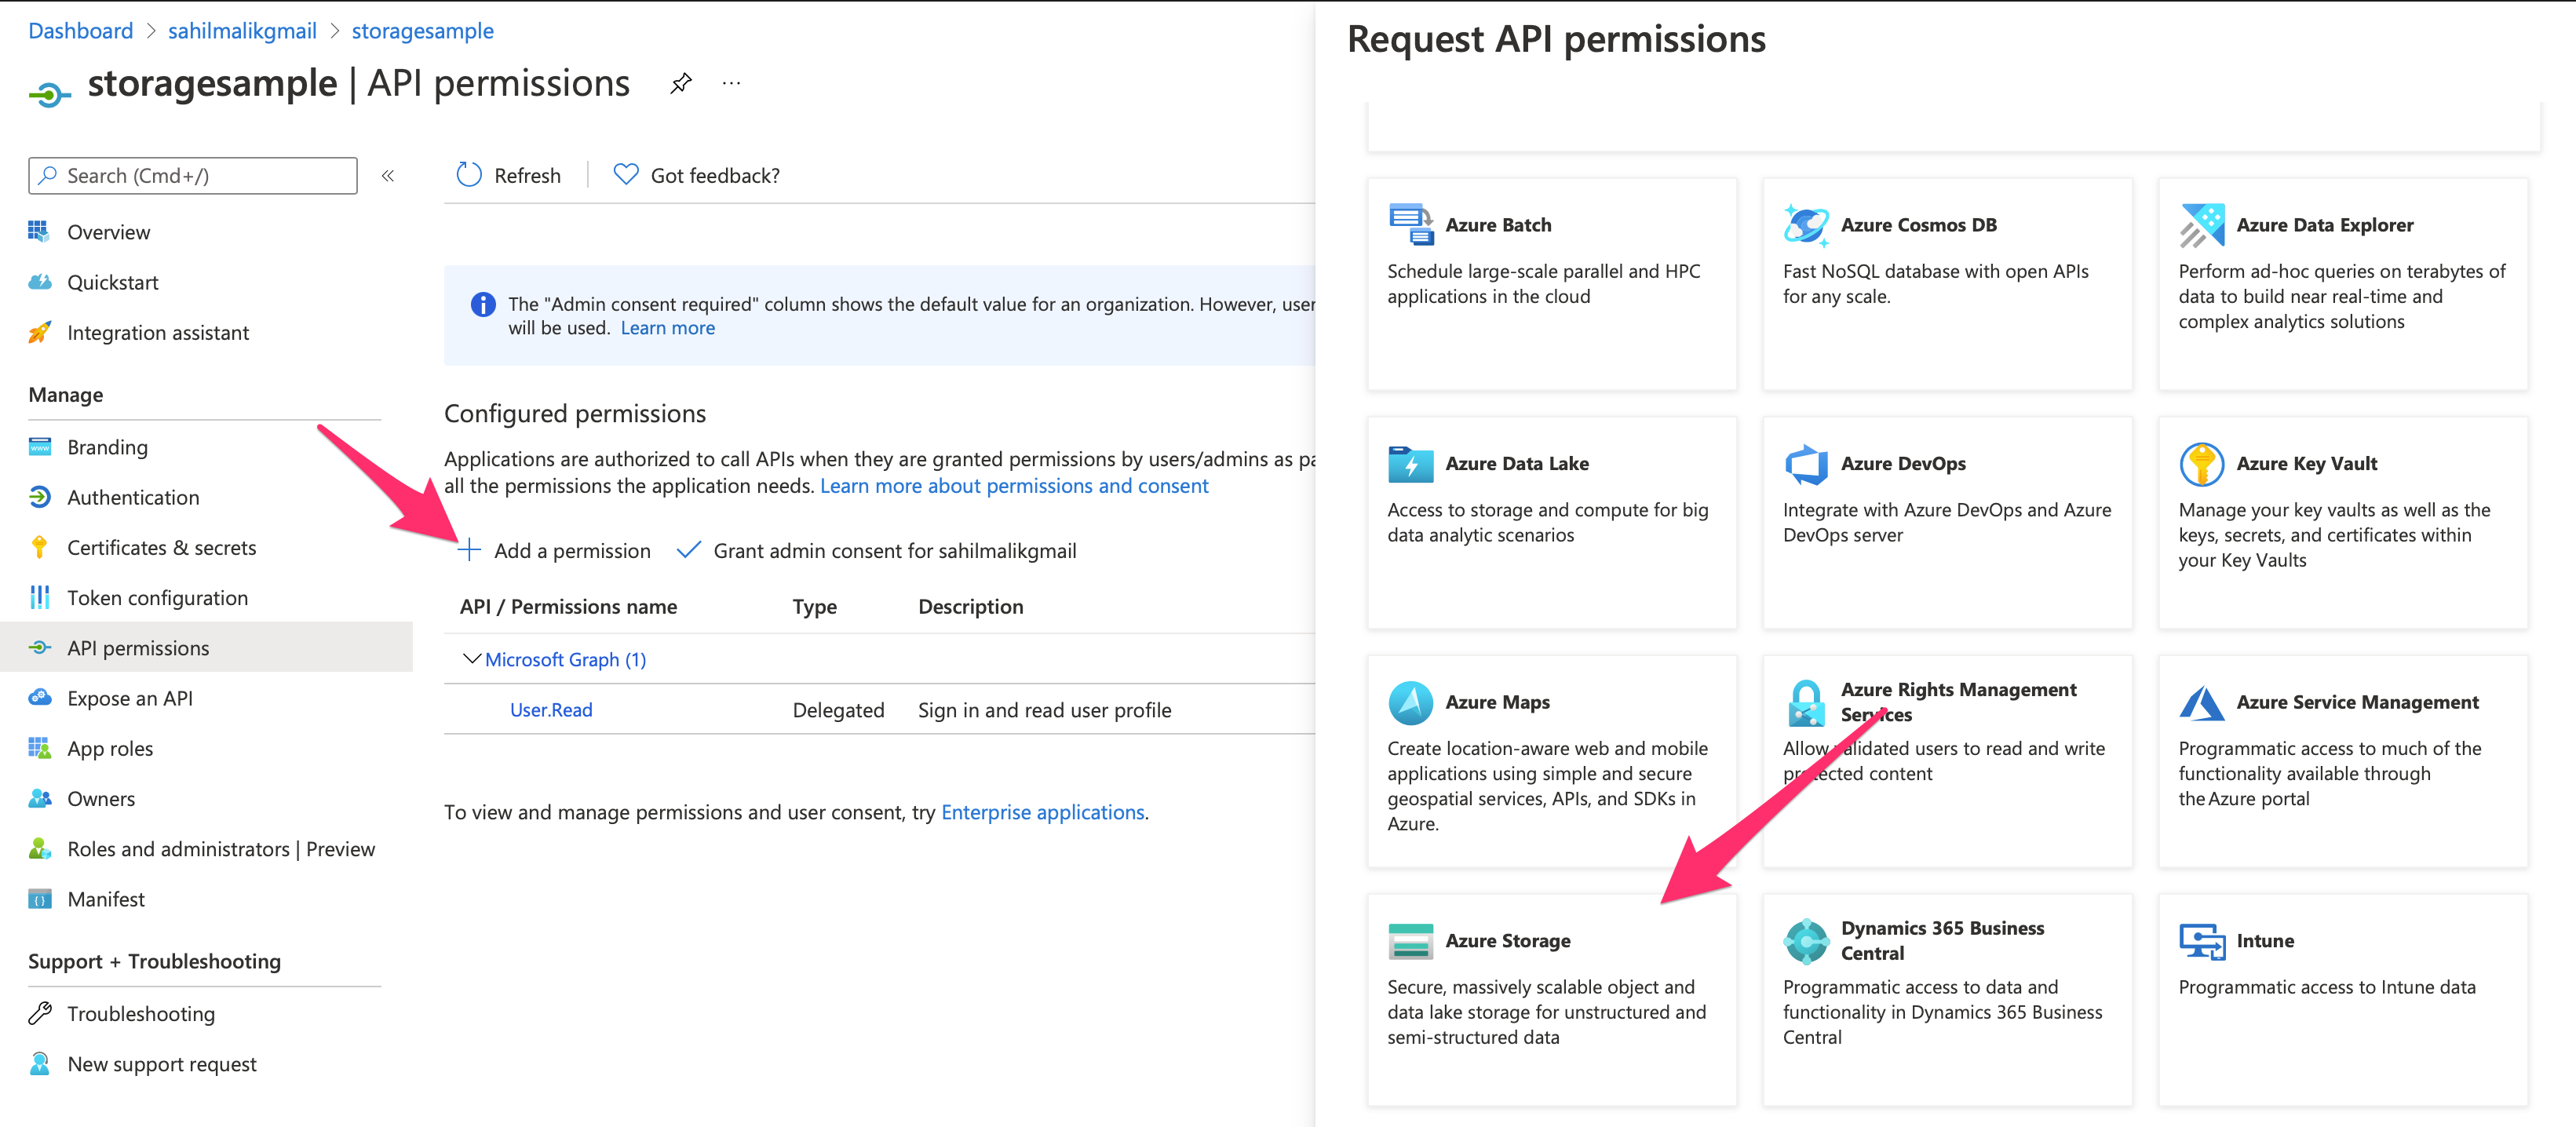
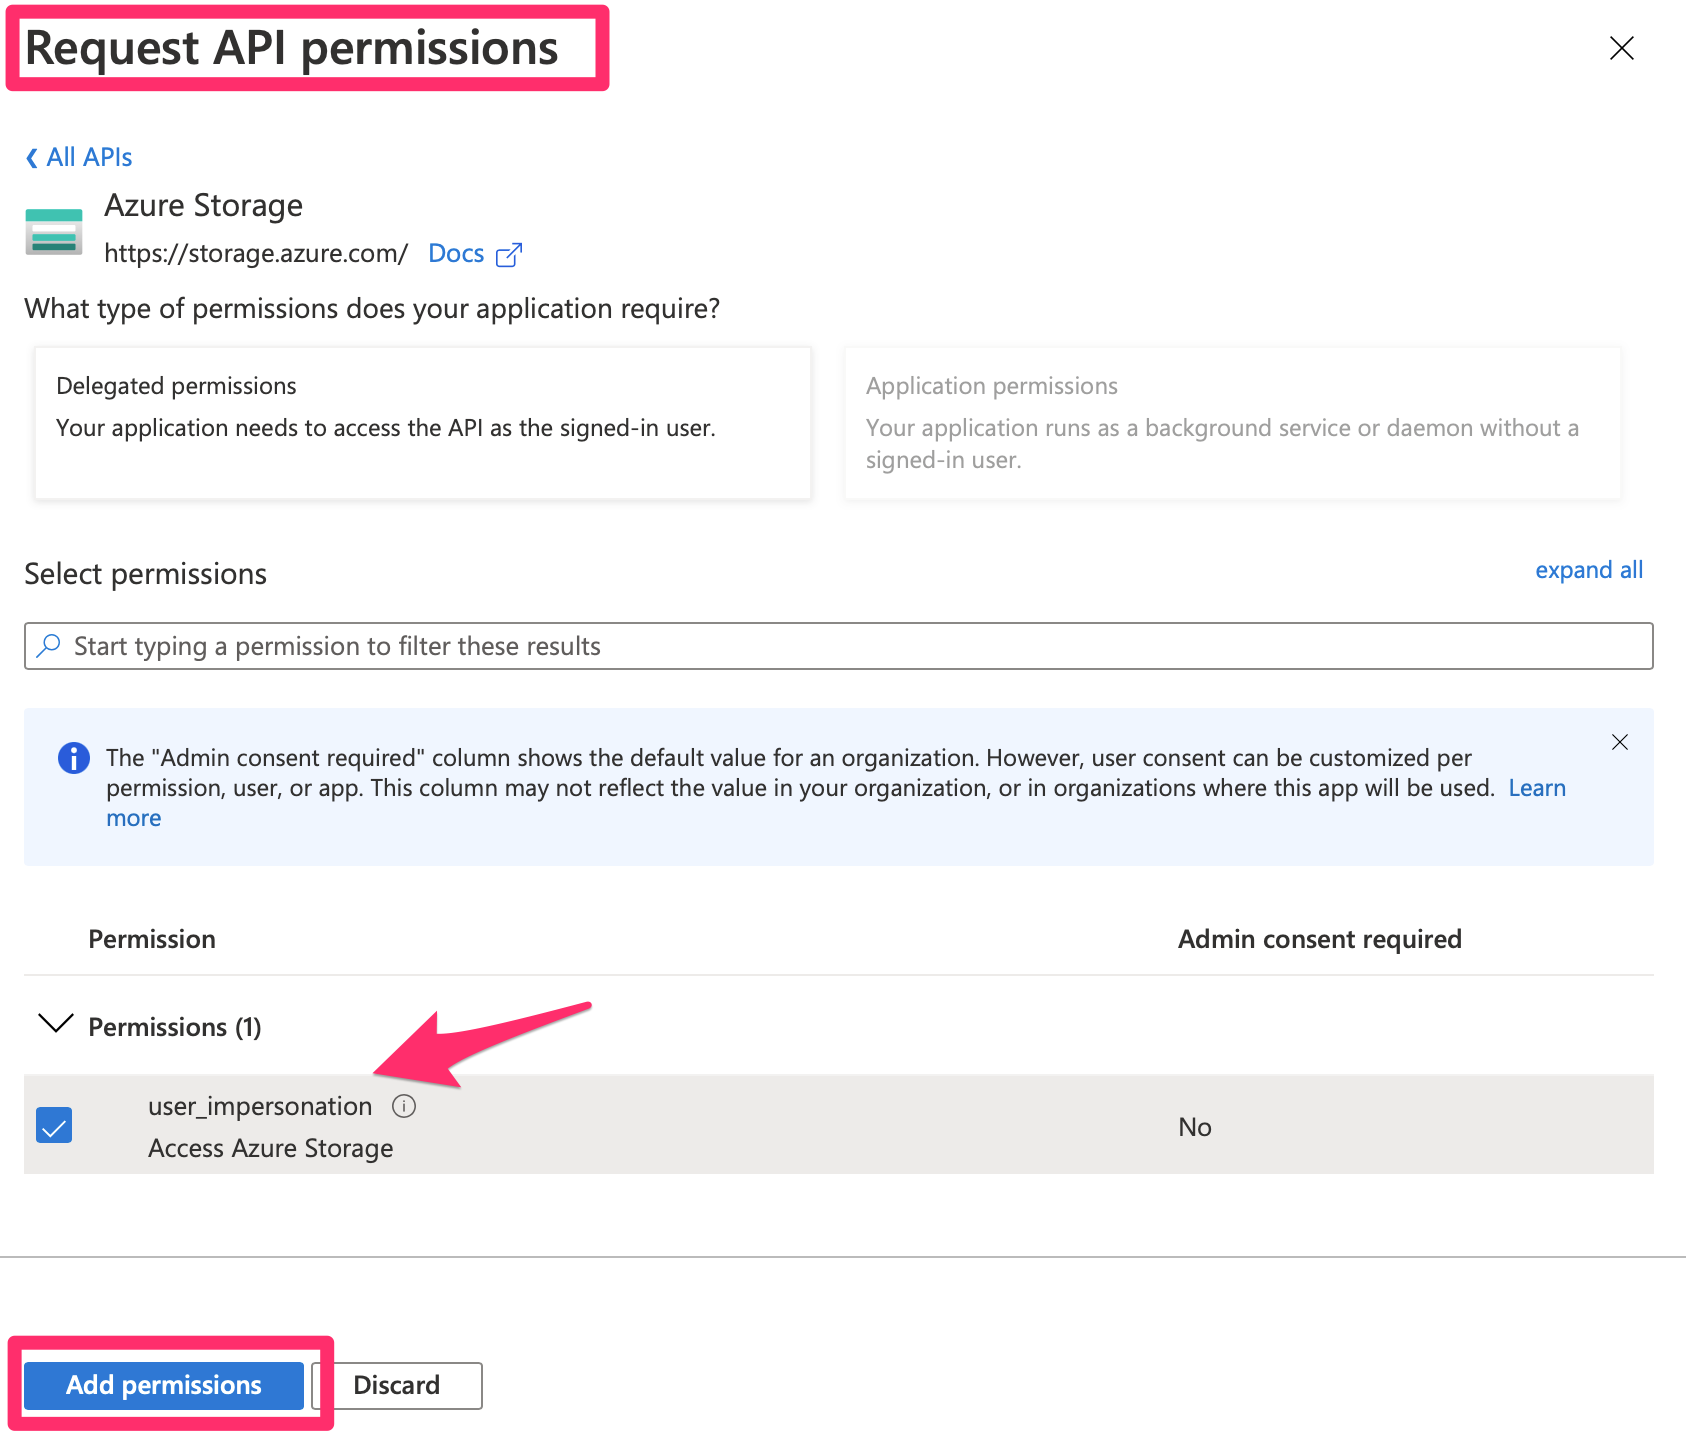
Any API author has a choice of exposing one or more scopes. Azure storage has chosen to expose a special scope called user_impersonation. Go ahead and choose to add that permission. Now, this is a little bit of a confusing concept. As can be seen in Figure 7, the title says Request API permissions and the button says Add permissions. By performing this action, you are requesting permissions. The permissions aren't ready to use until somebody consents to them. In this case, either the user or an admin can consent to them. As you can see from Figure 7, when asking for the specific permission, the column “Admin consent required” says “No.” This means that either a user or an admin can consent to such a permission.
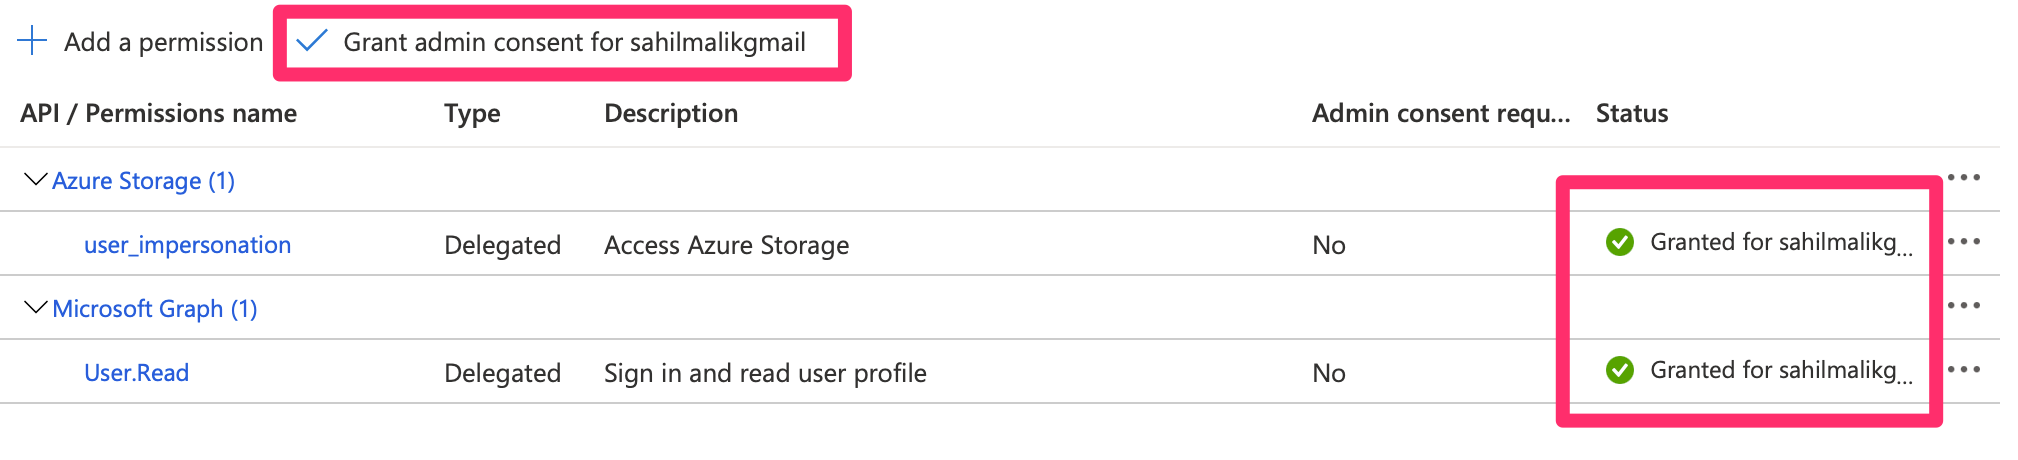
You just requested permission. Now you have a choice. Either you can allow the user to consent to the permission when using the application, or you can have an administrator grant this permission ahead of time. It's not uncommon to see administrators turn off the ability for users to consent to permissions on their own. While still in the API permissions area, go ahead and click on the “Grant admin consent” button. You should see a green check mark indicating that a certain permission has now been granted. This can be seen in Figure 8.
There are just a couple of more things you need to do in the app registration that are specific to the auth code flow you're using. First, you need to create a client secret. In your application registration area, on the left side, you should see a section called “Certificates & secrets.” Choose to create a new client secret and save that value somewhere. You're going to need it shortly. It's worth pointing out that auth code flow with PKCE is slightly superior and doesn't require such a secret. No secret to manage, no secret to leak. But I'm getting way too deep into authentication protocols here.
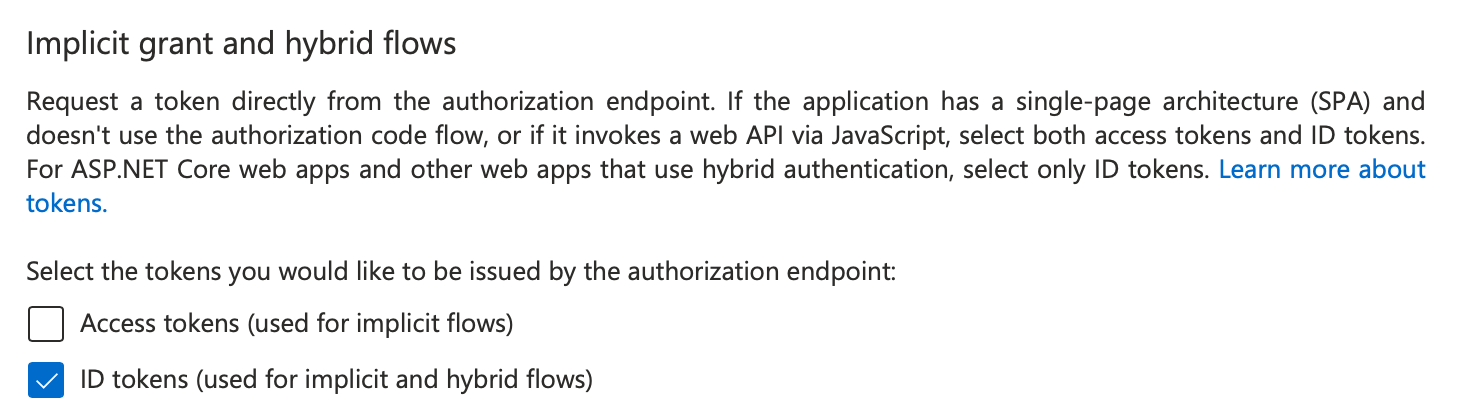
Finally, in your app registration/authentication section, check the ID tokens checkbox under “Implicit grant and hybrid flows.” This can be seen in Figure 9. Remember to hit “Save” at the top of your app registration screen.
This finishes your Azure active directory app registration.
Now, let's move to the next step, which is configuring Azure Storage permissions.
Thankfully, these steps are a lot easier. If you haven't already done so, go ahead and create a storage account, and in that account, create a container. In my case, the name of my storage account is sahilstorage, and the name of the container is testcontainer.
In this container, first grant yourself “Storage Blob Data Contributor” role. Next, navigate to the container overview page, and choose the authentication method to “Switch to Azure AD account” This can be seen in Figure 10.
Now any user that needs to write to that container will also need the “Storage Blob Data Contributor” role. So, you can either choose to test the rest of the application using the currently logged in user or grant permissions to a new user.
Finally, let's write some code. Because OpenID Connect is an open and well-accepted protocol, you can use any platform to write your application. I'll be showing you these instructions in .NET Core 5.
Start by creating a new Web application with single tenant authentication using the command below.
dotnet new mvc -au SingleOrg
Also go ahead and install the following NuGet package.
dotnet add package Azure.Storage.Blobs
Also, although the generated code already includes a NuGet reference to Microsoft.Identity.Web, ensure that you're on the latest Microsoft.Identity.Web and Microsoft.Identity.Web.UI. The minimum version my code will work with is 1.14, and the project template currently references 1.1.0.
You can do this easily by issuing the following commands
dotnet add package Microsoft.Identity.Web
dotnet add package Microsoft.Identity.Web.UI
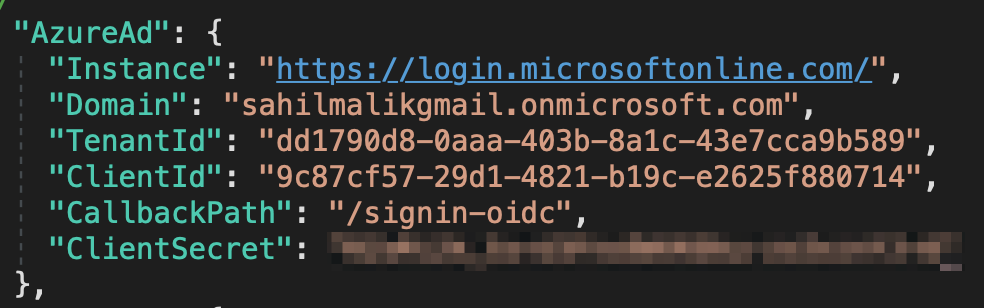
Now open the project in either VSCode or Visual Studio and edit the appsettings.json file with the ClientID and TenantID you'd copied earlier. These settings can be grabbed from Figure 4. For the domain, enter your Azure AD domain in a format similar to <tenantname>.onmicrosoft.com. Finally, in appsettings.json, add a new item under the “AzureAd” section, called “ClientSecret”, and add the secret you'd added earlier in your app registration. When you're done, your appsettings.json should look similar to Figure 11.
Now the bulk of my changes will go in HomeController.cs. But before I dive in there, I need to make some minor changes in Startup.cs. Specifically, I need to allow token acquisition for downstream APIs. That's a mouthful. In short, all it means is that you need a variable ready for a TokenAcquisition class, which will make it convenient for you to request tokens for Web APIs that you wish to call. Also, you'll need some kind of cache to hold your tokens, and the simplest one that needs no configuration is an in-memory cache. The downside of an in-memory cache, of course, is that when the application pool recycles, you lose your cache. This causes an extra hit on the Azure AD endpoints because your application will need to request tokens again. In heavy workload applications, you should prefer to use a distributed cache, such as redis, which Microsoft.Identity.Web fully supports. For this little test app, let's just include in-memory cache.
All this complex stuff can be abstracted into a very minor change in the Startup.cs, as shown below:
services.AddAuthentication(OpenID connectDefaults.AuthenticationScheme)
.AddMicrosoftIdentityWebApp(Configuration.GetSection("AzureAd"))
.EnableTokenAcquisitionToCallDownstreamApi(null)
.AddInMemoryTokenCaches();
Specifically, I added EnableTokenAcquisitionToCallDownstreamApi and AddInMemoryTokenCaches.
Now, let's jump over to the HomeController.cs. Add a method that creates a blob, as shown in Listing 1. Be mindful to include the blob URL that matches your Azure tenant and subscription. And in the GET for Index, you need to ask for a token, which you'll pass into the CreateBlob method.
Listing 1: HomeController.cs creating a blob
private static async Task<string>
CreateBlob(TokenAcquisitionTokenCredential tokenCredential)
{
    Uri blobUri = new("https://sahilstorage.blob.core.windows.net/testcontainer/Blob1.txt");
    BlobClient blobClient = new BlobClient(blobUri, tokenCredential);

    string blobContents = "Blob created by AAD authenticated user.";
    byte[] byteArray = Encoding.ASCII.GetBytes(blobContents);

    using (MemoryStream stream = new(byteArray))
    {
        await blobClient.UploadAsync(stream);
    }
    return "Blob successfully created";
}
Let's inject the ITokenAcquisition instance in the constructor first. This can be seen in Listing 2.
Listing 2: Injecting an instance of ITokenAcquisition
public HomeController(ILogger<HomeController> logger, ITokenAcquisition tokenAcquisition)
{
    _logger = logger;
    _tokenAcquisition = tokenAcquisition;
}
All that's left to do is modify the Index() method so whenever an HTTP GET is executed on the HomeController, a blob is created. This can be seen in Listing 3, which is especially interesting. Here we create a blob: That part is easy. The AuthorizeForScopes attribute is at the top. That attribute is basically saying that if the user hasn't yet consented for a certain scope, ask them to consent.
Listing 3: Creating the blob
[AuthorizeForScopes(Scopes = new string[] { "https://storage.azure.com/user_impersonation" })]
public async Task<IActionResult> Index()
{
    string message = await CreateBlob(
    new TokenAcquisitionTokenCredential(_tokenAcquisition));
    ViewData["Message"] = message;
    return View();
}
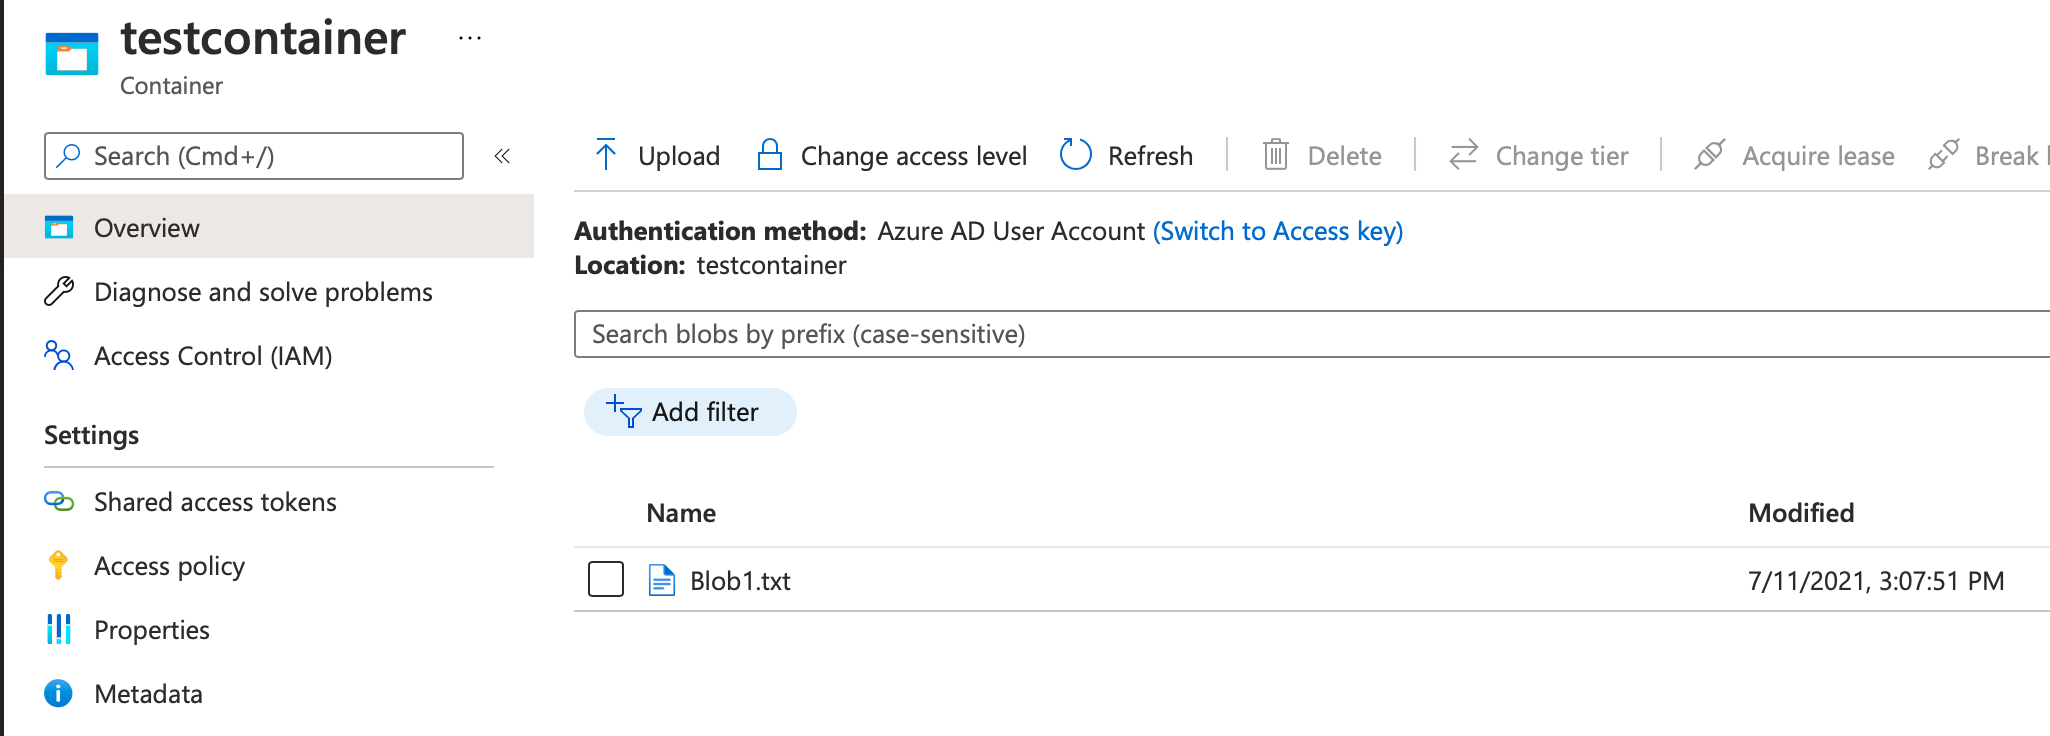
Now go ahead and run the application. Because you've already done admin consent, you won't be prompted for consent again. Feel free to revoke admin consent and see what a runtime consent looks like. Once the Home controller loads, go to your “testcontainer” and verify that a blob is created, as shown in Figure 12.
This is quite incredible. It's like we've achieved nuclear fusion. You were able to write to Azure storage, completely protected by Azure AD authentication.
Encryption
Now let's switch gears and talk about the other aspect of security in Azure storage. There are two parts to encrypting data. The first is encryption in transit and the second is encryption at rest.
When I talk about encryption in transit, I mean that when data flows from one computer to another, it must be encrypted. This is to ensure that only the sender and receiver are the two parties that can read that data. There should be no man-in-the-middle attacks. This is achieved by creating an HTTPS tunnel. In fact, when you use Azure storage, you must use HTTPS. There's no way around it, even for development purposes.
When I talk about encryption at rest, this means that by default, Azure Storage encrypts your data for you. This data is encrypted using a key that's managed by Microsoft and is completely transparent to you. You can't turn this encryption off. However, some customers wish to have further control. They want to specify their own key.
Azure storage allows you to specify your own key stored in a key vault as well. In fact, you can even choose to allow the customer to provide their own key store. This allows customers to have complete control over the keys, and then they are responsible for the security and rotation of those keys. It's worth pointing out that, at the time of writing this article, Microsoft managed keys work with all aspects of Azure storage. Keys stored in a key vault can be used to encrypt blob storage and Azure files, whereas customer-managed keys can be used to encrypt Azure blob storage.
Summary
There are hostile neighbors and there are hostile nations. When you're walking in a shady neighborhood in a metropolis, you watch over your shoulder, don't you? Imagine that you have a neighboring country - I'll pick the example of North Korea and South Korea. They don't exactly get along very well. Although I'm not privy to the details of what goes on at the border there, I'm pretty sure they're watching each other carefully. They have walls, binoculars, and soldiers, they have barbed wires, and they have guns pointed at each other. Border protection isn't such a concern for a peaceful country sitting in northern Europe where it's too cold to fight. In Finland, they just sit in saunas all day and play in the snow. Between them and North Korea there's just one country: Russia.
Now this example may be a little extreme, but I'd like you to sit back and think for a moment. On the Internet, everyone is everyone else's neighbor. And hackers can create a lot of damage at the speed of light, making less noise than a snake. We see this almost daily, in ransomware attacks, data leaks, you name it. And the damage is immeasurable.
Personally, it's frustrating to me how little attention is given to security for most of our enterprise systems. Everyone talks about features, but hacks happen every day, and the risk and damage for those hacks is shifted onto the consumer, who seldom appreciates the potential damage until it's too late.
We need to hold corporations and governments responsible for securing our data. I won't use a computer system unless I'm assured of its security, and you should be that cautious too. Remember this: Information leaked once is like opening a Pandora's box - you can't undo the damage.
As developers, we can play another very important role. We can lead with trust. We can do our part by building systems that have security in the very forefront. It's our responsibility. After all, we're the soldiers on the front lines in this very important fight.
What do you think? Is secure coding something that needs more attention? Do let me know, and until then, happy secure coding.
