


Microservices. Everyone uses this architectural pattern nowadays. Software architects and product managers especially love this style because it comes with tons of benefits in the agile age, including extensibility and availability, of course, but also a resiliency, just to name a few. It appears that microservices solve many problems that teams faced for decades. Is there a price to pay?
With microservices, a lot of things get easier. However, they also come with some drawbacks. To name a few of them, maintainability, complexity, and security. In this article, I want to focus especially on the last one: security. In order to really understand the underlying problem, I'll rough out some common problems.
Introduction to the Difficulties
First, when thinking about microservices, most of the time, we have in mind a multitude of small services, each one performing one business-relevant task, covering even an entire sub-domain, like, for example, billing. But what about the security of such a billing service? Who can talk to the service? How can it be reached? What happens if someone steals key material?
In this article, I want to provide you with a step-by-step guide of how to build a fortress around your services and turn them into self-defending building blocks. For that purpose, I start with the protection of the whole mesh of services itself. By that, I mean how to secure the boundary of your entire cluster, who can access it, and which routes a client application can reach. You can think of it like a moat around a town in medieval times that protected the town from unwanted intruders. At the front door of the fortress, you station strong guards to ensure that the identity of each category of visitors is authentic and that they can pass.
But just protecting the walls isn't sufficient, not at all. Behind the walls, you must further apply techniques to protect the castle from unwanted guests. Think of the streets in the town as the communication pathways and the buildings as services. You don't want a spy to run around your streets and observe all buildings, or even the people living inside the buildings. Privacy matters. For that purpose, you apply communication protection techniques to make sure that when information passes between the buildings, it stays confidential and authentic. Further, you place another level of guards within the town. These guards separate the districts of the town into smaller parts. Every time information passes from district to district, the information needs to pass through these guards. In the end, this boils down to network policies in Kubernetes, because those define who can talk to whom within a cluster.
Once you have secure communications, you should be done, right? No. Think about a spy who manages to get into the town using a false identity, and he manages to take over one of the buildings. In such a case, the simple measures in place would never find the spy. This is not what we want, right? So what else can we do?
It starts with the buildings themselves. You can make it hard for someone to take over a building. By that I mean hardening the containers of your services that run as part of the cluster. Not running them as root or having a read-only file system are just some techniques that you're going to apply. Further, validating all the data that applications provide turns out to be a key defense against attackers, to name another one. But there also exist frameworks that observe your containers' behaviors, and those frameworks alert you in case something suspicious is going on. Finally, I will also talk about key handling. Keys form an essential ingredient to cryptography, and keys should be kept secret at any point in time.
Let's start now with your secure town.
Let's Build the Walls and the Moat
Before building any kind of wall around the town, you first need to think about what you want to protect. To ease the discussion here, I'll assume from now on that the microservices that you want to protect run in a Kubernetes cluster in terms of Docker containers, and that they offer various APIs in terms of HTTP(S) to several client applications. The services include a billing service, an order service, and a shipping service, for example. Each service has its own database, as is common practice for microservices. For illustration, think of a service as a building in a town. The floors of the building correspond to the components of the service, and the database to the cellar.
Now that I've set the context, let's start protecting the town. The first step is to build a huge wall around the buildings of the town, because not everyone should be able to see or even reach them. Why is it so important to protect the internals of the town? Why do you want to hide the services from the public?
The short answer is that every visible internal detail increases the attack surface. Suppose you don't have a wall around your services, and that an attacker can reach all of them publicly. First of all, it creates tremendous overhead, because you need to secure each service individually by using the same security measures. This is not only complex, but it also produces a tremendous cost. Just think about all the keys for each individual service. Second, when an attacker knows the internal structure, the attacker can freely choose which targets he wants to attack without any further condition. The attacker may even be able to see the data transfer objects and the responses of each service. Finally, when the attacker manages to compromise one service and he knows the internal structure of the cluster, it enables him to mount further attacks because he knows the targets perfectly. If he doesn't know the structure, it's much harder for him to mount further attacks.
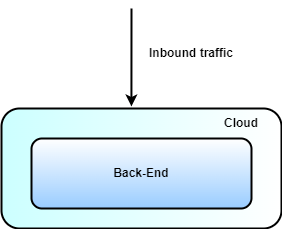
How do we now build such a wall? The first step is to place the entire back-end in a virtual private cloud that doesn't expose anything to the public internet (see Figure 1). This makes sure that no one sees what's inside your cloud from a public perspective. Of course, the cloud administrators who set up and maintain your environment will always have access to your infrastructure.
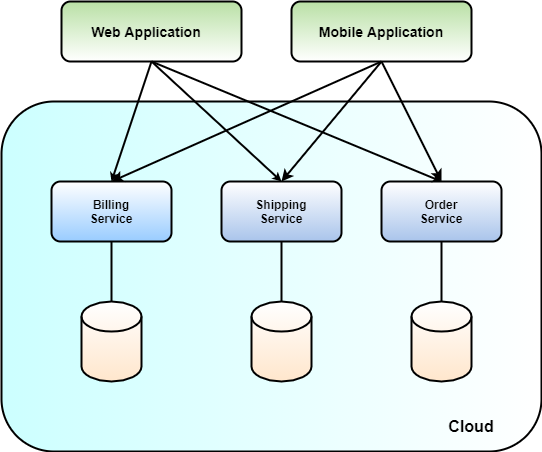
Next, you carve out the front door within the wall around your town. The front door is the main entrance for everyone to your services and it serves multiple purposes. First, it determines which services the applications reach in terms of API exposure. Defining which services applications reach is vital, because the lack of a central entry point leads to complex client applications, and you may accidentally expose services that you don't want to, as shown in Figure 2. Second, it provides you with a central point to enforce global authentication checks and apply common mitigation strategies against generic attacks. Let's go through them one by one.
The API gateway serves as entry point to your microservices. Thereby, you granularly define which routes you expose to client applications. For that purpose, you selectively decide which routes of microservices an application really requires, and which it doesn't. This limits the visibility of the APIs of your microservices tremendously and also gives you the opportunity to differentiate between the publicly reachable API and internal APIs that you may require for maintenance. What has it to do with security? Actually, quite a lot. For every service, or even endpoint, everything you expose increases the attacker surface from an attacker's perspective. The more a cluster exposes, the larger the surface for attacks gets. Hence, I suggest that you only expose what applications really require, and never more.
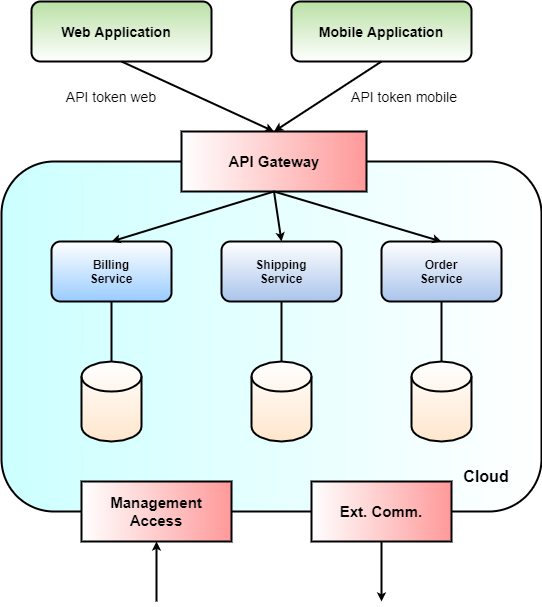
An API gateway is also the perfect location to enforce global authentication techniques, like, for example, API access tokens or similar. An API access token corresponds to a pre-shared secret between an application and an API gateway, and clients must provide such a pre-shared secret when communicating with the gateway. The API gateway verifies the pre-shared secret on each and every call of a client application to authenticate it. If it provides an invalid secret, the API gateway denies the access to the cluster. When there are multiple applications, it makes sense to have one API access token for each, in order to differentiate among different applications at the API gateway. This also helps you to limit API access based on client applications.
Finally, an API gateway can also be used to apply common security strategies against generic attacks like, for example, rate-limiting. Rate-limiting, when bound to IP addresses, effectively mitigates denial-of-service attacks, in which an attacker overloads your microservices with requests with the goal of consuming all resources of the service. Consuming all resources of a service brings the service down, thereby disrupting client applications due to service unavailability. If an API gateway already mitigates such attacks, the services won't ever be affected by such attacks, and even better, you don't need to duplicate this mitigation across all services. Nice, right?
But there's more to protect. What about the management of your services? You don't want unauthorized personal to change the running infrastructure, right? For that purpose, very strict access rules have to be in place, to make sure that not everyone can change your deployment. I suggest coupling the management interface to your Active Directory, or similar services, to protect the control plane of your cloud environment. Additionally, you also protect the outbound communication of your services with external dependencies. Figure 3 summarizes the whole situation.
Define the inbound and outbound interfaces of your cloud with caution.
Protect the Streets of Your Town
Now that you protect the town from the invaders of the public Internet by putting a huge wall in front of your services, you'd better start thinking about the streets of your town. You don't want completely unknown people walking around in your town in case they work for an authorized trading company that knows one of the API access tokens. When the town blindly trusts all trading companies that know an API access token who knock at the front door, and you don't have any security controls in place in your streets, individuals of the trading company could acquire all the gossip going on in your town. You don't want everyone to know what's going on in your town, right?
Secure Your Communications!
For that purpose, use HTTPS, or more general TLS (transport layer security). The TLS protocol protects communication channels by means of encryption and authentication. It provides you with confidentiality and authenticity of data in transit, which essentially means that an attacker can't read information, or willingly change information, without anyone noticing. For that purpose, TLS follows a strict protocol: First the two communication parties perform a handshake. As part of this handshake, the server presents a certificate to the client. Such a certificate wraps a public key into an envelope, which contains a signature by the authority that issued the certificate. An authority signs such a certificate with its private key, a key only known by the authority and that the authority keeps secret. The leakage of private key material enables an attacker to sign certificates of arbitrary attacker-controlled keys. To verify the signature of a certificate, the client only requires the public key of the authority, which everyone knows. The client evaluates the server certificate using one out of many different strategies:
- Option 1: Client passes through and accepts all certificates
- Option 2: Client accepts self-signed certificates
- Option 3: Client accepts certificates signed by a trusted authority
- Option 4: Client accepts only one specific certificate, also known as certificate pinning
The verification of the certificate makes sure that the client is really talking to the server it expects. This is vital! I mean, really vital! Otherwise, man-in-the-middle attacks become feasible, because the client can't verify to whom he talks. In other words, the client can't distinguish between a malicious server and the real server he wants to talk to. Figure 4 depicts the situation.

Option 1 and 2 don't offer you any form of security, because in the first case the client accepts all certificates without performing any check, and in the second case, the server can present a certificate that he signed on his own. Self-signed means that the server generates the signature of the certificate using the private key matching the public key in the certificate. There's no trust involved here! Only the third and the fourth option make sense from a security perspective. Option 3 means that the client verifies the signature of the certificate by looking up public keys of authorities that the client trusts, whereas in the fourth option the client only accepts one specific certificate.
I relate the four options to talking to someone at your door. Option 1 corresponds to opening the door for everyone, without even checking anything about the person at your door. In the second option, the person presents a passport where he put himself as the authority signing the passport. That doesn't sound secure, right? The third option corresponds to a real passport, established by a state or governing body. Here, the state acts as the authority that you trust, and you believe the state when it signs the passport. Finally, in Option 4, you only accept a specific passport, for example the passport of a person you trust. All others you reject, no matter who the person is.
In standard TLS, only the client checks the server certificate. However, there also exists a variant of TLS in which the client also needs to present a certificate to the server, called mutual TLS, or client-authenticated TLS. For that purpose, the client presents a certificate to the server, and the server again applies one out of the four strategies mentioned.
After the certificate check(s), TLS negotiates the cipher suite to protect data in transit. There, it really matters which kind of version of TLS you use. For example, TLS v1.3 is currently the standard. It covers a lot of different encryption algorithms, where all of them can be considered secure and safe. However, it's very often the case that implementations allow negotiating to a lower TLS version, which may contain broken, or at least insecure, algorithms. So it's highly recommended that you don't allow downgrading the TLS version. After negotiating a cipher suite, the server and client agree on an encryption key for encrypting data in transit.
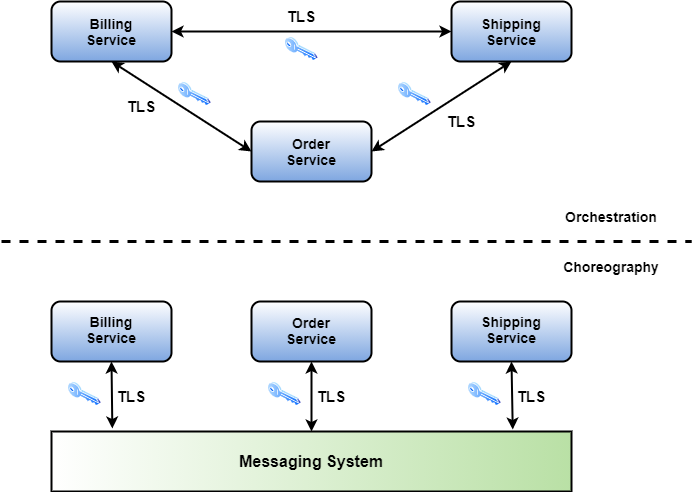
TLS protects the communication between two parties. Therefore, it applies to the direct communication between microservices in terms of HTTPS for example, but also to reactive microservices acting in a choreography. Why? Because the communication to the messaging system in reactive microservices usually also takes place in terms of HTTPS connections. Figure 5 summarizes the protection of the communications.
Use only secure communication protocols, even inside your cluster.
Define Districts in Your Town
Streets are safe, but what about districts inside your town? I mean, up to now you have a huge town, where you protect all your streets in terms of TLS. But sometimes you simply don't want each household to talk directly to another household, right? It should take place in more standardized manner, shouldn't it? For that purpose, I want to relate the terms of your town to Kubernetes terms.
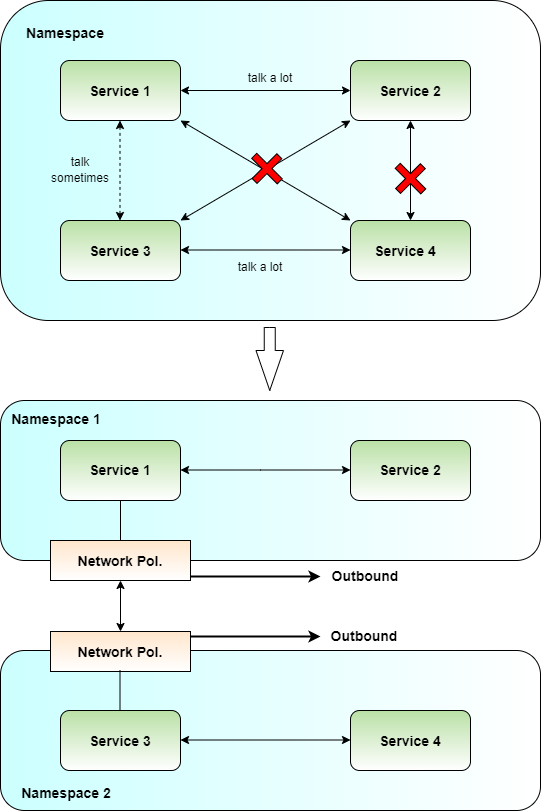
A town naturally breaks down in districts, because those are easier to manage. Kubernetes offers namespaces, which allow you to group the huge cluster that corresponds to your town into smaller, more manageable units (see Figure 6). So in this illustration, a district corresponds to a namespace. In order to somehow regulate the traffic between namespaces, Kubernetes comes with the notion of network policies. These policies allow you to define which service, IP address, or network can talk to who via which port. They separate your networks and namespaces, and act like access control lists in some form. You define such rules for both inbound and outbound traffic. Inbound means the traffic into a namespace whereas outbound refers to communications that leave the namespace. Engineers very often forget to define proper outbound communication policies. Attackers could exploit such a lack of outbound policies in some circumstances, by, for example, using a service to perform a server-side request forgery (SSRF) in case the service allows proxy HTTP requests. But also, in case an attacker makes it on a Pod, he could leverage improper outbound policies and install malicious software on the Pod.
Not only the communication needs protection - what about police, who spot suspicious behavior in your cluster? You'd certainly appreciate having a guard in place who constantly monitors what's going on and raises a red flag in case of suspicious behavior. There are plenty of frameworks out there that do exactly this, like, for example, Falco. Using such frameworks, you define the expected behavior of Pods, Services, or similar, via configuration files, and the framework warns your operator in case of deviation from the expected behavior. I suggest that you use one of these frameworks to monitor your cluster constantly from a security perspective.
Finally, you should also limit the resources that a Pod, or an entire namespace, consumes. Kubernetes allows you to define a capacity limit on the amount of resources that a namespace, for example, uses in terms of Resource Quotas. Parameters of such Resources Quotas include memory, CPU, etc. From a security perspective, I highly encourage you to define such limits, because otherwise an attacker could potentially bring your services out of resources, ending up in denial-of-service situations.
Limit what an attacker can do when he makes it into your cluster.
What about the Front Doors of the Buildings?
Next, you need to protect the houses of your town. Each house corresponds to a microservice. But where do you start? There is so much to do. I mean, you need to protect the doors, but also the rooms, the cellar, etc. Let's start with the doors.
Check Identities
How would you protect the front door of your house? When a stranger knocks on your door, you certainly first want to know who he is, right? When he proves his identity and you're convinced, you let him in. However, you only let him in through the front door - you don't show him the back door, probably. Additionally, you make sure that information from inside your house doesn't leak out to him, in case something goes wrong.
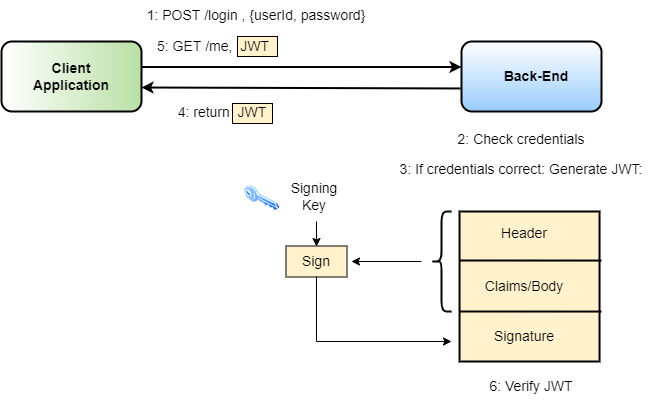
Let's start with the identity check. Microservices handle such identity checks by JSON Web Tokens (JWTs). A JWT consists of three parts: a header, a body, and a signature. The header specifies the algorithm by which the header and body gets signed. The body specifies the claims of the owner of the token. Claims here mean the identity of the user, like, for example, its identifier, its permissions, its validity period, and so on. The signature is the most important part of the token. Technically speaking, the signature corresponds to a cryptographic signature over the header and the body of the token. The private key to create the signature is only known to the issuer of the token, no one else. This signature makes sure that no one else can create, or forge, a valid token. Importantly, because the validity period is also part of the body of the token, no one can use the token after its expiration. But how does a user now get a JWT?
The user sends his credentials to a microservice, usually an authorization or login service, and in case the credentials are correct, the service responds with a new JWT. From that point on, the client needs to present this JWT every time he interacts with a service. Consequently, each service verifies this JWT with regard to its signature, and if one of the checks fails, like, for example, an invalid signature or the JWT is expired, the service refuses further processing and returns an error code. Figure 7 summarizes the situation.
How long should such a token be valid? Seconds? Hours? Days? Well, it depends on the use case. Having a token that stays valid for months, I certainly discourage, because the leakage of a token becomes fatal for your users. On the other hand, having a token that lives just for just a couple of seconds or minutes causes a lot of communication overhead to obtain new tokens all the time. So, somewhere in between is the right choice for most applications. But it remains unclear, in general, how to obtain a new JWT.
For that purpose, usually you use refresh tokens. Such refresh tokens are similar in spirit to access tokens. A refresh token is basically like an access token, but it usually only contains a user identifier and an expiration date, no other claims. The lifetime of a refresh token is longer than the access token's, to stay valid until acquiring a new access token. Whenever the access token expires, the client application sends the refresh token of the user to the back-end, which verifies the refresh token in terms of signature and expiration, of course. In case the verification succeeds, the back-end responds with a new access token. The way the back-end handles tokens is crucial, and I'll lay out a secure way of treating such tokens.
After a successful login, the back-end responds with two tokens: a short-lived access token and a refresh token. As soon as the access token expires, the client sends the refresh token to the back-end, which, in turn performs two operations. First, it revokes the previous access token and the refresh token, and second, it generates a new pair of access and refresh tokens. Whenever the back-end now encounters a revoked token, no matter whether it's the refresh token or the access token of a user, the back-end automatically invalidates all tokens of the user. This minimizes the damage that an attacker causes by stealing a token. Figure 8 depicts the workflow.

Some questions are left regarding tokens: Who handles all these tokens? Who creates tokens? Who checks them? In principle, you've got several options available:
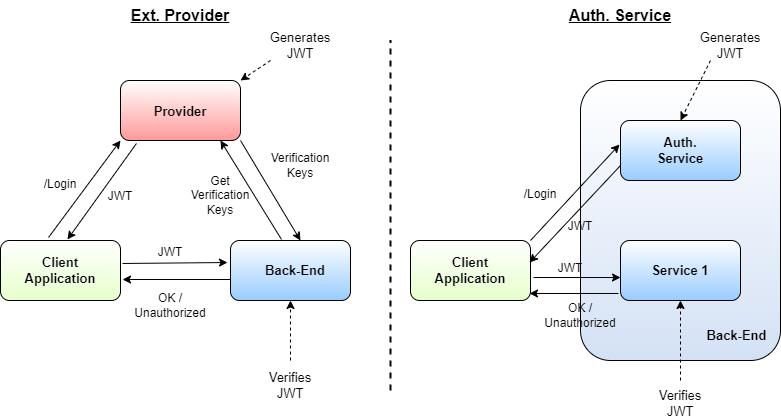
- Option A: You use an external provider for creating access tokens. In that case, you don't have to implement the token generation on your own, only the validation. This concern you either settle directly in the API gateway, or each service verifies the token independently.
- Option B: You implement the token generation and validation for each service within each service. This causes a tremendous overhead, because each service needs to have its own keys for creating and validating its access tokens.
- Option C: You have one service in your cluster dealing with the token generation, but each service validates access tokens on its own. In that case, when you use asymmetric cryptography, the secret key only needs to be known to the authorization service, and the public key has to be known by all services that validate the token. Such validation logic should be settled somewhere in a service chassis or middleware framework for reuse among all services.
Depending on the capacities, I recommend either going for option A or C, but certainly not option B. The last option gives you a lot of control of the whole authentication and authorization logic, whereas the first option is certainly much faster to implement. Figure 9 shows both options.
Remember that I said you don't show your visitor the back door of your house? I want to elaborate a bit more on this. First of all, the doors of a house correspond somewhat to the ports of your service. The more doors a house has, the more likely it is that an attacker makes it in. So, from a security perspective, it's recommended to only open the ports that a service really requires. Very often, services open additional ports as management interfaces, like, for example, JMX ports or similar. Bear in mind that every open port provides an additional attack surface to an attacker. Management interfaces pose an especially significant security risk in case an attacker reaches them. Of course, you'd configure authentication and authorization for these ports, but you mainly rely on third-party libraries most of the time, where you don't have much control over vulnerability management or bug fixing cycles.
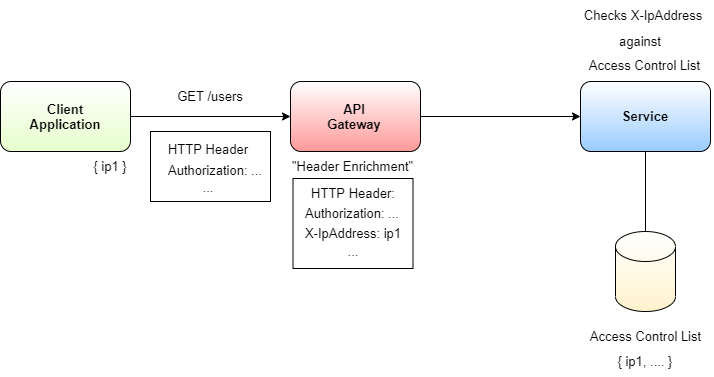
Furthermore, sometimes you want to accept only visitors from certain locations. Makes sense, right? Think about a top-secret headquarter for a secret service agency. You don't want to accept all visitors there, only the ones coming from offices you know. I'll translate it to microservices and get some context. The above situation may apply to some management services, or some endpoints in core services where you don't want normal users to get access. If the nature of such services is very critical for your business, you should consider introducing access-control lists to these services.
How do you implement this? It's rather straightforward: Your API gateway enriches the HTTP header of each request with the source IP address of the request. Next, the API gateway passes on the request to your service. The critical services then evaluate the source IP address within the HTTP header and check whether the IP address is on an Allow list. It's crucial to follow an Allow list approach rather than a Deny list approach, because it's a default Deny policy. After checking whether the provided source IP address is on the list or not, the service either permits or rejects the request. Access-control lists are very powerful and should be applied for mission-critical services. Figure 10 shows the workflow.
Finally, I assert that internal information from within your house should not make its way out to the public. It's like having windows in a house, rather than a complete glass-front (even though it looks nice). In the microservice world, this especially applies to error handling and exception propagating. Suppose you don't sanitize errors or exceptions. An attacker leverages this to obtain information about the internals of your back-end. For example, when playing around with input parameters, he may acquire knowledge about whether you use a SQL Server database or not. This already helps because he could try to mount SQL injection attacks. Or, suppose, on login with invalid credentials, the back-end returns an error message that the user is unknown. This enables the attacker to learn all registered users on the back-end by simply trying out all different usernames. It doesn't sound like fun - or does it? These are all small details, but they may have a tremendous impact on the security of your microservices, because such information helps an attacker to mount further, more sophisticated attacks.
How do you now implement all of this? Every service requires it, right? I suggest that you use a parametrizable service chassis for this. A service chassis is a collection of libraries that all services rely on, which implements cross-cutting concerns common to all services. I suggest that you implement all the considerations of this section through middleware in ASP.NET. The order of middleware is crucial. I recommend the following order of middleware for the three considerations outlined here:
- Exception middleware
- Authentication middleware
- Authorization middleware
- Access Control middleware
There are certainly more security considerations that could be settled here, like, for example, rate-limiting or similar, but rate limiting could also be applied globally to the entire back-end, as already described earlier. However, if you decide to apply rate limiting only to specific services, to efficiently mitigate denial-of-service situations, you could add a rate-limiting-middleware after the Access control middleware. Here, it's important on which information you base the rate limit. I recommend using the source IP HTTP header rather than the user's ID or email address, or maybe also a combination. Whenever the number of actions exceeds a pre-defined threshold, you block incoming traffic from that source IP address. Figure 11 summarizes the different middleware and their order.
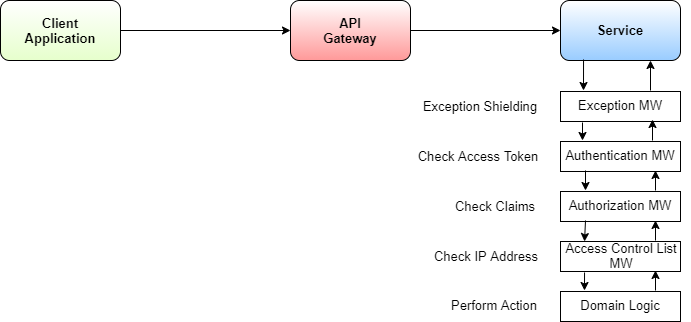
Use middleware to secure endpoints before processing any data.
How to Protect the Buildings?
You built a wall, you protect your streets and the front doors of your buildings. Sounds sufficient, doesn't it? No. Simply no. There are still a lot of concerns open. I'll provide you with some examples. For instance, suppose you've built your house using cheap material - it won't last long, right? I want to exaggerate a bit, to highlight the problem. When you use cheap material to build your walls, then anyone with a little strength breaks the walls and enters your house without your permission. It's like with the three little pigs and the big bad wolf. He huffs and he puffs, and he blows the house down!
Another concern relates to stuff that you take into your house. Usually, you only accept packets from a postman that you're expecting. At least, I wouldn't accept all packets that anyone drops in front of my door. You also check what's inside the packet before you use it, right? I wouldn't simply unpack all the packets I get and use the content without knowing what it is.
Building a Safe House
The former issue relates to container hardening, because the container corresponds to the houses in your town. When using Kubernetes, it's vital to harden your Docker containers. There are several considerations to think about:
- Don't run containers as root.
- Make the file system of your containers read-only, if possible.
- Don't auto-mount service access tokens into your container unless really required.
Running a container as root user is highly discouraged. Why? In case someone makes it into your container, he gains root privileges. This means that the attacker can do whatever root privileges permit. This could include reading out passwords, or, in case the file system is read-write, also change files inside the container. Having a file system that's not read-only allows an attacker to, for example, delete files from within the container or create new ones as he wants. This could cause severe damage, not only because it leaks information, but also because the attacker could alter vital files of the service. Finally, Kubernetes, by default, mounts the service account access token into the Pods file-system. Kubernetes uses such tokens to communicate with the Kubernetes API server. Acquiring such a token provides an attacker with the possibility to interact with the Kubernetes API server, thereby potentially causing further harm in the cluster.
There are three mitigation techniques against such scenarios:
- Docker container hardening
- Pod security policies
- Role-based access control
Docker container hardening refers to techniques that harden your docker image. There are several things to take into account. The ports that the Docker container allows for communication are of high importance. But the user who executes the application within the container appears even more important. Think about the user who runs the application in your container as the Windows user interacting with an application. You'd restrict the rights of the user as far as possible, so that the user can't do any harm to the operating system, wouldn't you? It's the same with containers: You don't want to run the container as root user. For that purpose, simply introduce a new user in your Dockerfile, drop all rights that aren't necessary, switch to the user, and run the application.
FROM <base image>
RUN groupadd -g 999 appuser && \
useradd -r -u 999 -g appuser appuser
USER appuser
... <rest of Dockerfile> ...
But there's more you can do. When dealing with Docker and Kubernetes, a verbose logging can help you a lot in case of security incidents. It's also important to make the root filesystem read-only, otherwise the container could potentially write to the host's file system.
Pod security policies form another important tool for hardening your Pods. They basically define the policies that apply to your Pods. This includes access to the host's file system or the host's network, but also whether you can escalate privileges or not. Whenever possible, try to define very restrictive Pod security policies, because they help you securing your Pods.
Finally, when talking about Kubernetes, you should also start to think about role-based access control (RBAC). RBAC defines which accounts in the cluster have which rights and permissions. You can either define cluster roles that apply to the entire cluster, or more granular roles. You bind roles and cluster roles to users by defining cluster role bindings or role bindings.
Harden your Docker Images and secure your Pods.
Input Data and Sanitize It!
All of the previous techniques help you to protect your buildings, but what about the content that passes in? What about the content of a packet from a postman? You want to make sure only packets with content you expect and can handle make it through, right? This is input data validation and sanitizing input data. This is one of the most overlooked security issues. I'll give you two examples.
Suppose you run a billing service, and it contains an endpoint for querying credit card information about a particular user. Further assume that the service uses a SQL Server database to run the query, and it returns the result of the query to the client. Well, that sounds pretty straightforward. What could go wrong, right? Wait, there was something called SQL injection, wasn't there? Just imagine for a moment that the service doesn't use any object-relational (OR) mapper like Entity Framework, but rather simply concatenates strings to build SQL queries. In this case, a client could immediately interact directly with your database, for example, reading all users' credit card information, or even dropping tables or similar by providing a specially crafted query string.
Another example is called remote code execution (RCE). Assume that you've got Pods running, and one of these pods needs to execute a filtering process directly by invoking a new process in .NET. For example, the service takes a filter string as input without sanitizing it. It's very likely that an attacker could remotely execute code by crafting a specific input string (depending on the situation, the language and the platform), and could terminate the intended command followed by his own injected command, or in case he can directly control the process input, just simply passes in the desired command. This even goes so far that the attacker could create a reverse shell within the container, which connects to his own shell locally, thereby getting full control over your Pod. That would be fatal. Game over.
class ProcessHelper
{
    public static void RunCommand(string commandName,string args)
    {
        Process p = new Process();
        p.StartInfo.FileName = commandName;
        p.StartInfo.Arguments = args;
        p.Start();
    }
}
There are even more examples, like data that you pass into a service, and which another service uses without sanitizing it, perhaps within a website. If the front-end uses this data directly in HTML, you may have a nice XSS vulnerability, which could result in a lot of damage.
I hope I convinced you about input data validation and sanitizing your input data. It's vital for any kind of service. But how can you do it now? You should follow these strategies:
- Validate integers with regard to expected ranges.
- Validate strings depending on their usage. I'll talk about this in more detail shortly.
- Validate data transfer object on deserialization.
I want to dive a little deeper into the validation of strings, because attackers often use string parameters for their exploits:
- The string parameter makes it to a database query: Make sure no SQL injection is feasible. Very often, services construct SQL queries or SQL commands by using string concatenation rather than OR mappers or prepared statements. Such constructs make it easy to provide a parameter, for example a name like
Joe; DROP TABLE users;--, which deletes your users table from the database. - The string parameter makes it into a webpage: Escape the string properly to mitigate XSS. When you don't properly escape characters like
<or similar, and more generally speaking filter the input with regard to XSS, an attacker could provide JavaScript code within the parameter that the victim potentially executes inside the browser. - The string parameter makes it into a URL: Validate the URL against an allow list in case it's a full URL parameter. If you don't sanitize, the attacker could run Server-Side Request Forgery (SSRF), which means that the attacker uses your service as a proxy to access other, potentially internal, services. In case the string forms a part of a URL, sanitize it from characters like
../to prevent direct traversal. - The string parameter makes it to an email-service: Make sure that the provided email address is a legitimate email address and that there is only one recipient. Verify the format very precisely, otherwise an attacker could use your service to send emails on his own behalf.
Sanitize your input data to prevent exploitation.
I think you understand why input data validation is crucial for running a microservice. If you don't properly validate data, you put a lot at risk.
Finally, I need to talk about how you provide the input data to your service. Again, you have multiple options on the table. When using HTTP, highlight the following choices:
- Provide data via the URL
- Provide data via the HTTP header
- Provide data via the HTTP body
I start with data coming from the URL. Imagine, for example, a URL like GET /users/{userId}. This URL doesn't look problematic at all, because the only parameter corresponds to a user ID. Nothing secret involved here. However, think about a URL like GET /users?userId={userId}&accessToken={accessToken}. Looks more delicate, doesn't it? Here the access token for accessing the service comes in the URL. That approach is very problematic, because many proxies, reverse-proxies, or similar, terminate TLS connections and log the URL of each request. Also, your local browser history may log the URL in such a case, and the access token of the user ends up in a log file or your browser history, thereby providing the operator or other users with sensitive information.
Putting data into the HTTP header, especially access tokens, provides you with much more security, because usually proxies or reverse-proxies don't log this information. Therefore, when providing sensitive information, it makes sense to put it into the HTTP header rather than the URL.
Finally, How Do You Provide the Secrets and Manage Keys?
I guess this is one of the most forgotten issues, apart from input data validation. When it comes to secrets, you find plenty of strategies for how to do deal with secrets. There are four ways to acquire secrets: hard-coding, providing secrets as files, providing secrets as environment variables, or dynamically retrieving secrets via a network.
Hard-coded secrets - what could go wrong, right? I mean, the application code isn't reversible, right? No. It's simply a No. Of course, don't get me wrong: To reverse engineer the application, you first need to get to the application executable's true. This isn't easy, for sure, but if no proper RBAC is in place, it's possible. The internet offers us plenty of tools to reverse engineer an application. Obfuscation counters reverse engineering, making it harder to reverse. But what about developers? All developers have access to hard-coded secrets, which may turn out to be a problem at some point.
class DatabaseHelper
{
    private string password = "top_secret";
    public string GetConnectionString(
        string server,
        string dbName,
        string userName)
    {
        return "Server="
            +$"{server}\\SQLEXPRESS;Database={dbName};"
            +$"User ID={userName};"
            +$"Password={password}";
    }
}
Providing secrets by files increases the security of your secret, because developers don't have direct access to these files during development. Of course, there is the same observation here regarding remote access to your container. In case an attacker makes it into your container, depending on your configuration, he could potentially read your secret from the file. Nevertheless, you at least eliminate the risk of a malicious developer, although you should still improve your security.
When providing your secrets via environment variables, you're in a similar situation as the files. A successful attack here has the same prerequisites as files because the attacker requires remote access to the container to read out the environment variables, provided that the DevOps set up the RBAC properly. So, here you don't increase the security.
These two approaches are the most common ones for Kubernetes because they are easy to implement and offer quite a lot of flexibility. Kubernetes provides you with two mechanisms to provide secrets: either ConfigMaps or the built-in Secrets. Each has a fundamental difference. Kubernetes doesn't protect ConfigMaps in terms of encryption, whereas Secrets potentially do. Therefore, go for Secrets if you seek this option. Kubernetes, by default, doesn't encrypt Secrets, it only base-64 encodes them. However, you can configure Kubernetes to use encryption, either with default keys or by coupling the secrets to your vault. A vault is a safe, cryptographically secured storage for secret information.
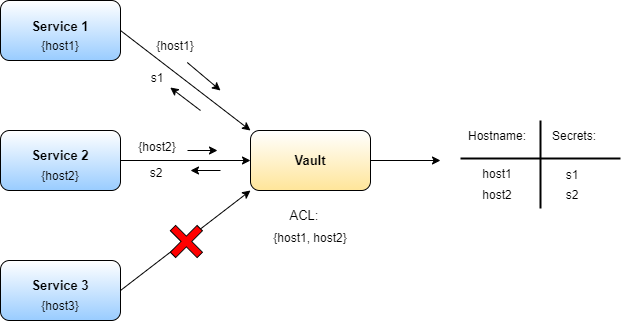
Finally, you have the strategy of reading your secrets directly from a vault. With this approach, you eliminate the previous issues of an attacker accessing your container. Why? Just having remote access doesn't help the attacker to read the secret in that case, because the secret isn't stored. It's neither on the file system nor in an environment variable. This is awesome from a security perspective, right? But how do you obtain the secret from the Vault without again using a secret? Sounds tricky, doesn't it? One idea would be to set up the vault in such a way that it only accepts connections from certain IP address or host names within the cluster. You turn your container into a read-only container and don't provide any network tools within the container, because then an attacker, even if he makes it onto a container, can't use any installed tools to communicate with the vault, and your service is the only one able to retrieve the required secrets. Figure 12 summarizes the situation.
Now that you know how to deal with secrets, we're done here, right? Sorry, no. There are still two topics I need to cover: revocations and key rotations. I'll start with revocations.
A revocation, in cryptography, refers to the process of marking a key to not be used anymore by all parties. Usually this applies to situations where an attacker stole a secret key, like for example the key for signing access tokens or similar. I recommend that you have a revocation process in place, which makes sure that all services discard the stolen key and don't accept any signatures from that stolen key any longer. It's crucial to define a revocation process and usually vaults have such processes in place. They enable you to get rid of stolen keys from your system in case of a compromise, and therefore tremendously increase your security.
Key rotation, on the other hand, forms a key ingredient to keep the cryptography of your services safe. For example, the more data you encrypt with the same key, the more information an attacker may acquire about that key. Gathering such information may not be useful at the moment but may enable an attacker at a later point in time to infer the encryption key, thereby breaking the confidentiality of data. So rotating keys is vital to secure your services, and additionally, it also limits the impact of a stolen key in case you don't know that a key was stolen. For example, suppose an attacker steals a key without you noticing. In that case, if the cluster doesn't rotate keys like, for example TLS keys; the attacker could use the key without any time limitation. By contrast, if you rotate your keys after one week, the attacker can mount attacks only for one week. This should highlight the importance of key rotation.
Code Example
In the GitHub repository https://github.com/apirker/middlewares, I provide some middleware implementations as an example for you to explore the techniques and ideas of middleware in this article.
Let's Summarize Now
I have shown you how to build a secure town. You started by protecting your entire cloud, by putting everything into a virtual private cloud, and defining only a single front-door, protected by strong guards that make sure only known applications talk to your back-end. Next, you protected your streets - the communication paths - by using TLS-protected channels to communicate information between services. This guarantees that an attacker who makes it into the cluster isn't able to read or modify your communications. Further, by splitting up the entire cluster into smaller parts, you managed to define pathways for communications between your services in a strict manner. After that, you turned your attention to services, starting with the front door of each building. The front doors you protect by JWT-based techniques, potentially together, even with access-control lists for mission-critical services. All of these concerns you nicely implement in terms of middleware, also making them reusable. The next step was to protect the building itself, and for that purpose, I've shown you some Docker hardenings together with input data validation and sanitizing techniques. Both of these are essential, especially the input data validation. Finally, I discussed various approaches for how to deal with secrets in Kubernetes, about the pros and cons of each. These, together with an effective revocation process and key rotation in place, boost your secret handling to the next level.
