


With the proliferation of the Web, various technologies for developing Web-based apps have emerged. Thick-client applications were once the standard way to deliver user interfaces. However, with time, the focus switched from thick-client to thin-client applications. If you designed your application with a certain type of user interface in mind, it may be difficult to integrate newer types of user interfaces (such as mobile UI), because of the tight coupling that might exist between the back-end services and the user interface code. This is exactly where the back-end for front-end (BFF) pattern comes in.
This article provides a deep dive on how to work with the BFF pattern in ASP.NET 6 Core.
Prerequisites
If you're to work with the code examples discussed in this article, you should have the following installed in your system:
- Visual Studio 2022
- .NET 6.0
- ASP.NET 6.0 Runtime
If you don't already have Visual Studio 2022 installed on your computer, you can download it from here: https://visualstudio.microsoft.com/downloads/
Microservices Patterns
There are several patterns in microservices architecture. Some of them are the Direct Access Pattern, API Gateway Pattern, and the BFF pattern. I'll discuss each of these in detail as I progress through the sections that follow.
The API Gateway Pattern
The user interface often connects with multiple microservices in a typical microservices-based application. This communication can become chatty when you have many microservices. Moreover, these microservices can evolve, making communication even more challenging. You might also want to implement the cross-cutting concerns in a single or central place rather than scattered across multiple microservices. Here's where an API gateway can help.
The API gateway works as a reverse proxy between your client applications and the back-end microservices. It routes requests originating from the client applications to the respective microservices and handles cross-cutting features (security, logging, and caching). It can also minimize latency by aggregating multiple microservices.
This approach works fine if you have a single client. However, it's not a good idea to use a single API gateway that aggregates all microservices of your application for multiple clients because this would make your API gateway service bloated over time and eventually into a monolithic service.
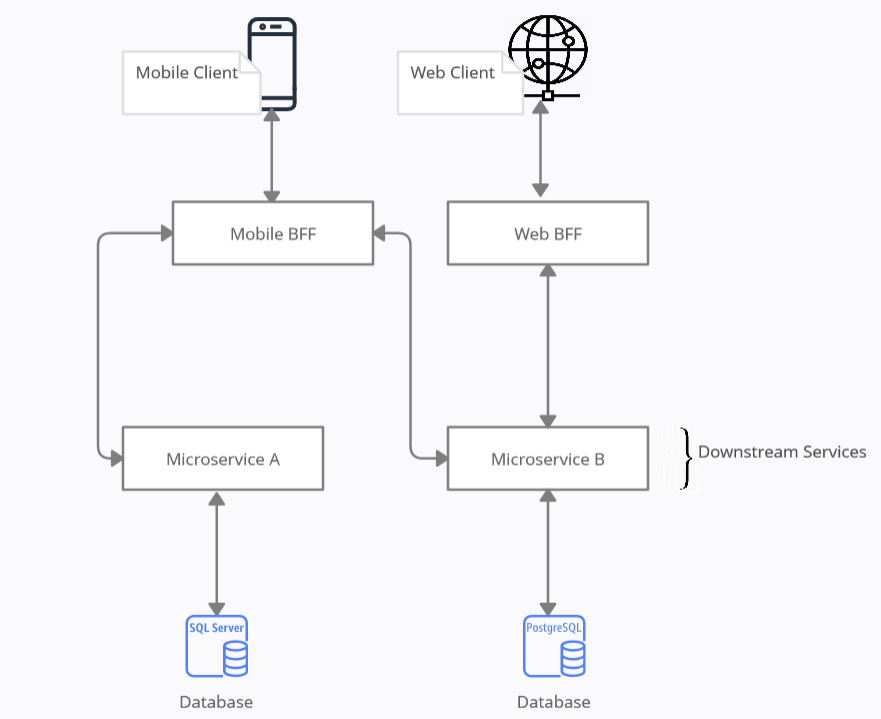
Figure 1 illustrates how a typical API gateway pattern works.

Instead, a better approach is to segregate an API gateway based on business boundaries and use an API gateway per client. Because you'll have multiple API gateways, one per client, you can have a facade to meet the requirements of each client. This approach is named the “back-end for front-end” or BFF pattern.
Introduction to the Back-End for Front-End Pattern
The back-end for front-end (BFF) architectural pattern proposes a server-side component for each front-end application, thus enhancing and improving the user experience. A BFF layer comprises multiple back-ends that are designed to meet the demands of specific front-end applications, such as desktop, browser, and native-mobile applications. One of the most appealing aspects of BFF is that it provides smooth user interaction independent of the platform on which the front-end application executes.
Back-end-for-front-end is an architectural paradigm, a variant of the API gateway pattern, with each client application having its corresponding back-end application. This pattern is good when you have multiple client interfaces with diverse needs, leveraging the same underlying resources. A real-world example of the BFF pattern is an application having both a Web and a mobile client.
The BFF pattern is an architectural paradigm, a variant of the API gateway pattern.
The BFF is tightly entangled to a particular user experience and is often maintained by the same team as the user interface. This makes it easy to develop and adjust the API based on the UI's requirements and simplifies the process of coordinating the delivery of both the client and server components.
Design Goals
The goal of the BFF pattern is to decouple the front-end applications from the back-end services and to reuse the APIs while ensuring that it doesn't cause over-fetching or over-requesting on the client-side. This is accomplished by developing a dedicated back-end for each front-end service. The BFF transforms the data into the correct format that the client application needs.
How Does the BFF Pattern Work?
The data rendered by the back-end microservices to the presentation, or the user interface layer, may not be formatted or filtered in the precise manner that the user interface requires. Hence, the user interface layer should contain the necessary logic to format this data appropriately. However, if you have such logic in the user interface, more browser resources are consumed, which is detrimental to the application's performance.
You may want to take advantage of the BFF pattern and move this logic to an intermediate layer to solve this issue. So, when the user interface requires data, it should call an API in the BFF layer. The BFF then invokes the relevant back-end microservices to retrieve the necessary data, formats it based on how it's represented in the user interface layer, and sends the formatted data to the user interface. There is minimal logic in the user interface layer.
Figure 2 shows how a typical BFF application works.
Benefits of the BFF Pattern
Obviously, BFF seems like a good thing, without much further discussion Here's a list, in case you're not already convinced.
- Separation of concerns: Your application is easier to maintain when the front-end and back-end applications are disentangled.
- Improved security: The BFF pattern can conceal sensitive information and send the response back to clients.
- Shared team responsibility: As front-end and back-end applications are isolated; several teams may work on different aspects of the application. The front-end team doesn't have to wait till another team has completed the BFF code.
- Better security: You can take advantage of the BFF pattern to hide certain sensitive information while sending the response back to the client. Additionally, this abstraction makes it extremely difficult for intruders, and your sensitive data won't be compromised.
- Rapid development: The BFF pattern encourages having a back-end API for each client and having the front-end development team control the development, thus increasing development velocity.
- Request aggregator: BFF can function as a request aggregator, reducing the chattiness of your client applications by acting as a front-end for downstream services.
- Consistent error management: BFF can play a crucial role in implementing consistent error handling in your application.
- Better Autonomy and Agility: Instead of waiting for the back-end team to build the API, the client development team has complete control, allowing it to be at the forefront of the delivery schedule.
The Problems of Over-Fetching and Under-Requesting
When developing applications, you may come across generic, reusable APIs. Generic APIs are difficult to build because they need extensive domain knowledge and insight. The two major drawbacks of this strategy are over-fetching and over-requesting. Over-fetching is a problem in which you obtain more data than you need, and over-requesting is when you make many requests to accomplish data aggregation. The BFF pattern is a solution to over-fetching and over-request issues.
Let's understand each of these with an example. Assume that you have two entities named Customer and Order. Now suppose I only need only the ID of all customers. Your back-end service might return data for all fields of the Customer entity, which is unwanted. This is known as over-fetching.
If you're to display all orders of a customer, your back-end service needs to fetch customer records and then retrieve all orders of the specific customer. This is an example of over-requesting, and it introduces complexity and performance issues.
Why the BFF Pattern Should Only Cover Presentation Logic
Typically, an application has the following levels of logic:
- Presentation logic: Responsible for representing the data into a format needed by the user interface
- Flow or composition logic: Specifies how the application's components interact with one another
- Domain logic: Represents the business logic of the application
- Persistence Logic: Determines how data is stored in the database or any different datastore
The BFF pattern should only cover the presentation logic. BFF should not handle the flow or composition logic because the flow logic of an application isn't related to the user interface. Instead, the flow logic of an application is domain-specific logic, for example, registering a user, processing an order, etc. So, if you let the BFF handle the flow logic for you, there is code redundancy.
Deploy the BFF and Its Client Together
The BFF and the UI are inextricably connected. Moreover, they represent a single deployment unit. As a result, if you change the BFF, you must also update the UI and vice versa. The team in charge of the user interface should also oversee the BFF. This makes it easier and more seamless to adapt the API to user interface requirements and deploy both client and server components seamlessly.
When Should You Use the BFF Pattern?
You can use the BFF pattern if:
- Your consumers need to consume data that requires a lot of aggregation on the back-end code.
- You need to incorporate customizations to the general-purpose back-end code to serve multiple interfaces.
- You'd like to optimize the back-end code so that it can satisfy the requirements of specific client interfaces.
You should not use this pattern when you have just one interface to communicate with the back-end services.
Implementing the BFF Pattern in ASP.NET Core 6
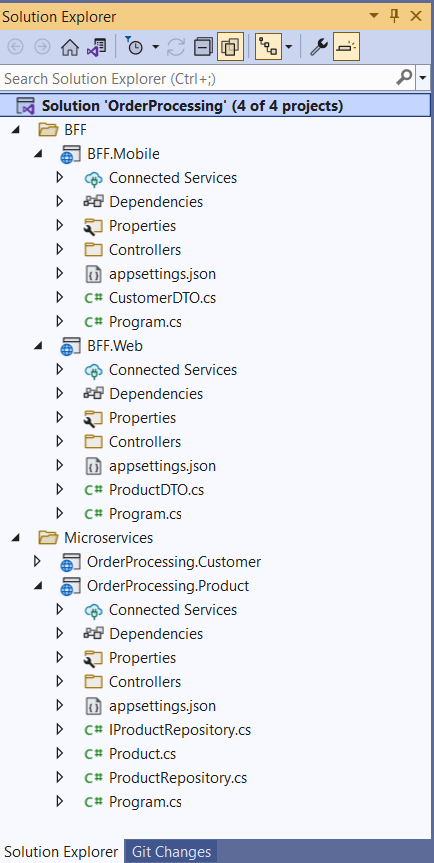
In this section, you'll implement a simple application to illustrate the BFF pattern. You'll build an OrderProcessing system that has just the Product and Customer services and their classes and interfaces for simplicity. You'll build this application and its services using ASP.NET 6 in the Visual Studio 2022 IDE. Figure 2 shows how the solution structure of the completed application looks.
Create a New Blank Solution Project in Visual Studio 2022
You can create a project in Visual Studio 2022 in several ways. When you launch Visual Studio 2022, you'll see the Start window. You can choose “Continue without code” to launch the main screen of the Visual Studio 2022 IDE.
To create a new Blank Solution Project in Visual Studio 2022:
- Start the Visual Studio 2022 IDE.
- Click File > New > Project…
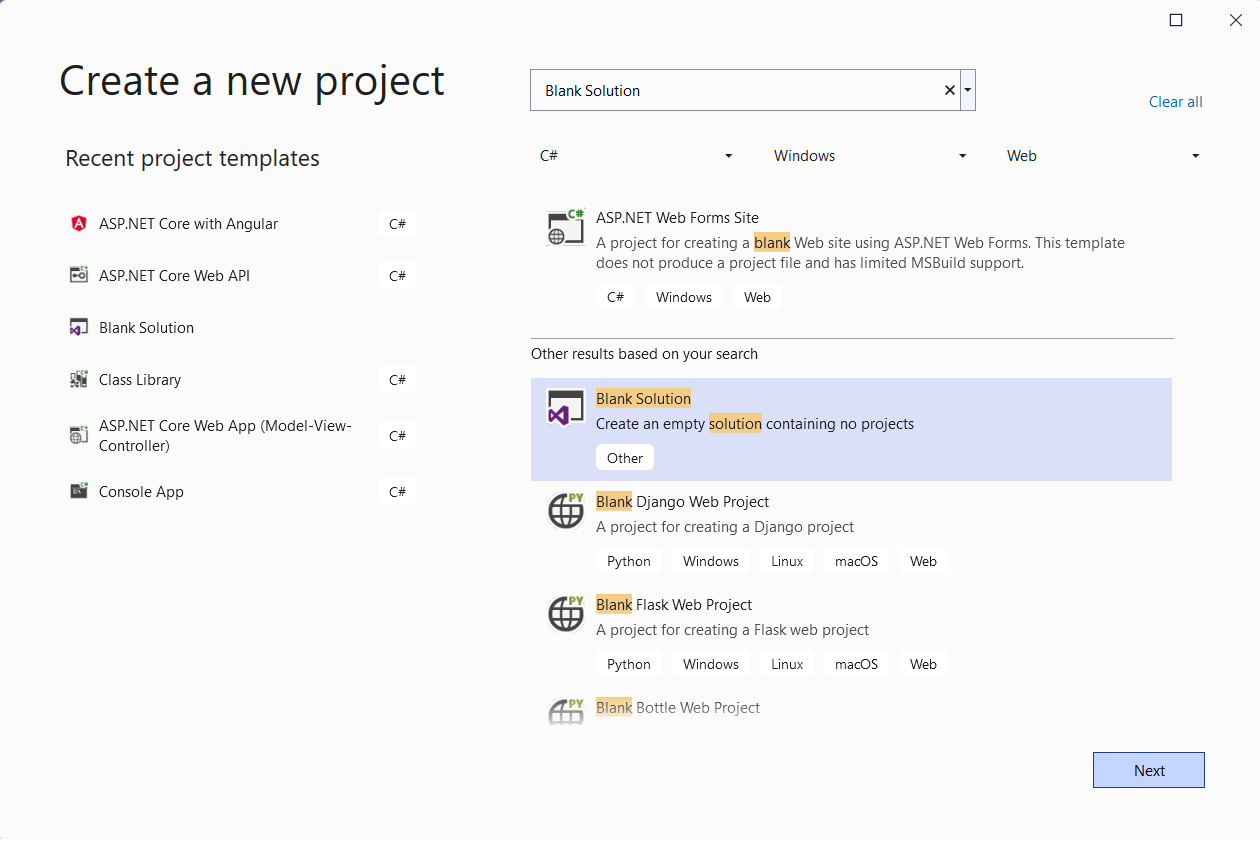
- In the “Create a new project” window, search for the “Blank Solution” project template and click Next to move on, as shown in Figure 4.
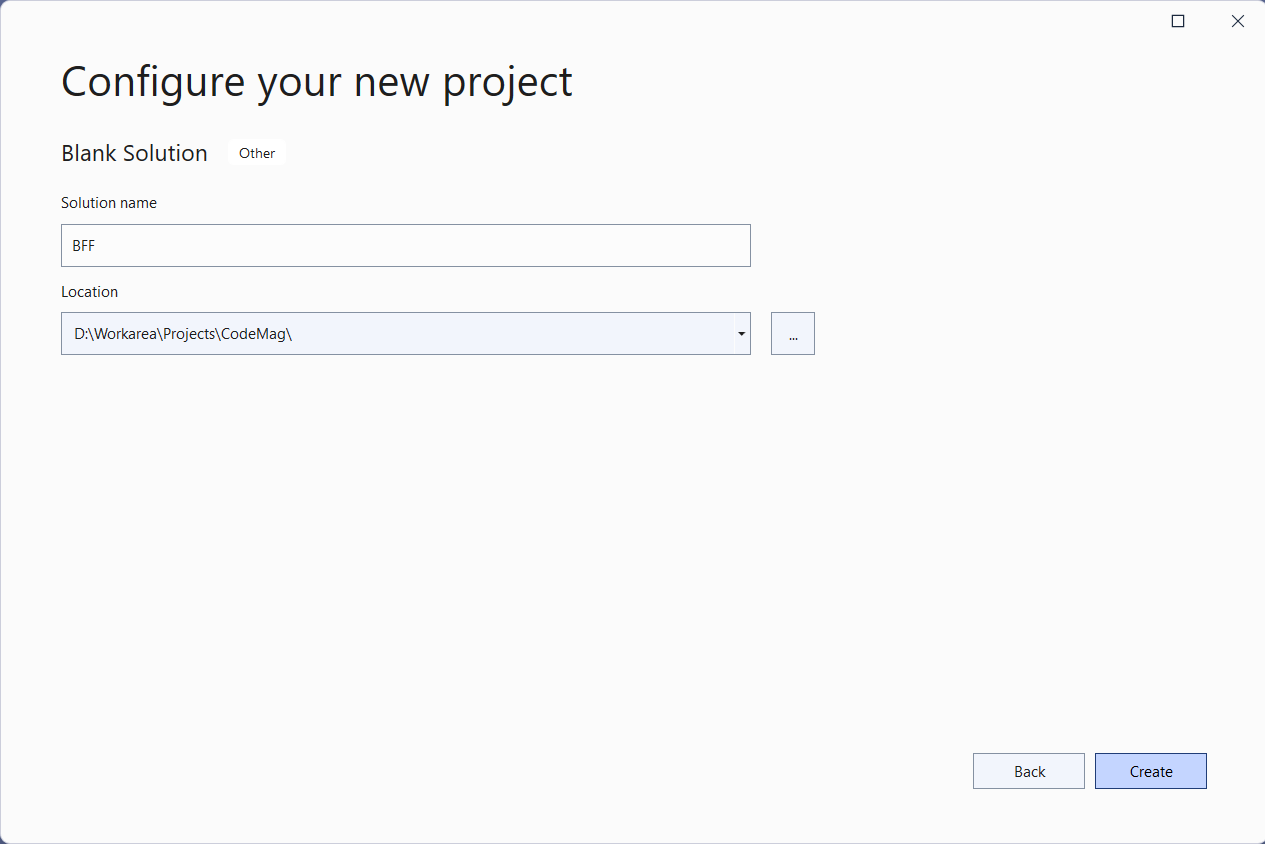
- Specify the solution name and the path where it should be created in the “Configure your new project” window, as shown in Figure 5.
- Click Create to complete the process.
Create the Back-end Microservices
Let's now create the back-end microservices. You'll create three microservices: Product, Customer, and Order. These microservices are ASP.NET Core 6 Web API projects.
Create a New ASP.NET 6 Project in Visual Studio 2022
To create a new ASP.NET 6 Project in Visual Studio 2022:
- Start the Visual Studio 2022 Preview IDE.
- In the “Create a new project” window, select “ASP.NET Core Web API” and click Next to move on.
- Specify the project name and the path where it should be created in the “Configure your new project” window.
- If you want the solution file and project to be created in the same directory, you can optionally check the “Place solution and project in the same directory” checkbox. Click Next to move on.
- In the next screen, specify the target framework and authentication type as well. Ensure that the “Configure for HTTPS,” “Enable Docker Support,” and the “Enable OpenAPI support” checkboxes are unchecked because you won't use any of these in this example.
- Click Create to complete the process.
Follow the same steps outlined above to create the other ASP.NET Core 6 Web API projects corresponding to the microservices you'll create. You can name these projects OrderProcessing.Product and OrderProcessing.Customer respectively.
Create the Entity Classes
Right-click on the OrderProcessing.Product project and create a new file named Product with the following code in there:
namespace OrderProcessing.Product
{
    public class Product
    {
        public Guid Id { get; set; }
        public string Name { get; set; }
        public int Quantity { get; set; }
        public decimal Price { get; set; }
    }
}
Similarly, right-click on the OrderProcessing.Customer project, create a new file named Customer, and replace the default generated code with the following code:
namespace OrderProcessing.Customer
{
    public class Customer
    {
        public Guid Id { get; set; }
        public string FirstName { get; set; }
        public string LastName { get; set; }
        public string Address { get; set; }
        public string Phone { get; set; }
        public string EmailAddress { get; set; }
    }
}
Create the Product Microservice
In the OrderProcessing.Product project, right-click on the Controllers solution folder and create an API Controller class. as shown in Listing 1.
Listing 1: The ProductController Class
using Microsoft.AspNetCore.Mvc;

namespace OrderProcessing.Product.Controllers
{
    [Route("api/[controller]")]
    [ApiController]
    public class ProductController : Controller
    {
        private IProductRepository _productRepository;
        public ProductController(IProductRepository productRepository)
        {
            _productRepository = productRepository;
        }

        [HttpGet("GetAllProducts")]
        public async Task<List<Product>> GetAllProducts()
        {
            return await _productRepository.GetAllProducts();
        }
    }
}
Create the Customer Microservice
In the OrderProcessing.Product project, right-click on the Controllers solution folder and select Add > Controller… to create an API Controller class. Replace the default generated code of this class with the code shown in Listing 2.
Listing 2: The CustomerController Class
using Microsoft.AspNetCore.Mvc;

namespace OrderProcessing.Customer.Controllers
{
    [Route("api/[controller]")]
    [ApiController]
    public class CustomerController : ControllerBase
    {
        private ICustomerRepository _customerRepository;
        public CustomerController(ICustomerRepository customerRepository)
        {
            _customerRepository = customerRepository;
        }

        [HttpGet("GetAllCustomers")]
        public async Task<List<Customer>> GetAllCustomers()
        {
            return await _customerRepository.GetAllCustomers();
        }
    }
}
Create the Repository Classes
You'll take advantage of the Repository design pattern to create two repository classes: a ProductRepository class that will be part of the Product microservice and a CustomerRepository class that will be part of the Customer microservice project. These classes implement the IProductRepository and ICustomerRepository interfaces.
Create a new interface named IProductRepository in the Product microservice project and replace the default code with the following code:
namespace OrderProcessing.Product
{
    public interface IProductRepository
    {
        public Task<List<Product>> GetAllProducts();
    }
}
The ProductRepository class implements this interface as shown in Listing 3.
Listing 3: The ProductRepository Class
namespace OrderProcessing.Product
{
    public class ProductRepository: IProductRepository
    {
        private readonly List<Product> products = new List<Product>();

        public ProductRepository()
        {
            products.Add(new Product
            {
                Id = Guid.NewGuid(),
                Name = "Samsung Mobile",
                Quantity = 25,
                Price = 90000
            });

            products.Add(new Product
            {
                Id = Guid.NewGuid(),
                Name = "Motorola Mobile",
                Quantity = 50,
                Price = 65000
            });

            products.Add(new Product
            {
                Id = Guid.NewGuid(),
                Name = "OnePlus Mobile",
                Quantity = 15,
                Price = 55000
            });
        }
        public Task<List<Product>> GetAllProducts()
        {
            return Task.FromResult(products);
        }
    }
}
Create another interface named ICustomerRepository in the Customer microservice project having the following code:
namespace OrderProcessing.Customer
{
    public interface ICustomerRepository
    {
        public Task<List<Customer>> GetAllCustomers();
    }
}
The CustomerRepository class implements the ICustomerRepository interface as shown in Listing 4.
Listing 4: The CustomerRepository Class
namespace OrderProcessing.Customer
{
    public class CustomerRepository: ICustomerRepository
    {
        private readonly List<Customer> customers = new List<Customer>();

        public CustomerRepository()
        {
            customers.Add(new Customer()
            {
                Id = Guid.NewGuid(),
                FirstName = "Joydip",
                LastName = "Kanjilal",
                Address = "Hyderabad, India",
                Phone = "9999999999",
                EmailAddress = "joydipkanjilal@yahoo.com"
            });

            customers.Add(new Customer()
            {
                Id = Guid.NewGuid(),
                FirstName = "James",
                LastName = "Smith",
                Address = "Calgary, Canada",
                Phone = "1111111111",
                EmailAddress = "jsmith@gmail.com"
            });
        }
        public Task<List<Customer>> GetAllCustomers()
        {
            return Task.FromResult(customers);
        }
    }
}
Register the Repository Classes
Register the CustomerRepository and the ProductRepository classes in the Program class of the Product microservice project. The following code shows how you can add a scoped service of type IProductRepository in the services collection.
builder.Services.AddScoped<IProductRepository, ProductRepository>();
Similarly, you should add a scoped service of type ICustomerRepository in the services collection of the Customer microservices project using the following piece of code:
builder.Services.AddScoped<ICustomerRepository, CustomerRepository>();
Create the BFF Services
Now that the back-end microservices are ready, let's examine how you can create the BFF Services layer. Follow the steps outlined in the earlier section “Create a New ASP.NET 6 Project in Visual Studio 2022” to create two BFF API projects, named BFF.Web and BFF.Mobile.
Create the Data Transfer Objects
Create two DTO classes namely, ProductDTO and CustomerDTO. The former should be created in the Product microservice project and the latter should be created in the Customer microservice project. The code snippet shows the ProductDTO class:
using System.Text.Json.Serialization;
namespace BFF.Web
{
    public class ProductDTO
    {
        [JsonIgnore]
        public Guid Id { get; set; }
        public string Name { get; set; }
        public int Quantity { get; set; }
        public decimal Price { get; set; }
    }
}
The following code snippet illustrates the CustomerDTO class:
using System.Text.Json.Serialization;
namespace BFF.Mobile.Controllers
{
    public class CustomerDTO
    {
        public Guid Id { get; set; }
        public string FirstName { get; set; }
        public string LastName { get; set; }

        [JsonIgnore(Condition = JsonIgnoreCondition.WhenWritingNull)]
        public string Address { get; set; }

        [JsonIgnore(Condition = JsonIgnoreCondition.WhenWritingNull)]
        public string Phone { get; set; }

        [JsonIgnore(Condition = JsonIgnoreCondition.WhenWritingNull)]
        public string EmailAddress { get; set; }
    }
}
Note how the JsonIgnore attribute has been used to disallow a property to be serialized if it contains a null value.
Create the BFF.Product Service
Create a new controller class in the BFF.Product project named WebBFFController with the code illustrated in Listing 5.
Listing 5: The WebBFFController Class
using Microsoft.AspNetCore.Mvc;
using Newtonsoft.Json;

namespace BFF.Web.Controllers
{
    [Route("api/[controller]")]
    [ApiController]
    public class WebBFFController : ControllerBase
    {
        [HttpGet("GetAllProducts")]
        public async Task<List<ProductDTO>> GetAllProducts()
        {
            return await GetAllProductsInternal();
        }

        private async Task<List<ProductDTO>>
        GetAllProductsInternal()
        {
            string baseURL = "http://localhost:5167/api/";
            string url = baseURL + "Product/GetAllProducts";
            using (HttpClient client = new HttpClient())
            {
                using (HttpResponseMessage responseMessage = await client.GetAsync(url))
                {
                    using (HttpContent content = responseMessage.Content)
                    {
                        string data = await content.ReadAsStringAsync();
                        return JsonConvert.DeserializeObject<List<ProductDTO>>(data);
                    }
                }
            }
        }
    }
}
Create the BFF.Customer Service
Now, create a new controller class named MobileBFFController and replace the default generated code with the code shown in Listing 6.
Listing 6: The MobileBFFController Class
using Microsoft.AspNetCore.Mvc;
using Newtonsoft.Json;

namespace BFF.Mobile.Controllers
{
    [Route("api/[controller]")]
    [ApiController]
    public class MobileBFFController : ControllerBase
    {
        [HttpGet("GetAllCustomers")]
        public async Task<List<CustomerDTO>> GetAllCustomers()
        {
            return await GetAllCustomersAsync();
        }

        private async Task<List<CustomerDTO>>
        GetAllCustomersAsync()
        {
            string baseURL = "http://localhost:5034/api/";
            string url = baseURL + "Customer/GetAllCustomers";

            using (HttpClient client = new HttpClient())
            {
                List<CustomerDTO> customerDTOs = new List<CustomerDTO>();

                using (HttpResponseMessage responseMessage = await client.GetAsync(url))
                {
                    using (HttpContent content = responseMessage.Content)
                    {
                        string data = await content.ReadAsStringAsync();
                        var customers = JsonConvert.DeserializeObject<List<CustomerDTO>>(data);

                        foreach(var customer in customers)
                        {
                            CustomerDTO customerDTO = new CustomerDTO();
                            customerDTO.Id = customer.Id;
                            customerDTO.FirstName = customer.FirstName;
                            customerDTO.LastName = customer.LastName;
                            customerDTO.Phone = null;
                            customerDTO.Address = null;
                            customerDTO.EmailAddress = null;
                            customerDTOs.Add(customerDTO);
                        }

                        return customerDTOs;
                    }
                }
            }
        }
    }
}
Note how only the non-null properties of the CustomerDTO class are used to return data. And now, the application is ready for you to explore. You can test the API Endpoints of the BFF layer using Postman.
Test the Application
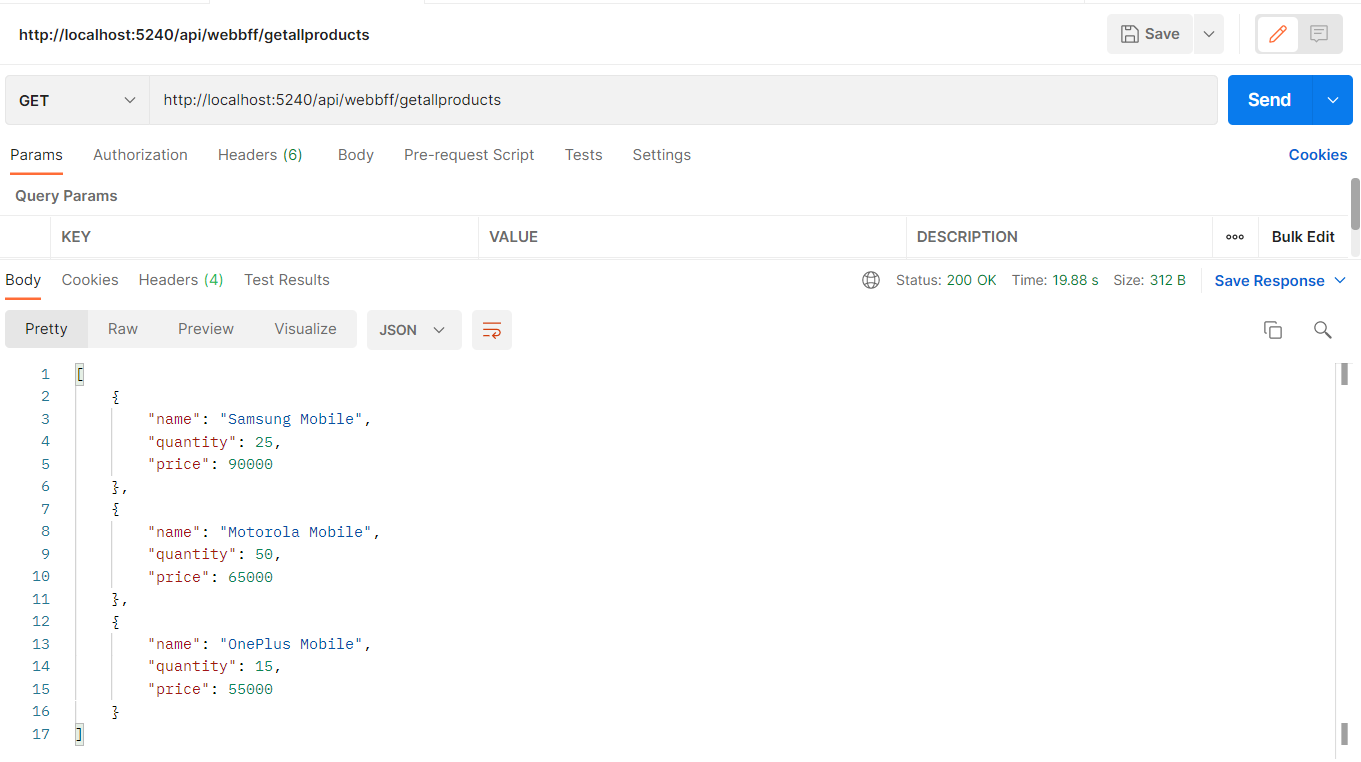
Figure 6 illustrates how the output looks when you invoke the getallproducts API method of the WebBFF service from Postman.
Best Practices
Some of the best practices you should follow when working with the BFF pattern include:
- Avoid duplicating the BFF logic to avoid code redundancy.
- Use the BFF pattern when your application works with several microservices and/or consumes data from external APIs.
- You can use the BFF pattern also when your application has several different user interfaces with each requiring data to be presented in its own required format.
Conclusion
Back-end for front-end is a design pattern intended to help both developers and end-users. It makes your front-end applications resilient to changes in the domain services while also avoiding over-fetching and over-requesting issues. It enables you to design specific back-end services for various front-end applications or interfaces.
In using the BFF pattern, you might see an increase in latency but that's acceptable because there would be a high resource usage if you were to work with back-end services that aren't optimized for the front-end.
