


With developers becoming increasingly comfortable with microservices, reverse proxies have gained visibility. Inside Microsoft, someone noticed that a number of teams were building reverse proxies for their own projects. Luckily, someone realized that a single, reusable reverse proxy would be something that we could all benefit from. This led them to release “Yet Another Reverse Proxy” or YARP. Let's talk about what reverse proxies are and how YARP works.
This bring us to two important questions: “What is a Reverse Proxy?” and “How do I create a reverse proxy?”
What's a Reverse Proxy?
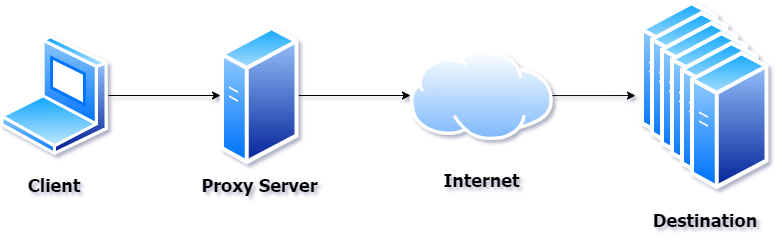
If you're like me, the word “proxy” is an overloaded term. In different contexts, the word proxy means something different to different people. In this case, I'm talking about a server that's an intermediary between the caller and the receiver of a networking call (usually HTTP or similar). Before you can understand a reverse proxy, let's talk about forward proxies (or proxy servers, as you might be familiar with).
A proxy server is a server that takes requests and re-executes the call to the Internet (or intranet) on behalf of the original caller. This can be used for caching requests to improve speed of execution or for filtering content (as well as other reasons). In Figure 1, you can see a typical proxy server diagram.
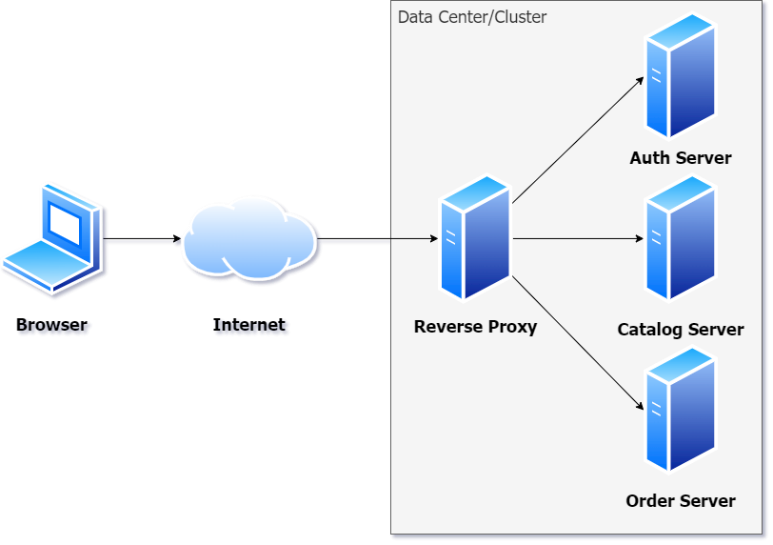
A reverse proxy is very much like a proxy server, but, not too surprisingly, in reverse. Instead of intercepting calls going outside the Internet/intranet, a reverse proxy intercepts calls from the outside and forwards them to local servers. Often the proxy server is the only accessible server in this scenario. If you look at Figure 2, you can see that all calls come into the reverse proxy. Often the caller has no idea that there's a reverse proxy.
Now that you have a general idea of what a reverse proxy is, let's talk about the why of reverse proxies.
Do I Need a Reverse Proxy?
Many projects have no need for a reverse proxy. You should learn about them anyway, because it's another arrow in your development quiver to use when you need it. The use-case for using a reverse proxy is fairly well defined. The reverse proxy can be used in microservice scenarios where you don't want individual clients to know about the naming or topology of your data center.
Reverse proxies are not only helpful in those microservices projects. Here are some other reasons to use a reverse proxy:
- Service gatekeeping
- Load balancing
- SSL termination
- Security
- URL writing
Although you might want to use a reverse proxy for all of these reasons, you don't need all of these services. Use a reverse proxy in the way your application works. You can use reverse proxies as a product (e.g., CloudFlare) or built into your own projects.
Let's look at a new support in .NET projects called YARP.
Using YARP
The most obvious use-case for many of you reading this article is to use a reverse proxy to provide an API gateway for microservices. A reverse proxy can expose a server that represents a single surface area for requests. The details of how the service is implemented and where the actual service resides are made opaque to the actual clients. This is what I call service aggregation. In this case, a reverse proxy is used to accept calls from clients and then pass them off to the underlying service (or cluster of services). This allows you to change the composition of the microservice without breaking clients.
You can use service aggregation to marry disparate systems without having to rewrite or change the underlying technology. For example, you might have a Java system from an acquisition, a .NET project that's built in-house, and a Python machine learning project that you have to integrate. By using a reverse proxy, you can create a union of all these services to provide a single API service area for these different technologies.
Now that you've seen a bit about what a reverse proxy is, let's see how to implement a reverse proxy it in a .NET Core project using the YARP library. To get started, you need any ASP.NET Core project. Let's create an empty project (calling it DidItAgain.Proxy):
> dotnet new web -n DidItAgain.Proxy
To use YARP, you just need to add the NuGet package:
> dotnet add package Yarp.ReverseProxy
Once installed, you can wire the middleware. First, you need to add the reverse proxy services and configure it:
var bldr = WebApplication.CreateBuilder(args);
bldr.Services.AddReverseProxy();
As you can see, you first add the proxy service dependencies with AddReverseProxy. You need to configure it, but I'll get to that soon. Before you do that, let's add the middleware:
var app = bldr.Build();
app.MapReverseProxy();
app.MapGet("/", () => "Hello World!");
app.Run();
Configuring the Reverse Proxy
In YARP, the reverse proxy needs to know what the pattern is that you're looking for in requests and where to pass the requests to. It uses the term Routes for the request patterns and uses Clusters to represent the computers(s) to forward those requests. This means that you need a way of providing the proxy with a set of Routes and Clusters. The most direct is to use a section in your configuration files:
var proxy = bldr.Services.AddReverseProxy();
proxy.LoadFromConfig(bldr.Configuration.GetSection("Yarp"));
By calling the LoadFromConfig, the proxy expects a section that conforms to the schema of the proxy configuration. It doesn't matter what you call the section, as long as it's a set of Routes and Clusters. For example, here's the general structure of the configuration section:
{
    ...
    "Yarp": {
       "Routes": {
            ...
        },
        "Clusters": {
            ...
        }
    }
}
Let's start with the Cluster:
"Clusters": {
    "CustomerCluster": {
        "Destinations": {
            "customerServer": {
                "Address": "https://someurl.com/"
            }
        }
    }
}
A Cluster (named CustomerCluster) is just a destination for an endpoint server(s). Note that there could be multiple destinations and each could use different semantics to determine where to locate an endpoint server and transform it. Requests typically keep their paths and append them to the address. This is typically matched with a Route:
"Routes": {
    "CustomerRoute": {
        "ClusterId": "CustomerCluster",
        "Match": {
            "Path": "/api/customers/{**catch-all}"
        }
    }
}
A route (named CustomerRoute in this example) is a set of rules for matching the request and pointing to a Cluster via the ClusterId. In this example, the route matches calls to the proxy server that start with /api/customers/ and directs them to the customer Cluster. Routes can match based on various criteria:
- Path (like you've just seen)
- Headers
- Query string parameters
- HTTP method
- Host name
This gives you a lot of control over how the reverse proxy matches URIs to other computers. Although typically used as a facade to your own servers, it can be used to proxy to wherever you want.
Programmatic Configuration
Although using the configuration file is a common way to configure the proxy server, often you want to have a data-driven approach or integrate the proxy with a service discovery service (e.g., the Microsoft Tye project). To supply the configuration file, you'll need to create a class that implements the IProxyConfigProvider interface:
public class YarpProxyConfigProvider: IProxyConfigProvider
{
    public IProxyConfig GetConfig()
    {
        return new YarpProxyConfig();
    }
}
The provider requires you to implement a class that represents the IProxyConfig interface. Although this interface is simple, the IProxyConfig is where the building up of the configuration happens. For example:
public class YarpProxyConfig : IProxyConfig
{
    readonly List<RouteConfig> _routes;
    readonly List<ClusterConfig> _clusters;
    readonly CancellationChangeToken _changeToken;
    readonly CancellationTokenSource _cts = new CancellationTokenSource();
    public YarpProxyConfig()
    {
        _routes = GenerateRoutes();
        _clusters = GenerateClusters();
        _cts = new CancellationTokenSource()
        _changeToken = new CancellationChangeToken(_cts.Token);
    }
    public IReadOnlyList<RouteConfig> Routes => _routes;
    public IReadOnlyList<ClusterConfig> Clusters => _clusters;
    public IChangeToken ChangeToken => _changeToken;
}
You can see that the interface has three members. The Routes and Clusters return a list of the Route and Clusters (with the same structure you see in the config file above). The ChangeToken is used to notify the system of changes to the configuration, if needed. Creation of the clusters looks like you'd expect:
private List<ClusterConfig> GenerateClusters()
{
    var collection = new List<ClusterConfig>();
    collection.Add(new ClusterConfig()
    {
        ClusterId = "FirstCluster",
        Destinations = new Dictionary<string, DestinationConfig>{
            {
                "server", new DestinationConfig()
                {
                    Address = "https://someserver.com"
                }
            }
        }
    });
    return collection;
}
Although I'm hard-coding the configuration (which is really not any better than configuration files), you could use code to determine how the clusters should be configured. It's similar to create routes:
private List<RouteConfig> GenerateRoutes()
{
    var collection = new List<RouteConfig>();
    collection.Add(new RouteConfig()
    {
        ClusterId = "FirstCluster",
        Match = new RouteMatch()
        {
            Path = "/api/foo/{**catch-all}"
        }
    });
    return collection;
}
Again, this should look a lot like the configuration file example. There's a difference in how you wire-up the services for the reverse proxy:
using DidItAgain.Proxy;
using Yarp.ReverseProxy.Configuration;

var bldr = WebApplication.CreateBuilder(args);

bldr.Services.AddTransient<IProxyConfigProvider, YarpProxyConfigProvider>();

bldr.Services.AddReverseProxy();

var app = bldr.Build();
Notice that you're adding your provider into the services collection and adding the reverse proxy. When it's constructed, it queries for the proxy config provider on its own and finds yours.
Now that you've seen how to configure it, let's talk about how to configure the proxy for different features. From now on, I go back to the configuration file because it's easier to show you how the Clusters and Routes are defined.
Load Balancing
An important use of reverse proxies is to provide generalized load balancing. Again, this allows the reverse proxy to forward requests to more than one server that supplies a specific service. Now you can scale out transparently to the clients of your service(s). Although load balancing is available as a service in many cloud-deployed solutions, in some cases, you'd want more control over it (or you'd use the load balancing support indirectly).
When I say load balancing, I don't mean just sharing load between servers. There are different strategies to load balancing. For example, Figure 3 shows a typical round-robin load balancing where calls are passed off to different servers in a linear fashion.
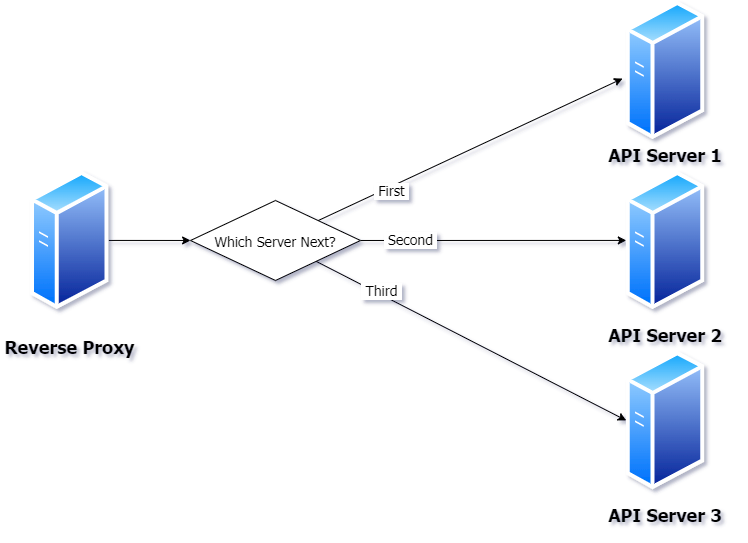
There are more strategies for load balancing, but this is probably the most common scenario.
To implement load balancing, you need to specify the load balancing type in the cluster:
"CustomerCluster": {
    "Destinations": {
        "customerServer1": { ... },
        "customerServer2": { ... }
    },
    "LoadBalancingPolicy": "RoundRobin"
}
The supported policies are:
- PowerOfTwoChoices (default): Picks two random destinations and picks the one with the least number of requests.
- FirstAlphabetical: Picks the next destination based on name (useful for failover instead of sharing load).
- Random: Picks a random server without regard for load.
- RoundRobin: Picks a server by going in order without regard for load.
- LeastRequests: Picks a server based on the smallest number of requests, but does require that it scan through each destination. This is the slowest but has the highest likelihood of dealing with overloaded servers.
Although load balancing can help you achieve scalability, it doesn't do this by knowing about your servers. If you're completely stateless in those servers, just using the load balancing policy is all you need. But sometimes you have state (e.g., server state or session state) on the servers and need to lock a client to a server once it's been picked. To do this, you can enable SessionAffinity:
"CustomerCluster": {
    "Destinations": {
        "customerServer1": { ... },
        "customerServer2": { ... }
    },
    "LoadBalancingPolicy": "RoundRobin", "SessionAffinity": {
        "Enabled": true
    }
}
This tracks affinity with a cookie, although you can change the behavior to use a header instead, as well as adding other parameters. By using these two options of the cluster, you can control the behavior of load balancing in the reverse proxy.
To enable load balancing or session affinity, you'll need to opt in during the mapping of the proxy server:
app.MapReverseProxy(opt => {
    opt.UseLoadBalancing();
    opt.UseSessionAffinity();
});
With this, you can add only the features you want to use.
SSL Termination
Most of the websites that you visit use SSL now to ensure end-to-end encryption of any data. This is a good thing. A reverse proxy has this option to do something called SSL Termination. This is just a fancy name for not using SSL inside a data center. As you can see in Figure 4, the SSL call terminates with the proxy server.
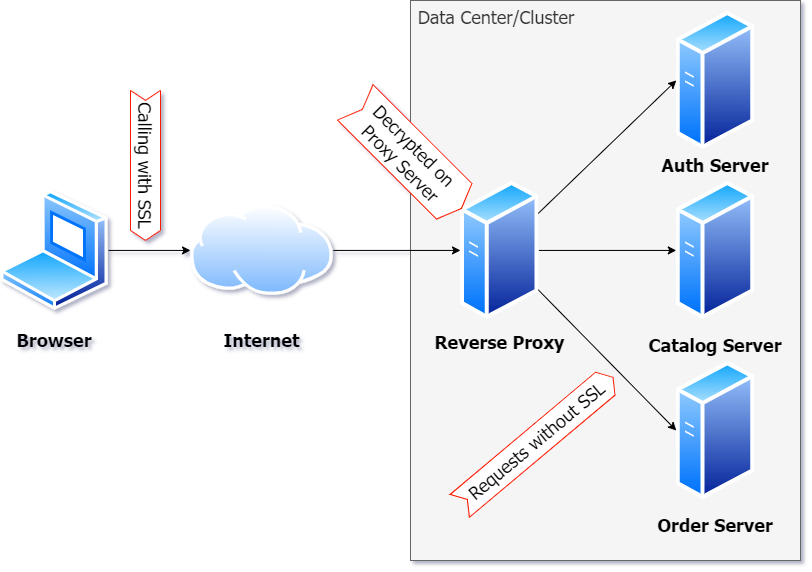
SSL Termination allows you to decide whether you need encryption to call the proxied servers. Often, within a data center (or cluster), requests are forwarded without SSL so that you can avoid having to manage certificates for each server cluster. Whether you use SSL is just a matter of what the cluster destination URL is:
"Clusters": {
    "CustomerCluster": {
        "Destinations": {
            "customerServer": {
                // http for no SSL or https for SSL
                "Address": "http://someurl.com/"
            }
        }
    }
}
Security
In most cases, you don't have to do anything special to enable security through the proxy server. If UseAuthentication and/or UseAuthorization are enabled, the proxy server forwards most credentials to the endpoint servers. Let's look at different types of authentication types:
- Cookies, Bearer Tokens, API Keys: As they are part of the request, they'll be forwarded.
- OAuth2, OpenIdConnect, WsFederation: As long as they are configured as cookies, they flow through to the endpoint servers.
- Windows, Negotiate, NTLM, Kerberos: These authentication schemes are network connection based. Because the connection is through the reverse proxy, they aren't supported in YARP's reverse proxy.
In most cases, authentication flows through to the endpoint servers. I'd be consistent with testing your authentication schemes, though.
URL Rewriting
In some cases, you may want to change the URL before it's sent to the endpoint server. The reasons for this vary, but one common case is to allow for a change to the API without having to change the endpoint API server's syntax. To do this, you'll want to introduce transforms into the configuration. Transforms are added to the Routes so that it is transformed before passing it to a Cluster. For example, if you need to change the URL path, you can do it with a transform:
"Routes": {
    "CustomerRoute": {
        "ClusterId": "CustomerCluster",
        "Match": {
            "Path": "/api/customers/{**catch-all}"
        },
        "Transforms": {
            "PathPattern": "/api/v2/customers/{**remainder}"
        }
    }
},
In this case, it replaces the path with a new URL and anything in the catch-all is added as the suffix. In this example, the transform could be used to redirect to a versioned API. The types of transforms include:
- Path prefix: Supports removing or adding a prefix to the request path.
- Path set: Replaces a path with a static path.
- Path pattern: Like the example, allows you to use pattern matching to recreate the endpoint URL.
- Query strings: Add, remove, or convert query strings to other parts of the request (path, query string, or header).
- HTTP method: Allows you to change the HTTP method before it's sent to the endpoint server.
- Headers: Allows you to have complex changes to headers that are added/removed before a request is sent to the endpoint server.
With the transformation support, you can really control how the requests are formatted when you're forwarding the request to the endpoint server.
Where Are We?
I hope, at this point, that you've seen the benefit of using a proxy server and, by extension YARP. This utility server can be plugged into your architectures to solve a series of different problems. I hope you find that YARP is easy to add to a server and easy to configure.
