


The web is everywhere. Web apps run on devices of all shapes and sizes from desktop computers to mobile phones, thanks to ubiquitous implementation of modern open web standards. For developers seeking to build apps for a broad range of devices and platforms, the web provides unmatched cross-platform reach.
.NET has supported building web apps from its earliest days. The new .NET 7 release has end-to-end support for building web apps including high-performance back-end services with ASP.NET Core, rich interactive web UI with Blazor, and middleware for everything in between. Many of the largest, most heavily used web apps on the planet are built using .NET technologies. .NET provides a full stack and cross-platform solution for building web apps along with great tooling in Visual Studio and an active open-source ecosystem.
Blazor enables client web UI development with .NET without the need to write JavaScript. With Blazor, you author reusable web UI components using a combination of HTML, CSS, and C# that can then be used in any modern web browser. Unlike earlier attempts to run .NET in browsers, like the ill-fated Silverlight, Blazor relies only on open web standards, like WebAssembly and WebSockets. Blazor is also fully open source and has an active community of contributors and independent project maintainers.
Blazor became part of .NET and ASP.NET Core with .NET Core 3.0 back in 2019 and is fully supported as part of the .NET 6 long-term support (LTS) release. .NET 7 includes many great new Blazor features that make implementing web apps easier and more productive. Let's look at what .NET 7 has to offer for Blazor development!
Blazor Custom Elements
Blazor provides a powerful component model for encapsulating reusable pieces of web UI. This makes it easy to build reusable libraries of web UI components and to quickly build apps using preexisting components.
With .NET 7, you can now use Blazor components from existing JavaScript apps, including apps built with popular front-end frameworks like Angular, React, or Vue. .NET 7 adds support for using Blazor components as custom HTML elements.
With .NET 7, you can now use Blazor components from existing JavaScript apps, including apps built with popular front-end frameworks like Angular, React, or Vue.
Modern browsers provide APIs for defining custom elements that can encapsulate UI elements. These custom elements can then be used with any web UI. You can host custom elements implemented using Blazor with either Blazor Server or Blazor WebAssembly.
To get started building custom elements with Blazor, you first need to add a package reference to Microsoft.AspNetCore.Components.CustomElements.
To register a Blazor component as a custom element, use the RegisterCustomElement<TComponent>() extension method and specify a name for the element. Be sure to use an element name with at least one dash (-) in it, as this is required by the custom elements standard.
In Blazor WebAssembly, you register a custom element like this in Program.cs:
builder.RootComponents.RegisterCustomElement<Counter>("blazor-counter");
In Blazor Server, registering a custom element looks like this:
builder.Services.AddServerSideBlazor(options =>
{
    options.RootComponents.RegisterCustomElement<Counter>("blazor-counter");
});
You can now add a blazor-counter element to your app to create a Counter component.
<blazor-counter></blazor-counter>
Note that to use the custom element you'll need to specify explicitly both the open and close tags: Custom elements don't support XML-style self-closing elements.
To set up your JavaScript app to use a Blazor custom element, you'll first need to decide if you want to use Blazor Server or Blazor WebAssembly and add the corresponding script to your app (blazor.server.js or blazor.webassembly.js).
<script src="_framework/blazor.webassembly.js"></script>
<!-- or blazor.server.js -->
To use Blazor Server, you'll need an ASP.NET Core app to host the Blazor components. With Blazor WebAssembly, you'll need to publish the app together with your JavaScript app. During development, you'll want to set up your front-end development server to proxy requests to the ASP.NET Core back-end or Blazor WebAssembly app and run both apps simultaneously. Using ASP.NET Core to host both apps can simplify the development experience. ASP.NET Core provides templates for hosting Angular-, React-, and Blazor WebAssembly-based apps that you can use to get set up quickly.
You can pass parameters to your Blazor custom elements using HTML attributes or by setting properties on the element object using JavaScript. For example, let's say the Counter component has a parameter for specifying the increment amount:
[Parameter]
public  int IncrementAmount { get; set; }
You can specify the parameter in HTML on the custom element like this:
<blazor-counter increment-amount="10"></blazor-counter>
Or using JavaScript like this:
const elem = document.querySelector("blazor-counter");
elem.incrementAmount = 10;
Note that the HTML attribute name for the property is kebab case (increment-amount) and the JavaScript property is camelCase (incrementAmount).
With the JavaScript syntax, you can pass complex parameter values using JavaScript objects, which will then get JSON serialized. With HTML attributes, you're limited to passing simple types like strings, Booleans, or numerical types. Passing child content or other templated content via render fragments is not supported.
Data Binding Get/Set/After Modifiers
.NET 7 includes some nice improvements for configuring data binding in Blazor.
In Blazor, you can create a two-way binding between UI elements and component state using the @bind directive attribute:
<input @bind="searchText" />
@code {
    string searchText="";
}
When the value of the input changes, the searchText field is automatically updated accordingly. Also, when the component renders, the value of the input is set to the value of the searchText field.
In .NET 7, you can now easily run async logic after a binding event has completed using the new @bind:after modifier:
<input @bind="searchText" @bind:after="PerformSearch" />
@code {
    string searchText = "";

    async Task PerformSearch()
    {
        // Do something async with searchText
    }
}
In this example, the PerformSearch async method runs automatically after any changes to the search text are detected.
It's also now easier to set up binding for component parameters. Components can support two-way data binding by defining a pair of parameters for the value and for a callback that's called when the value changes. The new @bind:get and @bind:set modifiers now make it trivial to create a component that binds to an underlying UI element.
<input @bind:get="Value" @bind:set="ValueChanged" />

@code {
    [Parameter]
    public TValue Value { get; set; }

    [Parameter]
    public EventCallback<TValue> ValueChanged { get; set; }
}
The @bind:get and @bind:set modifiers are always used together. The @bind:get modifier specifies the value to bind to, and the @bind:set modifier specifies a callback that's called when the value changes.
A parent component using the above component (let's call it MyInput) can now bind to the value of the input using @bind-Value.
<MyInput @bind-Value="text" />

@code {
    string text = "Type something great!";
}
Show App Loading Progress
The Blazor WebAssembly project template has a new loading UI that shows the progress of loading the app (see Figure 1).
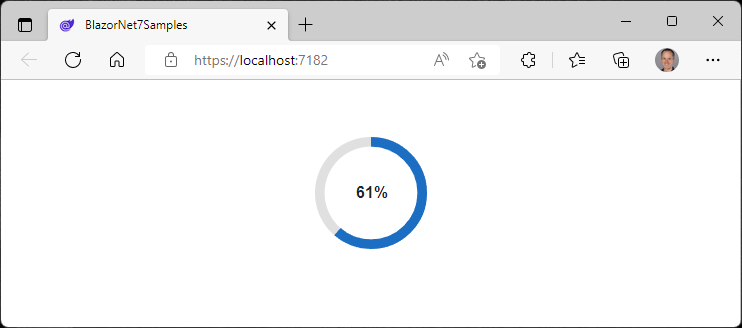
The new loading screen is implemented with some simple HTML and CSS in the Blazor WebAssembly template using two new CSS custom properties (variables) provided by Blazor WebAssembly:
--blazor -load-percentage: The percentage of app files loaded--blazor -load-percentage-text: The percentage of app files loaded rounded to the nearest whole number
Using these new CSS variables, you can create a custom loading UI that matches the style of your own Blazor WebAssembly apps.
Empty Blazor Templates
The Blazor project templates provide a great starting point for learning how to build your first Blazor template. In addition to setting up the Blazor app for development, these templates include sample pages demonstrating commonly used features as well as Bootstrap for CSS styling.
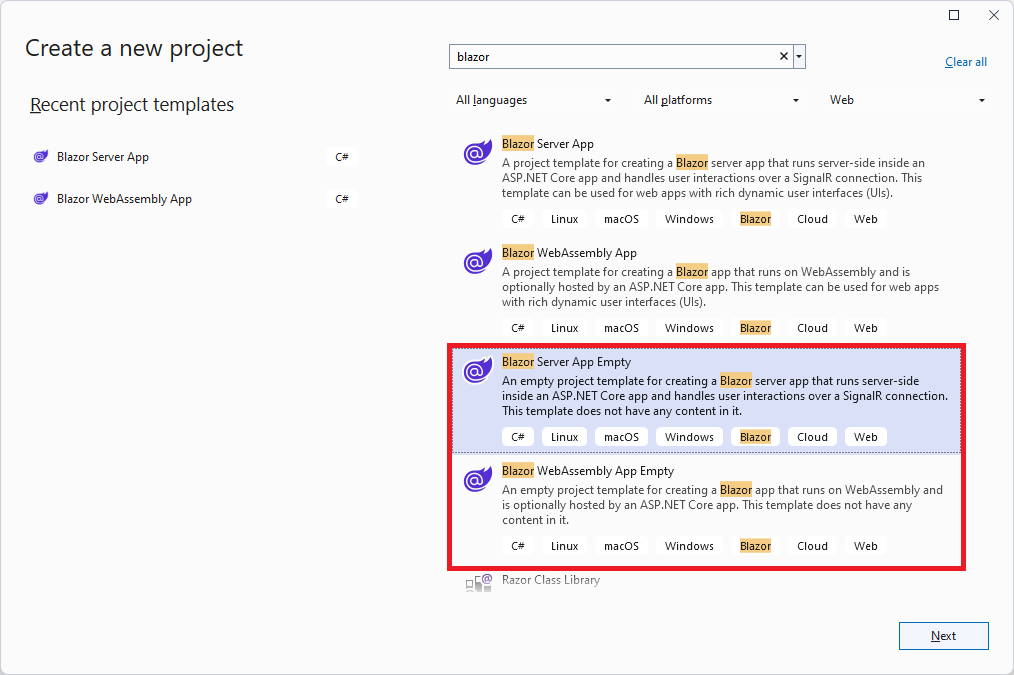
After you've figured out the basics of using Blazor, the included demo code is no longer needed and having to repeatedly remove it can get tedious. So, in .NET 7, we've added new empty Blazor project templates that include only the bare necessities for creating a new Blazor app. You now have a completely blank canvas that you can make completely your own, including using whatever CSS design framework you want.
The new empty Blazor templates appear alongside the existing Blazor templates in the Visual Studio new project dialog (see Figure 2).
Handle Location Changing Events
Blazor in .NET 7 now has support for handling location changing events. This allows you to warn users about unsaved work or to perform related actions when the user performs a page navigation.
To handle location changing events, register a handler with the NavigationManager service using the RegisterLocationChangingHandler method. Your handler can then perform async work on a navigation or choose to cancel the navigation by calling PreventNavigation on the LocationChangingContext. RegisterLocationChangingHandler returns an IDisposable instance that, when disposed, removes the corresponding location changing handler.
For example, the following handler prevents navigation to the counter page:
var registration = NavigationManager.RegisterLocationChangingHandler(async cxt =>
{
    if (cxt.TargetLocation.EndsWith("counter"))
    {
        cxt.PreventNavigation();
    }
});
Note that your handler will only be called for internal navigations within the app. External navigations can only be handled synchronously using the beforeunload event in JavaScript.
The new NavigationLock component makes common scenarios for handling location changing events simple.
<NavigationLock OnBeforeInternalNavigation="ConfirmNavigation" ConfirmExternalNavigation />
NavigationLock exposes an OnBeforeInternalNavigation callback that you can use to intercept and handle internal location changing events. If you want users to confirm external navigations too, you can use the ConfirmExternalNavigations property, which will hook the beforeunload event for you and trigger the browser-specific prompt. The NavigationLock component makes it simple to confirm user navigations when there's unsaved data. Listing 1 shows using NavigationLock with a form that the user may have modified but not submitted.
The new NavigationLock component makes common scenarios for handling location changing events simple.
Listing 1: Use the NavigationLock component to confirm user navigations when there is unsaved form data.
<EditForm EditContext="editContext" OnValidSubmit="Submit">
    ...
</EditForm>
<NavigationLock OnBeforeInternalNavigation="ConfirmNavigation" ConfirmExternalNavigation />

    @code {
        private readonly EditContext editContext;
        ...

        // Called only for internal navigations.
        // External navigations will trigger a browser specific prompt.
        async Task ConfirmNavigation(LocationChangingContext context)
        {
            if (editContext.IsModified())
            {
                var isConfirmed = await JS.InvokeAsync<bool>("window.confirm",
                   "Are you sure you want to leave this page?");

                if (!isConfirmed)
                {
                    context.PreventNavigation();
                }
            }
        }
    }
Dynamic Authentication Requests
Blazor provides out-of-the-box support for authentication using OpenID Connect and a variety of identity providers including Azure Active Directory (Azure AD) and Azure AD B2C. In .NET 7, Blazor now supports creating dynamic authentication requests at runtime with custom parameters to handle more advanced authentication scenarios in Blazor WebAssembly apps.
To specify additional parameters, use the new InteractiveRequestOptions type and helper methods on NavigationManager. For example, you can specify a log-in hint to the identity provider to indicate who to authenticate, like this:
InteractiveRequestOptions requestOptions = new()
{
    Interaction = InteractionType.SignIn,
    ReturnUrl = NavigationManager.Uri
};

requestOptions.TryAddAdditionalParameter("login_hint", "user@example.com");
NavigationManager.NavigateToLogin("authentication/login", requestOptions);
Similarly, you can specify the OpenID Connect prompt parameter, like when you want to force an interactive login:
requestOptions.TryAddAdditionalParameter("prompt", "login");
You can specify these options when using IAccessTokenProvider directly to request tokens:
var result = await AccessTokenProvider.RequestAccessToken(new()
    { Scopes = new[] { "edit" } });
if (!result.TryGetToken(out var token))
{
    result.InteractionOptions.TryAddAdditionalParameter(
        "login_hint", "user@example.com");
    NavigationManager.NavigateToLogin(
        result.InteractiveRequestUrl, result.InteractionOptions);
}
You can also specify authentication request options when making HTTP requests and the token cannot be acquired by the AuthorizationMessageHandler without user interaction:
try
{
    await Http.GetAsync("/orders");
}
catch (AccessTokenNotAvailableException ex)
{
    ex.Redirect(requestOptions =>
    {
        requestOptions.TryAddAdditionalParameter("login_hint", "user@example.com");
    });
}
Any additional parameters specified for the authentication request will be passed through to the underlying authentication library and on to the identity provider.
Hot Reload Improvements
.NET 6 introduced hot reload support, which is the ability to apply code changes to your running app during development without having to restart it. Both Blazor Server and Blazor WebAssembly apps support hot reloading changes, although hot reload for Blazor WebAssembly apps was significantly more limited.
.NET 7 improves hot reload support for Blazor WebAssembly apps by adding the following capabilities:
- Add new types
- Add nested classes
- Add static and instance methods to existing types
- Add static fields and methods to existing types
- Add static lambdas to existing methods
- Add lambdas that capture this to existing methods that already captured this previously
Work is ongoing to improve hot reload across all of .NET, so expect more hot reload improvements to come in future releases.
Blazor WebAssembly Debugging Improvements
Debugging Blazor WebAssembly apps presents unique challenges because the app runs within a web browser. To debug your Blazor WebAssembly code, Visual Studio connects to the browser via a .NET debugging proxy using the browser's JavaScript debugging protocol.
Blazor WebAssembly debugging in .NET 7 now has the following improvements:
- Support for the Just My Code setting to show or hide type members not from user code
- Support for inspecting multidimensional arrays
- The Call Stack window now shows the correct name for async methods
- Improved expression evaluation
- Correct handling of the
newkeyword on derived members - Support for debugger-related attributes in
System.Diagnostics
Expanded Crypto Support
.NET 7 includes expanded support for cryptographic algorithms when running on WebAssembly. The following algorithms are now also supported:
- SHA1, SHA256, SHA384, SHA512
- HMACSHA1, HMACSHA256, HMACSHA384, HMACSHA512
- Rfc2898DeriveBytes (PBKDF2)
- HKDF
Improved JavaScript Interop on WebAssembly
.NET 7 introduces a new low-level mechanism for using .NET in JavaScript-based apps. With this new JavaScript interop capability, you can invoke .NET code from JavaScript using the .NET WebAssembly runtime as well as call into JavaScript functionality from .NET without any dependency on the Blazor UI component model.
The easiest way to see the new JavaScript interop functionality in action is using the new experimental templates in the wasm-experimental workload. You can install the wasm-experimental workload using the following command:
dotnet workload install wasm-experimental
This workload contains two project templates: WebAssembly Browser App, and WebAssembly Console App (see Figure 3).
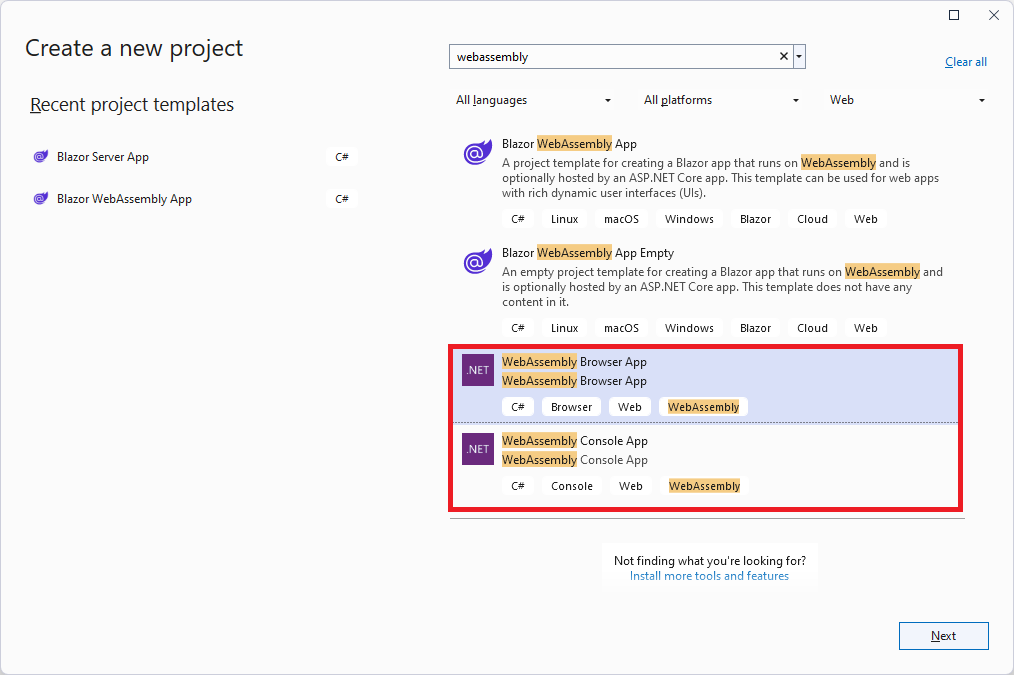
These templates are experimental, which means the developer workflow for them hasn't been fully sorted out yet. But the .NET and JavaScript APIs used in these templates are supported in .NET 7 and provide a foundation for using .NET on WebAssembly from JavaScript.
The WebAssembly Browser App template creates a simple web app that demonstrates using .NET directly from JavaScript in a browser. The WebAssembly Console App is similar, but runs as a Node.js console app instead of a browser-based web app.
The root html file in both templates imports a JavaScript module (main.js or main.mjs) that imports the relevant APIs from dotnet.js for working with .NET from JavaScript using WebAssembly.
import { dotnet } from './dotnet.js'
const {
    setModuleImports,
    getAssemblyExports,
    getConfig,
    runMainAndExit
} = await dotnet.create();
These APIs enable you to set up named modules that can be imported into your C# code.
setModuleImports('main.js', {
    window: {
        location: {
            href: () => globalThis.window.location.href
        }
    }
});
To import a JavaScript function so it can be called from C#, use the new JSImportAttribute on a matching method signature:
[JSImport("window.location.href", "main.js")]
internal static partial string GetHRef();
The first parameter to the JSImportAttribute is the name of the JavaScript function to import and the second parameter is the name of the module, both of which were set up by the setModuleImports call.
In the imported method signature, you can use .NET types for parameters and return values, which will be marshaled for you. Use JSMarshalAsAttribute<T> to control how the imported method parameters are marshaled. For example, you might choose to marshal a long as JSType.Number or JSType.BitInt. You can pass Action/Func callbacks as parameters, which will be marshaled as callable JavaScript functions. You can pass both JavaScript and managed object references and they will be marshaled as proxy objects, keeping the object alive across the boundary until the proxy is garbage collected. You can also import and export asynchronous methods that return a Task, which will be marshaled as JavaScript promises. Most of the marshaled types work in both directions, as parameters and as return values, on both imported and exported methods.
To export a .NET method so it can be called from JavaScript, use the JSExportAttribute:
[JSExport]
internal static string Greeting()
{
    var text = $"Hello from {GetHRef()}";
    Console.WriteLine(text);
    return text;
}
You can then get the exported methods in JavaScript and invoke them.
const config = getConfig();
const exports = await getAssemblyExports(config.mainAssemblyName);
const text = exports.MyClass.Greeting();
You can also invoke the main entry point in a .NET app.
await runMainAndExit(config.mainAssemblyName, ['dotnet', 'is', 'great!']);
Blazor provides its own JavaScript interop mechanism based on the IJSRuntime interface, which is uniformly supported across all Blazor hosting models. This common asynchronous abstraction enables library authors to build JavaScript interop libraries that can be shared across the Blazor ecosystem and is still the recommend way to do JavaScript interop in Blazor.
In Blazor WebAssembly apps, you also had the option to make synchronous JavaScript interop calls using the IJSInProcessRuntime or even unmarshalled calls using the IJSUnmarshalledRuntime. IJSUnmarshalledRuntime was tricky to use and only partially supported. In .NET 7, IJSUnmarshalledRuntime is now obsolete and should be replaced with the [JSImport]/[JSExport] mechanism. Blazor doesn't directly expose the dotnet runtime instance it uses from JavaScript, but it can still be accessed by calling getDotnetRuntime(0). You can also import JavaScript modules from your C# code by calling JSHost.ImportAsync, which makes the module's exports visible to [JSImport].
Blazor Hybrid
Blazor isn't just for web apps! Blazor components can also be hosted in native client apps using the Blazor Hybrid hosting model. In a Blazor Hybrid app, your components run directly on the device, not from within a browser. WebAssembly isn't used and there's no need for a web server. The Blazor components render to an embedded web view control using a local interop channel. Blazor Hybrid apps run fast and have full access to the native device's capabilities through normal .NET APIs. You can reuse existing Blazor web UI components with Blazor Hybrid apps and share them with both your web and native client apps. With Blazor Hybrid you can build a single shared UI for mobile, desktop, and web.
Blazor Hybrid support is included with .NET MAUI in .NET 7. By hosting your Blazor components in a .NET MAUI app, you can build native mobile and desktop apps using your existing web development skills. .NET MAUI provides access to many native device capabilities through a common cross-platform API, including the ability to reuse native UI controls alongside your Blazor components. To create a new Blazor Hybrid app with .NET MAUI, simply use the included .NET MAUI Blazor App project template. Blazor Hybrid support is also available for WPF and Windows Forms apps on NuGet.
Blazor Just Keeps Getting Better!
Blazor has come a long way from its humble beginnings. Blazor today can be used to build a web-based UI for nearly any kind of app. With the addition of the many improvements to Blazor .NET 7, Blazor continues to provide itself as a mature and modern client web UI framework. We hope you enjoy working with Blazor in .NET 7 and we look forward to seeing what you build with these new capabilities!
